

Hamsters are wonderful animals. They are great for honing aspiring artists. The structure of the hamster's body seems simple, but at the same time it has certain features. Having received basic skills in how to draw a hamster, you can subsequently improve your drawing and make it more realistic.
Today we will try to draw a cartoon hamster. You will see - it's very easy! The step-by-step instructions are very accessible and are suitable for both adults and children. Let's start?
Preparation for work
We will draw with a simple pencil, and paint the resulting drawing with anything: paints, felt-tip pens, You can also leave a black and white hamster. So we need a simple pencil of medium softness, paper (preferably drawing or landscape paper, but of good quality). For the hamster's whiskers, you can take a special thin mechanical pencil - this will be more realistic, but you can do with the usual one.
How to draw a hamster in stages
Step one. Draw a circle. This will be the head of the hamster. Try not to press hard on the pencil - draw with thin, light dashed lines to make them easier to remove if necessary. Attach a large, elongated "U" to the bottom of the circle. This will be the body of the hamster. Then you need to take an eraser and erase the inner lower part of the circle that touches the body.

Step two. At the top of the head, now connected to the body, draw two small circles for the eyes. One should be slightly smaller than the other. If, before you draw a hamster, you have decided that it will be a girl, then make her long eyelashes. Then darken the eyes with a pencil over the entire area, except for the middle - this highlight will be the pupil.
Step three. Under the eyes, but not in the middle, but a little closer to the smaller one, draw a small inverted triangle. Then, with a thin eraser, gently erase its upper side - you get a nose. Draw two smooth semicircles under the nose. They look like the letter "E" that "fell" to the left. This will be the hamster's upper lip.

Step four. In the bottom middle of the letter "E" drawn in the previous step, make a slightly pointed "U". As you may have guessed, this is the mouth. Now draw a mustache for the hamster - three smooth lines each coming out of the cheeks.

Step five. At the top of the head, draw two large circles to form the ears. They will also have an inner contour for extra volume and realism.

Step six. Two more "U" squiggles will be the front legs folded over the abdomen. If you look at the drawing, it becomes clear how to make them. And draw the hind legs from below with narrow ovals.
Step seven. We add to our hamster drawings: a little fur on the abdomen, claws on the paws, we draw the contours more strongly. You can draw some thing that he will hold in his hands.
Step eight. We take paints, colored pencils, felt-tip pens and paint the animal. Do not be afraid to experiment, use several shades: for example, dark and light brown, sandy, golden, reddish. This will only benefit the drawing.
Now you know how to draw a hamster with a pencil. Look, what a cutie turned out, isn't that so?
With the help of this article, you will figure out how to draw a hamster in stages to make it cute and funny. Since the drawing is very simple, you will need a couple of minutes of free time, a sheet - white or torn from a notebook, and a few colored pencils and pens. Use this sketching guide, add your own ideas to the picture and have a hamster that everyone will love, regardless of age.
Before drawing a hamster, check out what you need to do this:
- sheet of paper - 1 pc.;
- simple pencil - 1 pc.;
- black gel pen - 1 pc .;
- blue pen - 1 pc .;
- pink pen - 1 pc .;
- colored pencils: black, brown, orange - 1 pc .;
- eraser - 1 pc.
Step-by-step drawing
After reading the following step-by-step instructions, you will learn how to draw a cute hamster.
- To begin with, we prepare a sheet of paper - white or checkered (which will be convenient for beginners and children), and a simple pencil with an eraser.

- We draw the body of the future hamster, similar to a triangle with strongly smoothed corners. On top we make 2 small curls - a cute forelock.

- In the lower part, at approximately the same distance from the edges, erase 2 small segments with an eraser, in which we draw the elongated hind legs of the hamster with 3 fingers.

- The next detail is the ears. We draw them on both sides of the head in the form of two arcs, larger and smaller, above each other. When this is done, we begin to draw the face.

- We draw the eyes depending on the style: in this case we are drawing a cute cartoon hamster, which means that his eyes will be large, with white splashes inside.

- We supplement the space around the eyes with details: draw small cheeks below the eyes, add antennae to the hamster in the form of 2 stripes, and also draw a line, which we will paint in a different color later.

- The nose and mouth of such a hamster are drawn simply: it is enough to draw a horizontal line, and under it there are 2 arches, reminiscent of an inverted three.

- When the hamster got its face, we go down below and draw the front legs - 2 underprinted ovals with a couple of stripes-claws.

- To make the picture even more cute, draw cookies in the paws of the hamster - almost a circle on which you can depict the bite mark.

- The drawing of the hamster with a pencil is over - let's start coloring. To begin with, draw out all the contours with a black gel pen for greater clarity of the picture. You don't have to circle the little things: cheeks, stripes, etc. We paint over the eyes with a black pen, leaving only the alleged spots white, and below we make a small lattice resembling eyelashes.

- Paint over the inside of the ear and cheeks with a pink pen. Fill in the lash space with a blue handle.

- With an orange pencil, paint over a piece of the head, separated by a strip, and both pairs of legs. We make cookies brown, and chocolate chips on it black.

- Ready! Now you can add some of your additions to the drawing and enjoy the work done.

Video instruction
If you want to quickly and easily understand how to draw a cute hamster in a style that interests you, use not only a photo, but also an informative video. In it, they step by step disassemble how to first draw, and then color the animal.
Hamsters are cute and fluffy animals loved by adults and children. They have fun stuffing their cheeks when they eat, happily running around on a wheel in cages, and can become entertaining and easy-going pets. They are attractive not only for the simplicity of the content, but also for the variety of breeds that determine the appearance. The coat of these rodents can be of almost any shade, from snow-white to black, with or without spots. The length of the fur is also completely different. The question of how to draw a hamster is asked by many, and this is especially interesting for parents of young children. A step-by-step guide on this topic is provided in this article. So, how to draw a hamster in stages for beginners?
Instead of introducing
Drawing a hamster is not at all difficult, but it causes difficulties for many. The main thing is to make him look like himself, and not like a mouse, a rat or, say, a guinea pig. That is, before drawing a hamster, you should familiarize yourself with its appearance and anatomy. At least a little.
How to draw a hamster in stages - getting started
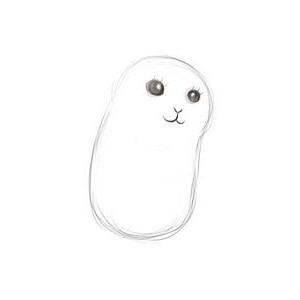
First of all, take a pencil and lightly depict a kind of semi-oval. There is no need to chase the ideal parameters, this is just a sketch. And the main thing here is to enjoy the process. Nearby, slightly intersecting with the first, we also easily draw another oval, similar to an egg. This is the head of the future animal. We draw here two semicircular intersecting lines, they will help in the future to determine where the eyes and mouth will be.
Head details
We draw the ears of the animal, depicting two lines that look like an arch. Here it is worth turning on abstract thinking in order to correctly determine the location, since it is necessary to draw a hamster with a pencil in three dimensions. The guides drawn earlier will help with this. Under the large oval, which is to become the body of the rodent, we put two dashes bent upwards. These are the future legs. The sketch of the animal, with which we will learn how to draw a hamster in stages, is ready. From this moment on, we press harder on the pencil.

We continue to work
We draw the eyes of the animal in the upper left part of the head. The shape of the hamster's eyes is an oval pointed on one side, located slightly at an angle. Draw a circle inside for the future pupil. It must be shaded by clicking on a pencil. But be careful, you need to leave a couple of highlights. Use the guide lines made at the beginning of the tutorial to shape the ears. Draw folds and grooves inside the shell with uneven lines. Also work on the visible part of the other ear.

On a small oval that looks like an egg, we begin to draw the face of the animal. The nose looks like an unfinished V, and just below it is the line of the mouth. To make a mustache, draw quick strokes around. How to draw a hamster with a fluffy face? Along the entire perimeter of the smaller oval, we will go through a series of short strokes, depicting fur.

The body of the animal
Use the dashes under the large oval to draw the legs. Around them we draw a silhouette with lines and finish it with our fingers. We do the same with the other paw. We draw sharp claws. Around this large oval, draw the animal's fur with short strokes, depicting an oblong body. We attach it to the head.

Draw fur with separate long strokes. Determine for yourself what kind of coat your hamster will have. Maybe it will be Angora, with long wavy fur, or maybe Dzungarian, with very short fur. Draw a tail in the lower right side of the body with a curved line. For the cleanliness of the picture, we erase the original guides. We apply shading to the entire body of the hamster, giving volume to the drawing. Determine the direction of the light and work in that direction. When finished, blend the drawing a little. The hamster is ready!

How to draw a cartoon hamster?
It's even easier, the kid can handle such a picture, since volume and shading are not needed here. You can do without guides. Let's start again with an egg-shaped oval. This is the head. Behind her we draw another oval, as if a little hidden behind the first one. This is the torso. We draw the ears.

Draw an imaginary horizontal line in the middle of the hamster's head. Draw two circles right above it, one slightly smaller than the other, these are the eyes. We schematically depict the paws, drawing two squares and an oval under them.

Gradually connect the ears to the head with a smooth line. We do the same with the body and paws. We give a pointed shape to the ears and muzzle and, on the contrary, smooth out the limbs. Below we sketch out the fur and draw the tail.

Erase the original sketch lines with the eraser. Add details. Draw small pupils inside the eyes. Watch closely, their location will give this or that expression to the animal. We draw the auricle. The semicircle inside the body is the hamster's breast. On the paws, we divide the fingers with short lines.

The cartoon hamster is ready. Color it as you wish.
Probably, not everyone loves rodents, and many even experience panic horror at the sight of an ordinary, shaking with fear, little mouse. But everyone loves hamsters and many keep them even at home, as a rule, placing them in a spacious glass jar. The hamster looks very cute and harmless, watching its owner with trusting eyes.
Drawing a hamster is difficult, like any other animal. Each has its own characteristics and differences, which are difficult to accurately convey in a drawing without experience. Since learning to draw a hamster, most likely, there will be small children with me, I made this lesson as easy as possible. I hope you can from the first time together with me step by step, with a pencil draw a hamster without mistakes.
Video how to draw a hamster for children.
1. Before drawing a hamster

Before drawing, let's make very simple outlines for the head and paws, and also outline the line for the back of the hamster. To do this, unfold the sheet and draw a large circle in the center, and next to it, just below, two circles for the paws. And, of course, the curved back line. The circles do not have to be perfectly straight, but the back line needs to be drawn in exactly the same way as in my drawing.
2. Let's draw a general outline of the hamster

Only four lines you need to add to the drawing at this stage and you get the general outline of the hamster.
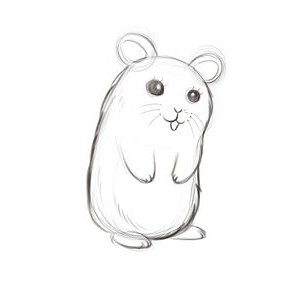
3. Head, ears and legs

It may seem that at this stage it will be difficult for you to draw. Not at all. Draw two ears, eyes and nose first. You see, the hamster is already looking at you, as if asking, let's draw further. Draw three legs, the fourth will not be visible in this figure. But now you need to draw a hamster muzzle. From the middle of the nose, draw down two connecting oval lines and draw a line for the neck just below the circumference of the head.
4. Drawing of a hamster in detail

Before that, we drew outlines to help you maintain the basic proportions of the torso and head. In this step, you will need to carefully draw the other small details of the hamster, so take your time. If necessary, erase with an eraser and correct inaccurate lines. But first remove from hamster drawing extra contour lines.
5. How to draw a hamster. The final step

This step is the most difficult because you need to draw the muzzle in detail. Start with it. First, draw what seems easy to you. Delete the contour lines for the eyes and nose. The eyes should be slightly elongated as well as the nose. Use a pencil to mark the pupils and draw the nostrils. Now you can also outline the mustache with dots on the muzzle and go to the ears. Draw the claws on the paws, they are also easy to draw. And the last thing that needs to be done is to outline the areas on the hamster's skin, including on the face, where a different shade of paint or a simple pencil will be applied.
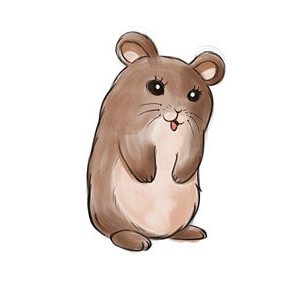
6. The drawing of the hamster needs to be colored

To completely finish drawing a hamster, you need to be sure to color the drawing with colored pencils, or apply shadows with a simple pencil. Hamsters sometimes have a rather variegated skin color. You can paint the surrounding objects next to the hamster or make the background of the picture monochromatic in light colors. I hope you could learn how to draw a hamster and can now draw other animals as well.
Any animal, especially a cat, is not easy to draw, since they are very mobile, and it is impossible to make them sit motionless, for example a kitten, for even a minute. That is why it is difficult to draw a hamster "live".
The koala bear is probably the cutest animal in the world. In any picture, the koala always looks so good-natured that it makes every person smile. It seems to me that he even somewhat resembles a hamster.
Have you got a drawing of a hamster? Then you can draw a squirrel too. Let's try together to draw a squirrel, first with a pencil, and then "animate" the picture of the squirrel. Let's color the drawing with colored pencils, draw a tree branch with a squirrel and, of course, a bump in its paws.
In this lesson we will learn how to draw a rabbit. Pictures, where bunnies are jumping merrily, only at first glance seem simple to draw. In fact, it is not easy to draw rabbits or hamsters correctly, even with a pencil. In any drawing of an animal, you need to accurately maintain the proportions and convey its character.
Not only hamsters are sometimes kept at home, but even hedgehogs. True, in the forest they would be much better, even without milk. Maybe that's why hedgehogs don't sleep at night at home, but run around the apartment, rather noisily "clattering" their claws on the floor.
Today in this lesson you will learn how easy and simple it is to draw a hamster with a pencil step by step. Our lessons are suitable for all levels of preparation. We have collected several examples of lessons for you, you just have to choose the lesson you like and start drawing a hamster. As a result, you will have an easily and beautifully drawn hamster with a pencil step by step. Get started now. Write comments under the article, share with your friends.
Click on the option you want, go to it.
|
Option 1 |
Option 1 - How to draw a hamster for children in stages
Source
Let's draw a plump funny hamster. It's pretty simple. We are sure you will be able to draw it.
STEP 1

Start with a wide oval, be sure to draw auxiliary lines in it. A long big oval is needed below. Our hamster is almost the same in width as in height.
STEP 2

Draw the eyebrows using the guide lines. Create a small smile. By connecting two ovals, you get a back. Draw it with an uneven line depicting fur. Mark the legs.
STEP 3

Draw two large teeth in the mouth. Draw large, rounded eyes between the guide lines. The nose is small and the fur on the muzzle has an uneven line.
STEP 4

Draw the pupils and the iris of the eyes. Draw the fur with small, uneven lines. Bast shoes with thin fingers and claws.
STEP 5

The rodent is ready. You just need to remove the auxiliary lines.
RESULT
You can leave it as it is or add colors. Do you like your result?
Option 3 - How to draw a cute hamster in stages
Source

Hamsters can swim well. They draw air on their cheeks and use them as floats.
STEP 1

Mark the head with an oval, inside the auxiliary lines. Mark the lines of the arms and legs with smooth lines. Mark the paws themselves too.
STEP 2

Draw small ears on the head. Make eyes on the auxiliary lines. Make one eye larger. Draw a small nose below and on the sides of the cheek. They have dots and antennae. Make the contour of the head and back with an uneven line. Also outline the arms and legs for fluffy fur. Draw the fingers and toes.
STEP 3

Now add the outlines of the body and head with the same wavy lines. On the head and under it, too, draw lines representing folds on the body. Add pupils and tendrils.
STEP 4

If you haven't done everything yet, now is the time to finish it. Make the contour clearer.
RESULT
You can draw hearts and color the hamster. Make the eyes black with highlights. Make the paws and ears pink.