

Colored paper is a universal material. She can easily turn into a kitten, a dog, the hero of her favorite cartoon or fairy tale. A little imagination and effort - and now you already have the scenery ready. What you need for a fun dialogue between animals.
So, we choose the right colors, prepare glue, paints, felt-tip pens, pencils and go ahead - make wonderful finger puppets.
1. Print and cut out the diagrams of finger toys.


2. Glue the faces of the animals.

3. And now glue the torso. From a strip of white paper, make a ring-shaped finger holder and glue it to the inside of the toy's head.

Kids, as a rule, are delighted not only with the process of creating figures, but also with participating in the performance itself. So, if a younger brother or sister wants to try himself in the role of, for example, a bunny, I hope you will not mind.


Well, the dolls are ready! Theatrical performance begins!


But if you want to make fairy tale characters (king, princess, knight, dragon or pirate robbers), print out the following templates:


Puppet theater for the little ones:

And here are some more templates for finger puppets for pleasant leisure with your baby:


Finger toys are easy and fun to make. Note that dolls made from several materials at once - paper, fabric, beads look very cute and touching. Think about it as you create your next character for the game.
Good afternoon, guests and blog readers! Today I again want to touch on the topic of how and how to lure a child at home. This topic is very close to me, because I have two children at home. Which require attention and care.
In the previous article, I told you about didactic games with your favorite characters from Paw Patrol. Read who missed this issue here.
Today I want to offer another version of the game at home, this is a puppet theater. Of course, you can take your child to a real puppet theater, or you can create it at home.
Therefore, I will share with you some thoughts, developments to make such a miracle.
We need: your desire and a little free time 🙂
To be honest, we have different theater options at home, for example this wood.

My kids love him very much, because it is so funny and exciting when I show them a fairy tale, and they sit and listen. Now I have an eldest son, he can show and tell stories by himself. Just think, it's very cool, because the child is playing, learns to retell his favorite fairy tale, build a dialogue, etc.

I think that all preschool children, as well as the majority of children of primary school age, will not remain indifferent to such theaters. And if you also come up with fairy tales with a funny plot and an intriguing end, then in general you can get a real holiday for a child.

The simplest version of a do-it-yourself puppet theater is paper. It is easy to make it yourself. Well, or together with a child.
DIY paper finger puppet theater, patterns
The paper finger puppet theater is very popular with children, it attracts them, and also develops fine motor skills of the hands. Take a look.

The first option is a flat round finger theater. You need to make the head and the upper part of the doll, dress on the finger with a paper ring, or you can make cones.

Create these dolls with your child, start with character templates. Download them on my site by writing me a comment below, I will gladly send you templates, print and play fun.
After all, finger puppet theater is a whole magical art, in which children learn about the world around them. Any child will like being in the role of an artist, and this helps to believe in yourself and achieve success in the future. It is also a good material for the development of such processes in children as imagination, thinking, as well as the development of fine motor skills and much more.
Finger theater can be made of any materials at hand, such as paper, fabric, cardboard, cork, thread, cups, etc.
DIY desktop paper theater, templates
I show my children, here is such a desktop paper theater, which I made very quickly.

We need:
- cups from Rastishka, illustrations, ice cream sticks
Stages of work:
1. Take any illustrations and cut out along the contour of all the characters of the fairy tale.
3. Glue ice cream sticks on each fairytale hero.

4. Now take the cups and make a horizontal hole on top of each cup with a utility knife.

5. Well, now insert the stick with the hero into the glass. See how lovely it turned out. Very easy and simple, no worse than buying in a store.

Ice cream sticks can be replaced with plastic forks or spoons.
If you do not want to take illustrations from books, then you can find characters from any fairy tales on the Internet, save them, and then print them, and then cut them out and stick them on sticks. You can download from my site such ready-made templates for heroes based on such fairy tales: Kolobok, Teremok, Turnip, Zaichya's hut, just write a comment or review below, and I'll send you an email.
Paper puppet theater "Hodilki"
Such a theater is very popular with young children, for such a theater they need favorite characters and a couple of holes.

Believe me, children will be happy to play such games.

And if you invite friends to visit, then the game will be even more fun.

You can also receive samples of your favorite heroes' walkers to your e-mail address.
Desktop paper theater on plastic cups, corks, cubes
This option is also very easy to make, you can even draw the characters themselves, or find and cut, and then glue them onto corks or cubes. Everything is ingeniously simple.

How do you like this idea? All children love a kinder surprise, and all of them have little containers that you can bring to such a theater.

DIY glove doll
In reality, a lot of puppet theaters can be built. Even with almost no cash costs. You just need to turn on your wit and do it! You can sew for example.

Or you can learn to knit and knit such cute heroes:

Honestly, I used to knit well, now a little time is not enough for all this. But I never liked to sew. But, as an option, you can also sew a theater who loves this business.

Although here's the easiest master for you - a class on sewing a puppet theater from fabric, using gloves. Anyone can cope, even those who do not know the art of sewing.

We need:
- household gloves, knitted - 2 pcs., buttons for eyes - 2 pcs., threads, scissors, braid, stationery knife
Stages of work:
1. Take the first glove and steam the seam on the cuff, usually red or yellow. Tuck in the little finger, thumb and forefinger so that they do not come out, sew them up. You should have a head with ears and a neck. Sew the bases at the ears so that your fingers do not get there.

2. Now take the next glove and hide your ring finger in it, sew the hole. Bring your middle and index fingers together and now slide the hare's head over them.
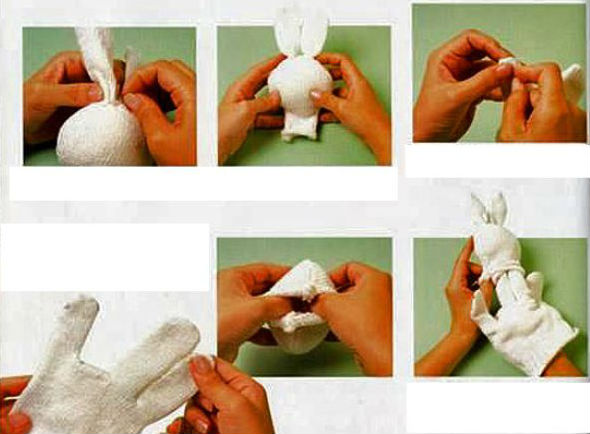
3. Sew the head to the neck. To hide the seam around the neck, tie a bow or bow tie. Sew on the button eyes and embroider the muzzle, or you can draw with a marker. You can decorate a bunny from a cannon or knitted threads by gluing a cute little bunny on its head. 😯

Thus, other toys can be made, such as a dog, parsley, etc.

My son, generally loves such a simple glove, puts it on and walks around all sorts of stories coming up with heroes 🙂

Here is such a short article for today. I think how many of you have small children, you will be happy to diversify their leisure time. Choose any kind of theater, do it with your child. And then enjoy the good mood and positivity. After all, all joint work strengthens your relationship! And the child will only be happy and glad of this, and will certainly tell you: "Mommy, how I love you!" The most magical words in this world.
Well, I say goodbye to you for today. Until next time.
P.S Do you know what is very important ?! It is in the home puppet theater that you can observe the child, his behavior. Because the kid can think of something, speak out, and we adults should still listen to what the child is talking about, what kind of conversations he is talking about.
In the finger theater made of felt (you can draw patterns for dolls with your own hands or take those that are suggested below) you can play with both toddlers and older children. And little needlewomen can even help make characters of any fairy tales out of felt. Already at the age of five (and some young artists even earlier), a child can draw a pattern for a bunny or a chanterelle and cut out a blank from fabric.
This activity is not only exciting, but also rewarding. Firstly, in the process of playing (performance), the child can try on the role of absolutely any fairytale hero, and secondly, the finger theater is a good simulator for motor functions and speech, develops artistry. Thirdly, an older child will develop in several directions, not only during the game, but also while making dolls for presentation with mom or dad.
Features of felt
It is very easy to work with felt, this material:
- does not need processing of sections, does not crumble;
- pleasant to the touch, soft, warm and fleecy;
- keeps a neat edge when cutting with curly scissors;
- the material has a wide selection of colors, bright and rich;
- keeps its shape well, durable and does not wrinkle;
- has no wrong side and face, is the same on both sides;
- you can not only sew on, but also just glue;
- does not change color after washing or when exposed to the sun;
- does not form piles and does not shaggy during sewing and use.
Fairy tale "Teremok"
To play the fairy tale "Teremok" on the stage of an improvised finger theater, it is necessary to make a mouse, a bunny, a frog, a fox, a wolf, a bear, and the teremok itself. You will need several sheets of thin felt of different colors, glue, scissors, a needle and thread. You also need a pencil and several sheets of paper to draw patterns for future toys for finger theater.
To make the Teremok finger theater, you need nine felt colors: two shades of green, white, black, gray, pink, orange, brown and beige.
Fairy tale characters
Let's start making toys for the theater with a frog. You need to draw on paper, and then cut out only seven parts from felt: two green bases, one frog tummy (you need a different shade of green, lighter or darker, depending on which was the main one) and four details for the eyes (two circles from white felt and two, but smaller, black). First, baste the tummy to the front of the frog with large stitches and glue the eyes. The smile can be stitched with a needle back seam or simply drawn with a black marker. Then it remains only to sew the front and back sides together, but so that there is room for a finger below.

To make a mouse, you need to cut out two bases of gray felt, a gray ponytail and a white tummy. Details for the muzzle (nose and eyes) can be cut out of black felt, or you can simply draw. This will be easier than trying to glue small pieces neatly. You can add pink semicircles to the mouse on the inside of the ears. Then it remains only to sew all the details, and then sew the two halves of the toy together, leaving a hole for the finger.
It is a little more difficult to make a bunny with your own hands due to the large number of small details. In addition to the base of white felt, you need to cut out pink cheeks, the same tummy, a white tail and oblong pink ovals for the inside of the ears. First, glue or sew all the details to the parts of the toy, draw the eyes and nose, and only then sew the bases together.
To make a little fox sister, you need to cut out two parts for the body from orange felt, a tail and a muzzle, a white tip of the tail, a breast, almond-shaped eyes and a black nose. First, sew on the breast and muzzle, tail, then glue the rest of the details. As in the previous cases, then fold the two fox pieces and sew together with a buttonhole stitch.
Now it only remains to make a gray wolf and a bear. For the wolf, cut out two parts for the body, a tail, a muzzle, white eyes, a breast and a tip of a tail, a black nose. The technology is the same - sew on the larger parts, and glue the smaller ones to the base. Then sew the front and back of the body together.
For a bear, you need to cut out two body parts from brown felt, a tummy and a muzzle from felt in a shade lighter, two white eyes (draw the pupils with a marker). On the face, embroider a floss with black thread or draw a nose and mouth with a marker. Sew the muzzle and tummy to the base, sew the two halves of the base.

From the remaining felt, you can make a house with pockets for all characters - a teremok.
Masha and the Bear
In the finger theater, you can play the fairy tale "Masha and the Three Bears" or several episodes of the popular children's animated series "Masha and the Bear". Bears can be made as described above, but for Masha you will have to prepare other patterns. So, to make Masha, you need to draw a base (two details) - a silhouette of a girl in a sundress and with a scarf on her head. You also need to separately prepare two parts of the headscarf (front and back), hair, two parts of a sundress (also front and back). For a sundress, you can additionally cut out decorations, for example, flowers or buttons. All the details are quite large, so you can do without glue, and draw your face with a marker. You can brown Masha with regular blush or pastel crayons. Finger theater from felt "Masha and the Bear" is ready!
Fairy tale "Turnip"
Do-it-yourself finger theater patterns from felt for the "Turnip" fairy tale can be drawn independently based on images of finished toys. But dolls for such a performance are more difficult to make than the characters from Teremka or Masha from the fairy tale Masha and the Three Bears, but you can choose simpler options. In total, you need to make seven toys: grandmother and grandfather, granddaughter, dog and kitty, mouse and, of course, turnip. Finger toys are made according to the same scheme as for other fairy tales: details are attached to the base that will make this or that hero recognizable. For example, a braid for a girl, a kerchief and an apron for a grandmother, a beard for a grandfather. Make the turnip a finger toy too - this will make it more convenient to show a performance based on a fairy tale.

"Kolobok"
For the fairy tale "Kolobok" you need such felt dolls: grandfather and grandmother, gingerbread man, bunny, wolf, bear and fox. We have already learned how to make all these characters in the description of the finger theater schemes based on the fairy tales "Teremok" and "Turnip". It only remains to make a kolobok. To do this, you just need to cut a circle out of yellow felt, draw eyes, nose and mouth for it, sew it so that there is room for a finger.
Other characters can be done as already described, or use other patterns. Making a finger theater out of felt with your own hands is a creative process (both during the creation of toys and during the performance), so variations are possible. One of the options for a bunny pattern, for example, is below.

"Three piglets"
Felt dolls for the fairy tale "Three Little Pigs" can be made in different ways. Toys can be complex, detailed or simple. One of the options for a pattern for a finger theater made of felt with your own hands (pig) is below. But a pig can be drawn schematically. A toy can only consist of a pink base, a tail, ears and a stigma - the presence of even only these elements will already make the doll recognizable. Of course, the show will not do without a house of three pigs.

"Ryaba Chicken"
Patterns for the finger theater from felt (making toys with your own hands is very simple) based on the fairy tale "Kolobok" is presented below. You can, of course, draw characters in a slightly different way, add or remove some details.
If you work according to the proposed finger theater pattern, you need to transfer the pattern to felt and cut out all the details. There will be a lot of them, so it is better to make toys one by one: first grandmother, then grandfather, then chicken Ryaba, then mouse (or in another order). Here you can give free rein to imagination, because the clothes of old people and the Ryaba chicken itself can be of a variety of colors.

Most of the small parts will be more convenient to stick to the base. But it is better to sew a shirt, pants, apron, sleeves, a chicken wing and some other elements for a fortress.
DIY finger theater
Master class on making finger puppets from felt
Author: Demidova Ekaterina Nikolaevna, educator, MBDOU "Combined Kindergarten No. 62" Silver Hoof ", Kurgan
Theater is thoughts of free flight,
Theater - fantasy blooms here generously ...
Vladimir Midushevsky
The master class is designed for educators and specialists of preschool institutions, teachers of additional education, parents and creative personalities.
The finger theater is intended for theatrical activities in kindergarten and at home, can be used in the course of direct educational activities as a surprise moment. It can be a wonderful tradition for your family.
The choice of material - felt due to the following criteria:
easy to process, the edges do not crumble;
wide range of colors, different thickness and density;
natural, safe for health !!!
Goal: making a finger theater for the development of the creative abilities of children through theatrical activities.
Tasks:
to acquaint with the technology of making finger puppets from felt;
to develop the acting and directing abilities of children;
develop fine motor skills;
to contribute to the enrichment and activation of vocabulary, to develop monologue and dialogical speech;
to form an interest in arts and crafts;
develop skills in organizing practical activities.
Materials and tools:
felt is simple, self-adhesive;
lace;
beads, rhinestones, small buttons, small eyes for dolls;
reinforced threads;
tailor's pins;
needle;
tailor's chalk;
pattern paper;
glue "second";
scissors;
sewing machine.

Chanterelle patterns:

Manufacturing technology of the fox doll.
Before starting work, let's recall the basic safety rules when working with scissors and needles.
store needles and pins in a specific place (needle bed). Do not put needles, pins in your mouth, or stick them into clothes.
do not use rusty needles and pins in your work.
do not leave the scissor blades open during operation.
do not cut while walking.
Making a pattern for a finger doll will not take you much time. First you need to decide on the size. The base of the toy should be about the height of your index finger. We draw the body and other details. Do not forget to make allowances for those parts that are inserted into the base.
We select materials for our chanterelle. We transfer the details to paper and cut them out.
Base - 2 parts;
Head - 1 piece;
Muzzle - 1 piece;
Ears - 2 parts;
Tail - 1 piece;
Ponytail tip - 1 piece;
Legs - 2 parts.

We transfer the pattern to felt. We pin the larger parts to the material with pins, outline the small ones with tailor's chalk.

We distribute the details in places.

Adjust the right foot to the base. We carry out bartacks.

Adjust the second leg. We carry out bartacks.

We adjust the muzzle on the head. Align the edges with scissors.

We sew the ears to the head with a triple bartack.

We design the ponytail - we sew the tip of the ponytail into the detail. Align the edges with scissors.

We connect the body parts along the contour. Do not forget to insert the tail on the side. We carry out bartacks. Align the edges along the outline.

Using glue, we attach the head to the body. We work with glue carefully, as traces may appear on the surface of the material. We make the eyes and nose from large black beads. They can be glued or sewn with threads in color.

Manufacturing technology for finger puppets "Mashenka".
A distinctive feature of the execution will be the treatment of the head.
We draw a pattern. We select materials.
Base (dress) - 2 parts;
Sleeves - 2 parts;
Hands - 2 parts;
Lapti - 2 parts;
Head - 1 piece;
Klondike (front part) - 1 piece;
Klondike (rear view) - 1 piece;
Scythe - 1 piece;
Spout - 1 piece;
Bangs - 1 piece.

Patterns of the doll "Mashenka"

We cut out the blanks. We place the details in their places.

We adjust the sleeves to the dress, put handles on the bottom of the sleeves (without tweaking them).

Adjust the lace along the bottom of the dress. We carry out bartacks.

We adjust the bast shoes. We carry out bartacks. Sew the dress along the contour. Align the edges along the outline.

We adjust the bangs and nose on the head. To prevent the spout from slipping under the sewing machine foot, it must first be glued.

We glue the head to the base. Glue a self-adhesive felt kerchief on top. We fix the braid between the two parts of the scarf. Align the edges.

We fix the edges of the scarf with a machine stitch. We carry out bartacks.

We glue the eyes - beads. Brown the cheeks with a red pencil.

Masha's eyes can be decorated with special accessories for needlework - a peephole.

Here's what we got!

My first works.

Design options for the finger puppet "Frog".

Design options for the "Petushok" finger doll.

Design options for finger puppets - little men.
It doesn't take much effort to create a fascinating and mysterious fairy tale world for a kid. It is worth spending a little time and creating a finger theater for playing and performing at home. The uniqueness of this theater lies in the fact that it was created with the love of a mother or grandmother. Each toy is filled with the energy of positive and love, in each element there is a part of the soul of a loved one.
From an early age, each kid learns various songs, poems and fairy tales. A fairy tale can teach a kid to recognize good and bad, to understand what time and space are, and also to learn about the connection between nature and man.
Finger theater functions
 The Finger Theater allows you to create a fairy tale in miniature. It can be placed in the palm of your hand. A child can play a role any character using small figures. Each character can be put on fingers or on special stands that allow you to organize a performance on the table surface. If the child is still too young, then his relatives can play the show. The kid is guaranteed the delight of the finger theater.
A theater like this can be great simulator for speech and sensory-motor system. It is suitable for babies over 1 year old. Pupae help develop the mobility of children's fingers, communication using the replicas of the heroes of the fairy tale, and also contribute to the disclosure of the child's creative potential.
 Play can be a mechanism by which the kid will quickly master the score. An example of such a teaching tale can be safely called "Teremok". In the fairy tale, there is a constant n e recount of heroes ("... and the three of them began to live"). The child will not only learn to count, but will also be able to master concepts such as "left and right" with the help of fairy-tale characters and their actions.
You can play such a puppet theater not only at home, but also on the street, in a clinic or in transport. A fabulous plot will help you not just fun spend time, but also not to notice the long and tedious road to the dacha or to the village to his beloved grandmother.
Instructions for creating a mini-theater
In order to make a finger theater at home, you must have:
- Fabrics of different colors and textures (you can use felt).
- Non-woven. It will help glue small parts.
- Embroidery threads (preferably floss).
- Wooden slats for frame creation theater for finger heroes (horizontal slats should be 45 cm long, and vertical ones - 30 cm. There should be 4 sticks in total).
- Scotch.
- Gouache.
- Cardboard (preferably thick).
- Fabric for sewing curtains of a small theater (you can take silk).
- For the rear view, you need bright color pictures.
Making a stage for performances

- The first step is to fasten the wooden slats together with glue.
- The finished frame for beauty can be painted with paint (preferably white).
- In order to make a sign for an impromptu theater, you can use thick cardboard. You need to draw a template on cardboard, cut it out and paint it with prepared gouache or ordinary felt-tip pens. In this case, cardboard can be purchased, or you can use an unnecessary box from the game or equipment that everyone has in the house.
- The sign should be cut along the contour so that two longitudinal-shaped puzzles can be made in the future. Then the sign must be fixed on a base of wooden slats.
- The next point of work will be to create the background of the theater. To do this, you need to cut out a piece of cardboard. The cardboard will have a length of 45 cm and a height of 30 cm. It is necessary to make 4 notches in the cardboard so that you can then insert pictures of the size of the album sheet into them. In order for the cardboard to fix on the wood base, you need to make special small-sized slots. The details are ready. Now they need to be fixed on the base and hang curtains made of silk or other material. The material can be tied with a beautiful ribbon or cord, or simply fall in a straight line. The curtains can be fixed to the strip base with thread, wire or tape.
Sewing heroes of fairy tales
 Before sewing dolls from fabric, you need to do finger theater templates with your own hands from paper and make a pattern. A baby can help in this matter. This is a very exciting activity - creating a drawing of characters - develops the imagination. To save time, you can print paper finger dolls templates. Then we follow these instructions:
- Finished patterns must be cut with scissors. Transfer them to a fabric base. Do not forget that the body of each hero will consist of two identical parts.
- Ears, nose and eyes can be made of fabric of different colors or embroidered with threads. The fabric parts are neatly cut.
- If too thin fabric is used for dolls, then you can glue it with non-woven fabric for additional sealing.
- On the front of the heroes' torso, you need to place small details, such as eyes or a nose.
- When creating a grandmother or granddaughter, do not forget about the hair. They can be made of woolen threads. A handkerchief and a bow will help to complement the image.
- When creating grandparents, do not forget about wrinkles. For more realism, they can be embroidered with threads.
- The finished front and back must be hand-sewn. Each hero of the tale is put on a finger or a special stand.
- If the performance is planned to be played on the table, then a special stand must be made for each character. It can be made of a plastic chopik plug into which a screw is screwed. The base of the cork can be made from a five kopeck coin. To do this, using ordinary glue, the coin is glued to the plastic base.
- If you didn't manage to make the figures for the theater yourself, then you can buy ordinary small fabric key rings. Cut the bottom with it and, pulling out the synthetic winterizer, change it to a frame made of durable fabric.
Staging of the fairy tale "Turnip"
For the turnip, you need to prepare the main character of the fairy tale - the turnip. It can be made of fabric. After that, the back of the scene needs to be decorated with a printed or hand-drawn picture. It can depict a garden, a house and nature. After that, each character appears on stage and is voiced. The characters can be voiced by mom or dad, or by the baby himself.
Believe me, such a pastime will definitely captivate the baby, and will help not only develop speech and motor skills, but also simply have fun with the whole family.
Attention, only TODAY!