Fashion houses offer girls and women in the cool season to cover their heads with warm scarves or scarves. What if there is no opportunity to purchase them? The answer is simple: knit an exquisite scarf hood with knitting needles yourself. A person with any level of knitting techniques will be able to cope with this task, even novice needlewomen who have only just met with the front and wrong loops.
Product Types
There are several types of such a wardrobe element:
- hood with a long scarf;
- scarf-snood with a hood;
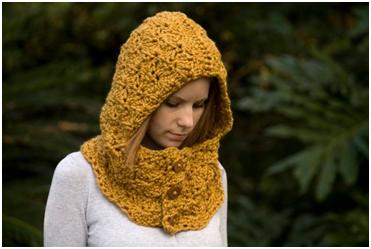
- scarf hood with button fasteners.
It will not be difficult to play any of the proposed models if you deal with the abbreviations used, patterns and study knitting patterns. Therefore, we will not waste time, but proceed to consider master classes for beginner needlewomen.
How to tie a scarf with a hood
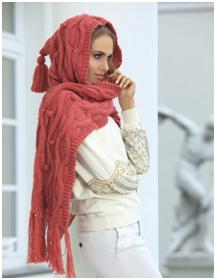
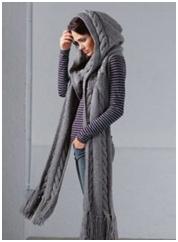
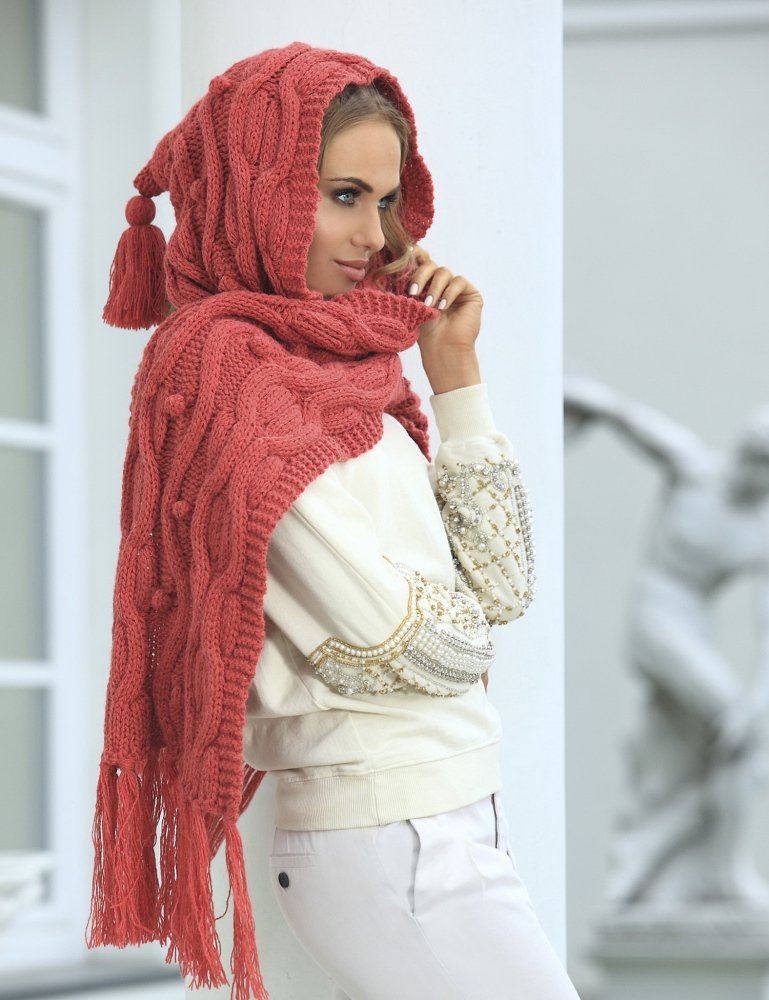
The amazing model of the hood scarf, created by knitting needles for the provided master class, will keep you warm in the cool season and not damage the hairstyle that many women care about so much.
To create such a model of a convenient wardrobe element, you will need:
- mixed yarn (wool / acrylic);
- knitting needles No. 3 - 2 pcs.
- auxiliary knitting needle 2 pcs.
Plus, you need to deal with abbreviations and patterns:
- P. - loop;
- L. p. Or LP - facial loop;
- Out. p. - purl loops;
- R. - a number;
- U.S.– “bump” pattern;
- U.K.– “braid” pattern;
- W.Zh. - pattern "harness";
- W. z. - zigzag pattern.
Description of patterns used in the work. How to knit a bump pattern? Let's figure it out. For its implementation, only a few p are used. For the test, dial 5 p. On the knitting needles and knit according to the scheme: remove the first p. (This is the edge), knit the second with the front, 5 p. From the third. How to do this? Not difficult: PL without removing the yarn, again the LP, the yarn again and close the loop of the face. Then tie the 2 remaining loops: the first LP, the last wrong (it is the edge).
After that, you will need to knit according to Figure 7 p. (on the back side, all loops are out., and on the front side - front). And in 8 p. all central 5 items to combine in 1 LP. And so it turns out "bump".
There should not be any difficulties with the braid pattern, because for her work, a knitting method is used - the front boat and an additional knitting needle. The report is 12 p., Therefore: 4 l. p., remove the next 4 p. on an extra knitting needle and place them before knitting, knit the remaining 4 stitches, and then take the remaining stitches from the extra knitting needle and knit them stitches.
After 5 p. you need to slightly change the knitting: place the initial 4 sts on an additional knitting needle and place behind the product, knit the next 4 stitches, then pick up the stitches with the extra stitch and only then finish the remaining 4 l. n. It remains only to alternate these methods of crossing every 5 r.
The pattern is plaited: it has 8 points. Knitting is carried out according to the scheme: the first 4 points are transferred to an additional knitting needle and placed behind knitting, l. p. knit the remaining 4 p., then pick up with an additional 4 p. and fulfill them with the facial. Next 5 p. there is a smooth surface, and the cross is made in 6 p. Repeat until the end of knitting.
Zigzag pattern: 10 p. Are calculated on it. Knitting occurs according to the scheme:
- 1 p. - 3 p. Place on an additional knitting needle and place before knitting, make 1 l. n., pick up the removed n. and finish a series of drugs;
- 2 p. - all out. P.;
- 3 p. - l p., three p. Remove and leave before viscous, then l. p., pick up three p. and finish row l. P.;
- 4 p. - like the second;
- 13 p. add a bump pattern to the third loop.
- 17 p. - everything fits in a mirror, only an additional knitting needle should be located behind the knitting.
Well, you got acquainted with the key patterns used in this model, it remains to understand what the scheme of the future scarf with a hood looks like. Here she is:
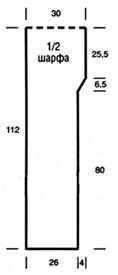
Walkthrough On knitting needles dial in a convenient way sixty p. And perform four p. garter stitch. After that, you need to distribute the pattern as follows: 1 p. To remove, 5 p. To garter stitch, 3 p. To the back surface, 3 p. To the front surface, 3 p. To the back surface, 8 p. Well, 3 p. on the wrong surface, 10 p. on y. C., 3 p. on the wrong surface, 12 p. K., 3 p. on the wrong surface, 5 p. on garter stitch, 1 hem.
Everything is quite simple, and so you need to tie 80 cm. After that, adding loops on one side will begin. For beauty, it is better to start performing it immediately after the edge or first loop. Adding is done until the knitting becomes 4-5 cm wider. Now it remains just to continue knitting to the desired length of 110 cm.
Mirror the second half of the future hood scarf. Combine the resulting parts in a convenient way to get a scarf hood. If desired, you can attach brushes to the hood scarf or decorate it as you wish. Do not be afraid to include fantasy, because this is your product. And let it become unique. The scarf hood is ready.
It turned out pretty interesting. If you did not like this model, then you can safely make a change in the pattern distribution pattern and recount the dimensions of the future product.
Video: The Secret of Knitting a Hood Hood
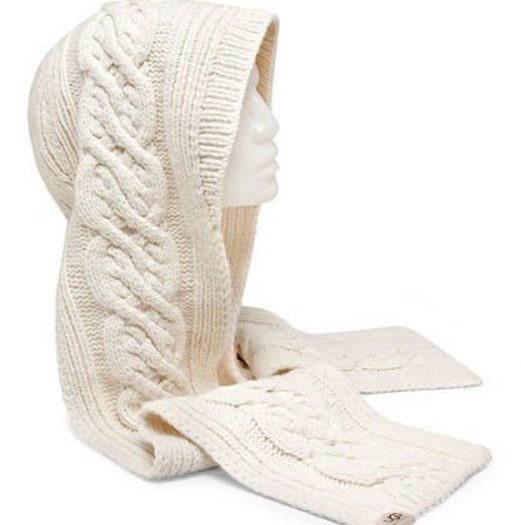
An unusual way to knit a hood with a long scarf
 Want to knit such a beautiful wardrobe item? Then carefully read the description and do not rush to work with knitting needles, because one awkward movement and you will have to dismiss the knitting.
Tip: be careful when distributing the pattern, especially if you have scored a number of loops different from the one declared in the master class.
It is necessary to prepare:
- mixed yarn (wool with silk) - 9 skeins;
- knitting needles - 3 pcs.;
- hook - for stitching parts.
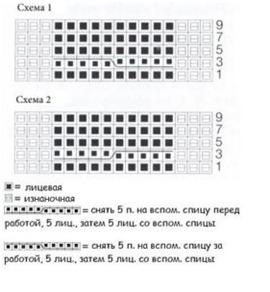
Walkthrough: dial 52 p. And tie 2 p. garter stitch. To do the distribution of loops: remove 1 p., 4 p. Go to the garter stitch, 16 p. Distribute the braid to the pattern (scheme No. 1 will be presented below), 10 p. We perform the front surface, 16 p. Go to the braid pattern (scheme No. 2), 4 p. We carry out garter stitching and 1 p.
Continue to approximately 70 cm (this is the estimated length of the scarf). If you do not need such a long scarf hood, then this value can be adjusted.
Here is a pattern for knitting a braid for 16 points:
Close 46 p. And continue to work with the remaining 6 p., Performing a garter stitch to a length of 36 cm. Move work to additional knitting needles. Repeat the manipulations to create the right half of the future hood scarf. Important: close 46 p. On the wrong side so that 6 p. Remain on the left. Move to extra knitting needles.
Then the hood fits. For him, he will have to dial one hundred and six p. And tie the future hood using the scheme: 1 p. Hem, 4 p. To hand-knit, 16 p. Distribute the braid on the pattern (pattern No. 1), 64 p. Will remain on the front surface, 16 p. pick up on the braid (scheme No. 2), 4 p. to perform garter stitching and 1 p. hem. So knit 56 cm.
Start reduction: after the first braid, for this, knit 1 bp, and then 2 together, tilting to the left side, then in the drawing, but before and after the central loops, make the broach p. Behind the back wall and continue to the end, not forgetting to make 2 facial together (as at the beginning of the river). Repeat such manipulations 7 times. Knit about 19 cm, drawing on the existing pattern.
Form the occipital part in short rows. In the first row, do not knit 1 st. To the center and unfold the knit, knit back with a crochet. Repeat the manipulation without reaching the edge first by 2 p. (Repeat a couple of times), then 2 times three loops and 2 times not knitting 4 p. Repeat the same with the right half of the product. Connect the remaining loops at the hood with a “loop to loop” stitch. Sew on the part as shown in the diagram.
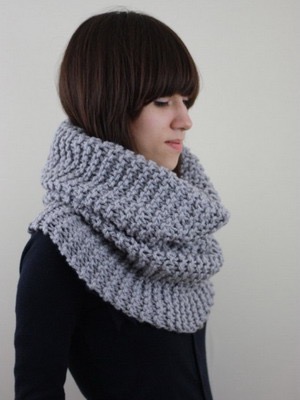
Many girls stubbornly don’t wear a hat even on the coldest days, believing that no headgear suits them. At the same time, a variety of excuses are used: “I will remember my hairdo”, “I look silly in a hat” and, finally, the most popular one is “I have a hood.” Indeed, what could be more convenient than just throwing a hood and running from the porch to the bus stop or store doors. Maybe this option is really comfortable, but it can not be called beautiful and stylish. Such a hastily thrown hood spoils the whole image, making it unassembled and messy. And what do you say if we propose you to knit such an unusual headdress that will be no less convenient than a hood, but it will look like from the cover of a magazine? Let's try to knit a scarf hood together with knitting needles, and a step-by-step description will help us do this.
What is a scarf hood
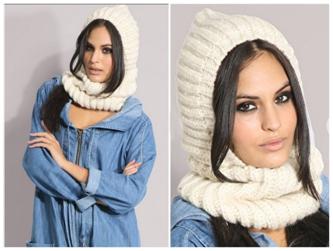
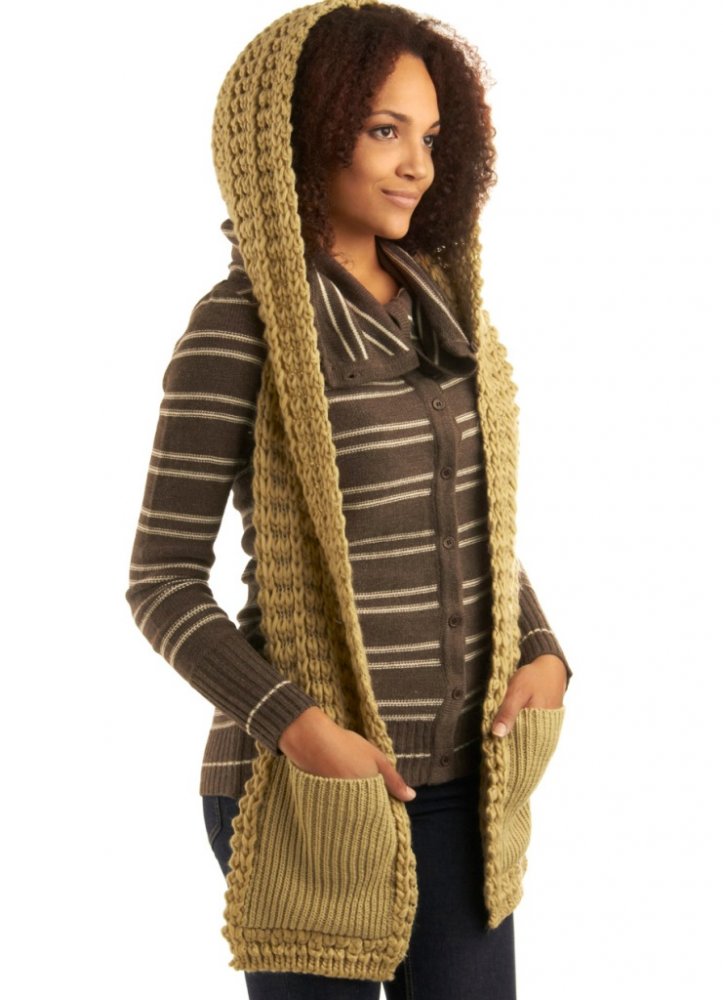
First of all, let's figure out what this hood scarf is. It is a knitted design of a hood and a scarf in the form of a ring that fits around the neck. Thus, this accessory combines the properties of both a hat and a scarf.
The scarf-hood can be worn not only on the head - if desired, it can be draped around the neck in the form of a dense ring. It will turn out something like a snood from many layers of yarn.
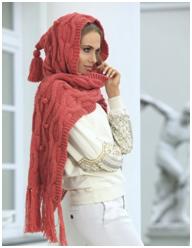
Another unusual option is a combination of a knitted hood with a real long scarf, the ends of which descend to the chest. In this case, the edges of the scarf can be decorated in the form of sleeves by sewing on them warm pockets. And then an unusual winter accessory will combine not only a scarf and a hat, but also mittens. This kit looks very cute and youthful.
How to make a pattern for a scarf-hood
In order for the scarf-hood to fit beautifully in the size of the head, for beginners it is better to first draw a pattern of the future product. In fact, to make a medium-sized scarf-hood, we need two rectangles, which we will then sew together in a special way. The dimensions of the first rectangle should be one and a half meters by forty-five centimeters - this will be the part that is wound around the neck. The dimensions of the second rectangle should be twenty-five by seventy-five centimeters - this will be the hood itself. Experienced craftswomen can not sit over knitting with a ruler, but do all the work "by eye".

To make a scarf-hood you will need
- about a kilogram (yes, this is a very voluminous product) of wool yarn of any color
- straight knitting needles No. 7
- needle
Below is a step-by-step description of knitting a scarf-hood.
How to knit a scarf hood
1) We begin with the manufacture of the hood itself. To do this, you need to dial fifty stitches on the knitting needles. We knit the first three centimeters of the product with a classic elastic band according to the 1x1 scheme: one front loop, one back loop.
2) Next, we start knitting with an English elastic band. The first loop in the very first level must be removed, and the second - we knit as a front one. Next, we put the thread on the left knitting needle and remove the third loop as the wrong one along with this yarn. We knit the next buttonhole as the wrong one, and then again remove the wrong one with this crochet. So we draw the entire first row, while the last loop must necessarily be the wrong side.
3) Turn the knitting in the opposite direction and proceed to the design of the second level.
4) The first loop on the second level must be removed, and the second - we knit as the wrong one. Next, we put the thread on the left knitting needle and remove the third loop as the wrong one along with this yarn. Then we make a double loop on the left knitting needle (it is formed from the wrong loop and yarn filmed at the first level). We knit this double loop as the front.
5) We continue to knit the remaining levels with knitting needles according to the same pattern. At each level, remove the first loop, remove the back loops with a crochet, and double loops - we knit as facial, while always leaving the wrong loop at the end of the level. Please note that in case of detection of incorrectly knitted levels, raising the loops in the “English gum” pattern will not work - you will have to dissolve the wrong section and knit everything again. Therefore, be careful and do not rush.
6) When the workpiece reaches the required length, the loops of the last level must be closed and cut the thread.
8) It remains only to connect both blanks and our scarf-hood is ready! For women seeking to preserve the styling, such a hat will be a real salvation - it will be warm in it, and the hair will remain as magnificent as immediately after leaving the house.
Related videos
You can see how to tie a scarf hood in more detail in the following videos. It is easy to figure out incomprehensible elements with schemes and step-by-step instructions from experienced craftswomen and easily make yourself (or as a gift to someone) a warm and cozy winter accessory.
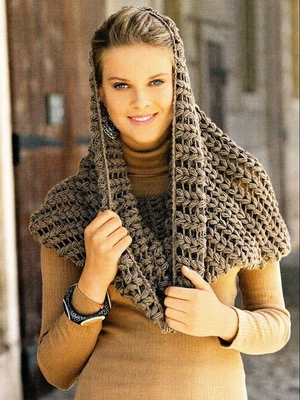
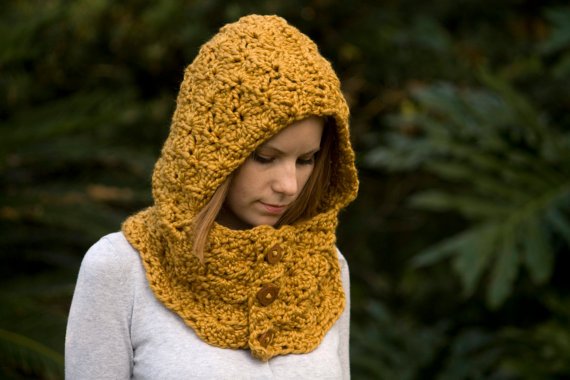
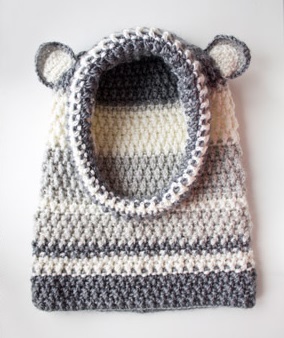
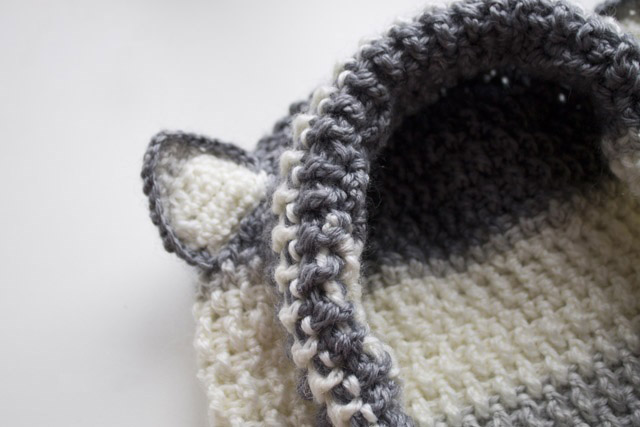
The cold is already on the verge, so urgently choose a scarf. We offer to crochet a fashionable snood - a hood with ears. Snood is a fashion trend for several seasons. This is a great scarf replacement accessory. It combines both a scarf and a hat. Snood can be worn as a scarf, or as a hood. In the dark palette of this season, there was no place for only black color; it was successfully replaced by deep gray (different shades) and rich brown.
Snud
A favorite of the catwalks - that's what the leading fashion designers of the world call Snood in 2015!
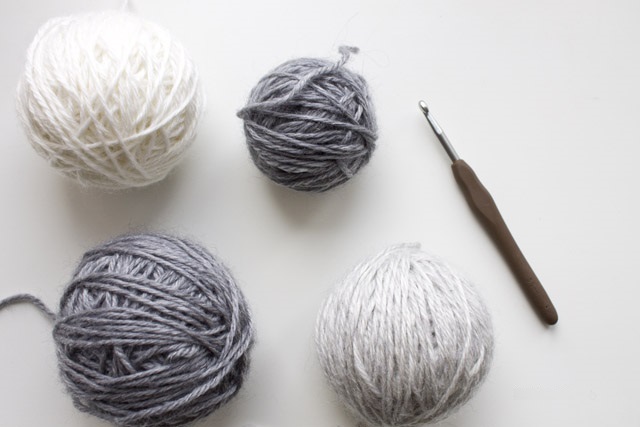
For work you will need:
- yarn wool 100% or 50/50 wool + acrylic, 400 grams (4 skeins)
- hook 6 mm
The width of the snud - hood is 31 cm (girth 62 cm). Height 40 cm.
Snud pattern
We knit front and back with embossed crochet posts. If you do not know how to knit embossed embossed columns, the video is given at the end of the article.
1st row - double crochet (CCH)
2 row - 1 front, CCH, 1 wrong side, 1 front, 1 wrong side, and so on until the end of the row
3 row - we knit like the second row
4th row - 1 wrong side, CCH, 1 facial, 1 wrong side, 1 facial, so until the end of the row
5 row - we knit as 4 row
Then we repeat knitting from 1 row. Decreases in this pattern are done as follows: 2 columns are knitted together. The work used yarn in three colors: white (1 skein), dark gray (2 skeins), and light gray (1 skein).
Getting to work
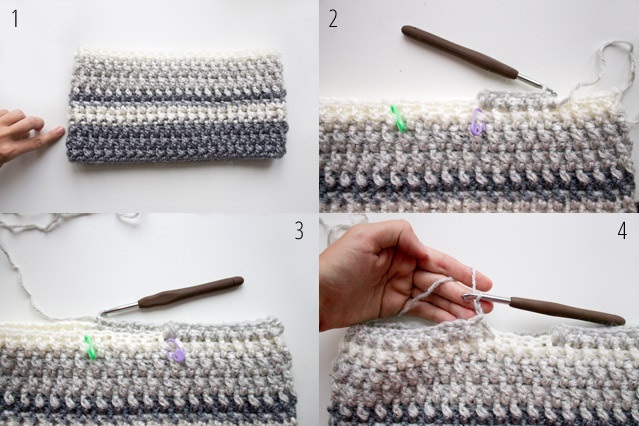
Dial a chain of 87 air loops in dark gray and lock the chain into a ring.
1 row - 2 air loops for lifting, 87 CCH
2-6 row - we knit according to the pattern
7-9 row - we knit according to the pattern with white yarn
10-11 row - we knit according to the pattern with dark gray yarn
12-16 row - we knit according to the pattern with light gray yarn
17-18 row - we knit according to the pattern with white yarn
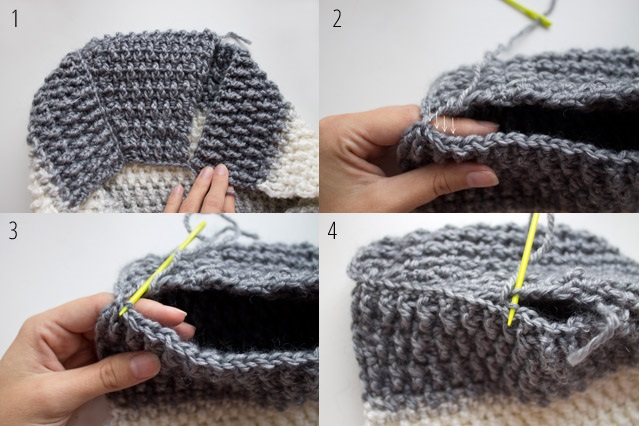
Cut the thread, close the knitting. We position the canvas so that the seam is on the left, as shown in Fig. 1. We will knit a recess for the face. In total, we had 87 columns + we consider the place of joining the rows as a column, totaling 88 columns. There are 44 columns on the front side, and we will work with them. First of all, the front part must be divided by markers or pins, between them there should be 12 columns. We will knit with light gray threads and rotary rows. That is, knit in a circle.
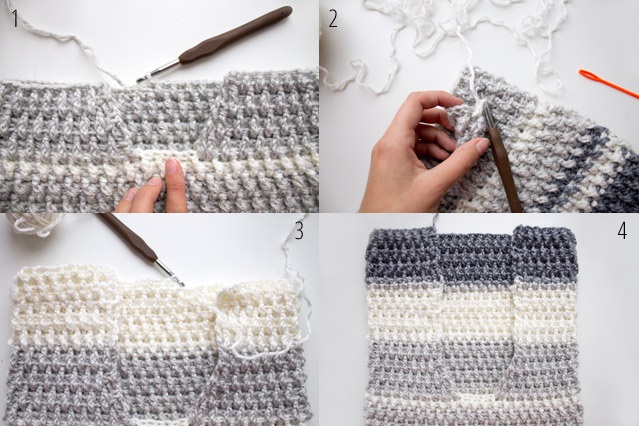
1 row - 76 columns in the pattern
2nd row - start with 2 air loops for lifting (Fig. 4)
We make 1 decrease at the beginning of the row and 1 decrease at the end of the row (74)
3 row - 74 columns in the pattern
4 row - decrease, 70 columns in the pattern, decrease (72)
5 row - 72 columns in the pattern
6 row - decrease, 68 columns in the pattern, decrease (70)
7 row - 70 columns in the pattern
Change the thread to white (Figure 2)
8-15 row - 70 columns in the pattern
16 row - we knit 70 pillar. light gray thread pattern
17-23 row we knit 70 columns in a pattern with dark gray threads.
Cut the thread and close the knitting.
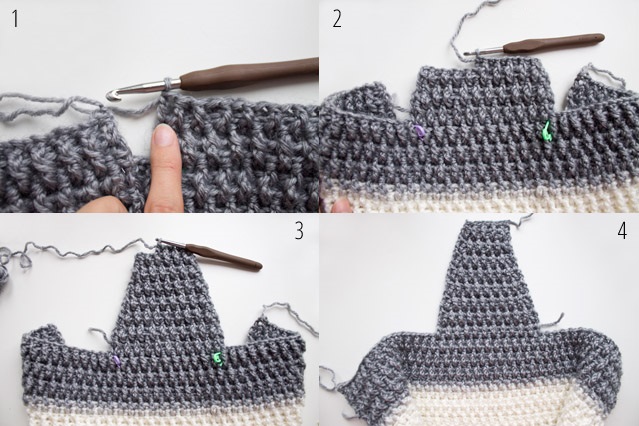
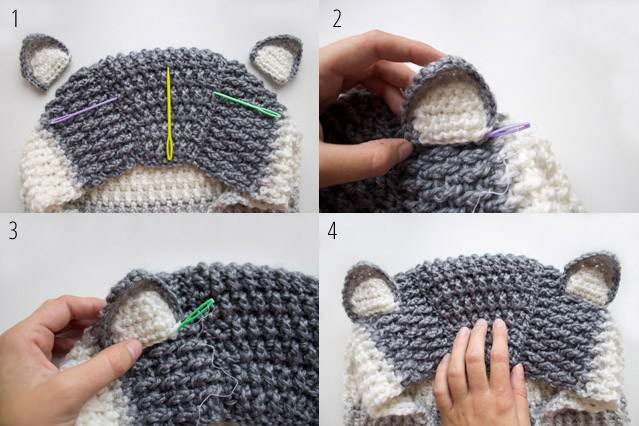
Now we will knit a little cap for the top of the hood. The top will be round. Now we have 70 columns, again divide the canvas with markers so that 22 columns appear between them (Fig. 1).
1 row - 22 pillars. dark gray thread pattern
2 row - decrease, 18 columns in the pattern, decrease (20)

3 row - 20 columns in the pattern
4 row - decrease, 16 columns, decrease (18)
5 row - 18 columns in the pattern
6 row - decrease, 14 columns, decrease (16)
7 row - 16 columns in the pattern
8 row - decrease, 12 columns, decrease (14)
9 row - 14 columns in the pattern
10 row - decrease, 10 pillar. decrease (12)
11 row - 12 columns in the pattern
12 row - decrease, 8 columns, decrease (10)
13 row - 10 columns in the pattern
14 row - decrease, 6 columns, decrease
15 row - 8 columns in the pattern.
Close the knitting (Fig. 4)
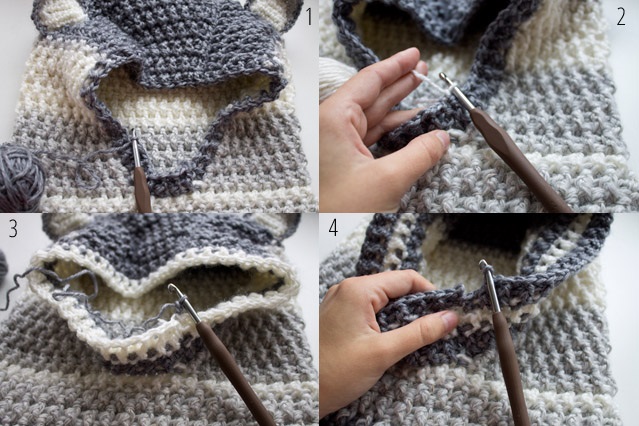
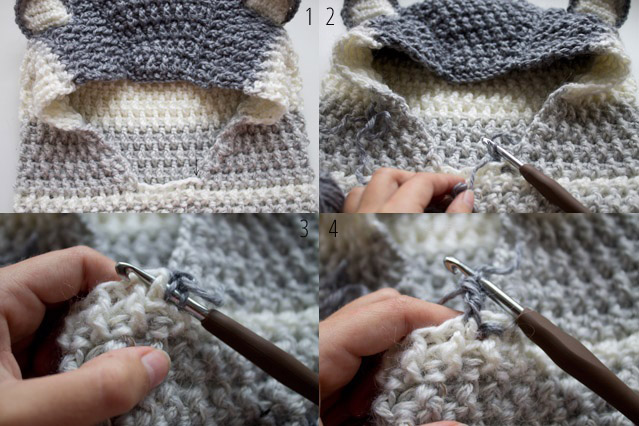
Now fold the toe, as shown in Fig. 1 and sew it with the left side of the fabric. You need to cling the needle to the hinge walls that are marked by the arrow in fig. 3. Otherwise, you get an ugly seam.
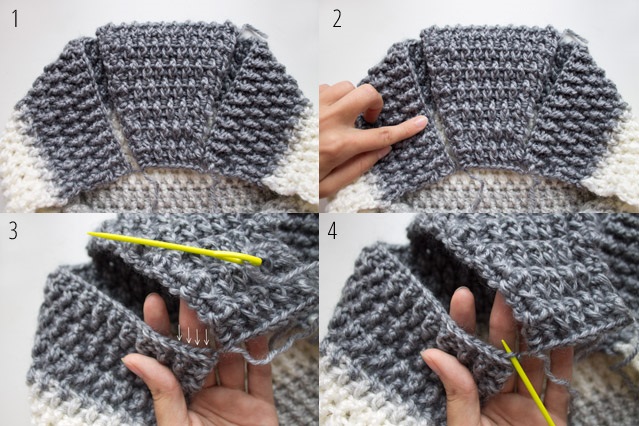
Now we sew the cape with the canvas on the right.
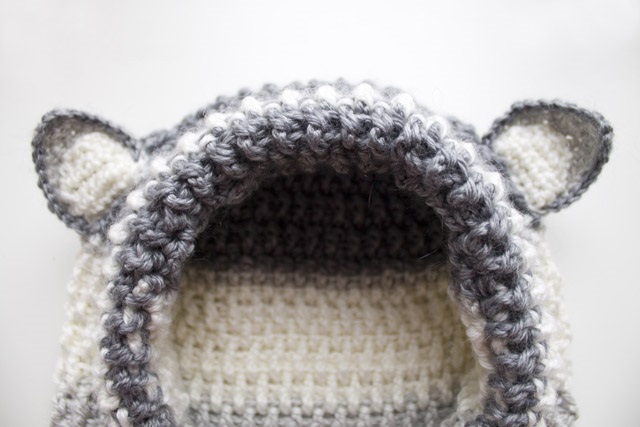
We turn out the hood, make ears.
Ears
Consist of two parts sewn together.
1 white part:
2-3 row - 7 sc
4th row - decrease, 3 sc, decrease (5)
5 row - 5 sc
6 row - decrease, 1СБН, decrease (3)
7 row - 3СБН we knit together, close.
1 part light gray:
2-3 row - 9 sc
4 row - decrease, 5 sc, decrease (7)
5 row - 7 sc
6 row - decrease, 3 sc, decrease (5)
7 row - 5 sc
8 row - decrease, 1 sc, decrease (3)
9 row - 3 RLS we knit together, close.
We knit 1 and 2 rows with dark gray color, then we change the thread to white and we knit 2 more rows. A total of 6 rows of strapping.
Your wonderful snood - the hood is ready.
Useful video about how embossed crocheted embossed posts:
If you like knitting more, here.
The color palette of snuds