

Study drawing human figures - A separate section in the program according to the drawing. When doing this work, students solve specific learning problems:
- learn to determine the position of the entire figure of a person in space, depicting proportions taking into account perspective reductions, to determine the nature of the movement of each individual part of the body;
- develop a sense of plastic-structural-functional bonds in the construction of a human figure;
- to develop an attitude to the figure of a person as the most perfect, beautiful, harmonious creation of nature;
- to develop creative initiative and independence, based on previously acquired experience;
- constantly remember that the work of the draftsman must be considered as a combination of thinking and the logic of constructing the image in the process of observing nature, to cut off attempts of thoughtless copying and drawing of details;
- deepen professional skills and graphic skills.
Figure of a male figure
As an example, consider practical work "Drawing of a male plaster figure." Students draw from nature a plaster cast from antique statues of Herculesstanding above eye level. To successfully complete this work, the author completed the drawings, sequentially illustrating the main stages of the work.
Drawing of a male gypsum figure. The first stage (Fig. 1.2)
- Choosing a place to draw.
- Layout drawing in the plane of the sheet.
- Choosing the largest size of a person’s height.
- A mental comparison of the figure chosen for drawing, taking into account promising abbreviations.
- Marking of the jugular cavity.
The right choice of place for drawing is very important. The place is chosen not only for aesthetic reasons. It should be at a distance of two to three values \u200b\u200bof the growth of the model. Before you touch the surface of the paper with a pencil, you need to mentally imagine the future result. Given the number of hours allotted for work, it is necessary to allocate time: divide your work into stages with a clear installation for each of them. When the work reaches a specific goal in each lesson, the drawing is faster and the results are more significant.
Composing a human figure on a sheet plane, you must avoid the central image and make sure that the side margins are different in size. Of great importance in the arrangement is the illumination of the figure and the background located behind the image. Shaded areas of the sheet should balance light. The front side of the figure contains more small details than the back. The viewer, looking at them, should have room. Therefore, the background cannot be fractional, and the edge of the sheet should not be close. In front of the front of the figure, the field should be larger than in front of the back. If we see the figure from below, then the upper field above the head should be larger than the lower.
Drawing composition - a responsible stage of work. The final result largely depends on it. You should not rush here. Using a viewfinder and preparing a sketch of a small size can help to compose a drawing well. When composing an image, the painter uses only the general form with no details. Therefore, it is necessary to first determine the proportions of the rectangle into which the whole human figure fits in as a whole (Fig. 1).
When composing a human figure in a given plane, it is necessary to pay attention to the direction of movement of individual forms human body. It is necessary to outline the drawing on paper in a generalized way, paying attention not to run into, but to the general character and movement of the form. You can immediately make a live sketch under the influence of the first impression of nature.
By arranging the figure of a person in the plane of the sheet, the painter selects at the same time the highest height of the picture (Fig. 1,2).
Remembering the canon of the male figure, the painter must find the characteristic features of the person whom he depicts. A. Dürer writes: “Beauty and ugliness also lie in the heterogeneity of people: some have big heads, others have small; some broad at the shoulders, others narrow; some are broad at the hips, like women, others are narrow; some have a long torso and short legs, or vice versa. Everyone should pay attention to such things if he wants to do something. ”
Antique canon. The size of the head fits eight times in the height of the whole figure. If these eight parts are noted, then the second part will be from the chin to the line of the nipples; the third - from the nipples to the navel; the fourth - from the navel to the pubic joint; fifth - from the pubic joint to the middle of the thigh; sixth - from the middle of the thigh to the knee; seventh - from the knee to the lower part of the caviar muscle; the eighth - from the lower part of the calf muscle to the sole.
When conveying the individual characteristics of a person’s figure, it should be remembered that deviations from the rules are very slight. Given the prospective reductions, it is necessary to outline the size of the head and the point of the pubic joint (Fig. 3).
The height of the head is a module of the figure and is of great importance when finding the remaining proportions. The pubic joint divides the figure into two main parts - the torso with the head and lower limbs. These values \u200b\u200bneed to be found only by comparison with the largest height. Be sure to outline the jugular cavity in the figure.
Drawing of a male gypsum figure. The second stage (Fig. 3)
- Setting the figure on a horizontal plane.
- Determination of the center of gravity and the main line of the figure (generalized).
Tightly put the figure in the drawing on a horizontal plane - the next crucial stage of the work of the draftsman. To do this, you need to find the center of gravity of the figure, lowering the perpendicular from the jugular cavity. In a figure resting on one leg, he will surely fall to the reference point of the foot. You can check this by a plumb line or a pencil, holding it by the sharpened end of the stylus. In our case, when the figure stands above the eye of the painter, it is necessary to especially carefully draw the trace of the supporting leg in a perspective reduction.
From the pubic joint, determine the distance to the skewer of the supporting leg and connect it to the previously found foot point.
From the jugular cavity, outline, while generalized, the main line of the figure.
Figure of a male figure. The third stage (Fig. 3.4)
- Determination of the directions of the main inclinations (head, shoulders, pelvis, legs and arms).
- Finding the correct proportions of the figure.
- Simplified marking of the main volumes of the figure.
Having carefully considered nature, the painter must determine the movement of the main parts of the figure in space. You need to start searching and image directions from the pelvic section. To do this, find reference points located on the upper edges of the iliac crest of the pelvic bones. Comparing them with each other in height, it is necessary to draw a line and set aside the points on the left and right. When determining the directions of the shoulder girdle, it is necessary to compare them with the directions of the pelvic section and compare these two main directions with each other. In a person who rests on one leg, these directions will be opposite. In his treatise on painting, Leonardo da Vinci writes: “If a figure rests on one of its feet, then the shoulder from the side that rests will always be lower than the other.”
The search for the direction of head tilt should begin from the jugular cavity, determining it relative to the vertical. The rotation of the head is determined using a section passing through the sagittal suture of the parietal bones of the skull. The main volumes should be outlined in the figure in a generalized way, inscribing them in simple geometric shapes.
Distances within a large form are sought, starting from the midline and paired. So, the sternum of a person is equal to the clavicle. By connecting the extreme points, you can get a triangle that can be rotated in space at the request of the painter, etc. All construction should be done, taking into account the proportional dependence of both individual parts and the entire figure. Before planning the volume of the limbs, it is necessary to install the patella, the inner and outer ankles, the calcaneus and the nail phalanges of the fingers. The proportions of the hands are determined from the head of the humerus. The elbow joints and lower heads are from the ulnar and radius bones. It must be remembered that the bones of the shoulder and hips are always longer than the forearms and tibia. Brushes are outlined generically, depicting the "grip" of the hand. The foot should have a pronounced rise.
The main thing at this stage is not to be distracted by small details. It is better to perceive the whole drawing as a whole if the painter often looks at the result of his work from a distance of two or three steps from the easel.
It is very important to see in kind an expedient harmonious interconnection of the proportions of all parts of a single organism.
Drawing of a male gypsum figure. The fourth stage (Fig. 5-9)
- Linear structural drawing of the figure.
- Refinement of the main reference points to verify the correctness of construction.
- Anatomical foundations of the human figure.
- Self-control of constructions using sections.
Linear design should be built from the middle of the figure down, and then up. The drawing of the head is carried out last. You need to start a structurally linear drawing with a drawing of the main line, starting from the jugular cavity and ending with the pubic joint - in front and from the seventh cervical vertebra to the coccyx - in the back. The drawing is conducted "transparently", that is, they draw the invisible part of the figure. Checking the correctness of the pattern vertically and horizontally is possible only when the locations of the control points are specified (see Fig. 5).
By marking the distances between the control points and comparing them with each other, the painter can exercise self-control.
And finally, the drawing is checked through cross sections (see Fig. 5). Performing a linear constructive drawing, students should apply their knowledge of plastic anatomy, obtained earlier. Using them, you need to be able to find changes in the shape relief caused by specific human movements (see Fig. 6,7).
The construction of the head is carried out at the last stage of the linear structural drawing. By tying the head to the shoulder girdle, the draftsman must present the shoulder girdle not only in the visible part. On top of the shoulder girdle schematically has the shape of a rhombus. The upper edges of the shoulder blades and clavicle are its sides. If you connect the seventh cervical vertebra with the jugular cavity of the sternum, this line will be a short diagonal of the rhombus. The rhombus of the shoulder girdle has an inclination forward, since the seventh cervical vertebra is higher than the jugular cavity. The neck cylinder is located in the center of the shoulder girdle. The sternocleidomastoid muscle connects the skull to the shoulder girdle. Therefore, the longitudinal section of the head in the figure must be built from the jugular cavity. First, draw the neck, and then build the section from the bottom up (see Fig. 8, 9). The anatomical analysis of the shapes of the human figure goes to the end of the work on the drawing.
How to draw a man with a pencil: a detailed description for beginners and children.
With the help of very simple master classes collected in this article, you can easily draw a person. Many of the adults, recalling non-trivial drawing lessons at school, are sure that drawing is quite difficult, and one must have giftedness. You think? No, we do not claim that in a few days we will make you a new Van Gogh, but we will aesthetically beautifully and accurately teach you how to draw. And remember, in drawing, as in any other craft, the main thing is not giftedness, but practice. As one great scientist said, to become a master of his craft, you need to spend only 10,000 hours on it.
In order to learn how to qualitatively draw a person in full height it is necessary to accurately distribute the proportionality of body parts and pay special attention to facial features.
If you decide to learn how to draw a person to his full height, we can recommend, firstly, stop drawing with dashed lines and start drawing with thin, barely noticeable, but still solid lines. Learning to draw is thus more difficult, but later it will come in handy. Secondly, do not listen to the advice of “experienced” what you need to draw with a pencil, eraser and eye. Feel free to pick up the ruler and calculate the correct proportionality. To train the eye on the proportions of a person, you need to draw a hundred paintings.
Also, do not forget that from what position a person stands, what he holds in his hands, where his gaze is directed, what facial expressions and much more. This indicates the condition, behavior and character traits of a person.
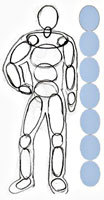
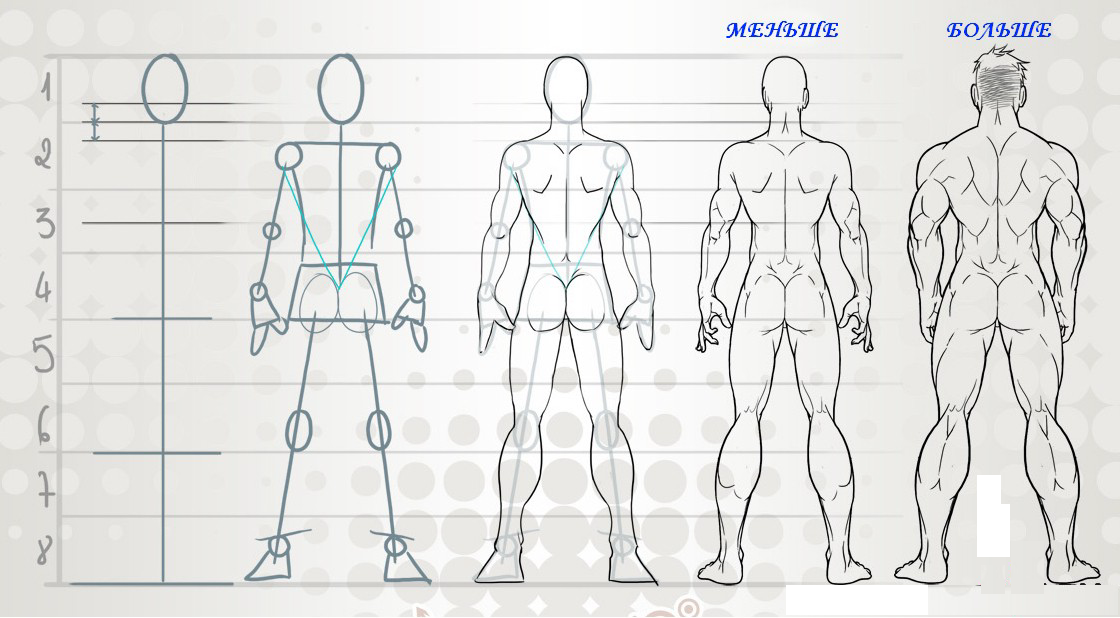
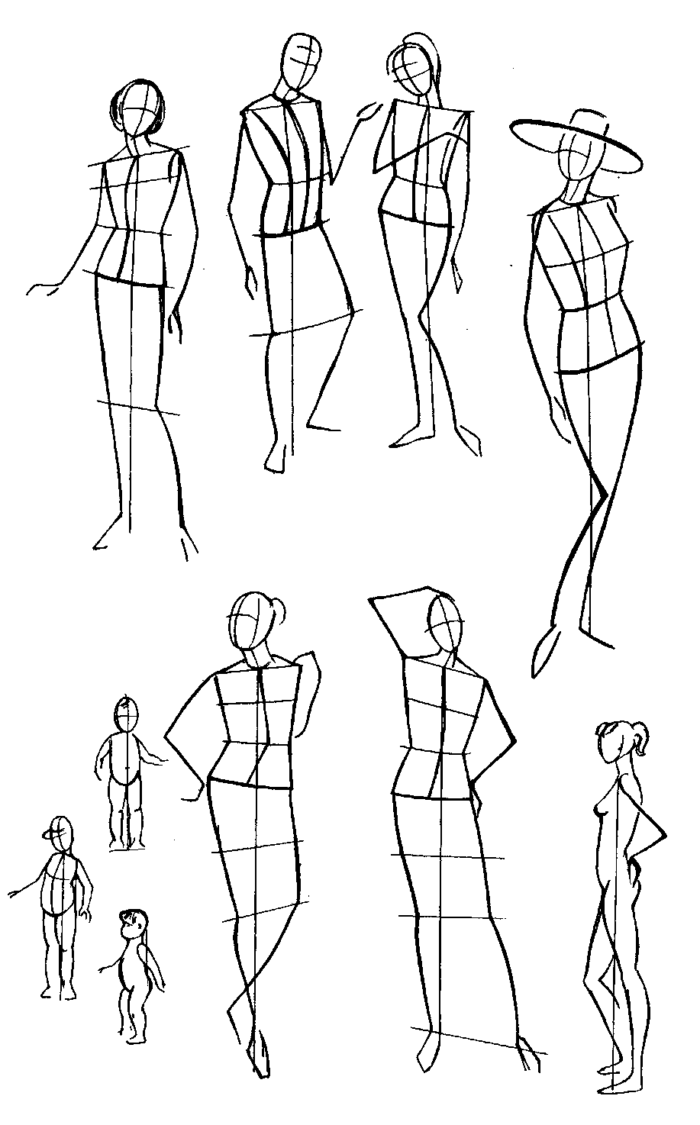
As experienced masters say, a person is proportionally divided into seven parts. To calculate the proportions, you can draw just such a scale, or you can double-check with a ruler during the drawing process.
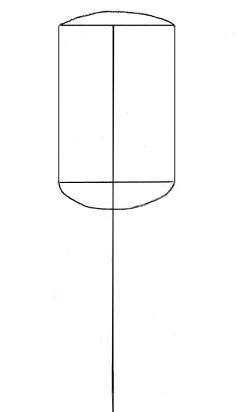
Draw in the middle of the sheet a straight line across the entire page. Slightly departing from the top, draw a rectangle in the ratio of 3: 4. Next, draw oval shoulders and a light oval below (outline of the bottom of the T-shirt). We will draw a man in the summer, so he will have a T-shirt and pants on it.
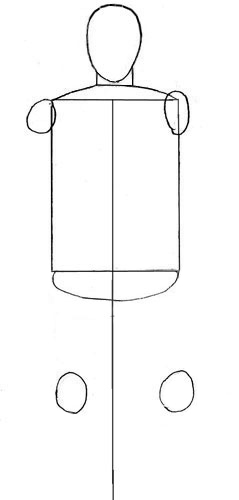
Now we draw, observing the proportions of the outlines of the head, neck, collarbones, and also knees schematically marked from below. Please note that the head, neck and collarbones are drawn as accurately as possible, but everything else can be drawn purely schematically, as from now on it will all get better several times. Also, do not forget that in the future, these first outline lines will be removed from the drawing, and accordingly draw them as subtly and barely noticeable as possible.

Now we begin to draw the body, for this draw the same lines as in the picture. We also complement the two circles below the knees - the human foot. Please note that as before, we are still sketching.
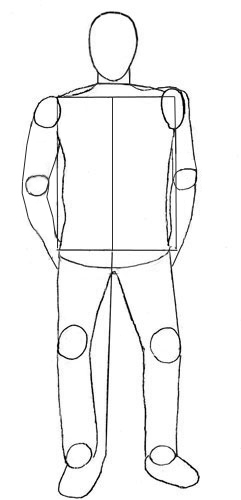
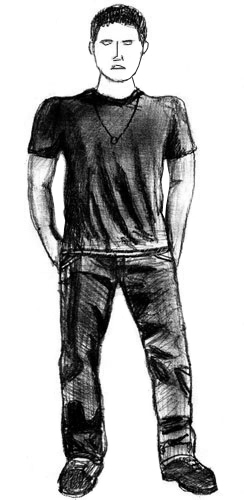
And now, according to the available sketches, we draw in detail the arms and legs of a person. Pay attention to the details and proportions of the person. It’s very difficult to draw palms and fingers correctly for beginners, so in our drawing the man brought his hands behind his back.
When drawing legs, pay attention to the fact that they are narrower towards the bottom, and you will not forget about the natural relief. Feet look in different directions, so a person looks more courageously.
Additionally, we check the proportionality of our person.

At this step, remove the extra lines and admire the “revived” pattern. We continue our creation - add volume. We draw a line of T-shirts, sleeves, trousers, select the neckline.
Now we draw a face: eyes, eyebrows, nose, lips, hair. As well as all the details in the clothes. Clothing looks more realistic if you draw strokes in different directions, take into account folds, the play of shadow and light. Also pay attention to small accessories such as a belt, chain, etc.
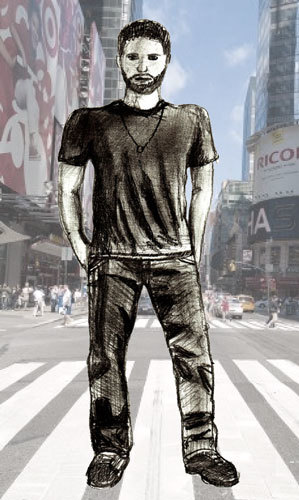
Now finish by adding the necessary touches. We detailed the face and added a beard that is now fashionable. In this lesson, we have described in detail the alternation of steps in the figure and the proportionality of a person in full growth, but do not forget that you also need to see the lesson how to draw a portrait of a person in order to correctly depict facial features.
Video: How to draw a body of a man in clothes with a pencil?
How to draw a man’s hands in clothes with a pencil?
If you wondered how to draw the hands of a man in clothes, you are on the right track. Yes, to draw well, you need to draw each detail correctly. To do this, in ancient times, artists studied human anatomy in detail, and now, as before, it was popular to draw from nature. But we offer not only to observe and draw from the hands of our friends and relatives.
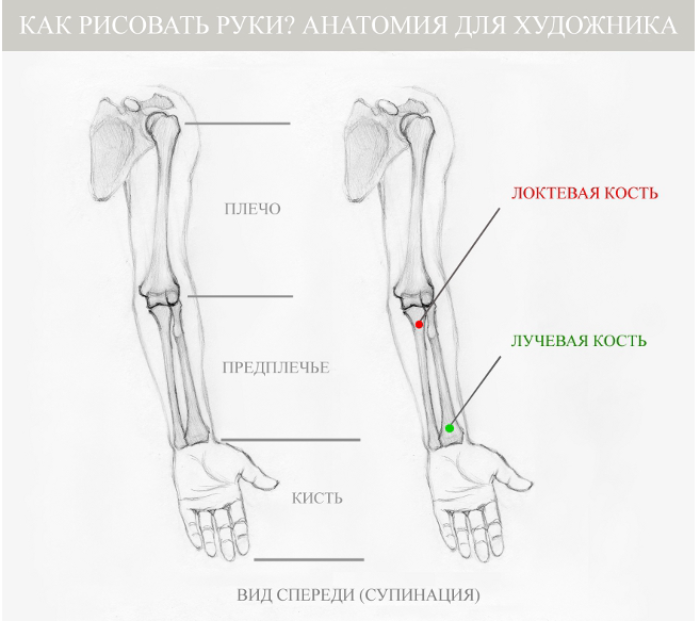
So, the hand consists of:
- Shoulder
- Forearm
- Brush
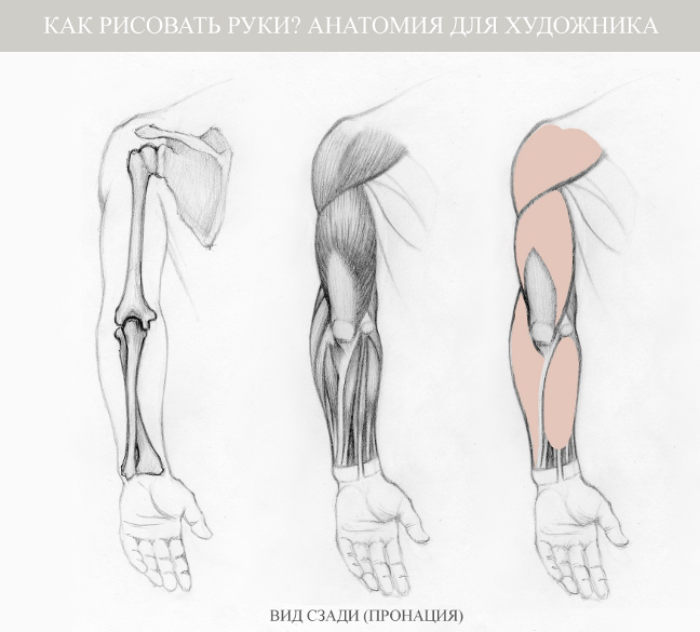
Look at the figures below, you can clearly see both the parts of the arm and the bones that are located in these parts of the arm. No matter how elegantly or vice versa, you would like to draw your hands, it is worth considering these proportions.
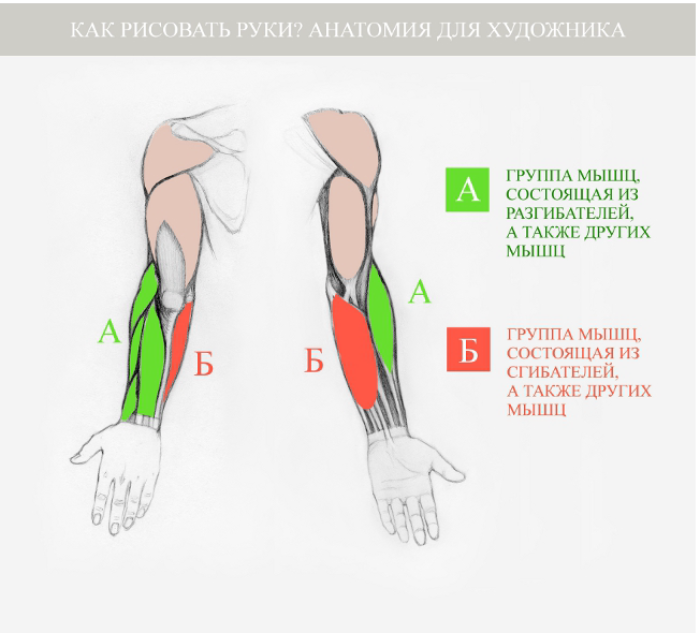
Now study the muscles, and also take into account their proportionality when drawing, depending on whether you are drawing up lean or lean arms.
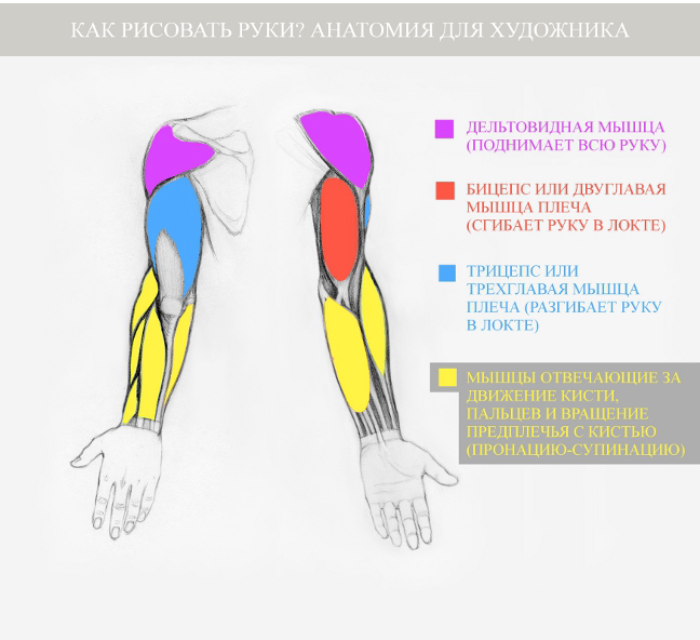
Now we’ll take a closer look at muscle groups, note that depending on the clenched hands in the fist, or on the contrary, the muscles will change shape.
Having studied the bone and muscle structure of the human body, we can go directly to the image. If you draw a large and detailed hand of a man, then first draw a sketch of the bone, muscles and only then draw the contours. Thus, the maximum proportionality will be observed.
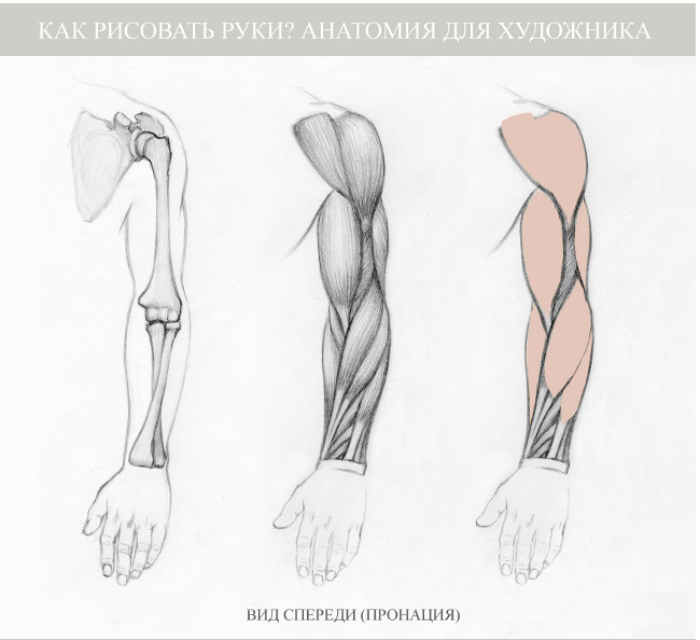
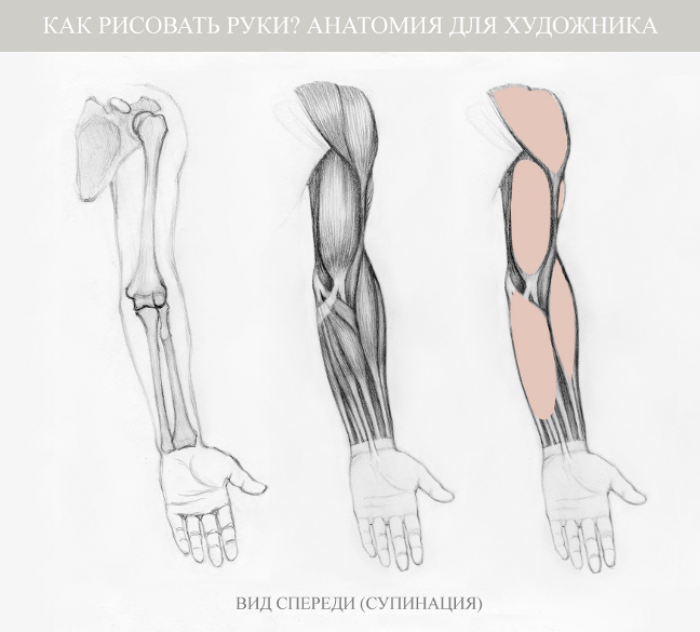
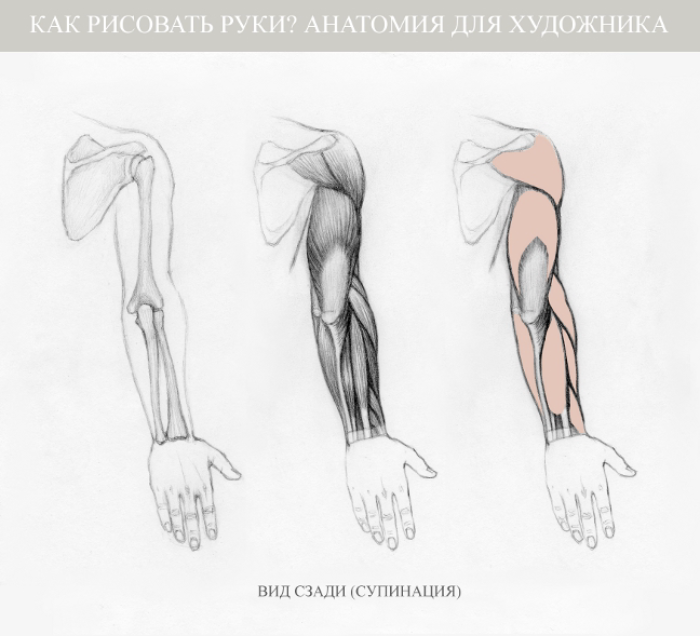
Now look at how the hand is drawn when the palm is turned in our direction (supination).
If you need to draw a hand bent at the elbow, work out proportionality, observe the natural bend, as well as the direction of the palm.
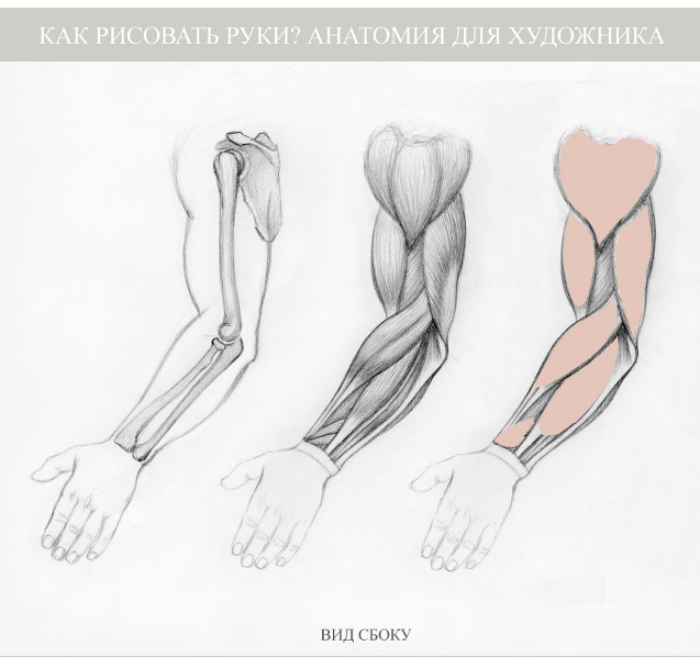
And in these pictures, hand drawing with forearms is examined in detail. See how the shape of the hand changes depending on the movement of the hand and angle. Try to draw the same picture schematically, but with your proportions.
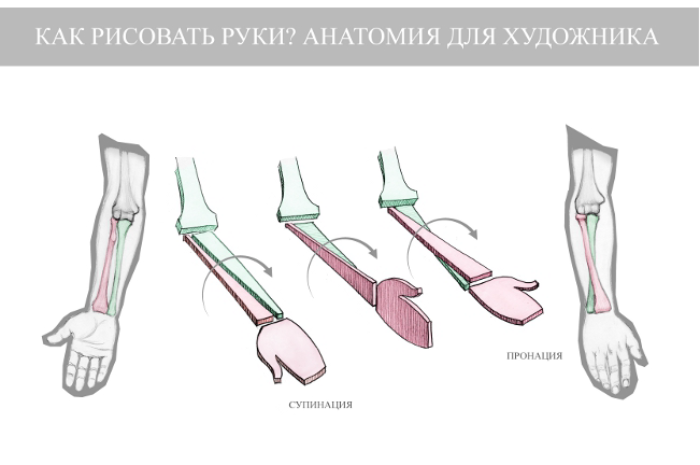
It is also often necessary to draw a hand in a certain movement. Outstretched hand, handshake, and more. For clarity of movement, see the diagram below. It will help prevent anatomical errors in the work.
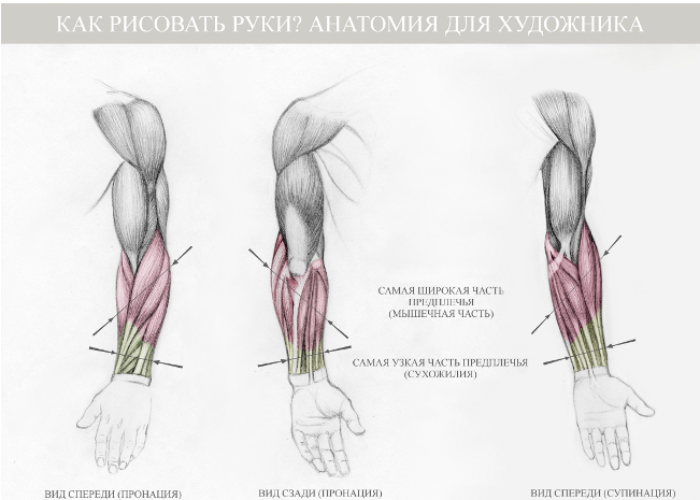
Also, working through all the nuances of the hand after you draw, check the widest and narrowest part of the forearm, as well as the smooth relief transition between them, according to the diagram below.
And for those who do not want to delve into the long analyzes and human anatomy, there is a simple scheme, observing which you can easily draw a male hand in several stages.
It is equally difficult to draw palms correctly. In order to maintain proportionality and to easily learn how to draw a “second person's face” - the palms, it’s enough to follow this simple lesson step by step.

Video: How to draw a man’s hands in clothes with a pencil?
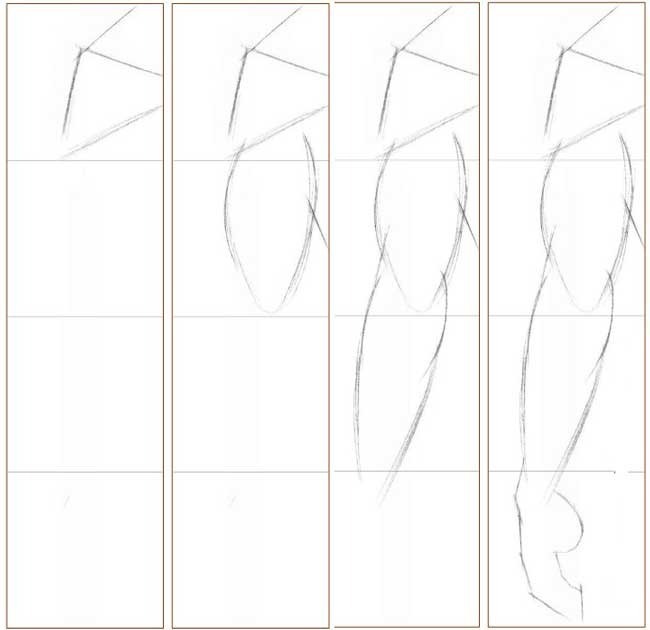
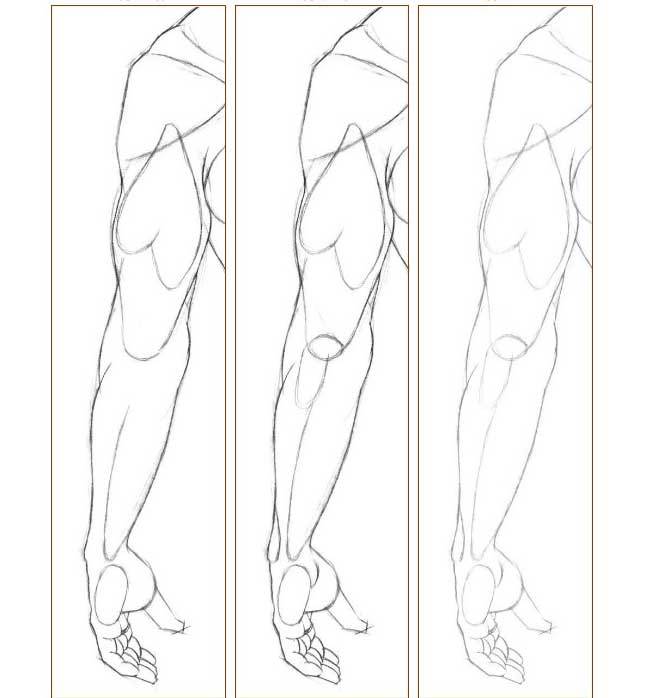
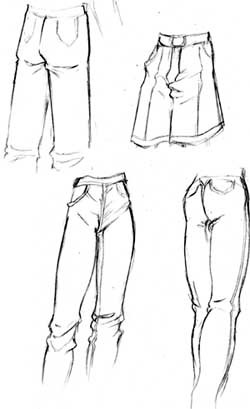
When drawing a man’s legs, it is also important to start the drawing from the base, moving to the muscles and only at the end put on trousers, pants or shorts. In this case, the picture will look more vibrant, voluminous. Pay attention to the lesson drawing below. Only four stages, but what a result! Take note and do not be lazy to draw lines that later will need to be erased, because they are the key to the necessary proportion!
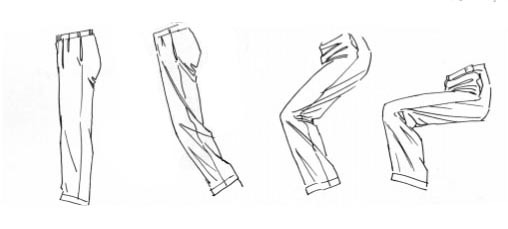
When drawing clothes, it is important to observe the play of light shade, as well as folds on clothes. Look, drawing the trousers of a man in different positions, how the folds on clothes change. You can draw more or less folds as needed, but they must be present.
Video: How easy is it to draw a man a man in full-length clothes in the cells?
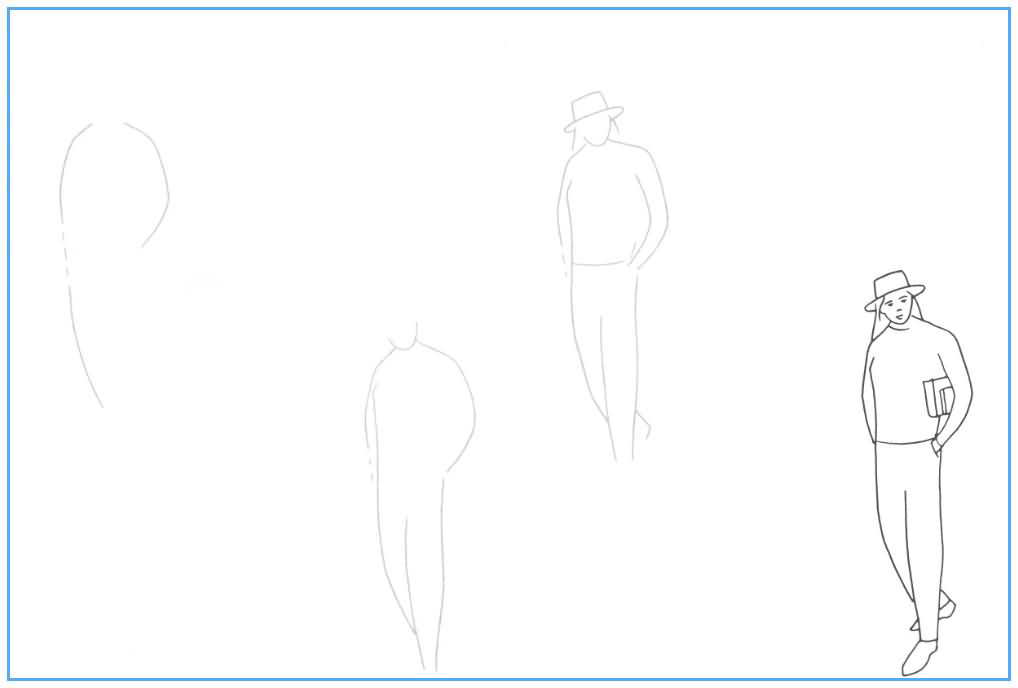
In this mini lesson, we will not go into the human anatomy, and show how to use a few strokes to create the silhouette of a man standing sideways.
We draw the curved lines big and small as in the figure. Focusing on them, we draw trousers, hands, outlines of the head. We turn to the details, do not forget to look after the proportions. Add a hat, a book, erase small lines and draw the necessary clearly with a pencil.
Video: How to draw a man a man in clothes in motion with a pencil?
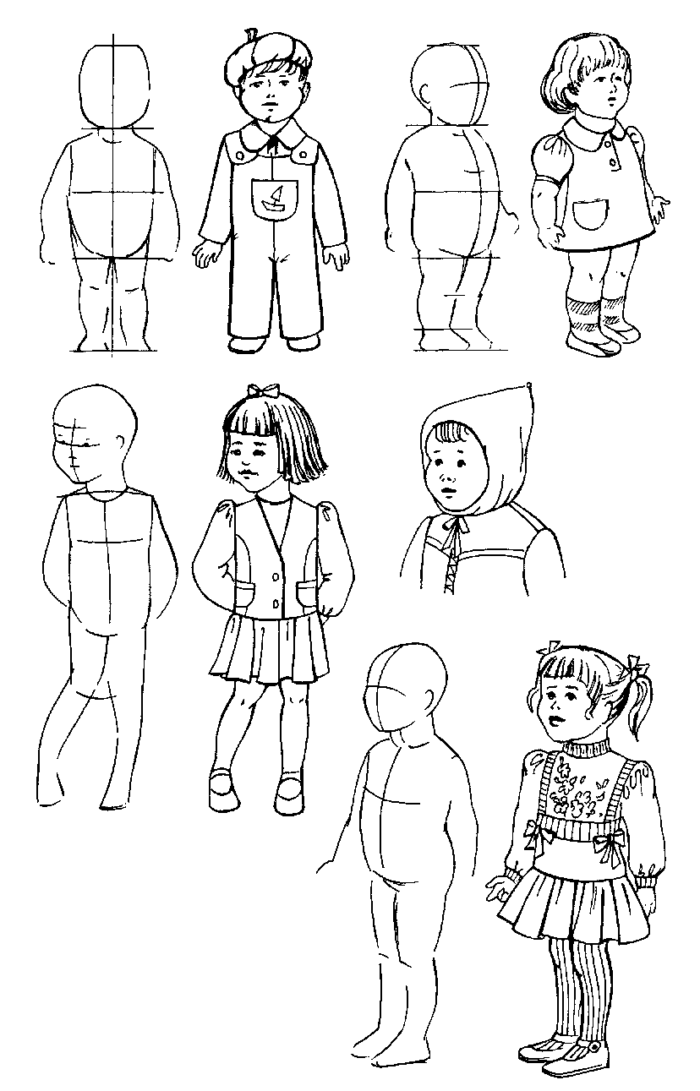
Drawings of a man men in clothes for children for drawing: photo
Video: How to draw a person in stages?
Drawing a person is not so simple. Rather, it is even very difficult. There are many rules by which we must learn to draw human figures. To do this, the artist must know the basics of human anatomy and physiology in order to correctly draw the skeleton, muscles and the body itself. There are special books, Anatomy for Artists, that teach this. All the basics and rules of drawing are studied in art schools and studios. And what about those children who do not go there, but really want to learn how to draw people, at least in a simplified way? For this, there are lessons in phased drawing on the Internet. Let's learn how to draw a man in stages.
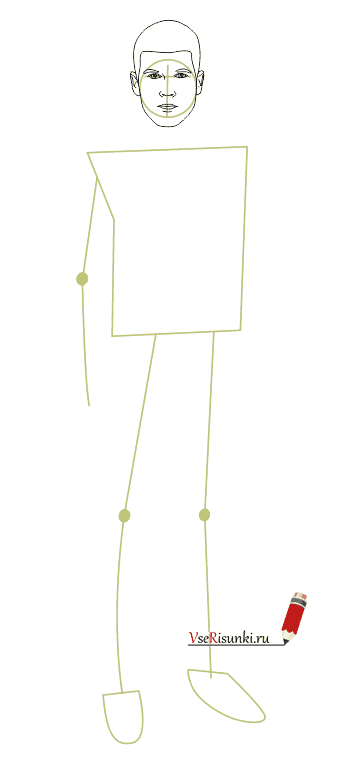
Stage 1. At the top of the sheet of paper we draw the face of a man. This is a circle of small diameter. Inside the circle we draw two lines intersecting each other at right angles: the lines of the eyes and nose. Below we begin to draw a circle, smoothly shaping the cheeks and chin. The chin is a little square. At the top we lengthen the face, open the forehead and style the hairstyle. The hairstyle will be of thick hair, lush, evenly cut.
Stage 2. Now we draw the face itself, give the expression (facial expression). On the horizontal line, draw the eyes symmetrically from the center line: the eyelids, the shape of the eyes is elongated, the pupils, eyebrows, nose bridge are denoted by a small dash. Then, slightly lower in the center line, draw a nose with nostrils, even lower - tightly compressed mouth and draw a dash - a fold under the mouth. On the sides of the head we smoothly draw neat auricles with large lobes.

Stage 3. On behalf of the man we will draw auxiliary lines of his body. This is a rectangle that has a protrusion from above, lines of arms and legs with dots denoting the elbow and knee joints. Legs end with feet (small oval figures).

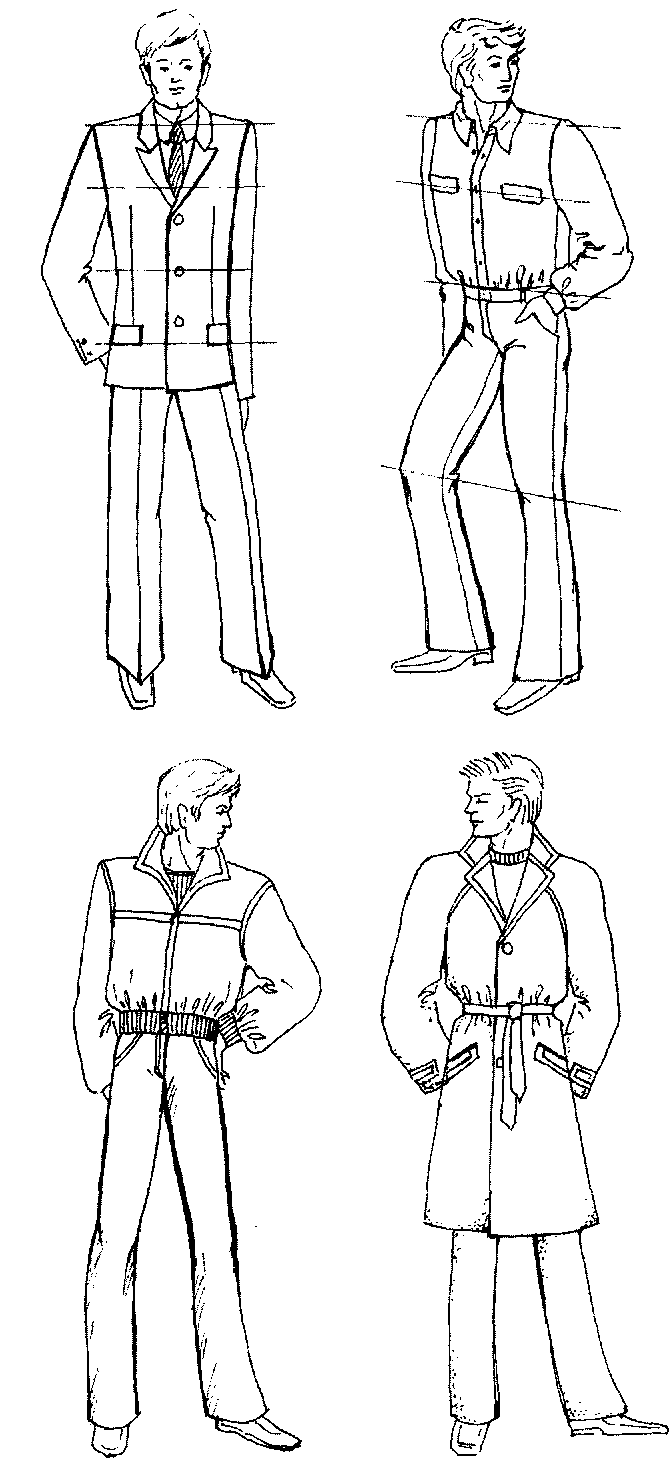
Stage 5. We begin the drawing of the jacket of our man.

Stage 6. Clearly draw the details of his costumes. We circle the shoulders, the sides of the jacket, buttoned. We draw pockets, designate folds on the fabric.
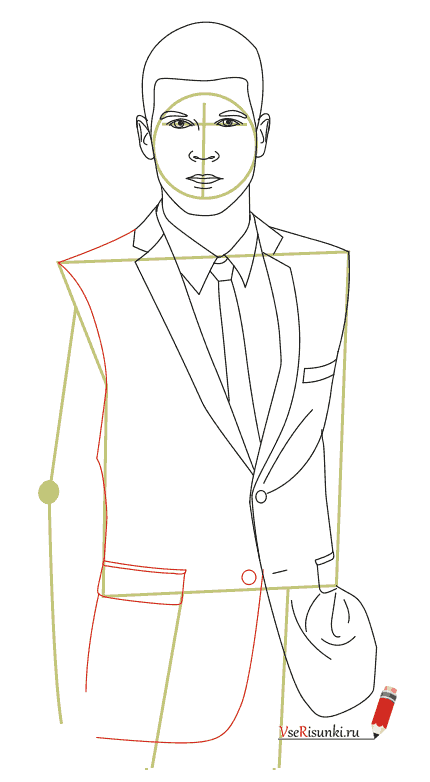
Stage 7. Now we will begin the image of hands. First, the left hand. She is in the pocket of her jacket. We design it as bent at the elbow and show all the folds on the sleeve.