

Have you already sewed a robe for your child? And just want to sew?
Why am I talking about a dressing gown?
If you are new to sewing, then sewing homemade clothes for your child is an excellent opportunity to “brush up” your sewing skills. The simplest and most rewarding activity is to sew for the home :).
In general, it is useful to start sewing with the simplest things. Just working out stitches on a piece of fabric is not at all interesting, would you agree? And we, mothers with children, have no time for this.
Therefore, it would be good to sew in such a way that the sewn item can be used, and at the same time, it teaches sewing skills.
And in order to sew a children's robe, you do not need a lot of time, skill and experience in sewing. Everything is extremely simple there. This can be done by a mother with any sewing experience or even without it.
 Firstly, cutting out a dressing gown is very simple. Often the cut details are simple rectangles that need to be sewn together. Such a unique designer :).
It can be even simpler. The front and back pieces are one-piece with sleeves. And here you only need to sew 2 side seams, edge the edges and sew on the waistband.
There are many options, but they all have one feature and advantage - simplicity! But this does not diminish the beauty :)
The main thing in home clothes is freedom, convenience and comfort. And for this purpose, additional design lines, cutting parts, and the like are contraindicated :)
 Besides the fact that dressing gowns are easy to cut, they are no less easy to sew. There is no point in using parts and assemblies that are difficult to process. Such as: welt pockets, complex collars, and so on.
And the fabrics used for home clothing are inexpensive and very easy to process, mostly cotton: calico, flannel, satin, and so on. Even if it is knitwear, it is also not very difficult to process - cotton, not very stretchy. You just need to choose beautiful colors.
But what will not be superfluous on home clothes are some finishing and decorative details. After all, home clothes should also be beautiful :). For example: patch pockets decorated with applique or braid, ruffles, decorative edging...
And, just on home clothes, you can practice processing such finishing and decorative aspects. Weekend and, especially, elegant clothes require more careful handling. And you can learn this from home clothes, as they can easily “forgive” uneven stitches and other processing flaws :).
It’s so nice to sew something new for your child with your own hands. For example, such a necessary thing after swimming as a robe with a hood.
Sewing such a robe for a boy yourself is not difficult. We'll tell you how to make a pattern that will help you make a cute piece for your baby's wardrobe.
First you need to remove everything necessary measures.
- Neck circumference (NC).
- Shoulder length (HL).
- Back length to waist (BW).
- Front length to waist (accident).
- Product back length (DI).
- Armhole depth (HD).
- Armhole width (W).
- Hip circumference (H).
- Sleeve length (SL).
- Circumference height of head.
The quality of your work and the convenience of new clothes for your child will depend on the accuracy of the data in the future.
How to make a pattern
Let's consider the stages of completing the drawing required for cutting a children's robe.
Base for back and shelf
Reference: The construction of the back and front is done in the same way at first, so you can draw the patterns for the front and back at once.

- On paper measure DI along the edge and put points A and B. You need to measure so that from the top edge of the paper to A there was at least 5-10 cm.
- Divide the OB measurement by 4, then to the result add 2 cm.
- The resulting number measure on paper from A and B perpendicular to the edge.
- We draw lines and put points B and D, respectively, the segments AB and BG will be obtained.
- We connect along the line B and D. It should be a rectangle.
- Add 0.5 cm to the DTS measurement and the resulting value put on segment AB from A. Here we put point T1.
- The GP measure, having previously added 2 cm to it, must also be measured on the segment AB from A. This will be G1.
- From G1 and T1 draw lines perpendicular to segment AB to the VG segment and, accordingly, set G2 and T2.
- Then take measurements We divide the ShP by 2 and postpone the resulting result from G2 to G1G2 and call point G3.
- Next from G3 draw a line parallel to segment A to AB B. We call the connection point the letter P.
- Divide the resulting segment G3P in half and place point P1.
- Connect P1 to G2 with a smooth concave line.
Building the back
- To build the back neck we need OSH measure. We divide this measurement by 6 and then add 1 to the resulting number.
Important! Remember the obtained value, it will be useful to us when constructing the front neckline.
- We put the resulting value from A to AB and call it Ш1.
- From Ш1 perpendicular to line AB we measure 1-2 cm and put point Ш2.
Important! The size of the perpendicular depends on the child for whom the robe is sewn. The smaller the boy, the shorter this line.
- Section Ш1Ш2 should not be inside the constructed rectangle ABCD, but from the outside.
- Using a smooth concave arc we connect Ш2 to A.
- From P on segment PG3 we measure 1.5 cm and put P2.
- From Ш2 we draw a straight line through P2.
- Then add 3 cm to the DP measurements and the resulting value measure on line Ш2П2, starting from Ш2.
- We call the resulting point P3. P3 should be located after P2. We connect P3 to P1 with a smooth concave arc.

Building a shelf
- From T1 to A we set aside the road accident measure, after adding 0.5 to it cm and call point Ш3.
- If you measured everything correctly, then Ш3 will be located above A outside the rectangle ABCD.
- Further from Ш3 we draw a parallel AB line.
- On this line we lay off the segment Ш3Ш4, equal to АШ1(back pattern).
- From Ш3 down past A we measure 6 cm and put point Ш5.
- We connect Ш5 with Ш4 with a smooth curved arc.
- We draw a line further towards Ш4 along the segment Ш3Ш4. We also draw a line upward along the segment G3P. Lines must cross. We call the intersection point P4.
- From P4 down P4G3 we set aside 3.5 cm - it turns out P5.
- We connect Sh4 and P5 along a ruler and continue further from P5.
- On this line from Ш4 we lay a segment equal to Ш2П2 (back pattern) and put point P6.
- We connect P1 and P6 with a smooth curved arc.
Construction of the sleeve 
- Add 3-4 cm to the OP measurement for a loose fit.
- Received value put it down on paper, calling the segment P1P2.
- From P1 and P2 draw parallel lines down, equal to the DR measure. Name the segments P1H1 and P2H2. The result will be a rectangle Р1Р2Н2Н1.
- Р1Р2 and Н1Н2 divide in half and connect the division points together, calling them O1 and O2. You should get a segment O1O2 parallel to P1H1 and P2H2.
- From O1 down to O2 measure the height of the sleeve cap - O3. We take this measurement from the back and front patterns. On the back, you need to measure the distance from P3 to the line G1G2, parallel to the segment PG3. And at the front, the distance P5 to the line G1G3, also parallel to the segment PG3.
- We add the resulting measurements together and then divide them in half.. The resulting value will be the height of the sleeve edge.
- From O3 we draw a line parallel to the segment P1P2 to the right and left until it intersects with P1H1 and P2H2 - O4O5.
- We connect O1 with O4 and O5. Divide O1O4 in half - O6.
- From O6 towards P1 we set aside 1 cm and through this point we draw a curved arc from O1 to O4.
- Divide O1O5 into 4 equal parts and set aside 1 cm up from the first division point and 0.5 cm down from the third division point.
- Connect O1 to O5 through these points with a smooth convex-concave arc, intersecting the straight line O1O5 through the second point.
Construction of the hood 
The hood pattern is based on head circumference + an increase of 4–8 cm and head height + an increase of 3–5 cm.
- Need to build a rectangle by these standards. In it, head circumference + increase will be horizontal lines, and head height + increase will be vertical lines.
- In the back right corner you need to put 2 cm down, in the bottom left corner up - 4 cm.
- Connect the resulting points together with a smooth curved arc, touching the top and left sides of the rectangle.
- Measure the length of the necks on the front and back patterns, fold them and add 1 cm.
- Place the resulting value from a point on the left side of the rectangle, raised by 4 cm, to the bottom line of the rectangle.
- Connect these dots together.
- Also connect the newly obtained intersection points on the bottom side with the right side.
The pattern is ready! Have fun sewing your boy's robe!
Everyone needs a robe with a hood! We suggest you sew a robe with a wide hood, a belt and a patch pocket. Our master class will tell you how to create a simple pattern and show you how to sew a robe with a hood with your own hands.
Robe with a hood: choosing fabric
How to sew a robe with a hood with your own hands? This robe fits freely on the figure, so its cutting and sewing does not require darts or raised seams.Pay special attention to the choice of fabric! A soft, warm fabric is best: cotton terry, flannel, cotton velvet, or cozy fleece. You can also use this pattern to sew a light summer robe from thin knitwear or silk. To accurately calculate the amount of fabric, construct all the pattern pieces and lay them out, taking into account allowances, on a flat surface. Measure the required size, taking into account the width of the fabric.
Depending on the type of fabric, select the method for processing seam allowances. The easiest way is to use an overlocker. Also, if the fabric is thin enough, you can finish the seam allowances with a double French seam, and if the fabric is too thick, use silky bias tape.
Our robe is tied with a belt, its length on average is equal to double the waist circumference plus 20-30 cm. We made one patch pocket on the robe, and you can add another one symmetrically or sew a robe without pockets.
So, let's sew a robe with a hood with your own hands!
Take the following measurements
- Robe length
- The length of the sleeve
- Hip girth
- Bust
- Waist circumference
Front and back
You'll need a T-shirt or other piece of clothing that fits loosely. Copy the neckline and armhole, as well as the shoulder line, onto a piece of paper, first for the back, then for the front.

Place the desired length of the robe down from the top of the shoulder. The width of the front and back under the lower point of the armhole should be 1-2 cm greater than 1/4 of the chest circumference. Compare the circumferences of the chest, waist and hips. If the waist and hip circumference is larger than the chest circumference, expand the width of the back and front by the required number of centimeters.

Add 7-10 cm in the center of the front and draw a new vertical line.
Sleeve
Measure the length of the armhole on the robe pattern. Calculate the height of the rim OO1 by dividing the length of the armhole by 3 and minus 5 cm, as well as the length of the auxiliary lines OP and OP1: half the length of the armhole according to the pattern.
From point O, set the height of the edge down and place point O1. Through O1 draw a horizontal line PP1.
From point O to the left and right, set aside the length of the auxiliary line of the sleeve edge OP and OP1. Divide the OP in half and set aside 1.5 cm from the division point upward. Divide OP1 into 3 equal parts and set it up from the first division point 1 cm down from the third division point - 0.5 cm. Draw a smooth line for the sleeve hem.
From point O, move the length of the sleeve down.
Hood
To create a hood pattern, take the following measurements:
- Head circumference
- Head height from shoulder to crown
Place point A in the lower left corner and draw a horizontal line to the right and a vertical line up from it.
Set aside 4 cm from point A and place point A1. To the right of A1, set aside 1 cm and place point A2.
Using the robe pattern, measure the length of the back and front neckline and add the resulting values.
From point A2, set aside the resulting amount + 3 cm in a straight line to a horizontal line from point A and place point C1.
From point A2, set aside the length of the back neck +1.5 cm and place point D. From it, set off the length of the dart at a right angle - 10 cm.
From point D on both sides, set aside 1.5 cm and connect these points with the height of the dart.
Smoothly bend section A2C1 upward.
From point A1, set the height of the head up according to the measurement + 3-5 cm (the more, the longer the edge of the hood will be) and place point B.
From point B, set aside 1/3 of the head circumference to the right according to the measurement + 4-9 cm (the more, the wider the hood will be).
From point C downwards, set aside 1-2 cm and through this point form the upper edge of the hood, as shown in the diagram.
Also connect this point to point C1 with a smooth concave line.
Uncover
The allowance for the bottom of the robe and sleeves is 3-4 cm, for the remaining seams - 1 cm.
- Front part - 2 pieces, mirrored
- Back part - 1 piece with a fold in the center or 2 mirrored
- Hood - 2 pieces, mirrored
- Belt - a strip 6 cm wide and the required length
- Free-form pocket with 3 cm top allowance
- The facing of the robe is 3 cm wide and a length equal to double the length of the front plus double the length of the hood plus 5 cm. If it is not possible to cut out a single facing, sew several strips into one.
- Two belt loops 4x6 cm
Progress
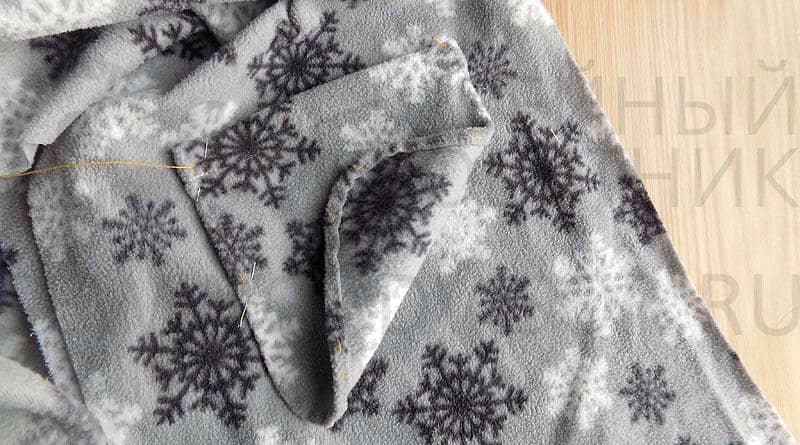
Fold the waistband piece in half lengthwise, right sides facing in. Sew along all sides, leaving an opening of about 5cm along the long side of the waistband. Turn the entire belt through the hole.


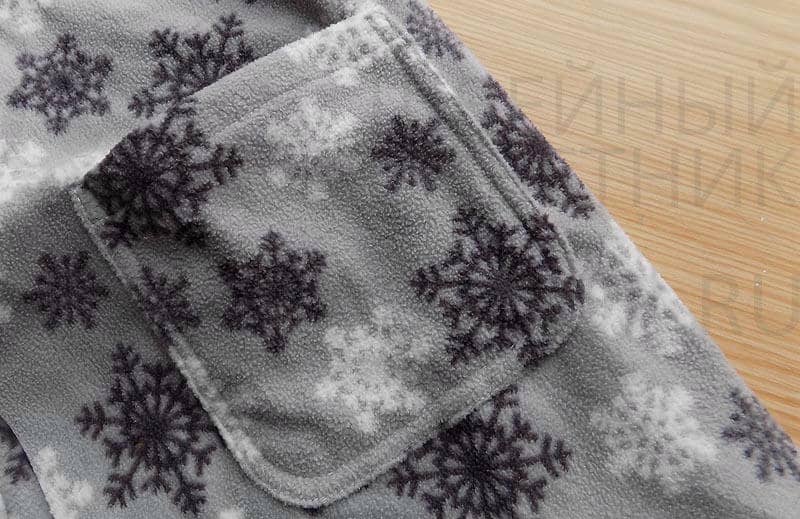
Fold the top edge of the pocket 5 mm, then 2 cm to the wrong side and baste. Stitch.

Fold the edges of the pocket 5 mm inward and baste. Baste onto the front half at the desired height.
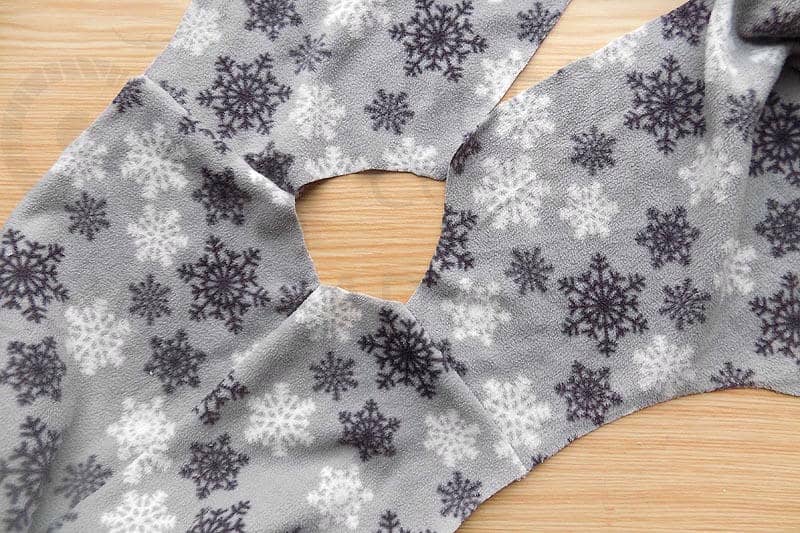
Sew the hood, placing the pieces right sides together. Process the allowances.

Sew the shoulder seams, placing the back and front pieces right sides together. Process the allowances.
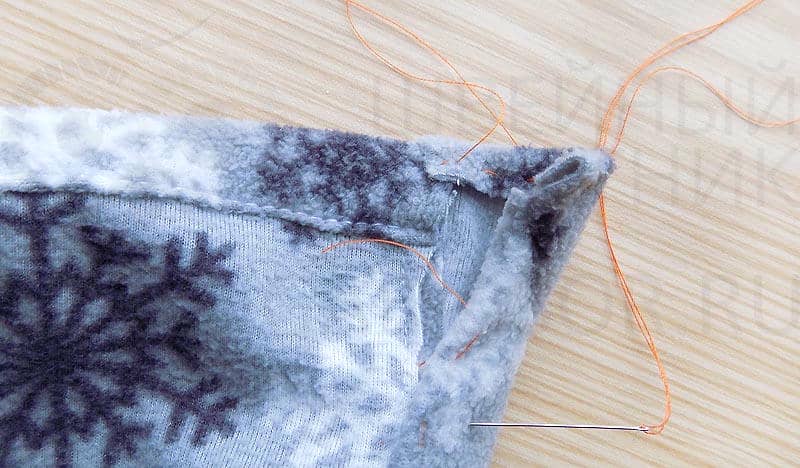
Sew the hood to the neck line. Wrap the seam allowance with bias tape from a matching fabric or scrap of the main fabric and baste. Stitch.

Sew the sleeves into the armholes, matching the top of the sleeve cap and the shoulder seam. Process the allowances

Sew the side seam of the robe and the side seam of the sleeve, aligning the armhole points. Process the allowances.

Fold the bottom of the robe twice and stitch. Sew the facing along the entire edge of the front halves of the robe and hood. Fold the edge of the facing, covering the folded bottom of the robe, and baste.
Fold the edge along the entire length of the facing, fold it in half and baste the seam allowances onto the edge.


Fold the belt loop pieces inward toward the middle and in half again. Sew the belt loops to the side seams at waist level, folding the edges at the top and bottom.


Every person loves to wrap themselves in warm and cozy things, be it pajamas or a robe. Coming out of the shower or coming from a cold street, you want to put on everything that is warm, soft and fluffy.
Children, just like adults, need warmth and comfort. For a little princess, a soft robe sewn with love by her mother’s hands will be a real happiness.
The advantage of sewing a children's terry robe with your own hands is that you decide for yourself how it will look, and the unusualness of the work is limited only by the imagination of the author.
 Let's look at several styles of dressing gowns for children: from the simplest, which can be sewn in just an hour, to complex ones. Everything will depend on your taste and the wishes of the child.
Fabrics can also be very different. Both terry, “frote” fabric, and ordinary terry towels are suitable. Some models will require a certain type of material.
How much terry do you need to buy? It depends on the size of the robe and measurements. It is best to first make a paper pattern and calculate the amount of material required based on the obtained dimensions. Let’s say the width of the fabric is 150 centimeters, you will need about 200 for the length of the robe and sleeves, about 15 should be left for hems, indentations and seams, and about 20-30 for the strap, if it is present.
Taking measurements from a girl 9-14 years old
- Bust circumference is measured horizontally. It passes through the line of the chest and shoulder blades.
- Hip circumference is measured horizontally through the line of the buttocks and hips. Important take into account the protrusion of the tummy.
- The length of the robe is measured vertically from the intersection of the neck and shoulders.
- The length of the sleeve is measured horizontally. This is the distance between the spread hands.
Construction of patterns (terry robe with hood, zipper, trapezoid, etc.)
We consider 3 types of robes, as promised earlier.
Important! When creating patterns, do not forget about indents.
The first is the simplest - from a whole towel
 A skilled seamstress can sew this model in half an hour. You don't even need a pattern for it.
Take a large terry towel, fold it in half, and make an oval cutout in the middle of the fold, the size of a child’s head. Then you just need to spend time connecting and opening the hood.
Its pattern can be seen in the image:
The second level is more difficult - a solid, straight silhouette

- To begin with, draw a triangle on paper with one of the sides equal to ½ of the distance equal to the span between the child’s hands. In the diagram this line is designated as B.
- Line D can be of any size. This is the width of the sleeve.
- Side A is the length of the robe itself. You can choose one that is comfortable specifically for your daughter.
- And finally, C is equal to the half-circumference of the chest + two centimeters.
- The arc should round the axillary part of the pattern.
- At the top left point you should make 2 roundings:
- The first is from 6 centimeters to the right from the corner to 3 centimeters down. (back of neck).
- The second is from 6 centimeters to the right from the corner and up to 7 centimeters down. (front of neck).
- Add front smell to the drawing. In the diagram, this line is indicated in red and can be of any size.
The third level is the most difficult - flared downwards
This option differs from the previous one in that a pattern is made for the entire robe at once. It is suitable only if the span between the baby’s hands fits into the width of the fabric. Otherwise, you will have to make a 3/4 sleeve or sew on additional pieces of fabric. The diagrams show the required patterns.
 The height of the pattern will be equal to twice the height of the product, the width will be the distance between the spread hands. Sleeve width is arbitrary.
Hood
 Separately, I would like to take out the hood pattern.
Distances are calculated according to the following scheme:
Head height (K8-K11) = Height - Height of the neck point.
Half of the length of the neckline (K-K13) = Length of the neckline on the back + Length of the front neckline.
Then arbitrary roundings are made, as shown in the figure.
Assembling finished parts of a dressing gown for a girl
For all products except the first, the sleeve facings are folded halfway and stitched along the bottom. When basting and stitching the seams of the sleeves and side parts, the stitching should not be interrupted.
First view
Necessarily you should pay attention to the edge of the hood - it must be processed. To do this, you can use bias tape or simply use a hem.
At the end, the hood is sewn with a bed seam to the neck of the main part of the robe.
Second type
The hood is sewn as described in the previous assembly. The sleeve, shoulder, back and side seams are sewn.
 It's important to leave a small area to turn the waistband inside out after it's sewn on.. Then you should iron the part and stitch along the contour. After this, you need to sew 2 belt loops and stitch them on the side seams near the waist.
Third type
This type of robe will not have shoulder seams.. It means that Only the sides and hood should be sewn(how to process it is written in the assembly of the first type). It is recommended to do this using a bed seam.
I would like to note that It is not necessary to carry out everything exactly according to plan. Fantasy should not be limited to a couple of patterns from the article.
You can come up with many interesting details, such as bows, ears, pockets, etc. Good luck with your creativity and have a nice day!
Many people prefer to sew their own clothes. In order for the product to be of high quality, the craftsman needs a pattern. A children's robe with a hood can be made in several different ways. This will be discussed in this article.
Cutting a robe from a terry towel
There is a model that can be made in literally half an hour. It doesn't even need a pattern. In this case, a children's robe with a hood is made very simply: a neck is cut out in the middle of the towel. The hood is stitched to the neckline. The difficulty in making this model may lie in its cutting.
If the master has imagination and time, you can not just use a towel with a ready-made pattern. Using the appliqué technique, it is easy to create an exclusive and creative outfit, which may become your child’s favorite attire.
To decorate an outfit, you need to take fabric of a different color and even a different texture, for example, satin or silk. Applique details are cut out of it - in this version it is the body of a dolphin and its light belly.
You can purchase a second towel in a light blue color and a smaller size. An animal figure and a hood are cut out of it.
Instructions for sewing a robe from a towel
- The main towel is folded in half crosswise.
- A neckline is cut out in the center.
- A hood and a dolphin figure are cut out of a smaller towel. The proposed pattern will help with this. A children's robe with a hood will turn out beautiful if the applique is not very thick.
- An overlay for the abdomen is cut out of a light, smooth, plain fabric.
- The figure of the dolphin itself is sewn onto the chest so that the hood seems to serve as a continuation - the head of the animal.
- Be sure to process the edge of the hood. It is recommended to do this either with a hem or use bias tape.
- The hood is then sewn to the neckline. A bed stitch should be used.
- The eyes and mouth of a dolphin are embroidered on the hood.
- The light belly is located in the third layer. It is sewn on top of an applique that imitates the body of a dolphin.
- The edge of the neckline without a hood at the front of the product is treated with bias tape.
- If desired, the master can make a belt for the robe. Or you can sew large buttons on the sides and sew loops.
One-piece robe, flared at the bottom
If the span of the baby’s arms between the hands is not so large and fits into the width of the fabric, the following pattern will help to make such a model. The children's robe with a hood has no shoulder seams. Only the sidewalls are subject to stitching.

The model with contrasting lapels and large patch pockets looks very nice. But you can also sew a plain children’s robe with a hood. The pattern offered here can be used to sew garments of different sizes. It is only important to take into account the length of the product, the semi-circumference of the chest and the length of the sleeve.
Creating a pattern for a one-piece robe with a straight silhouette
A cool outfit with ears on the hood will delight both the baby and his loved ones. It looks like a fancy dress, so it gives only positive emotions. And it’s so easy to sew this children’s robe with a hood yourself. The pattern for making this outfit is quite simple.

- You need to draw a rectangle with one side equal to half the length of the span between the hands (size B). The second side can be arbitrary - this is the width of the sleeve folded in half at the shoulder (size D). The rectangle is positioned so that the longer side is horizontal.
- The second rectangle is built perpendicular to the first, placing them one on top of the other with the letter “G”. One side of the figure is equal to the length of the robe (size A), the other is half the chest circumference plus 2 centimeters.
- Using an arc, the lateral axillary part is formed at the site of the internal right angle.
- From the top of the connection of two right angles of both rectangles (at the upper left point), 6 cm is laid to the right and 3 cm down. These marks are smoothly connected with an arc. This is the back neckline.
- From the same top, 7 cm is laid down and connected with an arc to the 6 cm point. This will be the front neckline. In the drawing this line is highlighted in red.
- A scent is formed at the front of any size. It is highlighted in the drawing with a red line.
Usually craftsmen make their own patterns for children's dressing gowns. The hood can be a rectangle folded across, stitched together with a “bag”. But you can use the patterns suggested here. Ears are used as decoration.
Robe with yoke and sewn-in sleeves
Older girls already want to emphasize their femininity. Therefore, a model with a yoke will suit them. The shelves are slightly seated during stitching, which creates the effect of some pomp in the chest area.

This model requires some skill. But with enough care and attention, you can get a very decent children's bathrobe with a hood. The back pattern is applied to the fold of the folded fabric.
The shelves are also cut out after the fabric is folded with the right side inward. But in this case you should get 2 parts. The same goes for cutting sleeves and yokes.