

My teaching activity makes me think, doubt and look for the best ways to explain: how to build this or that node. Not all techniques give equally good results for different types of shapes.
And at the same time, it makes no sense to look for the most accurate and successful statement of the question itself is amateurish. I try to explain and show with examples: all techniques are good when you understand the principle of design. And at the same time, none is ideal.
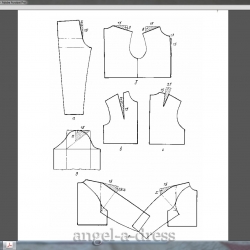
Let's look at the construction of the node “tuck solution on the convexity of the breast” in the female basic shoulder structures.
I recorded for you a short video tutorial with explanations and an “explanatory note” in the form of this article.
As in different design methods, a breast tuck solution is determined.
The complexity of this node is due to the fact that it is not possible to measure a physical indicator on the body in a direct way. Sometimes, in the author's methods, attempts are made to determine it indirectly, but it turns out only approximately and about. There are no reference points!
And I tell students that the pattern of the basic foundation is easy: "measured - drew." In fact. So it is in all methods, but taking into account the nuances.
If you learn not one or two design methods, but more, then you will be surprised how much they are similar to each other by the basic principles: building a drawing grid and restricting structural sections to verticals and horizontals.
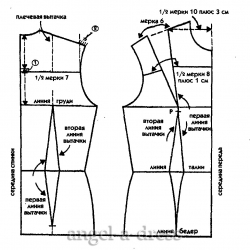
But it is surprising how the tuck on the bulge of the chest looks and calculates differently. It can be built from the line of the middle of the shelf (EMKO CMEA), from the armhole (Zlachevskaya G.M.), but the most common variant is the location of the tuck from the shoulder section. The tip of the tuck is always directed towards the center of the chest (CG, VG, VTG - different names for one point).
building the base framework for Zlachevskaya
 building a basic framework for EMCO CMEA
For example, in the technique of G.M. Zlachevsky uses two measurements of the width of the chest: 1) over the convex part of the chest and 2) over the chest. If you correctly measured the SH and SH control, then the pattern will be quite accurate.
In the method of “Muller and son” in the algorithm for constructing the chest tuck, a formula is used that takes into account the circumference of the chest, but does not take into account the fullness of the chest.
1/10 POG (half chest third). And often the solution is insufficient. Individual landing has to be adjusted: add 1-2 cm to the calculation formula.
A more complex path and more accurate construction are described in the EMCO TSOTSHL methodology. Two measurements of chest circumference are involved in the calculations: SG 1 and SG 2.
Tuck depth is determined by the formula
2 (SG2-SG1) + 2 cm
Yes. The EMCO TSOTSHL technique is more accurate, but it is also more complex. More complex measurements, more reservations, table increments and conditions when constructing nodes.
 tuck construction according to the TsOTSHL technique
 tuck construction according to the method of Muller and son
The technique of French designer Lin Jacques found fans because of the simplicity of explanation and construction. There are no complicated measurements and formulas. Take the tuck depth from the plate according to the exhaust gas measurement. Rather, determine approximately in the interval between the exhaust gas parameters of your size (here the "run" between the measurements is as much as 10 cm).
Literally in the book it is written like this: “The solution of the chest tuck cannot be determined by measurement on the figure or by simple proportional calculation based on k-l measurements. This value is taken based on the exhaust gas.
In addition, the depth of the tuck is adjusted depending on the posture.
If the shoulders are tilted back, and the chest protrudes forward, then the solution is increased by 1-2 cm
if the shoulders are tilted forward and the chest width is small, then the solution should be reduced by 1-2 cm ”
 breast tuck solution according to the method of Lin Jacques
 building a basic foundation by Lin Jacques
It is very similar that the English method of Winfred Aldrich solves the problem of finding the solution of the chest tuck. The chest tuck solution is determined in a tabular manner. The data in the table looks very believable for standard figures. In general, this is a very good, integral and uncomplicated technique for beginners. For figures with postural peculiarities, one should take not standard measurements, but real ones.
 building a basic framework for W. Aldrich
 breast tuck solution according to the English method
The whole diversity of the world of design I can not consider in a short article. It affected only the most popular methods in the former CIS, translated into Russian.
And for dessert - Chinese design techniques, completely unusual for us.
Practicing designers in China use a small number of dimensional features and design-proportional construction.
The constructions are simple. First, a foundation without tucks is built, and only then tucks are applied to the base base.
Many Chinese methods use the principle of a right-angled triangle, in which one of the legs is always equal to 15 cm, and the second leg is the floating value X. This value is determined by the calculation method depending on the construction site.
To determine the value of X when building the chest tuck:
(Exhaust gas 3 – Exhaust gas 5) / 2
Og 3 is the chest circumference of the convex points, is recorded in full size. Dimensional sign Og5 measured immediately after measurement Og3 , placing a centimeter tape on the back there, and lowering the front below, under the base of the mammary glands.
Given the relation ( 15: x ) , you can build a tuck in any area
shelves, sending it to the side, neck, armhole, shoulder, side or waist sections.
 building a basic foundation according to Chinese methods
 comparison of the depth of the tuck by different methods with the same physical indicators.
I hope that I was able to interest you in the material. Build it yourself! It is not as difficult as it seems at the beginning. But not easy!
If you are unable to master the design yourself on books or purchased disks, then come to me at.
I know the reason for your failures. I say this with complete confidence. There is only one condition in my courses: work! So, as I do, with enthusiasm and without laziness.
In this article I want to answer one more question, which is often asked by readers of the site. I recently received it from Tatyana in the following version:
“Why in different methods the solution of the chest tuck is calculated differently? In some - the calculations are carried out through the half-circumference of the chest, in others - through the width of the chest, and recently in the courses, I was puzzled by another method of calculation - using the size of the protrusion of the chest. Now I I’m completely confused. How to figure out which of the methods is more accurate and correct? Please write what you know about the third method for determining the breast tuck solution. "
I agree with the fact that there are several ways to calculate the magnitude of the solution breastplate tucks in the design of women's clothing. Each of the methods has its own author’s justification and is based on the author’s experience (a group of co-authors, a team ...) and the results of its repeated testing for designs developed on various figures. Therefore, the assessment of "right" or "wrong" in relation to any of the methods without analyzing the context in which it is applicable will not be entirely correct.
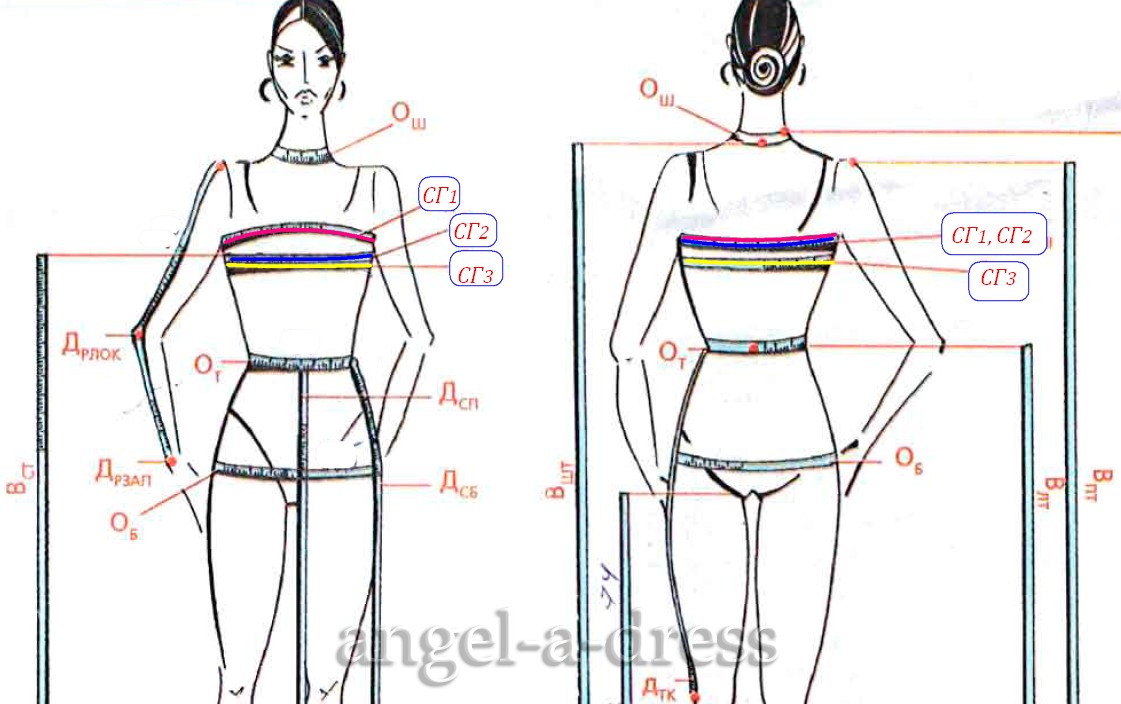
Basis the first method put the difference in dimensional signs chest second and first ( SG 2 - SG 1) The difference indicator reasonably determines the degree of protrusion of the mammary glands, taking into account the methodology for measuring these dimensional signs (RP). Let me remind you that for both RPs, a centimeter tape is superimposed on the protruding points of the shoulder blades, and in front the second girth of the chest passes through the nipple points (protruding points of the mammary glands), and the first girth of the chest above the base of the mammary glands (through the midsternal anthropometric point).
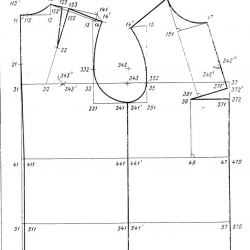
The specified method for calculating the chest tuck has found application in the methods of designing clothes of mass production - TSNIISHP (picture 1) , EMCO CMEA (Figure 2), (Figure 3), VDMTI , as it is based on the typical measurements presented in dimensional standards .
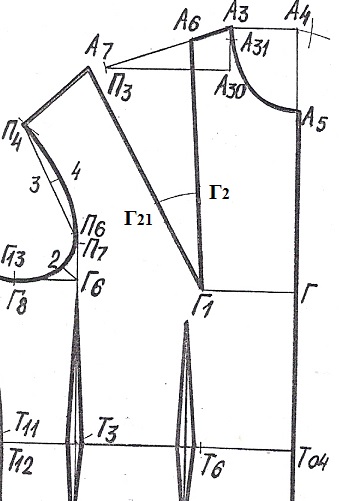
Figure 1 - Drawing scheme of the upper part of the front according to the TsNIISHP technique
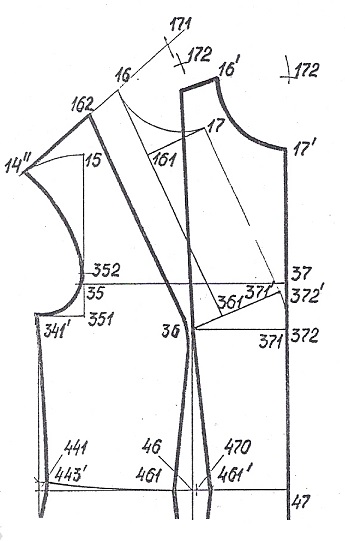
Figure 2 - Scheme of the drawing of the upper part of the front of the EMCO CMEA
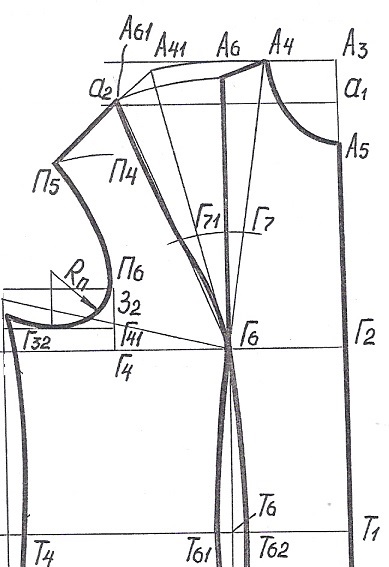
Figure 3 - Scheme of the drawing of the upper part of the front according to the method of MTILP
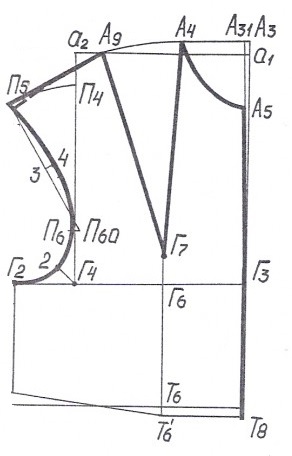
Figure 4 - Scheme of the drawing of the upper part of the front according to the TSOTSHL method
I recall that in the methodology TSNIISHP (Figure 1) the tuck solution is specified by a segment 2G 21 , which is delayed on the chord of an arc drawn from the center G 1.
2G 21 \u003d Cr 2 - Cr 1 -0.5
In the technique EMCO CMEA (Figure 2) the value of the solution is set by calculations
372-372 ′ \u003d 0.5 (T 15 - 1,2 -T 14),
where T 15 and T 14 - girths breasts second and first respectively
1.2 is a correction factor
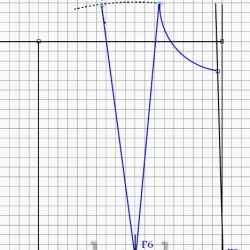
In the procedure (Figure 3), the tuck solution is specified by a segment D 7 D 71 on a chord of an arc, which is directed from the center at a point D 6.
D 7 D 71 = SG 2 - SG 1
A more detailed description of the principle of calculating and constructing chest darts in each of the above methods can be found on the website in the relevant articles on the characteristics of a particular design method.
The considered principle of calculating tucks is also used in the methodology (see Figure 4). However, given the fact that the tuck solution in this case is delayed along the chord of the arc drawn from the center G 7 through point A 4, coefficient appears in the calculation formula 2
A 4 A 9 \u003d 2 (C g2 - C g1) + (1.0 ÷ 2.0)
For figures with significant deviations in physique from typical (full, with a large or very small protrusion of the chest, with an deployed shoulder girdle) chest tuck solution is recommended to be specified using measurement "chest width second" (W r2). This dimensional characteristic belongs to the category of auxiliary and is measured only with individual tailoring. Let me remind you that Sg2 measured in the horizontal plane along the protruding points of the mammary glands to the verticals, mentally held down from the front corners of the axillary hollows. Record half the measurement value. In this case, the formula for calculating the size of the breast tuck solution takes the following form:
A 4 A 9 control \u003d 2 (W g2 - W g) + 2
In dimensional standards typical female figures measurement W g2 not provided! Thus, despite the rather high accuracy of calculations at second method determination of the breast tuck solution, it cannot be used to develop the design of mass production products. And vice versa, in design methods for individual tailoring, he found a fairly wide distribution. In this case, the accuracy of the calculations and the construction of the chest tuck will depend on the correctness of the measurements W g2 and W d
As for third method of calculating the breast tuck solution, then its characteristic is not entirely unambiguous, since I met different versions of this method in various author's methods (Bochkareva, LUBAX, Zlachevskaya, etc.) The most justified method for calculating and designing the bulge in the chest area is described in the works Svetlana Khovanchuk, who patented her own method of designing upper shoulder products in 1991. The principle underlying this method was once set forth in the Atelier magazine (No. 2/2002). The author claims that he arose not from scratch, but as a result of personal design experience, tested on more than 300 female figures of various body types.
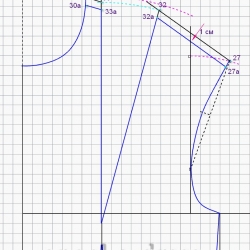
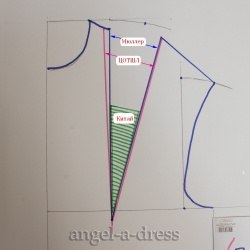
An analysis of the drawings (scans) of the product design carried out for the indicated number of figures allowed us to conclude that the size of the chest tuck solution is more dependent on the distance between two imaginary parallel planes, one of which passes through the base of the chest ( plane 1 in figure 5, a), and the second - through the protruding (nipple) points of the chest ( plane 2 in figure 5, a). Figure 5, b shows a method for prototyping the surface of a figure with tissue so that it would perform the function of plane 2. At the same time, the prototype fabric, bending around the surface, touches point A on the shoulder joint, which anatomically corresponds to the “large tubercle of the humerus”.
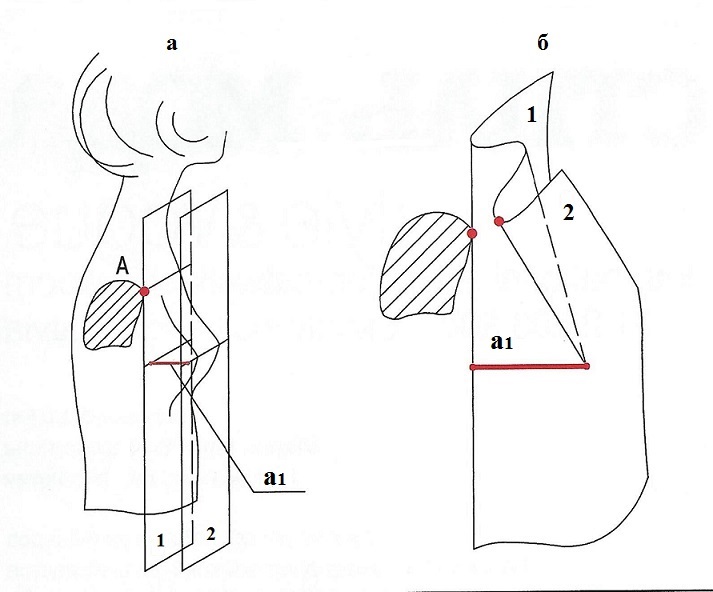
Figure 5 - The principle of formation of the chest tuck from the breadboard fabric
To determine the breast tuck solution in the considered way, an angular ruler is used, which allows, on the one hand, to fix the vertical from point A, and on the other, to measure the distance from this vertical to the plane 2 that corresponds to the distance a 1 in figure 5, b. The resulting value a 1 and there is a distance A 4 A 9 in the design drawing of the front (see Figure 6), that is, it is a solution of breast tuck.
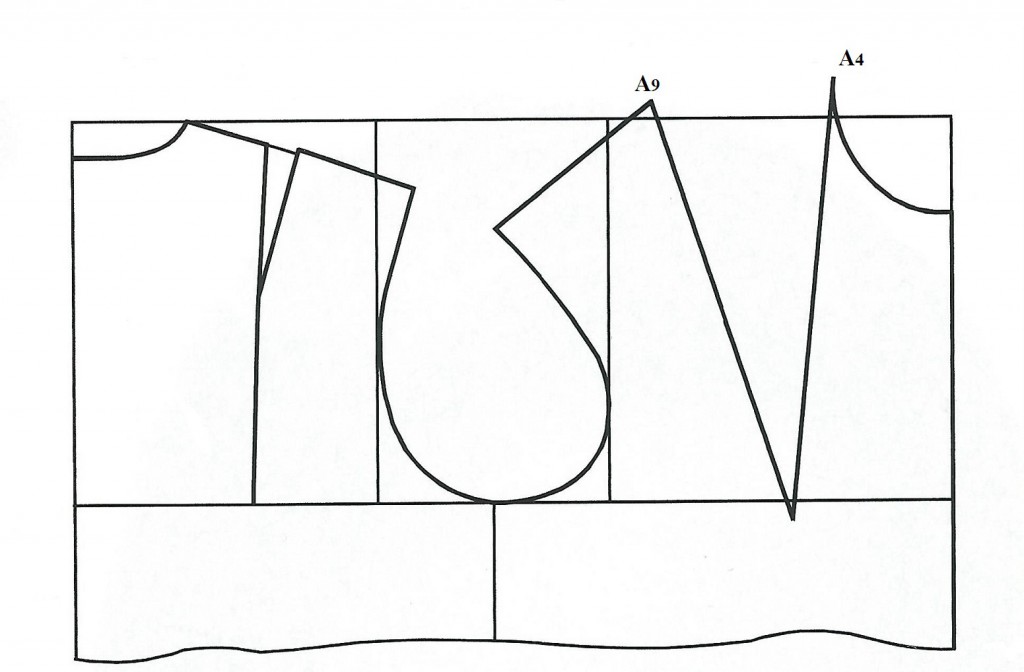
Figure 6
It should be noted that the plane 1 does not pass through the base chest cone glands, and across the point Alocated on the shoulder. From this we can conclude that this method creates the prerequisites for matching the size of the tuck solution with such indicators of body features as posture and a turn of the shoulders. In Fig. 7, one can trace the dependence of the size of the tuck solution on the posture of the figure with the same chest circumference. From which it follows that for figures with an inflexible figure, the solution of the chest tuck in the drawing will be larger than for the stooped figure.
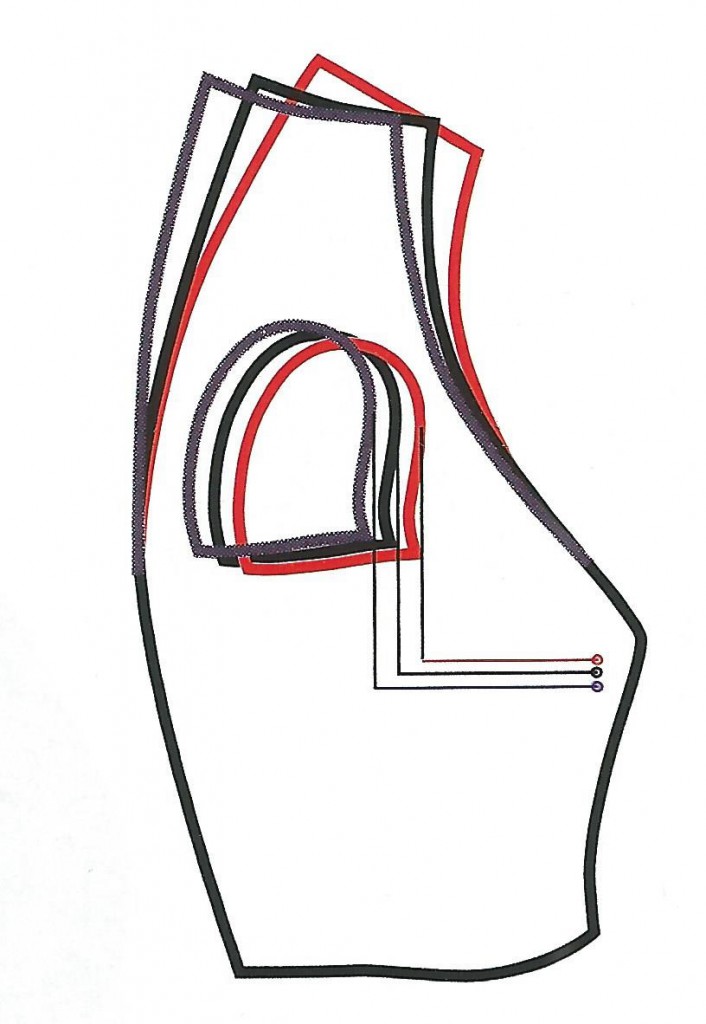
Figure 7 - Dependence of the size of the chest tuck solution on posture and turn of the shoulder of the figure
Immediately, I note that this method of calculation is applicable only for individual sewing due to the fact that it requires analysis of the constitutional structure of the upper part of the figure, as well as measuring indicators not provided for in dimensional standards .
I hope that Tatyana’s question related to this particular method. If not, please comment on my answer under the article. It is possible that you studied in courses according to the Lyubaks or Zlachevskaya method. In this case, you should ask a question on the forums of sites of these authors to get a first-hand answer.
If the article aroused your interest, do a good deed - share this information on social networks. It is possible that it will benefit other readers as well.
Horizontal chest tuck
Horizontal tucking can be done on almost any canvas, because it is carried out by partial knitting.
Tuck parameters (length and depth) we take from the pattern or we can calculate for ourselves.
The length of the horizontal chest tuck is equal to the half-girth of the chest minus the distance between the most protruding points of the chest plus 4-5 cm.
For instance:
Cg. - 48 cm. Tsgr. - 20 cm. |
: 2= 12 |
Tuck Length - 12 cm.
Tuck depth (solution) - the difference between the length of the front and the length of the back from a high point on the shoulder.
The location of the tuck is determined by the pattern, using a measure - the height of the chest.
If the product has an integrally knitted front part, then the chest tucks are performed simultaneously in two places, alternately pushing the needles forward first on the left side, then on the right. Thus, the central part of the part will be extended, forming the necessary size of the strand.
When we knit the shelves of the front separately, we make the tuck on one side of the fabric (side), while the shelves are knit mirror-to-mirror to each other.
There are several ways to make horizontal tucks. For example, take the density of the canvas - 3 p. X 4 p. in 1 cm .
Method 1
Example:
According to the calculation, it is necessary to perform a tuck by 30 p. And a height of 16 p. It turns out that you need to put forward in the PNP 6 times 4 needles and 2 times 3 needles.
Having knitted the fabric to the intended row, we adjust the carriage for partial knitting and begin to extend the needles according to the calculation on the opposite side of the carriage (on the c / knitted part alternately on both sides). Having extended 30 needles in the PNP from the edge of the canvas, in the next row we will knit them all at once and knit further exactly (approx. 3 cm) to the armhole.
Method 2
Method 3
Method 4
This tuck can be used when the usual horizontal tuck can distort the main pattern (press, openwork weaving, etc.). In those cases when you need to perform a tuck with a depth of more than 8 cm; we knit on a figure with a protruding belly or convex shoulder blades, etc. Example: Tuck 36 p. And a height of 18 p. Divide the height of the tuck into stages of 2 rows - we get 9 stages. Now we divide the length of the tuck into the number of stages - 36: 9 \u003d 4 p. And divide the height of the side cut into even sections - 10x8 p. We knit the first section - 8 p. and put forward 4 needles in the PNP, perform a backswing, knit 2 rows and return these needles to work again. We knit the next section - 8 p. and again put forward the needles in the PNP, but already 4 needles more - 8 needles. We perform 2 rows of CV and again return these needles to the RP. Thus, we knit further, through 8 rows we put forward 4 more needles each time in the PNP than the previous time, while we sew only 2 rows of stitches, and then we return the needles to the RP. In each case, the calculation will be different. |
Webbing
If the chest height is small and the canvas pattern is complex, then the horizontal breast tuck can be replaced by simply lengthening the entire front canvas (up to 2-3 cm). In the assembly process, the front part is lightly attached at chest level.
Sophisticated Tuck
After the needles are removed in the PNP, we knit them all and again put forward the same needles. Now we work from the side cut, introducing the needles into the RP according to the calculation of the slope (+ 5x6), until all the needles return to the RP.
If we knit two tucks on an integrally knitted front part, then first we put the needles into operation from the side of the left edge of the fabric, and then we knit the carriage from left to right, returning the needles to the right side. We put forward these needles again in the PNP and enter according to the calculation from the right edge of the canvas.
Most often, such tucks are performed with single-loop knitting, but all of these methods can be applied with double-loop knitting, if necessary.
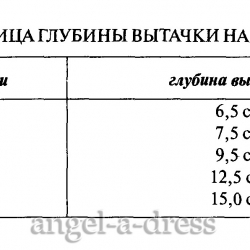
TABLE OF TURNING SOLUTIONS
Tuck cannot be done according to calculations. The table is approximate. Over time, you yourself will be able to determine the exact solution. This is achieved only by practice. And so on the fitting you can always increase or decrease it. If the figure is stooped, the chest is as if pressed, then the solution should be reduced by 1-2 cm than in the table.And if it is kinky, then the chest bulges forward, you need to increase the solution by 1-2 cm.Naturally, if a female girl has nothing in front, i.e. flat,you can guess that such a tuck shape is either not needed at all, or with a very small solution.Well, if the chest comes forward, regardless of posture, then accordingly they need to do more than in the table,regardless of chest circumference.I want you not to cut according to some patterns, but to learn to think creatively in the profession of tailor.
Freedom for fit
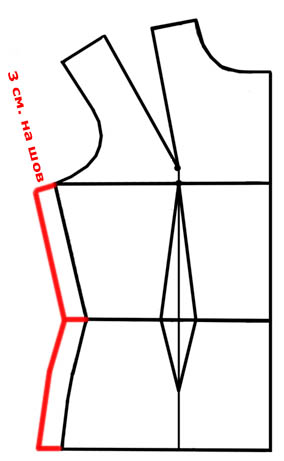
The cut system we are studying means that I never add extra centimeters to the girths beforehand.chest, waist or hips to the so-called freedom of fit.First, I cut the exact pattern by anatomical standards, and then add on the side seams
THERE IS SO FITTED ITEM:
First, we set aside exact measurements on the fabric according to the calculations, and then add 3 cm along the side seam line on the seam.When we are hinting at fitting, we are swept away by stepping back 3 cm from the cut of the material. After fitting, if adjustment is not required along the side seam line, we leave a seam allowance of 1.5 cm, and cut off the remaining 1.5 cm.
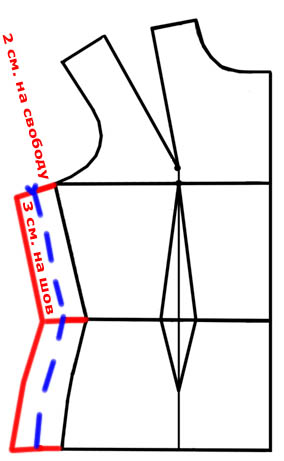
THIS IS THE SEMI-PREFERRED PRODUCT LIKE THIS:
First, we lay down the exact measurements according to the calculations on the fabric, and then add 5 cm along the side seam line. Of these, 2 cm are for freedom of fitting and 3 cm for the seam.When we hint at fitting, we wipe backing 3 cm from the cut of the material. After fitting, if adjustment is not required along the side seam line, we leave a seam allowance of 1.5 cm, and cut off the remaining 1.5 cm.
THERE ARE LIKE A FREE PRODUCT, Robe, etc.
First, we set aside exact measurements on the fabric according to the calculations, and then add 7 cm along the side seam line.Of these, 4 cm. On the freedom of fitting and 3 cm. On the seam.When we hint at fitting, we wipe backing 3 cm from the cut of the material.After fitting, if adjustment is not required along the side seam line, we leave a seam allowance of 1.5 cm.,
and cut off the rest.
 The same amount is added to the width of the sleeve, parallel to the lower sections, if it is a single-seam sleeve. If it is two-soul, then they are added only by sections of the lower part of the sleeve, the upper one does not change. And yet - in this situation, the armhole lowers in the armpits.
Semi-prime by 1 cm.
Coats and bathrobes - 2 cm.
And accordingly, the sleeves on the lower part of the sleeve also drop by the same amount.
You correctly measure the measurements of Cr1 and Cr2 one by one, but in addition to these two measures, there are also measurements of Cr3 and Cr4, which are used to build the base of the shoulder products according to the TsOTSHL method (Central Experimental Technical Sewing Laboratory). It is on this basis that we are here building our design for shoulder products and a set-in sleeve using individual measurements.
Mercury Cg3 is removed as described above by AlexandrijA. This measure according to OST -17 326 is a measure that determines the size of the figure and, precisely, it is used in the calculations to construct the design of the shoulder products according to the TSOTSHL technique.
Measure Cr4 is removed so that the centimeter tape passes around the body under the base of the mammary glands and closes on the right side of the figure. This measurement is used in the design of linen and models with a cutting waist under the chest.
I already wrote above that in many editions on construction, for some reason instead of the measure Cr3 they write the measure Cr2, taking it for the measurement that determines the size of the figure. Although, according to the OST, these measurements differ in size from each other. Because of this, confusion occurs, but this is not scary, because in both cases we use the same measurement, but we call it differently.