

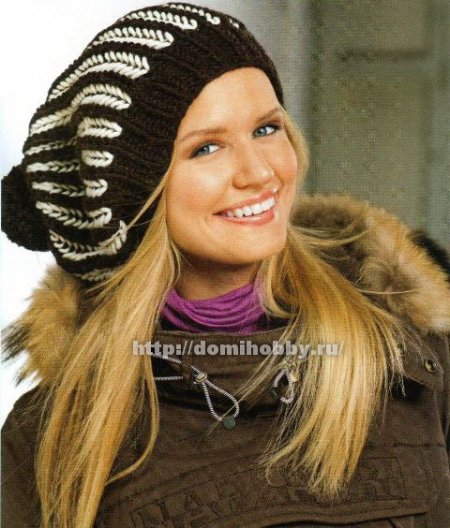
Feminine and elegant hat with a braid pattern I liked many fashionistas. Many needlewomen have already knitted this popular model of hats, and for those who have not had time or are just starting to learn how to knit, I suggest studying cap knitting workshop with a cross braid.
To knit a hat, 100 grams of YarnArt Shetland Chunky yarn (50% wool, 50% acrylic, 100 g / 150m), knitting needles No. 4, 1 additional knitting needle, and a needle for stitching a hat were required.

Description of knitting caps:
First, the main part of the cap is knitted - tulle, in the transverse direction. Then, along the long side of the main part, it is necessary to dial loops and tie the bottom, making reductions to the crown of the cap. At the last stage, the remaining loops on the crown tighten and stitch the cap along the occipital part.
A set of loops. In order for the seam behind the cap to be invisible, it is better to sew open loops of the main part with a “knitted” seam, combining the loose starting row and the non-closed loops of the last row. It is easy to loosen the loops of the initial rad, if at the beginning, make a set with a hook that can be quickly loosened.
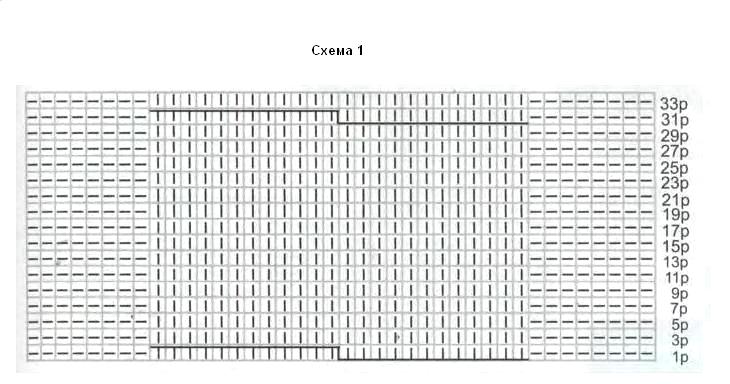
Dial 40 loops and knit the main part of the cap in the form of a long strip with a “braid” pattern in the center. The first and last loops are edge, form them in a “chain” along.
Knitting the main part. From the hem, first and last 7 loops, knit with a garter stitch, i.e. and in the front and back rows, knit these loops face.

Knit the central 24 loops with the front stitch, through 12 rows in the 13th front row in the central part, cross the first 16 loops. To do this, rehook the first 8 loops to an additional knitting needle and leave them at work, first knit the next 8 loops, then 8 loops from the additional knitting needle.


Knit the next 11 rows with the front stitch and in the 25th front row cross 16 stitches from the second half of the central part. To do this, knit the first 8 loops face, remove the next 8 loops on an additional knitting needle and place them before work, knit the last 8 loops face, then the loops from the additional knitting needle.


Repeat the weave pattern from the 2nd to the 25th row 5 times, then knit 12 rows of face stitch. The connected main part of the cap with the “braid” pattern in length should be equal to the girth of the head. At the end of the loop do not close, re-pin them to an extra spoke.
Knitting the bottom of the cap.On the top of the connected part, dial the loops, pulling them from the edge of the loop to the working needle. Loops on the front side, so that a number of edge loops remain on the inside.
Knit the gathered loops with an elastic band 1x1 (1 front, 1 wrong) 11 rows. In row 12, knit all the loops 2 together, making 2 together the front and 2 together the wrong. Next, tie another 4 rows with an elastic band 1x1, again reduce all the loops by half. Having knitted two more rows, cut the working thread, leaving a long segment. Pass the thread into the wide-eye needle, pull the tip of the thread through the remaining loops and pull them together.

Stitching caps. In conclusion, it remains to sew the bottom and the main part of the cap. Sew the bottom by inserting the needle by the edge loops on the wrong side, and sew the main part by loosening the stitches of the initial row and the closed loops of the last row on the front side using the “knit stitch” technique.


Secrets and techniques of performing a garter pattern. Knitted models of women's hats.
We need hats for warmth, beauty, style, not only in the cold season. Although the beauty and sales industry offers their finished models, you can also repeat them or create original caps with your own hands. For beginners in needlework, simple patterns and tips of experienced craftswomen are provided. The main thing is to find information and realize your idea. Continuing the topic of knitting with women’s hats, let us dwell in more detail on models made with garter stitch.
How to knit a simple and double knitting with a circular and two knitting needles for beginners: a scheme with a description
part of the fabric on the knitting needlework knitting needleShawl knitting is most understandable for beginner needlewomen from the point of view of execution technique.
If you plan to knit on 2 knitting needles:
- 1 row - remove the first loop, then all the loops are facial, and the last is the wrong one,
- 2 row - remove the first, again all the front ones, and the last - the wrong one,
- 3rd and all odd rows - like 1st
- 4th and all black rows - like 2nd
Or instead of the front, knit the fabric purl on both sides.
Below is a pattern diagram:
 2-knit scarf pattern
 To make a garter stitch in a circle, remember that the wrong side of the product is not available to you. You work only with its front part.
Therefore, alternating rows do this:
- without edge and last, which on two knitting needles fit differently from the main fabric,
- all the loops of the row are first facial, and then in the next passage and wrong. Or vice versa - first seamy, then facial.
The pattern is as follows:
 the appearance and pattern of the scarf pattern when knitting in a circle
 The secrets of shawl knitting
 in the girl’s hands is a fragment of the canvas. knitted shawl
 Your product or its element will look more magnificent if you carry out garter stitch on it / them with purl loops. The ideal solution for this method is to work on lapels, the edges of pockets, fields on sweaters.
To make the product look neater, use the reverse set of loops, that is, as if from the inside. And by the same principle, close them in the last row.
Below is a photo instruction:
 a step-by-step way of looping for a beautiful edge, the first 4 steps
 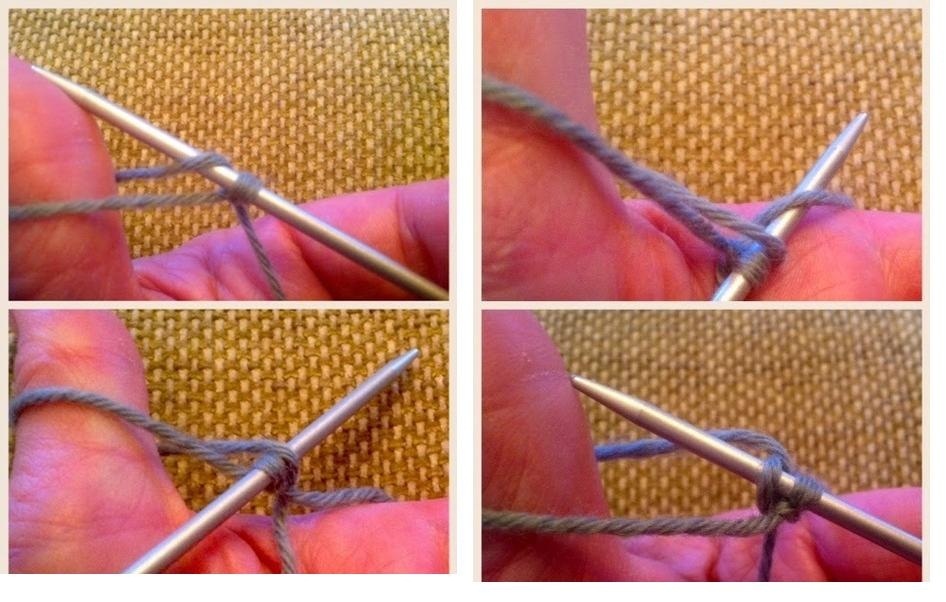 a step-by-step way of looping for a beautiful edge, the next 4 steps
 - Another nice feature of the garter pattern is the absence of the need to knit elastic at the beginning of the product, and before closing the loops.
The edges of the bound thing keep their size, do not stretch and do not "go".
- Add a highlight to the garter pattern by knitting one row on the knitting needles of a larger diameter than the main ones. Alternate this technique at your discretion when working on the product.
How to reduce loops and finish the cap with a garter stitch?
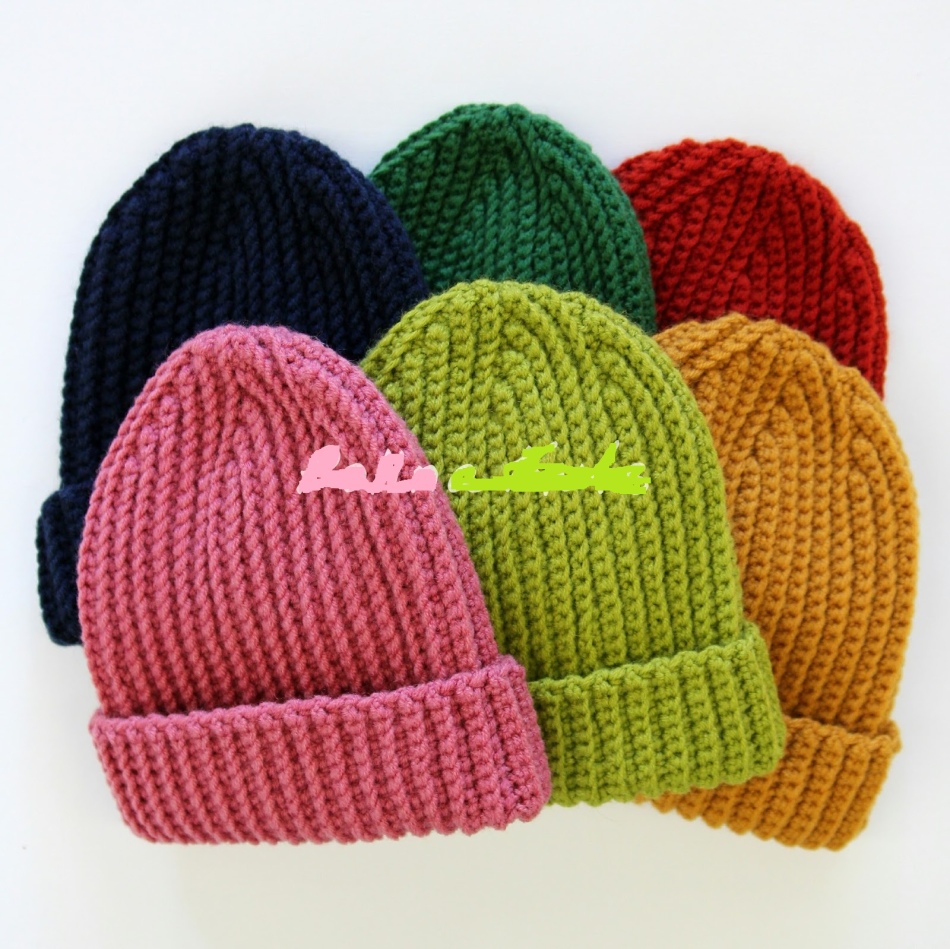 multicolored knitting hats with a handkerchief pattern
 Depending on the number of knitting needles involved in the work and knitting technique of the scarf pattern, the answer will be different.
If you knit a hat in a circle without a seam, then reduce the loops:
- only in the front rows
- knit them two together
- alternate 1 front, 2 together front to the end of the row
- pull the final 8-10 stitches with a thread and secure it from the wrong side
To work on 2 needles, only with the back loops, reduce them like this:
- go to facial
- repeat all the steps above
How does the bottom for a hat fit with knitting needles?
 the bottom of a woman’s hat made with a shawl pattern
 Depending on your preferences and knitting skills, the bottom for the cap is performed in a number of ways:
- with decreases in 1 or several rows
- wedge formation
For the first option, a few tips:
- so that the cap sheet is rounded softly, calculate the number of rows for reduction, loops on a sheet of paper and determine the pattern. For example, 6 times 5 loops, 3 times 7, 2 times 11 each. Pull the remaining ones with a thread, stretching it twice,
- perform reductions through a specific number of rows, for example, 2 or 4,
- if there is a pattern, consider its rapport. Consider the reduction so that it is preserved as much as possible.
In the second option:
- define the number of wedges. Often needlewomen use a 6 or 8 wedge reduction. Although there are 10 wedge caps,
- close the loops either at the beginning or at the end of the wedge,
- for a softer rounding of the cap, knit 2 loops together through a row.
A simple women's hat with knitting needles of a vertical garter stitch for beginners: a scheme with a description, photo
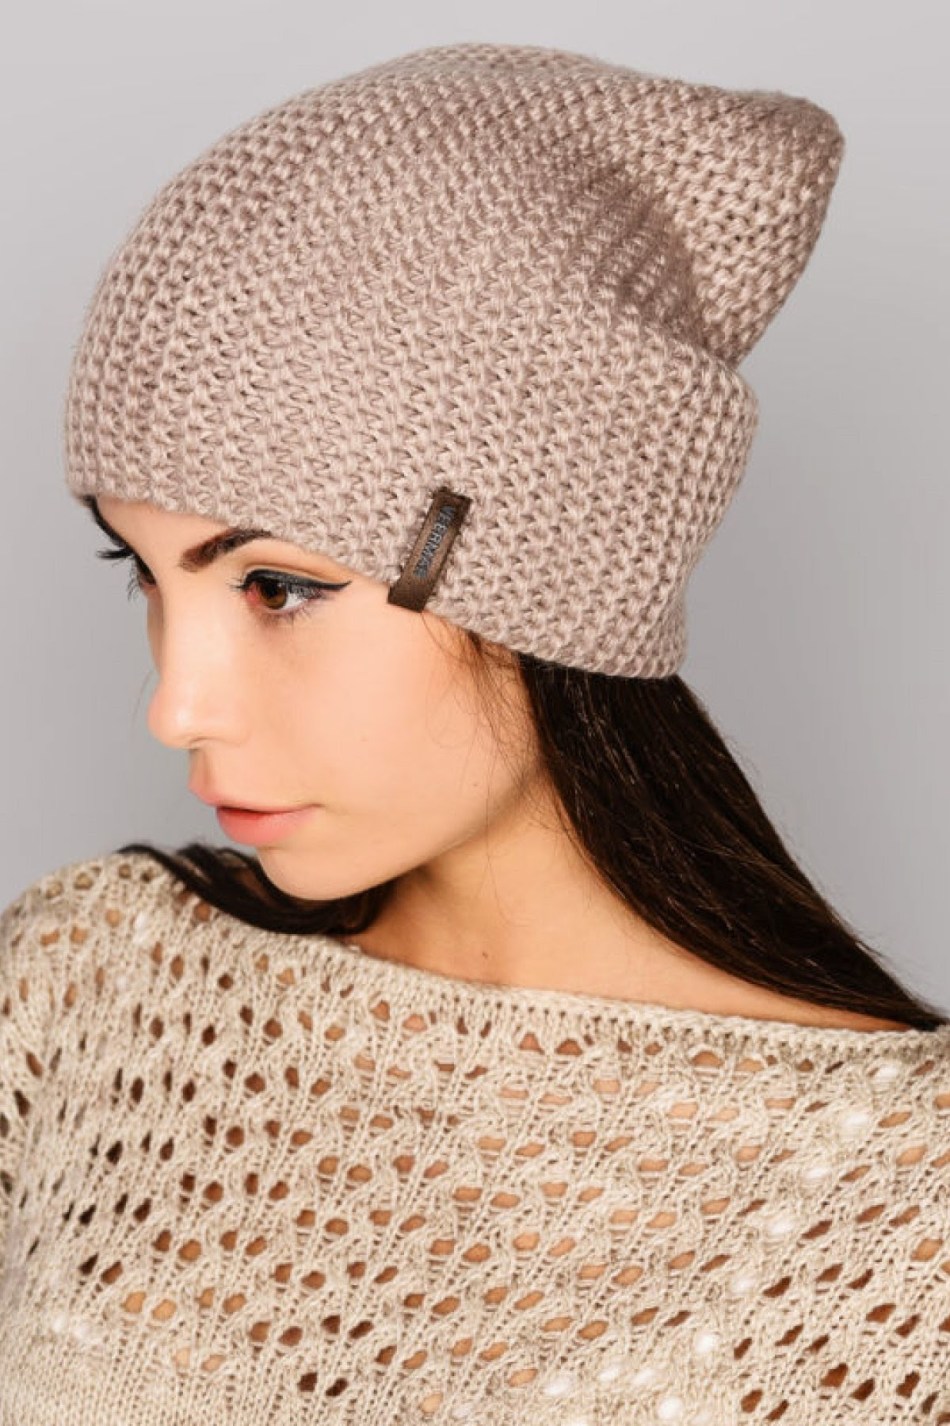 simple model of female knitting with a scarf pattern hats on a girl
 Vertical garter stitching means that you should work not from bottom to top, but from left to right.
In other words, use the shortened row technique.
Prepare:
- pick up yarn and knitting needles of equal diameter
- take measurements of the head and determine the depth / height of the cap
- draw a diagram, perform a control sample with a handkerchief viscous, measure the density of work
- convert centimeters to loops
Operating procedure:
- dial the number of loops equal to the height of the cap, for example, 56 yarns of medium thickness or in 2 additions. You’ll have such a hat with a drooping crown
- to stitch it more conveniently, set with a contrasting thread,
- knit a scarf pattern in any way convenient for you - either front or back,
- perform work on the wedge, which is repeated from 6 to 12 times depending on the circumference of the head,
- try on the semi-finished product while knitting.
The repeating wedge consists of unbound rows:
- 1 row - at the end of the row, leave 12 loops. Wrap the working thread around the first loop that remains on the left knitting needle,
- 3 row - leave 11 loops,
- 5 row - 10, and so on, until one remains. Do not knit it, but keep it until the end of work on the hat.
Having reached the desired size, all the loops located on the left needle, pull the thread and fasten its tail from the inside.
- Do not cover the last row of fabric, but sew with the first. Pre-loosen the bobbin thread.
- Sew together the buttonhole method without using a thread.
Below is a detailed diagram and description of a specific model of a women's hat made with a vertical garter stitch.
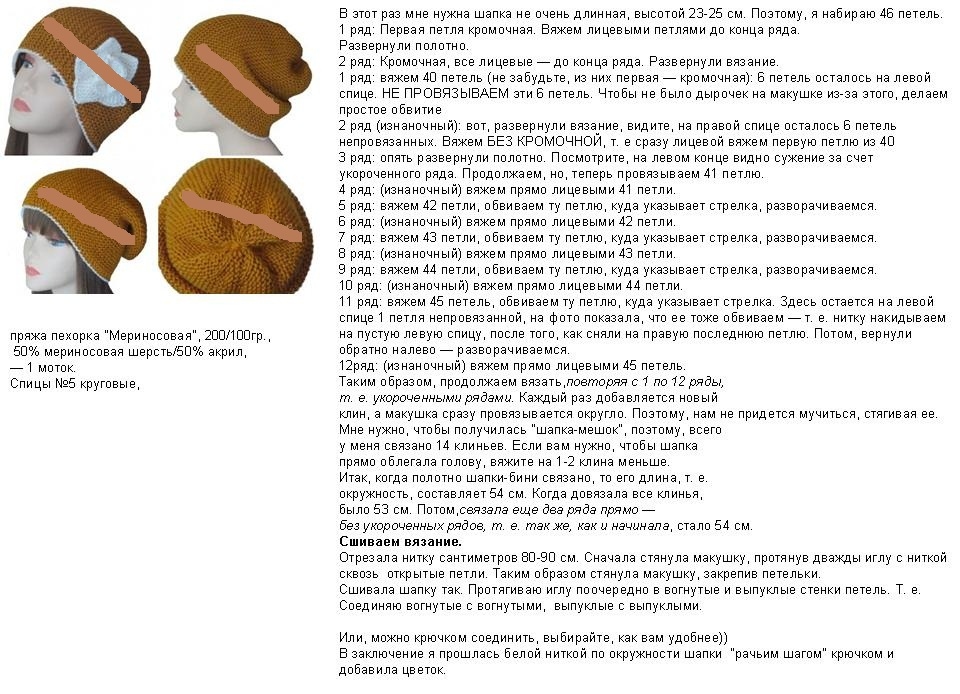 photo and detailed description of knitting a female hat with a handkerchief pattern vertically
 As well as several photos of finished models of caps.
 simple women’s hat mats connected vertically with a gingham pattern, example 1
 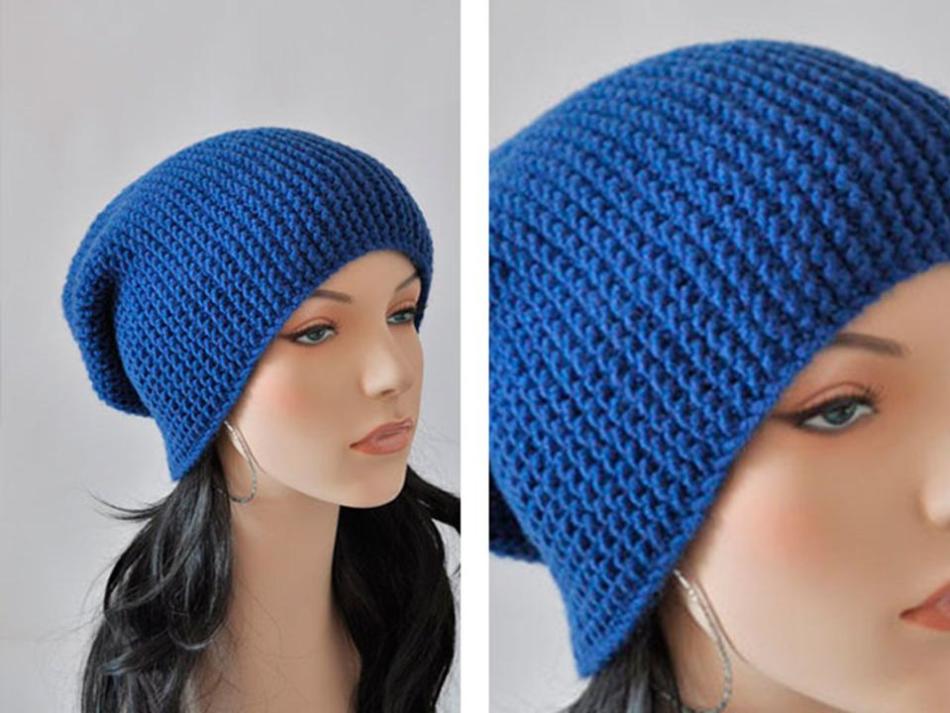 simple women's hat mats connected vertically with a gingham pattern, example 2
 Women's hat with knitting needles knitted across: a diagram with a description, photo
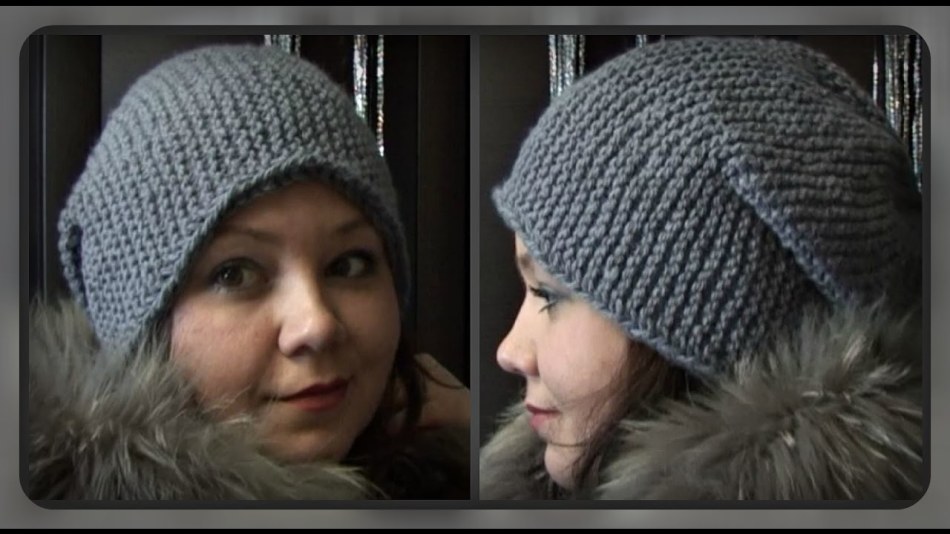
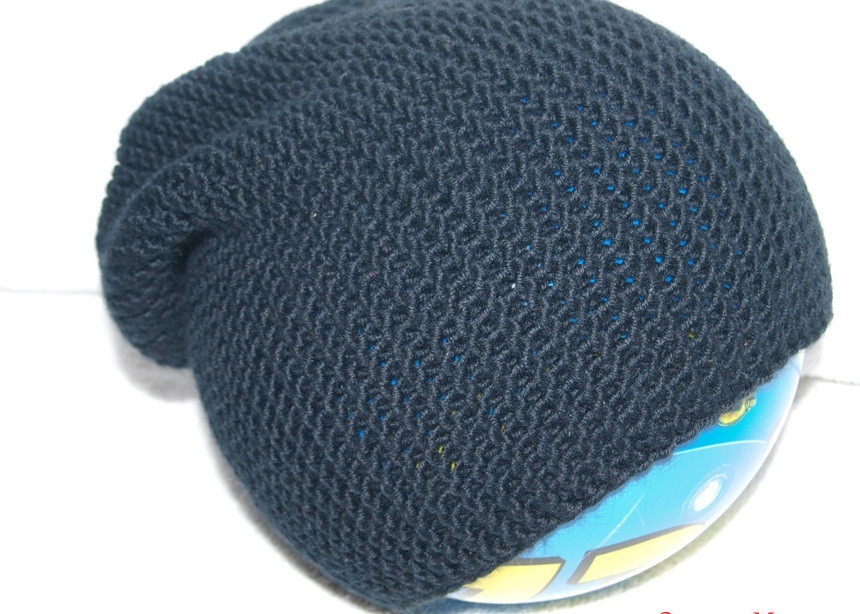 dark gray hat knitted with a scarf
 The transverse way of knitting hats is not work in the usual vertical way, but horizontal. That is, you gain the height / depth loops of the product and knit its width, taking into account the difference on the top of the head and around the forehead-ears-neck at the same time.
In other words, bring to life a beanie hat on your knitting needles.
One of the examples of working on the female model of the cap with a garter pattern was considered in the section above.
Add a series of descriptions and diagrams in the pictures.
 a description of the work on the cap with a scarf pattern across, example 1
  a description of the work on the cap with a scarf pattern across, example 2
 And more photos of finished products.
 ready-made women's hats
 How to knit a women's hat with knitting needles diagonally?
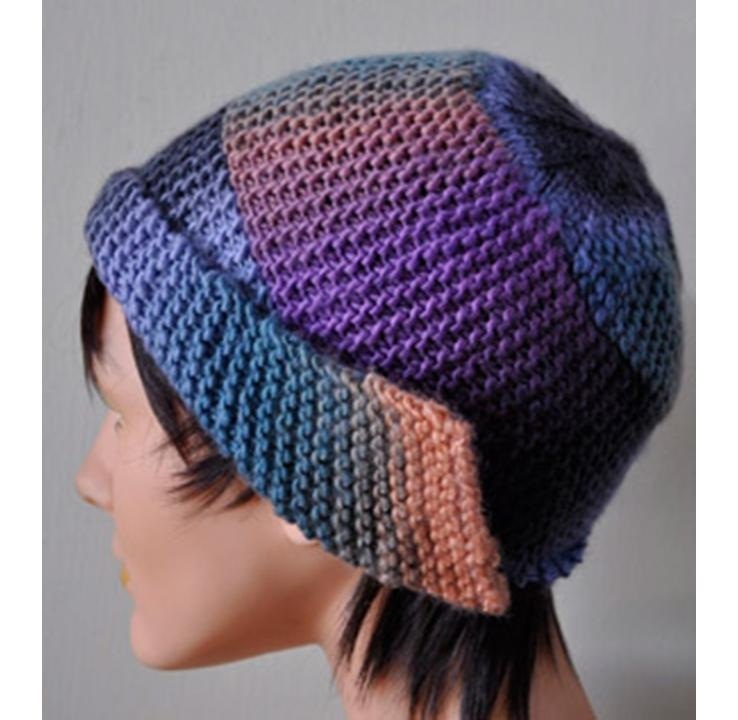
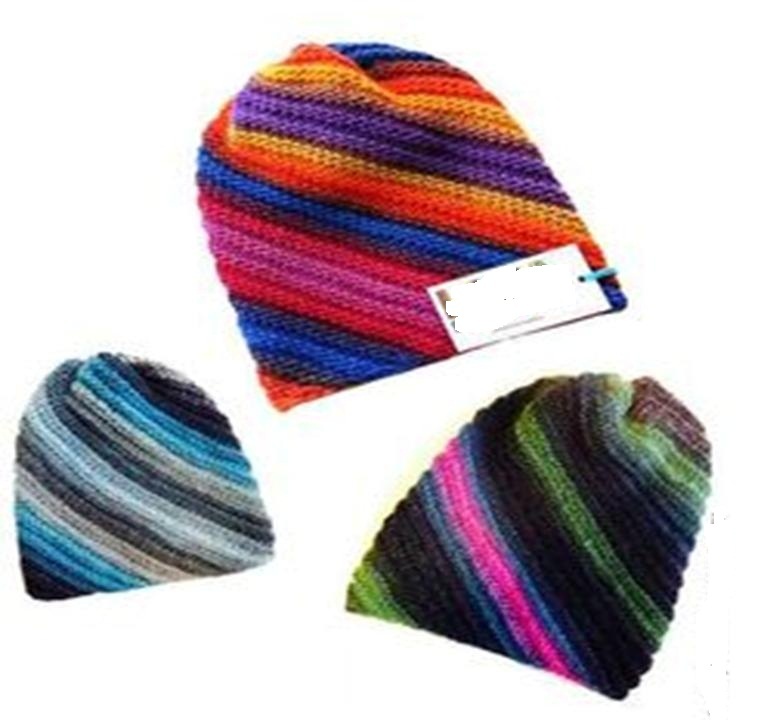 three bright caps knitted diagonal knitting needles
 The diagonal or spiral knitting of the caps is interesting by the unusual arrangement of the pattern on the product.
Since the garter stitch stretches well and at the same time retains the shape of the cap, select it to create the product using the diagonal method.
Pay attention to a number of points:
- draw a diagram of the future heading in the unfolded form. It will be a rectangle. So visually it’s easier for you to navigate while knitting,
- take measurements of the head, translate them into loops and rows, designate accordingly in the diagram,
- decide the moment with the lapel - either knit it right away, or raise the loops along the edge of the finished hat and add it.
In the first version, add the number of loops for the lapel, equal to its height, and knit vertically with alternating loops for the picture. For example, if this is a 2x2 elastic band, then perform 2 rows of facial and the same number of purl. Landmark - the front part of the cap, adjusted for alternating rows on the working spokes.
Highlights in working on such a hat:
- start knitting with a small number of loops, for example, 4,
- increase their number by adding in each odd or even row,
- apply work to the head to see the moment when you need to reduce the loop on one side. It will come after you reach the depth / width of the future cap,
- continue to work with building loops on the right and shortening on the left,
- when you reach your head circumference, perform cuts on both sides of the canvas,
- sew the finished product in a spiral also.
How to knit a women's hat with knitting needles in crocheted shortened rows: a scheme with a description
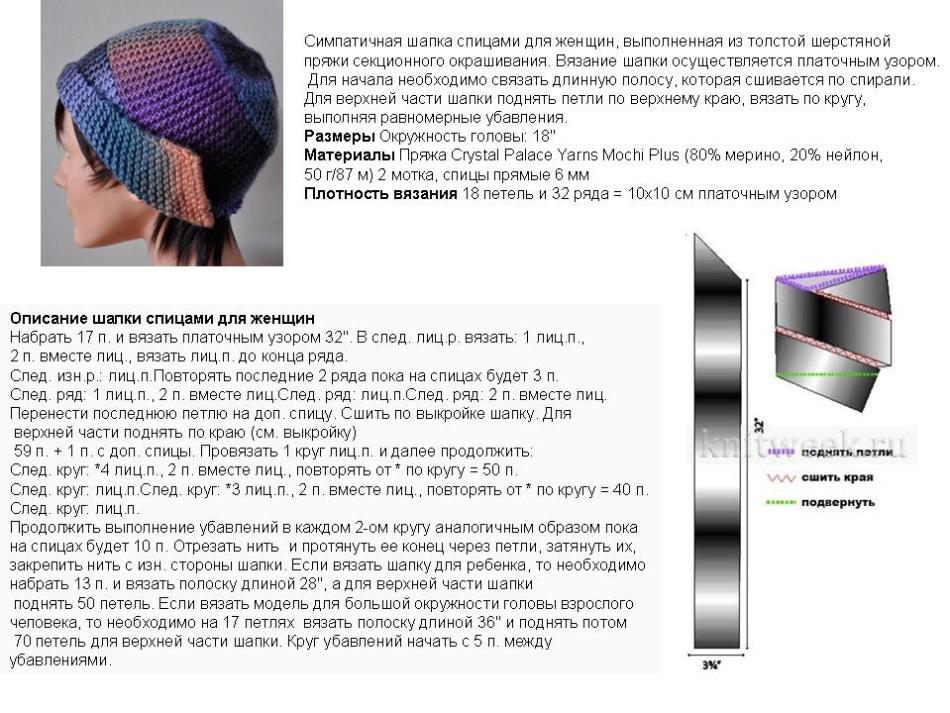
 originally wearing a hat on the girl’s head, knitted with shawls in a cropped pattern
 Shortened rows in knitting hats with needles save your time working on the crown.
In the sections above, we examined models of women's hats made with a garter pattern in a similar way.
Add some job descriptions from the pages of magazines / sites on needlework.
 description of work on the original bright female headscarf
description of knitting a female beanie cap
How to knit a female beanie hat, stocking with knitting needles?
 finished gray beanie hat on a girl knitted with a patched pattern
 A beanie hat is any that does not have ties. Beans come in and:
- short, tight-fitting head
- elongated, hanging from behind in stocking
A common point when knitting both types with a scarf pattern is working in a vertical plane.
And the difference is in the number of originally typed loops. Since they are an indicator of the width of the future product.
The second important point is the number of loops left to form a wedge. The more there are, the more flat the bottom on your hat will come out.
For a stocking cap, leave 5-6 loops. Then the bottom will be elongated and convex.
By the way, a stocking cap easily turns into a shorter beanie if you make a lapel on it.
How to knit a fashionable volumetric female hat with knitting needles from a thick viscose yarn?
 original hat-hat made of thick yarn with a handkerchief on a girl
 Please note that the headscarf on the hat looks good on a small head. It gives volume to the product and, accordingly, to the head of the owner.
If you take a thick thread, then the visual volume of your cap will significantly increase.
An interesting fashionable model of a headscarf cap in the picture below.
Women's hat with knitting needles knitted with a lapel: scheme, description
 interesting knitting pattern for women knitted hats
 To tie a hat with a gingham pattern that will have a lapel, you either:
- do work on the elongated headband. Then it easily tucks as you need,
- create an exclusive model where this part of the product has an asymmetric shape with obligatory decoration.
For the implementation of the first type of women's hats, most job descriptions from the sections above will suit you.
To please yourself with an interesting model, use one of the ready-made ideas below.
 description of knitting over a hat with a lapel of a garter stitch, example 1
  model 2 - knitted women's hat with a lapel lapel pattern
  description for model 2
 Double women's hat with knitting needles: a scheme with a description
Warm hats for the cold season are needed for women of any age. A good solution are dual models.
Their peculiarity is that you knit first the outer part of the cap, increasing it by a couple of centimeters, and then the inner one, which has the size of the circumference of your head.
To neutralize the discomfort while wearing such a hat, choose soft yarn for the inside. For example, knitting threads for children.
For the convenience of work and to avoid excessive pomp, perform the inside of the cap with the front smooth. She should “look” at your head.
A detailed description of knitting a female double hat, see below.
 a description of the work on a female double hat with a shawl pattern
 How to knit a fashionable women's hat with knitting needles with a garter stitch: a scheme with a description, a photo
 interesting model of a female hat with a headscarf with a scythe
 Having mastered knitting hats with a handkerchief pattern, add complexity and originality to your future models. Insert the braids in the middle of the canvas or alternate both patterns.
Consider a detailed description for a women's hat with knitting needles made of garter stitch and braids:
 Description of knitting hats with a scarf with a scythe
 And another interesting model with a different arrangement of the braid:
 description of knitting a women's hat with a scarf with a scythe
 Women's hat with knitting needles knitted with ears: a scheme with a description, photo
 funny blue hat with ears knitted with garter knitting needles
 Caps with ears look original on the female head. Please note that they come with:
- fake ears
- elongated parts over the ears, turning into a tie. Easier - with earflaps
The former are characterized by simplicity of execution with the subsequent formation or knitting of the details of the ears.
For the second - originality and warmth in the ears, neck.
Several schemes for describing work on women's hats with ears made of garter stitch.
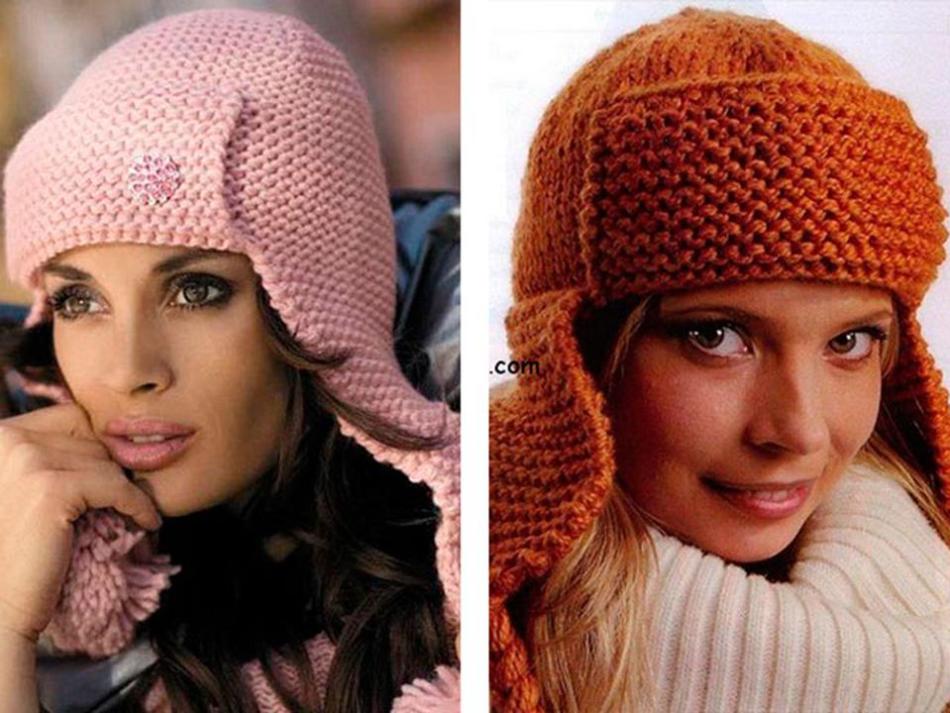 photo of the original hats with ears made in a garter pattern
 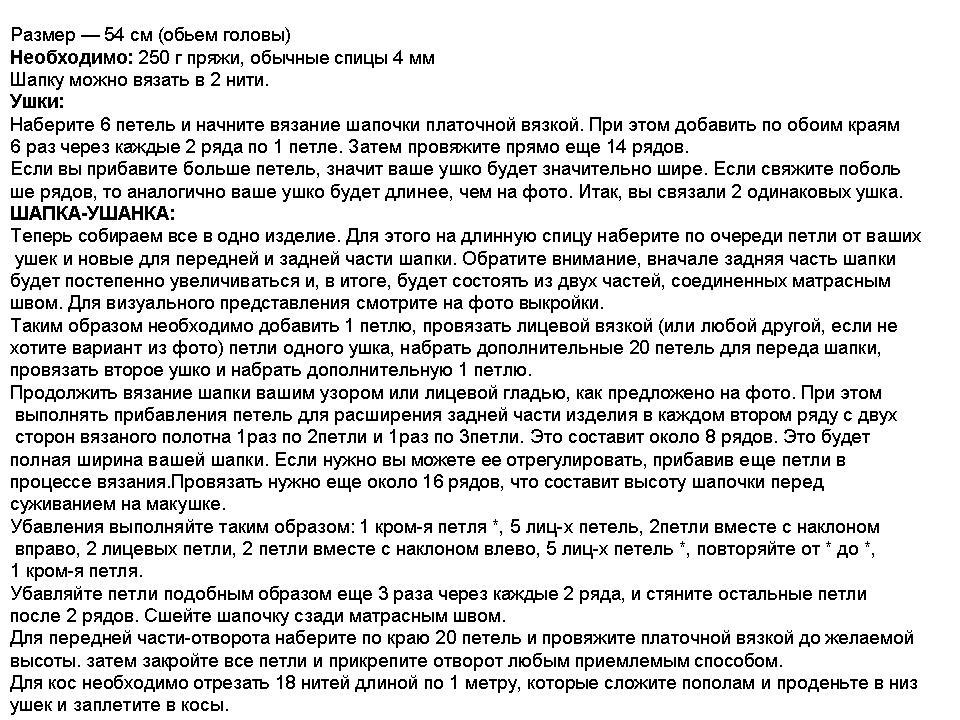 description for creating original caps with ears made in a gingham pattern
  photo and scheme of work on a hat with ears with a handkerchief pattern
 So, we learned how to knit a scarf pattern, taking into account a number of secrets. And also create simple and fashionable women's hats with it.
Pick up the knitting needles and start your journey in needlework. What if you enjoy and become a favorite hobby that brings pleasure and a penny?
Knit a fashionable beret with a relief wavy pattern. The cherry color of the beret will add color to the autumn look.
You will need: 3 skeins of red-brown Magic + yarn (50% wool, 50% acrylic, 80 m / 50 g) Brique; No. 4,5 and No. 5,5.
Fantasy pattern, No. 5.5: the number of loops is a multiple of 10. Knit according to scheme 1, on which the persons are shown. and out. R. Start with loops before rapport, repeat rapport, end with loops after rapport. Repeat from 1st to 6th p.
Description of beret knitting: dial 74 sts. On knitting needles No. 4,5 and knit 4 cm (\u003d 12 p.) With a 2/4 elastic band, starting from 2 persons., Then repeating the rapport. Then go to the knitting needles No. 5.5 and knit 2 p. persons. smoothness, evenly adding to the 1st r. 48 p. Then knit on the received 122 p. With a fantasy pattern, starting with 2 out. instead of 1 out. After 38 p. (\u003d 14 cm) from the set edge of knit faces. stitch, performing diminution.
39th p.: 7 persons., * 3 p. Persons together., 10 persons., Repeat from *, end a row of 8 persons. instead of 10 persons. (\u003d 104 p.).
41st p.: 6 persons., * 3 p. Persons together., 8 persons., Repeat from *, end a row of 7 persons. instead of 8 persons. (\u003d 86 p.). Repeat the decrease in the same way in the 43rd and 45th p., Knitting in each of them 1 p. Less at the beginning and at the end of the row and 2 p. Less in the intervals between the decreases than in the previous row (\u003d 50 p .).
47th p.: 3 persons., * 2 p. Persons together., 3 persons., Repeat from *, end a row of 2 persons. (\u003d 41 p.). 49th p.: 3 persons., * 2 p. Together persons., 2 persons., Repeat from *, end a row of 2 persons. (\u003d 32 p.).
51st p.: 3 persons., * 2 p. Together persons., 1 persons., Repeat from *, end a row of 2 persons. (\u003d 23 p.). 53rd p.: 1 persons., 11 x 2 p. Persons together. (\u003d 12 p.) Knit 1 p. On the remaining loops, then tighten them with a working thread.
Crochet zigzag lines on a fantasy pattern 1 p. Art. b / n, introducing a hook under the head of each out. n. Fill the seam.
knitting pattern:
The knitted hat and scarf-collar is made of knitting needles from a warm woolen strand, the weaving of a volumetric braid effectively wraps around the head and adds splendor to the scarf.
HEAD CIRCUIT 56-57 cm
YOU WILL NEED 300 g of white (No. 01) yarn Adelia NELLY (70% wool, 30% acrylic, 100 m / 100 g), knitting needles GAMMA No. 3.5, hook GAMMA No. 2.5

Pattern with a scythe: knit according to a pattern on which only persons are shown. R., in out. R. knit loops according to the pattern. Start with 1 chrome., Repeat the rapport loops, end with 1 chrome. Perform 1 time from the 1st to the 38th p., Then repeat from the 13th to the 38th p.

Knitting density. Pattern with a scythe, knitting needles No. 3.5: 17 p. And 18 p. \u003d 10 x 10 cm; Art. b / n, hook No. 2.5: 15 p. and 14 p. \u003d 10 x 10 cm.
Description of knitting hats with needles:
For a hat with a hook No. 2.5, tie a chain of 6 air. n., close it 1 connection. Art. into a ring and tie into it 6 tbsp. non-cash Then knit st. b / n in a circle, starting each row with 1 air. p. rise. In the next row, double the number of loops. Mark every 2 nd with ring rings. Continue work by adding 1 n in each row in each segment. After 10 cm \u003d 14 r. from the beginning of knitting add in every 2 r. in each segment 1 p. When the diameter of the cap is 26 cm, tie 7 cm \u003d 11 p. without additions and finish the job. For a strap with a braid on knitting needles No. 3,5, dial 18 p. And knit with a braid. After 52 cm \u003d 94 p. set all loops from the set edge. Sew the edges of the strip with a “loop to loop” stitch. Unscrew one edge on the wrong side (extreme 2 p.) And sew with a blind seam. Sew together the finished edge of the plank and the cap.
Knitting a scarf-collar: on knitting needles No. 3,5, dial 50 p., Knit 55 cm \u003d 99 p. pattern with scythe and loop put aside. Sew the edges of the strip with a “loop to loop” stitch.
Patent knitted cap
A knitted cap with a two-tone patent pattern looks stylish and modern. In a kit for a hat, knit a scarf in the same pattern.
Head circumference 54-58 cm
YOU NEED: 100 g of brown and 50 g of white yarn Schachenmayr SMC Boston (70% polyacrylic, 30% wool, 55 m / 50 g); a set of stocking knitting needles No. 7; set for pompons.
Elastic band: alternately 1 persons., 1 izn.
Patent pattern: knit in circular rows. 1st p., Brown thread: * 1 faces., Remove the next loop with 1 double crochet as out., Repeat from *. 2nd p., White thread: * Remove the next stitch with 1 double crochet as out., The crochet and the removed stitch, knit together out., Repeat from *. 3rd p., Brown thread: * double crochet and removed loop knit together faces., Remove the next loop with 1 double crochet as out., Repeat from *. Perform 1 time from the 1st to the 3rd p., Then repeat the 2nd and 3rd p.
Knitting density, patent pattern: 9 p. And 30 p. \u003d 10 x 10 cm.
Description of knitting caps:
On hosiery knitting needles with a brown thread, dial 56 p. And tie a 5 cm elastic band for the strap. Then knit with a patent pattern, while in the 1st p. evenly reduce 4 p. \u003d 52 p. After 24 cm from the set edge, knit with a brown thread with an elastic band, while in the next 2 p. knit 2 p. together persons. Pull the remaining 13 p. With a working thread and firmly fasten. Make a brown pompom with a diameter of 9 cm and sew it to the hat (see photo).
A knitted hat will delight you with cool autumn evenings. Additional decor with beads and velvet ribbon makes the hat even more beautiful. Pick contrasting favorite colors of yarn and start knitting hats.
You will need: 100 g of wool yarn of an average thickness of the main color, 20 g of yarn of a finishing color; pearls for decoration, narrow velvet ribbon; knitting needles and a hook corresponding to the thickness of the yarn, an additional knitting needle for braids; needle.
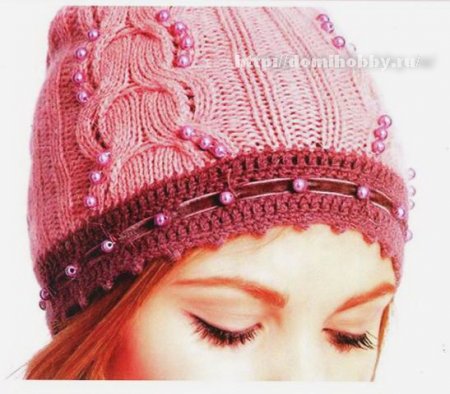
Description of knitting hats:
The model is knitted and decorated with beadwork. Tie the cap first. Begin work with a set of loops, the number of which should be a multiple of the pattern repeat (see diagram).
There are four such rapports in the original model. In order for the product dimensions to correspond to the desired, it is necessary to bind the sample before starting work, determine its density and, if necessary, make adjustments, for example, changing the number of loops between embossed strips of braids. At a height of 18 cm from the bottom edge, start making decreases, knitting 2 loops together in groups of 2x2 elastic bands between the “braids”. After 22 cm from the bottom edge, tighten the remaining loops with a working thread. Crochet the lower edge of the cap with crochet yarn: 1st row: RLS, 2nd, 3rd, 4th rows
C1H, 5th row: * 3 sc, "pico" *. Decorate openwork tracks in a pattern of "braids" embroidered with beads.
Sew a velvet ribbon along the finishing edge of the cap, fasten it with beads with an interval of 2-3 cm.
Pattern knitting hats:
Tight-fitting female hat, knitted with needles in a circle with a spiral pattern of faces. and out. loops.
Cap sizes: Head circumference 53.5 cm; height 21 cm
You will need: 2 skeins of yarn (50 g / 140 m) Eden Silk from Universal Yarn, Inc. (wool / silk), color 08 amethyst (purple); circular knitting needles 4 mm long 40 cm .; set of toe spokes (5 pcs.) 4 mm; marker for knitting.

Knitting density: 29 p. And 31 p. \u003d 10x10 cm pattern on the needles of 4 mm.
Description of knitting a spiral pattern: (number of loops is a multiple of 17)
1st row: * Double crochet, 2 persons. behind the back wall, x 2 times, broach, 3 persons .; repeat from * to the end of the row.
2 row: * Double crochet, 1 out., X 2 times, 1 person. behind the back wall, broach, 3 persons .; repeat from * to the end of the row.
3 row: * Double crochet, 2 out., X 2 times, broach, 3 persons .; repeat from * to the end of the row.
4th row: * Double crochet, x 2 times, 2 out., Broach, 3 persons .; repeat from * to the end of the row.
5 row: * Double crochet, 1 person. behind the back wall, x 2 times, broach, 3 persons .; repeat from * to the end of the row.
7 row: * Nakid, 1 out., X 2 times, 1 person. behind the back wall, broach, 3 persons .; repeat from * to the end of the row.
Repeat rows 1-7.
Description of knitting hats:
Dial 152 p. Lock in a circle, making sure that the knitting does not twist and place the marker of the beginning of the row. Throw a marker in each row.
Knit 11 rows with 1x1 elastic as follows: * 1 faces., 1 out .; repeat from * to the end of the row.
Track. row (with Nrib.): * 1 persons., 1 out; repeat from * to the last item, knit out 1 item 2 out. (for the front and rear walls) - 153 p.
The beginning of the spiral pattern
Knit 1 row of a spiral pattern, repeating the rapport 9 times in a circle. Continue to knit this way up to 7 rows inclusive. Repeat rows 1-7 another 4 times.
The crown of the head (Note. Go to the knitting needles when the loops become small.
1 row (with a decrease.): * Nakid, x 2 times, 2 vm. persons. behind the back wall, broach, 3 persons .; repeat from * to the end of the row \u003d 144 p.
2 row (with a decrease.): [Nakid, 1 out., 2 persons. behind the back wall, 3 out., 2 persons. behind the back wall, 1 out., 2 vm. out., broach, 3 persons.] x 9 times in a circle \u003d 135 p.
3 row (with a decrease): [Nakid, 2 out., 2 persons. behind the back wall, 3 out., 1 persons. behind the back wall, 2 vm. persons. behind the back wall, broach, 3 persons.] x 9 times in a circle \u003d 126 p.
4th row (with a decrease): [Nakid, 3 out., 2 persons. behind the back wall, 2 out., 2 vm. out., broach, 3 persons.] x 9 times in a circle \u003d 117 p.
5 row (with a decrease.): [Nakid, 1 persons. behind the back wall, 3 out., 2 persons. behind the back wall, 2 vm. out., broach, 3 persons.] x 9 times in a circle \u003d 108 p.
6 row: [Nakid, 2 persons. behind the back wall, 3 out., 2 vm. persons. behind the back wall, broach, 3 persons.] x 9 times in a circle \u003d 99 p.
7 row: [Nakid, 1 out., 2 persons. behind the back wall, 1 out., 2 vm. out., broach, 3 persons.] x 9 times in a circle \u003d 90 p.
8 row: [Nakid, 2 persons. behind the back wall, 1 out., 2 vm. out., broach, 3 persons.] x 9 times in a circle \u003d 81 p.
9 row: [Nakid, 1 out., 1 persons. behind the back wall, 2 vm. out., broach, 3 persons.] x 9 times in a circle \u003d 72 p.
10 row: | Nakid, 1 out., 2 vm. persons. behind the back wall, broach, 3 persons.) x 9 times in a circle \u003d 63 p.
11 row: [Nakid, 2 vm. out., broach, 3 persons.] x 9 times in a circle \u003d 54 p.
12 row: 11 persons. behind the back wall, 2 vm. out., 3 persons.] x 9 times in a circle \u003d 45 p.
13 row: x 9 times in a circle \u003d 36 p.
14 row: x 9 times in a circle \u003d 27 p.
15 row: x 9 times in a circle \u003d 18 p.
16 row: x 9 times in a circle \u003d 9 p.
Cut the thread, leaving a long end. Pull the thread through the remaining loops two times. Tighten and hide the tip.
It is interestingly knitted with knitting needles from pink yarn - longitudinal and transverse knitting, a braid and a large side give the actual proportions of the model.
Size 56-58

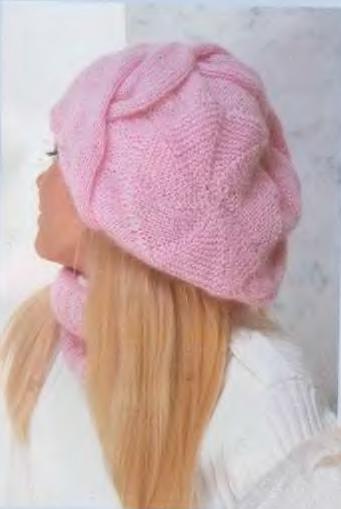
Materials: 200g mohair pink; knitting needles No. 4; needle.
Description of beret knitting:
The cap consists of three main parts: a side - elastic bands, stripes of even string - a transverse braid and a bottom. The dimensions of the parts, see the pattern. Perform a sample of garter stitch and a sample of 2 x 2 gum, determine the density of knitting and according to the pattern, calculate the required number of loops. Start knitting with the rim. To do this, dial the calculated number of loops on the knitting needles and knit with a 2x2 elastic band to a height of 20 cm. Knit the last row with an auxiliary thread, fold the loops to an additional knitting needle. Next, start knitting the transverse strip with a braid pattern (see diagram 1). After completing the part of the desired length, close the hinges. The next stage of work is the formation of the upper part of the headdress-bottom. To do this, collect the loops along the long side of the transverse strip and knit with a garter stitch, performing decreases along 8 wedges according to Scheme 2. Next, unpack the finished parts and connect the open sides of the border with the transverse strip using a thread and a needle using a thread and a needle. Connect the fabric along the back of the neck with a knitted stitch.
Collar. Model made with knitting needles.
Materials: 150 g mohair pink; set of stocking knitting needles number 4.
Description of collar knitting: Run a 2 x 2 elastic band and determine the density of knitting. Dial the estimated number of loops for the collar, distribute them into 4 knitting needles and knit the fabric according to the pattern (dimensions in the pattern picture).
The pattern of knitting a beret and a pattern with dimensions:
![]()
Rhombic hat
Classic rhombuses will decorate any product. For embossing, choose less fluffy yarn.
Size 57
Materials: 100 gr. yarn of medium thickness, knitting needles No. 4.
Work description:


Dial 133 loops on the knitting needles and knit with an elastic band 1 x 1 - 4 rows. Next, repeat the pattern 10 times. Then knit with 1 x 1 - 8 rows of elastic and make a roller; for this, knit the loop located on the spoke, together with the loop located on 8 rows below the wrong loops. Then divide the total number of loops into 7 wedges, mark with a pin the beginning of the wedge. Knit with front stitch, knitting 2 loops together front. Position the marked loop on top. Repeat reductions in each front row. Thread the remaining 14 stitches. Sew a hat over the seam.
We knit the top: draw a thread in two additions of dark and gray yarn about 90 loops and knit with the wrong side, reducing 12 loops evenly, in each front row. Then knit 2 loops together, assemble the remaining loops on the thread and fasten it on the wrong side. Sew on the crown with a blind stitch.
Crochet the hem with a white mohair on the hem with crochet posts. Crochet a chain of white mohair and stretch it over a gray canvas with a cross.
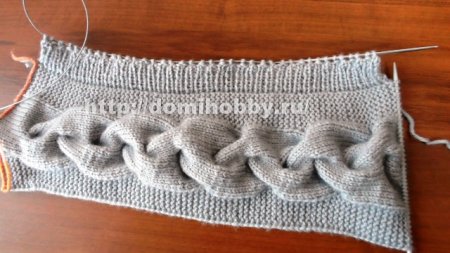
Feminine and elegant hat with a braid pattern I liked many fashionistas. Many needlewomen have already knitted this popular model of hats, and for those who have not had time or are just starting to learn how to knit, I suggest studying cap knitting workshop with a cross braid.
To knit a hat, 100 grams of YarnArt Shetland Chunky yarn (50% wool, 50% acrylic, 100 g / 150m), knitting needles No. 4, 1 additional knitting needle, and a needle for stitching a hat were required.
Description of knitting caps:
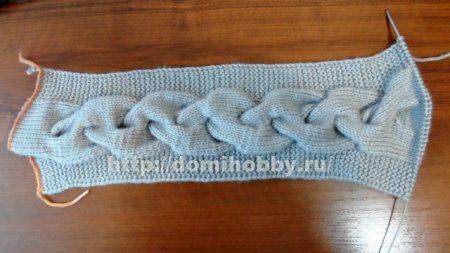
First, the main part of the cap is knitted - tulle, in the transverse direction. Then, along the long side of the main part, it is necessary to dial loops and tie the bottom, making reductions to the crown of the cap. At the last stage, the remaining loops on the crown tighten and stitch the cap along the occipital part.
A set of loops.In order for the seam behind the cap to be invisible, it is better to sew open loops of the main part with a “knitted” seam, combining the loose starting row and the non-closed loops of the last row. It is easy to loosen the loops of the initial rad, if at the beginning, make a set with a hook that can be quickly loosened.
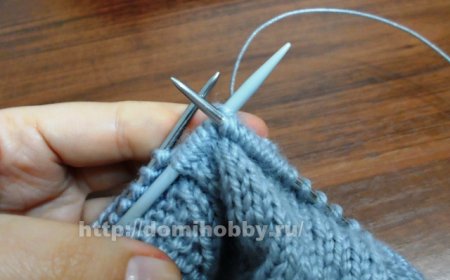
Dial 40 loops and knit the main part of the cap in the form of a long strip with a “braid” pattern in the center. The first and last loops are edge, form them in a “chain” along.
Knitting the main part. From the hem, first and last 7 loops, knit with a garter stitch, i.e. and in the front and back rows, knit these loops face.
Knit the central 24 loops with the front stitch, through 12 rows in the 13th front row in the central part, cross the first 16 loops. To do this, rehook the first 8 loops to an additional knitting needle and leave them at work, first knit the next 8 loops, then 8 loops from the additional knitting needle.
Knit the next 11 rows with the front stitch and in the 25th front row cross 16 stitches from the second half of the central part. To do this, knit the first 8 loops face, remove the next 8 loops on an additional knitting needle and place them before work, knit the last 8 loops face, then the loops from the additional knitting needle.
Repeat the weave pattern from the 2nd to the 25th row 5 times, then knit 12 rows of face stitch. The connected main part of the cap with the “braid” pattern in length should be equal to the girth of the head. At the end of the loop do not close, re-pin them to an extra spoke.
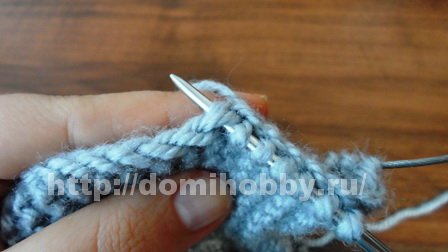
Knitting the bottom of the cap.On the top of the connected part, dial the loops, pulling them from the edge of the loop to the working needle. Loops on the front side, so that a number of edge loops remain on the inside.
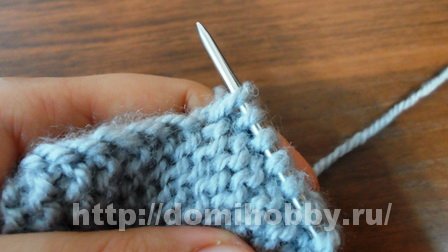
Knit the gathered loops with an elastic band 1x1 (1 front, 1 wrong) 11 rows. In row 12, knit all the loops 2 together, making 2 together the front and 2 together the wrong. Next, tie another 4 rows with an elastic band 1x1, again reduce all the loops by half. Having knitted two more rows, cut the working thread, leaving a long segment. Pass the thread into the wide-eye needle, pull the tip of the thread through the remaining loops and pull them together.