

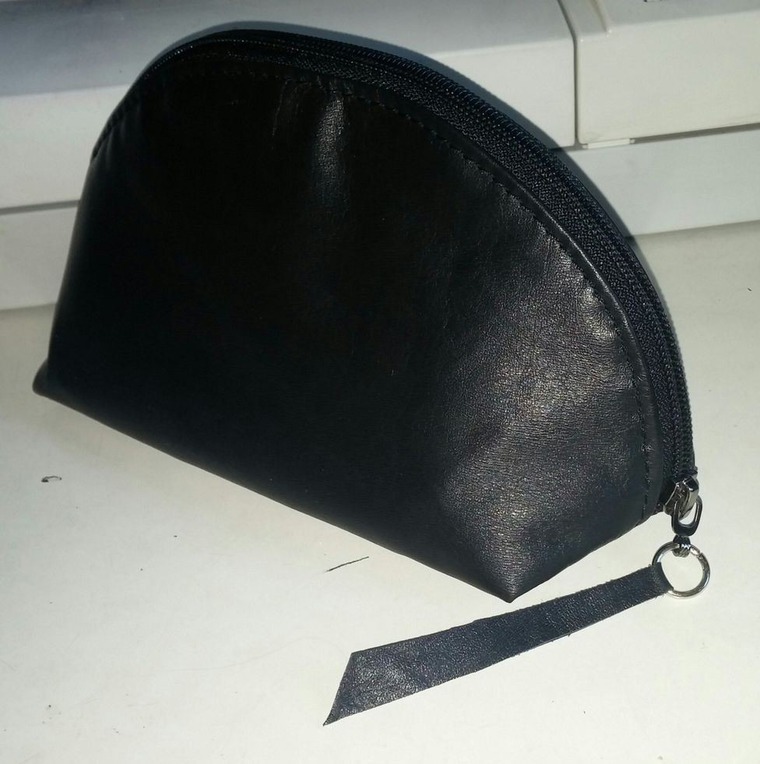
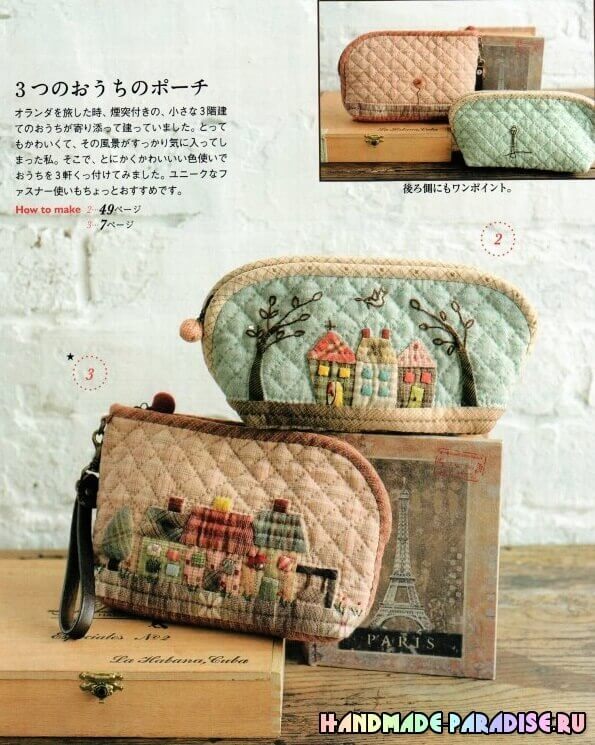
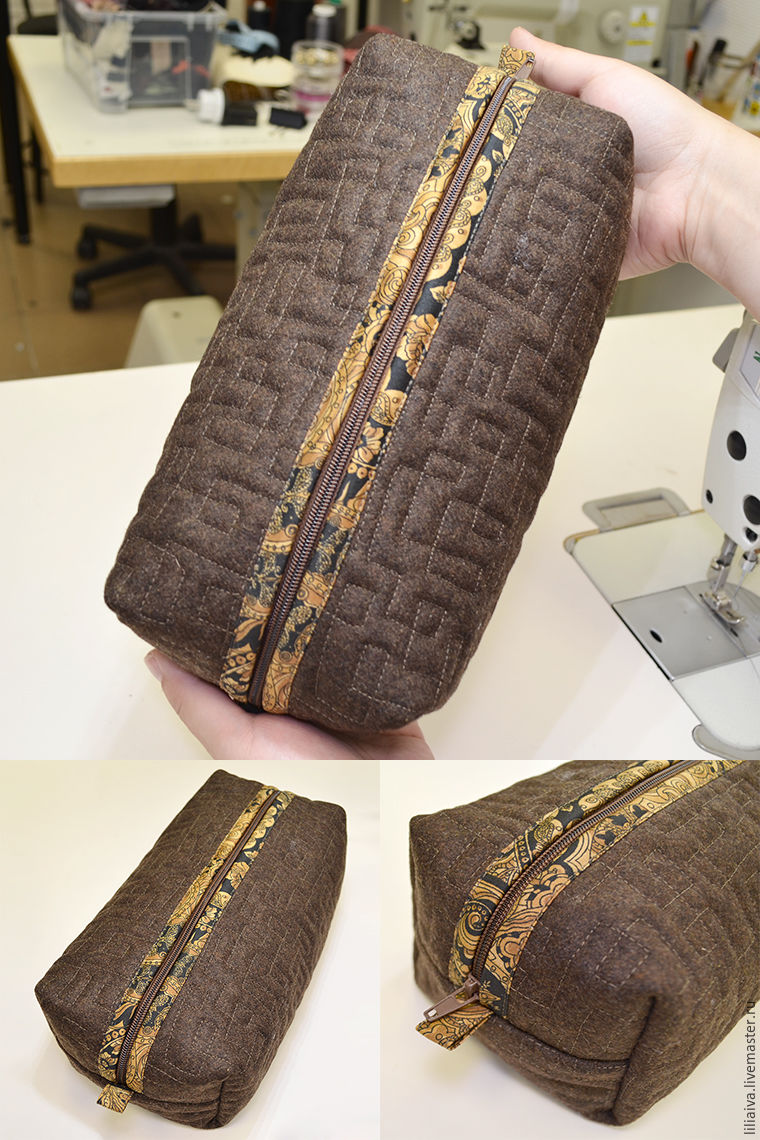
Today I want to show how I sew semicircular cosmetic bags. We know that almost all women and girls and grandmothers use cosmetic bags. Someone uses hairpins, cosmetics, and someone as a mini first aid kit. That is why cosmetic bags are in demand. Some people like large cosmetic bags, some small ones, but most often they buy medium-sized cosmetic bags. I want to offer your attention to a style that is in great demand with me.
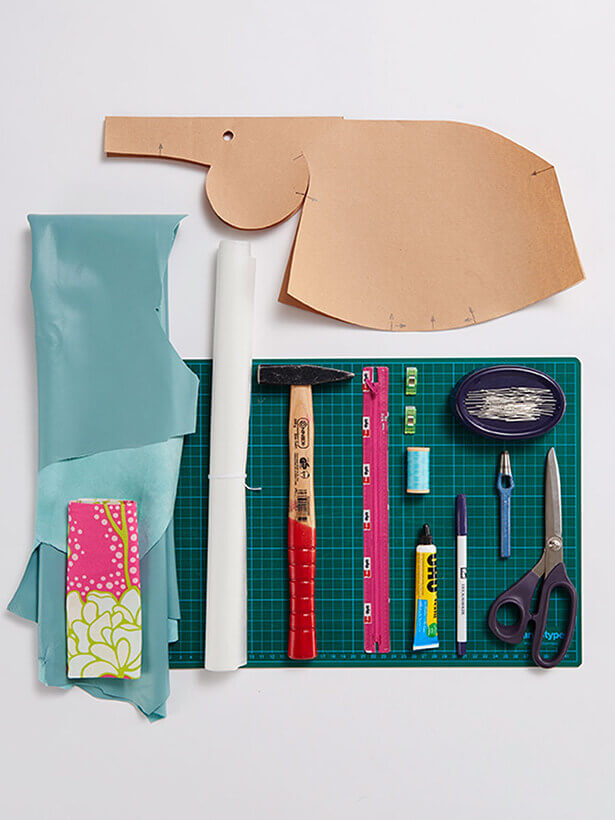
For work, we need materials: genuine leather, lining fabric, adhesive fabric (non-woven fabric possible), zipper, embroidery threads (optional) and leather threads (especially durable).
Tools: scissors, a transfer 0.5 mm wide (like double-sided tape), needles, a sewing machine, an embroidery machine (optional, you can do embroidery with your hands or a cosmetic bag without embroidery).
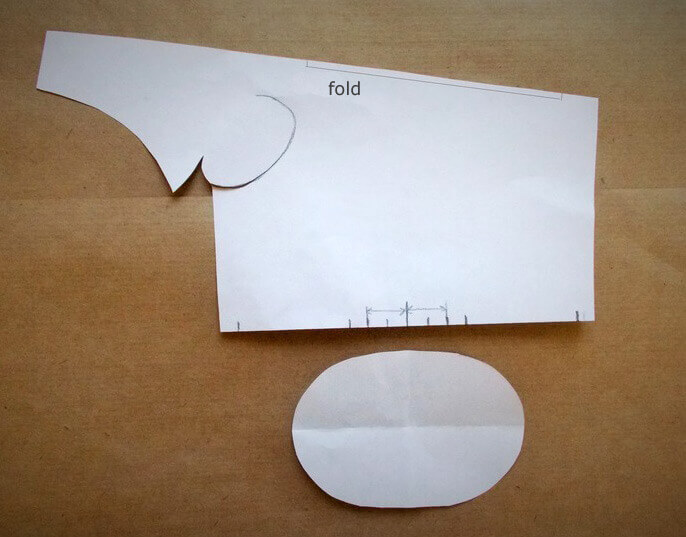
We start with the pattern, dimensions in cm.

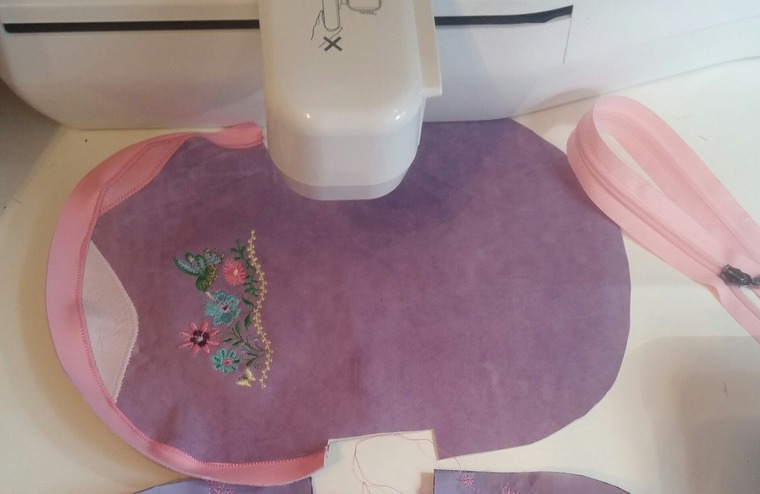
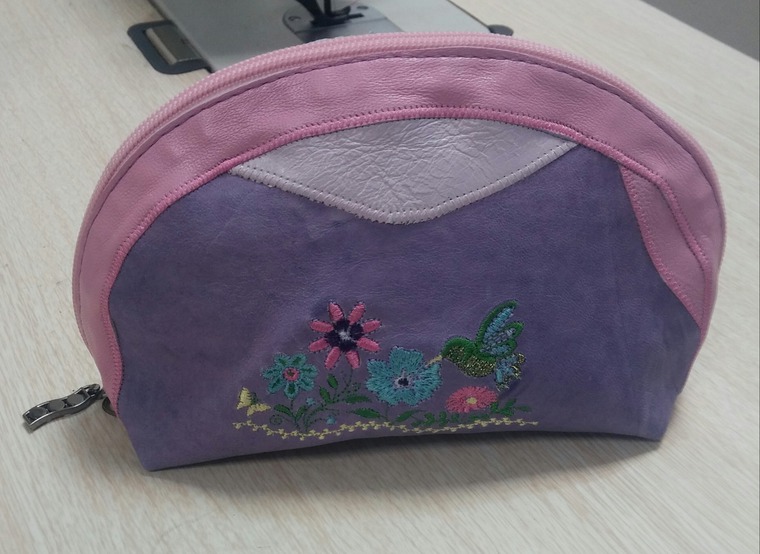
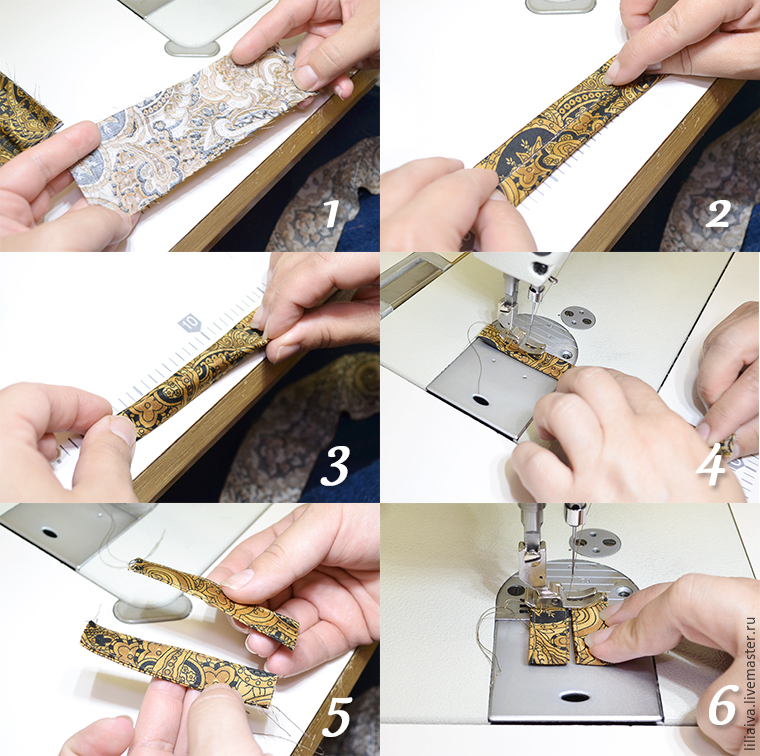
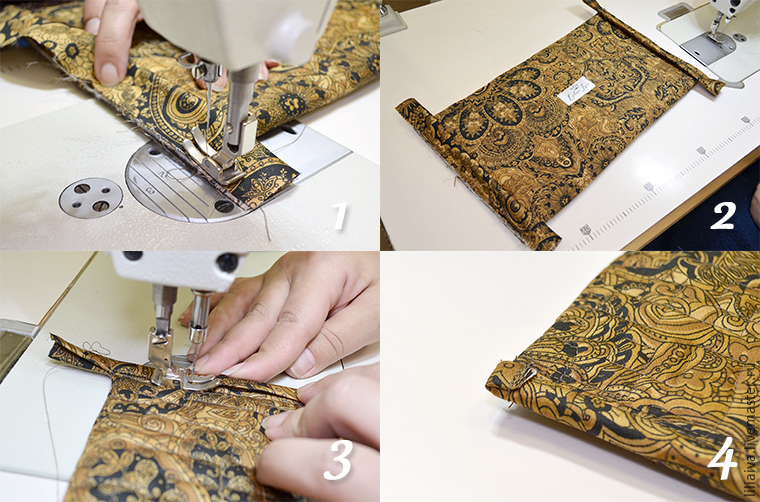
They cut out both sides of the skin simultaneously in a mirror image, made embroidery (I don’t stop at it), we have another purpose of the master class. For decoration and harmony with embroidery, I add a few shreds and a strip of pink leather and sew them with a zigzag. You can do plain. Surprisingly, multi-colored cosmetic bags love more than plain ones. From the lining fabric, we cut out 2 separate parts of the cosmetic bag and glue them with adhesive fabric and we build them up. I did not plan to do a master class, the thought came by chance, so there are no photos before this stage.
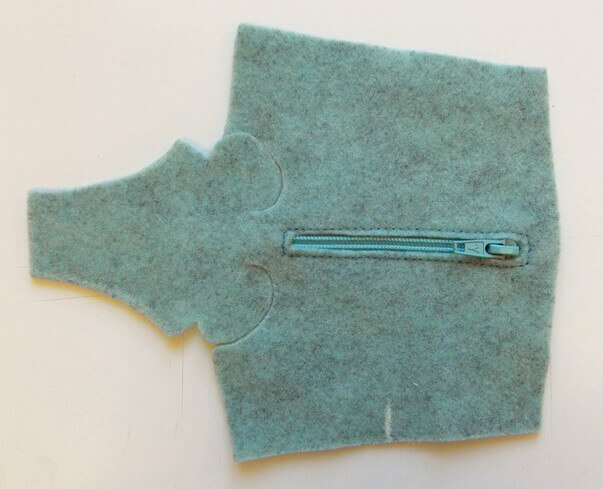
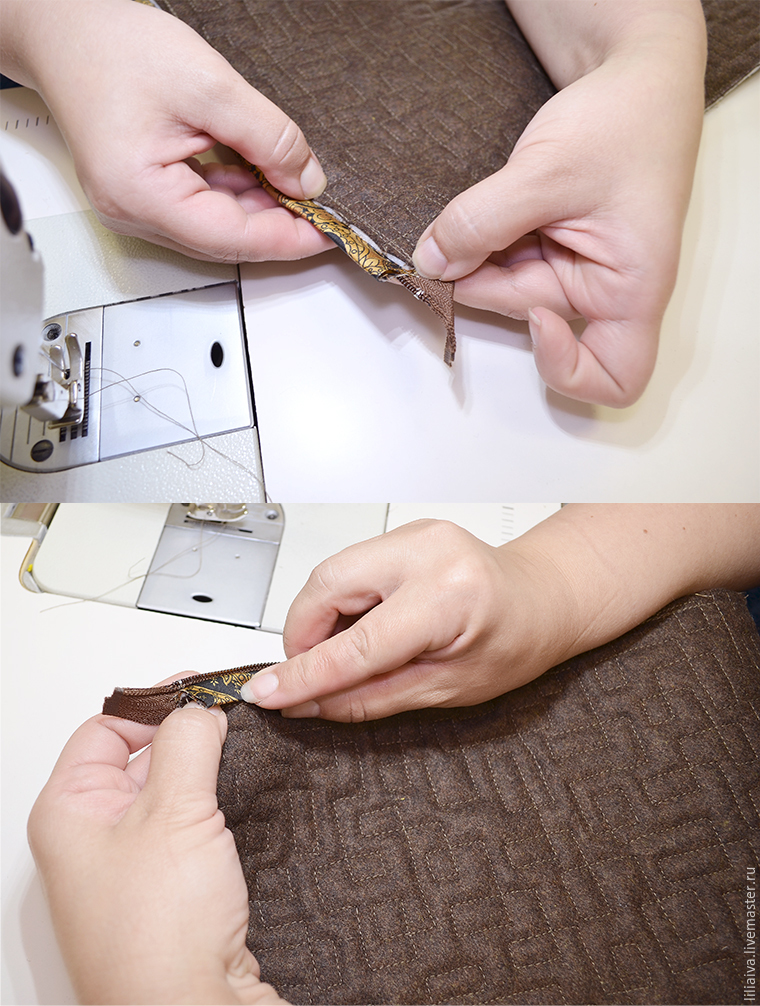
We start by rolling a zipper to the lining. Attach the zipper with a special foot and most importantly, you need to correctly position the zipper (the face of the lining with the inside of the zipper).
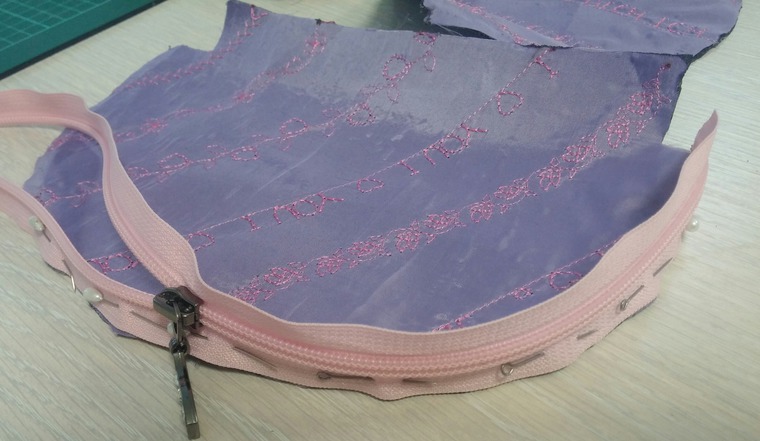
Adhering, we turn and we trim the lining.
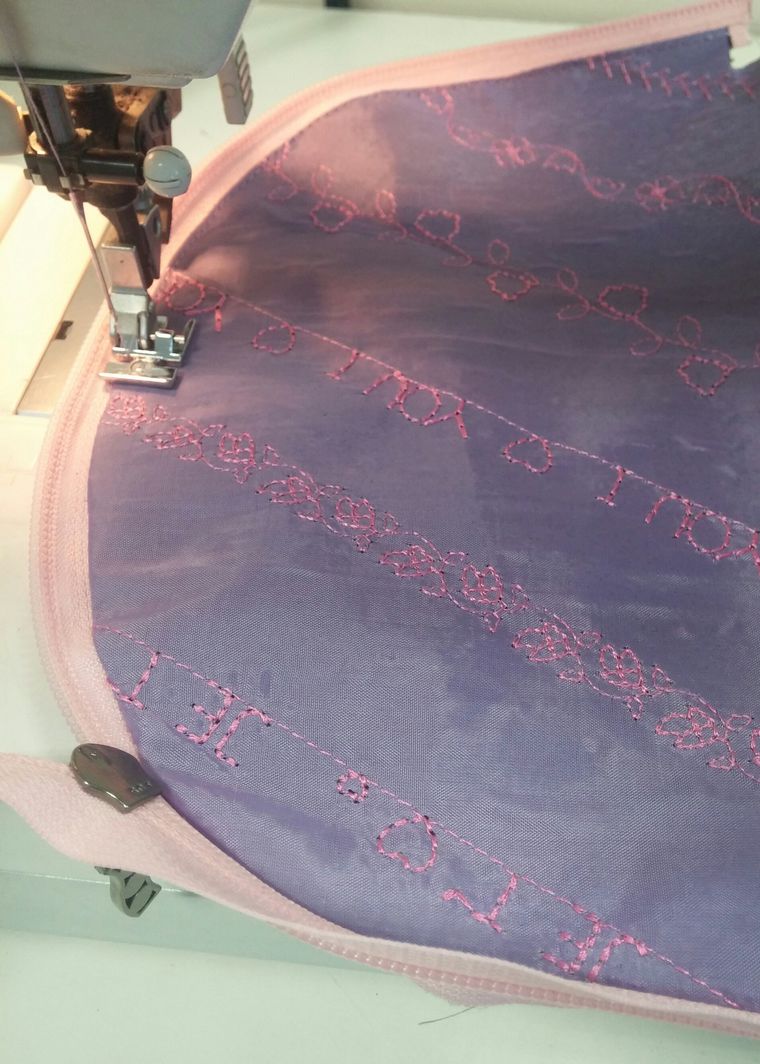
Then we outline the second side to the zipper.
![]()
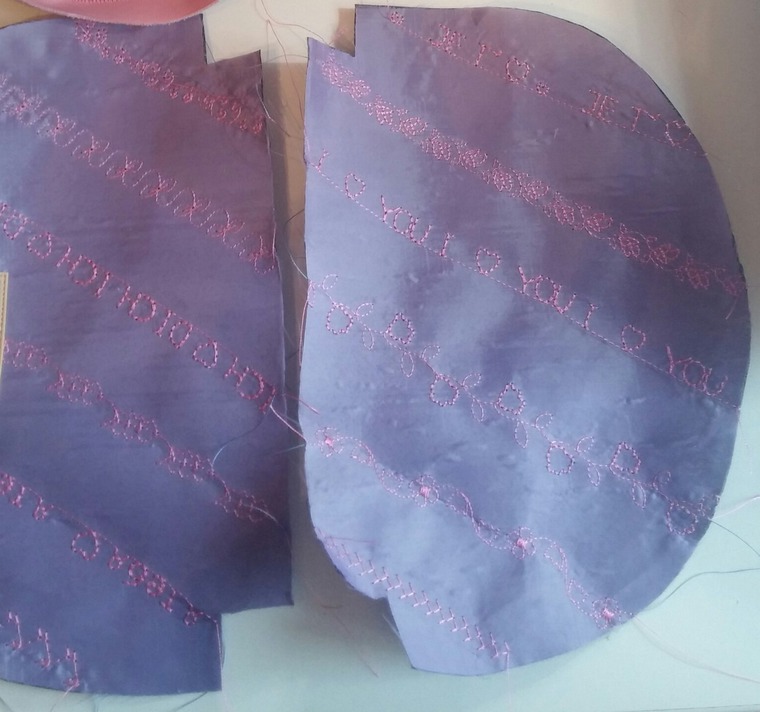
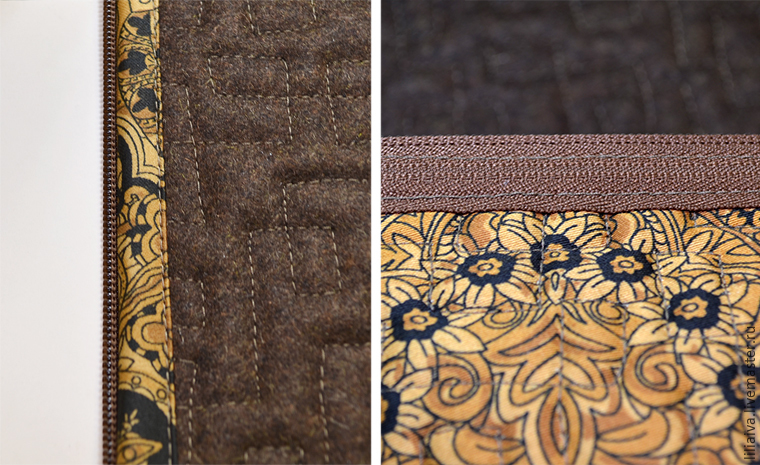
We repeat the same thing with the second side - we attach and we build.
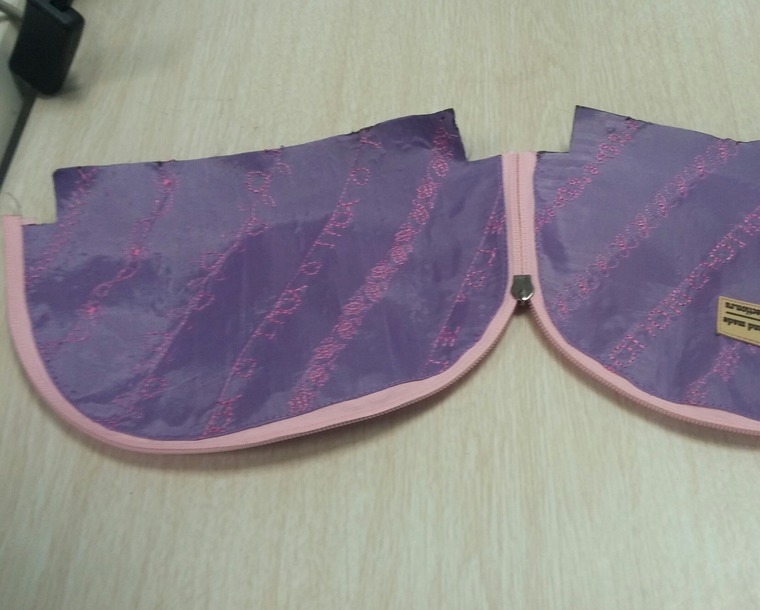
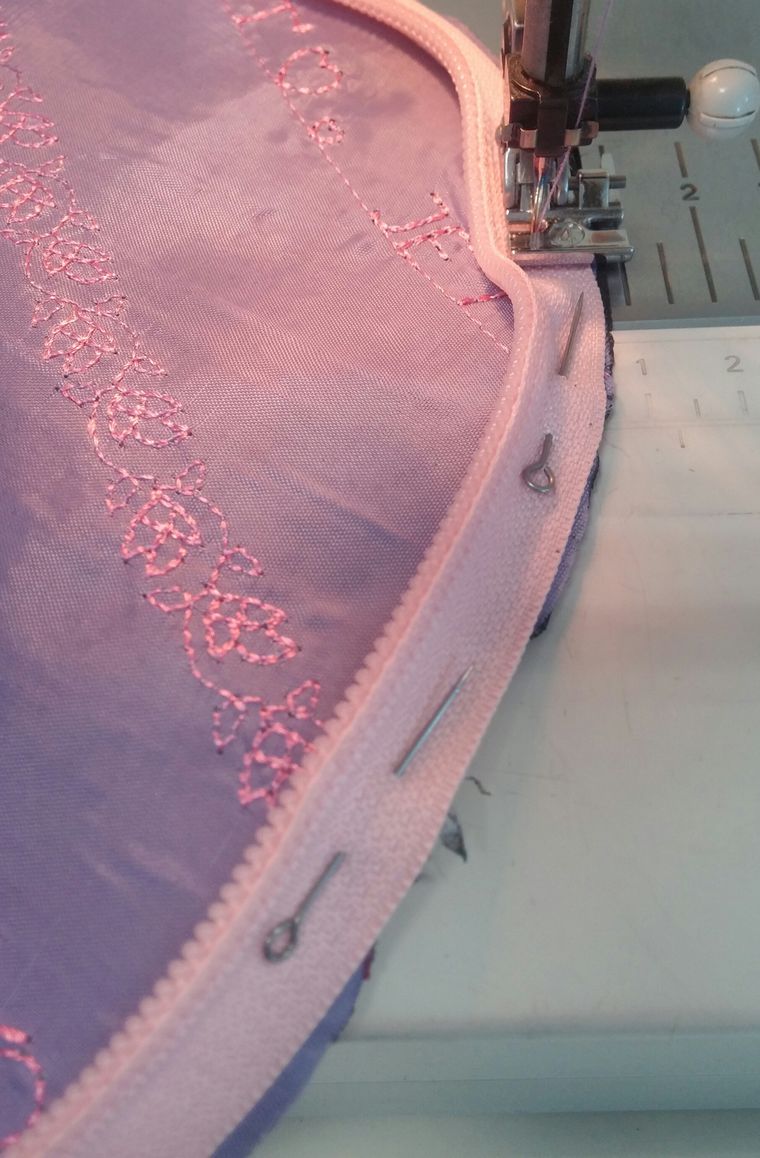
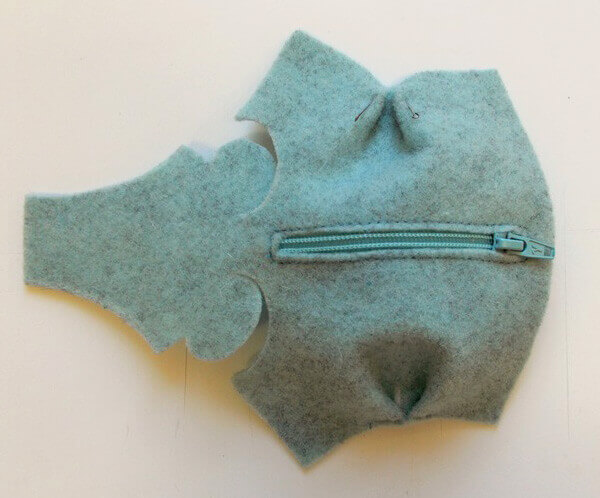
Then we glue the transfer a little lower than our lines and glue the top of the cosmetic bag on it. This is done because the top of the cosmetic bag is made of leather and we cannot sweep. Usually, a transfer is used to skim the skin. I do not advise sewing without stitching. Only a specialist can do this and not always. And to dissolve and rewire the skin is not so simple.
Glued and scribble, one and the second side.
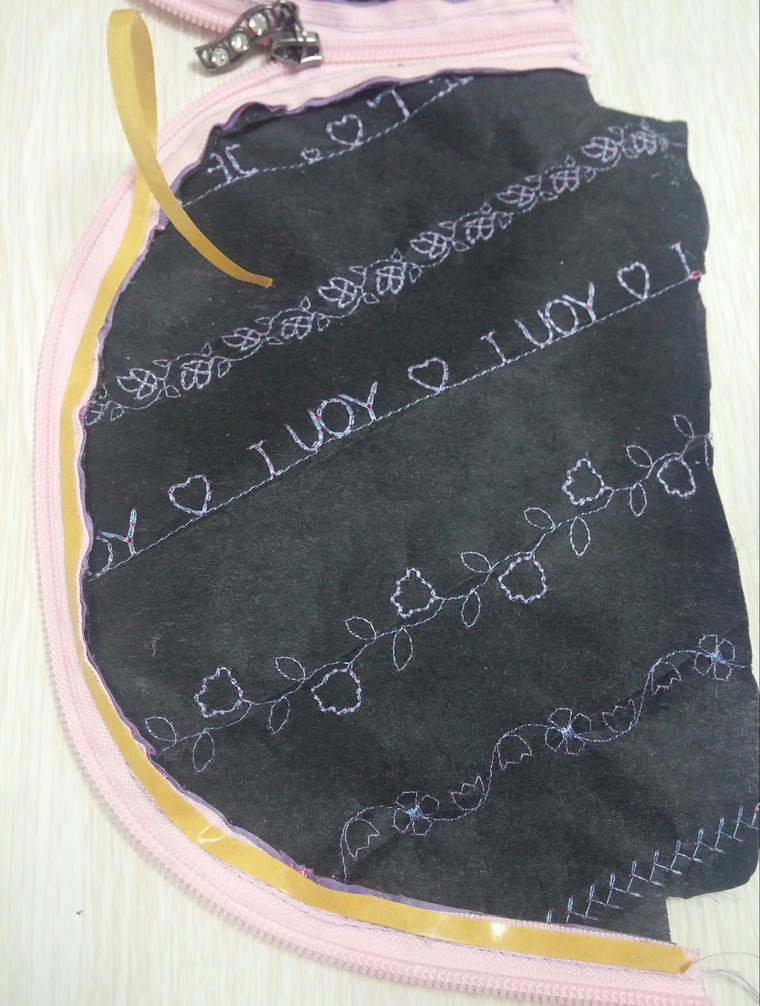
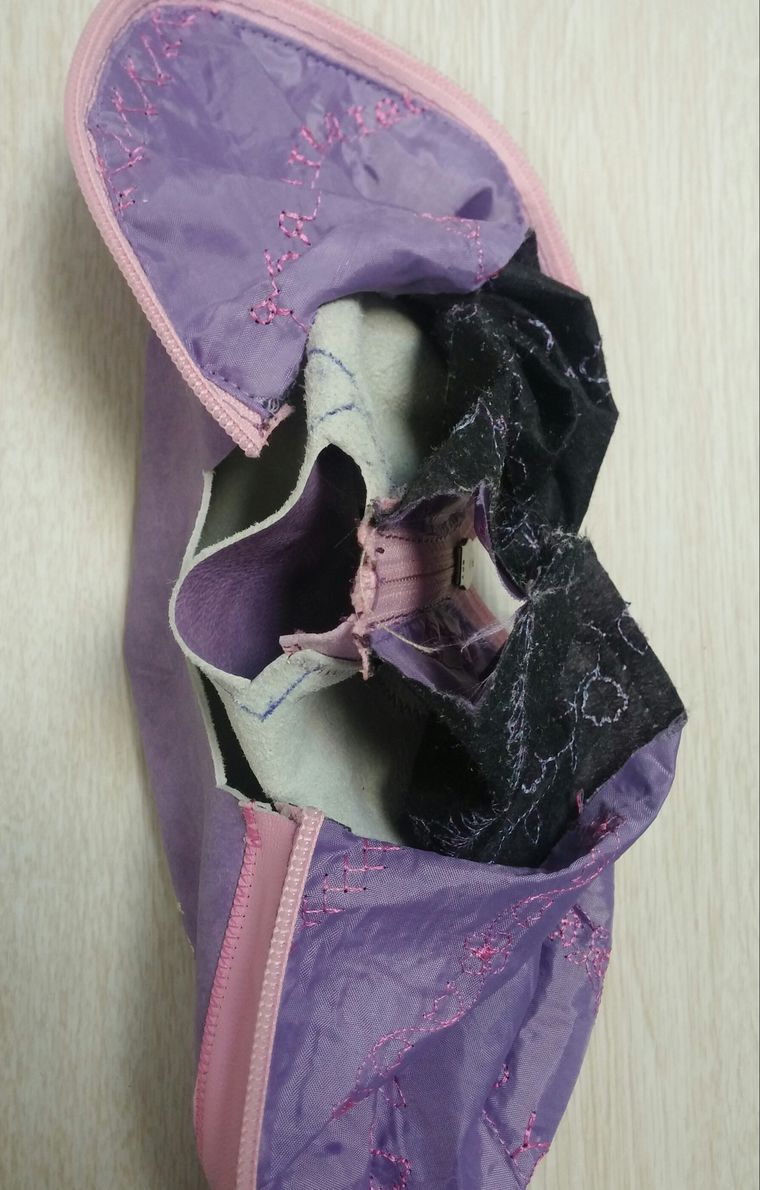
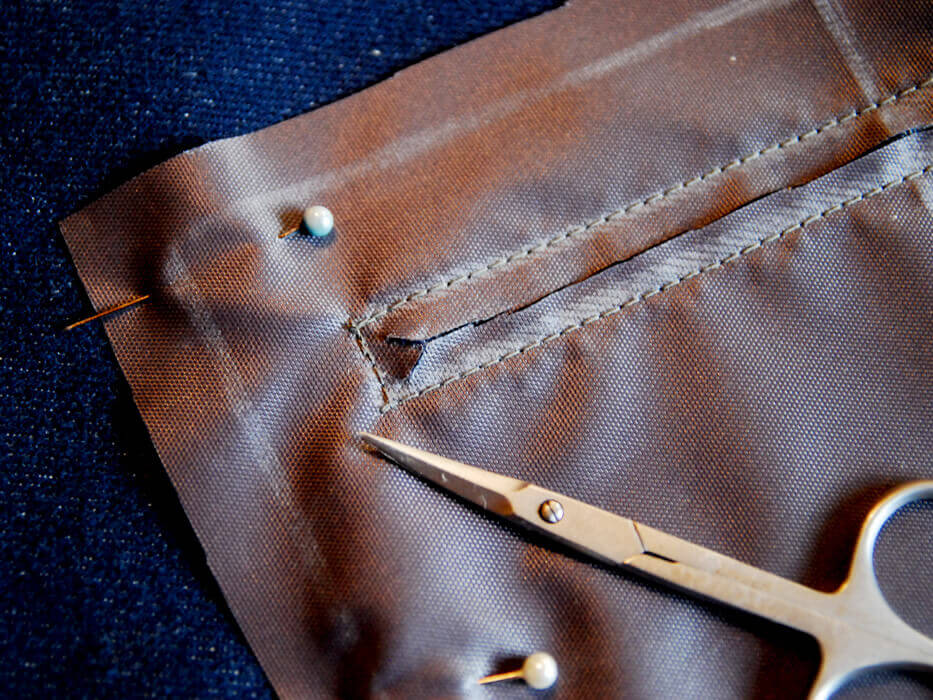
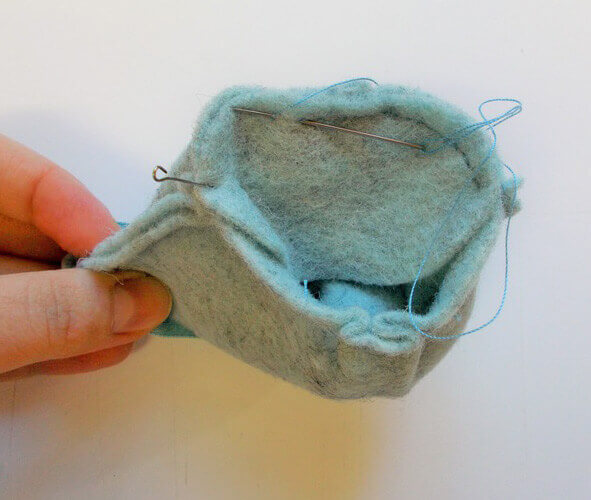
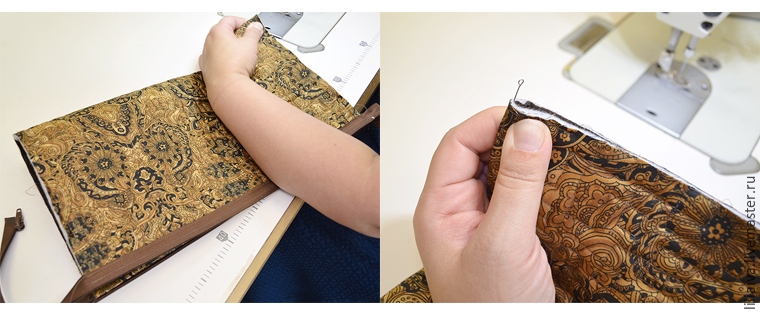
Adhering, we get an almost finished cosmetic bag, there are corners.
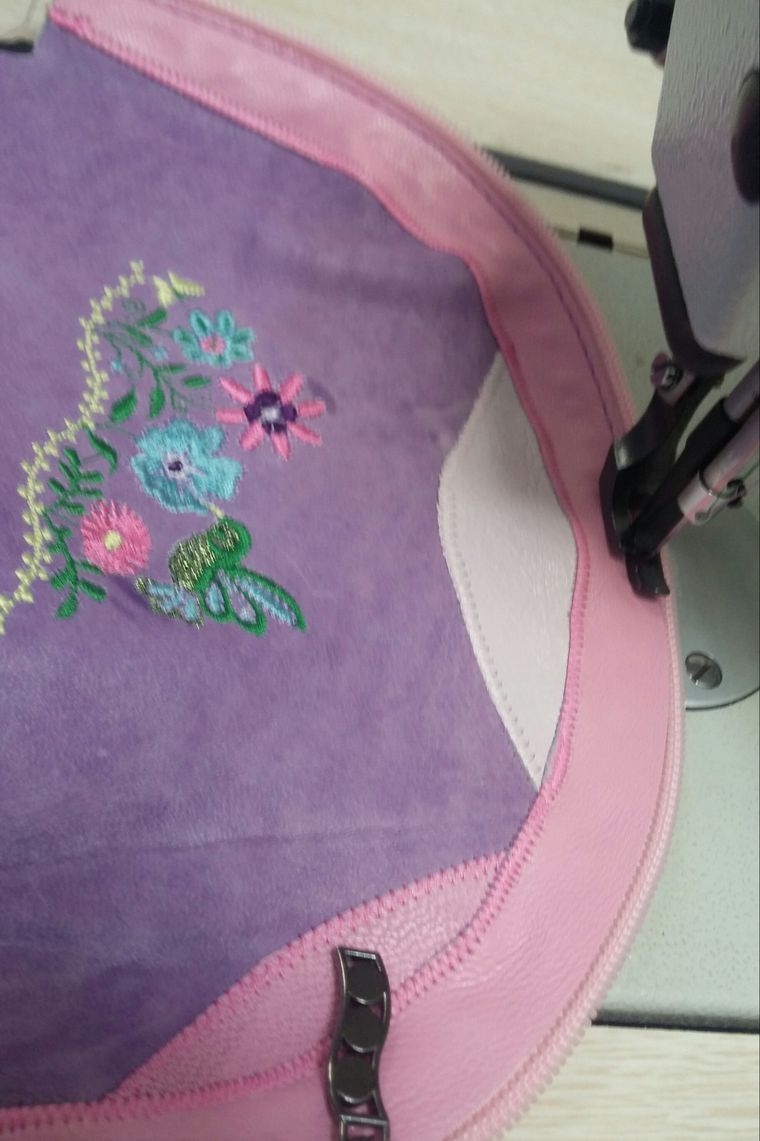
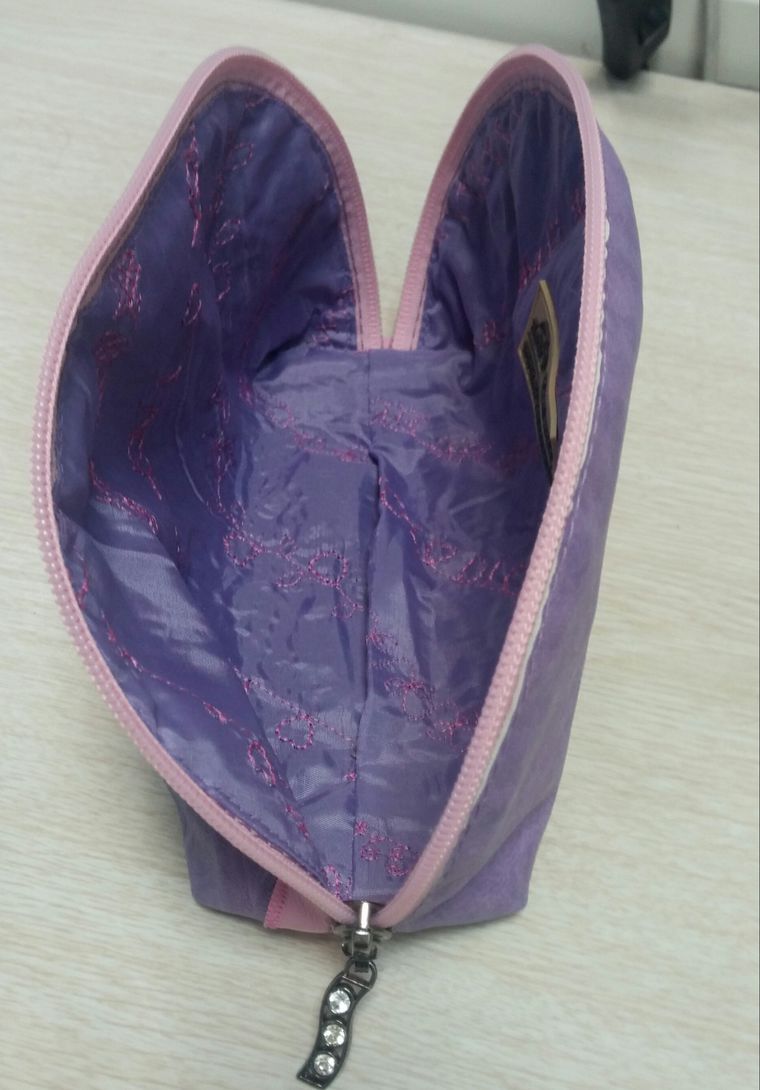
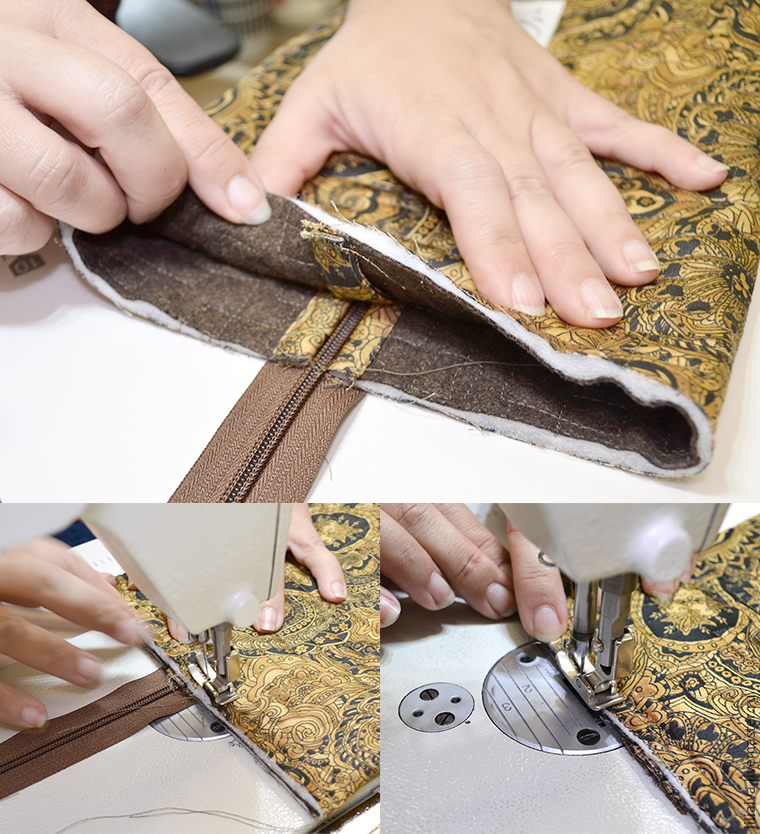
We sew the middle seam on the lining for 1/3 of the part and twist 1 corner. We are interested in the inside, between the skin and the lining. I took 2 photos from different sides from the side and from the top. You can see that the corner from the lining is slightly smaller. This is correct, so inside the lining will not pull together.
Fold the corner and sew it.
We look what turns out.

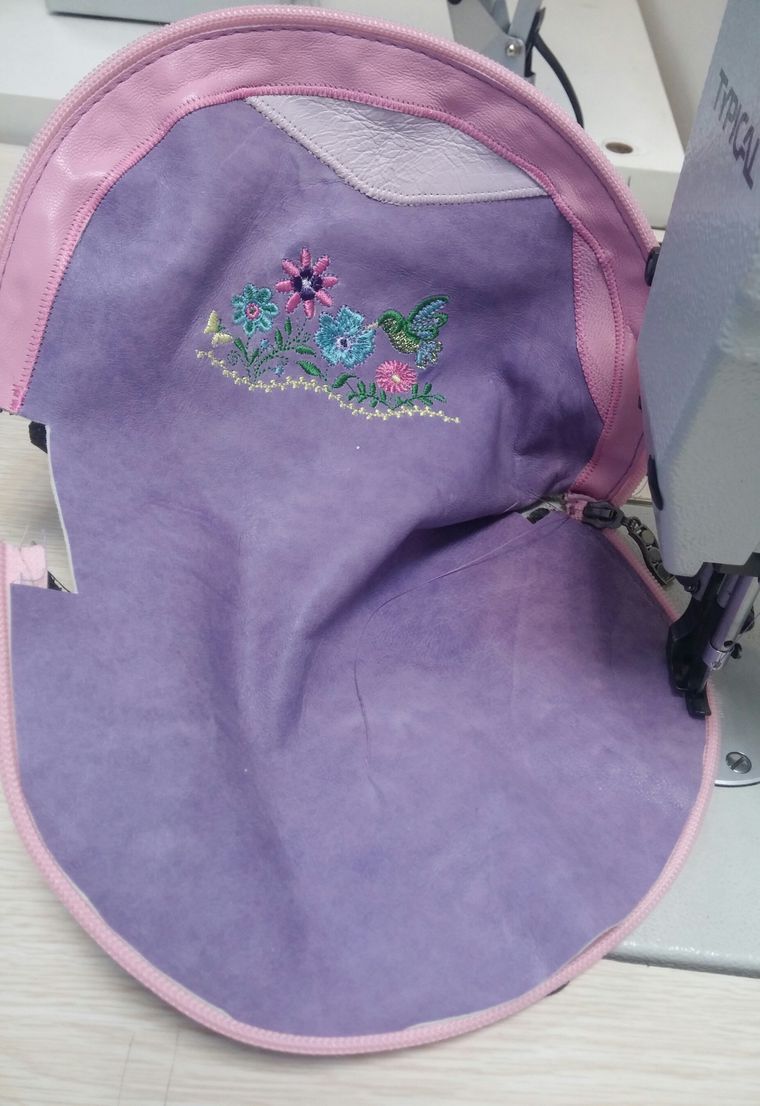
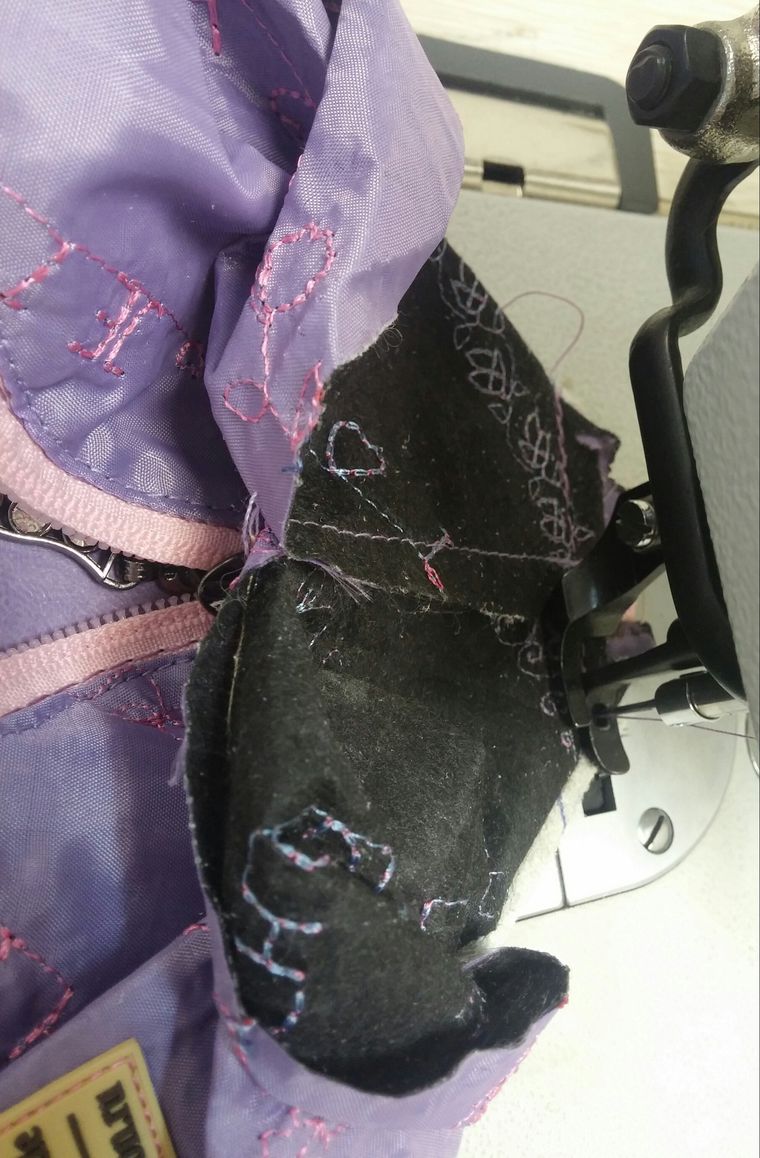
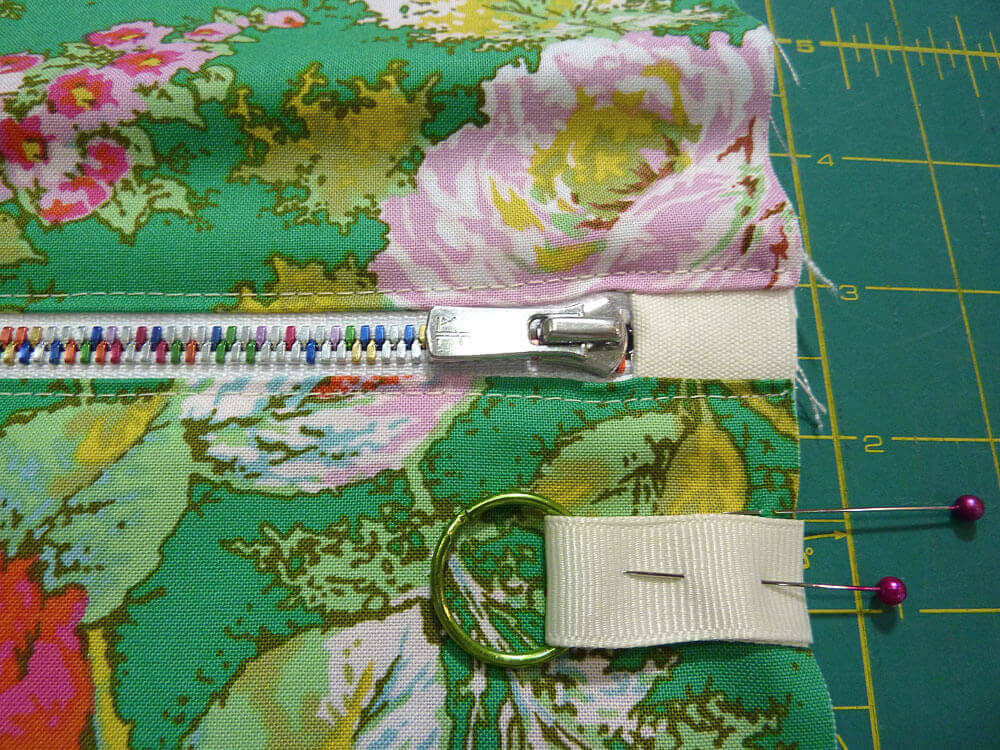
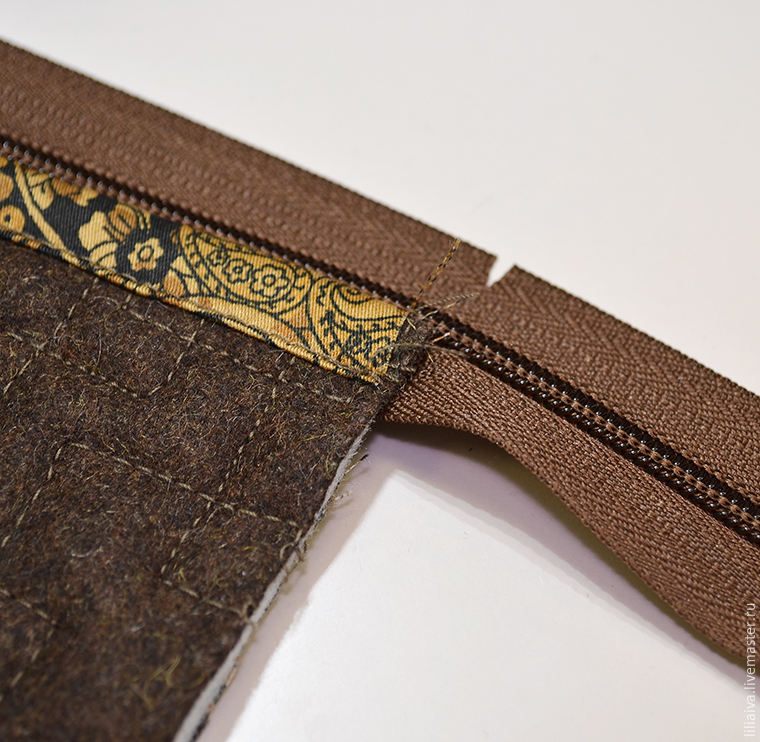
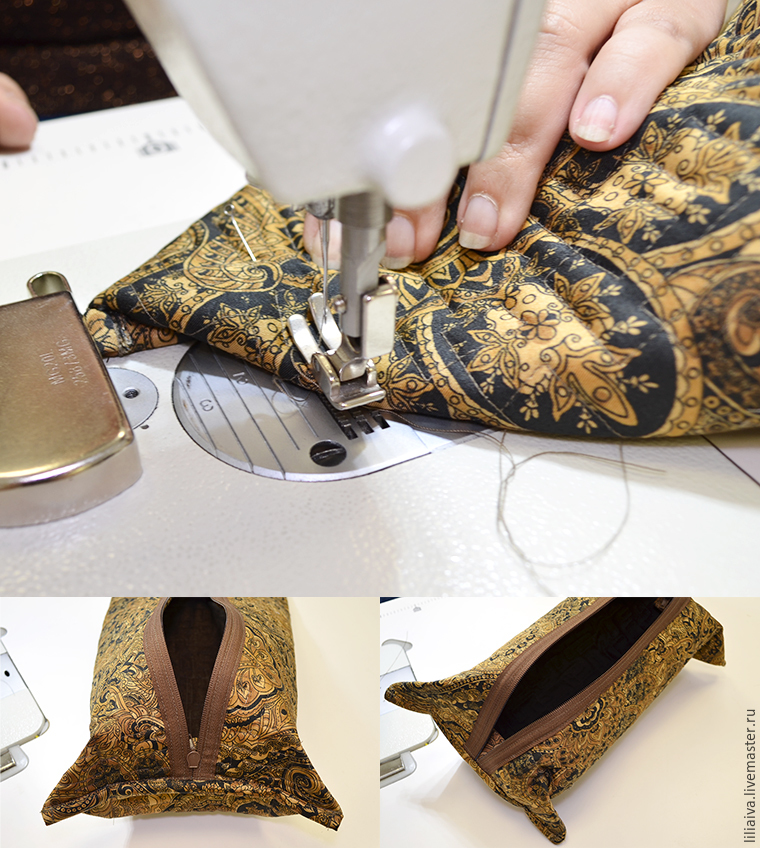
Now we sew another 1/4 of the middle seam of the lining on the other side. You still have a small hole for turning the corner, but this is enough to sew the corner. Then you need to connect the ends of the zipper manually with a needle or thread or on a typewriter and twisting it we sew up a corner. But I decided to add a half ring for the handle with a carbine. Some people like to put a makeup bag on something. To do this, I made a whip, hung a half ring on it and sewed it to the zipper, and only then sewed a corner.
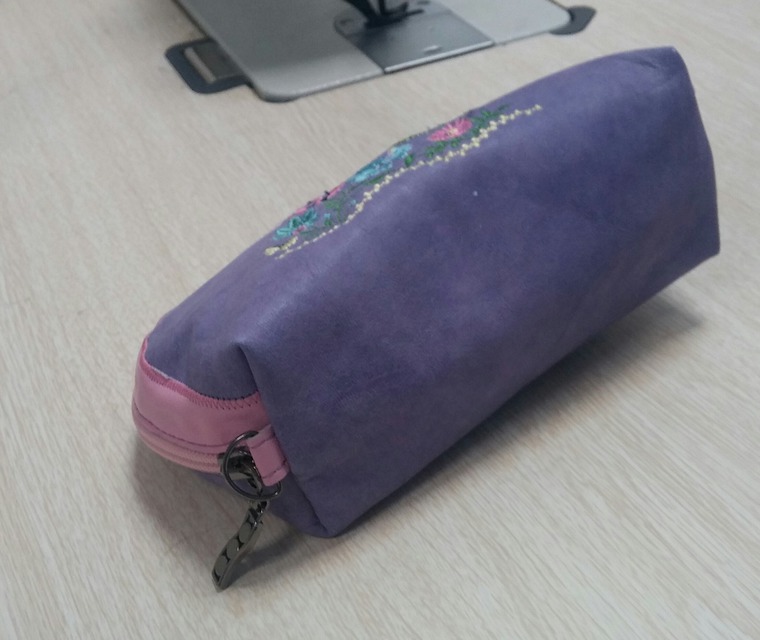
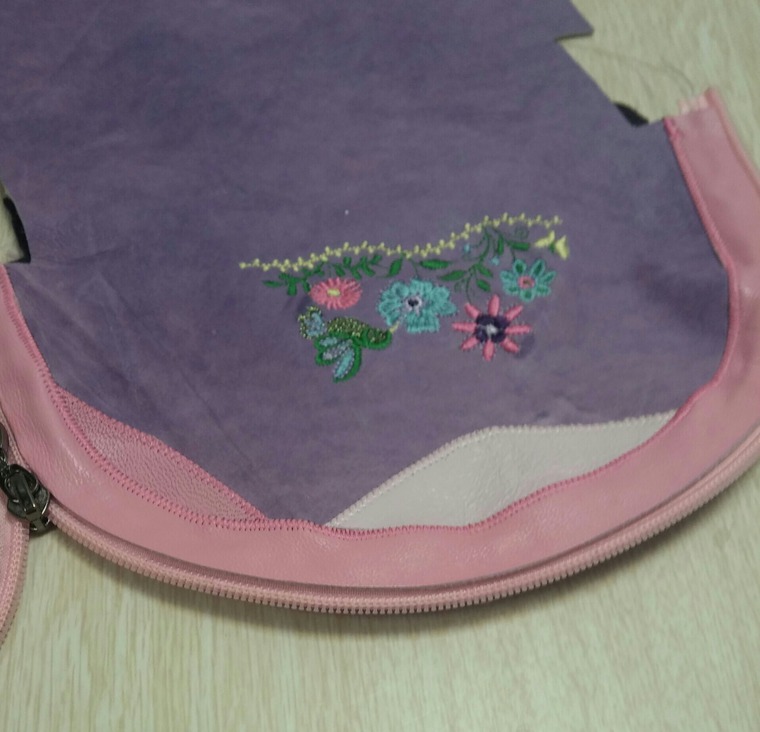
The cosmetic bag is almost ready, it remains to sew up the middle of the seam on the lining. You can sew in manually with a seam or typewriter, the choice is yours - as you like.
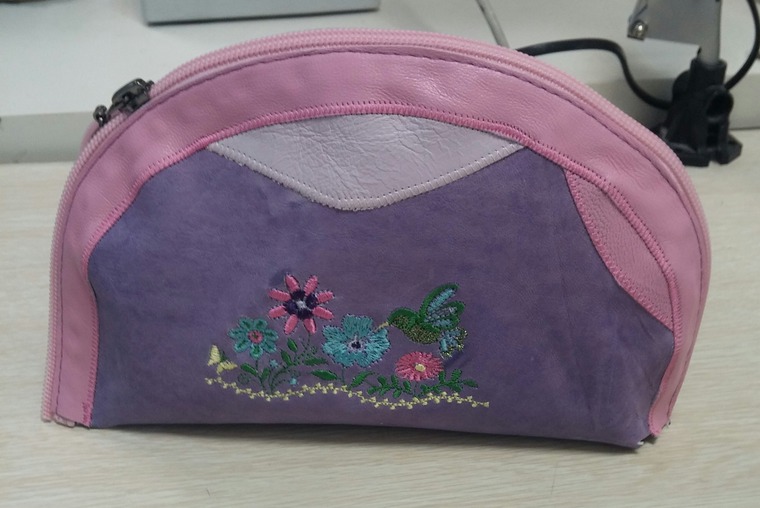
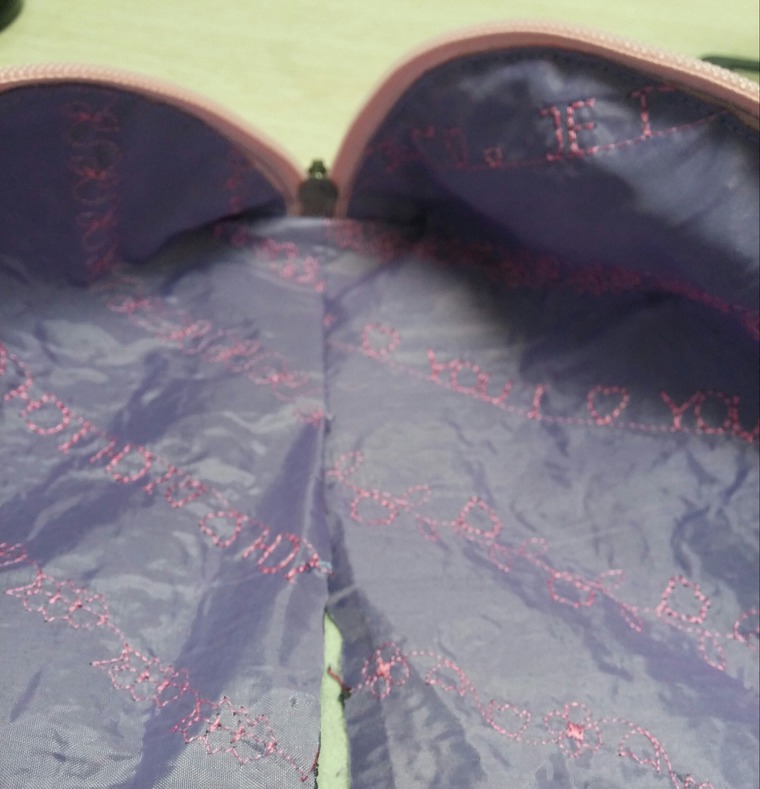
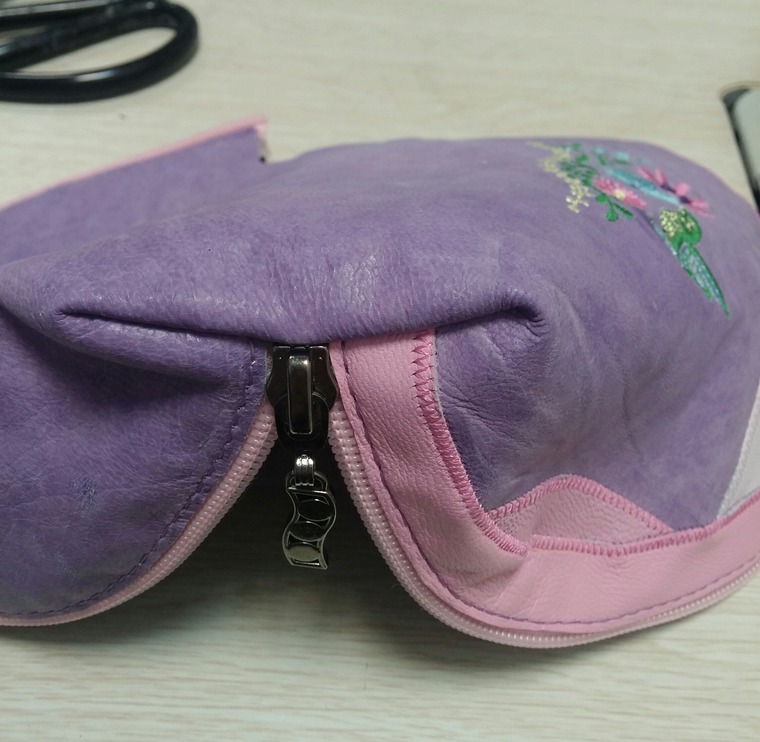
The makeup bag is ready. We make a handle with a carbine. And since I don’t really like metal on the dog of the castle, I like leather more, then you can replace the dog’s strap. Cut the strip, shape it, thread it into the dog and glue 1 side to the other and sew. You can connect 2 parts with holnitene. This is how you want at the moment. So, everything is ready.
![]()
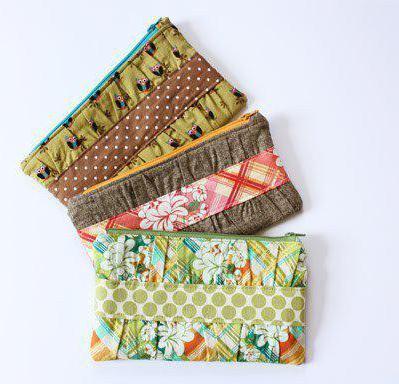
Cosmetic bags are made on the same principle as from pieces of leather, or plain.
Do you like to create original accessories? Do not know how to sew a make-up bag with your own hands? Patterns and useful tips that you will find below will help to realize interesting options with the help of accessible materials even to a beginner needlewoman.
From the article you will learn how to make a cosmetic bag with your own hands. A master class with photos will help you realize one of the models yourself. A cosmetic bag is a very necessary accessory for a woman. It is better to have several of these items.
Before you begin to learn how to sew a cosmetic bag, decide what you want to do: a thing of an unusual or standard form, color, design. A cosmetic bag may be like this:
- Flat or voluminous.
- Rectangular, square, in the shape of lips, heart.
- On a lightning, on a stave, on a flypaper.
- From fabric, leather, leatherette.
- With a flat surface or decorated additionally.
As you can see, there are plenty to choose from. You can take a specific sample or draw a sketch yourself.
What is required?
If you are a beginner needlewoman and have absolutely no idea how to sew it is better to take the finished ones and not waste time building them. Print the template you like on the printer at the appropriate scale and use it to get fabric parts.
If you decide to make a completely individual design, then you need to prepare the following:
- Thin paper, better millimeter paper.
- Ruler.
- Pencil.
- Eraser.
- Scissors.
- Material for performing the basics.
- Lining fabric, although you can do without it.
- Pins
- Tailor's chalk.
- A needle with a thread.
- Sewing machine.
- Fastener elements (zipper, Velcro, button).
- A chain, a strap for creating a loop, to make it more convenient to wear.
- Decor (flowers, beads, bows, beads, stripes, applications).
The amount of materials used and their list depends on how difficult you want to make.
How to sew a make-up bag with your own hands: patterns
You can’t do without a paper template. The simplest blanks are just one piece with folds. Such an example is shown in the photo below.
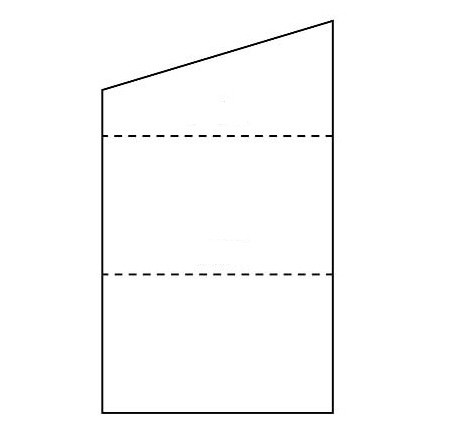 This simplest pattern of a cosmetic bag does not require special experience in sewing. The main thing - do not forget to make allowances for the seams. As for the form of the workpiece itself, it is not difficult to obtain from an ordinary sheet of paper of suitable proportions. Make two folds on the landscape sheet and cut a corner from one edge. All is ready.
If you want to make a more complex accessory with a symmetrical version of the clasp, you will have to take some measurements and draw elements with a pencil. You can again take a sheet of suitable proportions, draw fold lines at appropriate distances and carefully mark the triangle of the front with a fastener, such as Velcro. 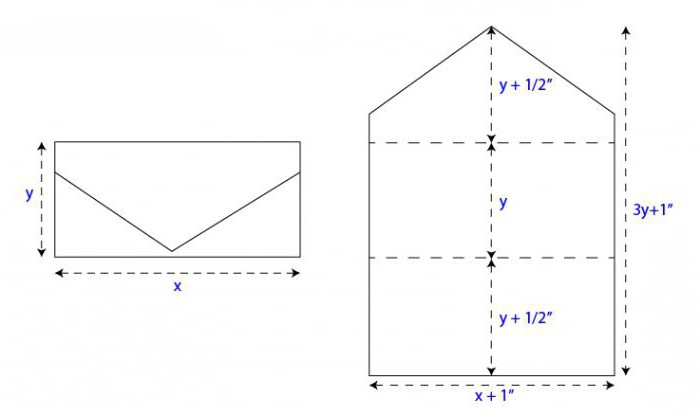 By the way, the pattern of the cosmetic bag can be made already taking into account the allowances for the seams and a small volume from the sides.
How to decorate the product?
How to sew a cosmetic bag with your own hands, even an inexperienced person can understand. Of course, it seems too boring and ugly. However, this standard form is easily compensated by the unusual decor:
- folds;
- frill;
- voluminous jewelry made of fabric;
- applications;
- beadwork;
- beads;
- artificial pebbles;
- bows;
- flowers from satin ribbons, nylon or chiffon;
- unusual button ornament.
DIY make-up bag: master class
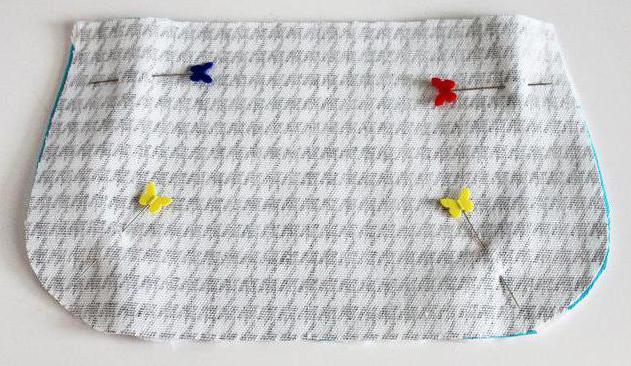
Consider an example more complex than shown in the pattern. If you understand how to make this product, a simple option to sew is not difficult. Making the cosmetic bag shown in the next photo will take a little longer than the pattern option, since here it is necessary to prepare more details and, accordingly, to sew more seams.
The work sequence will be as follows:
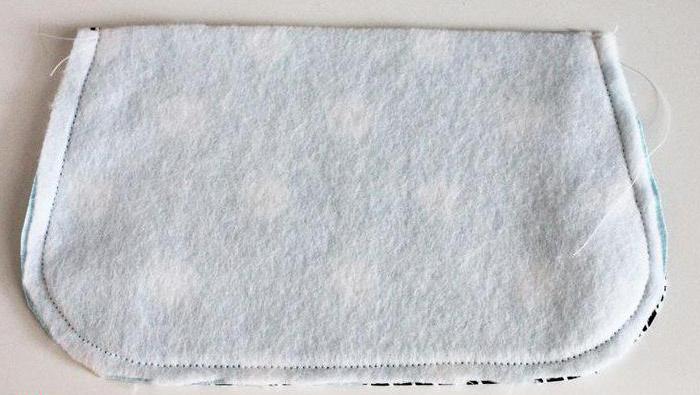
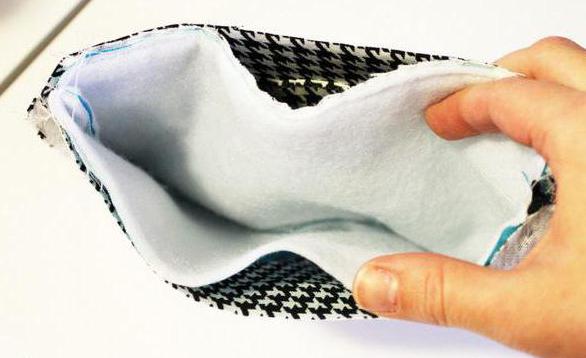
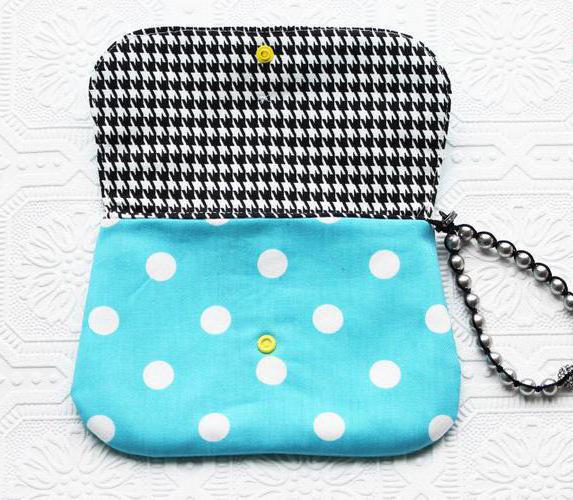
1. Take one or more shades of fabric for the base. Here, the outer side of the cosmetic bag is made of blue fabric in white peas, and the inside, including the fastening element, is white with a black pattern. A lining is also required. Cut out the required number of parts. Fold the elements in turn with their faces inward, pin them together, sew and stitch the seams. The photo shows an example with a closing element, which is made of different fabrics for the front and back.
2. Lining material is also sewn on this part to stiffen the element. As you can see, all three layers are stitched with one seam. After turning on the front side, the white lining will be in the middle between two decorative fabrics.
3. Using the same technology (with or without an additional layer), the main elements of a cosmetic bag are made. A closing part is sewn to them.

4. Make a lining inner layer and sew it.
5. Provide a loop for fastening the chain, ribbon, strap.
6. Install the fastener element (button, Velcro).
The presented option is quite simple to manufacture, since it does not require zipper stitching. The product looks beautiful due to the rounded shape, the flip design of the closing element and the original decor.
Conclusion
So, you saw how to sew a cosmetic bag with your own hands. Patterns are easy to build on your own or take ready-made ones. Create beautiful accessories from improvised materials. It is easy!
Which of the girls is not familiar with the situation: as always, at the right time, nothing can be found in the bag! And the right thing, according to the law of meanness, does not fall into the arm. We know what needs to be done: sew a convenient cosmetic bag! DIY make-up bag: depending on the fabric and the complexity of the pattern, it will take you just one evening to do this job. In order to sew cosmetic bags with your own hands, it is not necessary to have a sewing machine - everything can be done manually, with a “needle forward” stitch. If you sew carefully - no one will see the difference.
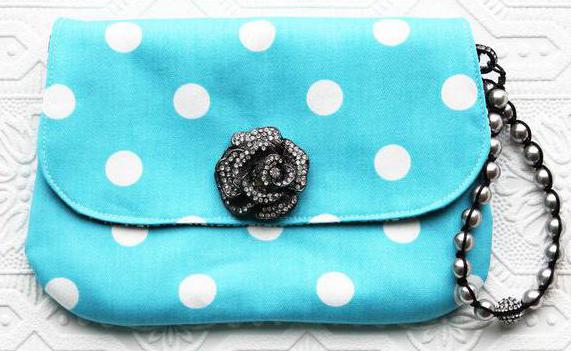
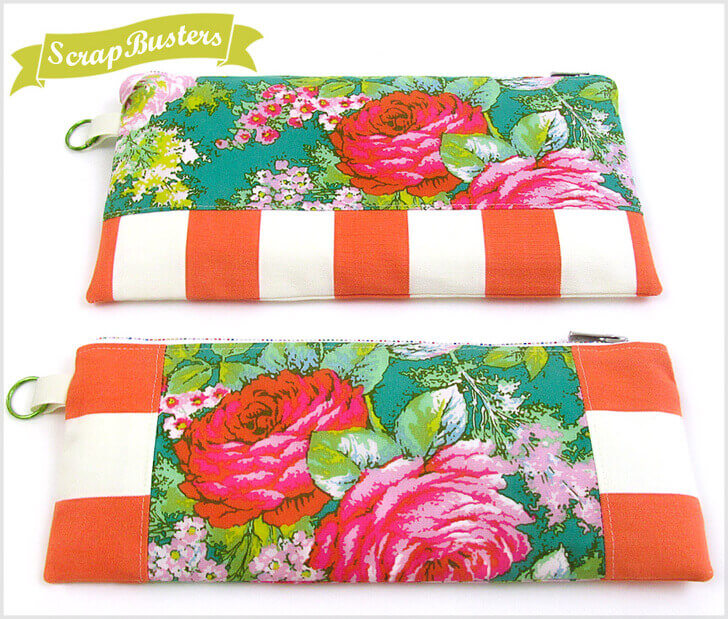
Cosmetic bag Rosa - big and small
First, we sew a cosmetic bag with a zipper - the master class is very simple. In the photo there are 2 cosmetic bags: large and smaller. We will sew the smaller one. In addition to storing cosmetics, it can be used by a woman and as a wallet - you can keep small bills in it. The pattern is not needed here, the size of the cosmetic bag is 23 cm wide and 14 cm high.
For work you will need:
- Flaps from the main fabric with roses 13/14 cm. - 2 pcs.
- 6/14 cm striped fabric flaps. - 4 pcs.
- Lining fabric - 25/28 cm.
- The synthetic winterizer - 25/28 cm. (If the lining is dense, then sew without synthetic winterizer).
- Lightning.
- Rep ribbon - 12 cm.
- Tailoring pins.
- Ruler, pencil, scissors.
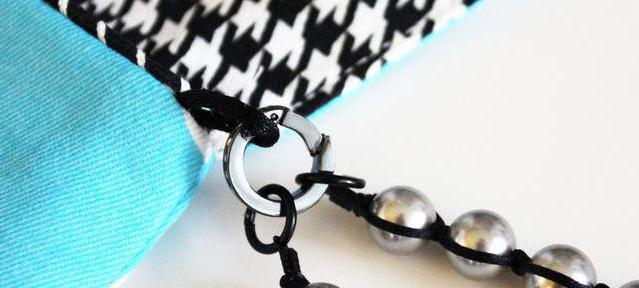
- Ring for decoration.
![]()
Shreds and lining were prepared, the rep ribbon was cut into 3 parts.
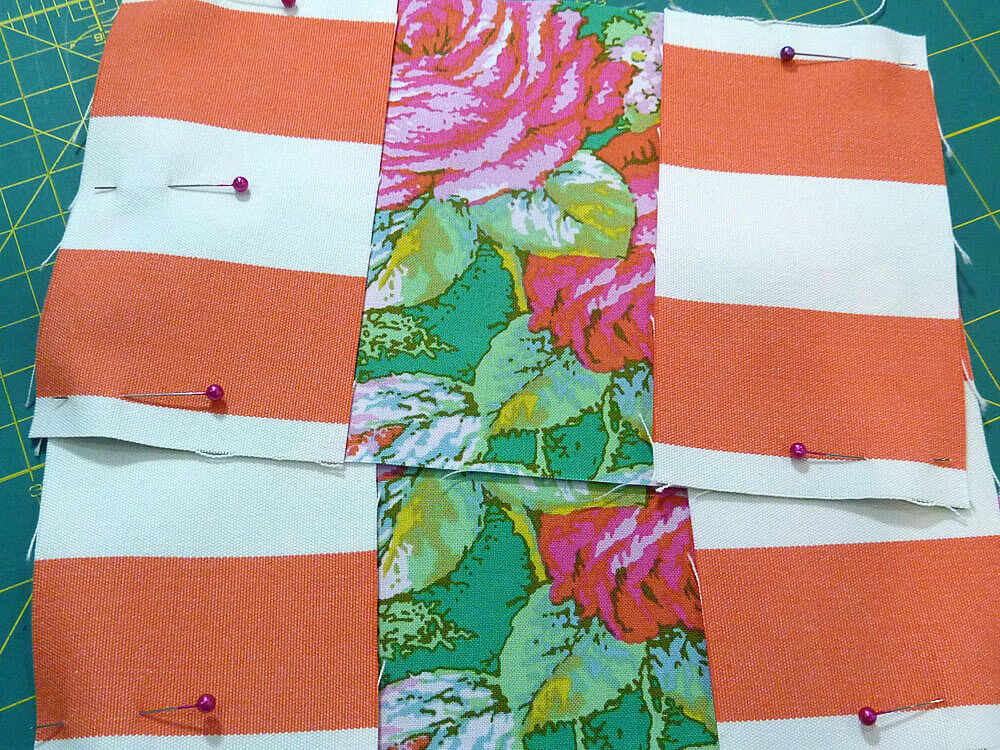
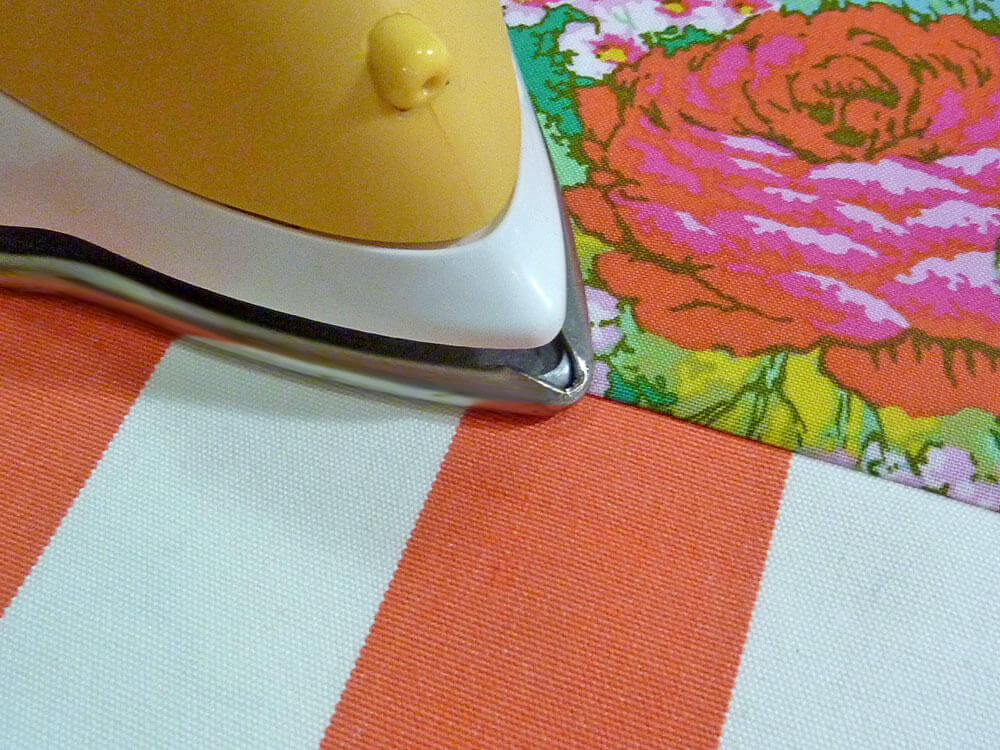
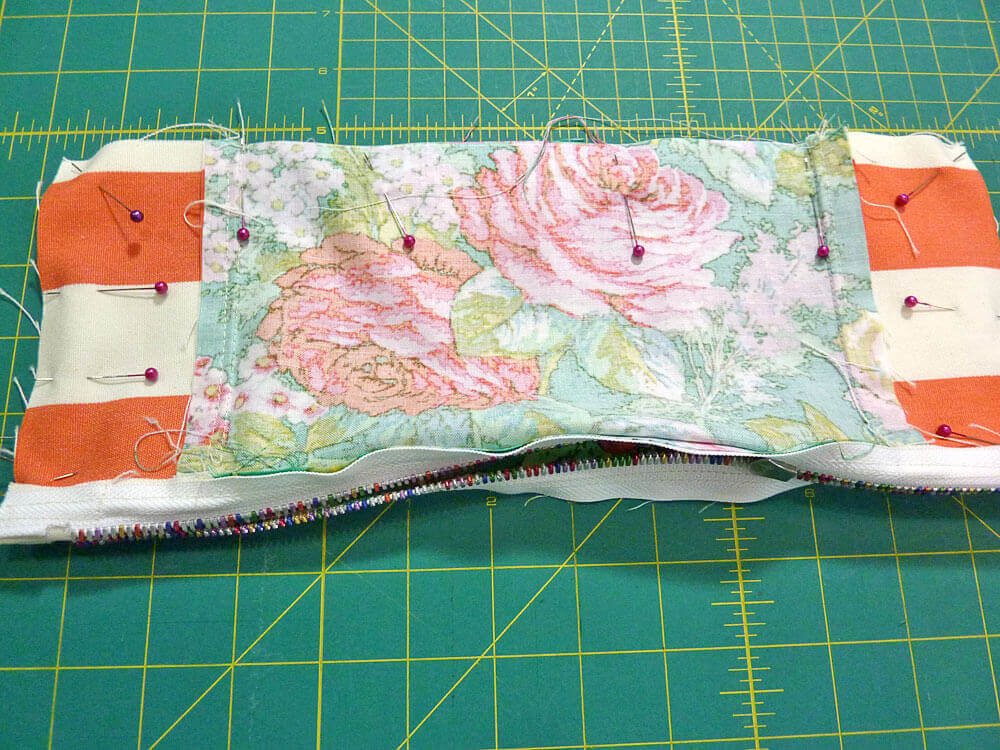
On the front side of the main part with a rose, we impose on both sides 2 parts in a strip face to the front. Stitch on a typewriter or sew on hands. We bend the seams towards the striped parts and iron.
If you are working on a typewriter, make a finishing line 0.5 cm from sewing off the shreds (seen in the photo below).
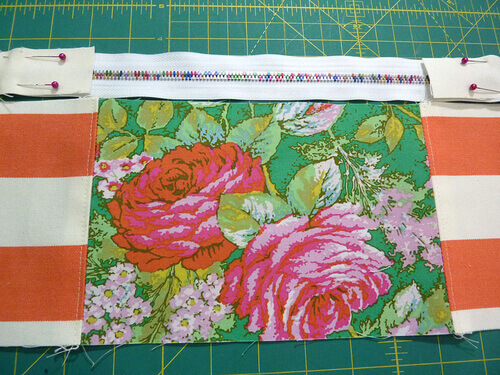
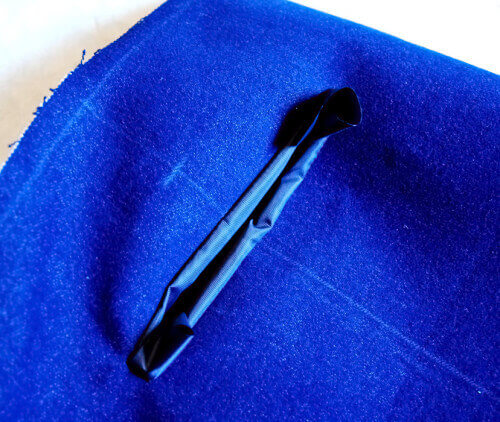
Next, we need to process the ends of the zippers with a rep ribbon. To do this, fold 2 pieces of tape in half, apply it to the front side of the zipper and pin it off with pins. Then we put the zipper on the front part of the cosmetic bag and also pin it with pins along the entire length.
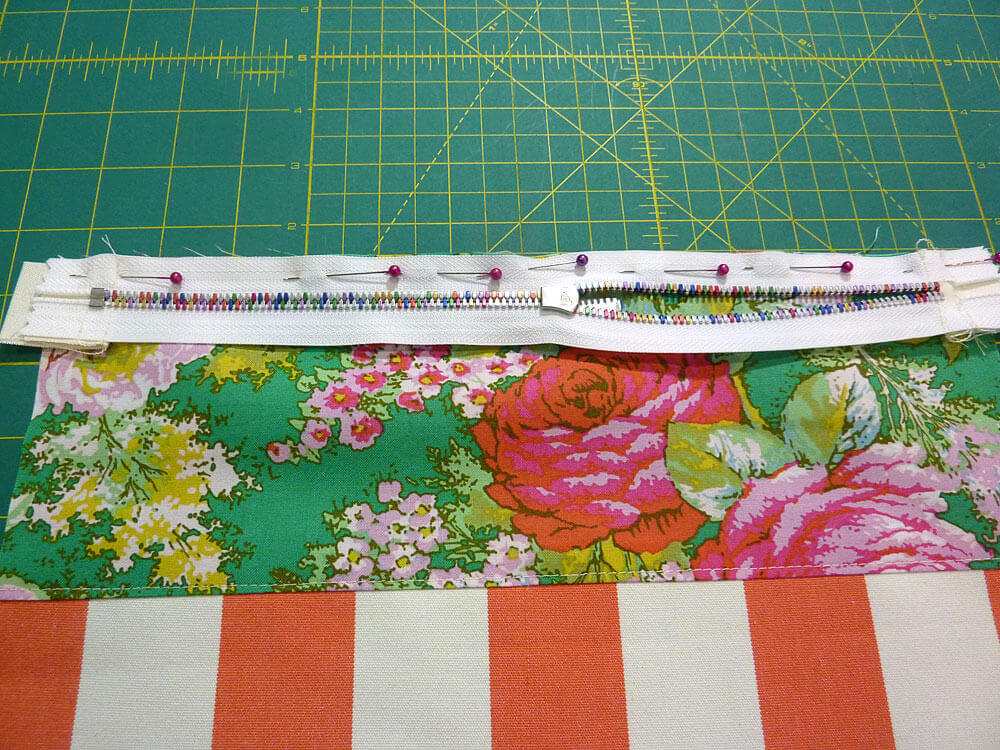
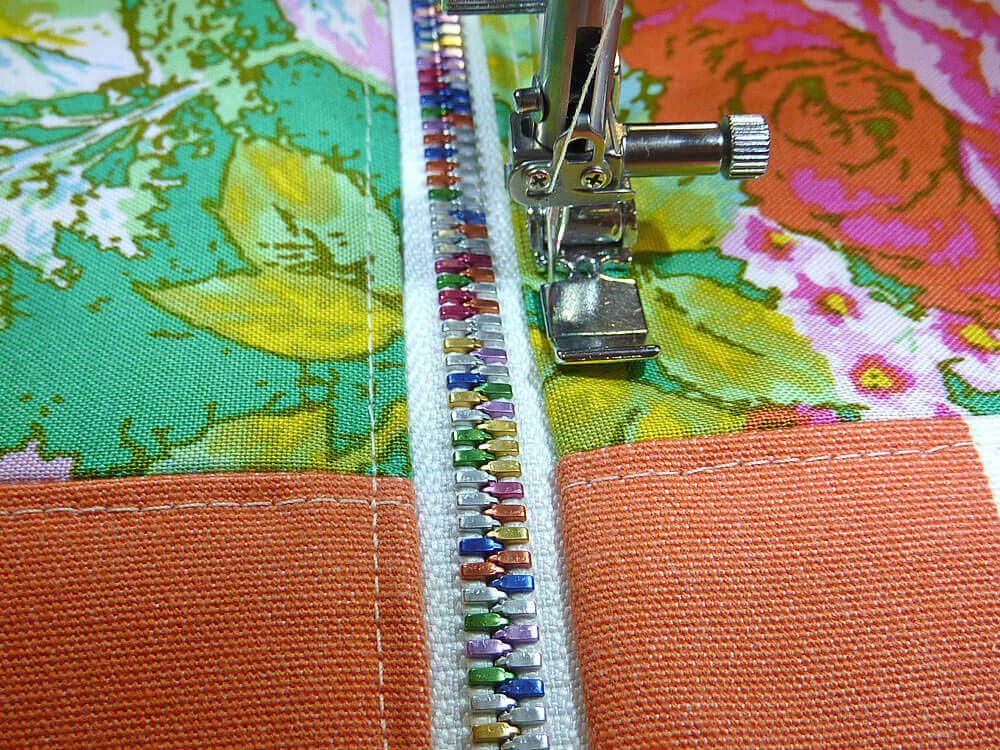
Sew the zipper first on one side, then unzip it and sew the second part of the zipper to the second half of the cosmetic bag. For beauty, you can decorate the zipper with a finishing line.
We pass the third part of the rep ribbon into a ringlet, then we pin it with a pin at a distance of 1.5 cm from the finishing line.
We continue sewing cosmetic bags. Turn inside out, align, pin the side parts with pins. We sew all 3 sides of the cosmetic bag. Seam width 1 cm.
If you decide to make a product with a synthetic winterizer, then it is advisable to sew it to the lining, so as not to get off.
Sew the sides of the lining. We turn the lining on the face, bend the top edge by 1 cm, press it with an iron. We put the lining inside the product. We stab with pins and hem manually by a hidden stitch.
![]()
That's all. If you increase the size of the product, then it will become more voluminous - it will already be a travel cosmetic bag. A cosmetic bag can be made with several compartments if, when sewing the sides of the lining, put another 13/13 cm flap.
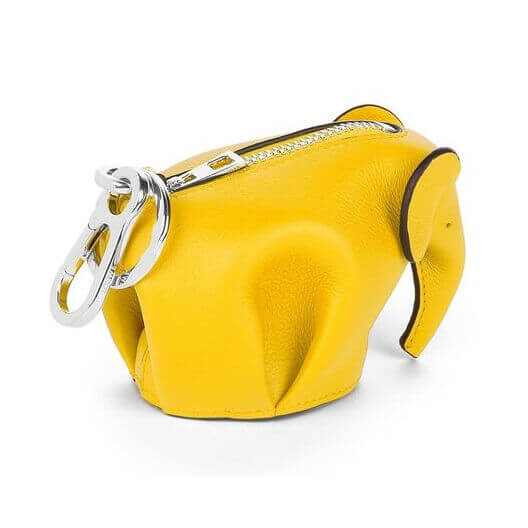
Recently, accessories in the form of animals have been especially popular, for example, in the form of such a cute baby elephant. How to make a cosmetic bag with an elephant - our master class will tell.
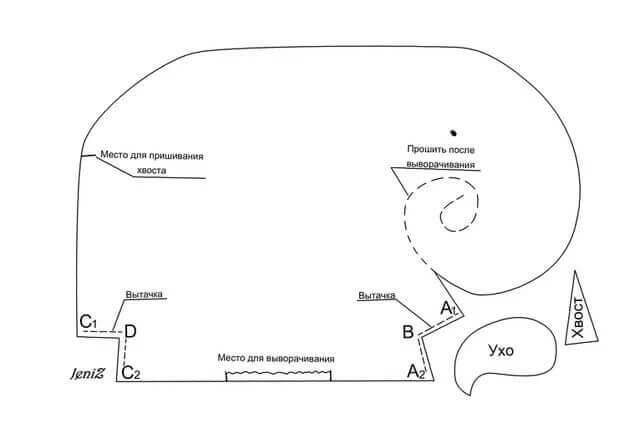
The elephant can be leather or felt. The pattern can be drawn by hand. Choose any. It is important that the elephant’s base be at least 30 cm in size. After the elephant’s pattern, you can estimate the folds on the base, and with this in mind, cut out the round base itself on which the elephant will be sewn. The diameter of the base is equal to the lower cut of the elephant. Next, we outline the cutout for the zipper. Another detail: in addition to two parts, it is necessary to cut the oval of the ear, which in the future needs to be glued or sewn to the main ear.
The pattern of white paper is not entirely successful, from it you can take only the oval of the base. This pattern will be more accurate than the previous one:

For work you will need:
- A piece of felt, leather, velveteen or suede.
- Zipper.
- 2 beads.
- Tailoring pins, scissors, needle, thread in the color of an elephant.
We draw on paper a pattern of the required size. If you want to make a product from velveteen or from denim, then you have to use glue interlining or doubler for shaping.
We make an incision on the back in order to insert a zipper. If you are making an elephant from a fabric, process the zipper with a liner so that the fabric does not spill out.
We process the zipper in the same way as a “framed” pocket: on the front side of the product we impose a piece of lining, 7-8 cm wide and longer than the zipper. Pins with pins. We mark with a chalk a “frame” 1 cm wide, and a length slightly less than the size of a zipper. Stitch the “frame” along our line. We cut like this, together with the main fabric, making triangular cuts in the corners.
We remove all our lining fabric inwards, iron it, and go along the “frame” on a typewriter or manually, straightening the “edging” from the lining 0.2 mm wide. We pin the lightning with pins, and stitch it, we get a neatly crafted edge.
We sew the “trunk” and the sides of the elephant. We sew the folds with a stitch.
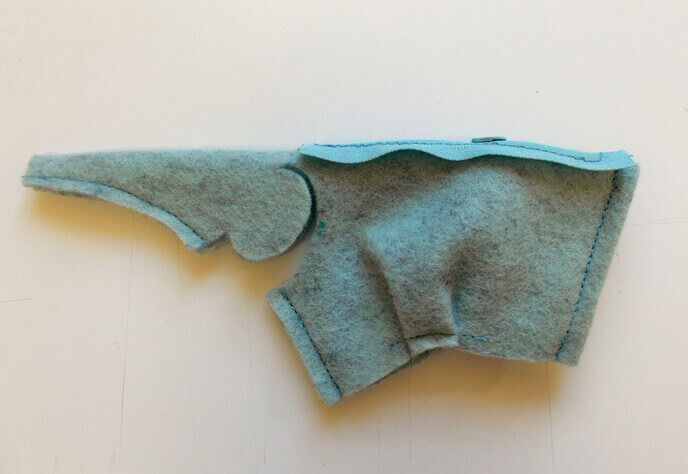
Glue or sew the “inner” ears to the ears. We sew the holes that remain with us.
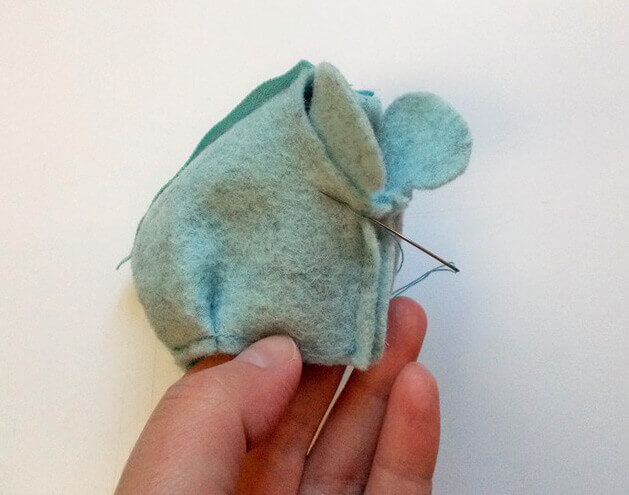
Pins off, and then sew the oval of the base.
That's all. The elephant is ready. You can sew beads instead of eyes, or you can embroider it with colored threads in ethnic style. Elephants bring good luck.
![]()
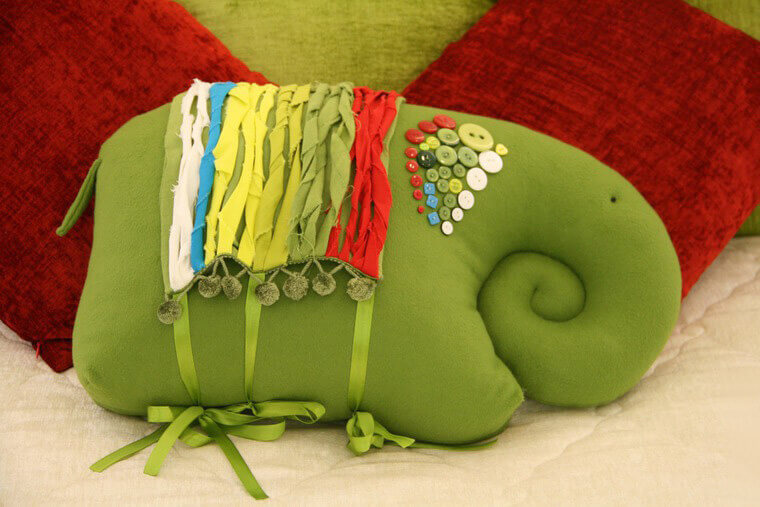
How to sew a make-up bag with your own hands? Another version of the cosmetic bag in the form of an elephant. Make a zipper on the back, and you can decorate with buttons, ribbons, bows, and so on.
How to make an unusual, cool makeup bag? It can be sewn round or volume, square or in the shape of animals. Here are just a few models: a wallet, a chest, a small bag - all of them with simple patterns.

Cosmetic bag for a modern girl - This is not just a handbag, but a thing that can emphasize individuality. If you are confident, brave and energetic and at the same time interested in hand-made, then we advise you to find the time to make a leather cosmetic bag.
Leather Searches
The first question that many needlewomen have in this case is where to get genuine leather and is it easy to work with, because it is scary to spoil expensive material.
In fact, finding skin is easy:
In specialized sewing stores. Moreover, more often you can find quality material in small shops located in the sleeping areas of the city. They do not catch the eye, have a small cross and a relatively low price policy. It is also worth looking for leather in stores selling goods for the production of shoes or upholstered furniture. Surely there are definitely suitable options! And if not, you will be offered to bring them to order.
In online stores of goods for needlework.
On the trading floors of Ebay, Taobao, Ali Express.
What to look for?
When choosing a skin, you need to focus on several points:
Type and thickness of skin. The most popular are pork, sheep and calf skin. In the first case, it is a little rougher and thicker, in the second it is softer and more pleasant, but also more expensive. There is also Cordoba leather (from horse croup) - it is perfect for your intended purpose, but often it is not loved for its excessive shine, which gives some kind of artificiality.
Manufacturer country. The leaders are Spain, France, Italy, Pakistan, Korea, China and Turkey. Italian leather is considered the highest quality and most expensive. Economy option - Turkish manufacturers. By the way, it is believed that the more severe the animal climate has grown, the rougher will be his skin after dressing.
Color of the skin. If you want to stitch a colored leather cosmetic bag, take wet wipes with you to the store. Before buying, wipe your favorite instance. If there are no traces on a napkin, feel free to pay for the goods. Otherwise, having acquired a coloring piece of skin, you will have bright not only a cosmetic bag, but also hands and things that lie next to it.
Useful Tips
Getting ready to sew a leather cosmetic bag, you need to keep in mind a few rules:
Leather cut details cannot be chipped and swept away, and seams can be torn apart - marks will remain on the skin.
The skin should be ironed from the wrong side with a not too hot iron with the steam function disabled.
When cutting, a paper pattern is never pinned to the surface of the skin, since holes are left on the skin when pins are removed. If you want to fix the pattern, this is done with adhesive tape.
When flashing leather products, a special needle must be installed on the sewing machine. If during the process the skin is difficult to advance, it is necessary to replace the usual sewing foot with Teflon or place sandpaper under the piece of leather with the smooth side down.
Master Class
In this master class we will tell you how to sew a simple oval-shaped leather cosmetic bag.
From the selected piece of leather, cut an oval. We duplicate it from ordinary fabric, which will become a lining in our cosmetic bag.
Two ovals are folded with the front sides to each other and stitched, twisted.
We sew in a zipper fastener. Its length depends on the size of the cosmetic bag - half of the oval around its perimeter. One edge of the lightning must be sewn to one edge of the oval, the other to the opposite. Thus, with a zipped button, the oval will be folded in half and will resemble a crescent in shape.
To make the leather cosmetic bag not look too simple, you can add some design elements - beads, beads, fabric flowers. And you can paint the surface of the cosmetic bag with acrylic paints.
I decided to try my hand at creating master classes. This, in the full sense, is my debut - I don’t have any experience in creating master classes, however, it’s time to start!
I suggest you sew a completely non-complicated, but very convenient travel cosmetic bag.
I don’t give sizes, because the design is so simple that everyone can choose the size for himself personally.
So, we need:
Above all, we will need “golden pens” and a good mood :)
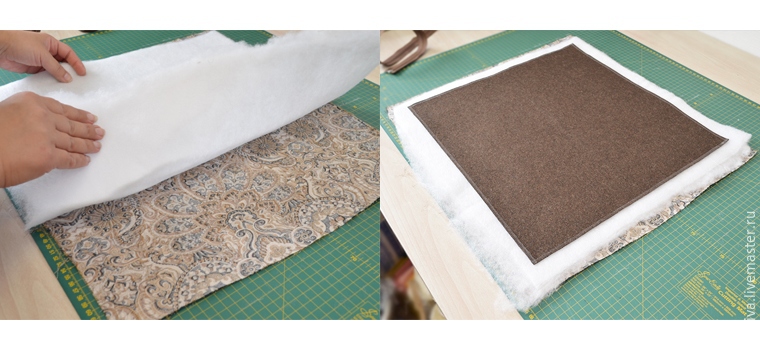
To begin with, iron the top fabric and lining, as well as the flattening sintepon iron:
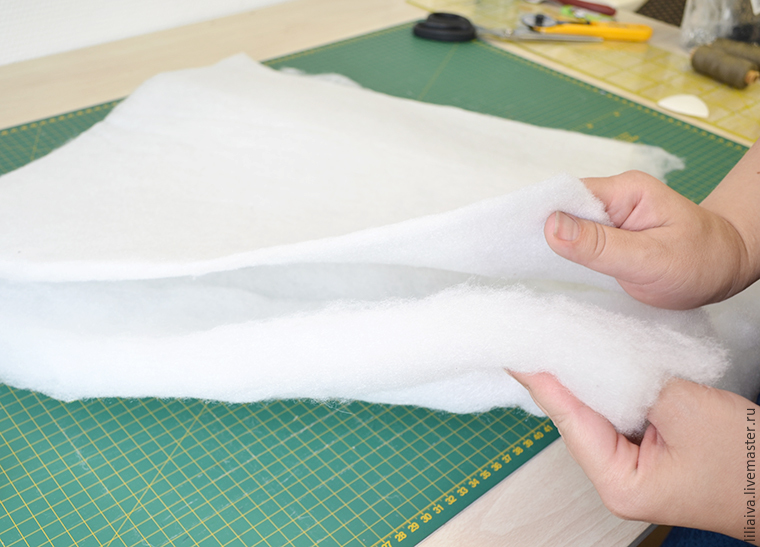
Here you can see the difference between the original thickness of the synthetic winterizer and the iron treated. This is done so that it is easier to work with syntepon.
Now add the "sandwich":
- the first layer - lining with the wrong side up;
- the second layer is a synthetic winterizer;
- the third layer is the top fabric with the front side.
Then we chop off all layers with pins:
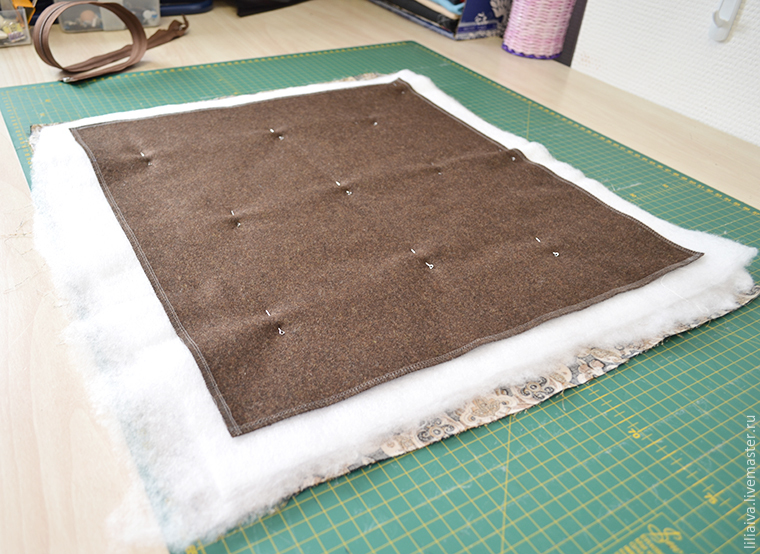
If you do not have the skills of free-running stitches, you can draw the fabric with disappearing chalk in any way convenient for you, for example, like this:
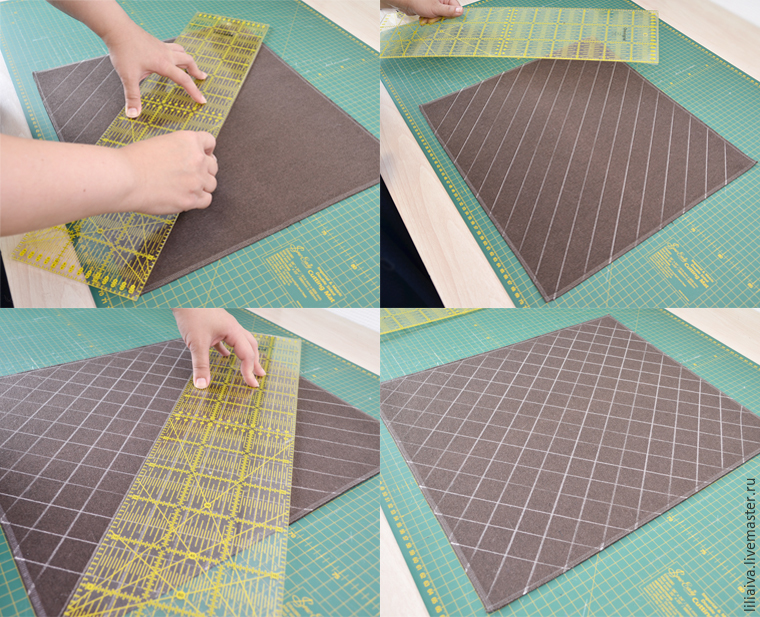
I chose a fairly simple geometric pattern of stitches:
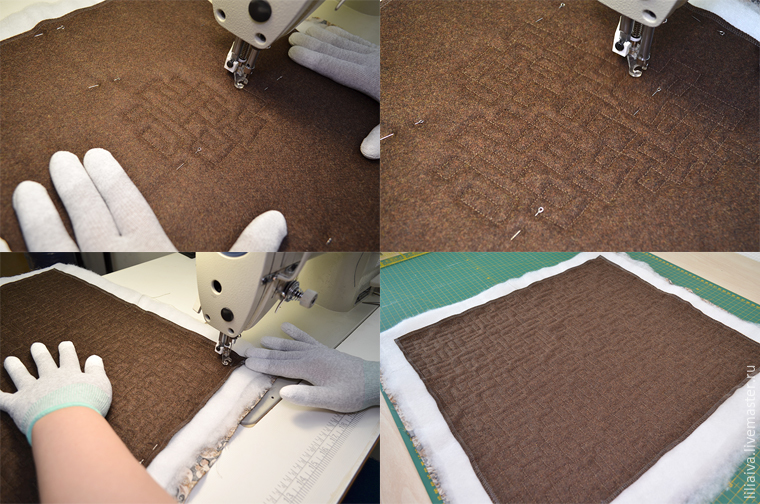
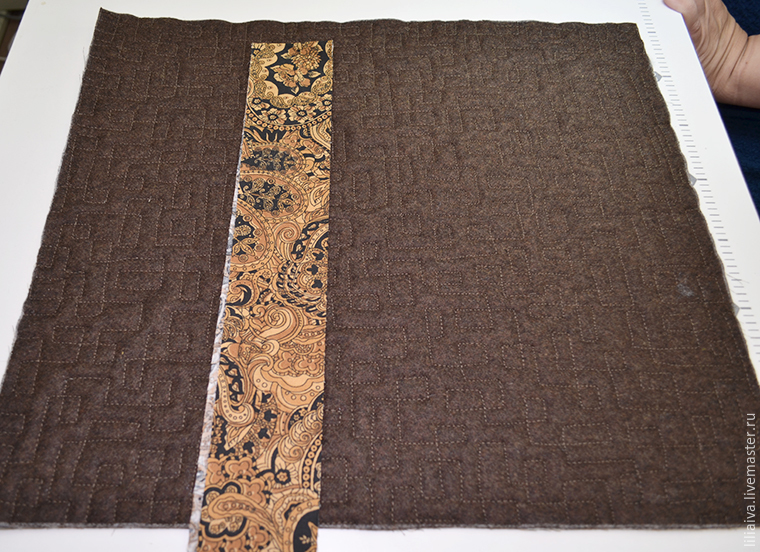
Having finished the stitch, we admire the result and cut off the edges, giving our sandwich a regular rectangular shape:
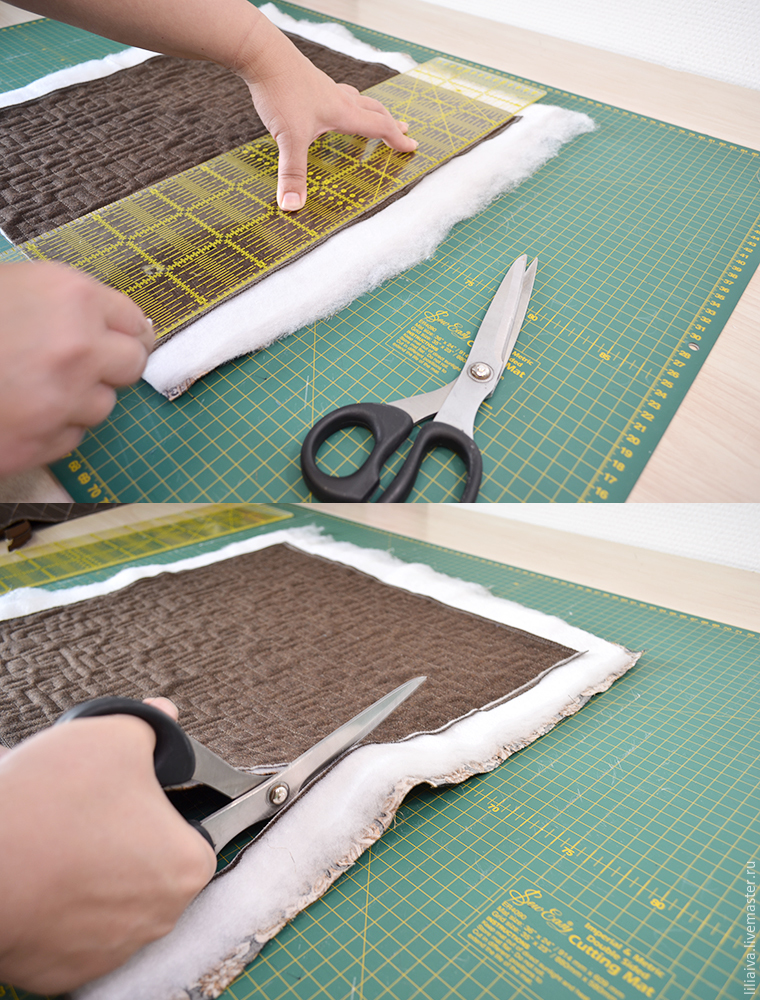
From the lining fabric we cut a transverse strip, 6 cm wide, for processing sections with an edge:
On two opposite sides, we adjust the folding folded in half at a distance of about 0.7 cm from the edge:
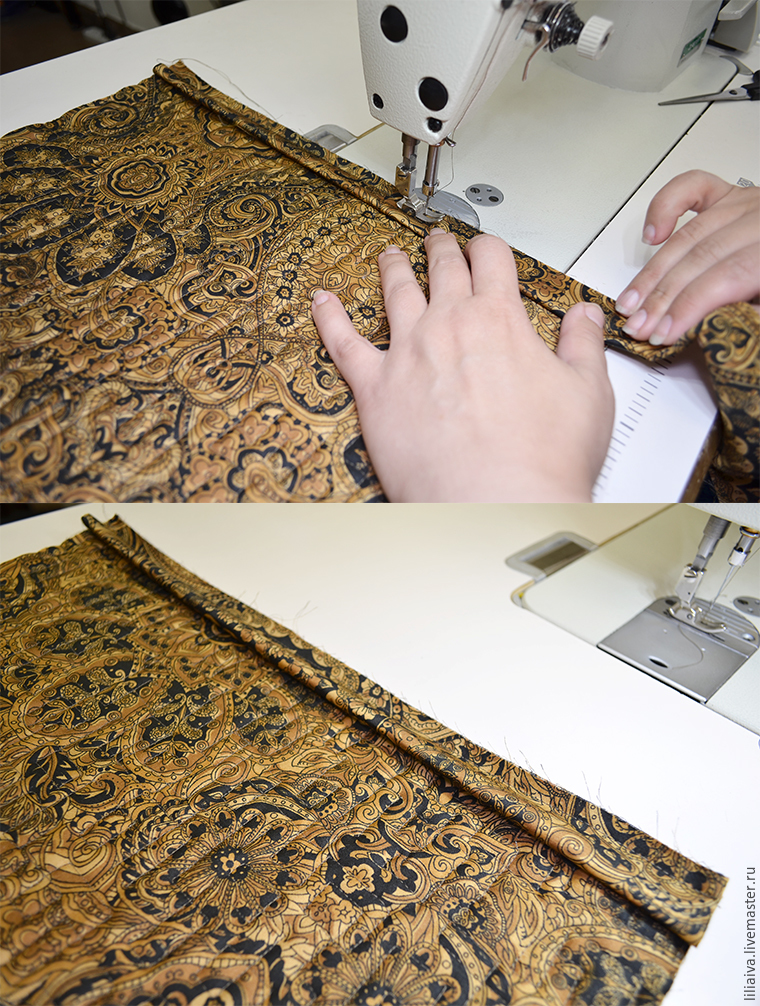
We bend the trim and make a line for it 1 mm to the edge (this operation can be replaced with ironing, but it’s more convenient for me):
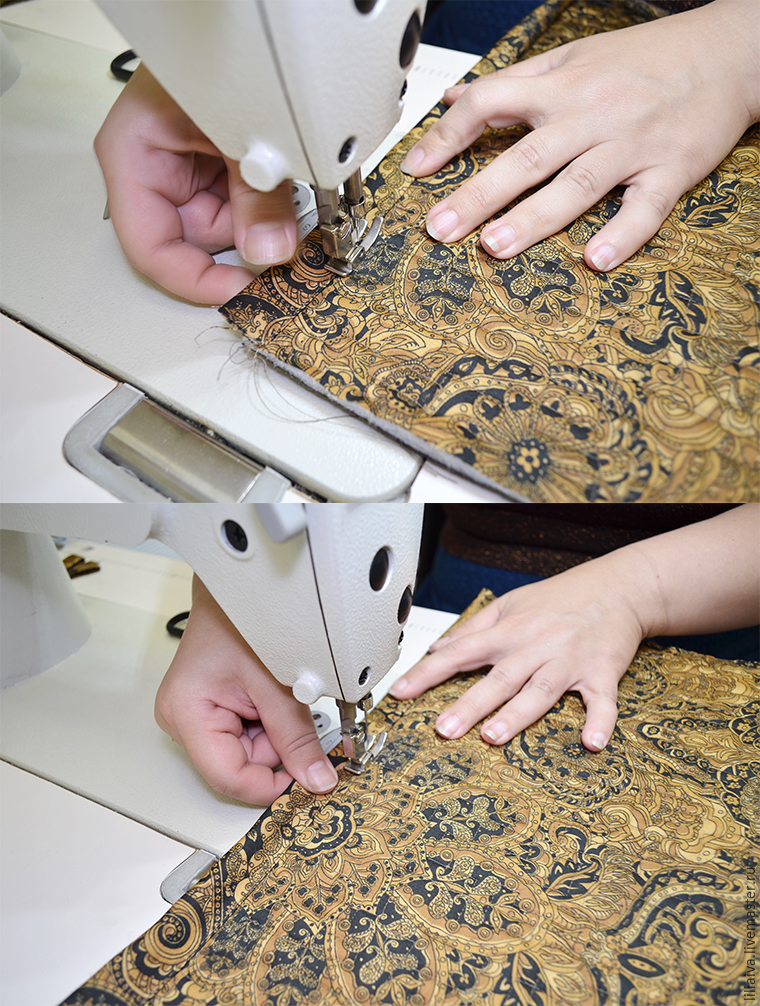
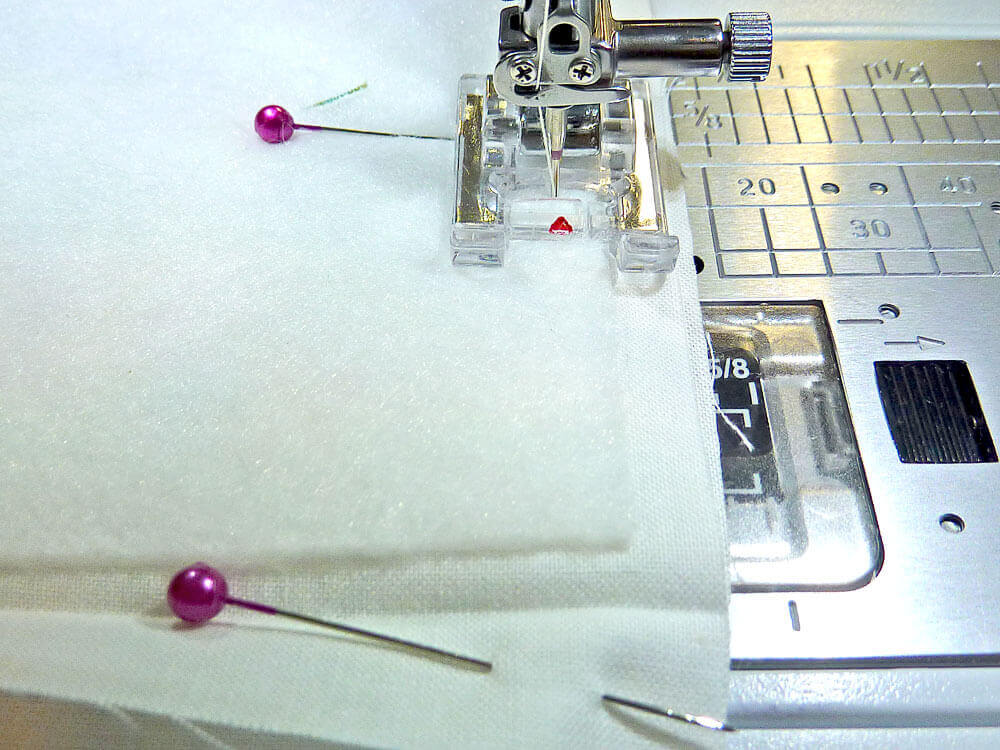
Now we sew the zipper. We put it on the wrong side, resting the cloves close to the edge of our sandwich. Stitch about 2 mm from the edge of the cut:
We cover the open section of the sandwich with a tape and again make a line 1 mm from the edge of the tape. In order for the machine not to distill the fabric of the inlay and oblique creases are not created, you can use a long needle:
![]()
As a result, the zipper will be sewn in two lines:
To avoid skewing when sewing the second half of the zipper, fasten it and make a notch at the beginning and at the end:
Fold our sandwich in half and mark the middle of two opposite open slices. I mark these places with a pin:
From the blank for make we make two loops:
We fasten them with a line on the middle marked earlier: 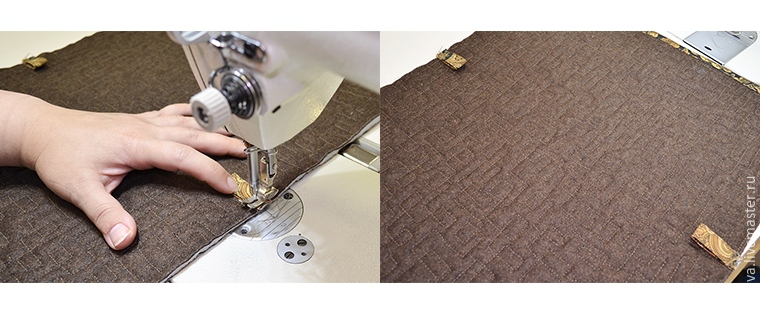
Sew the tag on the inside:
The next step is to fasten the zipper and, combining the zipper and belt loops, sew open sections. It’s convenient for me to make an extra line to the edge to squeeze the excess thickness:
Before stitching the opposite side, do not forget to unfasten the zipper, so that then turn the product: 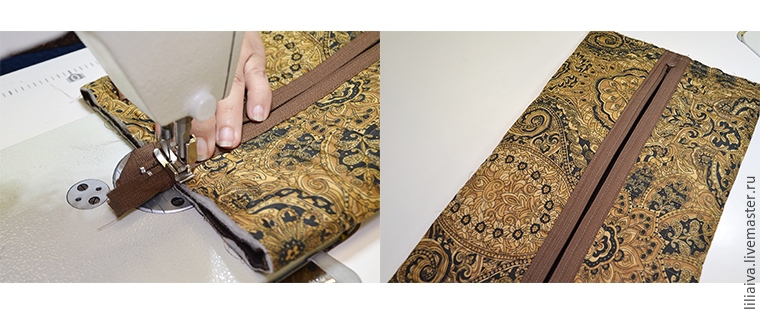
Open sections are processed with a strip:
In order to add volume to our cosmetic bag, we need to sew up the corners. With a pin, mark the bend and combine it with the reverse cut: 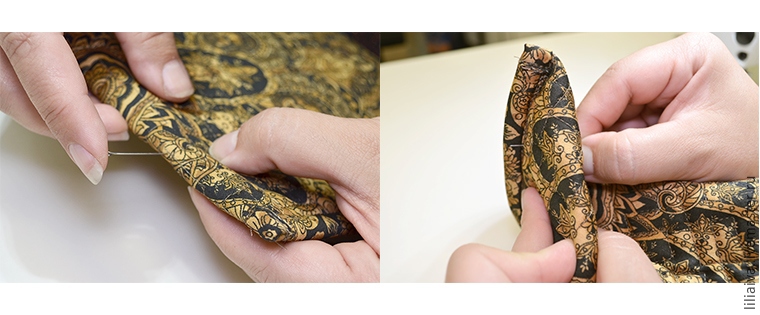
To ensure that all corners are the same, you can use a special magnetic limiter or mark them with a ruler and chalk. Thus, we add all four corners and scribble so that we get isosceles triangles, and the line is their base:
Now the fun part :)
We twist our design, admire and enjoy the result!
If something remains incomprehensible to you, ask, I will be happy to answer any questions :)
I wish you all a pleasant creation!