

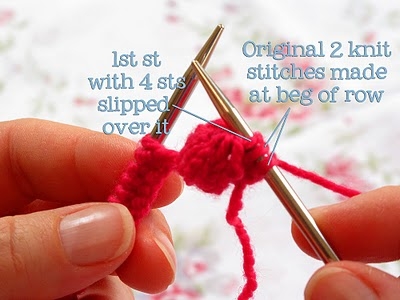
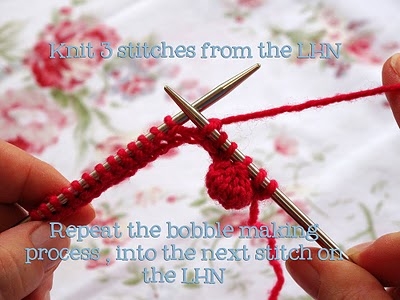
Usually assemblies are performed on hosiery samples; in their design they are similar to trims. Fold the knitted fabric along the row on the front side and knit each loop from the knitting needle together with the back wall of each corresponding loop of the previous row. The loops can be connected through one row to give a ribbed effect or to create an assembly. From small groups of loops you can create bumps. For a small bump - turn the work over, knit five rows of three loops, then knit together the resulting loops and three loops of the first row.
This photo shows that in a large assembly, the edge is made of purl loops, in a small assembly - of pico. The depth of the hem is four rows. Cones are actually small assemblies.
False folds
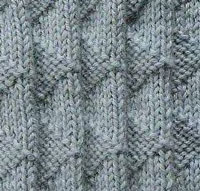
The wavy transition from the front loops to the wrong ones can be used to create a fabric with imitation of folds. Since gum is the basis, these patterns make the knitted fabric narrower and longer.
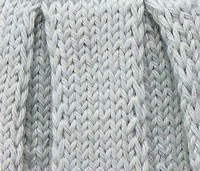
Real folds
Plan the folds on the stocking viscous sample and mark the folds in the folds with removed loops in the front rows. Remove one loop leaving the thread before work, to perform an internal bend; remove one loop with the thread at work to form an external fold. At the top of the fold, divide the total number of loops by 3 - for the front of the fold, the bent side and the back. Remove these groups of loops on the double-ended knitting needles and arrange the knitting needles so that a fold can be formed. Sew one stitch from each of the three knitting needles together to complete the top of the crease. Sweep the creases.
This method can be used to create pleated, bow or counter folds.
Trims and finishes
When the knitted product is ready, there remains the smallest detail, the finish of the product. On this page we will consider different ways of finishing knitted products.
Instead of rubber or garter stitches, you might want to try more durable double trims.
This technique is more consistent with sewing ladies' dresses, but it can be successfully applied in knitting, taking into account the selection of the appropriate yarn and design.
Beveled corners
Tapered corners made at the junction of the edge and trim, or between the edge and the front bar, may be the best solution. You will have to perform a series of decreases or additions to form an angle of 45`. Performed in alternating rows of shawl or pearl knit, they allow you to form an angle of 45`. In stocking, for the formation of the correct angle, mixed modeling may be required - in alternating rows and in each row, since the width of the loops is greater than their height.
I decided to make a small selection. Who has their own achievements, add, if not sorry, we will be happy! (S.Z.)

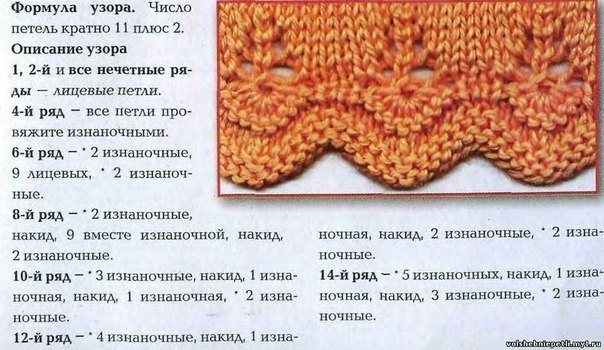
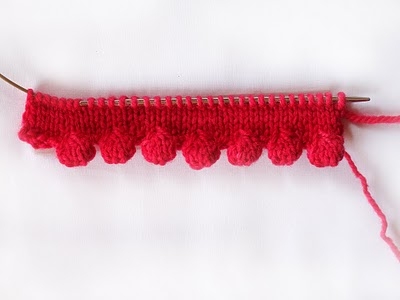
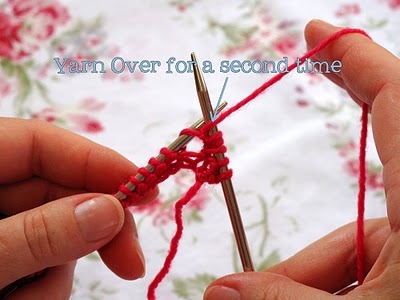
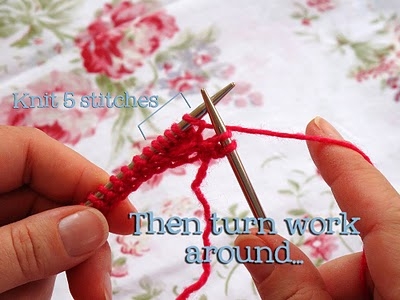
SPIDERS KNITTING ELEMENT

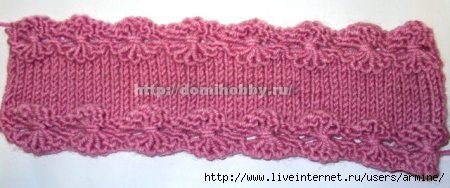
An interesting element of knitting "spiders", each "spider" is a group of entwined elongated loops. With this pattern, you can decorate the edge of a knitted product or diversify a calm facial surface by knitting a series of "spiders".
Description of knitting needles "spiders":
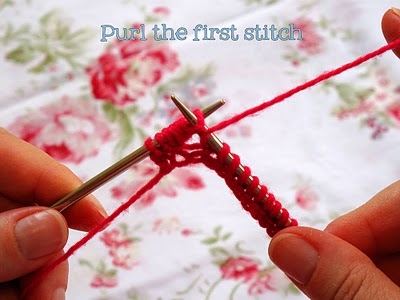
Knit the first row on the front side with purl loops, along the edge of the product it will be the first row.
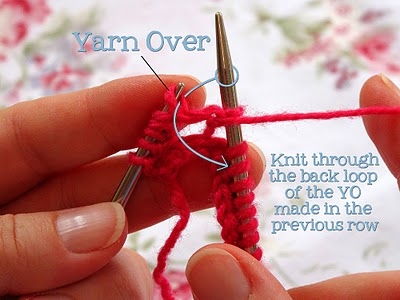
Knit the second row on the wrong side: chrome, * face.n, then knit the next 5 stitches with the front and after each loop, make three crochets, repeat from *, finish the row of faces.p., chrome.p.
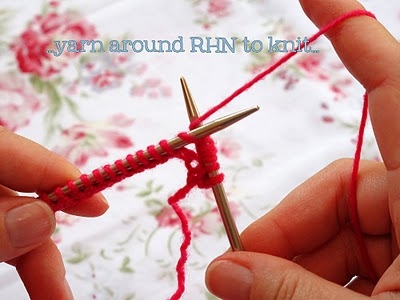
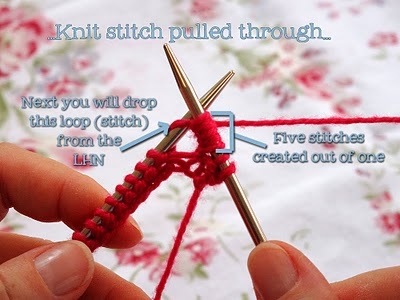
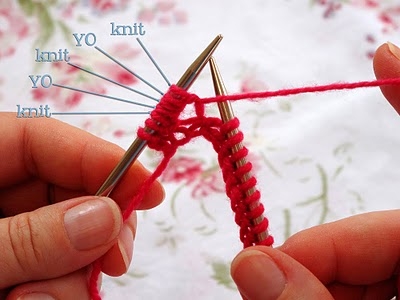
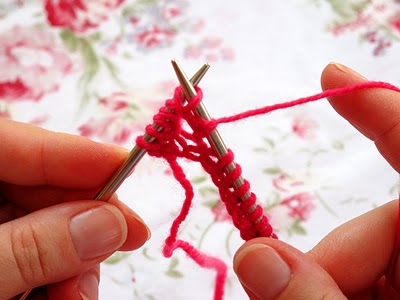
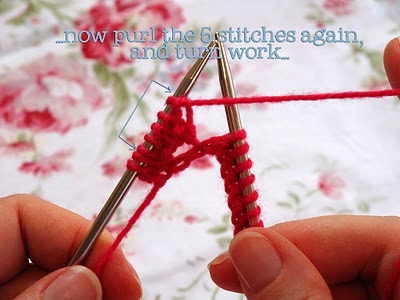
Third row: chrome., * P.p., before the next 5 loops, lower the crochets and stretch the loops due to the crochets on the extra knitting needle. Wrap the elongated loops around the working thread two times counterclockwise and move the bundle of wrapped loops to the right knitting needle without knitting. Then repeating from *, knit the wrong loop between the “spiders”, then pull the next 5 loops.
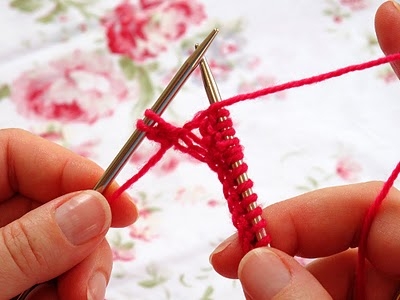
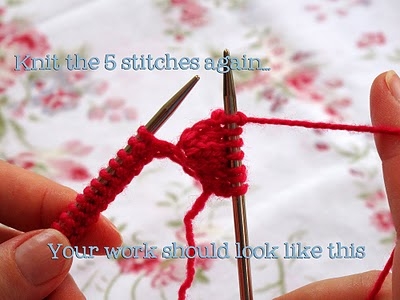
Fourth row: on the wrong side, knit all the loops, including those wrapped around the front.
Further, starting from the fifth row, on the front side, you can knit another wrong side, then the edge of the pattern will be more voluminous or switch to knitting the front surface, if you finish the product, you can close the loops.
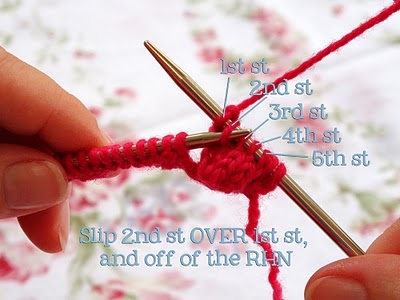
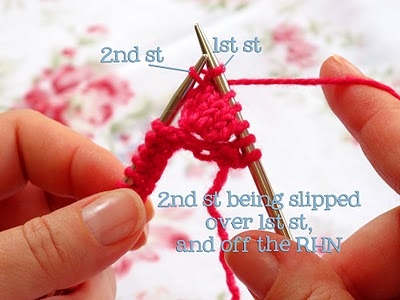
Cord closure
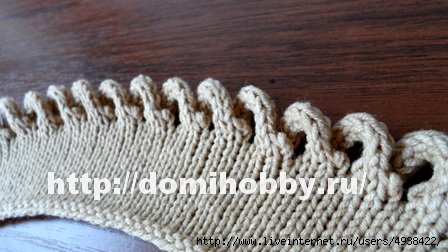
This knitting lesson is devoted to the method of decorative closing the stitches with knitting needles with the design of the edge of the cord. The connected cord lays in waves along the edge of the knitting, and an elastic beautiful edge is obtained. This original way of decorating the edge of the product is well suited for knitting women's or children's things.
The technique for closing loops with a cord is very simple. For example, the edge is decorated with a cord connected on three loops.
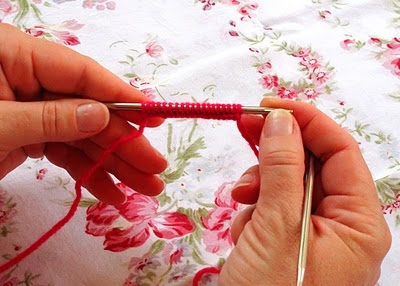
To knit the cord, you will additionally need two short stocking knitting needles.
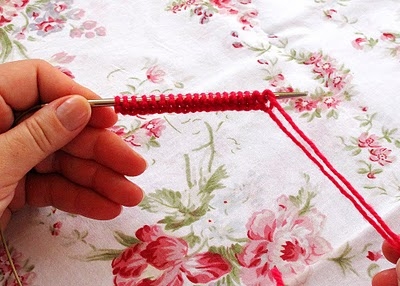
Perenite the last three loops on an additional knitting needle and knit a smooth cord on three loops. To do this, knit the loops face, then move them to the other end of the knitting needle, pull the working thread to the beginning and without turning the work again, knit the three loops face, so knit a string of 10 rows.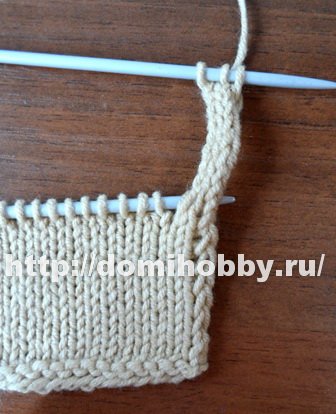
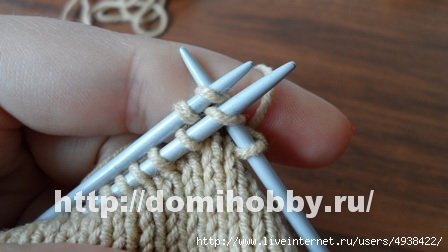
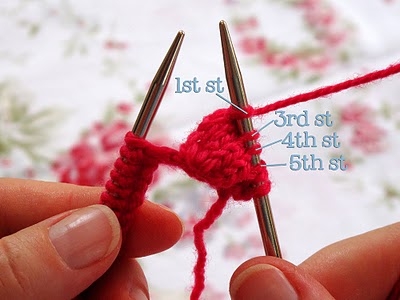
Connect together the knitting needles of the main fabric, it should be in front and an additional knitting needle with loop loops. Now knit together three loops from both knitting needles with the front knitting, for this, enter the working knitting needle into two loops at once from the first and second knitting needles.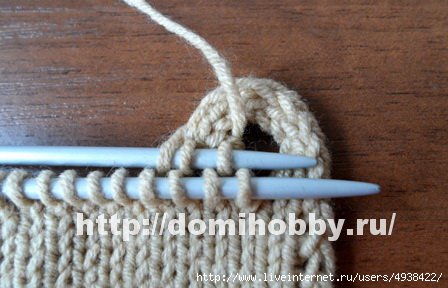
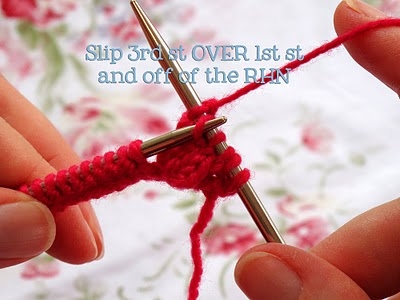
After securing the first wave, knit the second string on three loops of the same length to form a second length.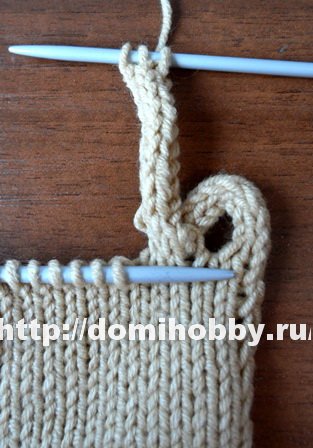
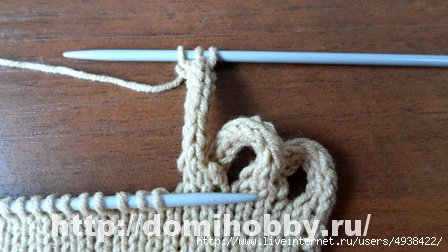
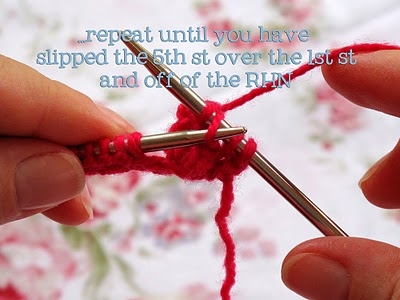
Repeat the previous steps until all loops in a row are closed.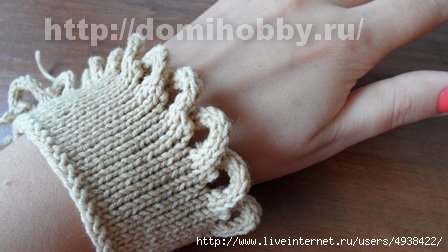
Another way, wordless (in the sense of English), but detailed.


.
An interesting way to knit the edge of the product
It can be combined with almost any viscous for processing the open edge, especially for seamless knitted planks:
-Two edges are made on each side, in the front row they are knitted as follows: the first one is removed without knitting, the second one is knitted with the front one; at the end of the row we remove the penultimate one without knitting (the thread is AT work), we knit the edge one with the front one.
They turned the knitting, in the wrong side: we remove the hem, without knitting, the next one we knit the wrong one; at the end of the row, we remove the penultimate one without knitting (the thread BEFORE work), we knit the edge one with the front one.
In the same way, you can make three edge loops so that the edge is thicker, we knit them in the same way, we do not knit in a checkerboard pattern.

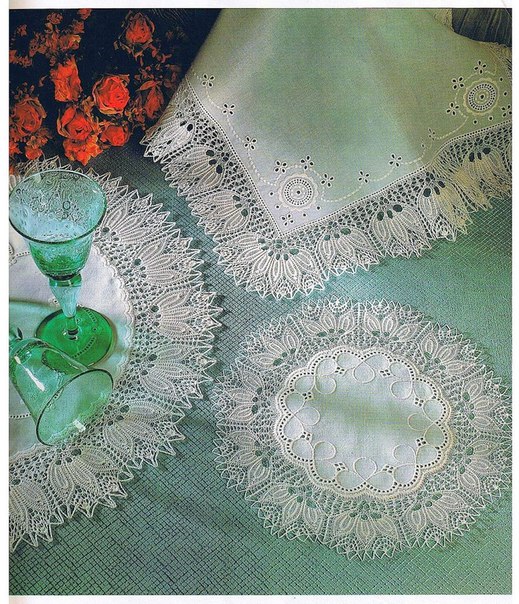
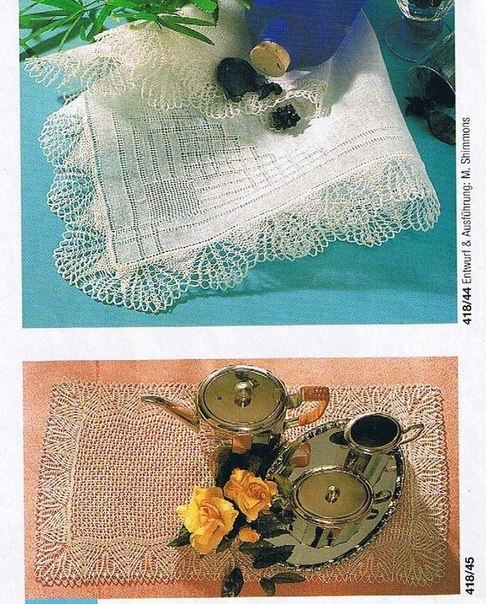
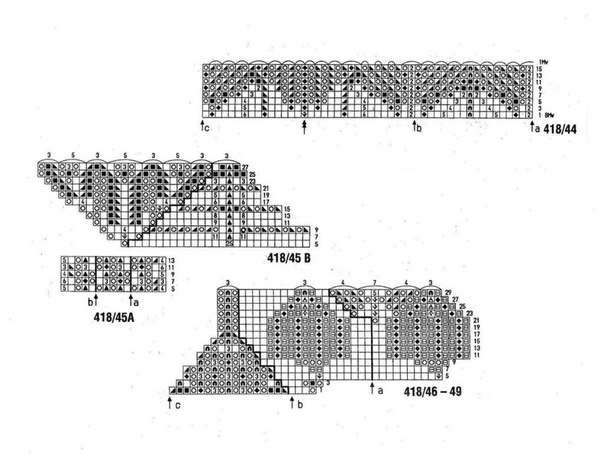
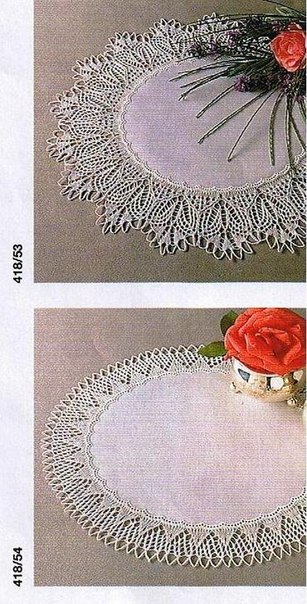
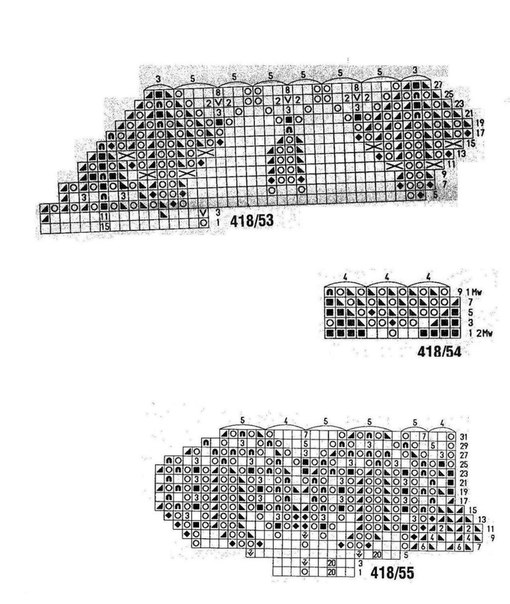
A selection of stunning border patterns!
1.
2.
3.
4.
5.
7.
8.
9.
10.
With fringe
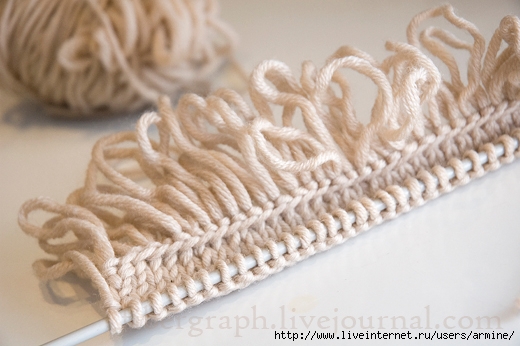
A very interesting set: the fringe will turn out strong, in the form of loops or, if cut, a lock.
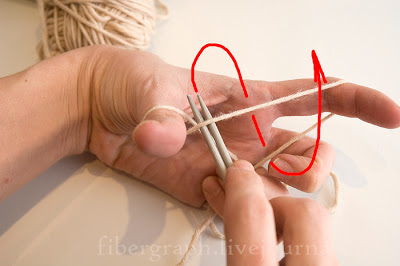
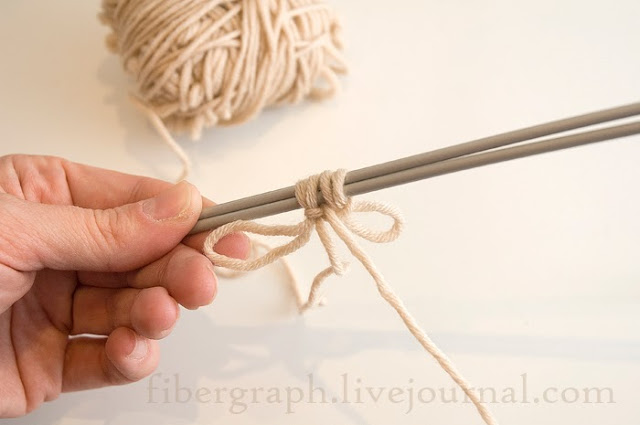
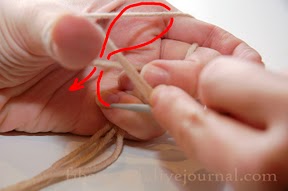
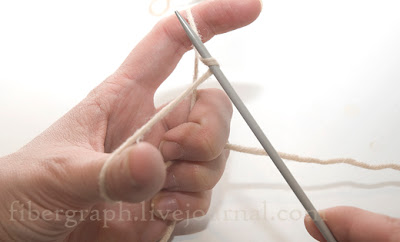
Starting position: the thread from the ball on the index finger, the tail lies in a loop on the big one.
We put two knitting needles together, we direct them under the thread on the thumb ...
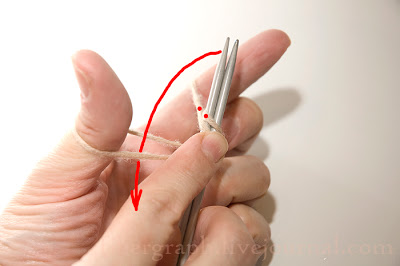
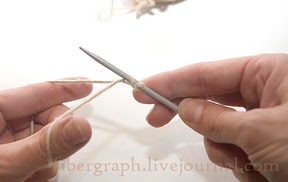
Dropping the thread with thumb and pull the knot with the thread coming from the ball.
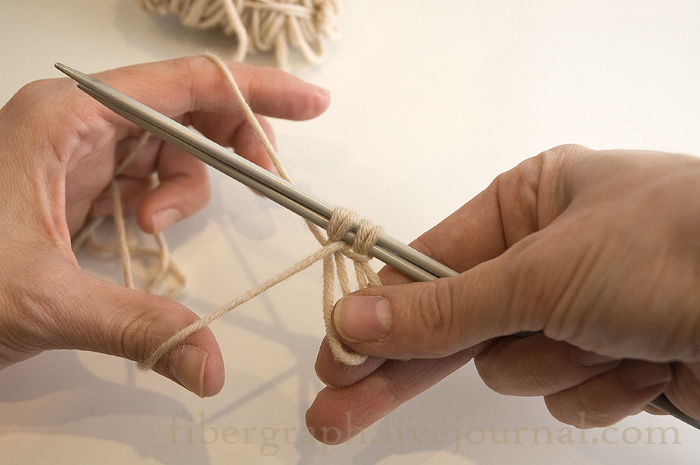
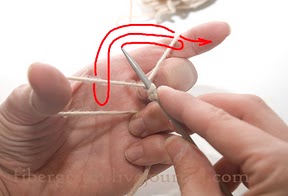
Reset the thread with forefinger (this is the first loop of the fringe), we send it to the right hand, at the same time placing the thread from the ball in front of it. Adjust, if necessary, the length of the eyelet by pulling the tail.
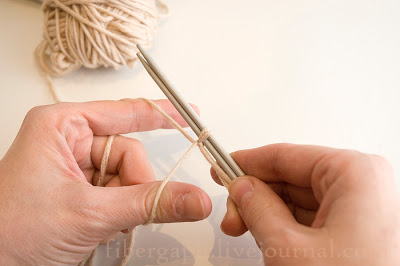
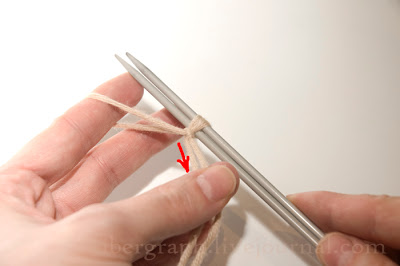
Again, we direct the knitting needles under the thread on the thumb, grab the loop on the index, etc.
To adjust the length of the fringe stitches, it is convenient to use a cardboard or plastic template. I was too lazy to make a template - the loops were not exactly the same.
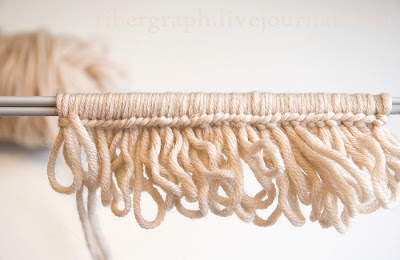
The result of the set will be a series of double loops on the spoke. In the next row, you can begin to knit the planned pattern, knitting each double loop as one.
THREADED THREAD KIT
Essentially the sameusual way, with the only difference being that a thread is involved in it.
So, take the thread from the ball and fold it three times.
We draw the thread on the thumb of the left hand so that the loop of the thread is between the thumb and forefinger, and the thread going from the thread to the ball would go through the index finger.
Insert the needle into the loop of the thread ...
Pull it on ourselves, then, according tothe usual way, we go under the loop on the thumb, we hook the thread on the index finger from the bottom up and go back to the loop of the thumb.
The edge drawn in this way has a noticeable edge, moderately elastic and quite decorative. Beforebulgarian Conceptionhe is, of course, far away, but this set cannot be called universal.
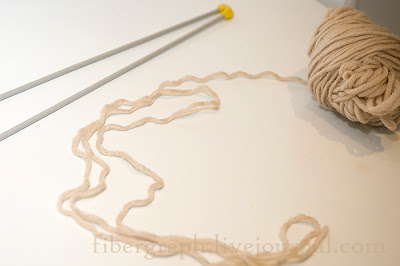
MACHINE EDGE
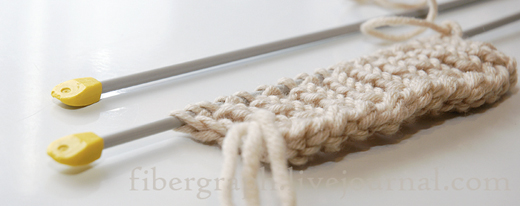
A dense, even edge is the result.
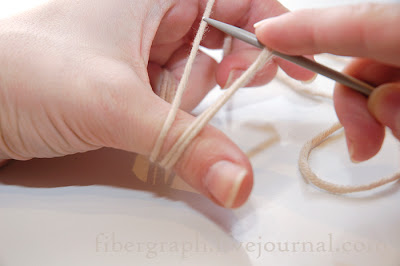
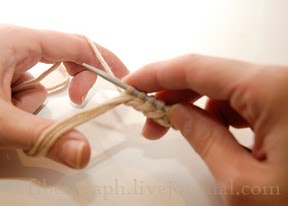
Starting position: the working thread is stretched between the thumb and forefinger of the left hand. The thread from the ball passes through the index finger.
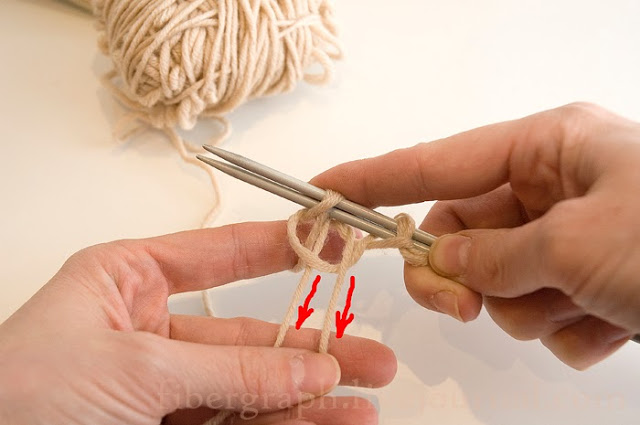
By moving from left to right, we place the needle under the thread, slightly twisting the needle. Edge loop obtained. In further work, hold it with the thumb or forefinger of the right hand, in order to avoid unnecessary displacement.
We dive with a knitting needle under the thread coming from the thumb, we catch the thread on the index and draw it back under the thread of the thumb. This is the rule for dialing all facial loops.
We direct the knitting needle under the thread going to the index finger, we catch the thread of the thumb, which we bring back, under the index thread. This is the rule for recruiting all the seam loops.
Make sure that the loops do not twist, and their interlacing of threads fixing strictly lay strictly under the knitting needle.
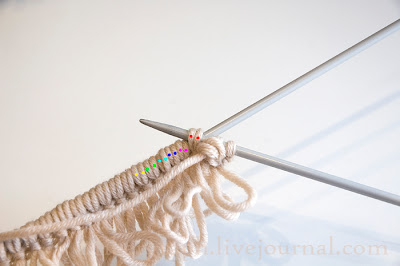
![]()
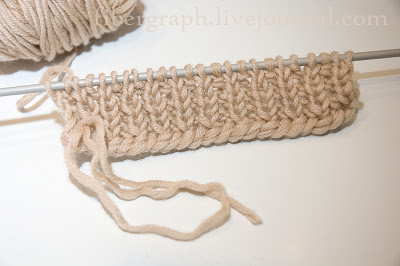
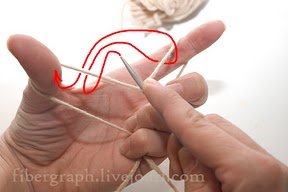
It is worth noting that the use of the concepts of front and back loops in this case is very arbitrary.
The purl loops with the “cushion” below are called purl (on the photo they are marked in red), facial - all the others:

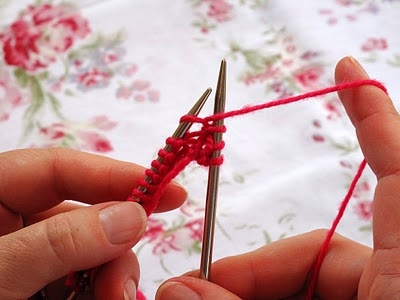
Alternating facial and wrong, we gain the required number of loops. The last dialed loop should be facial.
We turn the work. We knit the first loop as an edge.
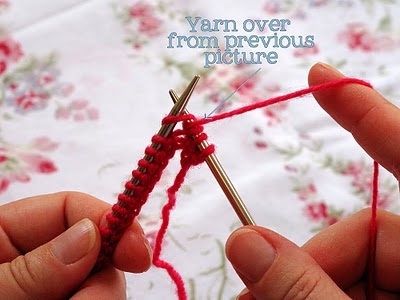
The next loop is facial, but oriented incorrectly relative to the continental knitting method. We knit it face crossed, and remove the next purl following it without knitting, leaving the thread before work.
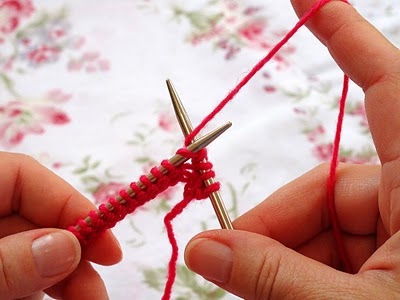
We work this way to the end of the row.
We turn the work.
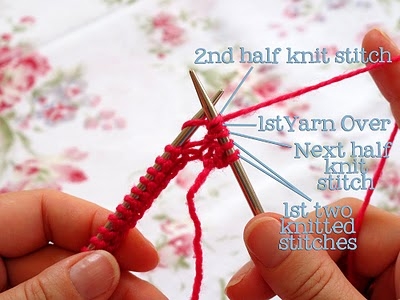
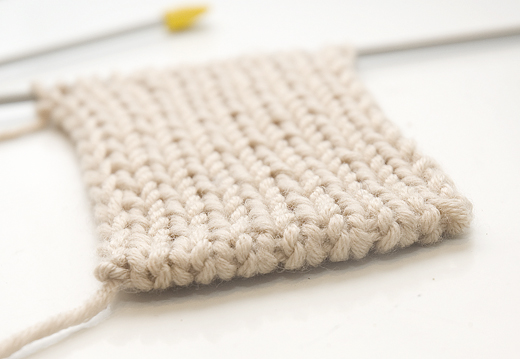
The orientation of the front loops is corrected, therefore we knit the next two rows according to the following rule: front over front, reverse seam without tying, thread before work.
Having tried this set, you will definitely pay attention to the fact that the first four rows give a rather voluminous edge. To avoid contrast, the stacked rows are knitted with needles of a smaller diameter.
To complete your product correctly, like any other handmade creation, you need to be able to properly draw edges. It is your decision on how to tie the edge that will play a key role in the harmonious, beautiful and high-quality finish of the product. It is very important that the overall pattern blends perfectly with the patterned edge.
Let's look at the most interesting and most common ways of how to tie the edge of the product with knitting needles. Having mastered these techniques, you can easily put them into practice. Remember, only the correct processing of the edge of the model will give knitwear an uniquely beautiful, complete look.
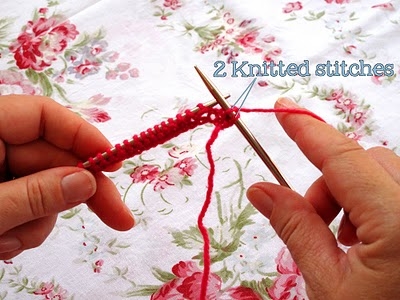
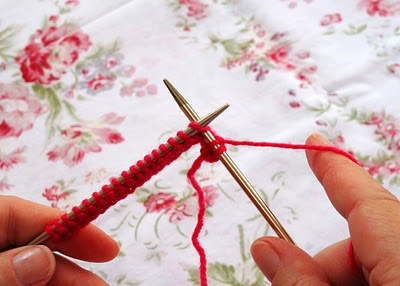
Knitting Methods
- We knit “cloves”. On the desired edge on the front side of the product, you need to dial loops on the knitting needles and knit the front surface. Draw 3-5 rows in each of the sides, taking into account the width of the edging. Then the work is performed according to the scheme: 1 double crochet, 2 front loops together. For the reverse side, the same actions are performed similarly, but with purl loops. Further knitting should be continued with facial stitching with the initially selected number of rows. In places where the crochets are made, the edging is folded in half. Thus, a serrated edge is obtained. If necessary, you can insert a cord or decorative tape inside. This hem trim is usually applicable for hem, cuffs, neckline, hood and trims.
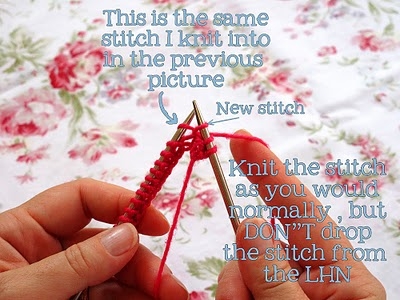
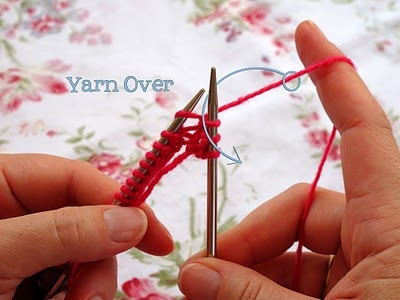
- We knit "elongated loops". We collect 15 loops and knit one row with the front loops, and the other with the wrong ones. Remember that the first loop is removed without knitting, and then elongated loops are knitted without gaps. For this, the right knitting needle is inserted into the eyelet, the front loop is knitted from it without losing the worked one. The working thread is thrown to him, so that she faces the work. Then from the bottom up, wrapping the thumb of the right hand, again throw the thread back. Throw a new loop from the right knitting needle to the left and knit a couple more loops along with the front. So from the front side an elongated loop is formed. The reverse loops are knitted for the reverse side.
- We knit a rubber band. When finishing use almost any gum. French gum looks very elegant, and the snake is great for framing hats. English false gum is not outwardly distinguishable from the factory, based on the use of threads of various textures. When it is supposed to insert a cord into the edges of the product, then it is better to use a double or hollow elastic band. Just keep in mind that you need to make a double set of loops for it.
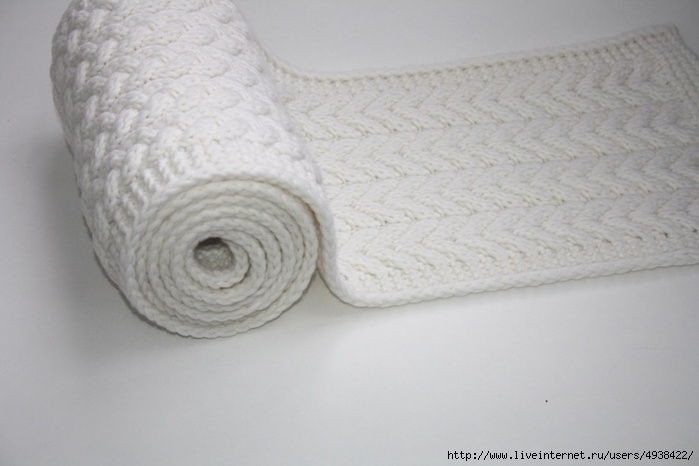
- We knit a "pattern". This technique is based on the continuation, up to the edge, of the main pattern of the product. It is this method that helps to solve the question: how to tie the edge of a scarf or plaid? With this technique, making a rectangular edge, the number of loops is constantly increased until a corner is formed. To do this, gain loops around the perimeter of the product or on both sides. Knit one side with facial loops and intentionally leave one loop in the center of the corner. Then make a crochet and knit the front central loop. Again, double crochet and end the second side with facial loops. The back of the item is knitted according to the drawing.
- We knit "braids". We collect the required number of loops of the desired width and knit a pattern. Moreover, on the one hand at the same time we “tie” it to the edge of the product. To do this, we knit the end loop of the row of “braids” together with the edge loop of the edge of our thing.
You can read about how to knit the edge of the product with knitting needles with the pattern of "spiders", as well as see step-by-step photographs of the work, here: "Spiders on the edge". Use various techniques and improve the structure of patterns. Then you will get exceptionally high-quality and original edges.