

 Crocheting is an interesting hobby with which needlewomen create original masterpieces: clothes, accessories, hats, interesting trinkets. Handmade things have a great advantage - their authors create unique products. Fashionistas love such products because you can be sure that you will not meet a girl in the same tunic or in the same hat.
The question "How to crochet a hat from the bottom up?" Is of interest, first of all, to young mothers. Knitted hats made of natural materials are perfect for a kid and a schoolboy. Some needlewomen are interested in knitting hats to create a headdress as a gift or for themselves.
Video lesson "How to crochet a hat from the bottom up"
How to knit a hat?
Crocheting a hat is not a difficult process, but the author must know a number of important nuances in order for the hat to be even and suitable in size.
In this video, the needlewoman demonstrates the process of knitting hats from beginning to end. In order to repeat the product, the viewer must possess basic knowledge: knitting the initial chain, an air loop, a single crochet. Novice artisans can familiarize themselves with these elements in this video tutorial.
The process of knitting a simple hat consists of the following steps:
- Knitting a chain.
- Connection chain in a ring.
- Knitting the main fabric to the point of narrowing.
- Narrowing the canvas by passing columns.
- Closing (completion) of the cap.
The girl will show how to start and end the rows, how to use yarn of a different color in knitting and return to the previous thread and how to calculate the level of narrowing of the cap according to the proportions of the fabric.
Note to the mistresses!
The tutorial video “How to crochet a hat from the bottom up?” Was created for beginner needlewomen. They can learn how to create a simple hat using elementary tricks. It is better for a beginner to practice using a miniature hat, and only then create a hat.
To such a hat, you can knit a simple scarf and wear an original set.
There are two basic principles for knitting hats:
1) starts from the top of the ringlet with a thread (or a closed chain of loops), a circle is knitted, gradually turning into a flat lower part, and ends with a circle or lapel.
2) it starts from the bottom from a chain of loops equal to the circumference of the head (naturally, in terms of the pattern of the figure), it is knitted exactly, then further reductions are made in the upper part, coming to naught. This option is less convenient and the tip is not so neat. You can knit in a circle (it turns out a pipe) or just a cloth, which is then sewn.
There are still other options - from individual stitched wedges, start from the side, knit a rectangle ... But the first two are the most important for hats.

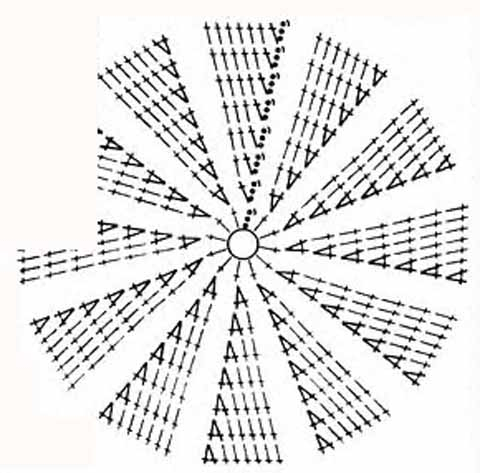
![]()
There are basically 2 ways to decrease:
1. Decreases in 6 places.
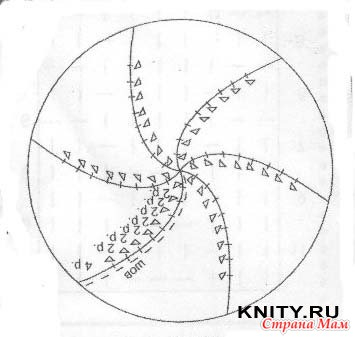
Divide the loops into 6 parts (wedges). If the number of loops is not divided by 6, then you can make one or more wedges more or less, alternating them. You can mark the knitting with pins or colored threads. Next, we make reductions at the beginning of each wedge. And the second decrease is done in the fourth row after the first. Further, make reductions in every second row. To obtain a more elongated bottom, you can make a third decrease in the 4th row from the second decrease. And then also decrease in every second row. When 1-2 loops from each wedge remain on the spoke, we break off the thread and leave the end about 50 cm. We thread the end of the thread into the needle and collect all the remaining loops on this thread. We pull this thread through the loop twice so that there is no large hole. Sew the occipital suture with the same thread.
2. Decreases in 8 places.
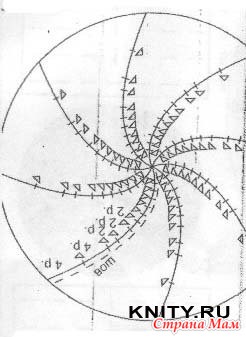
Divide in the same way into 8 wedges. We make reductions at the beginning of each wedge several times in every fourth row, then in every eighth.
The loops at the beginning of the wedge are also reduced in two ways:
1. 2 loops together front with a slope to the right. Thread at work. Insert the right knitting needle into two adjacent loops on the left knitting needle, capturing the loops on the front walls. We knit the front loops.
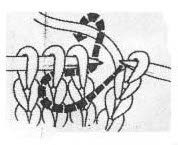
2. 2 loops together with the front with a slope to the left. We do the same thing, only grab the loops on the back walls. 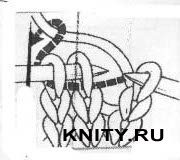
How to knit beret.
From the point of view of creating a form - this is the easiest job. First, a circle is knitted, the diameter of which is about 27-35 cm. This value depends on what shape you want to give the beret, as well as on the fashion. After that, the straight part of the beret is knitted with a height from the 1st row to 5 cm. The shape of the beret also depends very much on the height of the straight part. When the beret is put on his head, the even part will create folds and a fold in volume. The larger the even part of the beret, the more its volume. After the flat part, the lower part is knitted, on which, instead of increases, decreases are knitted. The end of the work is determined by the standard. Beret should sit tight on his head.
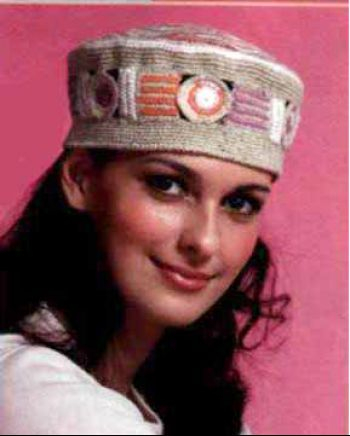
Beanie Round Cap
For such a hat, a circle with a traditional amount of increases fits in. Unlike a beret, the diameter of this circle is determined by the size of the cap. First of all, taking a measurement of the circumference of the head, find the radius of this circle, remembering the formula: circumference \u003d 2 / Pi * R. Then, with the cap size 56, the diameter of the circle can be taken 16-17 cm, taking into account the stretching of the tricot. That is, when knitting the simplest hat such as a fez or skullcap, you need to knit the initial circle with a diameter of 17 cm. Then go to knitting an even part of the hat without increases. The height of this part, as a rule, is determined by a measure, on average, about 12-14 cm.
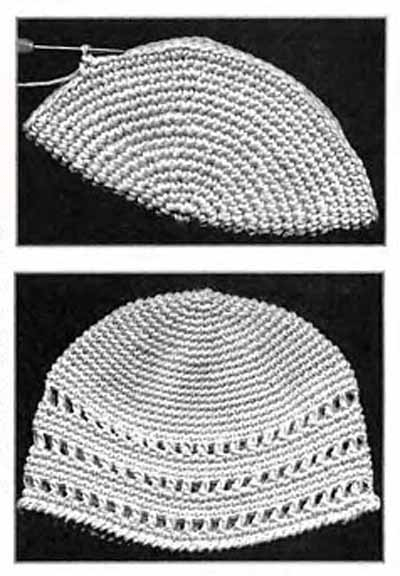
To get a rounded bottom, the diameter of the initial circle is taken less, that is 10-12 cm. Then, to get a hat of the right size, you will have to knit several rows that will give a rounding of the bottom. When knitting the RLS circle, 6 RLS in each row is added (when knitting С1Н - 12 С1Н), and when knitting the transitional part, you can either evenly add 3 RLS in each row (6 С1Н), or alternate rows without additions and rows with 6 -th additions (for С1Н by the 12th additions). Having connected several such series, you can see that the cap begins to take the desired shape. If folded knitting double and measure the edge of the cap, you can get the size of the cap. Along the edge, the length of such a folded shape should be about 27 cm (2 cm should be left on a stretch of knitwear). Further, the knitting will go in a circle without increases exactly to the height that is needed for this model (12-14 cm).
The cap is an elongated cap.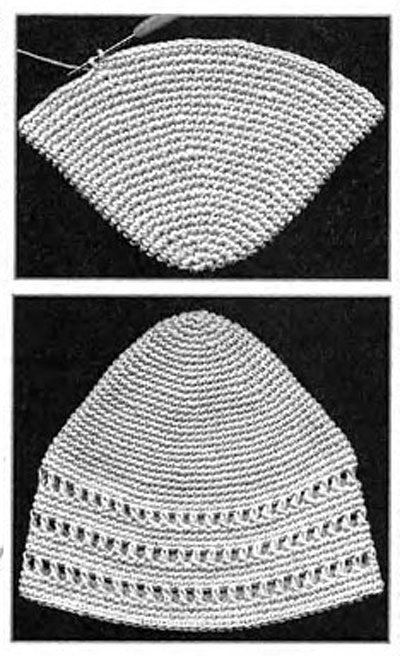
This shape of the cap can be obtained in two ways. You can associate a circle with the traditional number of increases in each row: for RLS, this is 6 increases, for С1H it is 12 increases. The diameter of this circle should be taken less, that is 6-9 cm. Then, to get the right size of the cap, you will have to knit a larger number of rows for rounding. For this, you can alternate rows with and without increments, or take half the number of increments in each row.
In the second method of knitting, you can knit in a circle, making fewer increments in each row from the very beginning of knitting. For RLS, this is 5 increases, and for С1Н -10 increases in each row. So, performing increases in each row, they knit a hat to the desired size. The shape of the bottom in this case is obtained as if given from the very beginning and, unlike the previous method, it is difficult to change it.
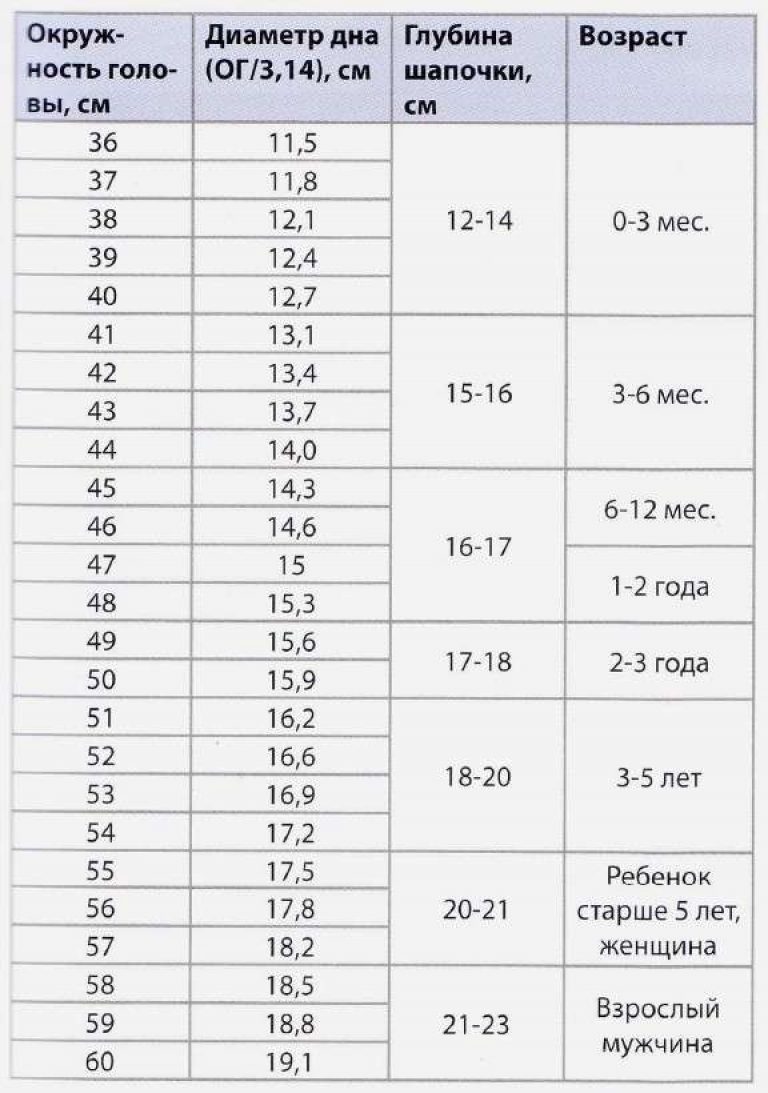
First you need to correctly determine the size of the cap.
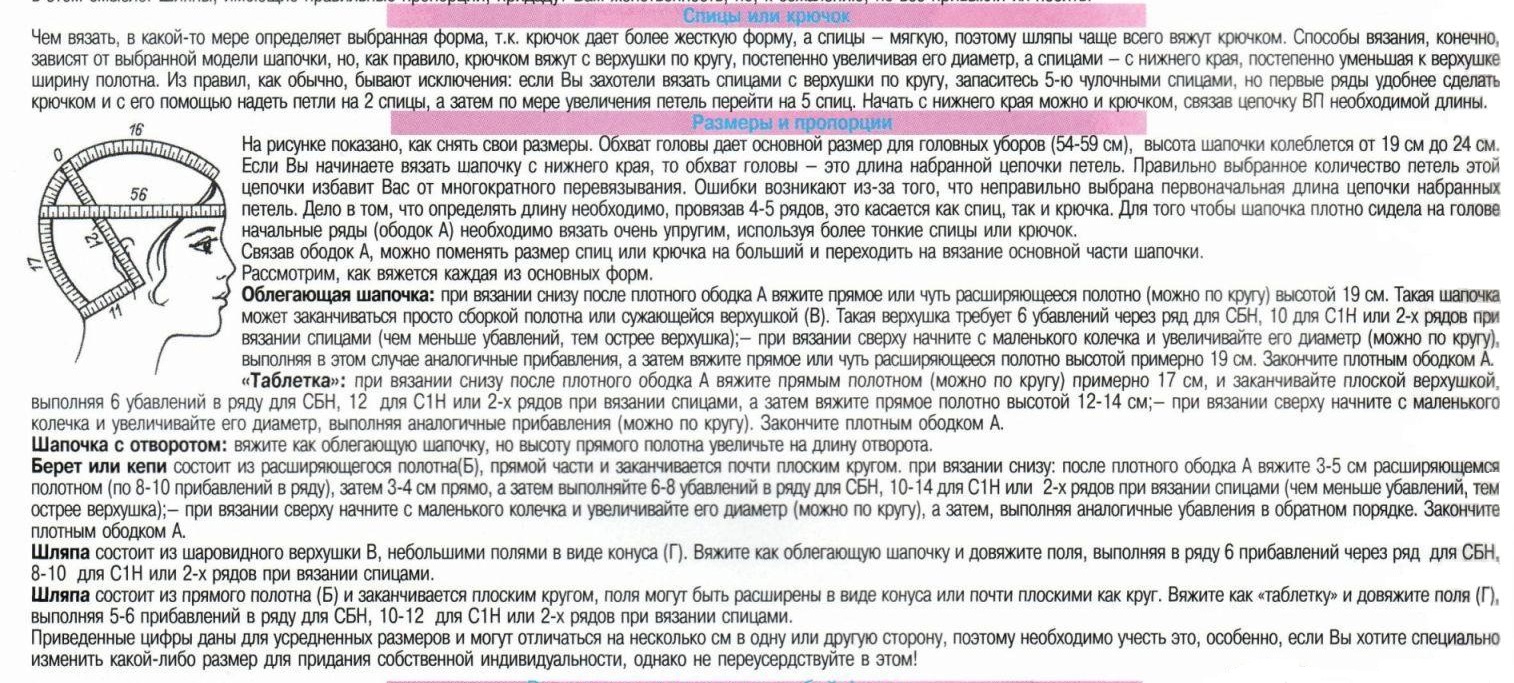
The initial line for taking measurements is the stroke line, it is equal to the circumference of the head. This determines the size of the header. Take measurements on the frontal part above the level of the eyebrows, and on the most convex part of the neck. Tighten a centimeter tape tightly (see. Fig. 1). In the figure, the head circumference is 56 cm, the depth of the cap is 21 cm. Accordingly to this size, the table shows the size of the caps.
The next step is to choose how to knit. You can knit in a circle without seams or in straight and reverse rows with one seam. If the models are warm and dense, then it is advisable to choose patterns made by Art. b / n., and if you want the canvas is soft and free, then - Art. s / n
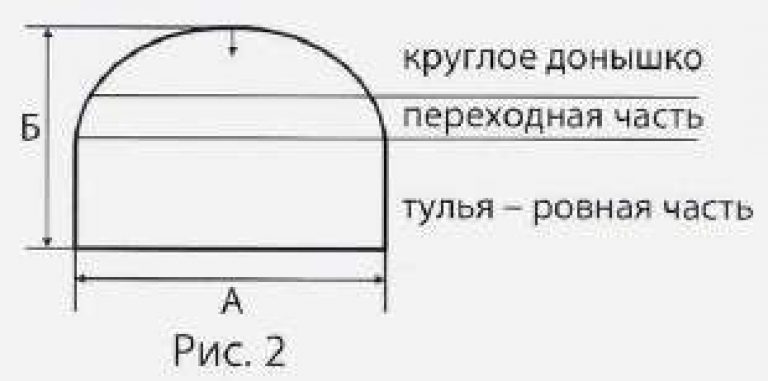
The work is performed in the following order. The base of the cap can be conditionally divided into 3 parts: a round bottom, a transitional part, a flat part - tulle (see. Fig. 2). The figure shows the dimensions: A - half the circumference of the head, B - the height of the cap.
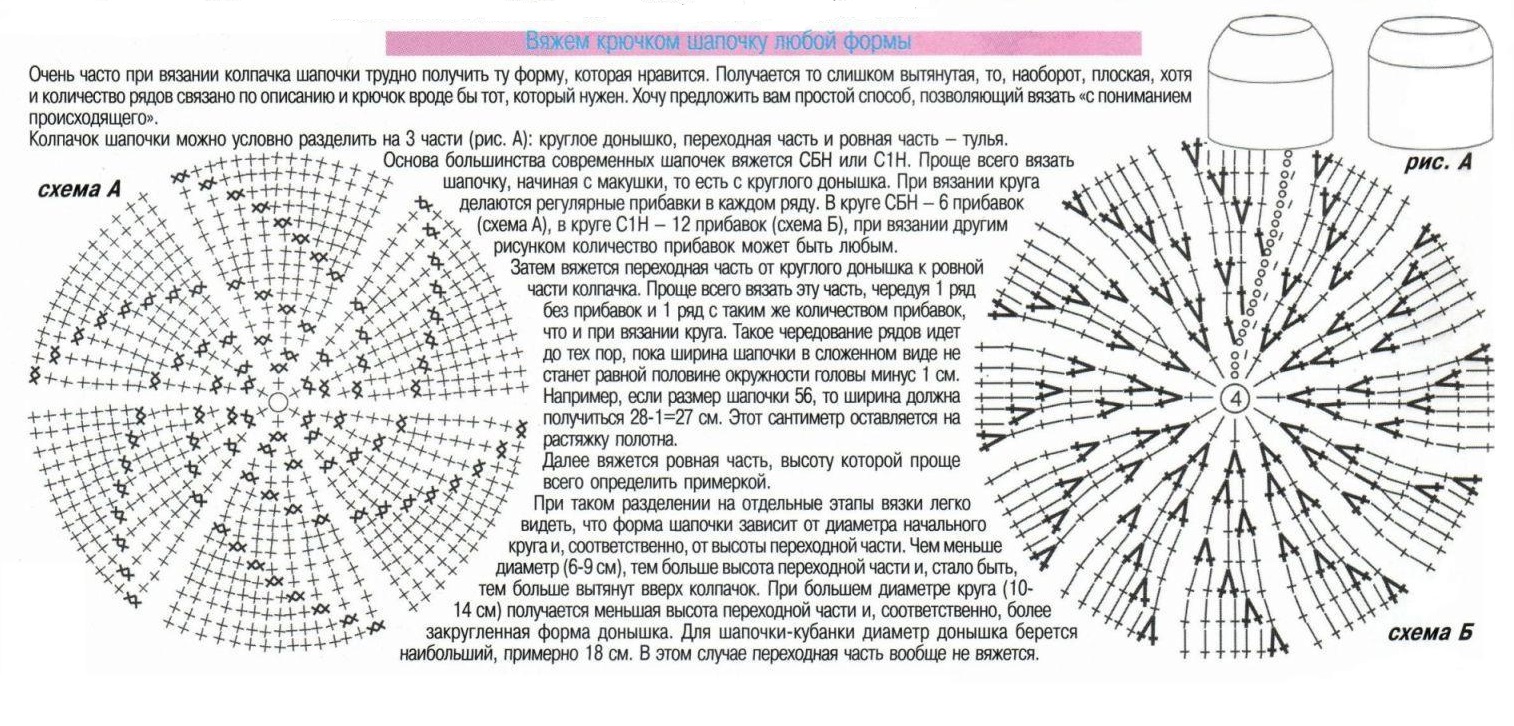
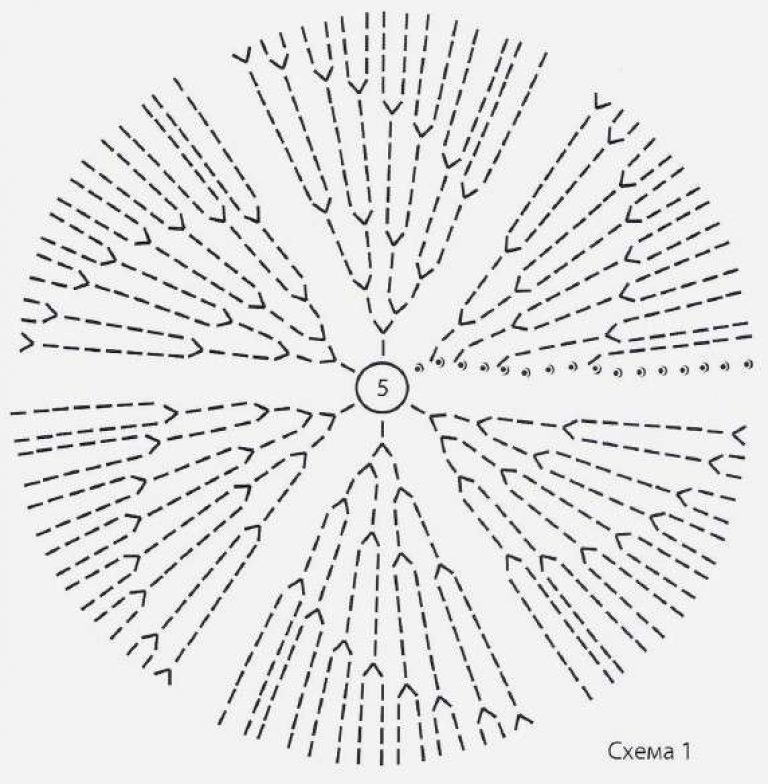
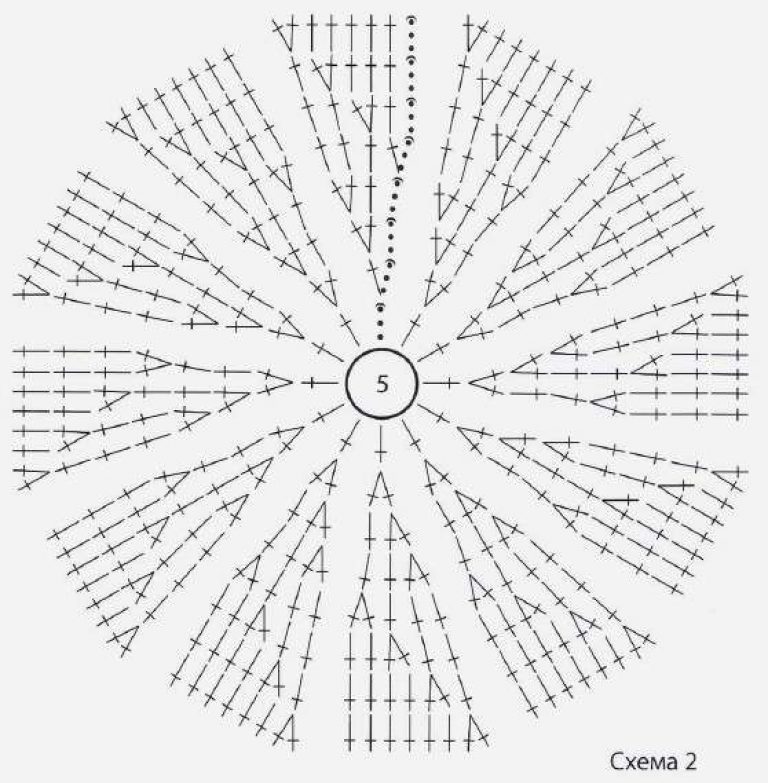
1. The round bottom is knitted according to the law of the circle, based on regular and uniform additions of loops in each row. It is very important to perform the same number of applications in each row (from 6 to 12 loops), breaking the circle into 6 - 12 sectors. The knitting of the round bottom is shown in diagram 1 (pattern - st. B / n.) And diagram 2 (pattern - st. S / n.). For high hats, the bottom diameter is from 8 to 10 cm, and for low - from 12 to 15 cm. If you want to get a clear delineation of sectors, then add along the entire height in the same places. If you want to get a smooth canvas, then the places of addition are changed in each row.
2. The transitional part is easier to knit, alternating 1 row without adding loops and 1 row with the addition of the same number of loops as when knitting the bottom. Perform this alternation of rows until the width of the cap when folded becomes equal to half the circumference of the head minus 1-2 cm (for stretching the canvas). For example, if the head circumference is 56 cm, then the width of the cap when folded should correspond to 26-27 cm (28 cm - 1 or 2 cm). The smaller the diameter of the bottom, the greater the height of the transitional part and the cap is elongated upwards. The larger the diameter of the bottom, the lower the height of the transitional part and the rounded the bottom of the cap.