

How to make a knife handle?


The knife is perhaps the most courageous weapon. It was also used by our ancestors when they went with their bare hands to hunt wild animals. The most important knife is, of course, the blade. However, the convenience of a knife handle means a lot. The denser and more comfortable the knife will lie in the hand, the more efficient it will be to stab and cut. Sometimes it happens that the old handle of a knife wears out or falls off over time, and you have to make a new one.
In this article we will tell you how to make a handle and how to make a handle for a knife with your own hands.
Material
- Abalon or abalone is a natural material from the shell of the mollusks of the same name that live in the southern Pacific Ocean. Although this material is not very durable, it is popular because of its attractive appearance. As a rule, it is used for small pocket knives. Sometimes the handle of the knife is also made of plastic that externally imitates this material.
- Aluminum is a very durable material that provides sufficient handle strength without adding excess weight to the knife.
- Bone. Bone handles for knives are made from natural bones of animals that died naturally. As a rule, bone handles are covered on top with a carved pattern, which improves their appearance and grip with the hand.
- Carbon fiber is the most durable of all existing synthetic materials. The manufacturing process is very time-consuming, so such pens are always expensive.
- Leather. As a rule, leather knives have hunting and military knives. Typically, the base of the handle is made of another material and is covered with leather only on top, because this material is short-lived and quickly wears out.
- Stainless steel has great strength and good anti-corrosion properties. It is often used to make knife handles in combination with other materials, such as plastic and rubber, so that the knife does not slip in the hand.
- Tree. The handle for a knife from a tree is made of the most different breeds. Soft tree species that contain a large percentage of moisture are not well suited for making pens. Experts advise using hardwoods for this purpose: redwood, oak, maple, etc.
The material for the knife handle can be used almost any: different kinds plastic, ivory, buffalo horns, etc. However, such materials are used much less frequently than those described above.
Step-by-step instruction
We will describe the manufacture of a knife handle using the example of the most commonly used material - wood. It is the most universal and does not require the use of special tools.
Do-it-yourself handle for a knife is made as follows:
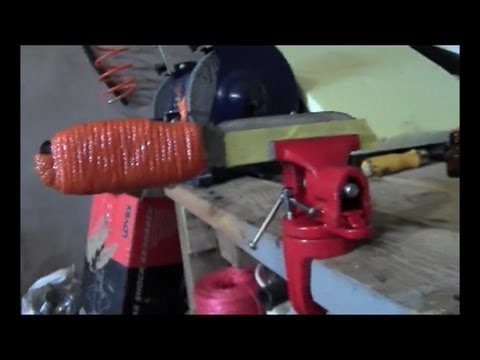
- Protect the blade of the blade with electrical tape so as not to get injured during operation.
- Place the blade on the wood where the knife should have a handle, and outline the outline of the future handle. There should be two such details.
- Cut 2 parts of a knife handle. It is not necessary to strive to maintain high accuracy, since subsequently we will still grind it.
- Attach one part to the blade, wind it with electrical tape so that during operation it does not budge, and drill a hole for the pin.
- Make a symmetrical hole with the second part of the handle.
- Pass the pin through the hole.
- Lock the handle with epoxy.
- Press the handle firmly against the blade until the resin hardens.
- Using a wood rasp, give the handle the desired shape, and then sand the surface using sandpaper.
- After that, polish the handle and varnish it to protect the handle from the harmful effects of moisture on the wood.
How to make a hunting knife with your own hands? This question was asked not by one man who is fond of hunting.
Each self-respecting hunter must have a hunting knife in his arsenal. In the process of hunting, there are many situations in which a knife is simply necessary: \u200b\u200bfrom sharpening all sorts of pegs to cutting up prey.
Today there is a great variety of shops for hunters and fishermen, where for the money you can buy any kind of knives. However, serially made knives do not differ in durability and quality. A more expensive option is to order a hunting dagger from a famous master. In this case, you can get a fairly high-quality blade. But the greatest pride and satisfaction can only bring homemade hunting knives. Indeed, in the process, you can adjust the knife according to your desire and taste. The manufacture of hunting knives is a rather complicated process and requires thorough preparation.
Characteristics of a hunting knife
In order to make a hunting knife, you need to figure out how it differs from other species.
So, in addition to performing ordinary cuts, he must cope with the following tasks:
- to finish off a wounded beast;
- take off the skin;
- butcher the carcass.
Based on this, we can distinguish the characteristic features of the design:
- Straight butt, for a powerful blow when finishing. For finishing, a separate blade with a point, which is located in the center, is often used, it is also called a hunting dagger.
- The blade is 100-150 mm long.
- The use of harder grades of steel.
- A handle made of wood, birch bark or non-slip artificial materials, with a moderate relief. It should be convenient for cutting on and off, as well as stitching movements.
- Lack of additional devices in the design.
So how to make a hunting knife?

Steel selection
Before proceeding directly to forging, it is necessary to determine the material from which the hunting knife will be made.
When choosing steel, five of its main properties are operated on:
- Hardness. The ability to resist deformation. Hardness is measured by the Rockwell scale, which has a gradation of 20 to 67 HRC.
- Wear resistance. Resistance to metal wear. Directly related to the hardness of the steel used.
- Strength. Preservation of the integrity of the blade during impacts and other damaging factors.
- Plastic. Absorption and dissipation of kinetic energy during impacts, cuts in bends.
- Redness. The indicator of the stability of steel when exposed to temperature. The temperature of forging and hardening of steel depends on this indicator. The most reddish are hard steel grades (over 900 ° C).
All properties are closely related. The predominance of one of the indicators leads to a decrease in the quality of the material as a whole. The severity of a particular property is caused by doped additives and elements present in the metal.
Depending on the presence of certain alloying elements, steel is marked accordingly. For example, grade U9 - carbon 0.9%, grade X12MF - contains 1.2% molybdenum and vanadium.
Of the most suitable steels for the manufacture of a hunting blade, one can note steel of two grades that are most widely used:
- XB5 - diamond, alloyed carbon steel with high hardness (up to 70 HRC) and excellent cutting properties. The metal contains chrome and tungsten, which add strength. But with prolonged contact with water and moisture, corrosion spots may appear, so a knife made of such steel requires careful care.
- X12MV - stamped steel, tool, hardness up to 60 HRC. The composition includes: chrome - increases corrosion resistance; molybdenum - makes steel more viscous; vanadium - increases heat resistance.
Recently, powder steel, for example, ELMAX (Sweden), has become popular. Steel is quite durable and viscous, and also has corrosion protection. Products made from it keep grinding for a long time.
Damask steel - has exceptional hardness and elasticity, is not subject to corrosion. Damask steel has a pronounced pattern, which is attached to carbon steel. Damascus steel blade easily copes with mechanical and thermal loads. The best hunting knives are made of damask steel.
Damascus steel - not inferior to damask steel in all respects, but requires protection from moisture and dampness. Damascus blade has a unique pattern and holds sharpening perfectly, however, it must always be wiped after use and periodically lubricated with special oil.

Forging blades
Instruments
We figured out the material, now we should talk about the necessary tools and the forging itself.
For forging you will need:
- hammer up to 1 kg and hammer 4-6 kg;
- kuznetsk forceps, you can use pliers with stripped insulation;
- adjustable wrench;
- vise;
- an anvil or a homemade fixture under the anvil;
- grinder;
- welding machine;
- grinder;
- blacksmith's furnace or hearth, with letting-in by means of bellows or a fan.
Before starting work, experienced craftsmen are advised to draw sketches of hunting knives that can be performed in the presence of a particular material. After choosing a suitable sketch, they begin forging.
Forging stages
The forging process consists of several main stages, it is necessary:
- Kindle the furnace and heat the metal to a certain temperature (depending on the steel used).
- Design and forge the shank. Subsequently, the workpiece is held for it.
- The formation of the future nose of the knife. At this stage, the future shape of a hunting knife is acquired.
- Forging blades at minimum allowances. At this stage, the metal should be gradually forged, without changing the thickness of the workpiece.

Handle manufacturing
Making handles for knives is a creative process, justified by their practical use. The handle should be durable, comfortable and practical. At the moment, there are plenty of materials from which you can make a knife handle with your own hands. You can create various combinations of materials and apply various manufacturing techniques, the main thing is that the knife handle with your own hands meets the individual requirements and characteristics of the owner.
Material selection
The most elegant, comfortable and most importantly - durable - are handles made of animal horns. Another advantage of this material is that it lends itself well to processing.
A handle made of wood or hard rubber may be damaged if dropped. The metal handle is strong and reliable, but not practical due to freezing at low temperatures.
The most suitable and affordable material for the manufacture of the handle is fiberglass impregnated with epoxy (epoxy resin), and laid in several layers. The material is lightweight, durable and not affected by temperature. Textolite was also widely used. However, for the manufacture of a handle from PCB, it is necessary to use a solid bar, because when gluing several pieces, the strength of the product is lost.
Step-by-step manufacturing
It should be noted that before manufacturing the knife as a whole, it is necessary to initially select the type of handle: overhead or type-setting, because the shank of the workpiece under the handle is formed at earlier stages.
The manufacture of a knife handle is divided into several stages:
- Make a sketch. On paper, draw the contour of the blade and shank, apply a drawing of the future handle on top.
- Measure the length and width of future pads or cheeks. If the handle is typesetting, determine the number and thickness of the constituent elements.
- To make bolster and trailer from brass (aluminum).
- If the handle is type-setting, drill holes for the shank in the components. If the handle of the consignment note drills holes for the wads of metal in the shank, then alternately in both blanks for the pads.
- Put on linings or composites using epoxy and tightly squeeze or wind the handle blank from all sides for more reliable fixing of the handle to the shank.
- Bringing the handle to readiness with a file or other grinding tool. (Produced after the resin has completely dried).
- Sanding the handle. Giving the handle perfect smoothness and shape.

Scabbard
The scabbard is an integral part of high-quality hunting knives. They are designed to keep the blade from external negative influences, and also allow you to keep the hunting dagger always at hand. The knife for everyday use should be equipped with a folding scabbard, for convenient cleaning. The sheath for a hunting knife can be made of leather and wood. Everyone chooses how to make a sheath for a knife.
Wood sheath
It is necessary:
- Saw a suitable bar into two halves. If the handle is made of wood, it is best to use a block of the same wood species.
- Draw on each half the outline of the corresponding side of the blade.
- Make a recess in the two halves of the scabbard by the thickness of the blade. It is necessary to slowly adjust the recesses so that the sheath subsequently sat tight.
- Glue halves strictly along the edges of the recesses. A moderate layer of epoxy should be applied to prevent penetration into the recess for the blade. If necessary, pre-sand the bonded surfaces for a snug fit. You can also fasten the halves with decorative screws.
- Finalize with a file or dremel, sand.

Leather sheath
You will need:
- Make a layout of paper and tape.
- Transfer the pattern to the skin and cut, leaving a margin of about 7-10 mm along the seam.
- Soak the skin in water at room temperature for 20-30 minutes.
- Cut a thick plastic liner.
- Protect the blade with masking tape.
- Wrap a knife soaked, cut out leather. Fix the necessary bends (you can use regular clothespins).
- Make a suspension (trenchik) and form a hole on its loop. Cut a strip of leather and fold in half, this will be the suspension.
- After the skin has dried, glue the pendant and sew it to the scabbard.
- Glue the plastic liner.
- To make an expansion wedge for the upper part of the sheath.
- Sew the scabbard after making symmetrical holes.
- Soak the scabbard and put the blade in them, then place under the press to give the final shape.
- After drying, you can soak the skin with shoe wax or special impregnations.
Making a knife from a file
As you know, a good blade made of excellent steel can cost decent money. In such cases, the question arises, how to make a knife with your own hands from improvised materials? An old, unnecessary file will come to the rescue, from which you can make a hunting knife with your own hands.
Tools and materials
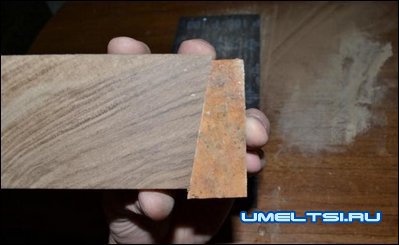
Making a hunting knife with your own hands from a file must begin with the selection of the source material, or with a simple “workpiece”. It is best if it is a Soviet file, because at that time they were made of very high-quality steel. The shape of the file should be flat rectangular, and preferably diamond-shaped, about 30-40 mm wide.
It is necessary to determine what the handle of the future knife will be made of, and prepare materials for it. In addition, you will also need:
- epoxy resin;
- brass or aluminum rivets;
- vise;
- sharpening machine;
- grinder;
- sandpaper of different grit;
- magnet (necessary for hardening);
- ferric chloride (for etching).
Step-by-step instruction
- First of all, to make a knife with our own hands from a file, we draw sketch future knife.
- Annealing. We heat the workpiece to about 700 degrees. When you have to make a knife with your own hands at home, you can use a gas stove. To determine the heating, coarse salt is used, poured onto the heated area when it begins to melt, which means that the heating is sufficient. After the metal acquires an even color, it is necessary to keep it in this state for 4 hours. Then the metal should cool slowly.
- The formation of the blade. We cut off everything unnecessarily with a grinder, give shape to the future blade. Then, using circles of different grain sizes, they form a descent on the knife with their own hands, a butt, a shank for attaching the handle.
- We make hardening and product leave.
- Grind and polish the knife to the finished state. We use sandpaper, gradually reducing its grain size, for polishing we use a felt circle and Goi paste.
- Attach the handle and bring it to its final state by grinding and sanding.
- Etching. An important step that is necessary to prevent rust on the blade.

Additional devices
These devices most often include a trainer and a sharpener, as well as countersunk holes in the back of the knife and pockets on the sheath.
Trenchik
Special loop for attaching the scabbard to the belt. In the manufacture of the trainer, various materials are used: rope, cord, strip of leather. Making scabbard with your own hands allows you to perform a trainer from any material at hand.
The trench can be glued, sewn, screwed on the inside of the scabbard, the main thing is to make a loop with a margin for any belt width. The length must be selected individually.
Sharpened
A small, fine-grained block of stone used for sharpening a knife. The sharpener is attached to the sheath and is necessary for prolonged use of the blade.
Pockets
Making a knife with your own hands and a sheath for it allows you to fully equip it to your taste. But it is necessary to carefully consider the need, and most importantly the practicality of a pocket.
When making handles for knives, some craftsmen leave a cavity in the back, into which small objects can also be placed.
How to harden steel at home
In fact, steel hardening can be performed not only in the forge. It is quite possible to build a small stove in the fresh air or do with a gas stove. It is only necessary to create conditions for holding the maximum amount of heat near the knife. To do this, use thermal screens, or more simply, metal plates.
The metal must be heated to obtain a uniform bright red color. At the edge of the blade, the metal is thinner, therefore it glows harder and can have almost white color. A magnet will help determine the optimal degree of glow. If the magnet stops responding to the metal, it needs to be cooled. It is necessary to cool sharply, take it with ticks or pliers and dip into a bucket of water, and some craftsmen advise to dip into the used engine oil.
After the hardening process, the metal remains “stressed” and there is a danger of crumbling. In order to prevent this, metal tempering is carried out. We put the knife in the oven, heated to a temperature of 200 degrees, and leave it for 2 hours, then turn off the oven and let the metal cool with the oven.
Making a knife with your own hands is a rather laborious task. Even using ready-made blueprints for making knives and detailed instructions, on the way to success you can spoil more than one blank, fill more than one corn, get more than one cut. But do not stop there, because everyone can make a blade with their own hands.
The independent manufacturing process gives rise to a special attitude to your blade, makes you appreciate the labor invested in it.
Video
Watch the video how to make a hunting knife from a drill with your own hands.
Today we will talk about how to make a knife handle with your own hands, beautiful, durable and comfortable.
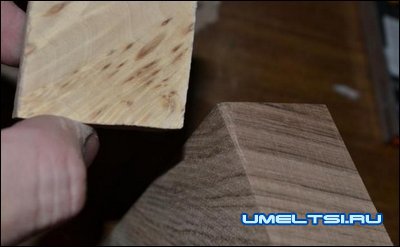
The handle will be made of wood, for this purpose, patterned walnut and sulevelis maple are best suited - the materials are durable, with a beautiful texture and well contrasting.
We also need brass and plastic. And, of course, epoxy glue for joining parts. We’ll take the knife blade ready.
We cut the blanks from maple and walnut with a hacksaw; if possible, you can use a jigsaw or circular saw with a planing disc - the cut will be flat, which will facilitate further processing. It is important to choose the correct sawing angle relative to the fibers in order to get a beautiful texture on the cut.
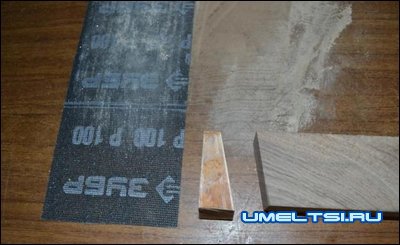
Next, the resulting workpiece is sanded on sandpaper or sand mesh. Particular attention should be paid to the careful fitting of wooden blanks to each other - they should fit without visible gaps. If the edges of the joint do not fit snugly - it doesn’t matter, they will cut off anyway during further processing.
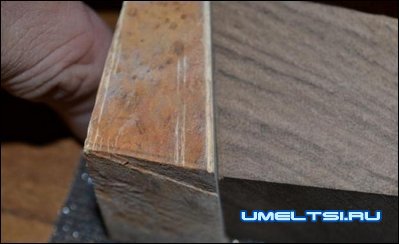
After that, they take a blade with a dressed bolster, put a shank on the wooden blanks and circle it with a pencil. Then, using a square, transfer the marking to the ends of the workpieces.
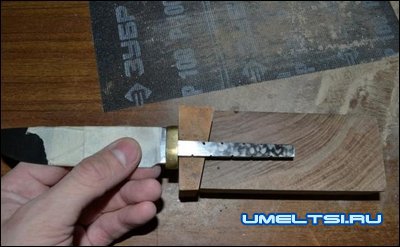

And so, the hole for the shank is marked, you can proceed to drilling. By measuring the thickness of the shank, select a drill of the same diameter. At home, it is best to drill with an electric drill, holding the workpieces in a vice. In this case, the width of the shank, we got two parallel holes with a thin partition between them. The latter is removed with a file and a file. Caution, needle files break easily. The alignment of the hole is controlled by multiple dressing on the shank and the grinding of the desired side.

Next, prepare a package of parts, following the sequence: bolster-suvel-brass-nut, not forgetting to lay plastic gaskets in each connection. The parts must fit together without gaps, the quality of bonding and the aesthetic attractiveness of the product will depend on this.
It will be even easier to make a knife handle that will be incredibly aesthetically pleasing - as well as durable - from bone or from the horns of various animals. Most often, horns of elk or deer go to such crafts, and if you can get saiga, you can consider yourself lucky, because such material already has beautiful bumps and is slightly curved.
Those wishing to make a handle for a knife precisely from such "raw materials" should first remove the core from the last, then boil it for a couple of hours. After this, the horn must be turned with a file from the back and sides of the future handle - to remove bumps. To fix the blade of the knife in it, you can use wooden and metal plates.
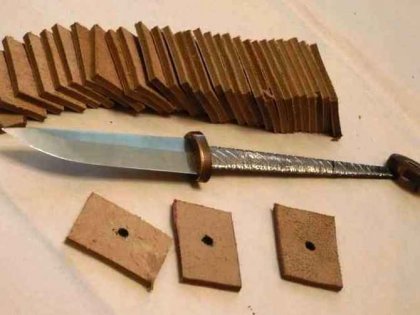
One of the simplest (even for beginner craftsmen) ways to make a handle for a knife is the typesetting method. The "zonovye" handles thus assembled in this way were once popular - usually from pieces of colored plexiglass or plastic. Creating products from such materials, it should be borne in mind: they are inconvenient in operation because of their slippery.
To make a knife handle in this way is better from birch bark or very thin wood of different colors.
This material, to make a knife handle, is cut into pieces of the right size, in each of them a hole is made for the blade core - and everything is strung on the last one interspersed with metal plates, and after that it is well grinded.

To make a knife handle aesthetically pleasing, it is not necessary to create such a product from scratch. It is possible to start decorating an existing handle - for example, wrap it with a piece of leather of suitable sizes or with durable colored thread or very thin twine.
It will be great if you manage to make a handle for a knife made of wood or bone with carvings or more complex patterns made using the popular pyrography technique. In modern conditions, its use will require a special device - a pyrograph, which gives the material of the handle the desired shape.
Nowadays, you can buy a knife in almost any configuration, but many people prefer home-made options, since they are made according to an individual project and can have any configuration. For comfortable use, it is important to make a convenient handle, and for it to serve for a long time, a special impregnation of the wooden handle of the knife with certain compounds is necessary, and then we will consider how to carry out the work correctly.
What will be needed for work
Before starting the workflow, you need to make sure that you have everything you need at your fingertips, the list may vary, but the main components are unchanged:
| Blade of knife | This part should be ready, since you need to see what kind of shank the workpiece has, further work directly depends on it. This item is most often ordered from specialist blacksmiths or purchased ready-made from artisans. |
| Handle Material | Most often, wood with an interesting texture is taken, it can be walnut, maple, oak or other options you like, the blanks should be a little more than necessary. You can cut them yourself, the direction of sawing is selected so that the texture was presented in the most favorable light |
| Fasteners | This primarily refers to epoxy, with which all components are combined. Rivets are also sometimes required, for this it is easiest to use a copper or brass bar, which should have an appropriate diameter |
| Impregnation | High-quality impregnation for the handle of a knife made of wood is very important. For this, a special dishware varnish or linseed oil, which can be purchased at any art store, is most often used. |
| Tool | For work, both manual options are used - a hacksaw, a plane and, and a power tool. With it, you can carry out all the necessary operations much easier and faster. |
Important! For work, select dry wood without loose sections, only durable material with low humidity guarantees the reliability of the handles during use.
Workflow Description
Before starting work, it is necessary to determine what type of handle will be used in this case, there are two main options.
Types of handles
Everything is pretty simple here:
- Riding type options are used for narrow shank blades. As the name implies, the assembly consists in securing the blade in the cavity, which is done at the end of the handle. The advantage of such solutions is that the handle is solid without any connections.
- Overhead options are used for blades with wide shanks, this is a more common option, which differs in that the handle consists of two halves, which must be ideally combined with each other to ensure the best comfort of use.
Assembly of products
The work is carried out differently depending on the type of shank, the first we will consider the rider version:
- The blank is taken and given a certain shape, this is done using any improvised means - hacksaws, jigsaws, cutters and other devices. When you get a rough version, you need to bring it to the ideal with sandpaper, but you can use and.
- Next, a hole is drilled in the end face, the depth of which must be equal to the length of the shank on the blade. If you want to expand the hole, then this is done using a needle file. As a result, the shank should sit freely on the handle.
- Now we will consider how and with what to soak the wooden handle of a knife, for this a water bath is made, i.e. In a large pot of water, put a small one into which flaxseed oil is poured. A pen falls into it and holds there until air ceases to be released from the material, after which the elements are removed, rubbed and left to dry and cool for a couple of hours.
- After the handle has dried, you need to prepare the epoxy resin (the instructions will tell you how to do it right). The composition is mixed with small wood chips and the prepared cavity is filled with this mixture, after which the blade is inserted into it. Do not forget to check its even location, then leave the product for a day, then you can use the knife.
- The workpiece is cut lengthwise into two halves, to do this work with your own hands, you will need to fix the tree in a vice so that you can precisely control the work process. The halves are brought to perfect condition in the same way as described above. For this, any tools and devices that are convenient for you are used, the surface is brought to the ideal with sandpaper.
- Next, you need to drill holes for the rivets, for this the handle is securely attached to the shank and drilling is performed immediately through all the elements, so you are guaranteed to get perfectly aligned holes.
- After that, it is necessary to make blanks for rivets, their diameter should coincide with the holes, and the length should be equal to the thickness of all elements.
- An epoxy resin is prepared, the internal parts of the handle halves, the metal shank, and also the rivets are lubricated with it. All elements are assembled into a single whole, after which they are wrapped in a piece of rubber and wrapped with tape for tight fixation.
- After a day, the product is inspected, if necessary, excess epoxy is cleaned. Oil treatment can be repeated if the surface had to be cleaned hard.
After the epoxy hardens, the structure can withstand even significant loads
Overhead options are done a little differently:
How to impregnate the handle of a knife made of wood, you decide, it can be linseed or hemp oil, as well as other compounds
Conclusion
We examined how to make and how to process a wooden handle of a knife so that it is not only beautiful, but also reliable and durable. The video in this article will tell you some important features of the workflow and help you understand it even better.