

There are two types of subframes: modular and prefabricated. Ready-made can be bought immediately in the store, and the modular will still have to be assembled. Ready-made ones are best used for small paintings (30x40 cm).
Advantages of a modular stretcher - in case of sagging of the canvas, wedges (which can also be bought in an art store) are driven into the grooves of the stretcher and the canvas is stretched. More often, such a need arises for large-format paintings.
The side of the stretcher with a notch or bevel is called the front side, it is made so that the canvas does not stick to the frame.
The canvas is pulled to the front side. If you decide to assemble a modular subframe, it is better to fix it with brackets at the joints.
To stretch the canvas onto a stretcher, we need:
- canvas,
- stretcher,
- furniture stapler,
- tongs (optional)
- hammer.
The canvas should be stretched to an elastic state, without wrinkles and sagging.
At the finished stretcher, you need to soften the corners a little so that the canvas does not break about them, for this we knock a little with the side of the hammer in all four corners.
Then we cut out the canvas a few centimeters more than the stretcher, so that we can fold the canvas afterwards. 
The figure below schematically shows a rectangular subframe, and points are also indicated and numbered - in what sequence to drive the staples.

We start from the longer side - find the middle and attach one of the sides of the canvas with two brackets.  Next, you need to hammer the bracket into the second point, i.e. we stretch the canvas to the left, holding the edges of the fabric with all fingers (so that it does not tear and stretch evenly).
In general, stretching the canvas requires strength and patience. Try this together - one pulls on, the other clogs the staples with a stapler. The fabric should be tightly stretched, but, at the same time, do not overhaul, otherwise it may tear.
Point 3 - we also pull and drive in two staples. 
Then we go to the other side of the canvas and score points 4 and 5, while pulling the canvas vertically. I use forceps to pull it - it's comfortable and my fingers don't hurt afterwards. 
Point 6 does not require any effort - just a little pull.
But 7 - you have to pull very hard! 
Further - 8 and 9 - we also pull with all fingers, but not strongly, because Points 11 and 12 have not yet been scored. The direction of tension is vertical. 
This is followed by 11 and 12. 
Then we return to the short side with point 6, drive in the extreme points without much tension, turn it over and, already tightening it tightly, drive in along the edges of the staple. Then - evenly, with tension, we hammer the staples. The interval between the clips is 4-6 cm. This is how we act on all sides of the stretcher.
Long side: 
short: 
We fix the corners with an overlap, with two brackets. 


If you pat your palm on the finished stretched canvas, it will feel like a drum.
Ready product. 

The fibers should be perpendicular to the lumen. Mine is not quite perfect)), but it is advisable to strive for this. 
After stretching the canvas, it should be prepared for the primer. For this we need gelatin. We dilute it in a ratio of 1: 6 (gelatin: water). The water should be hot (boiling water), but before that, you can pour a little cold water into the gelatin for about 10 minutes. Then stir the mass and cool. It will turn out to be almost jelly in consistency or a little thinner. This will cover the canvas twice. It is better to take a large brush (painting). The interval between coats is 12 hours. After the second coat has dried, it is necessary to lightly walk on the canvas with sandpaper (without fanaticism). Then you can cover with soil. The soil is bought in a store and diluted with cold water until it becomes sour cream. They also need to be coated twice, only with an interval of 30-40 minutes.
After these procedures, the canvas is ready for work.
The ART-FRAME specialists will stretch the canvas onto a stretcher in a short time. Our company has extensive experience in the provision of such services. We guarantee the timely execution of the order.
The stretcher is the base on which the canvas is stretched. The quality of all work, the durability of the picture directly depends on its quality. There are two types of subframes: modular and one-piece. The former are sold disassembled and consist of slats with grooves for joining at the corners, the latter are produced immediately in one piece.
Stretching the canvas onto a modular stretcher is a fairly straightforward process. But such products can disperse and deform over time, so they are not so reliable. Installing the canvas on a one-piece stretcher is associated with a number of difficulties, such work can only be entrusted to a professional, but its quality and durability, if done correctly, are much higher.
The stretch price depends on the type of stretcher selected. We have a wide range of these products at the best prices. Also, the cost of the service depends on the size of the painting.
When choosing a stretcher yourself, it is important to pay attention to the absence of defects. There are many different problems to face:
- blind connection of corners, the inability to adjust the tension of the canvas;
- no crossbar or cross for large-area canvases;
- there are no bevels on the inner sides of the product;
- low strength, poor workmanship materials;
- poor quality of production;
- the presence of grinder beetles or mold.
The specialists of our company will stretch the canvas on a stretcher of any quality, but the consequences of purchasing a product with the above-described defects lie with the customer. We can offer quality products from our range or inspect the product brought by the client for problems.
Where to stretch canvas on a stretcher in Moscow?
Our company offers convenient terms of cooperation for each client:
- optimal prices for all services;
- specialists are able to pull the canvas onto a stretcher in a short time;
- wide range of stretchers;
- convenient location of workshops in Moscow;
- high quality of work;
- an individual approach to each client, consulting on all issues of interest.
The stretcher serves as the basis for stretching the canvas. There are 2 types of stretchers: modular(prefabricated, wedge) and deaf.
Modular (prefabricated, wedge-shaped) stretchers can be purchased at almost all art stores. They are sold in slats of 2 (in increments of 5 cm in length) and are slightly more expensive than blind stretchers.
Modular subframes have a huge advantage - their corners are not rigidly fastened and when sagging, the problem can be easily and quickly corrected at home - you just need to knock out the wedges (Figure 6). This must be done very carefully so as not to spoil the canvas with a hammer and not to overtighten it.
In deaf stretchers, the corners are rigidly connected and if the canvas sags, then it will have to be dragged. The banner of the canvas should be done only by a specialist!
As a rule, a 1.8 cm thick stretcher is used for a medium-sized painting, and 3 cm thick for a gallery stretch.
The stretcher and the preservation of the painting
A poor quality subframe negatively affects safety. The paintings of modern painters very often have bad stretchers. Unfortunately, not all artists attach great importance to the quality of the stretcher.
Defects of the stretcher do not allow the canvas to be properly stretched on it, which ultimately leads to the destruction of the soil and the painting layer of the painting.
A high-quality stretcher is the basis for the long-term preservation of a painting.
Consider the main defects of the stretcher
- Blind connection of corners, which makes it impossible to adjust the tension of the canvas, which causes deformation of the canvas and its sagging.
- On the "blind" corners of the stretcher, artists nail plywood triangles, which make the stretcher even more rigid and motionless.
- No cross or crossbar - for large paintings. A subframe with a cross or crossbar will not skew and the corners will remain straight.
- The absence of bevels on the inner sides of the stretcher, which causes creases and debris of the paint layer, which are inevitable from the vibration of the canvas with stretchers that do not have these bevels.
- It is better to choose a stretcher that has rounded off all points of possible contact with the canvas (all sides on the front of the stretcher), so you will avoid serious damage to the canvas during transportation.
- A fragile stretcher that skews when the canvas is pulled.
- Step-like, loose connection of the strips at the corners and on the cross. With this defect, the canvas is deformed, creases and debris of the paint layer appear, and it is impossible to tightly connect the picture to the frame.
- The subframe is made carelessly, from raw wood, as a result of which, after a fairly short period of time, the subframe will "lead" and it will have to be replaced (in some cases, the frame has to be replaced as well).
- The stretcher is made of wood with knots. Even a well-made stretcher, on which there are knots, will eventually "lead" and will have to be replaced.
- Stretcher with grinder beetle. Thanks to the activity of these insects, the tree decays, turning into dust.
- The stretcher is moldy.
Tools
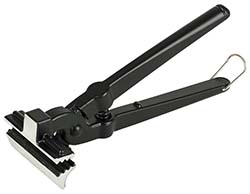
To stretch the canvas, you will need a stapler with staples (Figure 1), a special tool for stretching pictures (Figure 2), a tape measure and a hammer.
Never entrust the stretching or hauling of pictures to random persons: carpenters, joiners, etc. An experienced restorer should pull the old painting!
It is very important for the correct canvas tension to evenly stretch the canvas and feel the tension limit.
An inept stretching leads to unpleasant consequences:
- Formation of micro-fractures when shaking from hammer blows (this is mainly important for old paintings).
- If the picture is too taut - the appearance of craquelure when the picture is self-tensioning under the influence of atmospheric vibrations.
- If the picture is stretched too loosely and unevenly - sagging and wrinkling.
- The appearance of cracks in the paint layer and soil along the edges of the painting.
Canvas tension
The raw canvas is not stretched too much. it will stretch significantly during priming. The final touch will be to stretch the primed canvas by punching gussets in the corners. For a blind stretcher, it is advisable to use a primed canvas. It needs to be pulled tight like a drum.
Stretching the canvas while wet is strongly discouraged., since the threads of such a canvas are deformed irretrievably. Cotton canvases or canvases with an admixture of cotton suffer from wet stretching several times more. Canvas wetting has Soviet roots, when our artist was dealing with hard and brittle canvases. Such canvases were so inconvenient in preparatory work that they were invented to be "wetted" to facilitate stretching on a stretcher. Then, as in Europe, there was never such a practice.
Stretching the canvas onto a modular stretcher
- Measure the diagonals of the subframe, they must be the same !!! Fasten the corners with a stapler (2 brackets per corner).
- You need to stretch the canvas with a tool to stretch the paintings evenly with the same effort.
- When stretching, do not wet the canvas from the unprimed side, as this may cause the soil to peel off.
- Pull out the brackets securing the corners of the subframe.
- Bend and fix the excess canvas with a stapler (Figure 6).
- Insert two wooden wedges into the grooves on the corners of the stretcher and carefully knock them in with a hammer (Figure 6).
Stretching the canvas on a blank stretcher
- If possible, it is better not to use such a stretcher at all !!!
- Check the diagonals, they must be the same !!!
- Place the picture of the picture on a stretcher exactly horizontally. If you just have an unprimed canvas, it is important to position it so that the direction of the canvas threads is parallel to the edges of the stretcher.
- Using the tension tool, staple the canvas on 4 sides as shown in picture # 3.
- Fasten the canvas with a stapler every 4-5 cm along the entire perimeter of the stretcher, moving from the center to the edge, as shown in figure # 4.
- You need to stretch the canvas with a tool to stretch the paintings evenly with the same force and strong enough, because if the canvas sags, you will have to drag it again.
- Continue to stretch the canvas over the stretcher as shown in picture # 3. At the corners, the canvas is neatly tucked in and shot with a stapler.
- Bend and fix the extra canvas with a stapler (Figure 6), it will still come in handy when stretching the picture.
Gallery canvas stretch
Gallery stretch canvas is usually used for frameless painting. With gallery stretching, the canvas is secured on the back of the stretcher and wrapped neatly at the corners.
At home, it is quite difficult to stretch the canvas in this way, so it is better to contact a baguette workshop, which has professional equipment - a gallery stretching machine.
Canvas padding
- The process of stretching the paintings includes: removing the canvas from the old stretcher, making a high-quality stretcher of the required size, stretching the canvas onto a new stretcher, correcting the tension by pulling or knocking out wedges.
Despite its apparent simplicity, canvas dragging is a complex process. Features when it comes to old painting in poor condition or huge canvases. - We pull out the staples or nails and remove the painting from the old stretcher.
The painting is placed face down on a work table or flat floor. Using a not too sharp screwdriver, carefully remove the nail or bracket at an angle. - We check the diagonals of the new subframe, they must be the same !!!
- We put the picture on a stretcher. We align the edges of the picture along the lines of the stretcher and fasten it with two brackets on each side, first stretching it with hands or tongs along its sides in the corners.
- Next, we act according to the scheme described above in the stretch of the pictures.
- Large paintings are stretched differently - they are laid face down on the floor on a clean mat. A stretcher is placed on the picture with bevels down, the edges are baited in the same way as in the first case.
The process of stretching is almost the same as the one described above, the only difference is that the work is done more by intuition, since you cannot see the painting in front of you. It is necessary to carefully calculate the tension of the hand, to maintain consistency and uniformity.
Pulling the painting face down prevents it from sagging, from possible folds of the paint layer, etc. Since the painting lies flat on the floor, less tension is required when working with tongs.
You can then increase the tension with the help of the stretcher blades.
How to buy a finished canvas on a stretcher
- Do not buy ready-made canvas on a blank stretcher.
- Inspect the subframe carefully for defects.
- Check the softness of the stretcher material, if the wood is too soft, then do not buy such a canvas. Such a stretcher is easy to define - it is two times lighter than a conventional stretcher.
- Do not buy a ready-made canvas on a stretcher "Sonnet" from the manufacturer "Nevskaya Palitra". If you have canvases with a stretcher from this manufacturer, we strongly recommend that you replace the stretcher immediately.
The stretcher is modular, but made of very soft wood, which is softer than pressed paper. If you want to tighten the canvas, then nothing will work - the wedges enter this tree like butter at room temperature.
|
picture No. 1 Stapler for attaching the canvas to the stretcher. |
|
 |
picture No. 2 |
Stretching the canvas onto a stretcher requires special skills and experience. It can be of two types: modular (wedge or prefabricated) and blind. A large assortment of modules are sold in the artist's shops. They consist of two slats, the length of which is 5 cm. But at the same time, their cost is slightly higher than that of the deaf. The modules have a peculiarity: the corners are not rigidly fixed, and when the web sags, the flaw can be easily eliminated independently by wedging. The main thing is to do it carefully, trying not to damage the picture with a hammer and not deform it, distorting the image. We recommend that you order from our specialists at an affordable price and in a short time.
Preservation of the art object and stretcher
Stretching the canvas over the frame, if done incorrectly, will negatively affect the safety of the object of art. However, not everyone pays due attention to this point. A defective stretcher will not allow the canvas to be fully stretched, which will lead to cracks in the ground and painting layer of the image.
What they face when buying a low-quality stretcher:
- The corners, fastened tightly, do not allow adjusting the tension, and as a result, deforming sagging of the web.
- At blind corners, plywood triangles can be nailed, which will make the subframe inconvenient to use.
- Pictures of impressive scale must be stretched using a cross. This will eliminate distortion of the subframe and bending corners.
- If there are no bevels on the back of the stretcher, the canvas will begin to wrinkle, and layers of paint may crumble.
- Stretching the canvas onto a stretcher is a technologically time-consuming process, so it is better to use a design with rounded points in contact with the painting. They are located on the front of the subframes.
- Unstable subframes warp at the moment of stretching.
- A weak connection of the corner strips leads to deformation of the canvas, the appearance of creases and shedding of layers of paint. There is no way to fully connect the canvas and frame.

Sometimes you can find manufacturing defects in stores. These are stretchers made of damp wood or with knots. Because of this, the base will definitely lead and it will have to be changed. And sometimes together with a deformed frame. But the biggest problem is the infestation of the stretcher beetle colonies. Thanks to him, the wood crumbles and becomes dust. Mold is also possible, leading to the same result.
How the canvas is stretched onto stretchers
To do this correctly, you will need a production stapler, a woven stretching aid, a hammer, and a tape measure. The canvas, which is clean from the primer, does not pull very much, since it will still sag under the weight of the coating. Therefore, after the paint layer dries, wedges are necessarily knocked out. Deaf stretchers involve the use of exclusively primed canvas, and are stretched to the state of a ringing membrane.

Ways to stretch canvases on a stretcher:
- On modular: diagonals are measured, they must be identical. The corners are fixed with staples (one bracket at an angle on each side). The image is positioned clearly horizontally. The canvas without a primer is laid so that the weft threads run parallel to the edges of the stretcher. The canvas is attached from all sides. The brace is placed in 3 cm steps on each side of the perimeter, you need to move from the edges to the central part.
From the corners, the canvas must be tucked up and secured with staples. It is strictly forbidden to wet the canvas from the side where there is no primer, as this will lead to delamination of the soil. After all the manipulations, remove the brackets that fixed the subframe from the corners. The excess parts of the canvas are neatly folded and secured. 2 wedges made of wood are inserted into the grooves, they are carefully knocked out.
- Stretching the canvas on a blank stretcher. If there is no choice, then, as in the first option, the diagonals are measured first. Trim the canvas and fix it with brackets on 4 sides. Attach the canvas in 3 cm increments around the entire perimeter, moving from the center to the edges.
All other actions are performed in the same sequence as when pulling the picture onto the module, but in this case you do not have to tap the wedges, and you should not cut off the excess canvas, it may well come in handy if the picture has to be dragged.

The corners of the blind stretcher are connected rigidly and when the canvas sags, it will have to be re-tensioned. And this process can only be entrusted to a specialist. With an average size of paintings, a stretcher with a slat thickness of 2 cm is suitable, if necessary, a gallery stretch - 3 cm.
If the picture is expensive and important, you need to entrust its design to professionals. Attempts to save money on their services and do everything on their own often lead to damage to the canvas, after which restoration is required, and this service is much more expensive. For our part, we guarantee respect for the objects of art, loyal pricing policy and quality work. At the request of the client, the whole range of baguette-decoration services can be provided.
Sometimes an inexperienced beginner asks: why make a canvas with your own hands, because in shops for creativity you can buy canvases of different types and sizes. So it is so! But there are situations when making canvases with your own hands is simply necessary!
For example, you have have a great idea for a cityscape with an evening city, but the store does not have such a canvas format 50/100 cm. But for drawing you need a canvas of a unique shape, which does not exist in stores. Or you have conceived to write a modular picture on several canvases, but there is simply no way to pick them up in finished form.
The idea of \u200b\u200ba painting on a custom canvas
And besides that, ART stores sell primed canvases in rolls, so why not make a picture with your own hands right from scratch in the format you need? Read more about how to choose a canvas in the article, where I described everything in detail.
The main difficulty of the work awaits at the first stage the required format of the stretcher. Make a stretcher yourself without special skills and tools are unlikely to work. Therefore, here it is necessary to decide which is better:
- buy a ready-made stretcher
- order the manufacture of a specialist, usually from a carpenter
- purchase prepared modules (strips) to assemble the stretcher yourself.
By the way, stretchers are usually made from well-dried pine wood, but there are some brave artists who make stretchers out of plastic! Pictures on such a stretcher do not deform even after many years!
Now I want to notice that canvases bought in shops for artists, already glued and primed, even those sold in rolls. So after pulling it onto the stretcher, it is quite possible to get to work.
Important: all stretchers for painting should be movable, that is, the slats should not be glued together. As a rule, they are sold with 8 blades, which are inserted from the back and, if necessary, can push the slats a few millimeters apart.
How to make a canvas with your own hands
Until recently, the canvas was fixed on a stretcher with nails, now everything is simplified thanks to such a thing as a stapler! A great thing for fasteners, quickly and without unnecessary damage to the fabric from nails.
To make a stretcher, we need: a suitable stretcher, primed canvas, hammer, stapler, scissors, tape measure or ruler. And of course, self-confidence!

Stapler for attaching the canvas to the stretcher
So, a step-by-step progress of work:
First, you need to determine the dimensions of the canvas on the stretcher. It is necessary to cut the canvas with a margin of 5-6 cm on each side, so that the edges of the canvas are well wrapped on the back side of the stretcher.
Put the canvas on the table, place the stretcher on top so that so that the strands of the web are parallel to the slats of the stretcher. This is very important so that the finished canvas does not deform in the future.
Important: The stretcher must be placed correctly on the canvas so that the sides are not accidentally confused. The sides on the stretcher are not the same, we put it with the sawn side inward. So that it is aesthetically beautiful and there is no touch of the canvas with the stretcher, and such cuts of the slats are needed. The photo below shows that the stretcher slats do not fit snugly against the fabric. This is how it should be ...

Canvas stretch example
I would like to draw your attention to the fact that pulling a primed canvas onto a stretcher is more difficult, since the fabric no longer stretches so well under the layer of glue and primer. Therefore, some artists slightly wet the canvas from the back side to make it more elastic and pliable. Do not worry, after drying everything will return to its place and the fabric will stretch even tighter! In this case, it is advisable to make an additional layer of soil, as micro ruptures in the soil may result when wetted.
By the way, it is believed that it is impossible to wet the canvas from the back side, let me disagree with this ... Light moistening does not hurt, unless, of course, soaking so much that water flows from it
Fold the edges of the canvas and fix them with a stapler. Work with the long side first, starting from the middle of the subframe bar. Outline the fastening with 3-4 staples and turn the canvas 180 degrees. Secure the fabric on the opposite side. Make sure that the distance between the staples is no more than 2-3 cm.
Now fasten the canvas to the short slats of the stretcher. It is good to stretch the canvas, fix it step by step with a stapler. Work with the corners of the blade last. This is the most important part of the work, and the appearance of the future picture will depend on it. Gently pull the fabric, tuck it up and secure with staples. 
Important: you need to pull the canvas more tightly from the center
Inspect the result, tap the staples with a hammer, add more fasteners if necessary. Turn the canvas right side up and check the quality of the work.
What to look for:
- the tension must be uniform
- folds and creases of the canvas are unacceptable
- when tapping with your fingers, you should feel the drum surface.
If the canvas is loosely stretched, there is sagging or other imperfections., do not worry, all the amendments are in our hands! We have to be patient, remove the staples and redo the work where there is a need for it. Every artist knows that under the weight of paints there is a colossal load on the canvas. This means that it will stretch even more.
On a note: if you have to make a canvas for drawing a large size, then it is difficult to do without special pliers (tongs for stretching the canvas). These can be purchased at art stores.

Tongs for stretching canvas
If you want to stretch the canvas that is not yet primed, then it is better to do as shown in the photo below. First, we pull and fix the center of all four sides crosswise, gradually pulling the canvas trying to keep the fabric lines parallel. To avoid overtightening the fabric, use the same tension.
Do not forget that the fabric stretches, and if you drag in one place, it can sag in another .. At least this applies to large canvases, if you stretch it alone. I had to do this, ... If something still went wrong, I advise you to drag the canvas before you continue making the canvas.

Picture with an example of stretching the canvas
The photo shows an example using nails for fastening to the side of the subframe. In the store you can find these, this is how they used to be done. The main thing is to remember that the tension is uniform and the threads of the fabric ran parallel to the slats of the stretcher
Gluing
And now we will talk about if an ordinary fabric was originally purchased, that is, cotton, synthetic or linen. The information will be of interest to those who do not have the opportunity to buy ready-made canvases, as well as for those who who wants to go through all the steps and make the canvas completely by himself!
It is difficult to paint a picture on unprepared material, and most importantly, it is not practical, because the paints will be absorbed through the holes in the interweaving of the threads. In addition, paints on non-primed canvas tend to crack and shed over time. 
Therefore, the next step is gluing it!
Why glue the canvas? Firstly, sizing makes the fabric base stable, secondly, it protects the canvas from passing the binder from paints and soil to its back side, and thirdly, it “clogs up” the pores in the fabric, preventing the paint from seeping inside.
In addition, after gluing, the canvas acquires an elastic, durable film. The primer is better applied to the glued canvas, the gluing prevents the oil from being pulled out of the paints. This means that it increases the durability of the painting and prevents paint fading. Do you know that more than one painted canvas has suffered from improper gluing and primer!
You can buy the gluing or do it yourself.
Sizing in the art store is a paste made from natural resins and glue that is water-soluble. As a rule, store-bought ready-made glues contain special substances that prevent the growth of mold and mildew on the canvas. This is also very relevant, since over the years the fabric can suffer from mold, if, for example, the room has high humidity.
It is easy and simple to work with it. A wide brush or spatula, table or other horizontal surface is required to apply the sizing to the canvas. Apply a thin layer of paste with a spatula or brush without pushing it through the fabric. Dry for 3-6 hours. Repeat one more layer if necessary. In any case, the jar says how many times to apply the sizing.

Ready-to-use canvas sizing
And remember how artists used to glue the canvas without special means! For gluing with canvas, many artists themselves cooked wood glue or fish (sturgeon) and casein glue. A very time consuming and time consuming process! Moreover, this glue was applied only once and in a thin even layer. If the canvas is re-glued with samovar glue, then it becomes hard, and even cracks may appear with subsequent load on the canvas.
Today, many artists use edible gelatin for sizing. To do this, fill the gelatin package with water so that it is completely covered, mix and leave for a couple of hours. After the gelatin has swollen, pour boiling water in the same proportion.
It is applied with a spatula, so it turns out exactly. Dry for a day, and make a second sizing. There are holes on a poorly glued canvas (not glued pores of the fabric). Therefore, to determine the quality of gluing, look at the canvas through the light, if it is translucent, glue it again.

Sizing the canvas with gelatin
Semi-liquid PVA glue is also used for gluing canvases, although the reviews about such gluing are far from forest ones. I know that PVA-glues are used for cardboard. Many artists consider the best glue from sturgeon, that is, fish, so I think that gelatin is the best alternative, as it is a natural glue from the connective tissues of animals!
In France, where I have lived for the last 17 years, rabbit glue made from rabbit skin is used to glue the canvas. I think that each country has its own preferences for the adhesive composition, the main thing is that it is natural! If you are interested in painting, then you will be interested in an article with a charming charm! After all, acquaintance with painting begins not only with canvases, paints and brushes, but also with the wonderful creative world of artists!
Note that there are artists who don't do gluing at all, and slowly tighten the pores, holes only with soil. Whether it is correct or not, only the lifetime of the painting will tell. By the way, what brings the picture to a deplorable state, and how you can restore it
How to prime canvas
Why do you need a primer on canvas? It is important an intermediate layer, a "strong conductor" between the base and the painting, so that it can firmly adhere to the canvas. It also helps to create the necessary texture and color tone. The primer can be bought ready-made, as well as gluing, or you can do it yourself.
Canvas primer can be glue, emulsion, acrylic, oil, semi-oil, synthetic. Those canvases that are on sale are covered with an emulsion, acrylic primer. For example, on our canvas they write: « Acrylic primer Gesso covered the canvas 4 times "in French
Therefore, the most optimal choice is an acrylic, emulsion primer for canvas. It is versatile, great for painting with oil, acrylic and gouache paints.

Acrylic primer for canvas
Although there are artists who criticize such soil and believe that it is not suitable for oil painting. I will say that only these are sold here…. sometimes I myself make an additional oil-based primer on top of acrylic. There are many primer options, and each master prefers his own recipes and secrets in this matter.
The primer itself consists of two or three stages, so you should not force events and strive to prime the canvas in one go!
For the primer, you can use acrylic paint for construction work and make the primer yourself (see the recipe below) or buy ready-made primer at an art store. For the first layer, dilute the paint a little with water. until the consistency of very liquid sour cream. Sometimes it is recommended to add a little sizing to the first primer, which was mentioned earlier. This increases the adhesion of the ground to the canvas.
So, apply the primer to the canvas with wide strokes with a flute or a wide brush. Try not to run the brush several times in the same place and do not make beads. To get a super even primer, you can use construction wide trowels or a mini-roller, quickly and with less primer.

Uniform roller priming of the canvas
After drying the first layer of primer, apply the second one. Dry and inspect the canvas. Drying time 12-14 hours depending on the humidity of your room.
On a note:Make sure there are no drafts during drying! According to the observations of many artists, this is not beneficial for the canvas.
If you are satisfied with the texture of the canvas and its background, then you can complete the work on this. If necessary, add a few more layers of soil.
Well, if you decide to make a primer yourself, then here is a great recipe for good adhesion, that is, adhesion of the paint to the ground
- 200 g of building emulsion
- 1 yolk
- 2 tsp glycerin, that is, 10 g as a plasticizer
- ½ packet of gelatin, pre-soaked and diluted
- 5 tsp linseed oil, which will make the soil more elastic
- 1 tsp semi-liquid honey as a natural antiseptic
That's all! The canvas is ready for painting! Paint your colorful pictures and be filled with the energy of color, because, as you know, it does real miracles! About all the charm of color therapy
Output: as you can see, you can assemble a canvas with your own hands in different ways, you can look at things conservatively, correctly, or you can approach things creatively, not in a formulaic way .... The main thing is that the canvas turns out to be aesthetically correct and the result of your labors delights you with the brightness of colors for a long time!
Remember: "There are never big things without big difficulties" - so said Voltaire, French poet, philosophers, historian
Friends, so that the article does not get lost among many other articles on the Internet, save it to bookmarks. She will always be at hand if you want to return to her!
Ask your questions below in the comments, usually, I answer quickly to all questions