

Preliminary drawing for a portrait in oil. The drawing demonstrates how the features of a human face are located within an imaginary square. The width of the face at the level of the cheekbones is equal to the distance from the hairline to the interlabial line. The eye line runs in the middle of the square, and the tip of the nose is positioned halfway between the eyes and lips. (Figure 1)

At this stage, color and tone are added to the hair and a more saturated color is applied to the face and background of the picture. The sketch is now less linear and (Figure 3)
.
This is a finished drawing ... It can be left as it is, or used as a sketch for an oil painting.
This kind of sketch makes it easier to work on a real painting. (fig. 4)
Modeling is the preparatory work of defining large light and dark areas for a drawing or painting, a very important process in terms of composition.

|

|

|

|

Distribute light and dark areas so that you get an interesting composition. Consider large planes and outlines that will create a pleasing overall effect. Details can be added later.

To simulate a portrait, when zones of dark and light tones of different saturation are outlined, it is very important to find the ratio of size and shape. Saturation means the degree of brightness of the color. Tone - determines the ratio of light and dark in a drawing or painting, regardless of whether they are made in black and white or in color.
You should not make a drawing as an island in a sea of \u200b\u200bwhite paper, it should fill the entire sheet.

The partially veiled face is interesting in terms of composition and design of the painting. Here, accessories such as a veil, scarf or high collar provide many possibilities.

Tips When drawing the head in profile, leave a little more background in the front rather than the back of the model. In this illustration, the head is positioned exactly in the center of the canvas, which narrows the front space too much.
Here the head is slightly shifted to the right, which gives a more favorable effect.

If the head is placed too low, it can give the impression that it "falls" beyond the plane of the canvas; if it is too high, it will sort of “float”. When thinking about a drawing or painting of a person's head, find the correct position from the beginning; in this drawing, the head itself is aptly placed in the center of the image. But when the neck and shoulders are added to it, you can see that the whole composition becomes heavy at the bottom. (fig. 1)

In this picture, it looks like the head is too high, but there is still enough room for the neck and shoulders. And you can see that the head is in place and the image is balanced. (fig. 2)

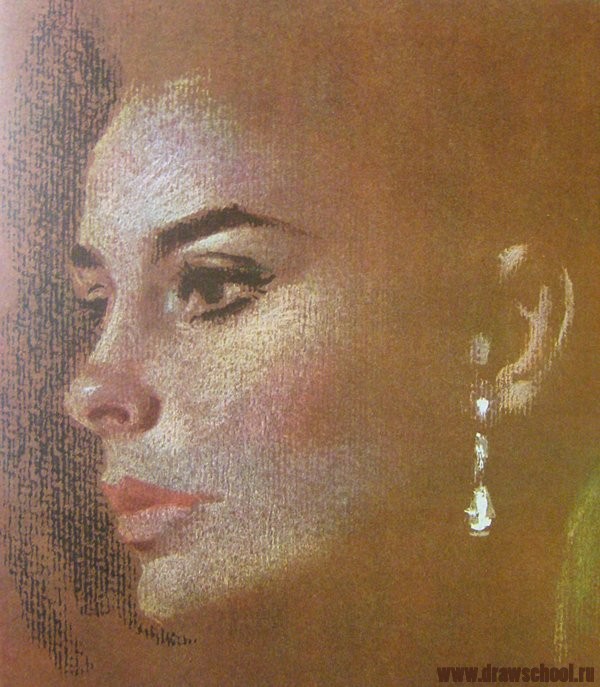
Oil A limited palette of colors was used for this work. Burnt Umber, Burnt Sienna, Natural Umber, Natural Sienna and Titanium White.

First, a light gray tone was applied to the canvas, on which the contour was then sketched with burnt sienna using a No. 5 column brush with a sharp end. After the drawing was completely dry, a transparent layer of burnt umber, diluted with a mixture of linseed oil, was applied to it with a flat brush “20” and dug. In the next stage, the face was covered with a flesh tint, which is a mixture of burnt and natural umber and white. The dark mass of hair is painted with clean and burnt umber.

At the end, pink lips and cheeks are added with burnt sienna and titanium white. The gray background around the hair is made from a mixture of natural umber and white. Thus, the finished painting is almost full of color, although it was painted using a rather limited monochrome palette. First, outline the facial features and determine the position of the eyebrows. Next, apply a flesh tone base, the unpainted areas will serve as the shadow.

Draw out the lips and add details to the nose and eyes. Outline the ear with the earring. Apply shadow near the front of the face to create depth and soften the shadows on the face. Add color to the details: lips, cheeks, nose and eyes.

An important part of the picture is its background. However, it can conflict with the subject of the image if the color or model is too conspicuous, if the background is too gray and even, the feeling of space and air between the background and the subject of the image disappears. To give more volume and roundness to the head, you should lighten the background where it touches the shaded side of the head and, accordingly, darken the background where it touches the light side. This will also create a sense of space between the head and the surrounding background.

On a transparent tone of pale green cadmium, diluted with turpentine with a few drops of desiccant for quick drying, superimposed with a flat kolinsky brush No. 20 over the drawing. After drying (within 24 hours), on top of the first tint layer, a second transparent and thin layer of burnt umber is applied, which must also dry. This process is shown separately in the illustration to show the color and saturation of the tint layers.

We build the composition of the model. In nature, shadows appear transparent, so here diluted paint is applied to shadows. When working on lighter areas, paint should be applied more densely.

This pattern includes predominantly dark and light colors. Some parts of the tinted canvas on the left remained unpainted, becoming part of the image. This is a complete picture. The shaded side of the face merges with the general background, which gives the image of the head a roundness.

Here we used kolinsky brushes (flat # 20 and pointed # 5) and a palette of paints consisting of: Burnt umber, pale green cadmium, Venetian red, yellow ocher and titanium white. This limited palette still produces a wide range of skin tones.
Tip A 40x50 canvas gives you good scope for proportioning the head, but you don't have to limit yourself to a specific size or configuration. For example, the above composition is tall and narrow.

The upper lashes are thicker and thicker than the lower ones, so they should look darker. The lower eyelashes become longer and more voluminous closer to the outer corner of the eyes. The placement of glare in the eyes should be carefully considered, and the glare should not be too large (a large glare makes the naturally wet eyes appear to be covered with glare). The upper eyelid casts a light (but noticeable) shadow over the eyeball. To achieve the desired wet look, place a small highlight where the inner edge of the lower eyelid meets the white of the eyeball. Don't make the protein too white - it should actually match the skin tone quite well. The iris has a softened edge - it's not just a colored disc on the surface of the eyeball, but a color zone within it. At the pupil, the edge gently passes into the iris. Sketch of a head measuring 20x25 cm (canvas on cardboard). The sketch was covered with several light layers of matte fixative.
At this stage, the facial features were outlined with a # 5 core brush, and then the hair and color background were worked with a palette knife.


It is not necessary to paint the entire canvas. In this painting, for example, open, unpainted areas on the canvas are part of the overall composition. The flesh tone is composed of a mixture of cadmium orange, ocher yellow and titanium white. Hair is made of natural sienna and burnt umber; the background in the upper part on the left is earthen green; the background at the top right is pale green cadmium; dark places behind the face - pure burnt umber.

The image shows different color saturation of the picture.
In the section: Lessons for drawing with oil paints
Materials Blue paint Paint Mountain mixture white titanium paint Cadmium yellow paint White 1 "Landscape brush Painting knife, * 5 Fan brush, * 3 ...
Many dreamed in childhood to learn how to draw well with paints on canvas. But not everyone has this dream come true.
Perhaps you didn't have time for art school, or you didn't have enough talent, and you eventually abandoned this idea, devoting yourself to more needed things. But if you still cherish the desire to learn how to paint with watercolors, the following recommendations may be useful to you.
Watercolors are the colors of choice for most artists. There are many techniques for painting with these paints, with which you can create beautiful drawings even without special skills. Below we will look at how to paint a portrait in watercolor step by step.
Brushes
In order to make a portrait in watercolor, you need to have several brushes. You may not need some of them in the future, but in the initial stages it is better to purchase them. Some artists use only one brush, but this requires some experience.
Everyone chooses a set for themselves. Some people prefer artificial hair brushes. Natural wool, for example, goats, also has good reviews. These brushes are popular in China.
Whichever brush you choose, it takes time to get used to it.
Drawing
If you are a beginner or have little experience, it is recommended to sketch the future painting in pencil before starting to work with watercolor.
I must say that some people prefer to work without a sketch, as sometimes the pencil lines show through in the final picture. And some are just more comfortable.
But in cases where maximum similarity and detail is required, it is better to draw the base with a pencil.
Watercolor
When the pencil drawing is acceptable to you, you can start applying the first coat of watercolor paint. Use classic colors: blue, red, yellow, blue, brown.
The mixture of blue and gray works well for backgrounds. If you need to portray a person in different positions, start applying paint from the head. And then, while the paint is drying, make a background.
Apply the first coat of paint to the rest of the drawing. When everything is dry, proceed to the second layer. Remember that when the painting is dry, it will look lighter, as some of it will be absorbed into the paper.
Lastly, add shadows and deepen the facial features. It is very important to be careful at this stage so as not to spoil all the work done.
Portrait painting tools
Now, using an example, we will analyze how to draw a portrait in watercolor.
To get started, prepare the following materials:
- Pencil B or HB.
- Watercolors in the following colors: cadmium orange, natural sienna, cadmium yellow, cobalt blue, lamp black, lemon yellow, burnt sienna, burnt umber, vermilion, carmine, blue or violet ultramarine, gummigut, natural umber.
- Brushes: medium, fine.
Drawing a portrait together
So, to paint a portrait in watercolor step by step, follow these guidelines.

Here's a portrait of a girl in watercolor. By this principle, with a little practice, you can paint portraits even from nature or from memory.
How to paint flowers in watercolor
Flowers surround us all the time. They give us beauty and inspiration, delight our eyes, and bouquets of flowers are the perfect gift.
And painted portraits of flowers in watercolor will become a wonderful decoration for your wall. The technique of painting flowers is not very different from the portrait technique. It is advisable to make a sketch with a simple pencil, and then layer by layer apply watercolor of the desired shades.

Remember to do shading to give volume and depth to the image in the painting.
If you dream of learning how to paint a portrait in watercolor, but are afraid that you will not succeed, first drop your fears and start reading this article. Here are simple and straightforward guidelines to help you pick up brushes and paints and get started.
What materials will be needed
Before you start painting a portrait in watercolor, you need to prepare the necessary materials for this:

Preliminary work
2. Now we begin to paint the portrait in watercolor. And the first thing that needs to be done is to apply a light, transparent underpainting to the paper with paints. For the face, we dilute with water cadmium orange or ocher (the paint should be very watery, pale). We paint over the face with wide strokes; in place of the glare, the paper should remain intact. Then we select other colors and go through the hair and clothes with a brush, also leaving the lightest areas untouched.
3. Now you need to deal with the eyes and lips. What is your model's eye color? Pick the desired paint, dilute it with water until it fade and paint over the iris of the eyes in the portrait. Do the same with the lips.
4. Apply shadows to the face. To do this, add a little burnt sienna to our diluted pale cadmium or ocher. Shadows at this stage should also be applied very lightly, not at full strength. In fact, they should only slightly differ in tone from the first paint layer. Please note that, therefore, you need to watch out for the shades that are reflected on the skin of the model's face. For example, on one side, warm light from red curtains can fall on the face, glare from clothes of cold tones can be reflected on the chin, etc. This should be taken into account and try to display in a portrait using additional colors.
5. Next, we begin to understand the shadows more thoroughly. We are looking for the darkest places on the cheekbones, on the lips, on the sides and wings of the nose, near the hair, etc. It is with the help of shadows that the face is modeled and volume is given to it. The main principle in watercolor painting is to always move from lighter to darker.
6. We are looking for the lightest intermediate tones between shadow and light. On the face, where the light falls on it, there are also places that are darker and lighter. We follow the play of light and try to repeat it on paper.
7. We work with hair and clothes according to the same principle as with the face.
8. At the final stage of work on the portrait, you need to take the thinnest brush and use it to trim small details and lines: individual strands of hair, eyelashes, lip line. Always remember that when working with watercolors, even in the darkest places, the paint must remain transparent.
9. It is best to work on the background in parallel with the whole portrait, but you can leave it for later. The main thing is that the background should not be worked out more than the face, but negligence is also inappropriate here.

Conclusion
We hope you have learned in general terms how to paint a portrait in watercolor. Well, now it's up to practice, because only direct work with will give you self-confidence, as well as the necessary experience and skill. I wish you creative success!
The portrait shows a girl in an autumn coat and beret with a scarf tied around her neck. Head in frontal position, shoulders in 3/4 view. The background is dark. The color palette is based on the ratio of cold and warm tones. The light is soft, diffused.
We determine the proportions of the height and width of the neck, placing the main masses of the portrait in sheet format. Linearly sketch out the front part, beret, scarf, shoulders. We draw the middle axis and determine the vertical ratio of the parts of the face. We outline the incision of the mouth, the base of the nose, the lines of the eyes and the armor.

We continue to work with a graphite pencil on the constructive construction of the details of the face, identify the volume of the scarf, and shape the hairstyle.

Refining the pencil drawing. We are working on the similarity with the model. We work out in detail the facial features, beret, folds of the scarf, outline the strands of hair.

Let's start with a pictorial solution. Lay the front part and coat with a transparent fill. We make a warm lining on the scarf, hair and beret.

Paint the background in a rich tone with a large flat brush. And then, when it just starts to dry, we create an texture on it with a clean wet brush.

Taking into account the nature of the lighting, we begin to reveal the shape on the front part with light semitones, layer by layer with glazes.

We actively work with color and tone. We prescribe beret, hair, coat and scarf, revealing their texture. We put emphasis on the collar of the sweater. Be sure to let each layer of paint dry.

We work on the face in detail, focusing on the eyes.

Finishing work on the portrait. We generalize the face with transparent halftones, use a damp brush to emphasize the structure of the beret and the fold of the scarf that comes to the fore, modify the hair, glaze the background.

ATTENTION!!! Only on our website you can order a video in which the main stages of creating your portrait will be filmed. A video camera was installed during the artist's work. HD recording quality. You can download the video to your computer or other device. Video recording and portrait are great gifts for any occasion! The price for this service is indicated in the "Prices" section.
Are you tired of thinking about what to give your loved one or loved one? Maybe an original surprise is suitable as a gift? Most likely, it is the portrait that will pleasantly surprise your friend on a holiday, for example, on his birthday? It is good that you have come to our site and are reading this text. On our website you can order portrait from photo with oil paintsany size, starting with a size of 20x30 cm (landscape sheet) and ending with sizes over a meter. Oil portrait is not only interior decoration in your apartment.
To order a portrait with paints means to receive a work that has a family, material value. Our artist Dmitry Vladimirovich Revyakin is a famous painter, and the prices for his works are growing from year to year. By placing an order on our website, you will receive not only a well-done work, but also the artist's autograph (Dmitry's signature is placed in the lower right corner of the picture), because many art lovers keep pictures and pass them on from generation to generation.
Watercolor portrait from a photo to order
A color portrait can be made using various graphic and painting materials, for example, watercolor, tempera; oil paints. At first glance, it may seem that it is too easy to purchase a painting with watercolors. In reality, finding a good watercolor artist is quite difficult. Such painting consists in light, glazed and transparent performance. It is important to convey glare, reflexes, color, semi-light, contrasts in a painting. Not just an artist, but rather a master who owns the technique of painting and academic drawing, can qualitatively depict a portrait from a photograph.
Usually, an artist, a master of his craft, shows in his work not only the similarity with the photo, but also the character of a person, his features, and inner world. A portrait with oil paints is an ideal gift for a loved one. You can choose a category of portraits and order any format. On our website, for the convenience of calculating funds, all paintings, in accordance with the volume of the artist's work, are divided into the following categories: vip, deluxe, premium, standard, economy. To order a painting from a photo means not only to save time (after all, it is not necessary to pose at all), but also to save money. In the section "PRICES" you just need to choose the category of the portrait, determine the size and call us on the number: 8 968 858 34 78
or write to email: [email protected] Call for any question and you will definitely be answered within 6 hours.
Portrait with oil paints from a photo to order
Oil painting on canvas costs a little more than watercolor portrait, but the additional cost will meet your expectations. Oil painting on canvas is a job for a master with vast experience. Our artist Dmitry Revyakin paints pictures, landscapes and portraits in any style and is famous for the quality of work. To order a painting cheaply on another website means to put yourself at risk, because the quality of the work may deteriorate significantly, and the shelf life of finished works is reduced to a minimum. We use expensive materials, and we prepare the canvases by hand. Strong stretchers, high-quality canvas processing, expensive paints, thinners and varnishes are all necessary materials to create an excellent portrait. The advantage of ordering on our website is the fact that you do not need to buy materials for the artist or order a frame for a painting. All costs are already included in the price of your order, and you can choose the frame together with the artist to your taste.
Why is a photo different from painting? Why do we recommend purchasing a painting, and not a photo printing?
Typically, ordinary photography does not recognize tints and complex color combinations. Most often, the tone in photography is the same foreground and background, there is no aerial perspective, which is especially appreciated in painting. An oil portrait conveys the personality of a person, in the picture you can depict objects that will serve as a hint about the profession and hobbies of the person being portrayed.
Taking a good picture of a portrait can be more difficult than painting it with paints. This is due to the fact that the camera changes the color and coloring of the portrait depending on the lighting. A photograph cannot convey the same colors and tones that are in a portrait. In addition, the camera distorts the contour of the face and in some places the sharpness. All this leads to the fact that the photo does not at all look like a real portrait. It is very difficult for a customer to explain this effect, because a person has never encountered this problem. Most often, the customer trusts the photograph, and not the words of the artist. That is why it is more expedient to show the portrait "live", and not in the photo. Showing a portrait can be compared to measuring a dress or suit. Until you try it on, you don't know if the suit fits or not. It's the same with a portrait - until you see it live, you don't understand whether a person is similar or not. The portrait and paintings should only be viewed live!
Our site shows examples of portraits, but believe me, in fact, they look much brighter. And, no matter how hard the photographer tries, an oil portrait looks many times better than in a photograph.
You can order a portrait in the technique of Dutch masters or the direction of impressionism on our website. To order a portrait in oil from a photo, you need a little:
- go to the section "Prices" (from the main page),
- choose the size of the future portrait and the category (the more expensive, the better the portrait is),
- call or write to Dmitry Revyakin, our artist (he will tell and explain everything).
An oil portrait from a vip or deluxe photo can be performed on condition that you provide a photo with a close-up photo of a person's face. The image is a face, the person's hairstyle should not be cropped by the edges of the photo. You can send for selection by mail not one, but several photos of the person being portrayed, with a note on the one that you like best.
Below you can see examples of photographs and portraits with oil paints (you can flip through the album).
You can keep the intrigue of the gift, because it is a great surprise. Of course, you don't need to pose to create a picture, for this you send a photo. All you need is a photo with good sharpness, which can be sent by email. mail. If you doubt the expediency of an order due to unclear moments for you, then call us and we will tell you about all the features of the work. Call 8 968 858 34 78.
Watch a video of how portraits are created from photography with oil and watercolors:
Oil painting is a laborious process that requires maximum concentration from the artist. Such work can take more than one day, so make an application in advance, do not postpone it. It can take an artist from several hours to several weeks to paint with oil paints. The more time the master spends on details and glaze layers of paint (this is a very thin layer), the larger and better the portrait will become. We recommend you portraits of the VIP, Deluxe and Premium categories. The works of these categories can be performed in various subjects, with detail, in super quality. There are various techniques, for example, "Along the raw A la Prima" in one coat of paint or in several layers. If you need a portrait urgently, we will try to get the job done as quickly as possible. There were cases when the customer took the painting in a day in its raw state.
Any painting (portrait or landscape) is sensitive to external conditions that affect its durability. We propose to cover your portrait with varnish, which will protect the painting from negative influences - light, moisture, dust. A portrait with watercolors, at your request, can be framed under glass. For a portrait with oil paints, the frame is selected individually. The selection of the frame depends on the color of the picture, its general tone and many other factors.
You can order any frame - from simple narrow to wide with stucco and beautiful patterns.
If you decide to make a gift to yourself or to people close to you, then do not postpone until the last day, call now at 8 968 858 34 78. The sooner you contact the famous artist Dmitry Revyakin and send photos for your future drawing, the more time the master will have to create high-quality painting. It also happens that you do not have suitable photographs to work on a portrait. In this case, we can organize absolutely free photography.
You can order:
- a portrait from a photograph of a person close to you;
- family portrait from a photo;
- portrait of an animal;
- portrait for passing exams at the art and graphic faculty;
- portrait with a plot.
Artist Dmitry Revyakin will make the most complex portrait with paints, even from black and white photography. To do this, you need to additionally describe the color of the eyes, hair or clothing, the features of the person being portrayed. Such details, additional information can be discussed in advance, for example, what color will be the background or the general color of the picture.
Applications for a portrait from a photograph on canvas are accepted at least one day in advance, and the deadline is 1-5 days. All questions of interest can be asked by phone: 8-968-858-34-78. Information on the cost of work is presented in the corresponding section of the site -