

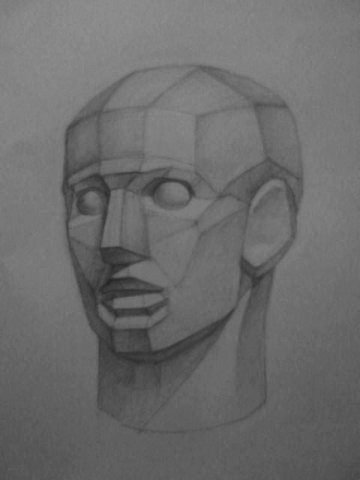
As a rule, the construction of the head begins with more generalized forms, this method of construction is called CUTTING. Many famous masters began their masterpieces with this construction method. I think you will be interested to know how this is done. So let's get started.
The depicted head is "chopping."
1) First we need to determine where our head will be in a sheet of paper (format A3 or A2). To do this, we outline the overall dimensions by measuring the ratio of the width and height of the depicted object. It is best to leave more space on the front side.
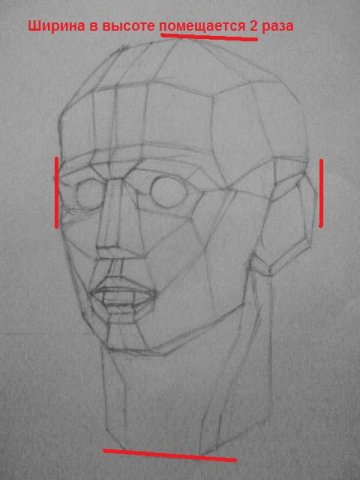
2) Next, we outline the total volume of the head, determine the angle, the location of the front part in your angle.
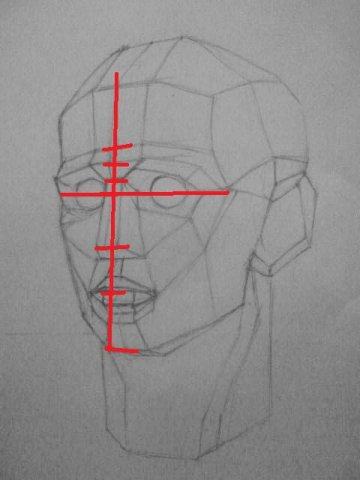
3) divide the face into proportional parts of the face (in this perspective, the middle line of the eyes is located in the middle) we outline the tip of the nose, nose bridge, eyebrows, middle line of the mouth, chin.
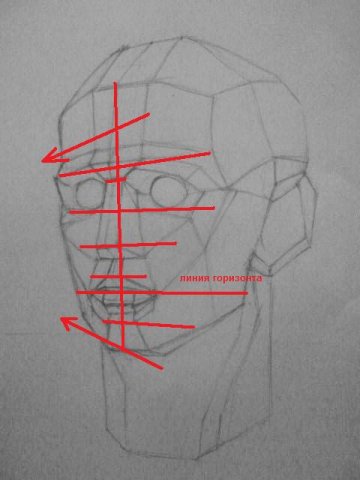
4) Find the slope of the head itself, and the lines of the front parts in perspective (reduction occurs)
What is closer to us, it seems more, what is further - less, that is, reduced.
5) We will find at what angle the nose is, build axial for the front part. We start by building the nose.
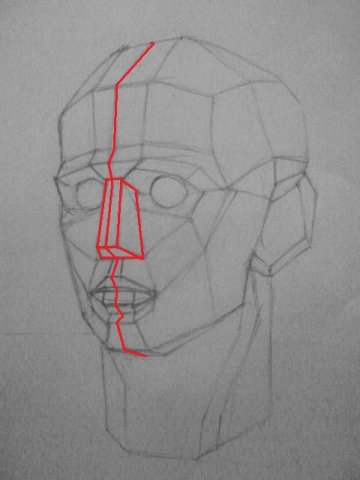
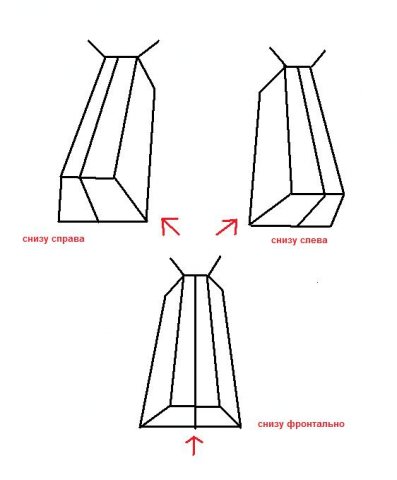
It all depends on our perspective, if we are below the depicted object, we see the lower face of the nose, if to the right of the object is the right side of the nose, and the front, in perspective. (As in our case. Here are examples of the construction of the nose by chopping.
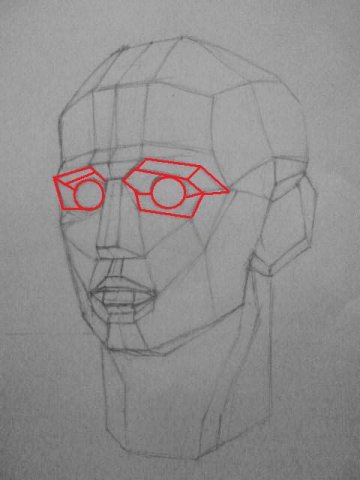
6) in the same way we will build other parts of the face:
Eyes
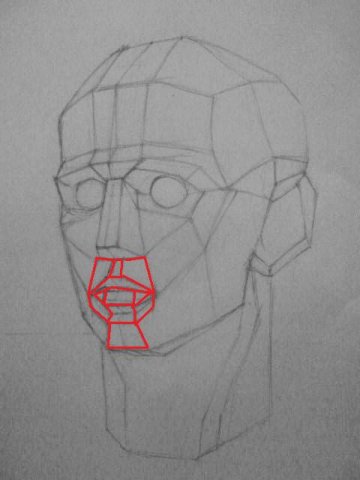
Lips and chin
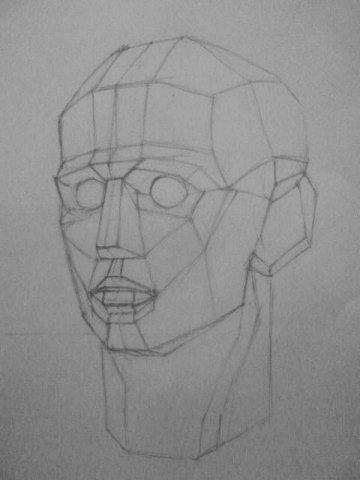
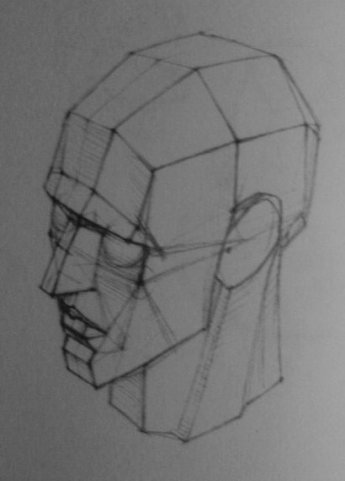
The face and head should be built along the edges. And as a result, we get this:
HATCHING WORK
1) Determine which side the light falls on.
In our case, top right.
In this case, the faces on which direct light hits are the lightest, on which the gliding light is a little darker, the darkest faces are turned away from the light. one should not forget about reflexes, but they are not brighter than light. If you draw a gibs head (as in my case) do not forget about the materiality of gibs. Border contrasts should be enhanced and reflexes and light brighter.
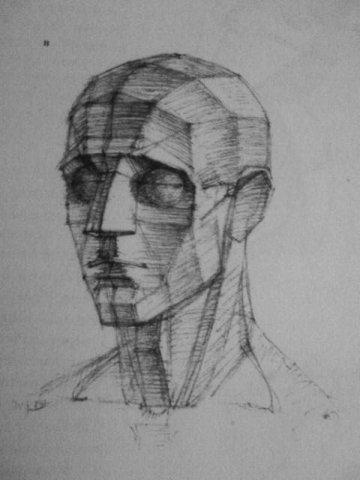
In the end, here's what happens:
P.S. Thanks to everyone who liked my lesson, I tried. I will be glad to see your robots. And good luck with your endeavors and talents. If you have questions about the lesson. I’ll listen and how I can help. Sorry for the quality of the images (done on a mobile phone). The author of the first chopping is Art_Yana. A source
Human head, principle of drawing a human head. And, as sometimes happens here, a small introduction ... Once I had to observe the following picture: an applicant passes exams, the task is to draw a person’s head. And imagine: a living person is sitting in front of him, a living head, his volume is full of muscles and bones, from above naturally chiaroscuro, distributed over all this wealth. The applicant sees all this and draws ... the skull of this person. There is nothing, one skull. Having drawn it, moreover, having completely filled the picture with a tone, it begins to wipe the fragments of the skull one by one and fill them with muscle mass. So he superimposed muscle volumes and skin on the base until he decided that the drawing was finished. To be honest, it's scary. You just don’t know what to say. In no case do I scold him and do not laugh, and do not give names, I simply state a fact. The exam passed for him safely, he passed it on a soft C grade, entered and unlearned, so everything is in order. But try not to do that.
I give a drawing of a skull:
You can view it and often check yourself while drawing a person’s head or its details.
Why: I believe that for a good drawing of a person’s head, of course, you need knowledge of the bone base, even better when you can remember at least a third of the names of the bones of the skull. Plus, knowledge of the muscle structure of the human head, how they change shape during contraction.
But all this begins to be understood over time, over a long period of practical training. Otherwise, such incidents are obtained, as with that applicant. He wanted to show knowledge of the structure and drawing of the human skull? He showed them, but not in the way it was necessary, and not in this case.
On the other hand, imagine the following picture: at one very good forum for artists, a man posted his drawing, told and showed how he made it. He shared his work, as he did the drawing, or rather, redrawn from a photograph. Simply put, he copied. The picture was very beautiful. In addition to everything, the proportions of the head were perfectly found, the similarity with the photo is almost one to one. And I received a lot of reviews, different, good and not very, but for one review I was just offended. In my opinion, a very offensive comment in terms of that: "a good picture on the grave." It turns out one unpleasant fact arising from sketching, not knowing the design features of the object and not knowing how the painted object behaves in space, is done with great love, there are a lot of works, and the result is far from what is expected.
We would like to find something in between. So that you can receive information both from a constructive point and from an aesthetic one, that is, approaching a documentary transmission of a person. It is important that you can develop in these two directions at the same time. We learn to understand the human head as a total volume, and we try to consider it more specifically, we study the details, but at the same time they also obey the main general volume. We do not detail, and do not do sketching. In this process, any detail does not go beyond the basics. Such a process allows us to draw normally both the skull and the living head of a person, and its details, both gypsum and living fragments, and allows draw a portrait . And experience and practice, for which it takes time, enrich knowledge in both directions at the same time.
So, the preface is over, get to work. You are given a drawing of a human skull. Look at him.
Drawing human head
Everyone must have heard of such a man, an excellent draftsman as Gottfried Bammes. He worked with head volume very simply, and at the same time cleverly. Look how he worked with the study of the volume of the head, found the total volume of it:![]() This is not his original work, but painted by me and "dragged" for a better understanding. He did not expect then that his work would be studied by students. These are copies of search patterns for head volume by Gottfried Bammes.
This is not his original work, but painted by me and "dragged" for a better understanding. He did not expect then that his work would be studied by students. These are copies of search patterns for head volume by Gottfried Bammes.
Look at the left — it kind of cuts off unnecessary areas and builds a blank from the total volume, outlining the main planes. You can also see how he clung to the structural points that we discussed with you in the last lesson. He based on understanding them when constructing the volume of the head in this way. The details are not looming, he does not go into the documentation, he is looking for the main thing.
Now look at the picture on the right. This is also his work, but here, Bammes, to search for the shape of the head with the help of the main planes, adds a constructive line drawing to search for proportional ratios and thus checks himself to construct invisible areas of the human head.
You can copy these pictures directly as shown here. Then, using your nature for clarity, also try to analyze the volume of her head. All this will help you when drawing a live human head.
This is not the only way to draw the volume of the head. Time has gone far ahead and developments in the field of drawing as well. Now we will once again go along the path that was developed at the last lesson and move forward in understanding the volume of the human head, in creating a drawing of the human head with a simple ordinary pencil.
What did you and I then stop at? See how to draw a human head the first part of the material. We realized that there are structural points, axes, and planes on the basis of which we can find proportional ratios of the parts of the head and build it. Today we will add the following material - we will learn to understand the form - the head as the volume on which there are already divisions of the total volume into small ones. From general to particular, the main rule. We will learn not to detail the drawing of a person’s head at the initial stage of work.
Drawing a human head with a simple pencil
We begin to draw a person’s head with a simple pencil. Be sure to pull the paper onto the tablet, put the sitter in front of you. Take a good look at this person’s head and pick up a pencil.Perhaps your person differs from mine in the nature of the skull, perhaps even strongly, all people are different. But the basis remains unchanged, what my person has also yours, only with its own characteristics.
So:
1. Find the place of composition, portrait in the sheet. Do not use the angle, do not use the point of view too high, or take it at about eye level of nature. It is desirable that the main structural points are clearly visible. Then you will experiment. The distance from the top is less than from the bottom, the distance from the face is greater than from the back of the head.2. We find a place for the volume of the head, for the neck and shoulder girdle.
3. We find the volume of the head blank, the generalized form, where its height and width are taken into account, as well as the characteristic features — the shape of the head, for example: pear-shaped, oval, round, or square (joke). Notice the proportions of the width-height of the disc, the shape can be found using the structural points that we studied — the most convex parts on the skull — the high, temporal, chin, length between the zygomatic and temporal, and so on. We are looking for proportions with the help of conditional three points forming conditional angles:
4. We find the axis of symmetry, which divides the head into two equal symmetrical parts, left and right. We find the axis of symmetry along the red line (remember the first lesson on drawing a person’s head?), We cling to a high point on the skull and on the point of the chin, see:
5. Find the three-quarter turn line. She will go through the zygomatic point to point cheekbones, which is clearly visible through the temporal point, we also find it visually. It’s like in a cube - a face that divides it into sides - front and side:
6. We find the line of superciliary arches. It can be drawn along the eyebrows, along their convex part, along the fracture points and continue. If you remember, drawing this line further in shape, it will determine the tip of the ear, which means you will know the outcome, check the proportions and do not forget about the perspective distortion:
7. Find the line that will run along the bottom of the pyramid or along the other, the prism of the nose. Having carried it further, we determine the lower part of the ear - look for the proportions:
8. We are looking for a line that divides the head into the facial and occipital parts, it passes through the high point, temporal point and ear hole:
9. We find the volumes of the pyramid of the nose and ear, which we can see, the place for them has already been prepared, the only remark: if the ear can be marked definitively, then the nose is preliminary. Further its location will be specified. While it has a little "freeze" in the air. But the nose pyramid is visible quite clearly, so turn on your eye and work:
10. Find the cheekbones. We notice the location and proportions on the conditional plane that these points and break points form. Well, as well as in proportional relationships with other objects found:
11. Find a place for the eyes. Previously, they will be located on one horizontal line (taking into account the fact that the line is drawn in shape and taking into account perspective distortion), we add the following: the angle of inclination from the inner edge of the eye to the outer can be different and it does not always happen that the outer edge eyes are higher than the inner one, which we specify in our nature. Also, between two eyes should fit another. Also, if you draw a line in shape from the edge of the nose up, then it will be in contact with the inner edge of the eye - check yourself:
12. Now let's think about this: a person’s head is a whole volume, it doesn’t happen that some kind of plane or point, or line suddenly appears out of nowhere and somewhere, somewhere unknown, disappears, everything is connected and interconnected here. If you touch on one “piece”, it will always lead to the search or change of the second. If you look at our work, the location of our nose is not entirely clear and it is not visible how it fits into the total volume of the head. Let's fix this defect, maybe the design or proportions of the nose will need to be slightly corrected. In any case, you need to see where it comes from and disassemble it constructively, maybe something else will be added to our nose.
We need to cling to something, in the last lesson we studied the brow ridges with you, let's find them in kind. And where are the superciliary bumps? On the superciliary arches. And where are the superciliary arches located? On the line of superciliary arches. And if you take a closer look, it becomes clear that all this wealth forms another plane, which we both designate, thereby connecting the volume of the nose with the volume of the forehead hanging over it:
13. Next, look at the cranium. It is obvious that the points of the superciliary arches can be connected with the points of the frontal tubercles, and the frontal tubercles with a high point on the skull, as a result we work out, probe, study and build the volume of the brain part of the head. Well, you can walk an eye from the frontal tubercles to the temporal point:
14. We work further. The temporal part of the head remains completely incomprehensible to us. Let's try to figure it out. In the last lesson, we simply created an additional auxiliary plane — connecting the break point (for convenience, we called it that, there is no such name in plastic anatomy, there are names of two bones that join together to form a break) and the middle of the ear, remember? We analyze in more detail, look:
 If you look at this area on the skull, you can see how two bones form a fracture, the zygomatic bone itself is visible, you can see how, rising to the fracture, it bends somewhat inland.
We do not have a skull, we have a man himself, with a full set of muscle tissue and skin, so that there will not be such clear gradations as in the skull, but it will not hurt to understand and understand everything that happens under a layer of muscles.
By the way, look at the temple area - it is distinctly located behind the zygomatic bone, behind the break point, slightly pressed into the skull. We call it the temple, in fact, the sphenoid bone is located there, which is located immediately behind the zygomatic and temporal bone.
Here we take and as close as possible to nature we designate this temporal region, the temporal bone under the body, causing the conditional planes that will form the volume for us.
15. In addition, we can divide one smaller plane into smaller planes, which is formed by the superciliary arches above the line of the superciliary arches:
16. Well, we will finally work on the superciliary arches, find their structure, character, volume. As you can see, we do not cling to one area of \u200b\u200bthe head and do not finish it completely either constructively or in tone. We smoothly move from one to another, since everything is interconnected, we work out the total volume, then smaller and more detailed, then again we return to the total volume. As a result, we get a smooth phased drawing. So, the superciliary arches ...
We find the following planes, see:
Well, we can draw these superciliary arches in all their beauty - mark them, and at the same time walk along the frontal tubercles - feel their shape, go through the temple - mark that area on the volume of the head that will "go" deep into the volume of the skull. Each person has a different one, look at your nature and catch its characteristic features:
17. Well, we kind of worked out the upper part of the head, built it up, let's move on to the lower one. Although you can not do everything one at a time, just move from one to another - just understand the process itself. So, we pass to the lower part of the volume of the human head. And here things are also: any planes are interconnected, one form “flows” from another, because the human head is one whole volume. We take and connect the zygomatic point with the angle of the lower jaw, the zygomatic point with the corner of the mouth, again, the zygomatic point with the point of the chin, and even better with the points that form the frontal plane of the chin, see:
Thus, we divide one large complex volume into several small areas, but not so difficult. However, which as before make up one complex large volume of the head.
18. We continue to work. The mouth and chin area remained incomprehensible to us. First, let's find the area of \u200b\u200bthe mouth. If you look at the human skull, you can clearly see that the mouth (see more details how to draw a mouth) is located at the meeting of two bones - mandibular and maxillary, forming an arcuate area where our teeth are located. If you look at a living person, the area of \u200b\u200bthe mouth is also indicated by the edges of the muscle mass that borders this area with arcs. Here we show these arcs:
19. We work out the area of \u200b\u200bthe mouth - the lower part and the chin (in more detail - how to draw a chin) It is not trimmed, not flat, it also has a thickness, volume, shape, which can be seen visually by the distribution of light in its shape. Let's show its thickness - draw a line from the protruding point of the chin to the corner of the lower jaw, you will see how it "wraps" down to the neck cylinder:
And the upper part, which will mate with the volume of the nose using nasolabial folds:
20. Let's move on to the eye area. To begin with, we outline a place for them in our head volume, in the sheet space. So far, we only determine the place for the eyes:
 What are we watching? We observe characteristic points on the skull that reproduce on living nature, with the only difference being that it's live the head, with muscles and skin, therefore the boundaries of these points will be fuzzy, the bone base will be under the plastic of the skin, but it should undoubtedly be taken into account in the structure and further work with the volume of the head, in particular with the orbits and eyes in them.
21. And finally, having worked a little on the neck cylinder on which our head is planted, the volume of the shoulders that hold all this wealth, we get such a constructive drawing:
 Do not forget that the neck is also a volume, also has a basis - part of the spinal column and muscle mass.
As you can see, if you look at the entire volume of a person’s head, its similarity to our cube is clearly read, which is very visible, for example, in the region of the zygomatic bone.
Having analyzed the structure of the head volume visually in this way, we can understand how the light will fall in its shape, creating tonal gradations. It is better to understand how to "fashion" the shape of the head and its details. And you can understand and justify each action with this knowledge. Do not throw this work far into the corner when you learn to draw details - the mouth, nose , eyes , chin, neck (see more details- how to draw a neck), continue to work on it. Well, if you blackened heavily like me, start over. Such strong lines of construction in the figure should not be.
As you understand, all the knowledge of this material is not enough in order to create a complete picture, a drawing of a person’s head, a portrait. But now you need to "digest" the amount of this information before proceeding to the next- how to draw a portrait and to the next- watercolor portrait ;)) Relax, get to the bottom of the essence, understand the principle of work, then draw on your own. After all, it’s not enough for us every time to create a picture of a new person from scratch, we need to understand the way of creation, to understand the principle. Then any person, with his own set of characteristic features inherent in his head structure, can be reproduced on paper. All people are different, as is the structure of their heads, but everything can be generalized, compared, found a key for conveying a complex, with a set of simple things.
Laboratory work No. 8:Outline stuffed birds in different angles
Purpose of the assignment: To study and show the relationship of the shape and plasticity of the body with the structural features of the skeleton. Analogies and differences in the anatomical structure of birds (Fig. 19).
Training tasks:
1. Perform on one sheet a layout of 3-4 sketches of a stuffed bird from nature.
3. Tonal study of sketches.
Materials and tools: a 2 format, simple pencil “T”, “TM”, “M”, elastic
Figure 19 - Outline of a stuffed bird from different angles
Laboratory work No. 9:Soft stuffed bird drawing (fig. 20-21).
Purpose of the assignment: To transfer the anatomical features of the bird in the drawing, to reveal the shape of the parts of its body, to learn how to transfer the texture of feather cover using soft materials.
Training tasks:
1. Lay out a stuffed bird from nature.
2. Perform a constructive construction with the transfer of anatomical features.
3. Tonal study of the drawing with soft graphic material.
Materials and tools: a2 tinted paper, charcoal, pastel, sepia, sauce.
![]()
Figure 20 - Figure of a stuffed bird (coal)
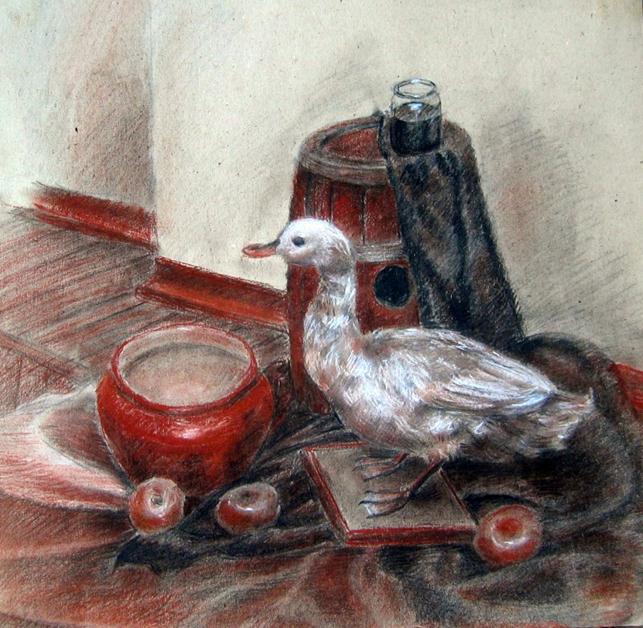
Figure 21 - Figure of a stuffed bird (coal, sauce, sanguine, sepia)
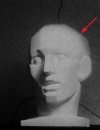
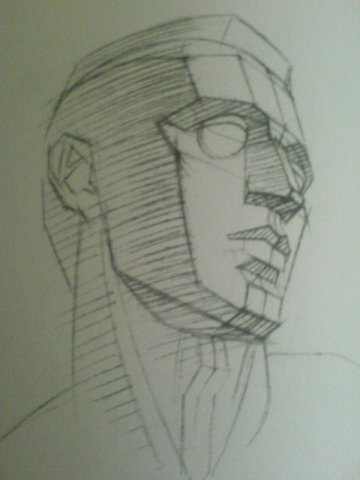
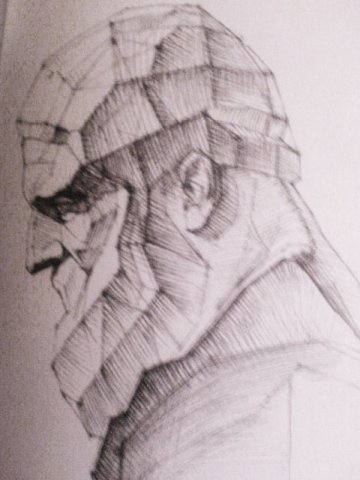
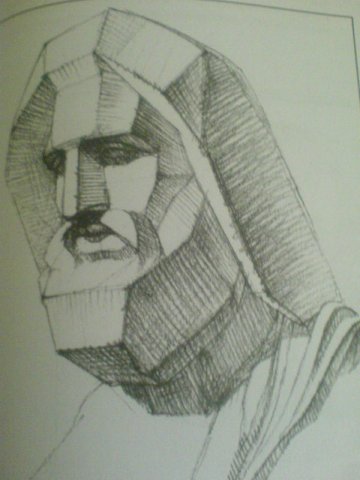
Laboratory work No. 10: Drawing of a plaster (chipping) model of the head
Purpose of the assignment: Application of skills and knowledge of perspective construction. The construction of the human head. The development of the ability to analyze the shape of gypsum cuttings, light black and white modeling of the form (Fig. 22).
Training tasks:
1. Lay out the chopping pattern in format
2. Build a drawing of a gypsum chopping head
3. Show easy light-shadow modeling of the form
Materials and tools: a2 format, a simple pencil "T", "TM", "M"
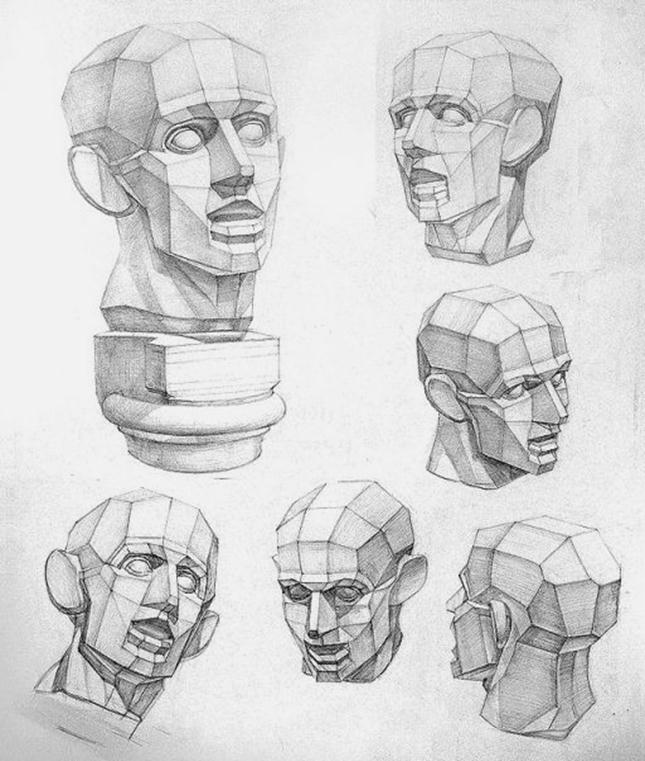
Figure 22 - Drawing of a plaster (chipping) model of the head
Laboratory work No. 11: Drawing of the parts of the face of David's head (eye, nose, ear, lips).
Purpose of the assignment: Continue acquaintance with the basics of plastic anatomy. The development of the ability to analyze the form. The development of drawing skills, understanding the design of complex shapes.
Training tasks:
1. Lay out a picture of a part of the face in a format.
Materials and tools: a2 format, a simple pencil "T", "TM", "M"
Before proceeding to the drawing of the head, examine the main parts of the face that determine the characteristic features of the plastic of the head. These include the eye, nose, lips (mouth) and ear. Most often, as a model for such sketches, plaster casts of the parts of the face of the marble statue “David” are used by the great Italian Renaissance sculptor Michelangelo, which have become classic full-scale models for students of drawing. We will analyze the complex structure of each part of the face.
Eye (Fig. 23-24).
The rigid base of the eye is the orbital cavity - the orbit located under the superciliary arches of the frontal bone. An eyeball is placed in the orbital cavity, the visible part of which determines the shape of the upper and lower eyelids. The upper eyelid is more prominent than the lower; passing over the convex part of the pupil, it rises, following the movement of the pupil. The inner corner of the eye is rounded, at the bottom of the teardrop is the so-called "meat". The outer corner of the eye is pointed, the lower eyelid turns under the upper. Between a fragment of an eyebrow - its head - and the upper eyelid, a “covering fold" hangs slightly above it. Observing the open eye in front, and mentally drawing lines from the teardrop through the convex points of the upper and lower eyelids to the outer corner of the eye, we get the shape of a horizontally elongated quadrangle. In this case, you should pay attention to the fact that the convex points of the upper and lower eyelids are vertically displaced one in relation to the other. Their position depends on the direction of gaze, expressed in a plaster cast by the border of the iris and the conditionally shown “flare” on the pupil. When turning the head to the profile position, the distance from the outer corner of the eye to the inner one is reduced and the eye fits into a triangular shape. When planning an eye, you need to carefully analyze its general shape and the movement of the eyeball. For the correct transfer of perspective eye contractions, the painter must determine what position the nature is in, how the midline of the eye is located: frontally, in three quarters, in profile. Refining the size of the hemisphere of the eye, the position of the pupil, upper and lower eyelids, it is necessary to draw, in addition to the middle axis, a transverse line of the relief of the form. Chiaroscuro will help to more clearly express the shape, if you carefully monitor how, at what angle of the surface of the eyeball and the adjacent parts are turned to the light source.
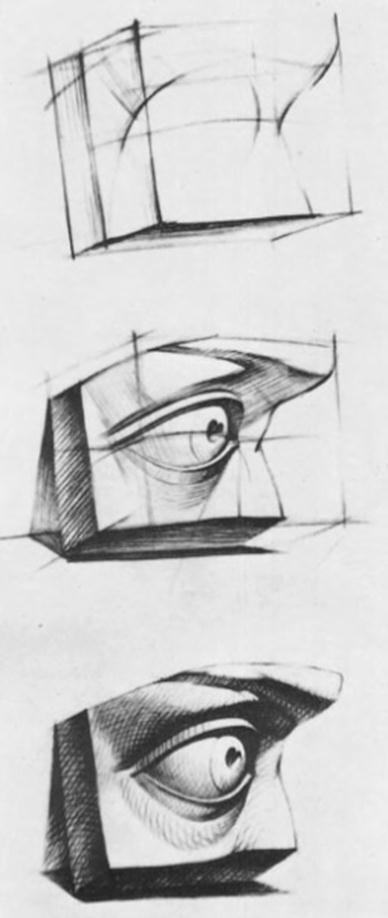
Figure 23 - Stages of drawing an eye
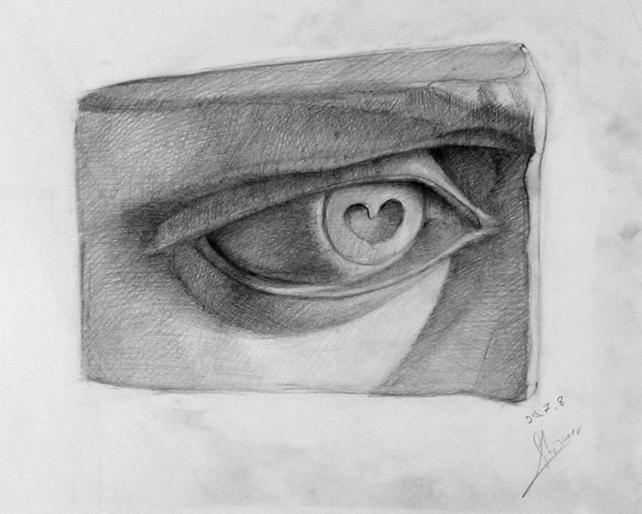
Figure 24 - Drawing of parts of David's face. Eye
Lips, mouth(fig. 25-28).
When constructing the mouth, especially in three quarters, you should focus on the middle profile line, i.e. to build a mouth symmetrically, without losing sight of the profile. You should also pay attention to the fact that the lips in their middle part have a sharper outline than along the edges, where the borders are less noticeable.
When drawing lips, it is important first of all to understand their plastic form. The shape of the upper lip is formed by the “quadrangular muscle of the upper lip,” starting at the root of the nose is also formed by the quadrangular muscle originating at the chin.
With all the variety of shapes, the lips have one common pattern - the symmetry of the arrangement of the parts (Fig. 25). This pattern must be taken into account when building the image.
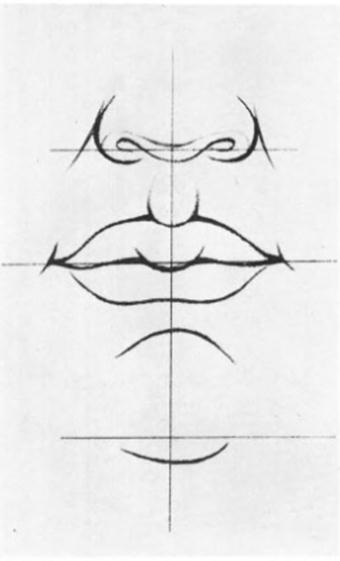
Figure 25 - Symmetrical arrangement of parts of the face
In relation to the centerline (profile) line, all parts of the upper and lower lips are located symmetrically, and therefore should be depicted simultaneously: a platform above the upper lip, a bow of the upper lip, dimples - the corners of the lips, the location of the two halves of the lower lip and the masses surrounding the chin under the lower lip. Using this image construction scheme, the vast majority go to extremes and draw this scheme with a hard line, pressing pencil hard on the paper. It is very easy to outline the bow of the lips by barely touching the paper with a pencil, since light is located in place of these lines, because the lip edge is its most convex part (Fig. 26, the bulge of the lip edge is indicated by arrows). A novice artist can understand and learn this in practice while drawing a plaster cast of David’s lips, where the plastic form is clearly “read”.
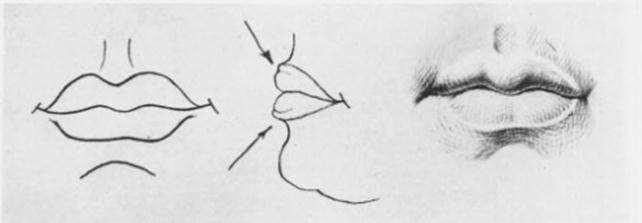
Figure 26 - Lip lip bulges
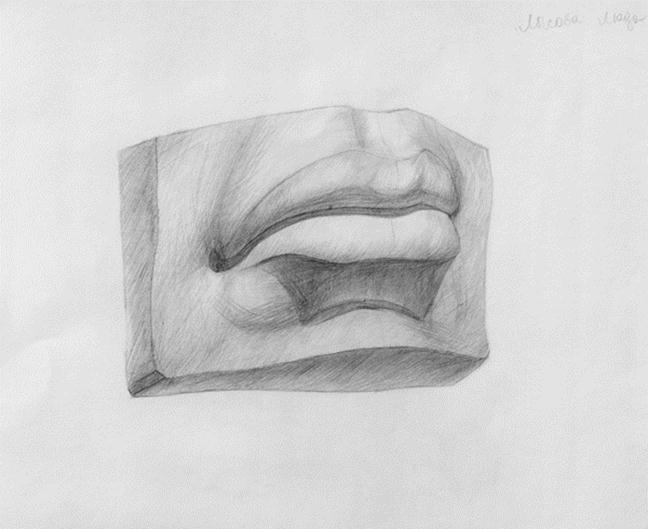
Figure 27 - Drawing of parts of David's face. Lips

Figure 28 - Drawing of parts of David's face. Lips
Nose(Fig. 29-32).
With all the diversity of male and female noses, the structure of the form is the same for all. Consider it in the diagram (Fig. 29). The front plane of the nose prism from the line of the superciliary arches to the hump forms a trapezoidal figure of the nose bridge (1); further from the nose to the middle of the nose, another elongated trapezoid is formed (2); from it to the end of the hump - the third (3), but inverted; and finally, the last trapezoid - tonsils (4). Depending on the individual characteristics of the shape of the nose, the structure scheme will change - snub-nosed, hunch-billed, straight, but the regularity of the structure remains. For example, we draw a person with a Mephistopheles nose (hunchbacked).
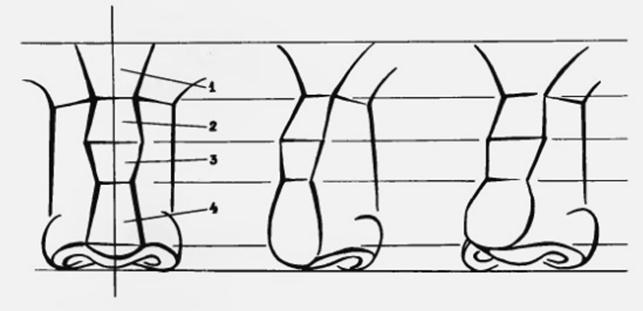
Figure 29 - Structure of the shape of the nose
It is desirable to depict the nose in three quarters, slightly below. It is important that its lower part opens, where the shape of the wings and their design are most clear. Getting to the drawing of the nose, you should carefully study its plastic and anatomical features. The front and side surfaces can be represented in the form of a truncated pyramid, since the shape of the nose at the base is wider, and at the bridge of the nose it narrows. Having identified the general form, we can proceed to a more detailed analysis, working out the main volumes and clarifying the proportions of the individual parts.
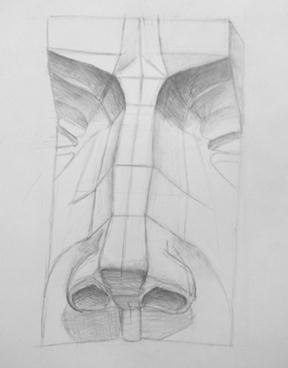
Figure 30 - Constructive construction of parts of the face of David. Nose
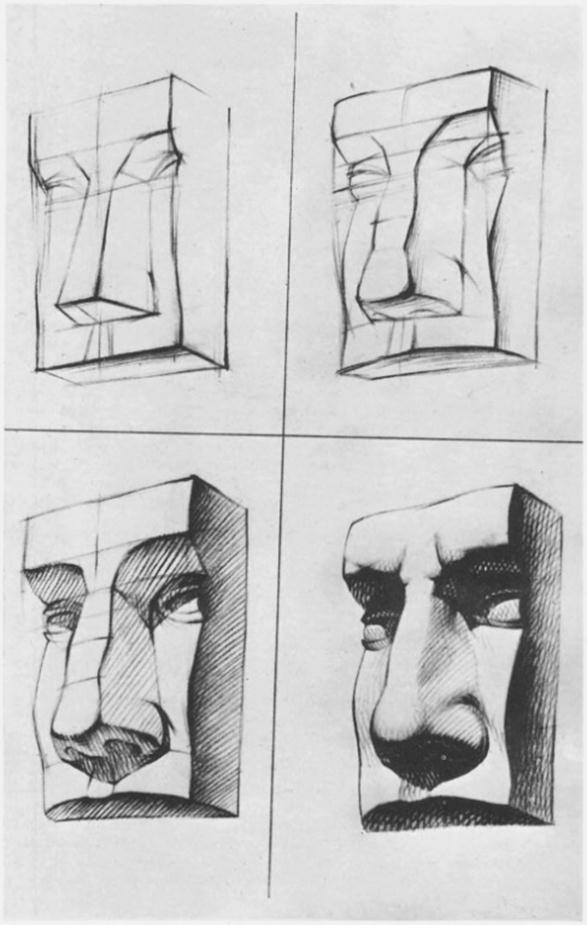
Figure 31 - Stages of drawing a nose
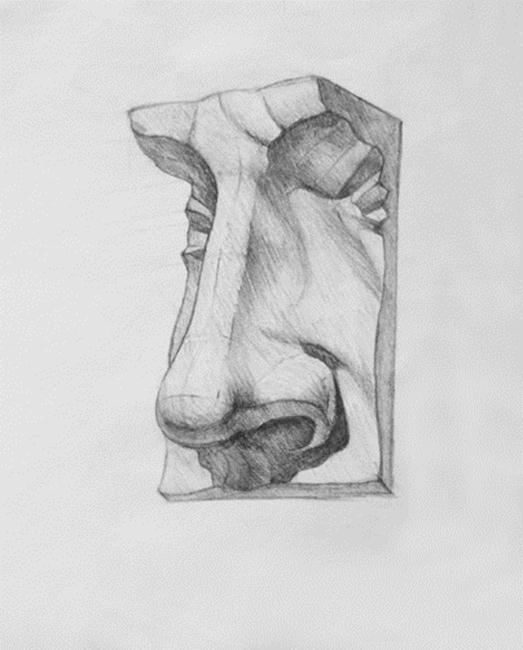
Figure 32 - Drawing of parts of David's face. Nose
An ear(Fig. 33-36).
An ear man, despite the diversity of its forms in different people, always has the same structure. In each person we can find an external curl (Fig. 33.1), which in the upper part goes to the middle of the auricle (Fig. 33.2), and in the lower part ends with a soft lobule (lobe) (Fig. 33.3). The inner part of the auricle is covered by a protector (fig. 33.4), and on the outside of the auricle is a tragus (fig. 33.5).
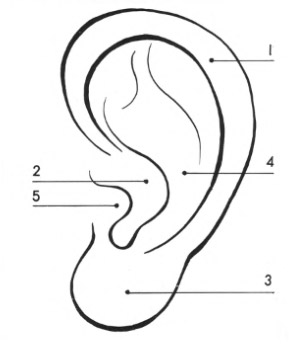
Figure 33 - Parts of the ear
When constructing the image of the ear, all these parts of the auricle should be in the field of view of the draftsman. In ancient manuals ear drawing rules were given serious attention. The tables clearly show the regularity of the structure of the ear, and the method of constructing the image (Fig. 34).
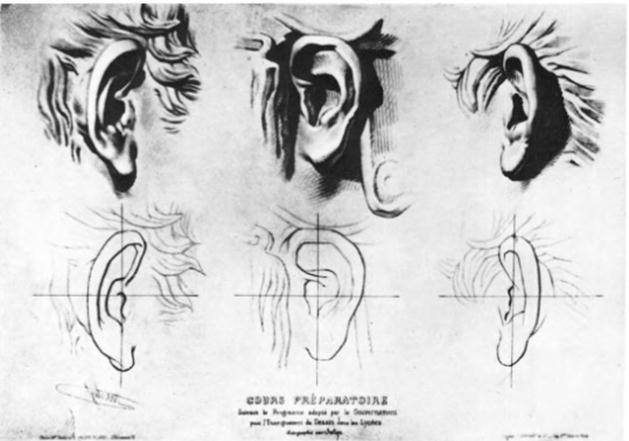
Figure 34 - The structure of the ear. The method of imaging
The plaster cast of David’s ear is a good tool for the draftsman, it clearly shows the structure and plastic characteristics of the form. Therefore, the study and drawing of the ear should begin with this cast.
We begin the drawing, as always, by identifying the general shape, then proceed to placing the components of the ear and clarifying the nature of their shape. If the shape is outlined correctly, then we can proceed to tonal modeling.
Performing the drawing of the ear, special attention should be paid to lighting, to the transitions of tonal relationships in individual parts of the form. Many, as a rule, do not transmit the movement of forms deep into the auricle, the linear pattern of the configuration of the curl and anti-curl become dominant, and the tonal task remains unresolved. As a result, the pattern is fractional and colorful.
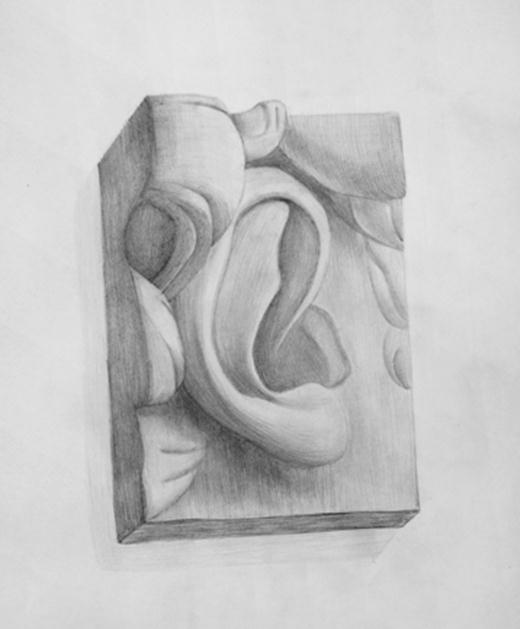
Figure 35 - Drawing of parts of David's face. An ear
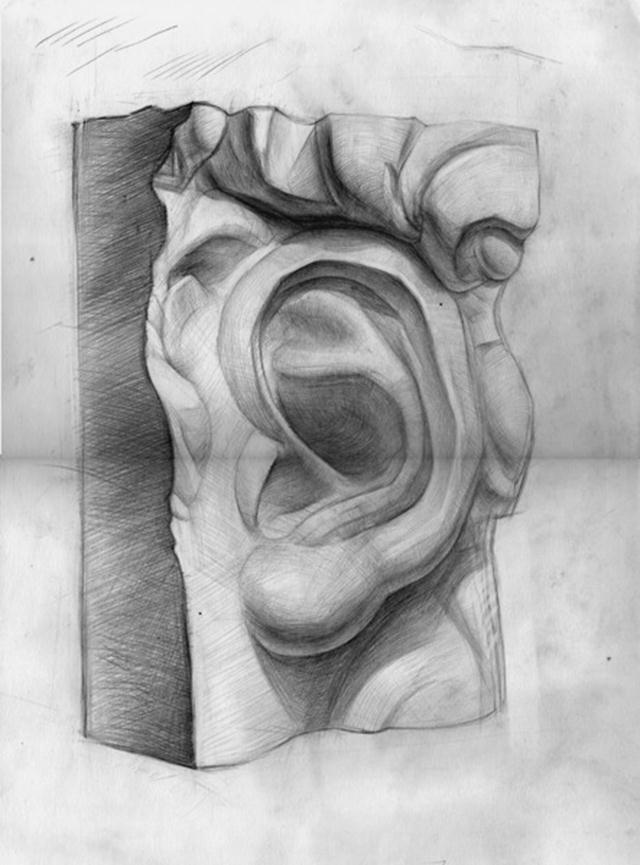
Figure 36 - Drawing of parts of David's face. An ear
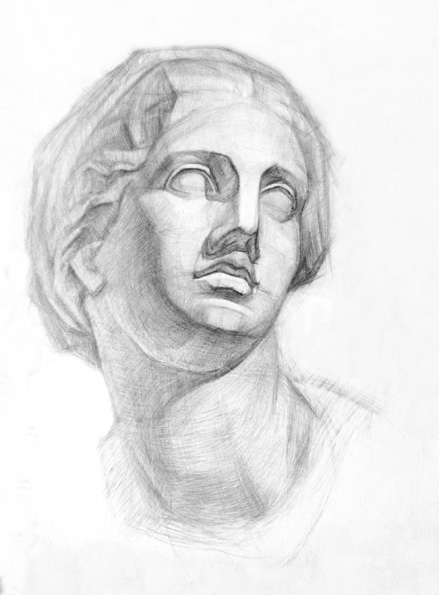
Laboratory work No. 12: Plaster mask drawing (Fig. 37-38).
Purpose of the assignment: To study the methodological principles of drawing a face of a person, to learn the laws of structure and methods of depicting details of the head.
Training tasks:
1. Lay out the pattern of the gypsum mask on the format.
2. Perform a constructive construction.
3. Show light light and shadow modeling.
Materials and tools:
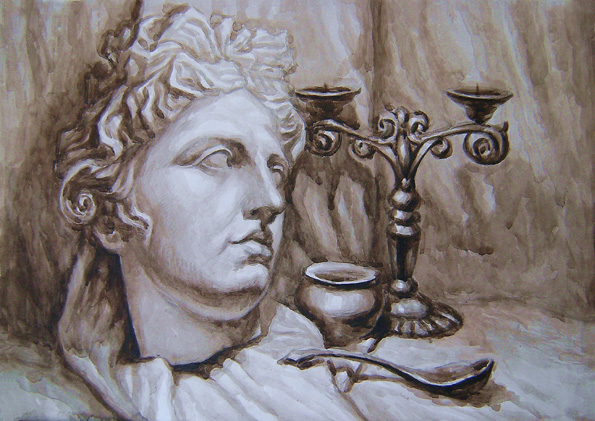
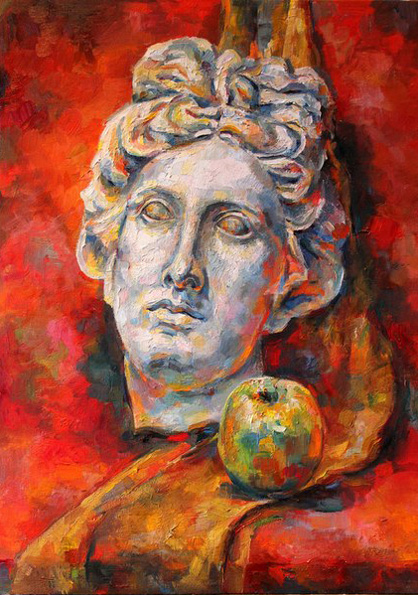
Figure 37 - Drawing of a gypsum mask. Diana
Figure 38 - The gypsum mask of Diana. Drawing sequence
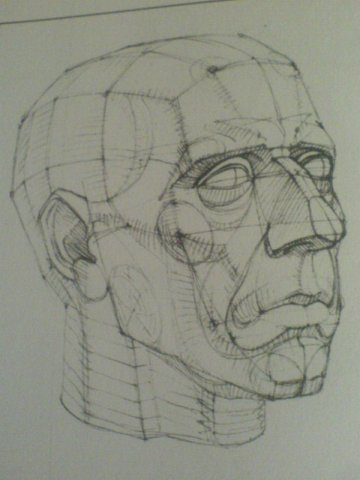
Laboratory work No. 13: Skull drawing in 3 angles (fig. 39)
Purpose of the assignment: To study the regularity of the structure of the shape of the human head, its structural and anatomical structure. The nature of the shape of the bones, their relationship.
Training tasks:
1. Compose in 3 angles a drawing of a skull on a format.
2. Perform a constructive construction.
3. Show light light and shadow modeling.
Materials and tools: a2 format, simple pencil "T", "TM", "M", elastic
The sequence of work. Perform skull drawings in full face, profile and 3/4. You need to start work with a large form. This is the total mass of the skull and the division of the shape along the cross. All symmetrical parts are indicated by one movement, one dashed field, and only then, when the whole shape develops, is the detailing carried out. However, the detail should not be too detailed. Extend the dashed fields as far as possible along the fractures of the form. This is necessary for the manifestation of plastic bonds. You will see how the fractures of the form pass into each other, one movement flows into the next, how organically large forms are complemented by small ones that fit into them with the naturalness of necessity.
When working with dashed fields, the shape should feel like an interpenetrating movement of surfaces.
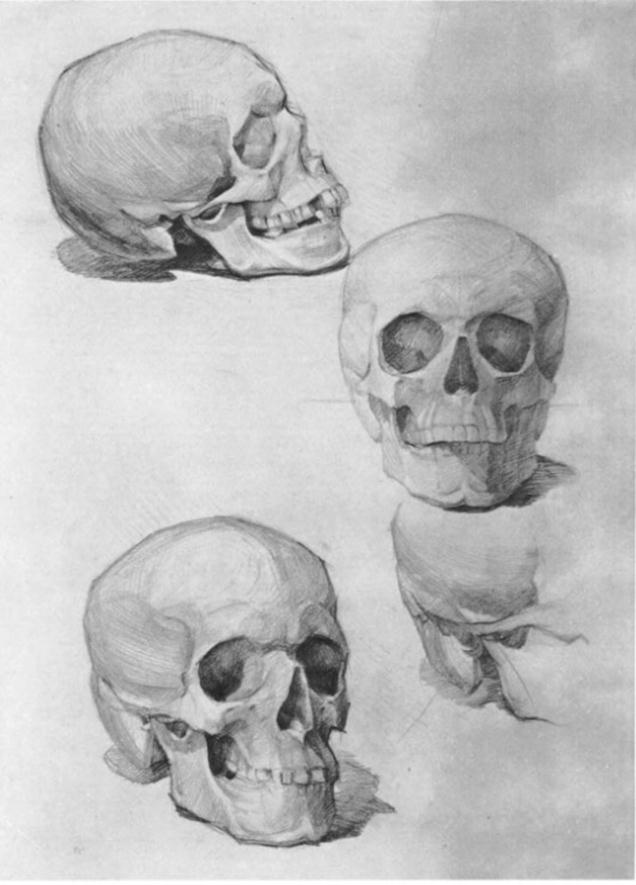
Figure 39 - Drawing of a skull in three angles
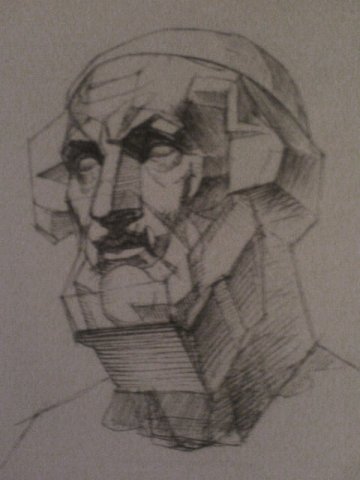
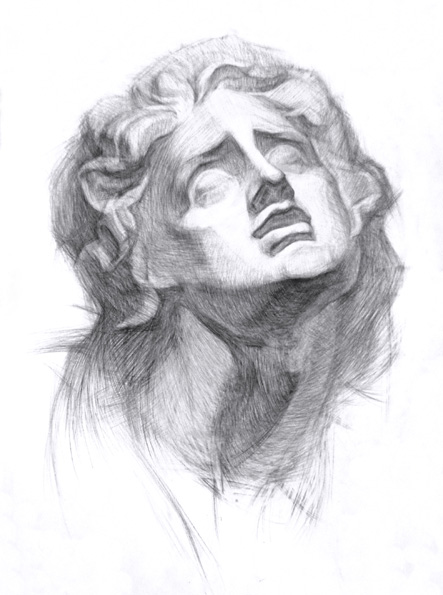
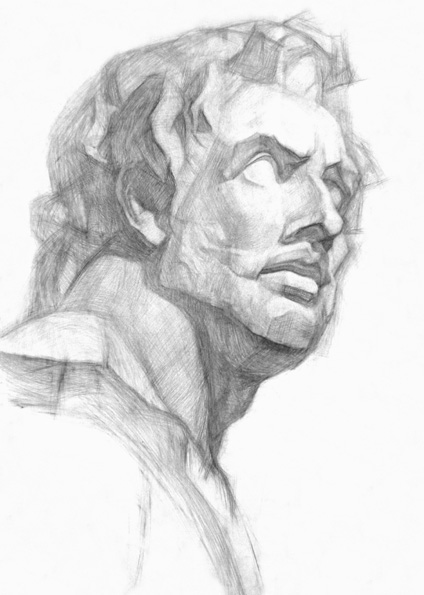
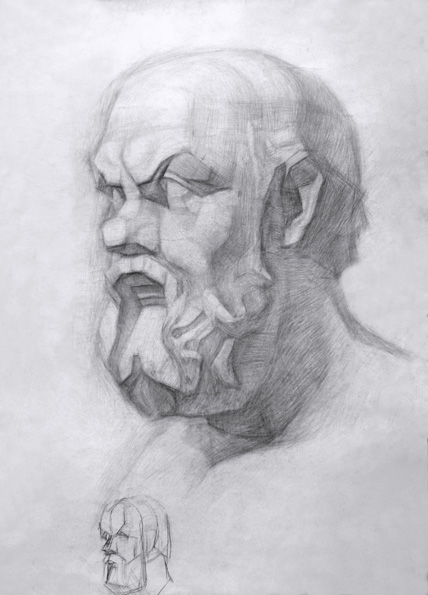
Laboratory work No. 14: Drawing of an antique plaster head (Antinous, Diadumen, Dorifor, Socrates) (Fig. 40-49).
Purpose of the assignment: Acquaintance with the pattern of the gypsum head and with the identification of its characteristic features in the construction.
Training tasks:
1. Properly compose the pattern of the gypsum head on the format.
2. Perform a constructive drawing of gypsum heads, taking into account its proportions.
3. To identify and convey in the drawing the characteristic features of the head.
Materials and tools: a2 format, simple pencil "T", "TM", "M", elastic
The sequence of work.The whole complex of work on a long drawing of the head should follow the methodological principle - from the general to the particular and from the particular again to the general, in other words, from the general, through a detailed analysis of nature, to the general figurative expression.
First stage - compositional placement of the image on a sheet of paper (Fig. 40).
Work begins with the compositional placement of the image on a sheet of paper. First you need to examine the nature from all sides to determine how it is more profitable (effective) to place the image on a plane, from which point of view the structural features of the form will be better expressed. The choice of the point of view from which the image object looks most expressively helps the artist to more successfully solve the compositional problem.
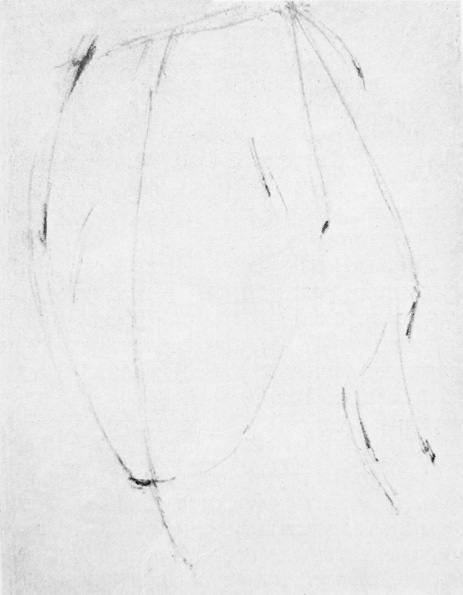
Second phase - transmission of the nature of the shape of the head, proportions and position of the head in space (Fig. 41). Before proceeding to identify the nature of the shape of the head, the student should be more closely acquainted with nature, note the most characteristic features of the structure of the form. The study of nature begins with direct observation. The artist, first of all, notices the general character of the form, the position of the head in space, and then the proportional relations of the parts and the whole.
The image is plotted very easily, they are drawn with a pencil without much pressure, the shape of the head is drawn in a very general and schematic way. The main character of a large form is revealed - a general view of nature.
To make it easier to catch the general nature of the shape of the head, you can screw up your eyes and all the details of the shape will disappear, and the total mass of the volume will remain in sight. Considering the shape of the head of Antinous, we note that it is wider in the temporal part and narrowed at the chin. If you look at the front of the head, you can see that it is close to the shape of a triangle: the upper part of the head (hair) is wider than the zygomatic part, and the zygomatic part is wider than the chin.
Having outlined the general appearance of the head, we must take a quick look at the nature of the shape of each part of it - the forehead, which consists of five main planes, the orbital cavities and the spherical shape of the eyes protruding from them, as well as the protruding prismatic shape of the nose. In the figure, we specify the directions of the planes that determine the shape of the lips, chin, nose, cheeks.
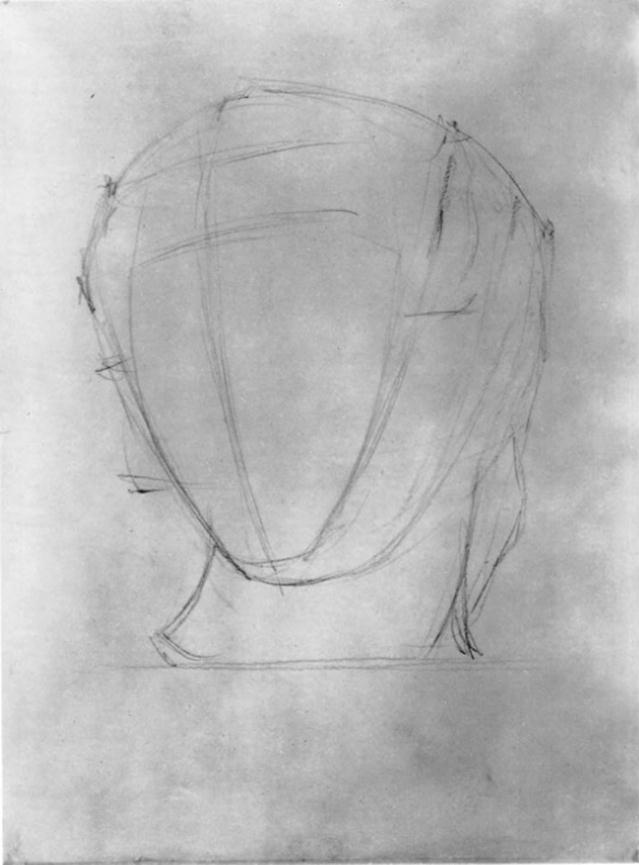
Figure 40 - The first stage
From the fourth year of study on the curriculum of the art studio "Painting" begins the drawing of gypsum parts of the face (eye, nose, lips, ear).
When building an image of a gypsum head, students should be well aware of the laws of the structure of the shape of the human head.
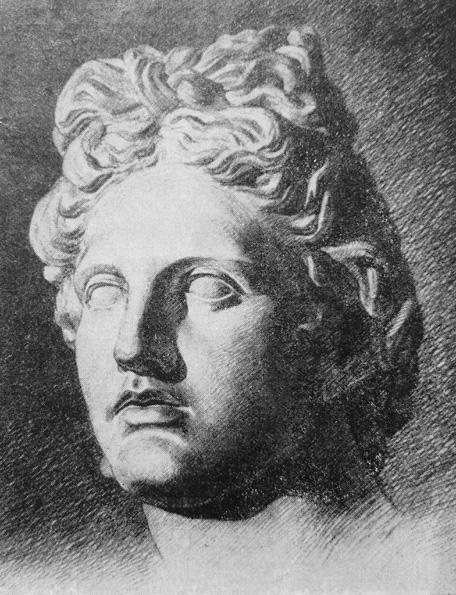
Educational drawing of an antique gypsum head "Apollo" - 7 stages.
At the first stage work begins by placing the head image on a piece of paper.
 |
One must look at nature from all sides in order to correctly understand the general character of the form. The composition of the picture is affected by the lighting and tilt of the head of nature. The painter should beautifully and expressively fill the plane of the sheet of paper.
At the second stage of work it is necessary to determine the nature of the shape of the head, its propociation and inclination, as well as not to forget about the perspective and precisely establish the horizon, the direction of the surfaces going into the depths. The shape of the head is a spherical cranial box, consisting of six main bones: frontal, two parietal, two temporal, and occipital. All these bones are joined together by sutures and make up a single shape. The front of the head is divided into three equal parts:
- from the line of the hairline to the superciliary arches;
- from the superciliary arches to the base of the root of the nose;
- from the base of the root of the nose to the base of the chin.
The distance between the eyes is equal to the width of the eye. The height of the ear is equal to the length of the nose.
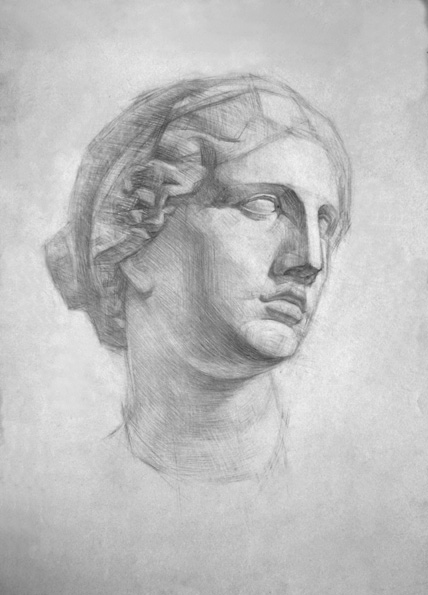
The fourth stage of work - plastic modeling of the form. Having correctly outlined the constructive basis of the image of the head, we proceed to the identification of volume by means of chiaroscuro. At this stage, it is important to trace the relationship of the structure with chiaroscuro and correctly understand its volume “large form” (image of the form without details).
When working on a long drawing, the point of view should remain unchanged.
Sixth stage of work - tonal elaboration of form and transmission of materiality.
Students finally finish the drawing of each detail and monitor the smooth transitions of tonal relationships (reflexes, highlights, halftones). At this stage, samples of great masters (reproductions) are demonstrated.
At the seventh stage summarizes the work done. The general state of the drawing is checked, the details are subordinated to the whole. The generalization begins with checking and clarifying the proportions of the head, then tonal relationships (the darkest and brightest place in nature is determined). The details of the background plan should be less elaborated than the details of the foreground. Reflexes should always be darker than light.
 |
The sequence of the drawing accustoms students to meaningful construction of the image on the sheet plane. The division of the work process into stages is conditional.
Drawings made by students of the painting studio "Zhivopi"
 |
 |
 |
 |
 |
 |
 |