

Before starting work on a character, before drawing details, you need to choose a person’s pose.
And while maintaining the proportions. So too short hands or a big head can ruin any masterpiece.
Experiment with the image of schematic men in various poses.
Make sure that the figure fits on the sheet and that the pose you choose is natural. As a last resort, try to recreate it - then everything will become clear.
Do not forget about the law of universal gravitation - it has not been canceled yet, as well as about the center of gravity of a person - it is located below the abdomen.
If you want to give the character dynamics and portray him in motion, then in this case his pose should not be balanced at all.
The body is a flexible and mobile system. Do not forget about the mobility of the hip joints and shoulder girdle.
How to draw people in different poses?
Sketches of human poses:
How to draw poses?
Creating a skeleton (baselines) is, oddly enough, the most important part of the job!
We draw an oval of the head. At this stage, it is not necessary to depict it perfectly flat.
Where it is more important to accurately draw the spine. Since it is he who determines the pose of the model.
The angles of the shoulders and pelvis are also important. So you can understand how body weight is distributed in this position.
Then you can add simple symbols for the legs and arms. And though you are well acquainted with the basic principles of proportion in human anatomy, but at this stage it is the angles that are important.
What is the angle of the shoulders? At what angle does the elbow bend, dividing the arm into two? You need to pay attention to this when looking at the sitter or the original image.
So in less than a minute the main work is done.
This approach speeds up the drawing process.
And even if you draw an imaginary figure from memory, you can still use the same method.
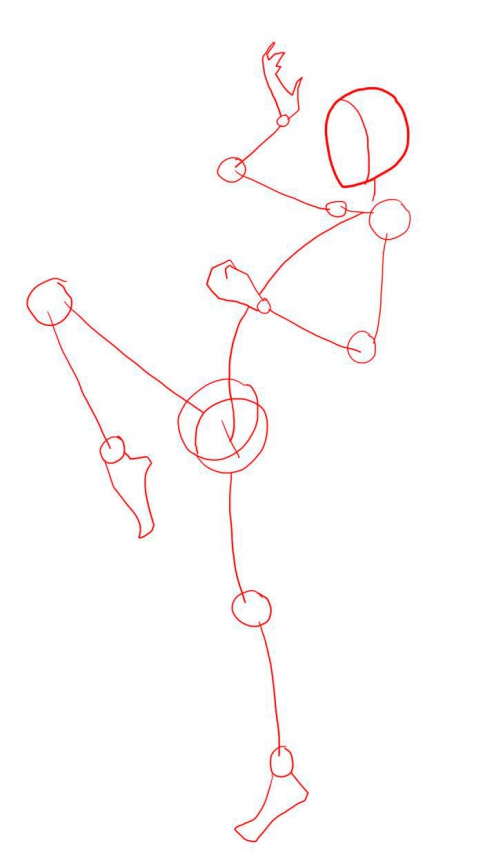
Now we will consider the operating procedure using a specific example:
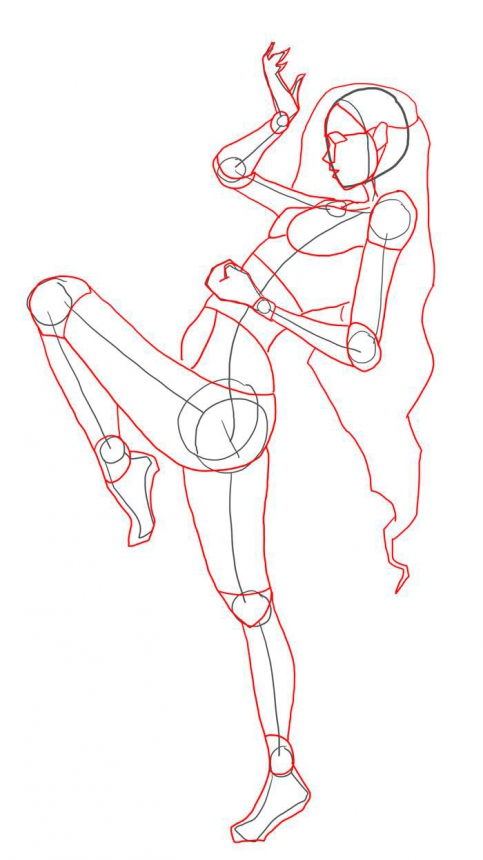
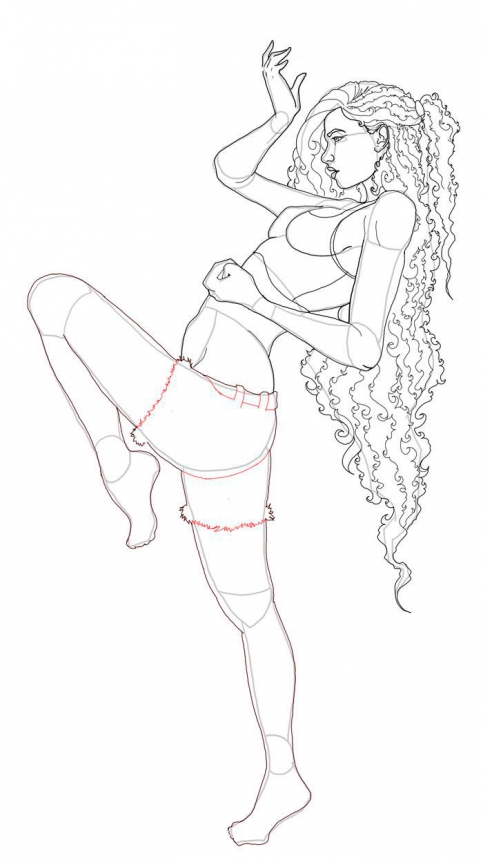
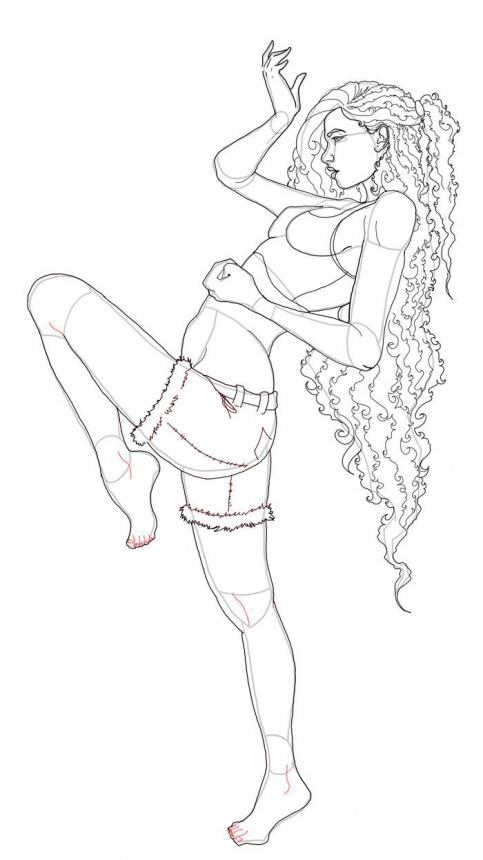
We draw the girl in full growth with a pencil in stages
We draw only the base lines and the main points.
The right leg is supportive. Please note the support is not carried out on the entire foot, but only on the toe. What gives a sense of dynamics.
The line of the spine and as a continuation of the supporting leg draw a soft, natural curvature of the body.
In this case, the head is located relative to this line at a certain angle.
The shoulder is slightly raised (it is not relaxed).
The position of the arms and raised legs also give a sense of movement.
We give the body volume using simple geometric shapes.
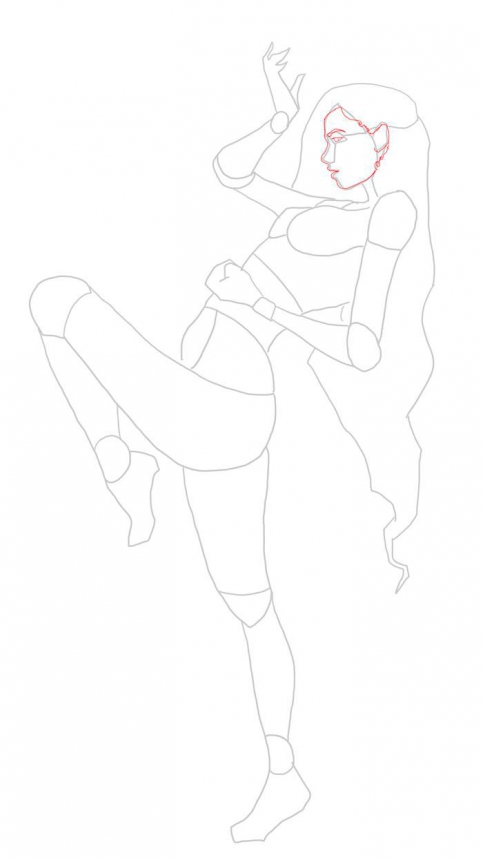
Then, in smooth lines, it is necessary to connect all the details into a single contour.
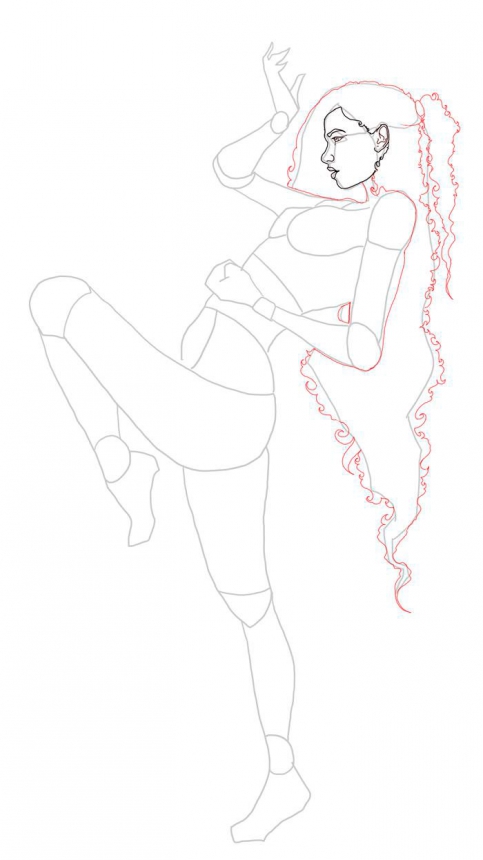
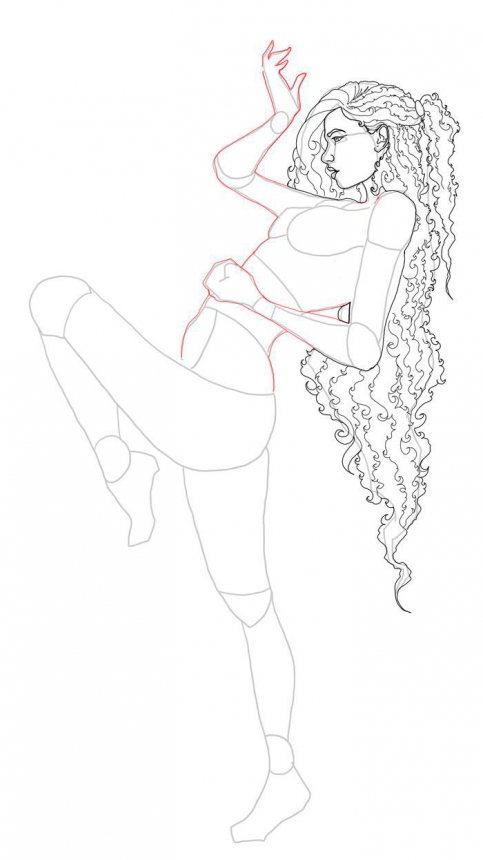
Now you can start drawing details and working out the individual characteristics of the character.


Any serious work requires the most complete dedication and organization, which is especially true for drawing such a complex object as a human figure.
Self-discipline is essential when drawing human figures from life. While working on the drawing of the model, nothing should distract your attention: neither music, nor conversations. Only you and the model are talking. All kinds of excuses like: "There is no inspiration, mood," - should not be the case when working on a drawing.
P.P. Chistyakov wrote: "Art is jealous, it requires full dedication and does not tolerate half measures." I especially wanted to draw the attention of students to this before starting drawing a human figure.
Full and free mastery of the pattern is possible only after acquiring the necessary knowledge and skills by gradually studying the natra, performing a series of exercises to draw geometric bodies, sockets, capitals, still lifes, human heads, etc.
So, before you pose a nude in a simple natural position, with emphasis on one leg. The figure is illuminated with artificial light in the normal position, i.e. above and slightly in front, so that the forms of the model are clearly visible and clearly readable. The figure stands against a gray wall at a distance of 3-4m. from her. The figure of a person, if this is the first time for you, is advantageous to start drawing in front, so that the horizon line runs along its middle. This is necessary in order not to complicate the study and drawing of the model. Pay attention at what level the model is set. If the model is on the podium, you should work while standing, if on the floor, then sitting. If the level is chosen incorrectly, there is a probability of distortion of proportional and perspective phenomena in the foreshortening. Therefore, the horizon should be close to the center of the figure. The distance from you to nature should be at least 4-5 m. At this distance, your gaze freely covers the entire figure without gross perspective distortions. At first, begin to draw a figure should be a simple graphite pencil. You should refrain from soft material; you can use it later, as you acquire the necessary knowledge and skills.
Before starting work on the figure model figure, you should definitely study it from all sides in order to get the most complete information about the object being drawn: the structure of the form, position, movement, volume of the form and its character. Such familiarization with the figure before drawing and during drawing is an indispensable condition. Before the start of the main drawing of this model, it is necessary to make a series of short-term preparatory drawings of a small size, moving from one view to another (front, side, back). It is not necessary to start drawing a figure from a three-quarter position without first mastering simple three-dimensional views (front, side, and back), since this can complicate the task of drawing and studying the figure. Short-term drawings can be performed on a single sheet of 0.5 sheet of whatman paper.
First you need to fix the paper and determine on it the location of future short-term drawings.
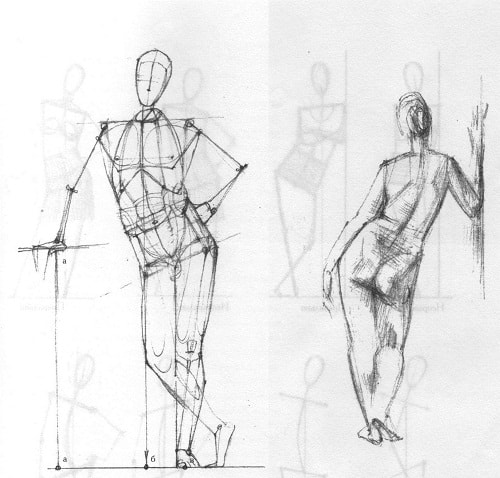
/ The planar image shows the static and dynamic patterns of a human figure in the position of a counter post (support on one leg) /
The drawing should start from the mark of the center of gravity line, which usually starts from the jugular cavity (fossa) or from the seventh cervical vertebra, depending on the position of the painter in relation to the figure. When drawing a figure in front, the line is drawn from the jugular fossa, when drawing from the back - from the seventh cervical vertebra, and when protruding from the side - either from the jugular fossa, or from the seventh cervical vertebra, or rather, from their middle. After this, the tip of the crown, the base of the foot and the level of the pubic joint, as well as the level and direction of the shoulder and pelvis, knee joints, the height and width of the pelvis, and the size of the head are outlined. Having defined them, proceed to refine the already outlined proportional divisions of the entire figure. Having clarified their sizes, proceed to the construction of the figure of the model.
When building a model, it is very important to remember the interaction of two parts of the body: the chest with the shoulder girdle and the pelvis. Their mutual position when resting on one leg has its own laws. . Due to the relaxed leg, the pelvis, losing the supporting function on one side, takes an inclined position, being held by the supporting leg on the other side. Thus, he not only takes an inclined position, but, which is very important, moves towards the reference point. For this reason, the connecting link of the body, namely its upper part - the chest with the shoulder girdle, obeying the position of the pelvis, takes a directly opposite slope. Therefore, the shoulder and the pelvis from the side of the supporting leg rush towards each other, reducing the distance. Conversely, from the side of a relaxed leg, they distance themselves from each other, increasing the distance. At the same time, which is very important, the chest with the shoulder girdle not only tilts, but also moves, like the pelvis, towards the supporting leg, while maintaining body weight in balance.
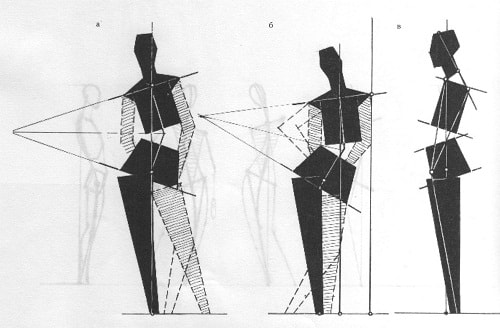
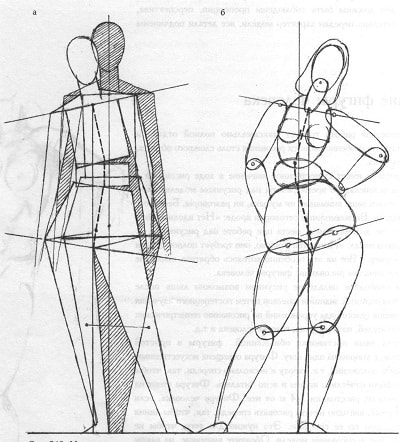
/ Plane contour image of a human figure in a post:
a - with support on one leg (without additional support);
b - with support on one leg (with additional support - shoulder);
c - the usual position of the figure (with support on two legs - static) /
All this can be well felt on oneself, making such movements, slowly transferring the weight of the body from one leg to another, carefully observing the process of working the body structure. You should pay attention to the position of the foot and its trace. The movement of the body is synchronous in nature, when you try to consider everything separately, you most likely will not understand the mechanics of the body. But this can be traced directly from nature, asking the sitter to change the support and slowly move from foot to foot. Thus, the trace of the supporting leg should be on the line of the center of gravity. The figure below shows the support areas of the foot when resting on one leg.

/ a - footprints of the supporting leg and zone of stability (plan);
b - the position of the supporting leg relative to the body of the body (plan) /
Even if the track falls on the line of center of gravity, this is not enough to verify the correct position of the body. To do this, a plumb line (center of gravity line) should be inserted from the jugular fossa, which, if the body is correctly positioned, should extend away from the navel, slightly closer to the supporting leg, somewhat away from the center of the pubis, closer to the edge of the hip joint of the relaxed leg, through the inner ankle, calf muscle, to the middle of the foot of the supporting leg.
One of the main tasks at the stage of constructing a figure in a figure is setting the figure on a plane so that it does not cause a sensation of instability, falling in any direction. That's why a plumb line is lowered for control. At the same time, do not forget to check what has been done at a distance (from the figure) to make sure once again that the figure is placed on the plane correctly.
In addition to the plumb line, which checks the stability of the model on the plane (podium, floor), there is a so-called middle line, which is better called the main bending line of the body. The main line of body bending is easy to check the plasticity of movements and the position of the figure, their compliance with the main movement in the settings. This line goes from the jugular cavity, along the axis of the sternum, the midline of the abdomen to the pubis and along the entire inner side of the leg or, along the whole figure, by the common sinusoidal line: from the crown of the head along the axis of the neck, through the jugular cavity along the axis of the sternum, the abdomen smoothly passing to thigh of the supporting leg, to the base of the foot. Such a curve can go from the jugular cavity or axis of the seventh cervical vertebra and further, as mentioned above. The bottom line is that such a curve determines the movement of a given figure when resting on one leg, thereby facilitating the perception of the plasticity of the movements of the entire figure when set in the figure. In this case, the main bending line of the body always runs along the supporting leg, as bearing the main function of the support.
Similarly, you need to consider the main line of bending of the body when drawing from the back or around. In drawing a human figure from the side, the main bend line (S-shaped curve) will go from the base of the skull, more precisely, from the region of the Atlas bone, seventh cervical vertebra, through the fifth and sixth spines of the spine, down to the pubis, from the pubis - through the middle of the knee joint of the supporting leg to the heel of the foot.
/ Scheme of the position of the figure in the post. The main line is an S-shaped curve going from the supporting leg to the head /
As you can see, the sinusoidal curve is observed from almost all sides, which gives the human figure a natural position, dynamics and plasika. As for the footprints of the foot of a relaxed leg, their position largely depends on two points of the correct position of the hip joint (the beginning of the leg) and how footprints on the glossiness of the podium or floor are determined in relation to each other and to body weight. Incorrect definition of the tracks leads to a lack of stability of the human figure in the figure, and a relaxed leg will appear shorter than the supporting one. In order to avoid such errors, it is necessary to correctly determine already in the initial stage of building the figure, taking into account promising reductions.
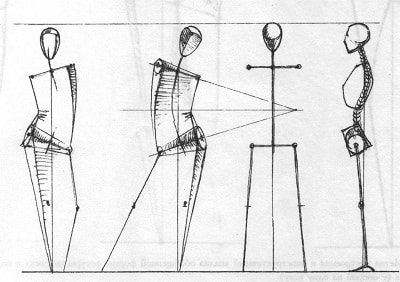
In order to avoid perspective distortions in the figure of a human figure, it is important to choose the right place for drawing, i.e. distance from the drawer to the model. This distance should be at least 4-5m. At a minimum distance (less than the specified), the image of the figure will inevitably be distorted. The smaller the distance, the greater the likelihood of distortion of the figure in the figure and vice versa, the greater the distance, the less the figure is subject to distortion. If the classroom allows (drawing class), the recommended distance should be strictly observed. If for some reason there is no such possibility, there is one way out: to observe a multi-level point of view (horizon line).
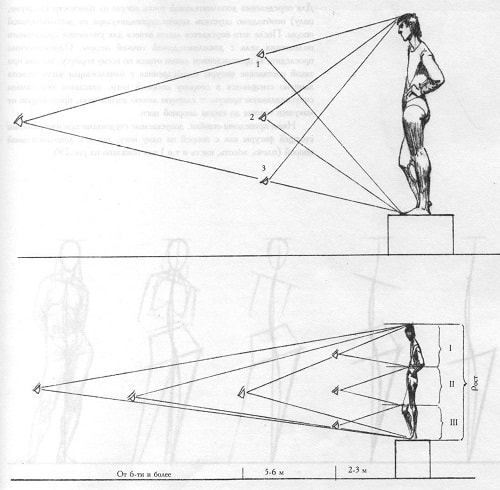
/ Situation: perspective change, horizon, point of view and distance /
For greater stability, the figure of the foot should be drawn from a low horizon, since it is from this level that the drawn foot gives the most stable position to the whole figure and, in particular, to the feet with respect to the plane on which they rest. When drawing a human figure at close range with an average level of the horizon, the feet give the impression of sliding along an inclined plane, thereby causing a feeling of instability of the whole figure as a whole. For the least perspective distortion of the figure in the figure, you need to divide the horizon line into three levels. The upper level I is the neck, the middle II is the pubic and the lower III is the middle of the lower leg. It is also possible to divide into two levels: the upper is the region of the solar plexus, the lower is the knee joint.
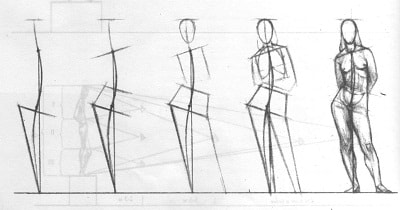
/ The sequence of constructing a drawing of a nude human figure. The main task is to give it a stable balance /
When drawing a figure with two support points, for example, with support on one leg and with additional support (forearm, brush, body or shoulder against the wall), the plumb line dropped from the jugular depression should extend between approximately two support points, i.e. between the supporting leg and the additional support (body, forearm, etc.). To determine the additional support point on the plane (podium, floor), it is necessary to lower the perpendicular line from the additional support. Then the plumb line is lowered to clarify the correct position of the body with an additional fulcrum. At the same time, follow the plumb line throughout the body, since with such a staging of the figure, the hip and nearby abdomen are noticeably shifted towards the supporting leg, thereby describing a sinusoidal curve - the main curve of the body bending from the crown of the head to the foot of the supporting leg.
/ The position of the figure in the counter post (with support on one leg) with additional support:
a - additional support;
b - plumb point;
c - the main support /
Below are the errors made by students in the depiction of a standing figure with support on one leg, and with additional support (shoulder, elbow, hand, etc.).
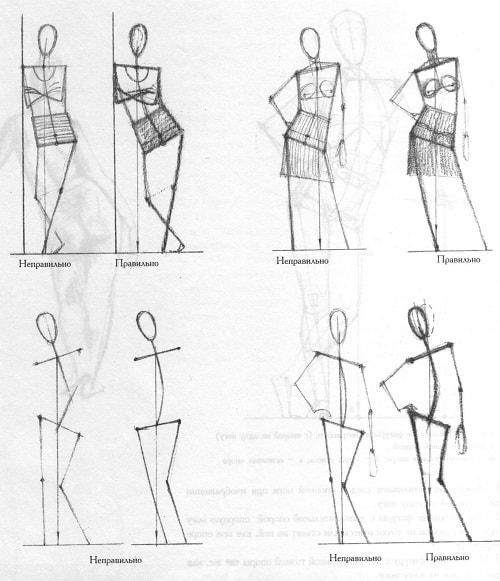
/ Correct and incorrect staging of a figure on a plane (floor, podium) /
- The footprint of the supporting leg is incorrectly set when depicting a figure resting on one leg.
- When drawing a figure with an additional support, the supporting leg (foot) is placed far from the plumb point or placed on it, as when supporting in a counter post.
- A figure with an additional fulcrum is depicted in the same way as a figure with support on one leg.
When building a figure based on one leg, the body, balancing and taking the spatial inclination of the pelvis and shoulder girdle, changes the axis of rotation, i.e. to maintain balance, parts of the body move, for example, when resting on the left leg, the axis of the hip joint relative to the axis of the shoulder girdle makes the opposite helical movement.
/ The figure in the counter post takes a helical position /
At the same time, from the side of the supporting leg, the pelvis always protrudes forward, as a result of which the shoulder from the same side goes to the opposite side.
Therefore, a change in one or another part of the human body always entails a change in the whole body. Given the complexity of the structure of the human body, it is impossible to correctly depict its external form without knowledge of the proportionality of parts of the human body. In order to make perception more meaningful, to understand what determines the nature of the form of nature, it is necessary to study the regularity of the structure of the shape of the human body.
Knowledge of this pattern contributes to the accurate determination of the size of body parts in relation to each other and to the whole. This is a very important and serious moment in the construction of any image, especially such a complex object as a human figure. When comparing proportional relationships, it must be borne in mind that absolutely exact proportions cannot take place here, since each person has some deviations, and this must be taken into account when drawing. You can determine the proportions from a place by the so-called full-scale, i.e. noting with a pencil on an outstretched arm the height of the figure and its parts as they are visible from the spot. However, this method has a purely mechanical nature, so you should rely more on the eye and knowledge about the proportion of the division of the human body. All this is described in detail in the "Proportions" section.
Drawing a figure and following its position on the plane, it is necessary to simultaneously work on revealing the nature of the general form of the model.
Most students, moving on to modeling the form, do not know how to identify the form, but instead draw it, transferring visible shapes, spots of light, shadow and halftone to the paper onto paper. As a result, the figure looks flat or overly rounded. The point here is not in the tonal relation, but, first of all, in the inability to correctly imagine a form in space and to connect this form with the background in the figure itself. The fact is that all the light-tone gradations that are visible in nature are not shapeless spots, they are inextricably linked with the plans and faces of the form. Therefore, working in tone, first of all, it is necessary to understand that it is necessary to reveal the shape as if you are sculpting from clay, giving it a real living form and the nature of a full-scale model. It is possible to identify the shape in the figure drawing by one line without applying a tone, in extreme cases - with the introduction of a light tone, reaching expressiveness with extremely mean means. But, without having much experience in drawing, it is extremely difficult to achieve such an effect.
When modeling a figure, while using the knowledge of anatomy, pay attention to the plans of the model, located in relation to the painter at different angles.
Each shape consists of planes and edges, which is due to the structure, which has already been mentioned more than once. Any of these faces in a live model has a softened shape. And, nevertheless, these are faces, plans that are addressed in different ways, located in different directions. If we consider the shape of the torso on a living model, then, at first glance, there are no faces on it. However, with a careful analysis of the form, we will see the boundaries separating the front surface from the lateral, lateral from the back, and with a helical movement of the body, we notice how the three-dimensional forms are divided into two parts - the thoracic and the hip. The figure below shows how the torso is enclosed in a contour in the form of a “box”.
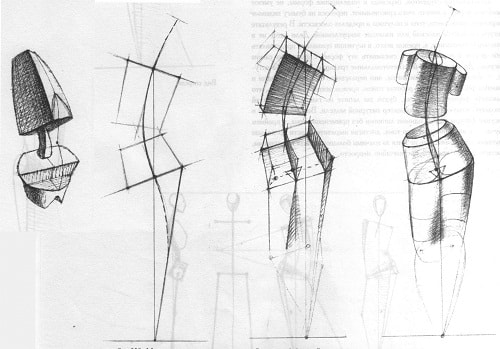
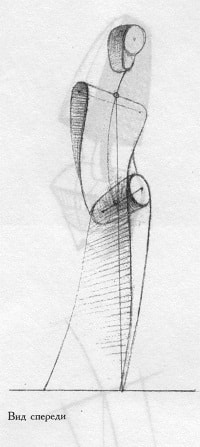
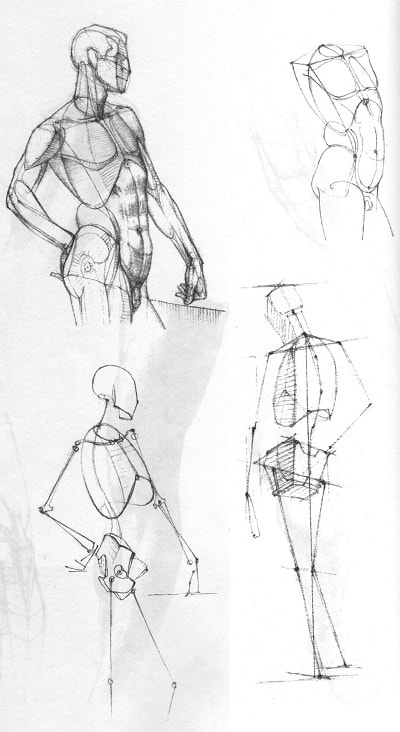
/ The method of construction and constructive analysis of the generalized form of a human figure in the position of a counter post (with support on one leg) /
In the initial stage of construction, the volumetric form will seem to us angular and rough. Gradually, as you refine the finer details, these angular coarse "boxes" need to be brought closer to living form, maintaining this in common until the end of the picture.
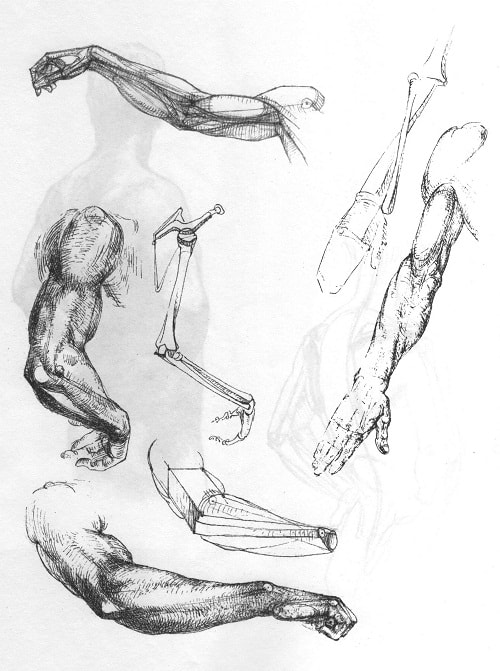
It is advisable to start studying and drawing the shape of the human body with plaster casts of Hudon, Apollo torso, etc. With their stillness, plaster casts provide a good opportunity for a calm, thoughtful study of the features of the body structure, where all the small details distracting attention are discarded, and complex forms of the human body are masterfully generalized. When studying samples of gypsum casts, it is important not to be limited only to external forms, since they are due to the internal structure. Such an approach to the study of the full-scale model leads to an understanding of the general consistency of the movements of the model throughout the human body. Without knowledge of plastic anatomy, it is impossible to master the figure of a human figure, just as it is impossible to do in the practice of teaching drawing with only theoretical knowledge. Therefore, the study of plastic anatomy should be based on the observation and study of living nature by sketching, remembering any sources related to plastic anatomy, be it anatomical drawings, gypsum anatomical figures, etc. Before turning to the image of a living figure, drawing a plaster torso is a good exercise.
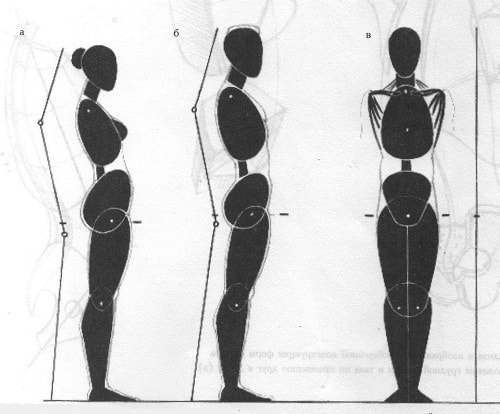
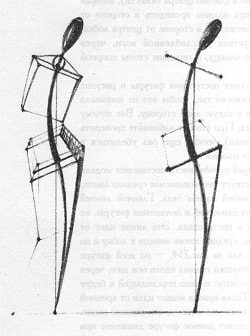
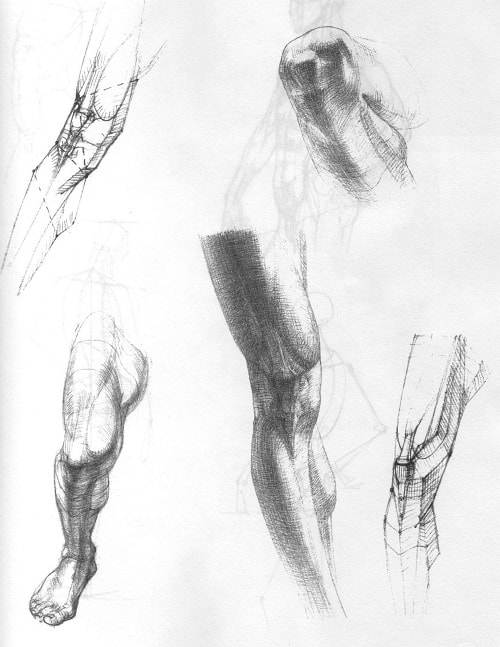
/ On the silhouette images (a and b), the main bend of the human figure is clearly visible, giving it the greatest plasticity /
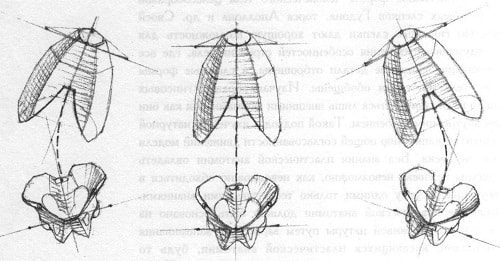
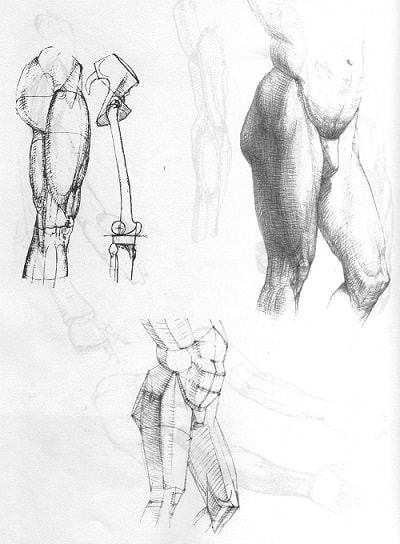
/ The relative position of the parts of the skeleton of the body in a static and dynamic position /
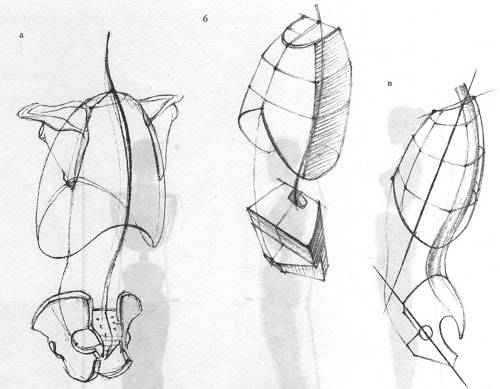
/ The method of analysis and image generalized design of the shape of the skeleton of the body (a, b); position of the chest and pelvis in relation to each other (c) /

/ Structural image of the shape of the body /
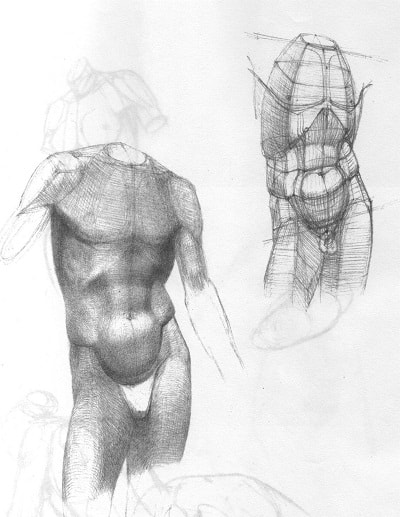
/ Constructive anatomical analysis and identification of the form in tone /
![]()
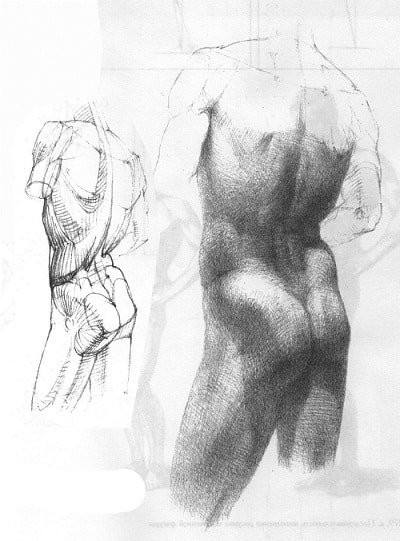
/ Torso image /


/ Constructive analysis of the construction of the back shape /
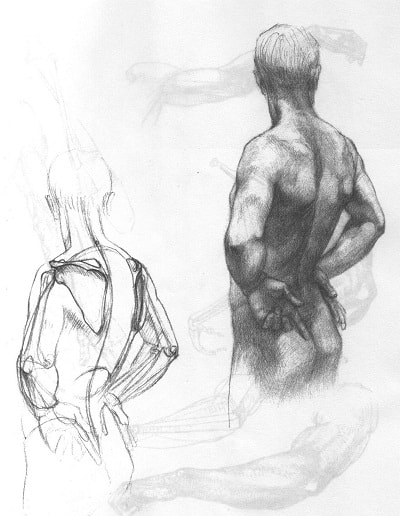
/ Torso from the back. Formation analysis of the upper back surface - the scapular region /


/ E.V. Gubanova. Male nude model. 1982 B., sanguine /
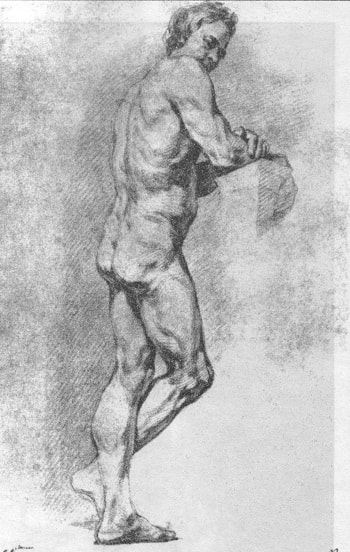
/ A.P. Losenko. Model. 1763-1775 B., sanguine /
How to draw beautiful pose - Basics of drawing
Note DrawMaster.ru: In fact, this wonderful lesson should be called "14 laws of female sexuality" or "How to get into the top ten pose!" because the conversation will be about that. The success of the whole picture as a whole often depends on the choice of the main character’s pose. Every self-respecting artist must possess the ability to correctly position a character. So .. Here are the key foundations - the foundation of your characters! If you misunderstand it, then do not expect much “better” much. Building greatly expands the personality that you want to fill your character with, giving you the power to deepen the character’s relationship with the viewer. This is where you give life to your character. This is where it all starts.
Tip 1: PURPOSE Now, before you take the pencil, the most important part is the design! A clear idea and knowledge of what you want to achieve. You must be very sure of what you are moving towards and believe that you can do it, that everything will work out. AIM ON THE TOP OF WHAT YOU CAN. ABOVE THAN SOMETHING ANYTHING ACHIEVED IN THE HISTORY OF MANKIND ON THE EARTH. From here you fill the process with positive and make sure that you have the ability to have a great start.
Tip 2: MEN vs. WOMEN IF YOU CAN BE ABLE WITH THE FEMALE STRUCTURE, THEN YOU WILL NOT HAVE DIFFICULTIES WITH THE MEN. Both man and woman are divided into many of the same basic components. If you deal only with a man, then this is only a matter of assembling several parts here and there, scaling and clarifying some areas. Honestly, I draw very few men, but when necessary, I can draw them effectively because I work with female figure. Those who focus primarily on male anatomy in the future will encounter the difficulty of conveying female beauty and sexuality. It is for this reason that this lesson will focus on magnificent female forms.
Tip 3:UNDERSTANDING WHAT YOU HAVE A CASE First of all, you need to get acquainted with the outlines and forms with which you will work. You must pay attention to all the curves, joints and components in order to understand where they should be located relative to each other. Finding hidden lines and the principle of where certain parts touch and connect with each other will be your guide to the work. Just remember, EVERY TINY LINE DRAWED BY YOU IS PURPOSE AND DESIGNED FOR WORKING WITH OTHERS IN TOGETHER. You will notice that if one thing disappears, the other will follow.

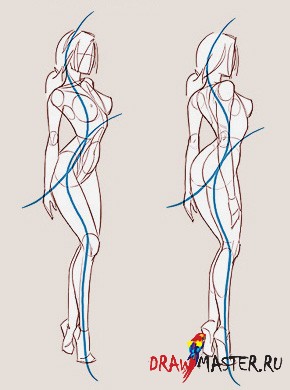
Tip 4: MOVEMENT Everything moves! Even if something does not move, in reality there is movement, with only a slight emphasis on anatomy and rhythm. TIP: FOR YOUR POSITION TO BE MOVED, THINK ABOUT IT AS ABOUT THE LETTER "S". THIS WILL BE A FLOWING LINE LEADING YOUR EYE TO THE FIGURE, WHICH EVEN WILL HELP TO HELP YOU WITH THE COMPOSITION IN GENERAL. Make sure that the visible plastic in the figure does not make it (the figure) straight, rigid and awkward.
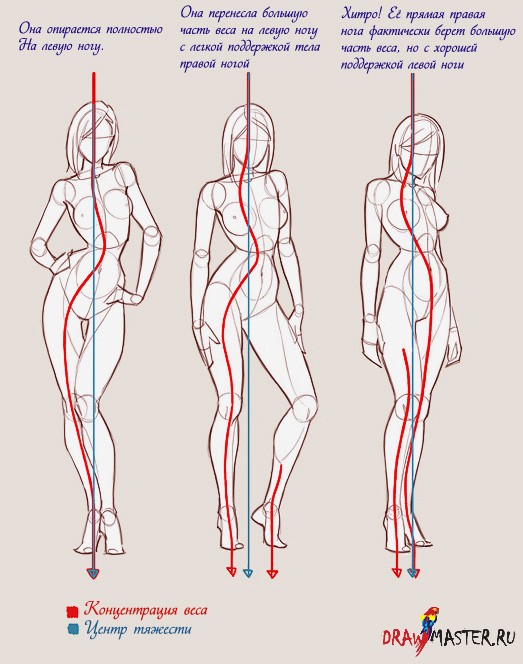
Tip 5:ANGULAR EFFECT When building a figure in an attractive, confident and sexy pose, you must adjust the angles in the head, trunk, hips and legs. To draw correctly, you need to understand this. The pose at the bottom is reached by the legs, which have moved and shifted the body weight to the right side. Now the right thigh confidently sticks out, legs are widely spaced and they occupy a significant part of the weight. ONE OF THE REASONS FOR LOCATION OF THE TORSO IN AN OPPOSITE CORNER WITH RESPECT TO THE HIPS IS COMPENSATION OF THE OFFSET OF THE CENTER OF GRAVITY AND ITS WEIGHT FOR MAINTENANCE OF BALANCE AND STORAGE OF THE BODY IN VERTICAL POSITION.
The head bends anywhere, depending on which direction you choose.
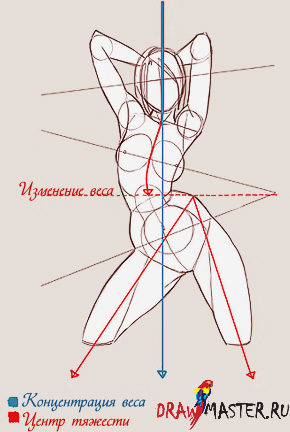
Tip 6:WEIGHT BALANCING I'm sure many of you were upset after trying to build a “simple” pose correctly. For some reason you simply could not do this, it seems that the posture had only one desire to "annoy you endlessly." Usually this is the result of people forgetting about the physics of balancing or about the center of gravity when working with all angles in a pose. REALLY THE SOLUTION IS ACTUALLY BASIC. SO SIMPLE WHICH USES FROM SOME OF US. The leg, which is the most direct and shortest, takes on most of the weight. So keep your support balanced against the character’s center of gravity, not forgetting where the weight concentration is.
Tip 7: A NOW RECTANGULAR! The perspective and perspective can very depress all of us artists, so don’t think about this difficulty well? This will be a great starting point. If you know how to enter a box or just a rectangle into perspective, this same knowledge will help you fit your figures into perspective from both fronts: front and back. YES, HUMAN AS A FORM MUCH MUCH MORE DIFFICULT FOR WORK THAN MANY OTHER THINGS, BUT IF YOU CAN KEEP PROPORTIONS WITHIN THE GUIDELINES OF THE RECTANGULAR, IT WILL BE PURPOSE. Pay attention to the stability of the central points in both fields.
![]()
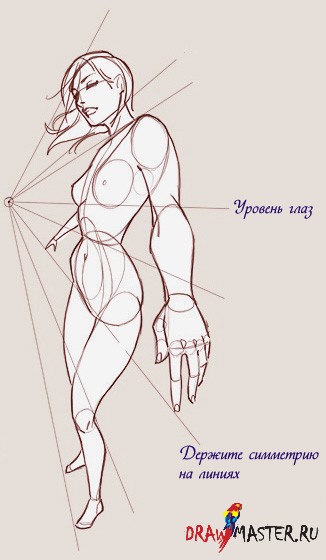
Tip 8: USING EXTINCTION POINTS Ok, this looks like a rectangle / box, but I find this approach more accurate for the job. This is by far my preferred method, although it did give me a bit of trouble. First you must determine the level of the eyes so that you look up at what is higher and look down at what will be lower. ATTEMPT TO KEEP THE BODY SYMMETRY BASED ON THE LINE. It would be safer to turn more often to the idea of \u200b\u200bthe figure to see which areas and parts are parallel to each other. Yes...! Poses that are far from symmetrical will require much more attention.
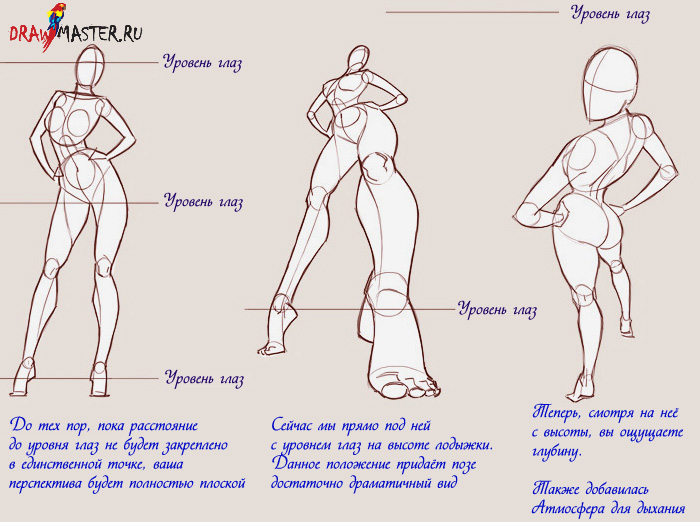
Tip 9:EYE LEVEL Eye level is really important when creating a dynamic posture. Using a low eye level can make your character dominant, heroic, or simply huge. The point at which you look plays an important role in creating the pose, because in essence, this is how you, the artist, want the world to look at your character. CHOOSING AN AMAZING POSE, DECIDE WHERE YOU WANT TO PLACE AN EYE LEVEL, BECAUSE IT CAN EVEN A SIMPLE POSE TO MAKE A VERY DRAMatic.
Tip 10:THE CENTER YOU NEED A breakdown of the workspace into a simpler scale will give you focus, which will help you focus on the main thing, without any confusing or uninteresting details. Loosen your technique and just smoothly go with the flow. When you think too much, you acknowledge that you still don’t know everything. In fact, you know more than you think, so do not let thoughts interfere with you! DO NOT THINK IF YOU CAN KNOW THIS. YOU LIMIT ONLY THAT YOU DETERMINE YOURSELF FOR YOURSELF;)
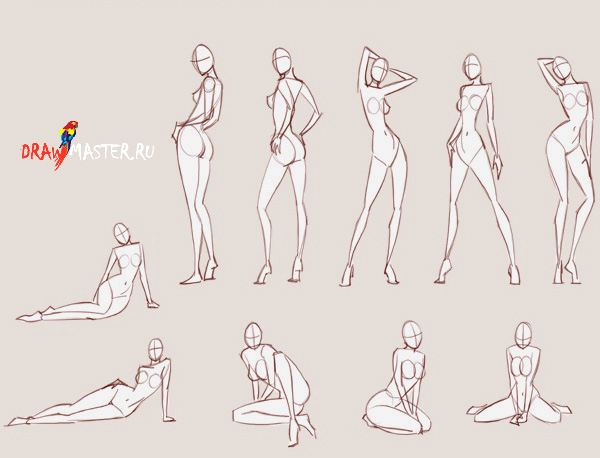
Tip 11:EXPERIMENT WITH DIFFERENT STYLES! Yes yes exactly! You really can learn a lot using a different style. Your work with the approach to things from different angles will give you a fresh point of view. ONLY YOUR UNDERSTANDING OF THE CONSTRUCTION OF ANATOMY AS A WHOLE WILL BE EXPOSED. I notice that my skills are self-upgrading after I work with various alternative styles. So it is highly recommended for everyone!
Tip 12:EMOTIONALITY Emotions and moods are a vital element in creating an illustration. Here you have the opportunity to further influence the audience by fine-tuning this area. The pose itself can convey a lot of emotions without using, for example, facial expressions. REAL EMOTION IN FACIAL EXPRESSION IS ALSO EXPRESSED IN THE OTHER PART OF YOUR BODY. There are no exceptions! So you just need to know the body language that you set for your characters.
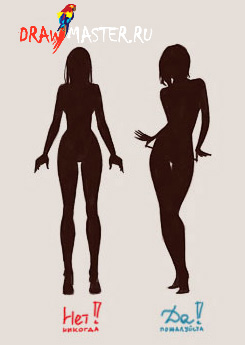
![]()
Tip 13: SILHOUETTE A great way to check if your pose is eye-catching or dynamic is to fill it with black or dark. SILHOUETT LETS YOU SEE IF YOU TRANSFER WHAT YOU ORIGINALLY ASSUMED. Your eyes will focus on the essentials without distracting the details, which in turn can help with composition and scaling. Looking at the external shape of the figure, you can choose which side it will be - front or back! Front and back - identical silhouette. You can also make sure that the shapes are not too flat or too straight (symmetrical), because this can give the figure a stiff or rigid shape. For women, even a simple tilt of the hips can solve a huge bunch of problems.
Tip 14: IMPORTANT ADVICE Use all of the above and the result is GUARANTEED! I still do this, and I would not be at this level of skill if I did not use these techniques. USE THESE Tricks AS MUCH AS YOU NEED AND EVERY TIME WHEN YOU NEED. Once you start acquiring these skills, you will have confidence that you can create without using references and achieve amazing results. You realize that you are able to draw things that you have never painted before and that will very accurately display their real copies. You will be surprised when you begin to discover what has been hiding from you all this time. A FEW TIPS IN CONCLUSION WELL DETERMINE WHAT YOU WANT AND LIKE FOR YOU. TRY TO STUDY AND UNDERSTAND THIS, MAKE YOUR PART, RELEASE WITH THIS ... Nothing is accidental. Everything has a purpose. Practice more, copy what you can (just do not pass off as your original work - these techniques are only for practice). BE MODERN. Arrogance will only hinder you. It gives rise to complacency, which prevents progress, to a higher level. TAG HIGH, TOGETHER ON THE BOUNDARIES OF WHAT ALREADY HAS BEEN ACHIEVED IN ART. LEARN FROM YOUR ARTISTS. ART IS SELF-EXPRESSION AND ACHIEVEMENT OF NEW, BEFORE OPEN TOPS DIRECTLY IN YOURSELF. Art - DOESN'T MEAN to be better than someone. FIND YOUR OWN STYLE. We are all unique incarnations of endless possibilities. Cross out the word “attempt” from use. Trying, you actually do not do what you intended, putting it off for later. Instead, just do what you’ve planned from start to finish. Feel the love and enjoyment of the experience that art brings to your life and you will move on. Believe in yourself, God is waiting;) Thank you for your attention! I hope this tutorial was useful to you \u003d)
prepared by the community
This method is just a tool to help you draw a human figure. This method does not claim to be the best and fastest. The purpose of this drawing method is to determine the shape of a person in three-dimensional space.
Classic animation (and Disney's company in particular) uses a similar way of developing heroes.
Using this method will help you put your ideas on paper.
Pose
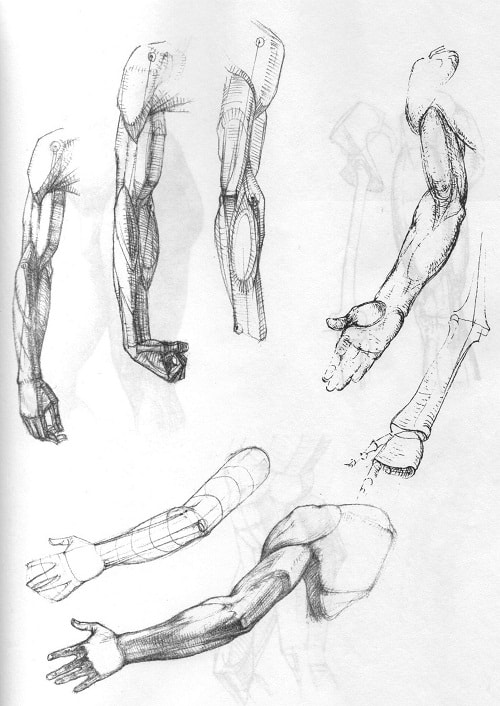
Basic anatomy
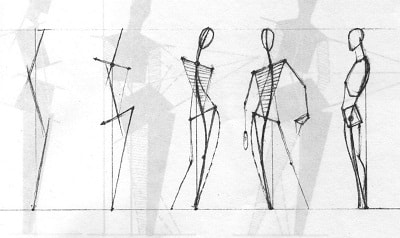
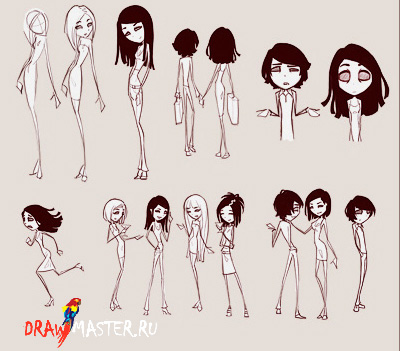
Stick figures ...
Wait, don't leave! Drawing stick figures can be simple ... but when was the last time, you drew them well ...
Do not underestimate the possibilities of such figures and the possibility of their use at the initial stage.
First of all, they represent a very important element of any subject that you draw: proportions of sizes. Everyone knows that almost everything in a drawing determines dimensions. Too short foot or too big nose can ruin the impression of any, even the best drawing.
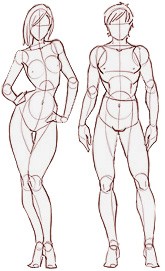
Let's look at stick figures. They have differences in details, but the essence is the same for everyone. We will review the details later. First, consider the proportions of a standing figure.
Stick figure 1. This is the main figure. You see the head, torso, arms and legs. You cannot do anything special with it except to practice the proportions of the parts of the figure.
Stick figure 2.
With this man you can experiment by determining the proportions of the arms and legs.
Stick figure 3. Added shoulder and pelvis width. Next we will see the need for these constituent figures.

The task.
Try to draw such figures and determine their proportions. This is the fastest and easiest way to practice proportioning.
Using stick figures is also a very quick way to determine how large you can draw people on paper. You do not have to fear not to fit into the framework of the sheet, as you clearly see where the legs or arms end, etc.
Language of the body
Again stick figures.
Now that you know how important it is to determine the proportions, we move on to creating poses using the same figures. It’s easier to say: decide what your hero is doing?
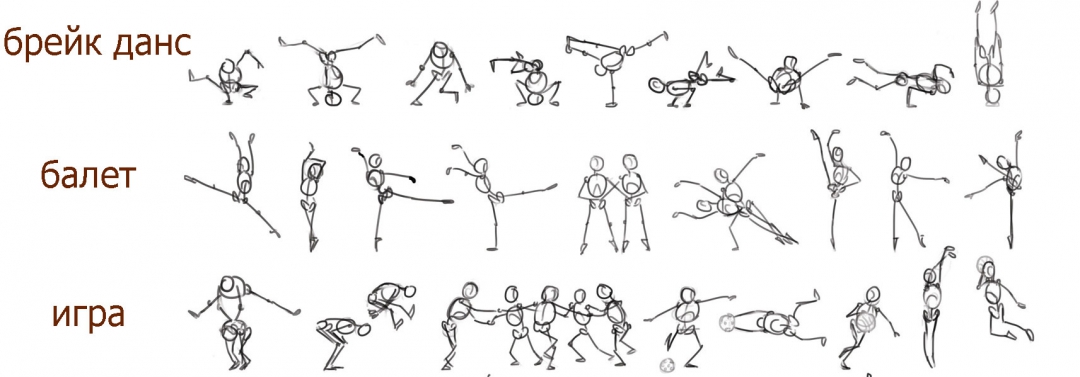
Playing with the little men, you can experiment with the poses before you begin to draw the desired pose for the picture. Yes ... a lowly man will help you plan your masterpiece.
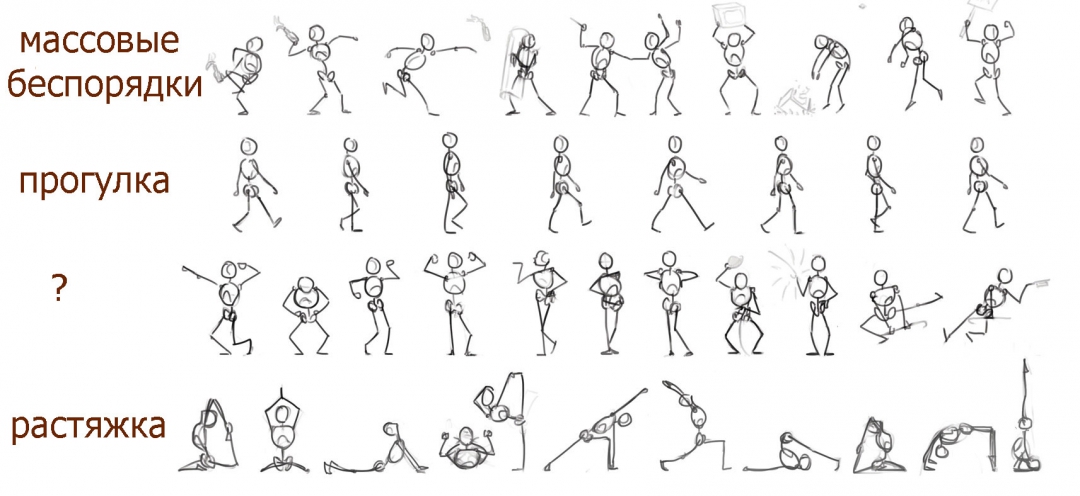
Little men in motion.
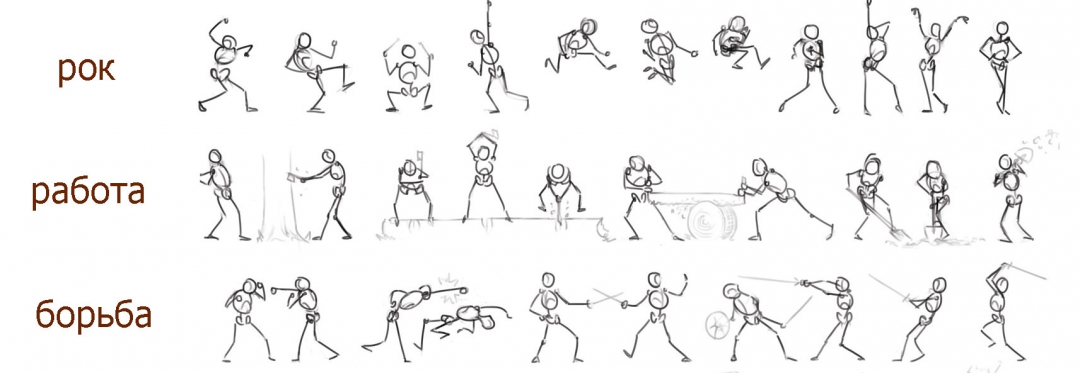
Here are some examples of using figurines to define a pose.
Throw a spear.
I think this one is dancing ...
This one is running ...
You see a certain shift in the position of the pelvis and shoulders, because we look at it from the side.
Gladiator
Again, some reduction in size (hand with a sword). Pay attention to the rotation of the body: a very natural position, especially when turning in the desire to see something.
Sadness or the search for contact lenses ...
Loafer
Another example of a curvature of the body. The shoulders and hips are angled.
Impossible or extremely uncomfortable position at the same time.
Anyway, it looks stupid
Balance: When you determine your posture, you should pay attention to the center of gravity. It is located in the lower abdomen, slightly above the perineum. The weight of your legs is almost half your total weight.
The position of the center of gravity in relation to the "rest points" of the body indicates the balance of the body. The following examples demonstrate this.
The red circle is the center of gravity
Red arrow - direction of gravity
Green arrow - resting points
Standard gait
As you can see, the center of gravity lies between two points of rest. This is a balanced pose.
A fall
Here the center of gravity is near the resting points. This is an imbalance causing the body to move sideways to the left.
Balancing
This is possible because the body is fairly symmetrical.

Compare with the following ...
Here the body leans to the right, causing an imbalance. You will notice that the center of gravity moves slightly to the right.

Run, figure run!
During running, the center of gravity is in front of the rest point. As you can see, this is an unbalanced pose ending in a falling movement of the figure. She, of course, will not fall, because she runs and moves one foot in front of the other, preventing the figure from hitting the ground.
![]()
Incline
The figure is at rest because the center of gravity is between two points of rest: one leg and a shoulder. The second leg is crossed with the first and does not affect stability.
Of course, you do not have to make the pose balanced. An unbalanced posture conveys dynamics, action and movement, while a balanced posture conveys a calm pattern.
All of the above is just an aspect of what you should take into account when thinking out a pose. This will give your drawing a very natural look.
Movement and action
The body is a malleable and mobile system, influenced by the center of gravity. It has no natural firm position.
The first picture shows a little man at least. Notice how the pelvic joints move due to gravity. The movement of the shoulders usually occurs in the opposite direction from the movement of the pelvic joints.
The second image shows a person lying (side view), leaning on one arm. This causes the rest of the body to hang on the free shoulder. Also, since the spine has some flexibility, it may be slightly bent.
Building
To draw a human body, you should at least know how it is composed.
At the base of the body, of course, lies the skeleton. In the system of stick figures, we have already seen some of this. Now we will look at the details. The human body consists of the following parts:
head (black)
ribs (blue)
spine (blue)
pelvis (blue)
connections (red)
hands (green)
palms (green)
legs (green)
] feet (green)
Front view
Side view
Pay attention to the spine (arms not counted, since attention is focused on the spine).

We can use a simplified skeleton shape when we want to draw a human figure:
Now you have more idea of \u200b\u200bthe figure.
Body building
Armed with knowledge about the structural features of the skeleton, we can now continue to work on attaching "external material": muscles or fat. To represent these parts, we will use ellipses, cylinders, and other shapes.
You choose the shape that is most similar to the part you want to draw.
Can't we now continue to draw a real body? Of course we can. But, nevertheless, it is better to use stick figures, so that at the initial stage you will not be distracted by extraneous details, focus on the correct proportions, balance and posture.
Volumetric representation of body parts.
Red lines are connection lines.