Most of our drawings are on female characters, so here we need a few tips and tricks for proper drawing. All to those who would like draw a woman or girl correctlydedicated! We hope that in a couple of dozens of simple steps we can help you draw any girl in a beautiful and pretty one without any problems! Let's start with you to study this topic.
Step 1.
First, let's see again how to draw a female face (although you can practice drawing on). You have to catch the moment that the portrait of women is full of curved arcs, soft lines and roundness.

Step 2
Let's stretch our hands and feel the difference in how to draw women and girls of different ages. We can now compare a girl (1), a teenager (2), an adult woman (3), or an old woman (4). Just a small example to help you!

Step 3
The eyes, which our collection (,) has on our site, are very important for a drawing or portrait of a woman, because they must be beautiful. It is necessary to add emotion - ordinary eyes, innocent, guilty of something or alluring and intriguing, maybe childish, this is your choice, which will be better for your drawing of a female figure.

Step 4
Now a few tips and tricks for. As you can see, women's hair has a large number of arcs and simple lines that are laid very softly. not forgetting the volume for hair!

Step 5
And just like a face with hair, we would like to show you that throughout the body of women there will be a mass of arcs, curved lines and such soft lines.
Step 6
In the previous step, you could look at the basic forms and anatomy. And now there are several types for the figures of women. You know that not everyone has the same body, and women are very individual. Usually the chest and hips are the same width, but we will consider more types. For some, the hips are wider than the chest, for some women, the chest is larger than the hips, or even the boy’s body, it always depends on her genetics and lifestyle or work.

Step 7
Perspective is also important, because you draw complex and beautiful woman drawing and would like to do something unique. For you, some examples for exploring perspectives.

Step 8
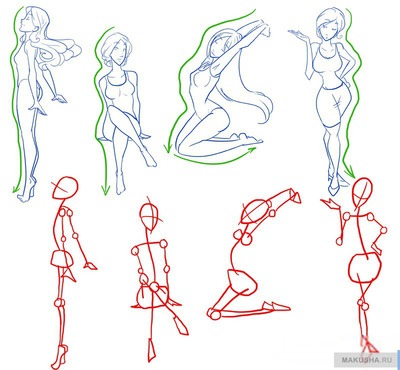
And as a final trick, we will show you some examples for choosing a female pose. Just like the shapes of their bodies, movements and bends are very soft and flexible! If you want the most feminine poses, then look for a pinup theme!
Step 9
We will look at the topic “ How to draw female figures“. First, draw baselines for the sketch base.
Many people know how to draw a flower or a tree. But the human body is far from all. Today's article will talk about how to learn to draw. female body. Simple steps that indicate individual actions will tell you how to easily draw a similar picture. Often, thanks to one technique, you can draw an incredibly graceful and balanced by all rules, a human body. The only caveat is that you don’t have to press hard on the pencil. After all, when you start to erase excess or curved lines, a visible and not very beautiful trace remains.
Step 1. So let's get started. When drawing a male figure, one must take into account the fact that she is less magnificent than a female. The main distinguishing features are some Box-like and certainty. There is muscle relief. In a man, the shoulders are wider and in combination with the rest of the body structure gives the appearance of some hidden strength and agility. From a side view, you can see that the male body does not have such distinguished curves as the female. You should also always draw a line of movement and balance of the body - then it is more convenient to draw.
Step 2. The basic overview of male body types consists of three points. The first is the "body of the builder." That is, a large number of clearly defined muscles and muscles are visible. This effect is achieved by lines located in the right places. In the second type, muscle mass is slightly reduced. In addition to a whiter narrow article, fewer muscles are also shown. That is, fewer lines are drawn. And in the last type, the third - the muscles are not shown practically at all. Just a body with certain lines of structure human body and that’s it. It must be borne in mind that all realism is achieved by certain lines located in the necessary places.
Step 3. According to the human anatomy - in this case, women, one can always see that the whole figure is centered on the hips and shoulders. The difference between the female and male bodies is in some seductive forms. The hips and shoulders of the female figure are vertically arranged in relation to each other and have almost the same width. It is best to observe the bends and balance of the body in motion. Then you can get the least open idea of \u200b\u200ball the formats and possibilities of muscle relief. For clarity, it will be best to purchase a mannequin or find a model.
Note: female body height is 6-7 goals.
That is, the height of the head is taken six to seven times and the logical and proportional growth of the woman is obtained. A key observation in drawing the female body is the unsharp, perfectly straight shoulders and the proportion of the hips.
Step 4. Dimensional variations of the chest are shown in the frontal and lateral view. From small to large - all breasts are drawn almost identically. By the same method. It is with one line, only the larger the chest, the more convex the line. For realistic drawings, you need to remember the laws of physics, which no one has yet repealed. In this case, the law of gravity lowers the chest down a little. But at the same time, the nipple bulges forward. Unrealistic will look like a picture on which the chest stands and stretches somewhat upward or fully forward. And in order to give volume, you should draw a line on the frontal view as if cutting the chest in half. In place of the steepest bend is just the nipple. This will also help when drawing clothes or accessories.
Step 5. When drawing clothes on the human body, the main issue can be called the bulges present under it. Although knowing the differences between the sexes, it will not be so difficult to outline all the bulges, given that the clothes are made of soft fabric. Wide hips, soft shoulders in women due to the ability to procreate. A wide shoulders, powerful arms and strong legs in men - the need to ensure their families.
Step 6. This stage will help to draw clothes on different types of the human body. For example, the three most common are taken. First stocky, low with a round face. Second is a common person: short, thin. And the third is tall, with well-developed muscular mass, broad shoulders and a narrow pelvis. It must be remembered that clothing always conveys the general structure of the figure, stretching in places of convexity. And creating creases around. In the second case - just small folds on the chest, sides when turning.
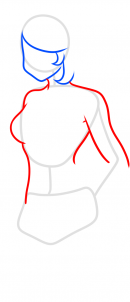
Step 10. Smooth lines to draw the chest, taking into account some decline down. A thin line indicates the hollow between the breasts. Draw a barely visible but clear line of the clavicle.
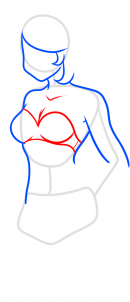
Step 11. Outline the rest of the body by drawing the hips of a woman equivalent to the shoulders in width.
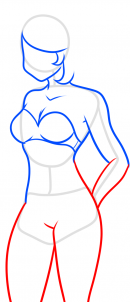
Step 12. Draw the left hand with a pencil, outline the right hand and carefully draw the fingers. Dress the girl in shorts and a short bodice. In principle, you can draw any clothes, but for the first time, just shorts and a bodice are enough. Draw the navel and inguinal lines. Indicate the lines of the bends and draw the hair. The length, structure of the hair is drawn as desired.

That's it, the drawing is over. Now it remains only to decorate the girl with pencils or paints. It must be remembered that if a realistic pattern is needed, then the colors must be selected as close as possible to the natural color of the hair and skin. Shading in different directions color volume can be achieved for all the bulges and protrusions of the female body.
It may not work the first time, but you can try it several times. And if you strictly follow the instructions, then soon a lesson on how to draw a female body with a pencil will be mastered even by a child.
In addition, look at another video tutorial showing how to draw a female body with a pencil.
And now you can leave comments on the lesson.
The human figure is far from the easiest object for drawing. However, starting to create a picture with the simplest baselines, you can observe all the proportions and make a neat and beautiful picture. Our tips will help you with this.
Preparation for work
So that at any time you can correct the picture, choose a hard pencil for work. First you will need to draw the body in a sketchy manner. Do this without pressing the stylus tightly so as not to scratch the paper. After completing this step, take a softer pencil. Also make sure that the eraser is of good quality - this will easily remove imperfections and at the same time will not leave stains and stains on the sheet.
We draw the girl’s body in stages
To draw a girl’s body in stages, we first decide on the position of the figure. Next, we outline the baselines on the basis of which we will build a silhouette.
The simplest thing is to draw the body of a girl standing directly facing you. Having successfully completed this task, you can try to draw a girl standing sideways, sitting on a chair or lying on the beach, for example.
Hello! Today we have prepared for you a lesson in realistic drawing - that is, it will be noticeably more difficult than our previous lessons. And the topic of our tutorial article will be drawing a girl.
In fact, the fair sex was only presented on our site before today's lesson (just like in the life of the author of these lines), and so we decided to make a little variety in our drawings. Yes, for sure, there was still, but you must admit, this does not change the picture much, considering what we want draw a girl. So let's get started!
Step 1
In the first stage, we need to identify the girl’s posture, her proportions, and position on paper, and the stickman will help us with this (stickmen?). First, let's pay attention to the rules of proportions of the female body, which differ from. Despite the individuality of each individual person and his proportions, which raises exceptions to the rules, in the drawing textbooks the female figure is inferior in height to the male figure. But, nevertheless, the rule of “seven goals” ( human's height, average, equal to the sum lengths of seven goals) is maintained.
The differences also lie in the structure of the hips and shoulders - for men, the width of the shoulders is equal to the sum of three goals in width, for women the shoulders are much narrower. But here women's hips are much wider than men's - in a woman, the width of the hips and shoulders is approximately the same, and in men the shoulders are much wider than the hips. Hands, wrists and fingers of a woman are smaller and thinner than men. The female tibia narrows downward and passes into a thinner ankle and a smaller foot.
When working with a stickman, convey the resting position of the hands, as well as the curving spine, which in subsequent steps will form a graceful posture. Indicate the correct inclination of the head - do not forget that the angle of our drawing is such that we see the girl from the back and she is slightly turned away from us.
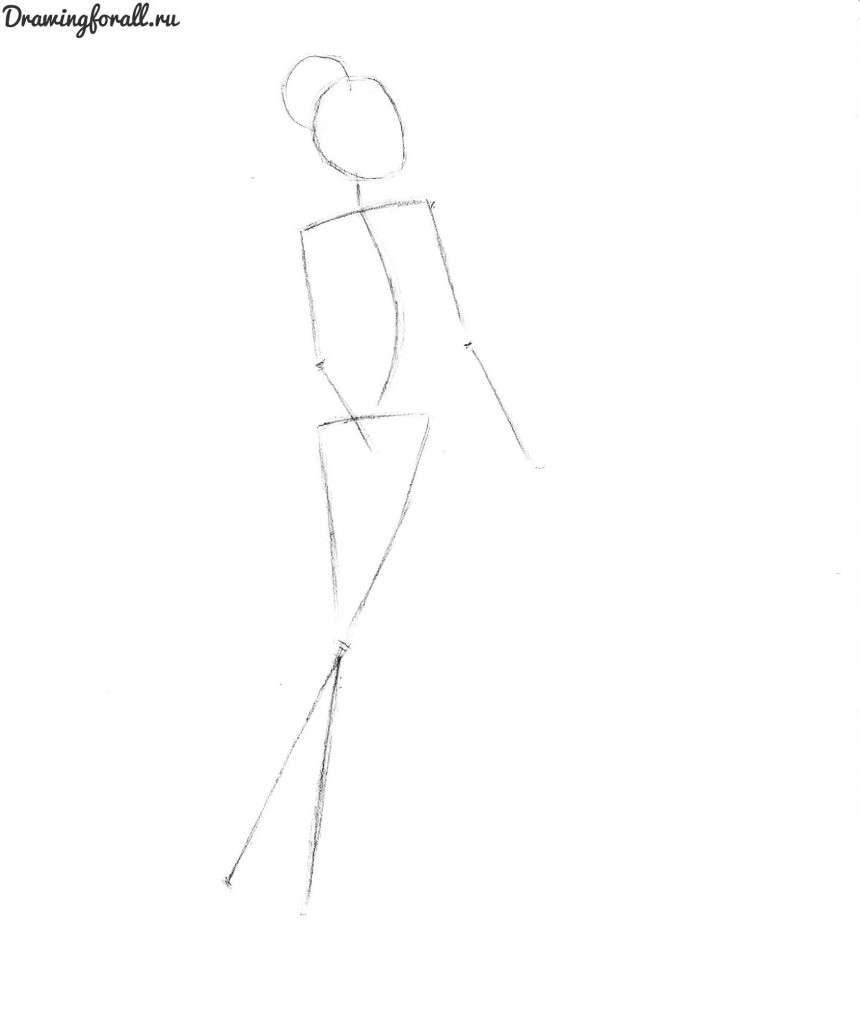
Step 2
Let's add volume to the figure. We outline the balls of the shoulder joints and elbows (do not forget, they should be very small - we draw a fragile girl, not). Pay attention to the location of these balls relative to the corners of the stickman. Then we connect the head with the shoulder joints with lines that will form the contours of the neck and clavicle area.
Next, we connect the balls on the hands with narrow, elongated cylinders to make feminine shoulders and forearms, draw the outline of a small palm. Please note - the palm is located opposite the connection of the right foot from us with the body.
Look at the contours of the body - on the one hand, due to the narrow waist and wide hips, they look like an hourglass, on the other hand, we see only one smooth contour, most of which is hidden by the right hand from us. The middle of our conventional hourglass is located opposite the elbow of our right hand. We draw the contour of the chest, focusing on the arm - the upper part of the chest should, at our angle, be located at the shoulder joint, while the lower part should end just below the middle of the segment from the shoulder to the elbow.
If we look at the bottom of the girl’s figure, we will see yet another “hourglass” formed, on the one hand, by the buttocks and hips, and on the other, by the calf’s muscles. When drawing legs, use smooth lines to emphasize the femininity of the figure. Indicate the necessary bends in the calf muscles and arches of the feet.

Step 3
A very short step, in which we will draw only the contours of the railing - it is our girl who relies on them, dreamily thinking. And the work on the silhouette of the girl herself will be that we will erase extra lines and markings from him from the previous steps. If earlier we did everything right, it should look something like this:

Step 4
Well, the silhouette of the girl is drawn, and now it looks like a store mannequin. Let's revive this mannequin with fine drawing and detail. As always, we will draw the girl in the direction from head to feet - therefore, at this stage we will take care of her head. First, draw the upper part of the hairstyle, dividing it into two parts, the largest of which we draw from the inside with lines of locks of hair. Draw also curly curls on top of this part of the hairstyle.
Do not forget about the important rule - the hair should be drawn in the direction from the roots and ends. We will draw curly locks of hair in the back of the head and go to the right side from us - we’ll designate the ear, for which several curls will be combed, and the longest will fork and go down next to the ear. At the same stage, we denote long bangs. To draw such a complex hairstyle is not easy, so we decided to make a close-up:
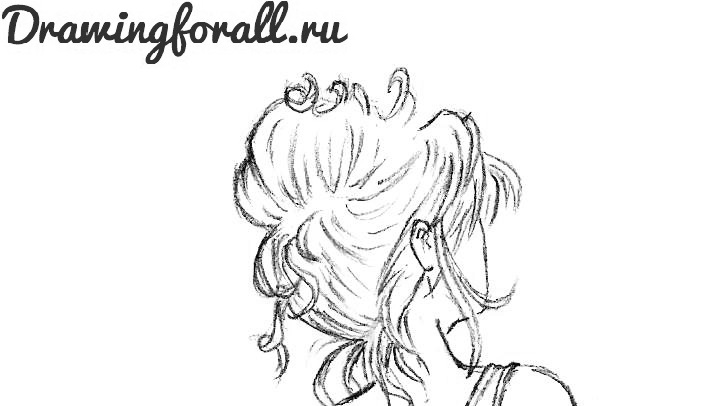
And here is how it looks in general terms:
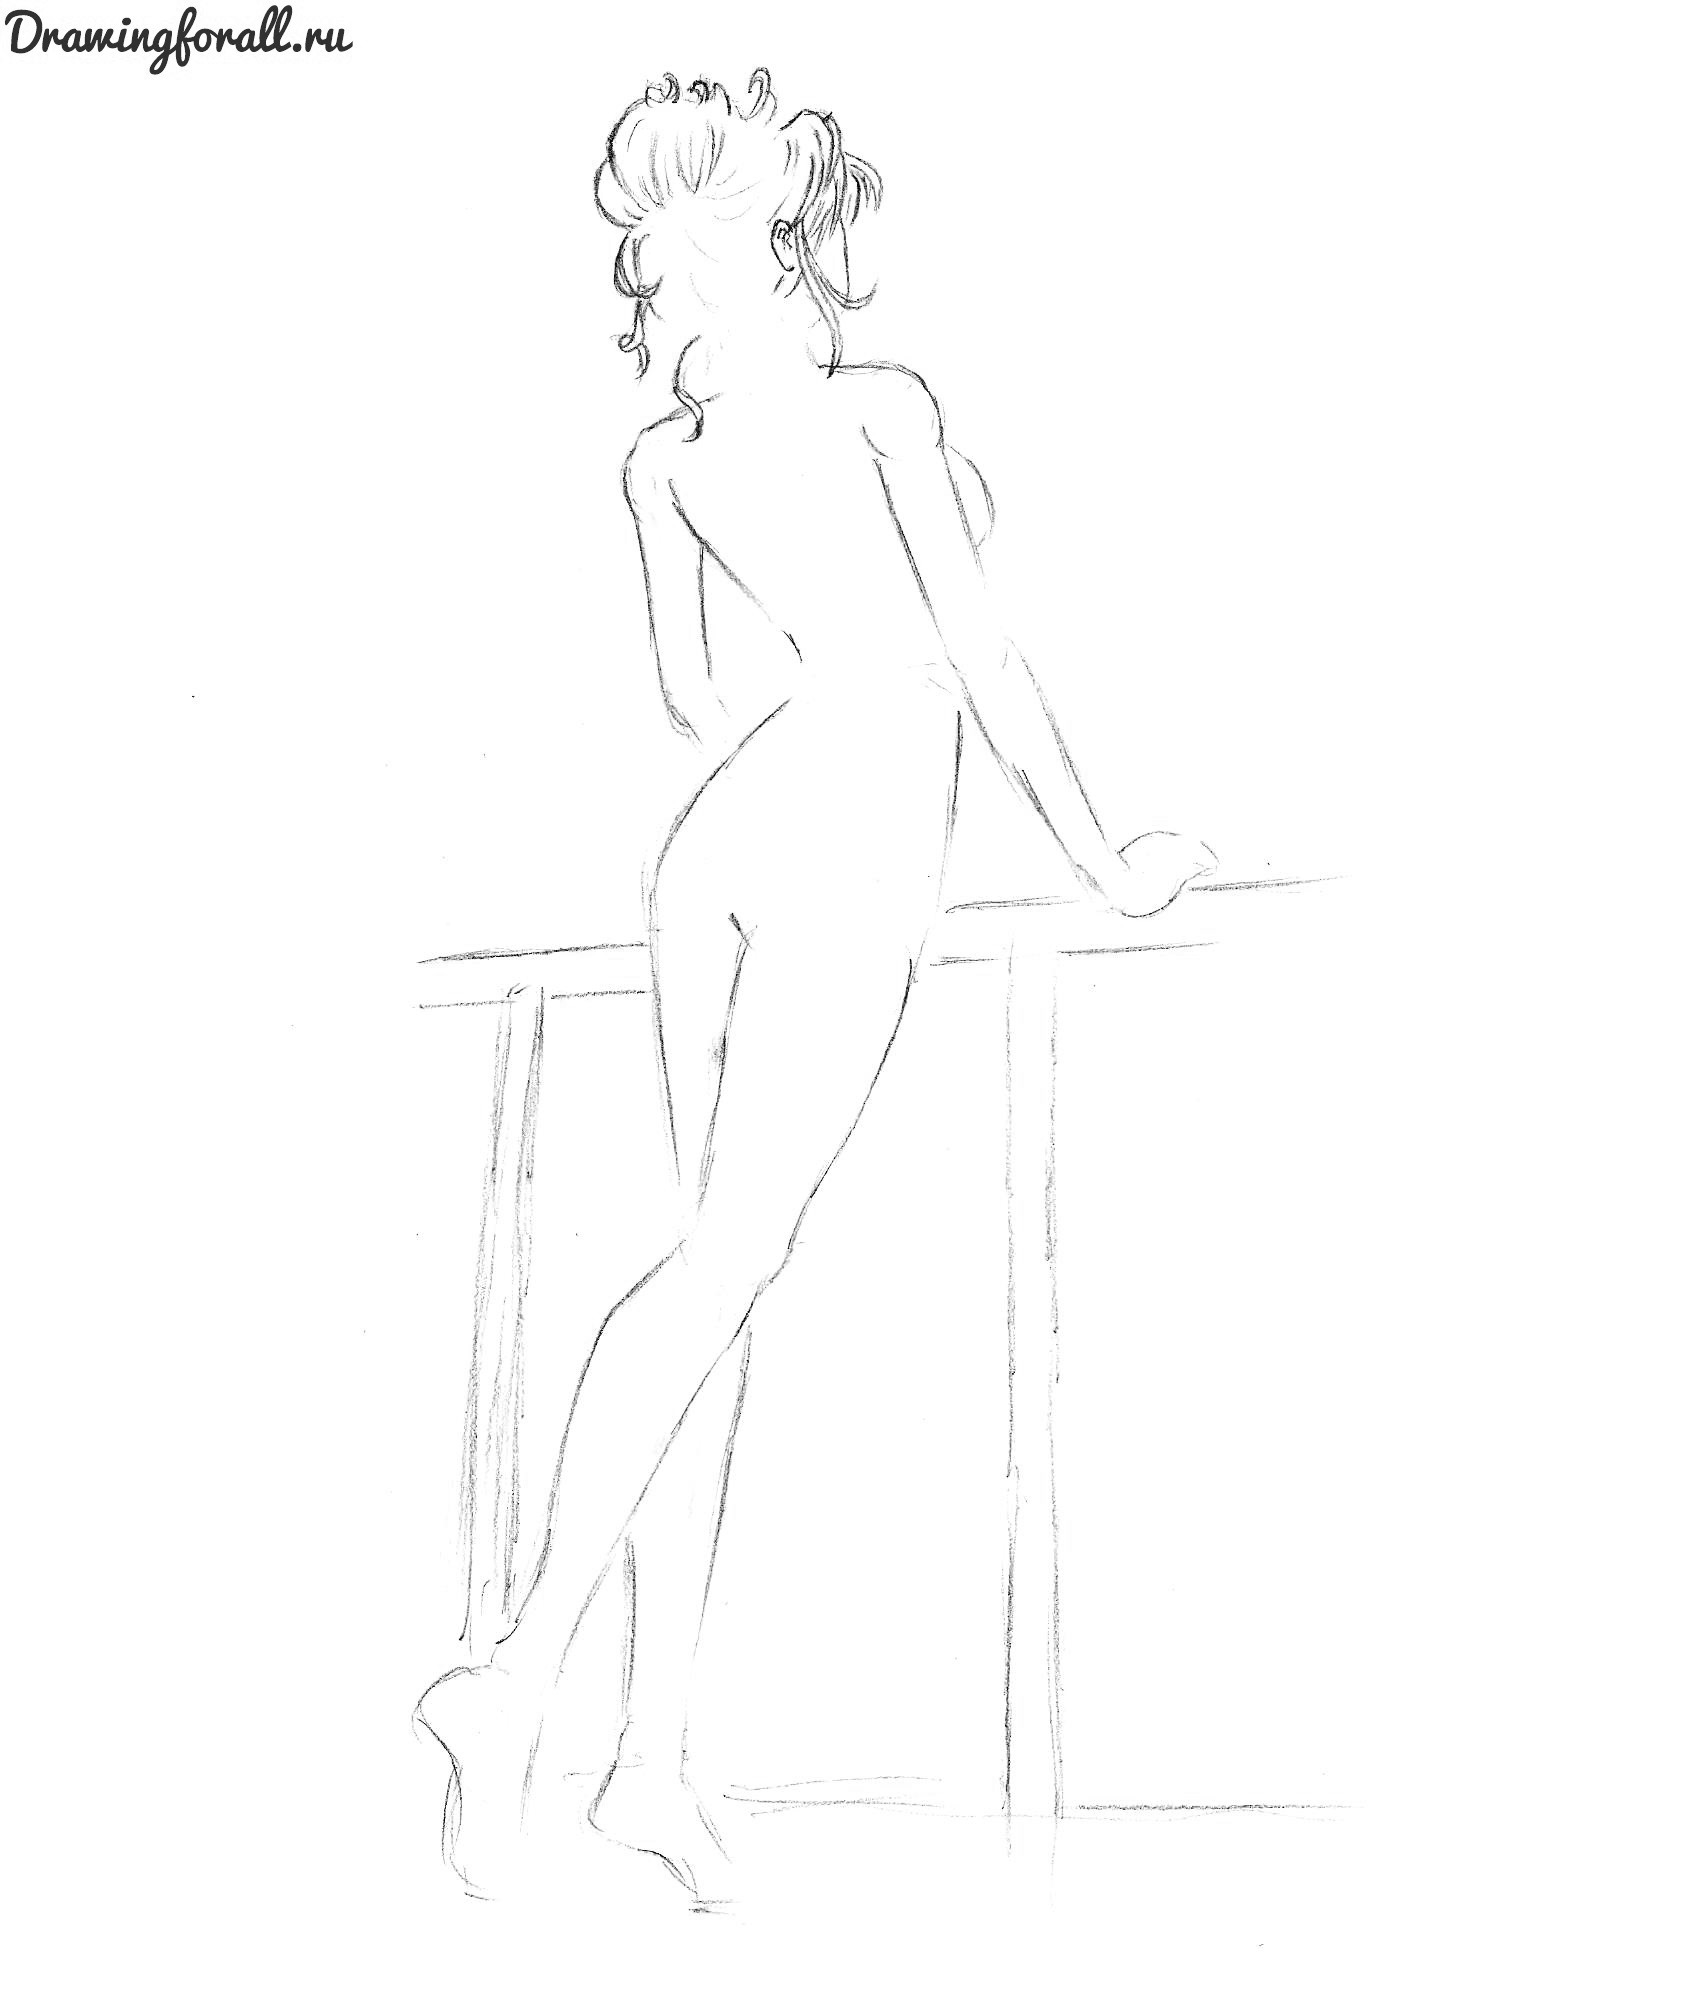
Step 5
We will finish the work on the girl’s hairstyle by drawing several smooth lines that will extend from the crown to the back of the head. We will also draw hanging wavy curls in the back of the head. Next, we turn over the chest, shoulders and upper part of the T-shirt - top. By the way, pay attention to the hem located at the edges of the strapless - they must be marked. Do not forget about the folds of fabric - such details greatly affect the realism of the picture as a whole.
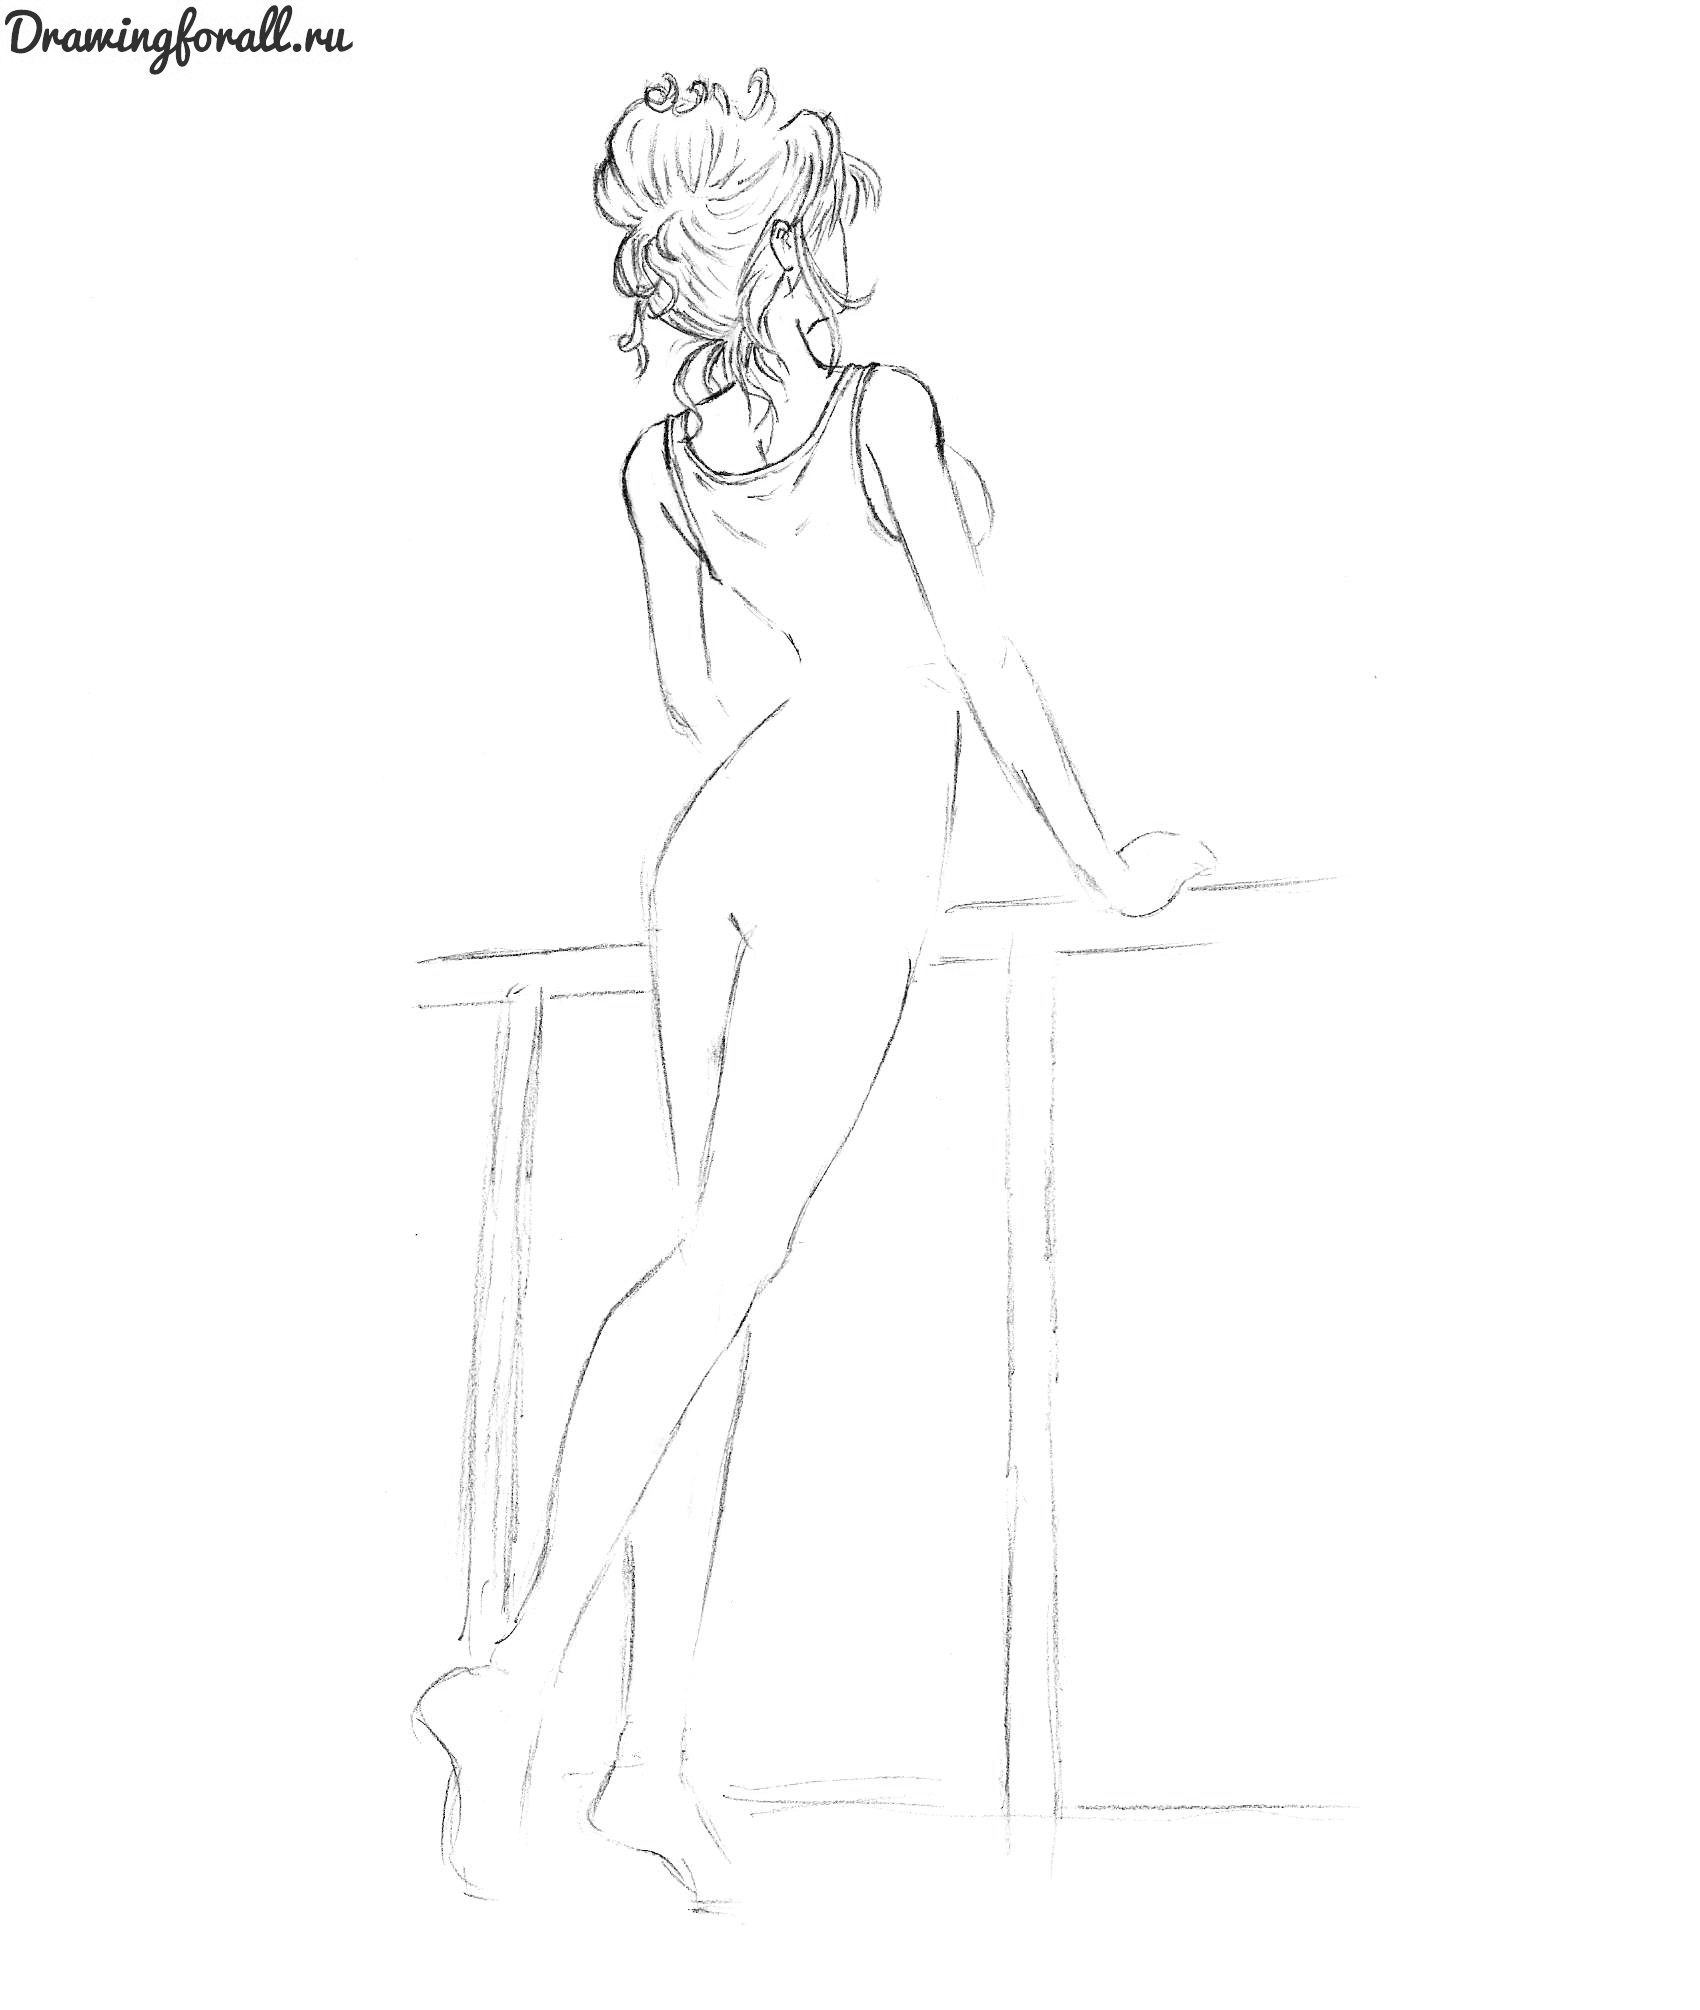
Step 6
We turn over the girl’s arms, detail the right of us: outline several lines in the elbow and draw a palm around the railing. In the palm of the hand, we outline the knuckles and draw the visible parts of the two extreme fingers. Next, draw the bottom of the shirt - the edges should be uneven, the central part should be covered with folds, and the back contour should be visible through the left edge of us. We will need our left hand (as we already wrote above) only to line and outline several lines on it in the region of the elbow bend.
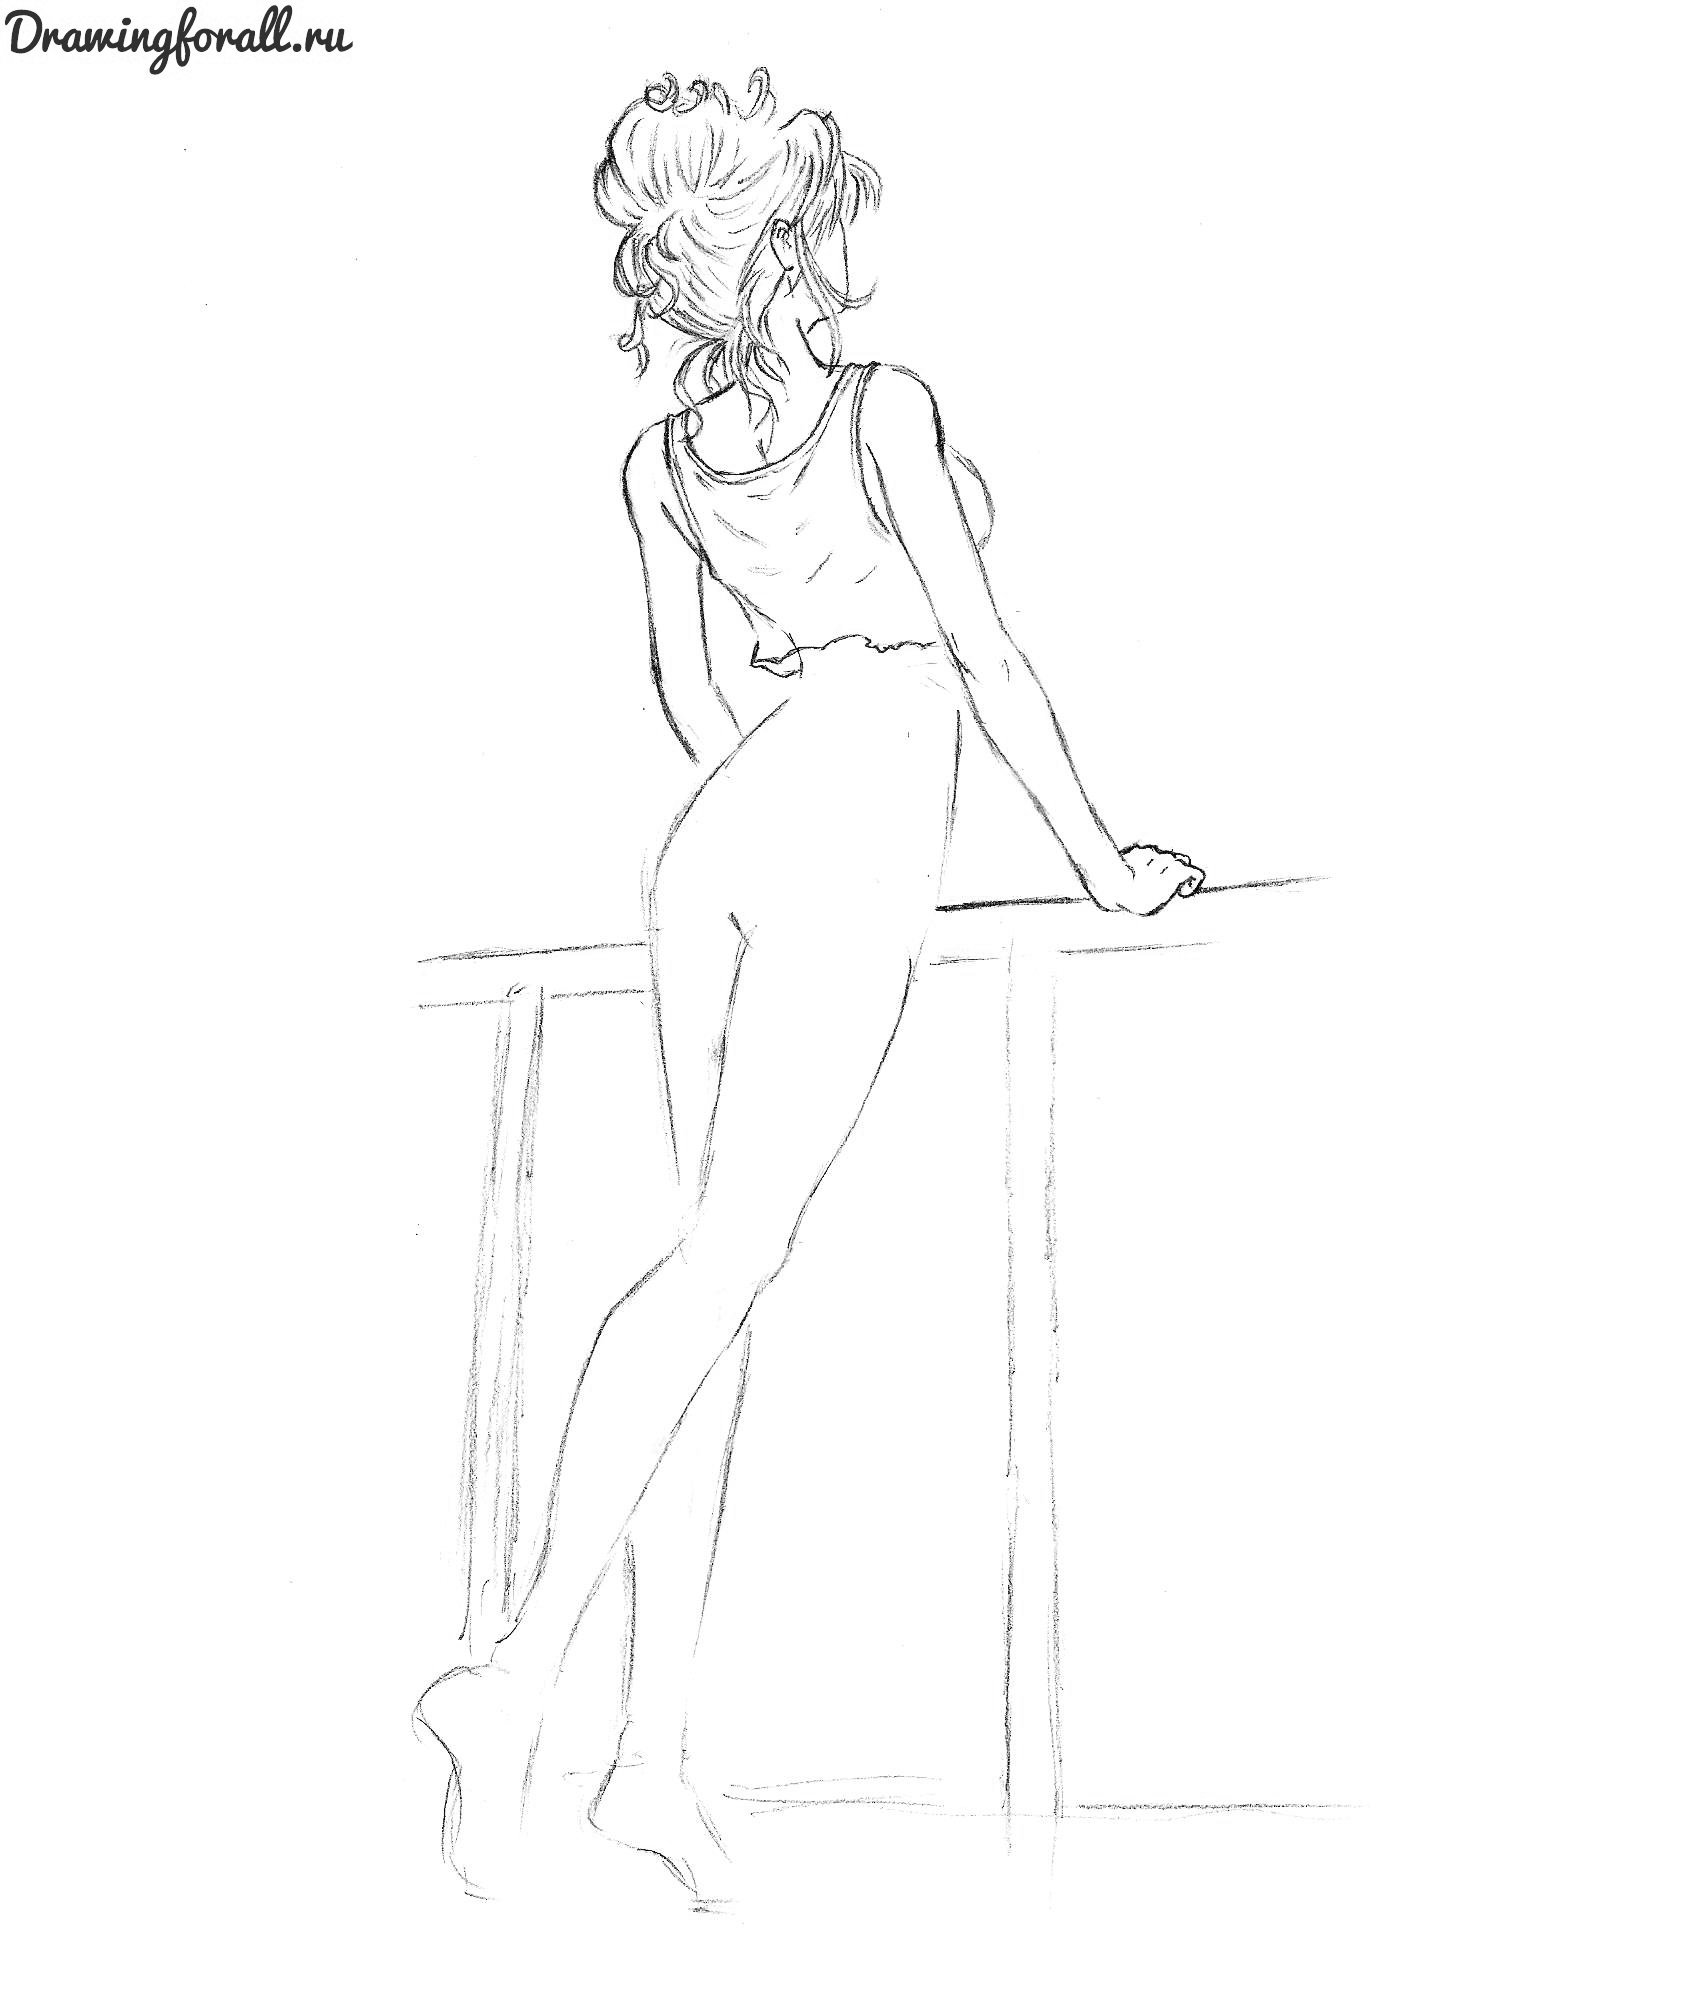
Step 7
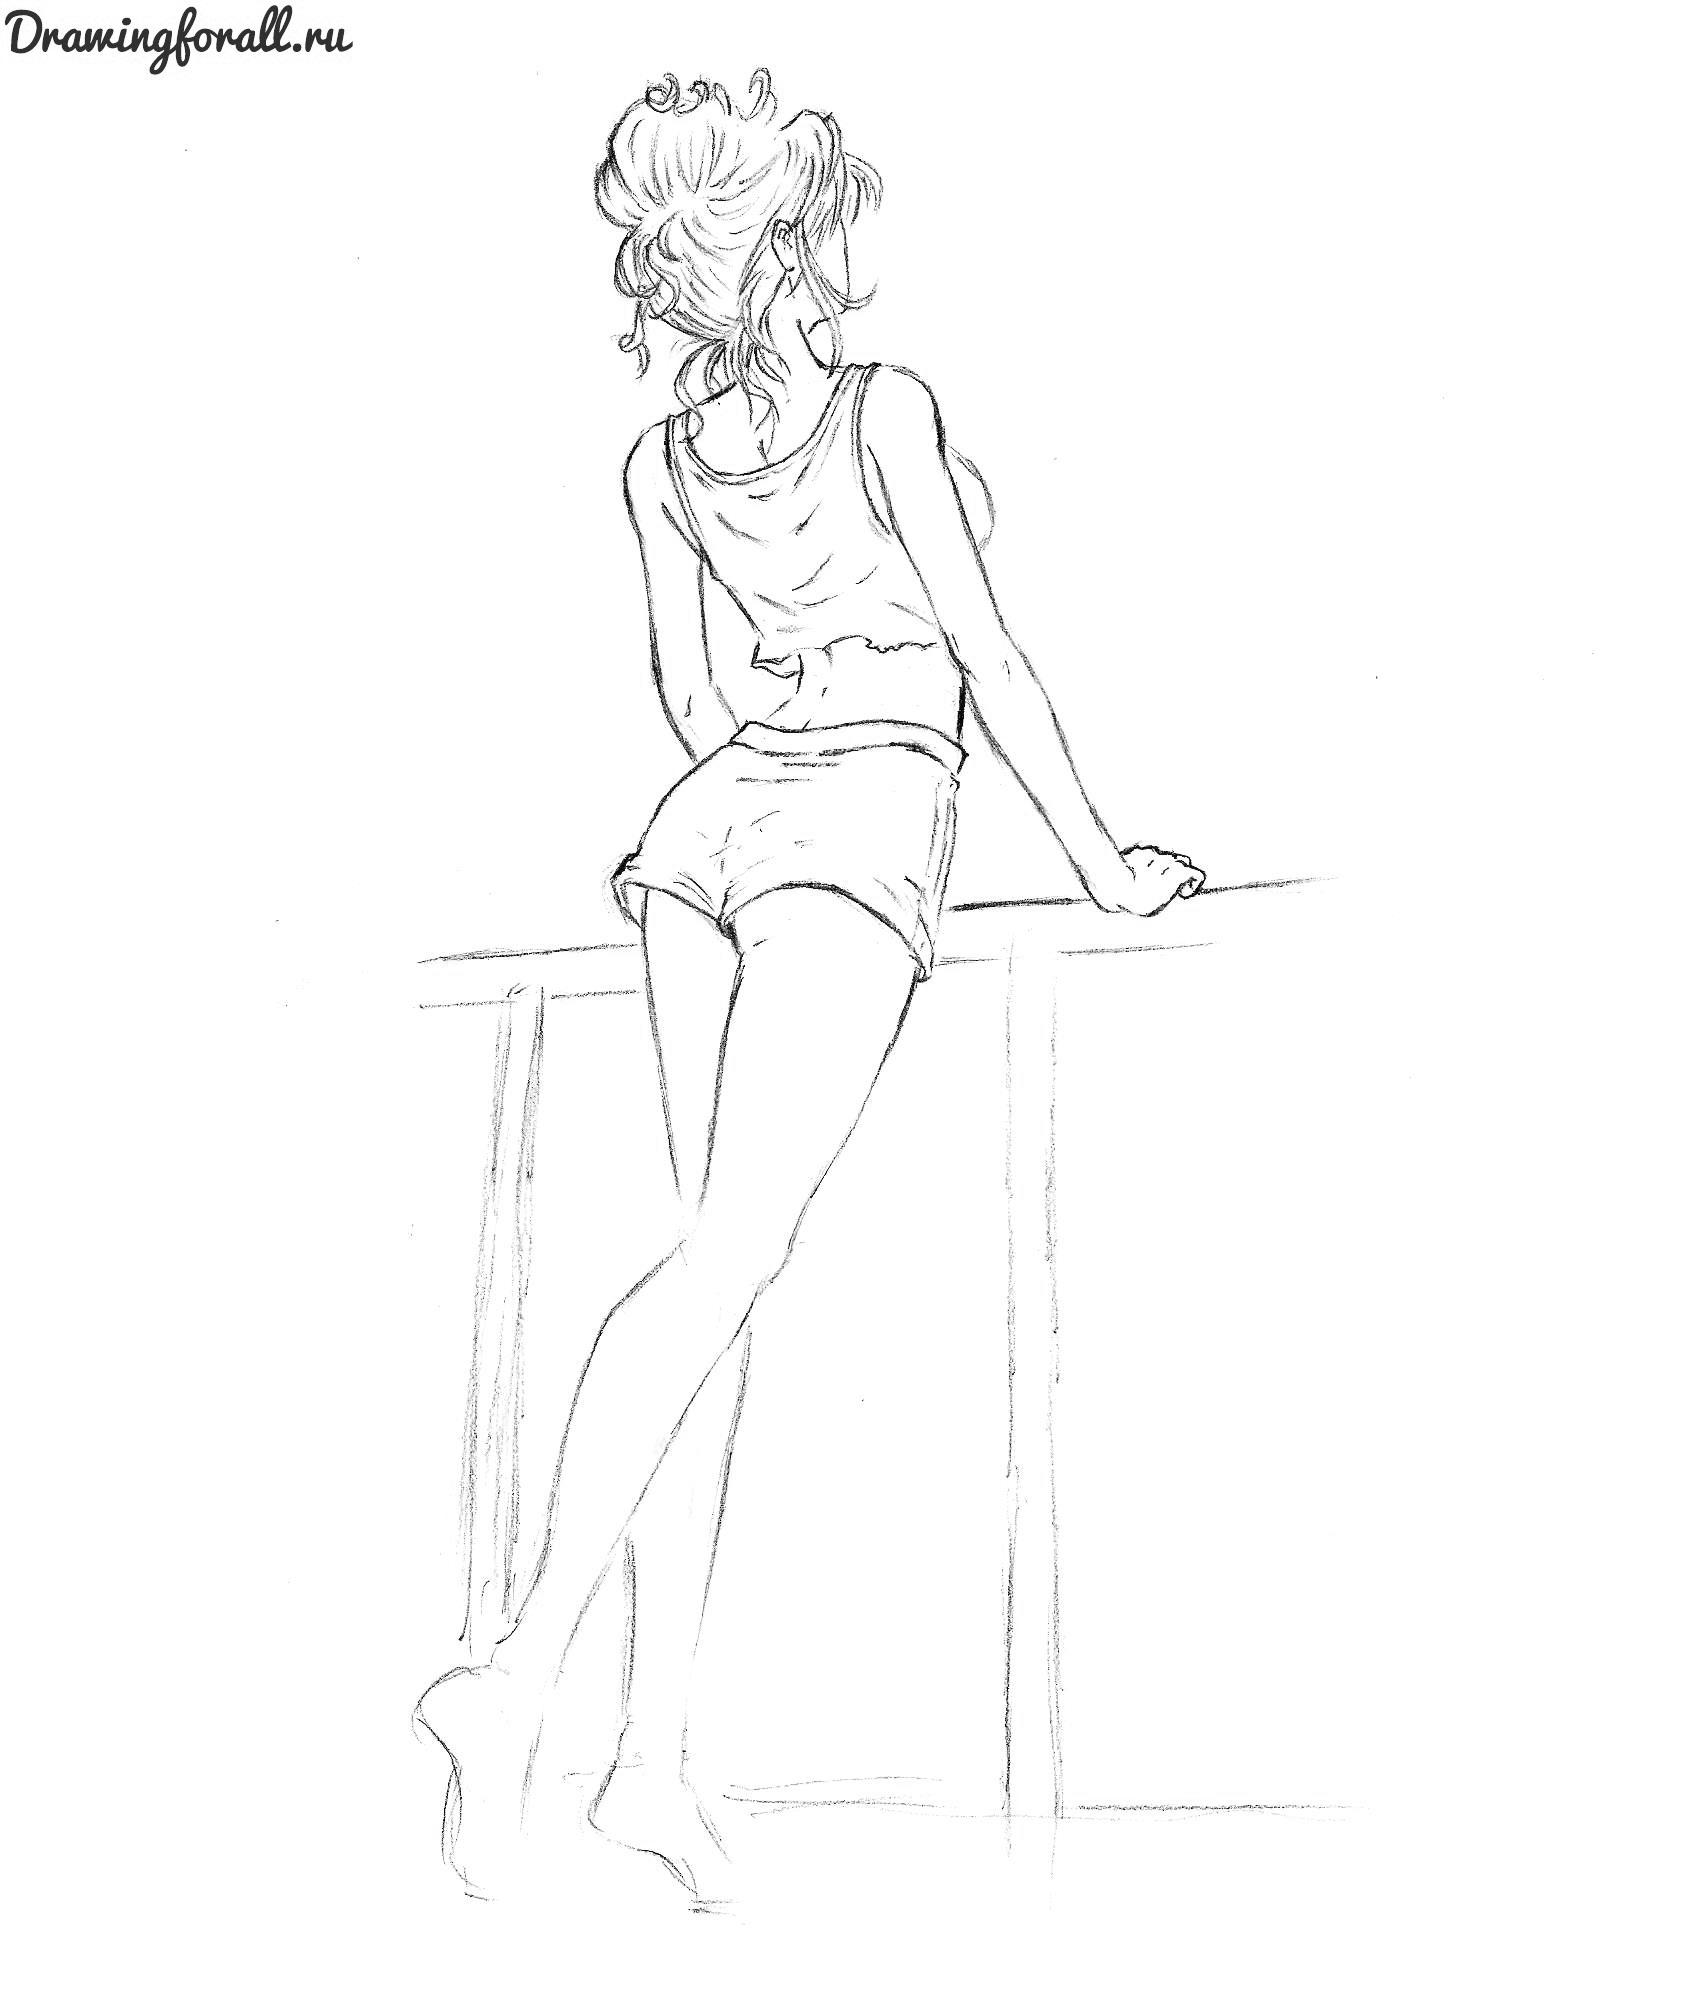
Draw the lower body of the girl. On the exposed part of the back, draw a dashed line of the spine (the same applies to the neck area, we skipped this part in the previous step), apply a few folds to the lower part of the shirt. When you draw shorts, do not forget to designate expanding downwards, slightly stretched in breadth of the leg.
Of the details, we note a wide horizontal line in the upper part of the shorts, a slightly visible silhouette of the gluteus muscles on our right, several folds of tissue in the same area, and stripes on our right. Also, do not forget the two horizontal folds of fabric located in the center of the upper part of the shorts.
Step 8
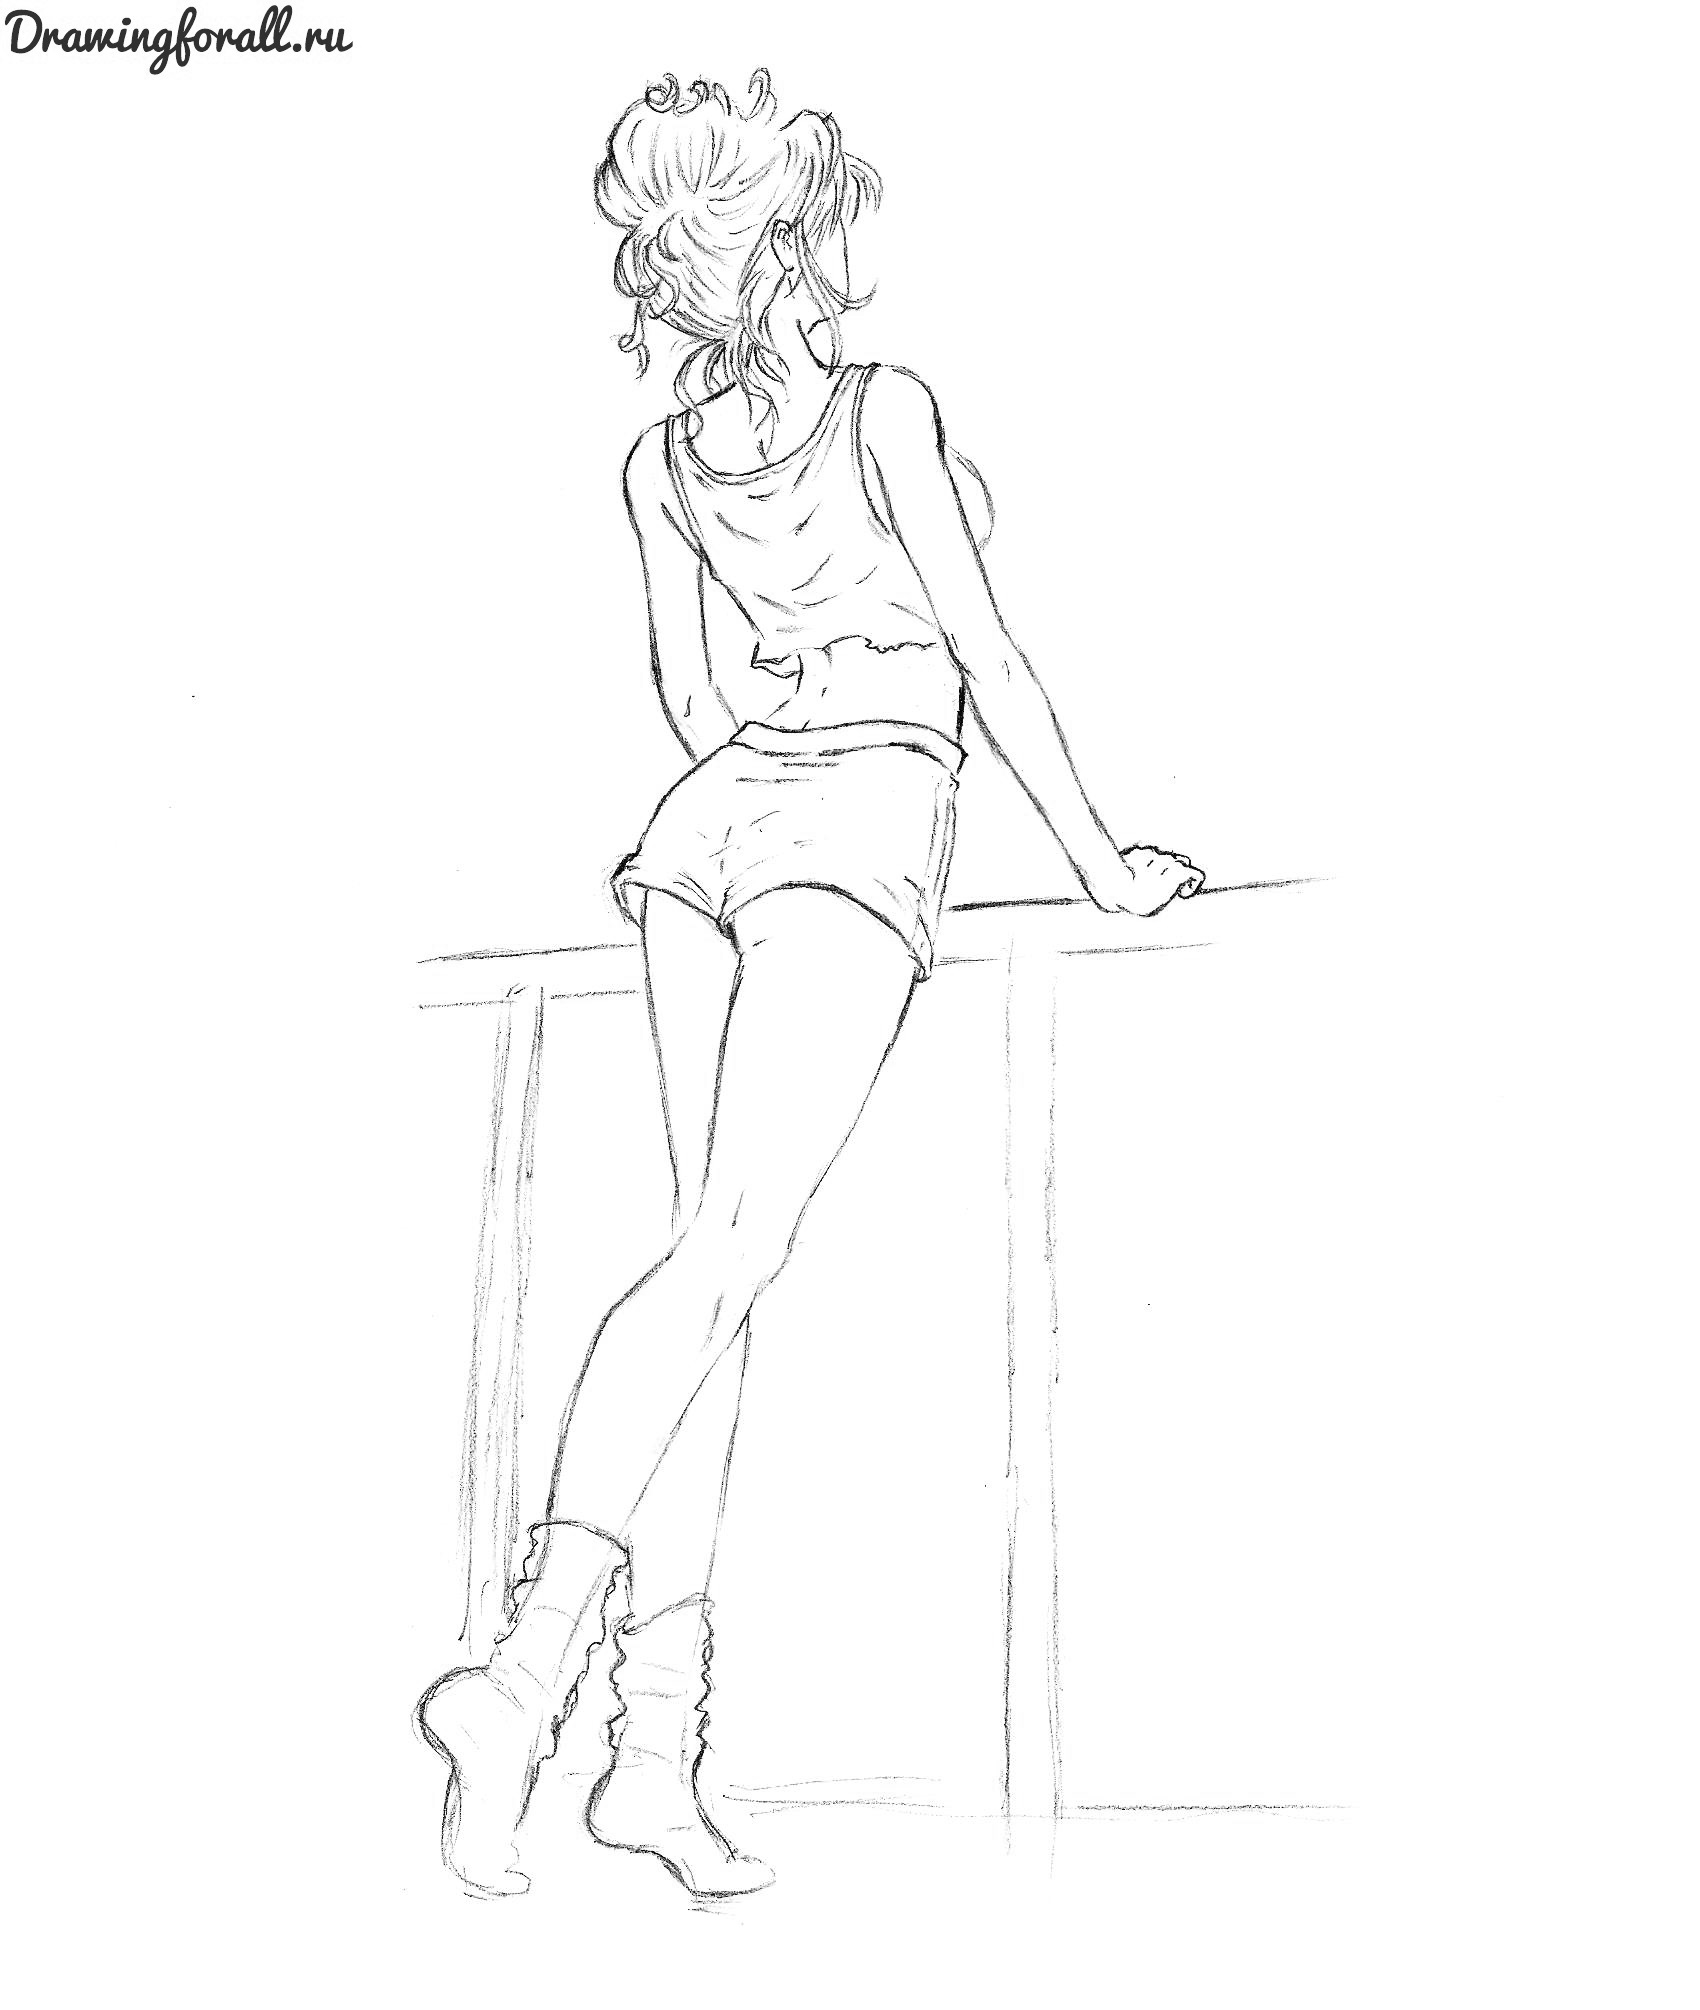
Now we’ll draw the feet of our heroine, who are wearing rather high house socks. To do this, apply the wavy silhouettes of the sock to our feet and mark the corresponding folds of fabric that look like smooth, slightly curved horizontal lines.
Step 9
We draw vertical lines on the socks, which should extend from the lower part of the lower leg to the ankles, not forgetting to slightly bend them at the intersections with the folds. Turn over the soles, draw the necessary folds on the fabric. Complete the stage with a fringing railing on which the girl will lean.
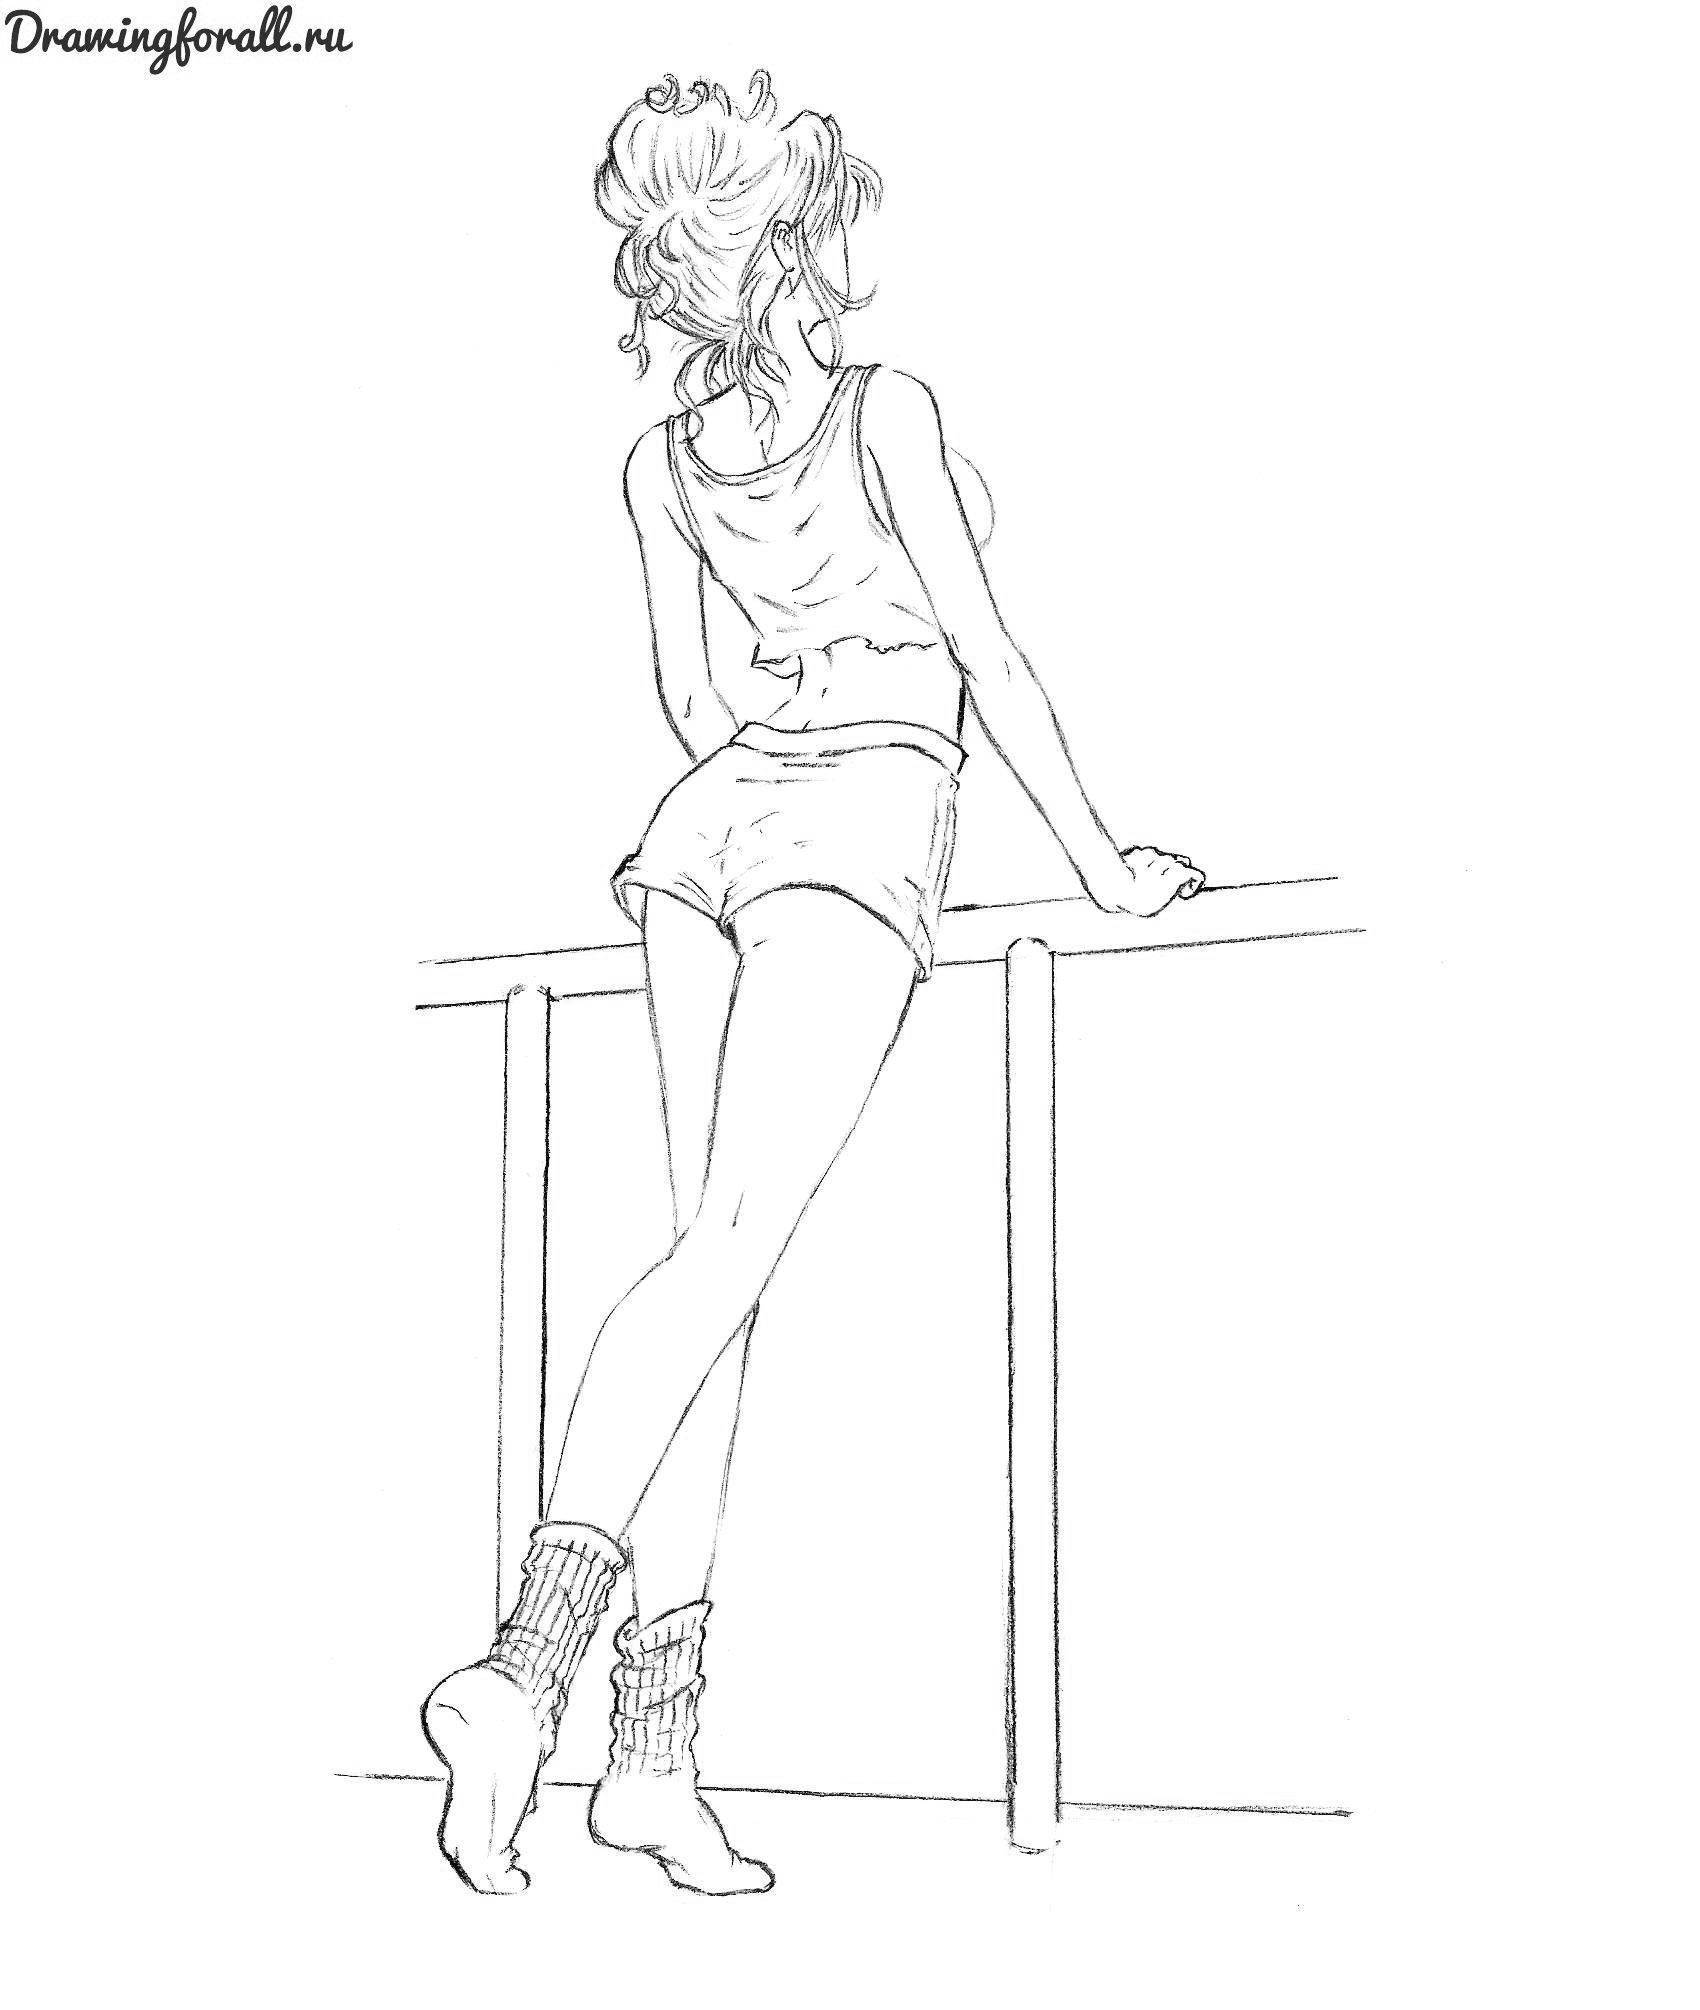
It was a lesson on how to draw a girl with a pencil, and it was prepared by the artists of the site drawing for all. Write your wishes regarding the topics of the following lessons in the comments under the article or on our contact page ..


