

The body has a skeleton structure. We need to give a flat drawing volume.

We place our image or character in a cube, the base of which is the area under our feet.
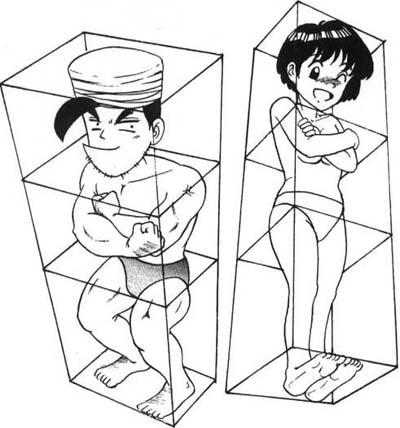
The most difficult task in body image is perspective drawing. That's what we use the cube for.
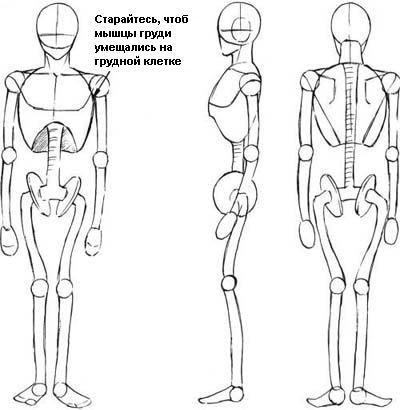
Human skeleton and its structure
Consider the skeleton and start drawing.
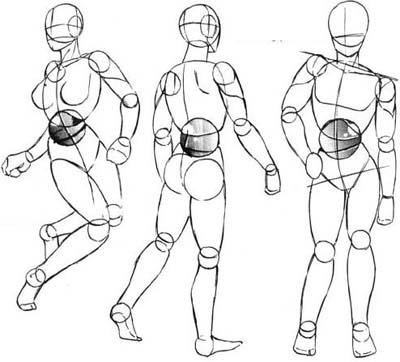
By distributing body weight and turning the body, you can achieve the correct image of the lower body.
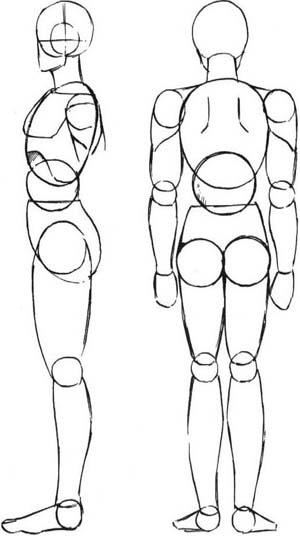
We draw in blocks.
If you imagine that the joint and stomach of a person are spheres, then you can immediately imagine the shape of the muscles. In the same way, one can feel the three-dimensional structure of the human body.

Pay attention to the clavicle attachment 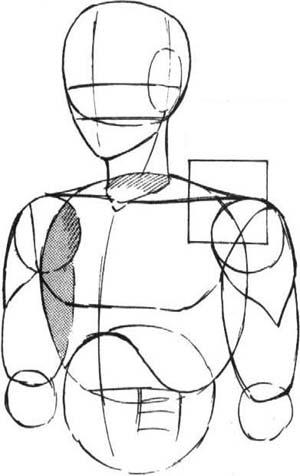 .
.
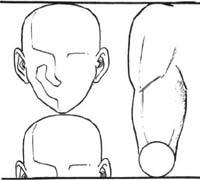
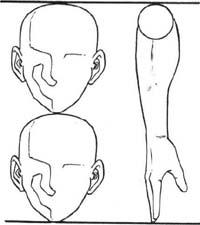
Carefully consider the angle of the shoulders, their projection.
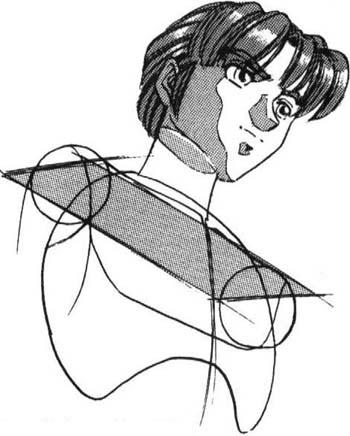
Use a 3D surface to make it easier to imagine the shoulder on the other side and indicate its shape.
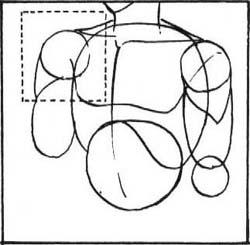
Consider female body in blocks
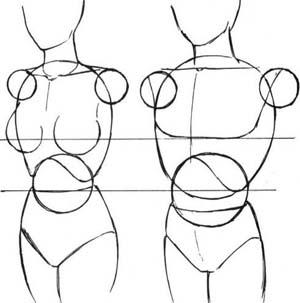
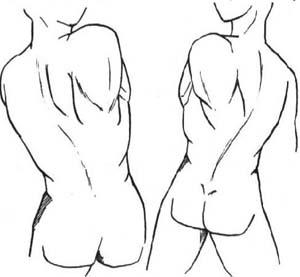
Attention is paid to the sides. The female hind muscles, in contrast to the male ones, are shorter. They quickly move to the hips.
To draw correctly, you need to remember about body parts that are not visible.
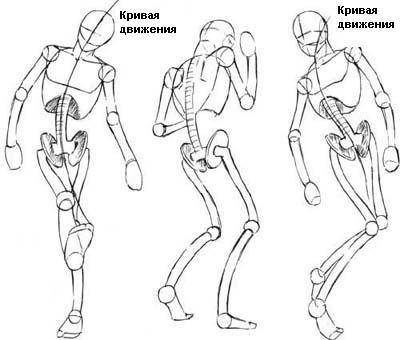
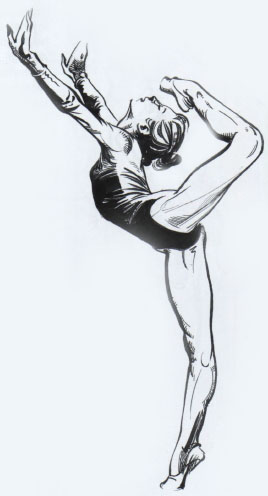
Draw motion
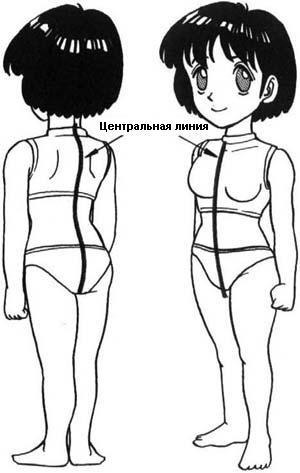
To correctly draw the human body in motion, you need to take the center line of the human spine and the curve of movement. The line of the spine divides the left and right sides human body. A balance is created, the line runs both in front and behind.
Attention should be paid to the waist. The center line should run along the visible side of the body.
The center line should run along the direction of movement of the person being depicted. The line may even coincide with the movement curve.

The motion curve helps to depict the position of the body in motion.
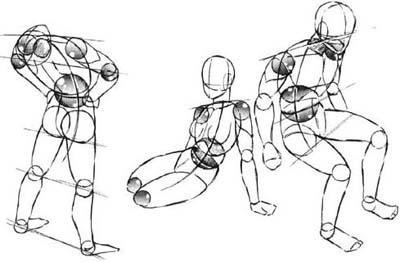
Draw from the corner
Poses can be represented using the form method. The option of combining the skeletal method and the viewing angle will be more successful.
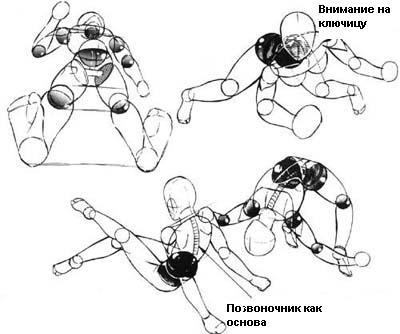
To simplify the work, you need to base the pose on the spine.
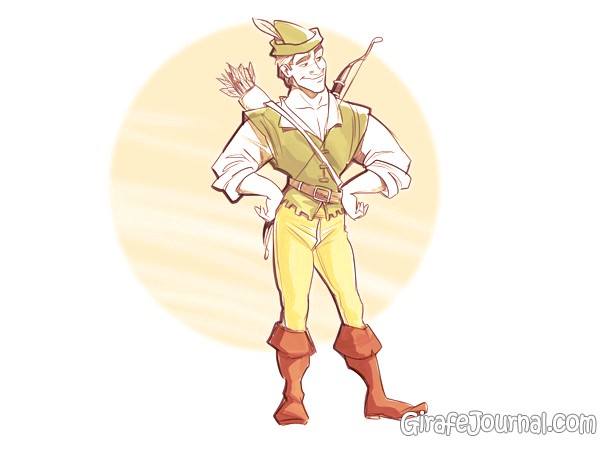
The usual body shape of a man
Introducing the things used to depict the male body that you need to remember:
- elbow position when raising a hand;
- radius of movement of the shoulder and elbow;
- The muscles of the sternum and collarbone should be placed correctly;
- muscles are tensed in motion;
- area of \u200b\u200bthe sternum and area of \u200b\u200bnarrowing of the hands coincide;
- when the legs are together - there is a small gap between the hips. If the legs are apart, the gap between the hips increases. Never depict the crotch as in the picture (figures above).
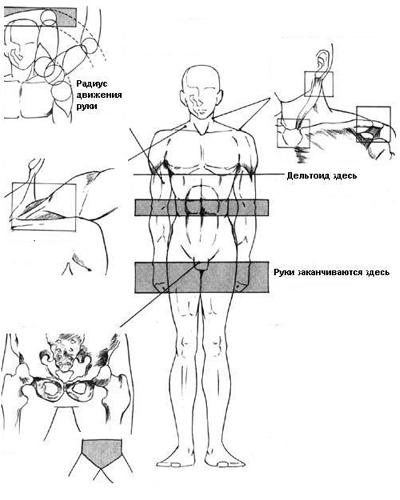
If your length of arms in the horizontal position is difficult, you should use a guide line. It makes it possible to show the length of a part of a person’s hand. You can also choose how to add the length of the biceps and elbow (hinge).
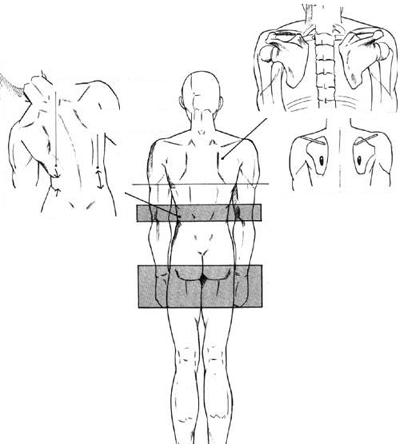
Now look from the back
- muscles during tilt are compressed towards the tilt.
- muscles stretch from the opposite side.
- the shoulder blades can be compared with the face.
- when the body is in motion - it is deformed.
- if the hand is raised up, the shoulder blade rises.

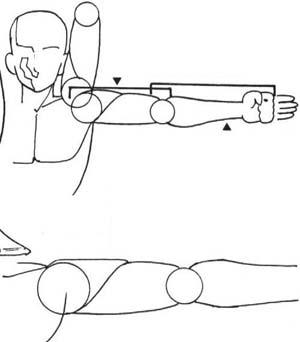
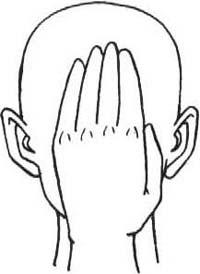
Now take a look at the side
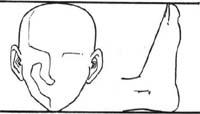
Important! The face of the character being drawn is the size of the hand; it should cover the portrayed face almost completely in height.
The forearm is 1.5 times the length of the head, and the rest is 2 heads.
The length of the foot and fingers is equal to the head.
Shoulders may vary slightly. 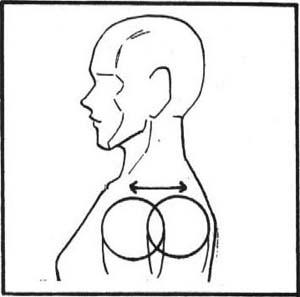
When the body is tilted, then the shoulders lower and lean forward.
If the body leans back, then the shoulders also lean back.
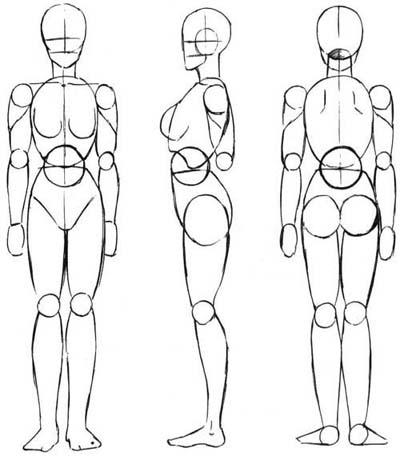
The difference between male and female body
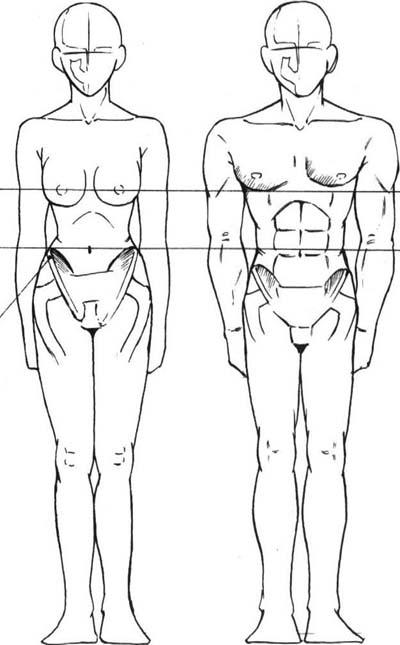
Women have narrower chest and shoulders than men. The pelvis, on the contrary, is wider than the male.
The pelvic bone of a woman reaches the navel, the waist line also runs along the navel.
The male body is the shape of a triangle turned upside down. The shape of the female body can be compared to bowling pins.


Body proportions
The proportion of the depicted body is equal to the number of goals that fit into its height.
It is very difficult to talk about the proportions of the human figure, because each person is individual and different in proportions from the others. Moreover, there are significant age-related differences in the proportions of the human figure.
But still, some basic rules for drawing a person need to know.
For a unit of measurement of the human body, they are used to taking their heads. In young children, the head fits in the body 4 or 5 times. It all depends on the age and development of the child. To more accurately determine the proportions, you must use the method of sighting.
In a teenager and a short adult, the head fits in the body 7 times.
On a sheet of paper vertically, draw the axis of symmetry with thin lines and divide this line into seven identical parts.
![]()
First determine where the belt and knees will be. Light lines define the chest and outline the legs.
Please note that there are NO round holes at the junction of the hands with the body.
Hands are below the waist, hands end just below the middle of the hips (observe nature).
Elbows are either on the belt line or a little higher.
The length of the shoulder is usually equal to the size of the head laid on its side. When building more often use the method of sighting.
Line (4), passing through the hips, divides the figure of a person in half.
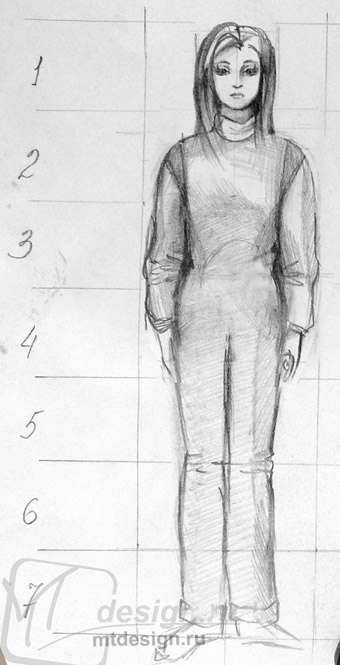
After the construction is completed with thin lines (without pressing, so that it is easier to erase with an eraser), the person needs to be dressed. Do not try to draw a person in a swimsuit or in a short dress the first time. Try drawing trousers and a sweater to hide body parts first. Pay attention in the first work to proportions.
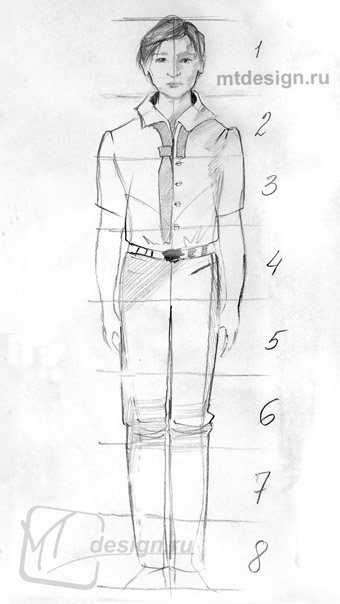
In an adult, the head in the body fits seven to eight times. If with the help of sighting you determine the figure eight, then the figure above shows how the figure of a person is divided into equal parts in this case.
Please note that the middle of the figure is again determined by the line of the hips (4), and the elbows are on the belt or slightly higher.
The pleasure of creating a cartoon character is immeasurable. The process of creating and developing a character is not just related to drawing a part of the plot: each character has its own form, personality and attributes. This is normal if you already know the proportions of the head and facial expressions of the hero. But this knowledge is useless if you do not know how to draw a trunk correctly! The artist must take these qualities into account in order to create a believable character.
There are several different types of characters in the animation, such as "dumb" and "bully." Want to know more about them? This will be discussed below.
1. Where to start?
The steps that we will follow today. very simple. First, you need to draw the main shape of the body, and then add other parts of the body. This procedure should be followed regardless of your character, be it the person, animal or object that you want to inspire (for example, make a smiling cup).
Each drawing that you will make will depend on the sketch phase. At this point, you will draw until the end result satisfies you completely.
After you have determined the necessary proportions, the next step is to draw the movement of the body, arms and legs. Hands can tell the whole story of the film with one movement.

Hands is a vast and complex topic (even in the cartoon) and deserves to be focused on them.
There is no secret in the process of creating the cartoon. 95% of artists draw characters and their movements with the help of special templates, just because they simplify the process.
2. Dimensions
Proportion is the most important factor in creating a cartoon character. The artist must pay attention to the size of all parts of the body, so this is the basis of the structure of the figures of the characters. For example, the hero is a bully, has a warlike character, so his head is not very large, but his chest is larger and more prominent! His arms and legs are strong and stand out well, and his jaw is highlighted. On the other hand, in Tikhoni, the character is based on the proportions of the child; he has a large head size in relation to his body. And all this in round shapes! The forehead and large eyes characterize the hero as a fragile person. Etc. ..
Animated studios often use oval shapes to determine character growth. For example, a child usually has a head larger than the rest of the body. But an adult has other proportions that vary depending on gender and physique.

Psychedelic cartoon? It looks like him.
When creating (or animating) a character’s body, it is recommended to have several templates on hand on a separate sheet of paper. Thus, you can draw it in motion and in different positions, having a template for the proportions of his body.

Educational example

It is important to draw a character in various positions, situations and clothes until you find the ideal body proportions for him.
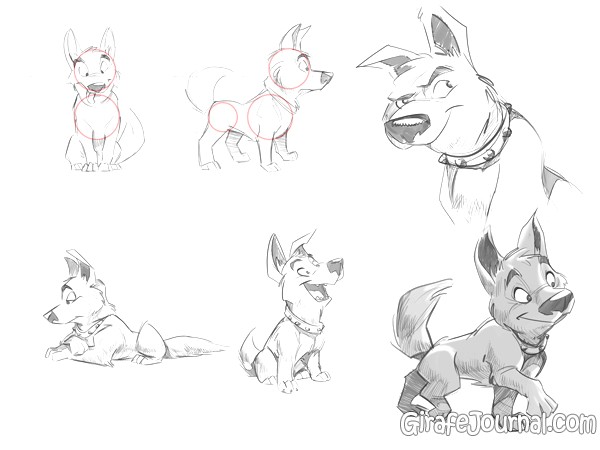
An example of a puppy.
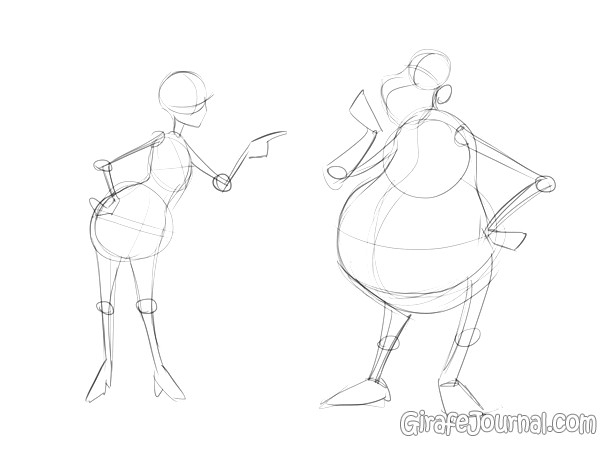
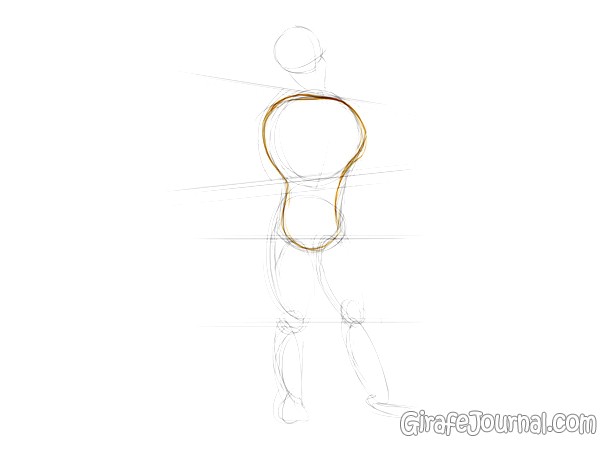
3. Body shaped pear!
Very often, animators use pear-shaped body shapes, or similar objects, to build a character, due to the similarity of his body with a fruit that immediately comes to mind. In fact, this is a common technique among animators, since several artists are working on creating one character, the correct proportions of each sketch must be maintained.
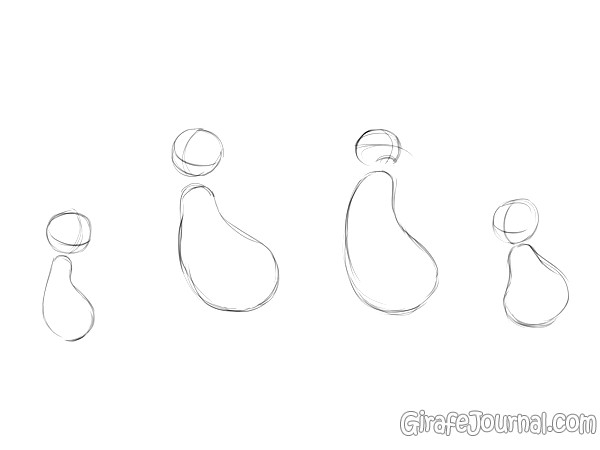
The above examples show the effectiveness of this method. You can make several different characters using the same template! Using templates helps to quickly create an identical character image in the human mind. This is especially noticeable in children, where everything should be simple and clear. Drawing the body in the forehead of a pear helps to maintain a dynamic look of the character and adds an interesting look to it!
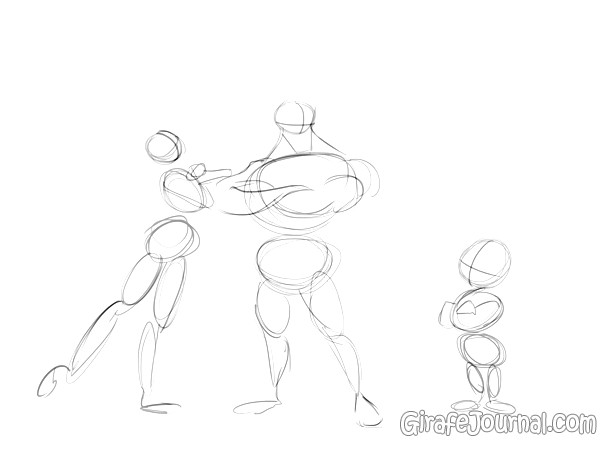
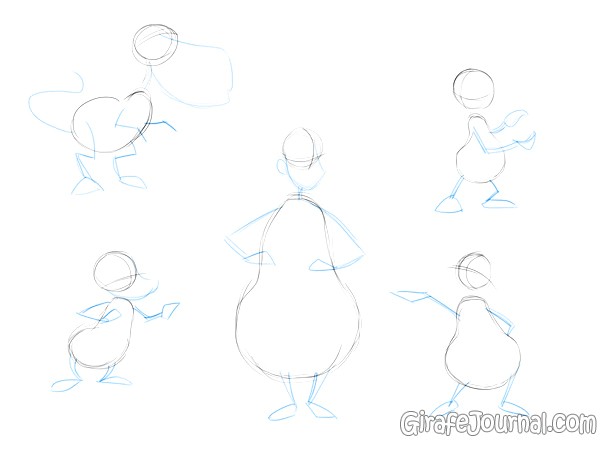
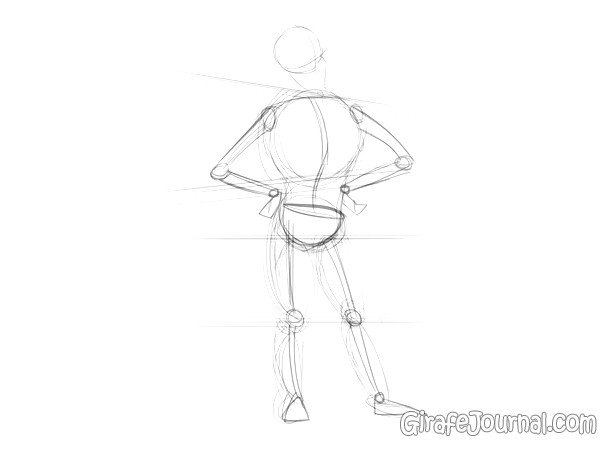
4. Add the skeleton
Now that we know how to define shapes, we need to define a simple skeleton structure. If you draw any cartoon character, you should know the main differences in the muscular skeleton and bone structure of heroes of different categories, such as cats, birds and people. This knowledge is necessary, and it will help to create smaller parts of the body, such as the joints, elbows and knees of the heroes.
Pay attention to the pattern: Rounded forms - the body forms a pear - skeleton joints.
During the creation of the cartoon, we must be able to convey each scene of the story in detail. This does not happen often when it comes to photographs or realistic drawings. Just because a person can hide his true intentions.
In the cartoon, everything is different. The gestures and physical characteristics of your characters should be clear even without dialogue or situation. For this reason, this is a very exciting art style!
Learn how to tell a story with your sketches and you will become a successful cartoonist
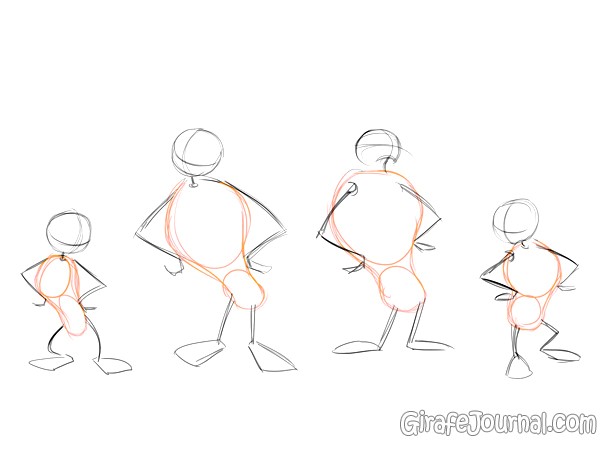
Summarize:
- Compare the proportions of your character with rounded shapes -
- Outline a pear shaped body
- Draw lines that will serve as guides for the main points of the character’s joints (skeleton) -
- Complete your character with the final details throughout the character structure.
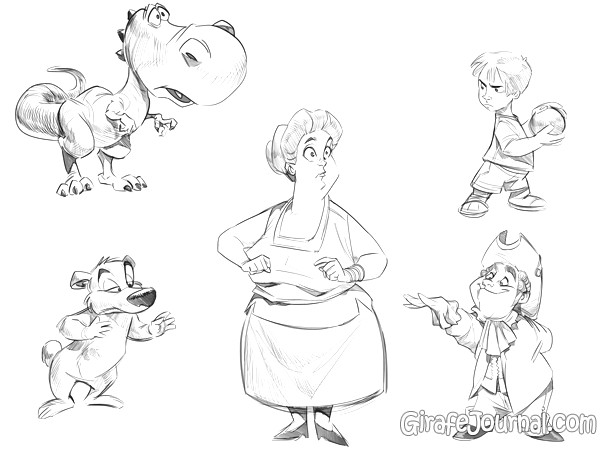
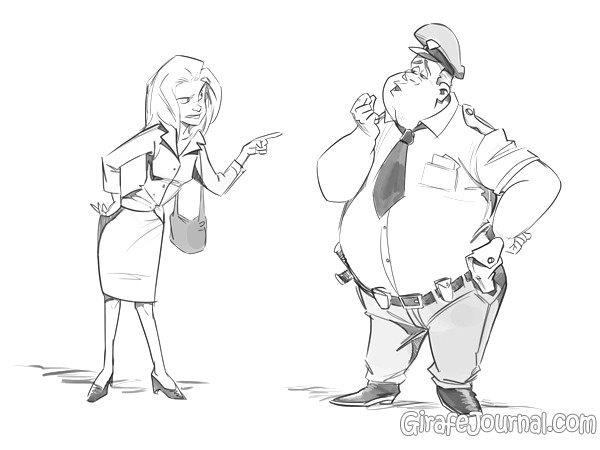
5. Inverting pears
Is there a “pear rule” for creating the character we just talked about? Not always. If we change this form, we will create a feeling of strength and power in our character! Check out the examples below.
Fragile person: body in the shape of a pear. Strong man: body in the shape of an inverted pear. Easy, right?
Can you find the difference in the shapes of the pear shape in this picture?
Another interesting analogy will be based on the details of the object, which create a certain physical type, as in the example below:

We mainly use the same principle of the pear shape. We just apply different studies based on the same technique. You, as an artist, can use that method. which suits you best!
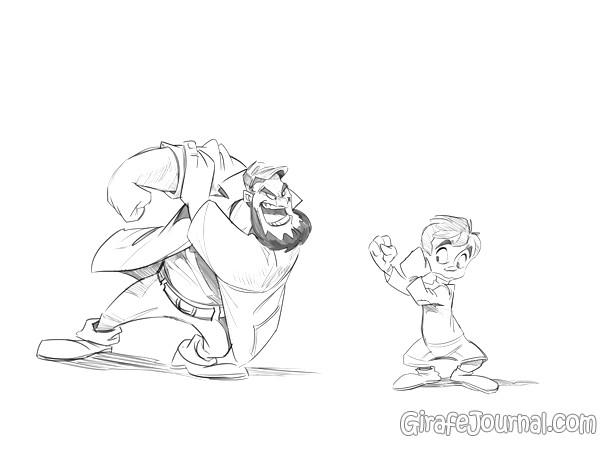
6. Stupid hero
"Silly hero" is someone who walks on two legs (even an animal) and looks stupid, clumsy and lazy.
This character is often a coward. He tries to avoid trouble more than to get carried away by some business. This character can also be a nerd. She can also be a nerd or an offended person.
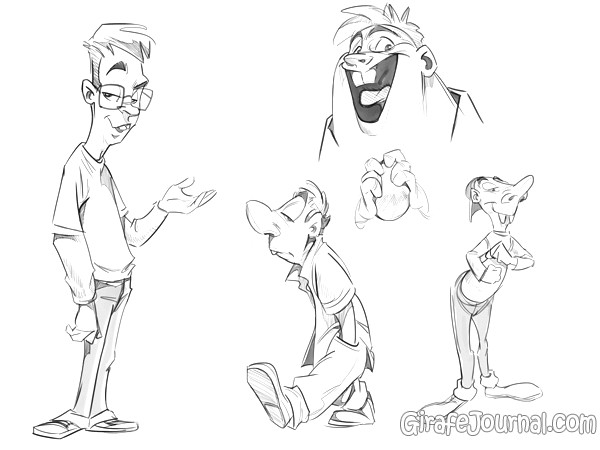
There is a pattern to follow when creating such characters. However, it is not mandatory and can be changed in accordance with the features of this hero:
- Hands may be thinner
- Big nose or head (in an animal),
- Big teeth.
- Small shoulders
- A small chin, or even its absence,
- The body is in the shape of a pear (not upside down, always up!).
In principle, these are the basic attributes needed to create a silly character. Experiment until you master this technique.
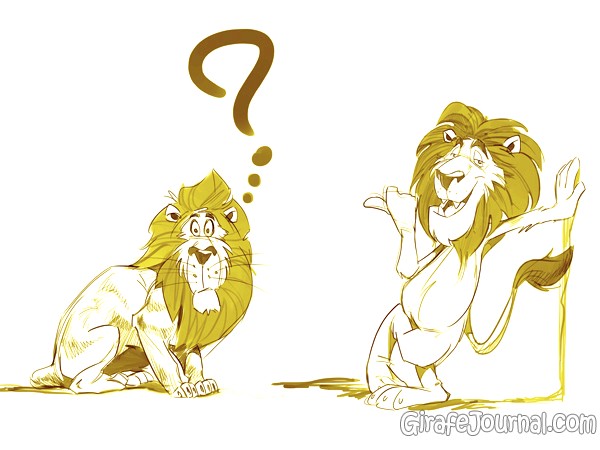
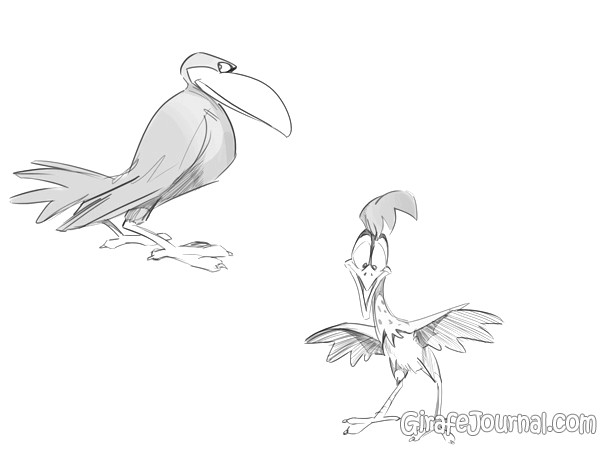
What? A lion on two legs? Wait. .. is this a stupid lion?
Not all animals that walk like humans are "stupid." Many of them have a sarcastic and ironic look. As an example, we can recall Woody Woodpecker and Bugs Bunny hare.
7. Apply knowledge: character creation
Now we will create a character figure based on the knowledge we have gained. Let's get started!
Step 1
I will start painting in a free style. It doesn't matter how many sketches we create until we find the perfect proportion.
Let's start drawing the head and torso with rounded shapes.
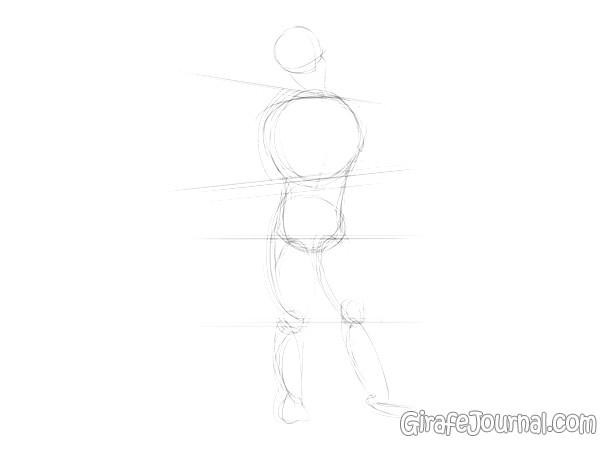
Please note that we easily determined the size of the hero.
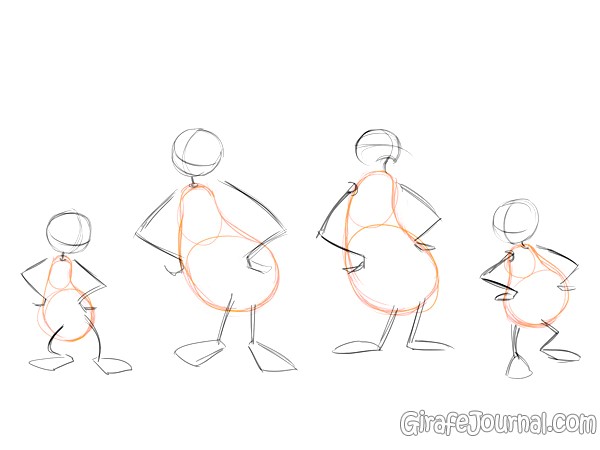
Step 2
Let's add lines that mimic the joints of the skeleton. Please note that we are creating a common position for the character where the body weight is directed on one leg.
Mark the hemisphere as a hemisphere - this will help to see how the hero’s legs will move.
Step 3
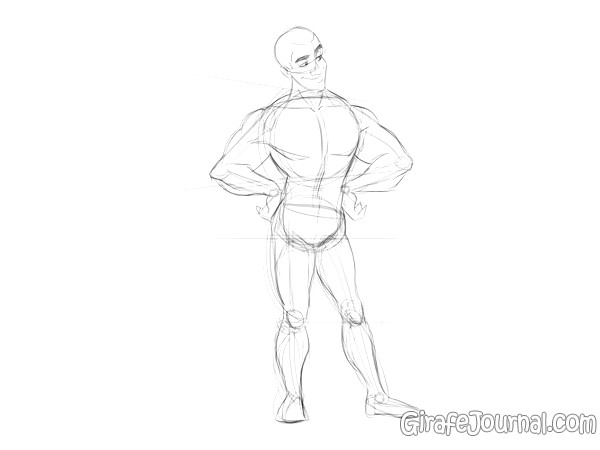
Wonderful! But this is just a sketch!
To draw muscles, you must have basic knowledge of human and animal anatomy, otherwise you will not be able to create a true image.
Step 4
After you are ready, you can draw clothes.
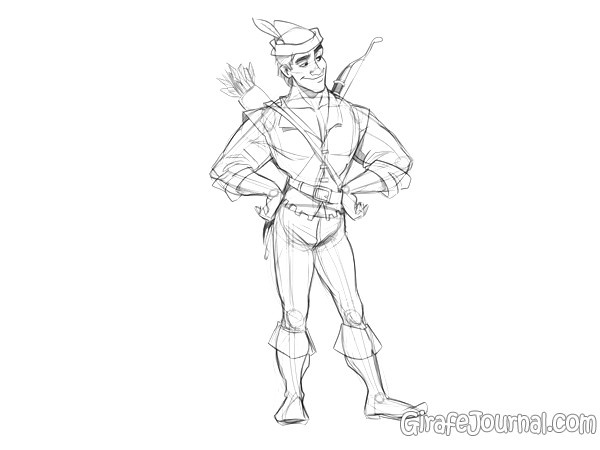
Perfectly. Now our hero is complete! By adding costumes and accessories, we have achieved the final result. Can we tell a story only from this picture?
Great work!
In this article we have learned. how to draw individual body parts of a cartoon hero. Moreover, we also learned how round and oval shapes work together to create the torso. We have learned the difference between different types of heroes: a bully, stupid, strong and helpless - we know how to correctly apply the shape of a pear to the character creation character. We got acquainted with the technique of creating a stupid character.
Have you already seen that you can create a full cartoon character from head to toe? I look forward to meeting him! Post your pictures below, and if you have questions, I will be happy to answer them in the comments.

How to draw a human torso? - Reviews and Comments
Similar works:
In the next few lessons we will study how to draw a human body. We will disassemble each part of the body separately.
Torso
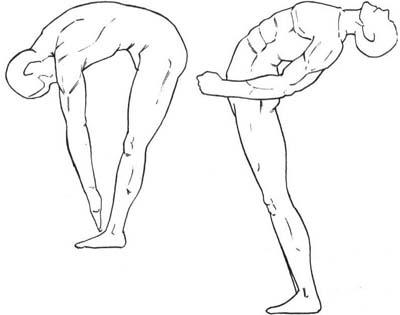
Upper body consists of bones and muscles of the shoulder girdle and chest. Bottom part - from hard bones of the pelvis. All flexible body movements are possible thanks to spinal structure, which, despite the fact that each vertebra can only move and rotate relative to the neighboring one, allows it to be twisted and bent along its entire length. This structure makes it possible to bend at the waist in each direction: forward, backward and sideways, and rotate left and right. In a standing position, the spine is shaped S curve.
When you lean forward your spine takes arc shape. Most often, this arc is more pronounced in the lumbar region, but in some people it is higher.

When you bend in the opposite direction, the greatest flexibility manifests itself again in the lumbar region, and some people may show remarkable inverse flexibility around the fourth lumbar vertebra.
The flexibility of the spine decreases with age, some have more developed, others less.
The abdominal muscles allow you to bend the body forward, while the sacro-vertebral muscle (the extensor muscle of the back) performs the opposite function - to bend the body in the opposite direction.

Shoulders
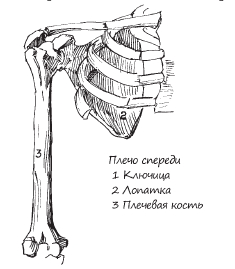 Skeleton of the upper limb consists of the skeleton of the shoulder girdle (scapula and collarbone) and the skeleton of the free upper limb (with three departments: shoulder, forearm and hand). The articular cavity of the scapula (relatively small in size) and the head of the humerus form shoulder joint.
These features provide very wide range of motion for arms and shoulders. The shoulder blades can move laterally with respect to the back of the chest. 
Deltoid muscles add width to the shoulders. Along with the pectoral muscles and latissimus dorsi (which give latitude to the back), their shoulder movement function.
 Female breasts are secreted due to the mammary glands, which are located on top of the pectoral muscles and are surrounded by a layer of fat, which gives them a special shape.
However the main difference between male and female skeletons lies in the fact that women have a proportionately larger pelvis, while men have a proportionally larger chest and ribs.
The article used materials from books:
- Ron Tiner “Figure Drawing without a model”;
- Loomis E. Nude. Drawing guide.