

Any TV, including those that are not related to devices with Smart TV, have service menuwhich controls the vital settings. In particular, the image size horizontally and vertically, brightness correction, as well as other parameters that can seriously affect the operation of the device. Therefore, if you do not understand how and what to do, it is better to exit this service altogether.
Not surprisingly, the service menu on Samsung TV is usually called extended, because it is used if you need to make serious changes to the TV itself. And to use it, you need to have a special remote remote control. Moreover, it is important that he was "native" to the TV, that is, came with him in the kit. Otherwise, even if you get to the menu, it will be difficult to be there, because the control is not reliable.
SocialMart WidgetWhat are the functions of the Samsung TV service menu
As already mentioned, the average user is not recommended to experiment with the service menu on Smart TV, including the Samsung K Series or any other series, even J. It's not that this is a whim of developers. On the contrary, users can press the wrong key on the remote control, and all settings will be lost, which will lead to a complete loss of the normal performance of expensive equipment.
But in the hands of the master, who has entered the service menu of the TVs, it can turn a standard Smart TV into almost a home theater. Nevertheless, sometimes such settings can be opened completely by accident, involuntarily pressing some combination of keys. If this happens, then you can change:
- The spectrum of the image, for example, choosing a green palette or red, and therefore, the picture on the screen will become a country. Few people want to watch TV in this format.
- Screen image size options. It may happen that the picture will not occupy the entire screen, but only half of it, and from the bottom, top or side. The picture may break into pixels, and undergo other unpleasant changes.
- Naturally, the service menu tv samsung can change the sound settings, making it so that even at the highest volume, the device will be barely audible. Or it uses various sound effects, due to which an echo may appear, the acoustics will increase, which also does not contribute to a comfortable viewing of the content.
- In addition, once in the service menu of the Samsung TV, you can connect and disconnect various built-in functions.
 In general, if the user needs to change some automatic settings, then this is done here.
How to get into the service menu of the Samsung TV 6
In order to go to the service menu, you need to perform a few simple manipulations. But they are available only if there is a remote control. For some models, a standard remote control is suitable, as for Samsung 5, or you will have to use a special remote control, which is not included, and you will need to buy it separately. But this is not a problem, because there are a lot of service stores.
- We take the remote control and press the following sequence: info - menu - mute - power;
- Having learned how to enter the service, you need to wait a couple of seconds, because the TV will restart after pressing the specified combination to display the necessary information;
- After that, the incoming person must learn to move in such a way as not to accidentally change the settings. If you need to change something, you need to click on “Enter” and only then enter the amendments;
- Go to "Control", "Cloning" and so on;
 It is important, before finishing work in the “Hotel Option” section, check “OFF” to protect some functions from failures. And also, since the user has entered the menu, and knows how to enter here at any time, you still need to understand how to exit and not harm the settings. This is done in this way:
- You can exit by simply turning off the TV;
- Then again, go to MENU-SYSTEM, and see what has changed;
- If everything is fine, we are logged in without any problems and are happy with the settings, which means that you can continue to use the TV with the updated menu.
To enter the service menu, press MENU - P.P - S.S and SLEEP on the remote control.
Exit - DISPLAY.
Chassis 3Y01 HU-TV1450 percent LC863332B
To enter the MENU - three times pressing the hidden key in the remote control (the lowest right).
Switching the MENU sections is done by the MUTE key.
Other switching and parameter selection (+), (-) channels, (+), (-) volume. Double-clicking the hidden key in the remote control (the lowest right) - on the screen:
B / W BALANCE
S-BRI - 76
when MUTE keys are pressed in this case, a thin horizontal strip in the center of the screen to adjust the geometry.
Exit the menu - hidden key in the remote control (the lowest right).
Chassis 5N11
HU-D25A percent S3P8849XZZ-A089
entrance to the service simultaneously press the toggle switch and VOL + and VOL-- on the face.
search for "MENU".
Chassis 5P19 (SK5.0L CA / SK5.0A CA) H-TV2910SPF percent TDA9384PS / 3/3
Press sequentially I + ---\u003e Smart Sound ---\u003e Smart Picture
Navigation:
Use the up or down arrow buttons to move through the pages.
Select the number "0 - 8", "Smart Picture" and "Smart Sound" on the remote control to go directly to the pages.
Exit: press "I +" on the remote control.
Chassis 5Y19
H-TV2910SPF
percent LA76938N 7N
entrance to the service is a hidden button in the remote control.
Chassis KD-035E H-TV2190PF percent TDA11106, TDA11136PS / N3 / 3 (NT11136PC301AG)
Entering service mode:
Press the MENU, 6, 4, 8, 3 buttons
Switching between pages - buttons 1, 2, 3.
Exit - STANDBY.
Chassis PAEX0186B, PAEX0217A H-TV2912SPF percent 8897CPBNG6PN9
To enter the service mode:
on the front panel of the TV, press (VOL-), bring to 00, without releasing the (VOL-) button, press the (DISPLAY) button on the remote
Chassis PAEXT001 H-TV1412 percent 8891CPBNG6NA3
Login to the service:
on the front panel of the TV, press "VOL-", bring to 00, without releasing the "VOL-" button, press the "DISPLAY" button, release both buttons, "DISPLAY", "Vol--" + "DISPLAY"
Chassis PH01
HU-TV2900SF percent TDA9381PS / N2 / 2I1318
1. Press “Menu” on the remote control. 2. Dial the code “8-5-0-0” M as a confirmation appears on the screen. 3. Press “2” - the frequency appears.
Chassis PH03 H-TV2111SPF percent TDA9341EA3M Menu-6-4-8-3
Chassis PX20078 H-TV1408, H-TV2108PF percent. TDA9381PS / N3 / 1974
Service: "MENU", "6-4-8-3", sections 1, 2, 3, 4 on the remote control
C2910, C2519, C2988
1. Set the volume to 0
2. Press the "MUTE" button on the remote control
3. While holding the “MUTE” button, press the “MENU” button on the front of the TV.
4. The letter "D" will light up on the screen in the right corner, and the adjustable parameter and its value will be displayed in the left corner.
5. Menu pages are changed with the "CAL” button
Parameter switching is done by the green and red buttons on the blue field of the remote control. Changing the parameters is done by the yellow and blue buttons on the blue field.
H-LCD2000
To enter the service mode, press simultaneously and
Click again.
H-LCD3202
1.Press the SOUND button and set the CINEMA mode
2. Press the TIMER button and set the time to 120
3. Press the green button (not the power off button), the service menu appears.
4. Next, press button 1, then button 2 for white balance
Exit - press button 3.
HU-TV2121
percent N403 KALORA HHEN16MD01.Video project. LA76810A
The lowest hidden button, (to the right of the chip) press once, FACTORY will be displayed. Further P + and P- switching options.
The output is the same as the input.
AIWA 1402, 2002KE, 2102KE.
On the TV board, press the special button S009 simultaneously with the (DISPLAY) button on the remote control. To exit, turn off the TV from the front panel
AKAI CT-2119PD \\ PDT, U2E \\ Y2 \\ Y2E
Entering TEST MOD- mode on the TV, press the + and - buttons, while holding them to turn on the TV.
Exit - press the POWER button.
AKAI CT2899 / 7171
For the CCU11 processor, press the (°), (С), (Н) buttons on the remote control. For CCU12, press the screwdriver into the contact in the remote control hole near the keyboard and then immediately press the button (S). To exit, press the (LOAD) button
AKAI CT2161, CT2565, CT2567, CT2865, CT2867
On the remote control, press the (MUTE), (OK), (TV) buttons. Data recording - button (OK). Output - (TV)
AKIRA CT-14PF9
On the remote control dial (MENU), (MENU), (V.WIEV), (MUTE). Use the (SLEEP) button to turn pages. Exit - (MENU) button
AKIRA CT-2155
Press the blue button, enter the INSTALL menu, press the buttons (4), (7), (2), (5). To exit, turn off the TV from the front panel
AKURA, CROWN, MNOKA CX25 / 26/34, CR20NT, CR1406FT, MK1498N / N, MK2183 / N
Pin 8 of the processor is used to turn on the mode. There is a special button S009 on the TV board. Press it simultaneously with the (DISPLAY) button on the remote control. Exit - Button (TV / TEXT)
BEKO
Input - on the front panel, simultaneously press two buttons for switching channels and turn on the TV with a network toggle switch (you can select the menu language).
BLAUPUNKT I563 (72) 53 DIGITAL PRO
To enable the internal memory of the processor, close its output 1 (contact MP2) to the common wire and turn on the TV. Press the buttons (i), (E). To exit, click on them again
BLAUPUNKT MM63-13VT, MM63-14HT
While holding button (i) on the remote control, turn on the power switch on the TV. Output - (POWER OFF)
BLAUPUNKT MS70-100 DIGITAL PRO, CS82-100 DIGITAL PRO
Press the button (i) on the remote control. Select the PROGRAMMIER OPTIONEN item and press the (ME), (AUX) buttons. Select the SERVICE MODE item. Press the buttons (ME), (3), (2), (0), (0). Output - (TV)
CIRTIS C-14/21/25 / 28M1 / M2
Close the conclusions 13 and 23 of the chip (SAA3010) in the remote control. Exit - button (P) on the remote control
CONTINENTAL CT1412
While holding the (P +) and (P-) buttons on the front of the TV, turn on the power switch. To exit, turn off the TV from the front panel
DAEWOO KR20V1T
Switch TV to channel 91. Keep clarity to a minimum. On the remote control, press the (red), (green), (menu) buttons. Output - (POWER OFF)
DAEWOO 2594ST, 2896ST, 2898ST
To enter you need a special service console R-30SVC. Output - (POWER OFF)
DAEWOO 21U1,21E1,21E5
Select channel number 91 on the TV. Set the sharpness adjustment (SHARPNESS) to minimum and quickly dial on the remote control (RED), (GREEN), (MENU). Output - (POWER OFF)
DAYTEK DCT-2062-S
On the remote control dial (DISPLAY), (MUTE), (SLEEP), (FUZZY). The next press of the (DISPLAY) or (SLEEP) button will turn on the service menu. To exit, turn off the TV from the front panel
FERGUSON 51K4 / 5 / 751L3 / 7
While holding the (VOL-) and (PROG-) buttons on the TV panel, turn on the power switch and hold the buttons until a message appears. Output - (POWER OFF)
FUNAI 2100A MK10 HYPER.
To set the TV in service mode, it is necessary to short-circuit the TP test point on the board with the label FAKTORY MODE until red F appears on the screen. Exit - (POWER OFF)
FUNAI MK7, MK8
Close the terminals 2 and 14 of the D6600A chip in the remote control. The button (6) in PICTURE SELECT mode switches the symbolic-graphic output of OSD information. To exit, turn off the TV from the front panel
FUNAI 2100AMK11
In the remote control, solder the button between pins 2 and 16 of the RT2461-103 chip. When you press the button once, FACTORY appears on the screen; the second time - B / W ADJUST (adjustment of the kinescope modes); third time - ADJUST (geometry); fourth time - SETUP (setting options); fifth press - exit the service. Use the buttons (Р-), (Р +), (V-), (V +) to set the required values \u200b\u200bin the necessary places
FINLUX 4028D
Immediately after turning on the TV, issue commands from the remote control (PRG), (EXT). Output - (POWER OFF)
FINLUX SERIA 5000
Immediately after turning on the TV, send commands from the remote control (TV), (PRG), (EXT). Output - (POWER OFF)
FINLUX 3021
Press the button (N1) on the front of the TV and quickly press the button located to the left of the button (N3). To exit, press the button to the left of (N3) again
GOLDSTAR CF-25/29 C26, C36, C76 (chassis MS-51V).
Input - simultaneously press MENY, --VOL, --PR on the panel. OK - remember the changes. To go to the white balance adjustment: \u003d i - for GG, \u003d? - for RG, \u003d x - for BG.
Exit - off on the remote control.
GOLDSTAR CF-25 \\ 29C44.
Long press the OK button on the Control board and the yellow button on the remote control.
GRUNDIG M63-105, ST63-160, ST63-781, E63-911
To start the internal memory of the processor, close its output 1 (contact MP2) to the common wire and turn on the TV in the network. Press the button (i) on the remote control (TP760). Use the (P +) and (P-) buttons to select SERVICE. Press (OK) and enter the code with the buttons (8), (5), (0), (0). Exit - press the button (i)
GRUNDIG ST82775, ST95775
Press the button (i), INFO CENTER appears. Select SPECIAL FUNCTION with the (P +) and (P-) buttons and press (OK). Enter the code using the buttons (8), (5), (0), (0). Exit - by button (i)
GRUNDIG M55 -..., M63 -..., ST63 -..., ST70 -...
Press the button (P / C) on the remote control, turn on the power switch. Output - (POWER OFF)
GRUNDIG ST55-725, ST55-750, ST55-800, ST55-95
While holding down the button (i) on the remote control, turn on the power switch. Exit - by button (i)
GRUNDIG P37 ..., P40 ..., P42 ..., P45 ..., P50 ..., T51 ..., T55 ...
While holding down the button (i) on the remote control (TP720), turn on the power switch. Remember value - (OK). Output - (POWER OFF)
GRUNDIG BOSTON ST270 / 8 / IDTV / LOG
Press the (i) key on the TV panel and the (OK) button on the remote control. Remember value - (OK). To exit, press the (i), (POWER OFF) buttons
GRUNDIG GV200VPS
On the remote control, press (CODE), then the buttons (4), (9), (3), (4) Then confirm (OK) and press (STAND BY). To exit, turn off the TV from the front panel
GRUNDIG M70-100, M70-580, M82-100, M95-100, M70-681 IDTV
Press the button (i) on the remote control. Use the (P) button to call up the SERVICE DEMO mode, press (OK), (AUX). Call SERVICE MODE with (OK), (8), (5), (0), (0) buttons. Unlocking - (VIDEOTEXT), (PAGE), (CANSEL), (PAGE), (OK). In order to remember the adjustments, it is necessary to connect pin 7 of the SDA3526 chip to a common wire. Exit - Button (i)
GRUNDIG M70-290 / 9, M84-211 / 8
Press the button (i) on the remote control. Use the (P) button to call up the DIALOG CENTER mode, press (OK). Call For authorizes dealer- (OK), (8), (5), (0), (0). Output- (POWER OFF)
GRUNDIG P37 / 40/50, T51 / 55/65
Close the pins 6 and 10 of the MC144105 processor in the remote control. Exit - Button (i)
GRUNDIG P37-065 / 070/730
While holding down the button (i) on the remote control, turn on the power switch. Output - (POWER OFF)
GRUNDIG M82-169 / 9 IDTV, Greenville 7003 text, Greenville 7003 NIC / TOP, ST63-700 text, ST63-700 NIC / text, ST63-700 NIC / TOP, ST63-780 text, ST63-780 NIC / TOP, ST70 -700 text, ST70-700 NIC / text, ST70-700 NIC / TOP, ST70-780 text, ST70-780 NIC / TOP, ST72-860 TOP, ST72-860 NIC / TOP, Greenville 550 SE 5586 TOP, ST 55 -800 TOP, ST 55-850 TOP, ST 55-710 NIC / TOP, ST 55-725 FT / GB, ST 55-800 NIC / TOP, ST 55-850 NIC / TOP, ST 55-850 FR / TOP, ST 55-900 FR / TOP, M 70-269 / 9 Reference, TrentoSE7016 / 9Ref. / PIP, M 82-269 / 9 Ref., Denver SE 8216/9 Ref./PIP, M 82-269 PAL-plus / LOG, M 72-410 Ref., M 72-410 / 9 Ref., M 72-410 Ref ./PIP, M 95-410 / 9 Ref./PIP, MW 70-100 / 8, Berlin SE 70-100 /8
On the remote control dial (INFOCENTER), (SPECIAL FUNCTIONE), (SERVICE) and enter the code (8), (5), (0), (0). Output - (POWER OFF)
HITACHI 43FDX, 53FDX
Open the front panel (four screws), remove the central panel (six screws), press the blue button in the left corner of the dialing board. To exit, press this button again.
HITACHI C25 / 28P445VT, C21 / 25 / 28P745VT, C28P405VT
Dial on the remote control (P), (*), (O / V), (#), (M). Output - (TV)
HITACHI C2575 / 76/77, C2975 / 76/77, CL25 / 29/76, CP25 / 29/76, C28300TN
While holding down the (VOL +) and (VOL-) buttons on the TV, turn on the power switch. Output - (POWER OFF)
HITACHI CS2840TA
Dial on the remote control in one second (- / -), (MENU), (TV). Output - (POWER OFF)
HITACHI C2578FS, C2589FS, SMT2578
On the front panel of the TV, press the (TV / AV) button and, while holding it, turn on the TV. To memorize each parameter, press the (ENTER) button. Output - (POWER OFF)
HITACHI CL2894 / TAN / TA, CP2894 / TAN / TP / AN
Turn on the TV and immediately dial the combination (MENU), (TV), (I) on the remote control. Output - (POWER OFF)
HITACHI C25 / 2844TN, C25 / 2864TN
While holding the (VOL +) and (VOL-) buttons, turn on the power switch. Under the cover of the remote control, press the button with the bracket sign twice. Output - (POWER OFF)
HITACHI CP2133TA / AN, CL2133TA / TN
Turn on the TV and immediately dial the combination (G), (M), (PROG) on the remote control. Output - (TV)
JVC AV-29PRO.
Input:
1. Set the volume value to 04.
2. On the remote control - DISPLAY and MENY.
Exit - off - power.
JVC-21TE, G21T, G250MX
Input - simultaneously press the remote control "display", "picture mode" 2 times.
off timer - remember.
Exit - press MUTE twice.
JVC-C21ZE (21TE, 14TE, 21ME, 14ME, 14W) G21T G21OT G25MX.
Enter the menu:
+
SERVICE MENU
1.VSM PRESET
2.SUB VSM
3.IF V / C
Menu control:
Press 1,2 or 3
PICTURE ADJUST - SELECTING ITEMS IN THE MENU
+ PICTURE ADJUST - CHANGE ITEMS
-PICTURE ADJUST - --- // ---
DYSPLAY- CALLING THE MENU ON THE SCREEN
OFF TIMER- SAVE SYSTEM CONSTANT
MUTE - SAVE THE CHANGE
MUTE - EXIT
LG MC64 and MC84.
Input - - simultaneously press OK on the remote control and on the TV panel.
MAGNAVOX.
Input:
1. Press the following combination on the remote control:,,,,,. Channels will change.
2. press MENU
Attention! This only works on * SOME * Magnavox TVs.
Exit - POWER button on the TV.
MITSUBISHI CT-21M5E \\ ET \\ RT, CT-25M5E \\ EN \\ ET \\ ETN \\ RT \\ RTN.
Input - press the S701 service switch (next to the tuner), then button 9 (within 5 seconds).
"*" - switching the adjustment display, "2" - "8" - adjusting the code, "6" - "4" - adjusting the data, "0" - writing to the memory, "1" - discarding the changes before writing to the memory.
The output is stand by.
MITSUBISI CT-29B3EEST.
Input - turn on the power. Press the S701 service switch (next to the tuner), then the 9 button (within 5 seconds).
Record - button 4.
Buttons 2 and 0 change the adjustment code, buttons 5 and 7 change the data value.
NOKIA 6364, 7364 CHASSIS 2B-F (EVROSTEREO 2B-F chassis).
Entrance - 1. (- / -) 2. (MENY) 3. (TV) - all within 1 second.
Recording the result - MEMO.
Exit - off from the remote control.
NOKIA, SELECO, SABBA ITT, TELEFUNKEN (STEREO PLUS chassis).
Input - 1. (mute) 2. (OK) 3. (tv), record the result “OK”
Exit - TV
PANASONIC (chassis MX-3, MX-3C).
Hotel mode:
1. On the remote control - off timer, on the CH panel. UP - enabled.
2. On the remote control - off timer, on the panel - VOL. –Off
Input - simultaneously press RECALL on the remote control and - VOL. on the panel.
Exit - press NORMAL on the remote control twice.
PANASONIC TC-29V50R CHASSIS MX-2A.
Entering trimming mode - press the button of the service switch S1101 (next to the centering switch). The message SNK will appear on the screen. S1103 (FUN) button --- select the required adjustment.
Exit - press S1101.
PANASONIC TX-21AD2C, TX-29A3C, TX-25A3C CHASSIS EURO-2, EURO-1.
Set the BASS bass control to maximum, TREBLE treble control to minimum. Press the F button on the TV panel at the same time as the REVEAL button on the remote control.
PHILIPS 25PT8303.
Login - simultaneously press "?" and "sleep" under the hood.
PHILIPS 14PT-1342 \\ 43, 14PT-1352 \\ 00 \\ 01 \\ 05 \\ 07 \\ 11 \\ 39, 14PT-1542 \\ 01 \\ 43, 14PT-1552 \\ 00 \\ 01 \\ 05 \\ 11, 20PT-1342 \\ 43, 20PT -1542 \\ 43, 21PT-1532 \\ 58, 21PT-1542 \\ 43, 37TA-1232 \\ 03, 37TA1432 \\ 03, 37TA1462 \\ 18, 37TA1473 \\ 18, 52TB-2452 \\ 19, M-2052 \\ 00 \\ 01, M2152 \\ 00 \\ 07 \\ 15, M2182 \\ 00, M2192 \\ 05 CHASSIS L6, 1AA
Input:
1. Using the service remote control model RC7150 - press the DEFAULT or ALIGN buttons or
2. Short-circuit the S1 S2 contacts on the processor (pin 14 of the IC7600).
Exit - STAN-BY button.
PHILIPS14PT-118A \\ 50B \\ 67R \\ 94R, 14PT132A \\ 50B \\ 50R \\ 75R, 14PT133A \\ 162R, 14PT137A \\ 162R, 14PT138A \\ 54R \\ 58T \\ 67R \\ 71R \\ 74R \\ 75R \\ 93S, 20PT188A \\ 73R \\ 67B 20PT120A \\ 78R, 20PT132A \\ 75R, 20PT137A \\ 62R, 20PT138A \\ 50D \\ 58R \\ 58H \\ 58R \\ 67R \\ 71R \\ 73R \\ 74R \\ 75R \\ 94R \\ 97R. chassis L7,1A / AA
1. With the help of special. service desk (DST) or
2. Short-circuit the service contacts M24, M25 on the printed circuit board (PCB) and turn on the power.
Exit - press stand by.
PHILIPS Anubis S \\ DD.
Entrance - close the contacts M31 and M32 (ground) next to IC7710.
Exit - STAN-BY.
PHILIPS 25PT400 / 42, 25PT410A / 42, 28PT400A / 42, 28PT450A / 42. CHASSIS GR2.2AA.
Input:
1. Close the contacts M33 and M34 (service).
2. Press the INSTALL key on the front panel to turn on the network switch.
Exit - STANDBY key.
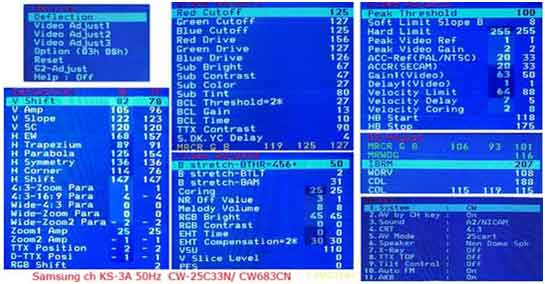
SAMSUNG CK 5038 ZR \\ TBWCX (chassis SCT11B) CK6202 CK7202 CHASSIS SCT12B.
Login - 1. (stand by) 2. (p.std) 3. (help-?) 4. (sleep) 5. (power on)
Exit - STATUS or HILDDEN.
SAMSUNG CS7272 PTR \\ BWX CHASSIS SCT 51A, CS-721, CS-723.
Input:
1. (picture off) 2. (sleep) 3. (p.std) 4. (mute) 5. (picture on)
Exit - off - power.
SAMSUNG TVP3350, TVP5050, TVP5350 (monoblock) CHASSIS: SCV11A, B.
Input --- Stand-By P. Ltd Menu Sleep Power On.
Samsung TV, one of the combinations should work:
Option 1: hidden button on the remote (HIDDEN)
Option 2: StandBy - P.STD - Help - Sleep - Power-On
Option 3: PICTURE OFF - SLEEP - P.STD - MUTE - PICTURE ON
SCHNEIDER with chassis DTV3, DTV4
Input:
1. Turn on the network button.
2. While holding on the remote control (remote control 204) simultaneously pressed the red and blue buttons for exactly 5 seconds, without releasing them, press the volume + and CH- buttons simultaneously on the TV.
Dial the combination clearly, withstanding a strict time interval.
Exit - turn off the power.
SHARP 54AT – 15SC.
1. Power off.
2. Vol - at the same time CH + on the panel.
3. Power ON on the panel and hold step 2 until it starts.
SHARP VT-1428M, VT-2128M.
Input:
1. Set the TV to standby.
2. Press CH UP for 2 or more seconds and simultaneously press the POWER button.
Exit - MENU button.
SHARP 14D-SC, 14B-SC, 20B-SC, 14D-CM, 21D-CK1, CV-2132CK1 CHASSIS PAL-A.
Set switch S1008 to the service mode position.
SHARP 14R-SC / M8 / M10, 14R-W, CV-14RU.
Set switch S1006 to the service mode position.
SHIVAKI CHASSIS 11AK19.
Input:
1. INSTALL key
2. on the remote control in the following sequence 4, 7, 2, 5.
All adjustments are changed via ADJUST.
SONY KV-2170, 2180, 2540 chassis BE4.
Input: 1. (?) 2. (5) 3. (+ Volume) 4. (tv) then MENY
Exit - (00)
SONY KV-E2551A \\ B \\ E \\ K, KV-S29 JN1 \\ MN1 \\ SN1, KV-S34 JN1 \\ MN1 \\ SN1, KV-S2941A (chassis AE-2B).
Input:
1. Press two buttons on the panel at the same time, then MENY on the RM-831 type remote control.
2. OK - remember the data. (adjust according to the table).
Exit - off - power.
SONY 25M1K KV-M1440, KV-M2171, KV-M2181, KV-M2101.
Input:
1. TV in STAND BY
2. Press DISPLAY on the remote control
3. -/- 5
4. - / - VOL +
5. - / - POWER
Next, press the MENU button on the control panel and get into 4 submenus
1. SAA 7283 00 00 00 00 00
all with tips in English. language.
2. TDA 8366 1 13 98
geometry, colors, brightness, etc.
Recording MUTING values \u200b\u200b- execution 2 times "0"
The data is given for the panel type RM-836.
SONY KV-S2941A \\ B \\ D \\ K, KV-S2942U, KV-S2943E SHASSIS AE-2F.
Turn on the power of the TV, and then double-press the ON button on the remote control. TT appears in the upper right corner, then press the MENU button.
SONY KV-S2952 KR CHASSIS AE-3.
Use the remote control type RM-831. Turn on the power of the TV while pressing the - and + buttons on the front of the TV.
SONY KV-G21M1 \\ G21P1 \\ G21S11, KV-T21M1 \\ T21MF1 \\ T21MN1 \\ T21MN11.
Input - press a combination of buttons on the remote 1 (UP) 4 (DOWN).
Press the MUTE button to display the WRITE screen (green), press the 0 key to enter the memory.
Exit-- press the POWER button 2 times.
TOSHIBA 2150 (chassis - S5E).
Input:
1. (mute)
2. (press MUTE again and do not let go)
3. (press MENY on TV)
"4" - contrast correction.
"1", "2", "3" - cut-off R, G, B
"AV" - selection of test signal. , "- volume +" - adjustment.
Exit - off - power.
BRANDT, FERGUSON, NORDMENDE, SABA, TELEFUNKEN, THOMSON (CHASSIS ICC9, TX-90, TX-91).
Input:
1. Stand by - with remote control
2. Turn off the network button.
3. While holding on the remote control the teletext button (blue) - turn on the network.
4. After turning on the TV, release teletext.
5. If it does not work, then in step 4 release the teletext button and again quickly briefly press.
Attention! Entering the service mode is possible in the absence of any signals on the scart.
Exit - stand-by button.
VCR Panasonic NV-SD205.
Technological mode in a subject - ++ according to the documentation. The same buttons, held for 5 seconds, reset all errors.
VCR PANASONIC AG-4700BY household 800, 950, 1000.
Pressing fast forward, rewind, and eject a cassette.