

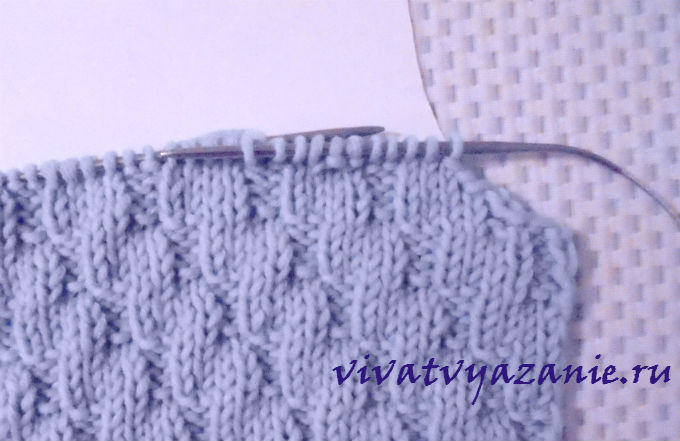
When knitting the first third of the loops (6 loops, including the edge), close in 2 steps: at the beginning of the front row, close in a row half of the loops (3 loops) and tie the row to the end. Turn the knit, close at the beginning of the row also 3 loops. At the beginning of the next (front) row, fasten the second half of the loops (3 loops) in a row and, having connected the row, fasten the same number of loops at the beginning of the wrong row. With a low density of knitting, the first third of the loops have to be closed in 1 step.
Reduce the second third (6 loops), one at the beginning and the end of each front row: at the beginning of the row, remove the edge, knit the next front loop (regardless of the pattern) and pull it through the edge. At the end of the same row, knit the edge and adjacent loops together from the wrong side. Knit the wrong rows without decreasing.
Cut the last third (6 loops) in the same way as the second, but not in each front row, but after one row, i.e., after decreasing (in the front row), knit 3 rows without changes (wrong, front, wrong) and only then do the next decrease.
Having tied the lower parts of the armhole, continue knitting the back to the shoulders. If it is carried out with an elastic band, plaits and other "springy" patterns, then knit it without changes (in a straight line). In other cases, give the armholes a concave shape. To do this, it is enough to make 2-3 additions of 1 loop along the armholes, performing them at regular intervals (see the plus signs for Fig. 173).
Calculation and knitting of the shoulders and neck of the back (Fig. 174). The shape of the neck depends on the model. In our example, after applying the construction lines (the neckline), the new neckline is 2 cm below the main line, the top edge of the bar ends 1 cm above the base (see working pattern).
Starting the calculation, connect the ends of the shoulders on the pattern with a straight line and lower the perpendiculars on it, defining the width of the new neck (then do all calculations on the right half of the pattern).
Measure the width of the new neck (8 cm) and shoulder (12 cm) and determine the number of loops in these segments:
3 p. X 8 cm \u003d 24 p. (Half of the neck);
3 p. X 12 cm \u003d 36 p. (Shoulder).
Measure a new slope of the shoulder (it is slightly more than 3 cm) and calculate from the control sample the number of edge edges in this value, for example 7. The number of edge edges in the shoulder slope always corresponds to the number of groups into which the shoulder loops need to be divided to reduce. Therefore, in this embodiment there are 7 of them.
Now you need to find out how many loops are in each of the groups. For this, the shoulder loops should be divided by the number of groups (or edge):
36 p.: 7 \u003d 5 p. (1 p. In the remainder).
Add the remainder to the 1st group, counting from the end of the shoulder (if the remainder is more than one, distribute it 1 loop to each of the groups located at the end of the shoulder). So, on the shoulder you need to reduce 1 time 6 loops and 6 times 5 loops.
Next, measure the height of the new neck (3 cm) and calculate the number of edge in this value - 7 (in our example, the height of the neck and the slope of the shoulder are the same). The number of edges in the neck height always corresponds to the number of groups into which the neck loops need to be split for reduction.
Having divided the neck loops by the number of groups (or edge ones), we determine the number of loops in each group:
24 p.: 7 \u003d 3 p. (3 p. In the remainder).
Distribute the remainder in 1 loop to the first three groups, counting from the middle of the back. Therefore, along the neck of the back, you need to reduce 3 times 4 loops and 4 times 3 loops.
Put on the pattern the calculation results (Fig. 175). Having tied the back to the shoulders, finish knitting with the wrong side. Mark the middle of the back and the width of the new neck with colored thread. Divide the knitting in half. Transfer the left half to a spare knitting needle, and knit the right half
just made calculation. To do this, close 6 loops of the shoulder in a row on the front side of the work and tie a row, leaving at the end 4 loops of the neck not knit (put them on a strong cotton thread).
Turn the knitting, remove the 1st loop without knitting, and knit the wrong row to the end. At the beginning of the front row, close 5 loops in a row, and at the end of the same row, leave 4 more loosened loops. Now there are 8 loose loops on the thread. Continue to knit until all shoulder loops are closed. Loops of a neck string on a thread (they remain open). Then tear off the working thread.
Next, knit the left half of the back. To do this, on the front side of the work, step back from the middle of the back 4 loops to the left (point A in Fig. 175), attach the working thread to the knit and tie the front row to the end. Turn the work and at the beginning of the wrong side make the 1st decrease on the shoulder (6 loops). Do all subsequent reductions in the same way as on the right half of the back, but only on the seamy side of the neck loop is it more convenient to string the thread with the open loops of the right half on it).
How to knit a set-in sleeve
Perhaps, set-in sleeves of all varieties found in sewing can be tied on knitting needles: long and. whether short; narrowed or, conversely, extended downward; straight (tube-shaped) or in the form of a flashlight; with a cuff or lapel and many others.
Sleeves can be performed not only from the bottom up from the wrist (the most common method), but also to the side of the sleeve seam (transverse direction of knitting). You can also knit a set-in sleeve from top to bottom (from the high point of the okat), but this is not entirely convenient. ·
We will get acquainted with the knitting of a set-in sleeve, narrowed down. knitting of the sleeve before the start of the cut (Fig. 176). 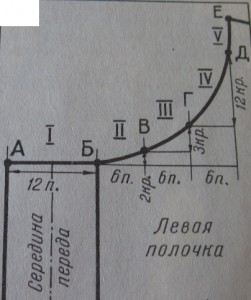
Calculation and knitting of the sleeve before the start of the round (Fig. 176). The calculation is faster to do for half the sleeve. Count the number of loops in the narrowest and widest parts of the sleeve:
3 p. X 10 cm \u003d 30 p. (Pg \u003d 3 p.);
3 p. X 1 8 cm \u003d 54 p.
Determine the difference (in loops) between the wide and narrow parts of the sleeve:
54 p. - 30 p. \u003d 24 p.
Measure the distance from the beginning of expansion on the sleeve to the beginning of the okat (34 cm) and divide this number by 24 (the difference in the loops):
34 cm: 24 \u003d 1, 4 cm.
Count the number of edging in 1.4 cm, in our example there are 3 of them, which corresponds to 6 rows. Therefore, to expand the sleeve, you need to add one loop in each 6th row. Let's consider how to do it better.
Type the desired number of loops on the knitting needles (30 p. X 2 \u003d 60 p.), Knit 4 cm with a garter stitch and go to the main pattern. Knit 2-4 rows and make the first addition: at the beginning of the front row, remove the hem and, having made a crochet (to yourself), knit a row, at the end of it, in front of the hem, scribble another crochet.
In the next seamy row, knit the yarn over with the front loops behind the back wall. Continue knitting, making similar additions on both sides of the sleeve in each 6th row, until there are 1 0 8 loops on the spoke (54 st. X 2 \u003d 1 08 st.).
In order not to lose count, always mark with colored thread or pin a pin to the row in which the addition was made. These marks, in addition, will be useful to you when making the second sleeve, so do not remove them until you tie both sleeves.
Calculation and vyvyazvanie okat sleeves To calculate the knotting of okat, it is most advisable to use the technique developed by practice. From whatever yarn and whatever number of knitting needles you knit, this technique gives fairly accurate results. Depending on the density of knitting, only the number of calculation numbers changes: the looser the fabric, the fewer. Get to know this simple calculation.
Divide the number of loops in segment A B (Fig. 177) into 3 equal parts (54 p.: 3 \u003d 1 8 p.). If there is a residue, then attach it to the 1st part. Next, divide the loops of each part into groups.
Loops of the 1st part divide into triples and deuces. Moreover, the first half is in triples, the second half is in twos (3 + 3 + 3 + 2 + 2 + 2 + 2 \u003d 1 7), add the remainder to the first digit (3 + 1 \u003d 4).
The loops of the 2nd part are divided into units (1 8 units).
The loops of the 3rd part are divided into triples (3 + 3 + 3 + 3 + 3 + 3 + 3 \u003d 1 8). If there is a remainder, add it to the first digit, counting from the high point of the okata (point O). Put the calculation results on the pattern.
The calculation is ready. You can start tying the okat.
At the beginning of the front row of the 1st part (point B), fasten 4 loops in a row and tie the row to the end. Turn the knitting and at the beginning of the back row also fasten 4 loops. Then continue to close the loops according to the calculation at the beginning of each row (either the front or the back), until you cut 18 loops on both sides of the sleeve.
The first third of the loops of the 2nd part (18 p.: 3 \u003d 6 p.) Reduce 1 loop at the beginning and at the end of each facial row. Cut the second third (6 loops) in the same way, but not in each front row, but after one. Reduce the last third (6 loops) in the same way as the first.
Fix the loops of the 3rd part according to the calculation in exactly the same way as in the 1st part: either at the beginning of the front, then at the beginning of the wrong side. When 6 loops remain on the spoke (of which 3 are loops on the right side of the okat + 3 loops on the left), close them in a row.
The book describes elementary things very well - I learned from it.
The armhole is one of the important elements of clothing of an important element. In this article we will explain how to do knitting armholes with knitting needles.
Then, knowing the height of the rounding, calculate how many rows exactly you need to make this reduction (the number of rows in 1 cm, multiply by the obtained height). When knitting the armholes 7-10 times, close at the beginning of the row a certain part of the loops. Usually, loops that fit in 1.5 cm are closed immediately, then in the first row 3 loops are reduced, in the next 2-4 rows 2 loops and in the remaining rows 1 loop.
Keep in mind that one armhole is formed at the beginning of the rows, and the second - at the beginning of the wrong side. When turning the work, the first loop should not be knitted, but removed on the right knitting needle. This is necessary so that the line for knotting the armhole is obtained without ledges and corners, smoothly.
An example of calculating knitting armholes with knitting needles
Knit from the calculation:
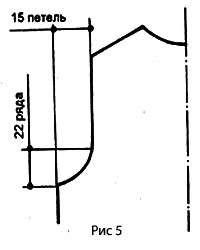
- armhole width \u003d 15 loops;
- rounding height \u003d 22 rows.
- Reduce 4 loops through a row - 1 time,
- 3 loops-1 time
- 2 loops - 2 times,
- then 1 loop 4 of each 4th row.
Knitting armholes with needles: video
This page is searched for:
- knitting armholes with knitting needles
- how to knit an armhole with knitting needles
- how to knit an armhole with knitting needles
- crochet armholes
Lesson number 46
In this lesson we will get acquainted with the calculation for knitting curved lines - the most difficult to knit. These include neck lines of various shapes, sleeve sleeves, armholes, front shoulders etc.
Knitting for beginners.
Many lovers of knitting believe that mastering the art of knitting such lines is not so easy a task that trying to solve it is useless. When working with a pattern, you will see how it helps to quickly and accurately make calculations for knitting fabrics with a complex contour.
As already mentioned, some of these lines, if they are the same as on a pattern-based, we offer to knit according to pre-prepared calculations. They are made according to the principle of knitting crooked lines, which will be discussed later, but for now we will use one more of the ready-made practical calculations - a calculation for knitting armholes in front.
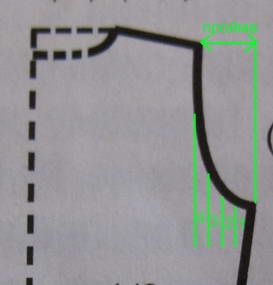
Calculation and knitting armhole front (fig. 1).
Determine the number of loops in the width of the armhole (segment AB) and divide this number into 4 equal parts. If there is a residue, add it to the loops of 1 part (to the one at the side seam).
3 p. X 8 cm \u003d 24 p.;
24 p.: 4 \u003d 6 p.
Now loops each part except 1, divide into groups (if residues are obtained in parts 2 and 3, add them to the first groups): divide the loops of 2 parts into triples (3 + 3), the loops of 3 parts into two (2 + 2 + 2), loops 4 parts - per unit (1 + 1 + 1 + 1 + 1 + 1 + 1).
Put the calculation results on the pattern.
Having tied the left shelf to the armhole, fasten at the beginning of the faces. row in a row 6 loops (1 part) and knit a row. Turn knitting, knit out. row and at the beginning of the front fasten 3 loops in a row (first group of loops 2 parts). Do all subsequent reductions of 2 and 3 parts according to the calculation at the beginning of each person. row.
Loops 4 parts, reduce 1 through 1 faces. row, i.e., making a decrease at the beginning of the faces. row, knit it to the end, then knit out. a row, further front, another 1 wrong side and only at the beginning of the next person. row make another decrease.
After completing the armhole, knit 5-6 rows in a straight line, and then add 2-3 times 1 p each at equal intervals (see the “+” signs in Fig. 1). Sometimes the knitting pattern is broken by the added loops. In this case, it is more advisable not to make additions, but to knit armholes in a straight line.
Calculation for knitting the front shoulders.
When knitting the shoulders, the front ones use the calculation made for the back shoulders, making only a slight correction: since the front shoulder is shorter than the back shoulder by 1 cm (with the same bevel of the shoulders), you need to determine the number of loops in this difference (in our example, 1 cm 3 .). The loops of difference should be divided into units and subtract them from one of the first groups of loops of the shoulder back, counting from the neck (see). After calculations, the following loop groups were obtained: 6 + 5 + 5 + 5 + 4 + 4 + 4.
The principle of calculation for knitting curved lines
(neckline)
If you carefully consider the front neckline (Fig. 2), you can see that it has a horizontal section - a segment of AB, almost flat - a segment of BV, inclined - VG, almost vertical - DG and vertical - DE. Only 5 different types of segments. Any of the curves can be divided into separate segments that have a certain angle of inclination. This possibility is taken into account when calculating for knitting curved lines. The calculation is done as follows: the curved line is divided into different types of segments, count the number of loops in the width of each and determine the number of edging in its height. For example, there are 6 loops in the width of the BV segment (2 part), and 2 in the height. Next, we use the calculation principle that is familiar to us: the number of loops is divided by the number of edge loops; as a result, the number of loops to be reduced in each group is obtained. 6 p.: 2 \u003d 3 p. Consequently, the loops of the curve line on the segment of the BV need to be reduced in 2 steps by 3 loops. Another example. In the width of the section of the main section (4 parts) there are 6 loops, and in the height of 12 hem - the section is quite long, therefore
We have to divide the number of edge by the number of loops to determine the length of the intervals between the decreases: 12 edge: 6 p. \u003d 2 edge (4 rows). Therefore, the loop of the curve line on the segment of the DG must be reduced by 1 in every 4th row. In this example, the second time we met with the calculation for an almost vertical line (remember the line of the side seam of the fitted model), only the height of the side seam line was measured in cm, the intervals were determined, and then their length was expressed by the number of edge ones. Now we will make a calculation for knitting the remaining segments of the neckline: 12 loops are placed in the AB segment (1 part). The segment is horizontal, so the loops in this section must be reduced in one step. In the segment of the VG (3 part) there are 6 loops; its height corresponds to 3 edge. 6 p.: 3 \u003d 2 p. Therefore, the loops of the segment of the VG need to be closed 3 times in 2 loops. The vertical segment DE (5 part) is knitted without reduction. 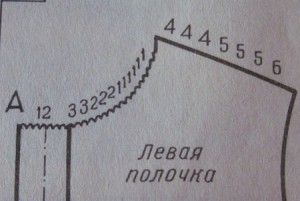 Put on the pattern the results of calculations for knotting the neck (Fig. 3): 12 + 3 + 3 + 2 + 2 + 2 + 1 + 1 + 1 + 1 + 1 + 1. Put also the calculation numbers for knitting the shoulders.
Tying the neck and shoulder of the left shelf Tie the shelf to the neck (Fig. 3, point A). At the end of faces. leave 12 unbound stitches in a row and string them on an auxiliary strong thread. Turn the knitting, remove the 1st loop without knitting, and tie the row to the end. Continue to work without tying the neck loops at the end of each face. row. The shoulder loops must be fixed at the beginning of the faces. rows after the armhole is connected. The neck and shoulder of the right shelf are knitted similarly to the left, only reductions are made in out. ranks.
Lesson number 47 (part 1):
/ 12.12.2015 at 21:31
Greetings, friends!
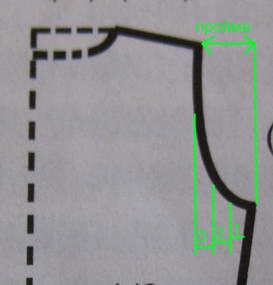
Today’s article is devoted to a narrow, but urgent topic from the category of technology for processing parts of knitted products, namely, we will consider how to design an armhole line, reducing loops for this. Starting knitters, as a rule, do not bother with an armhole when they begin to create their first knitwear . Fortunately, the soft and elastic texture of the knitted fabric allows you to cut sleeves in the armhole area just in a straight line (Fig. 1), or knit a raglan sleeve, which is also not very difficult (Fig. 2).
 It’s really not so easy to connect a thing with a set-in sleeve in the sense that the sleeve should ideally “fit” into the armhole, and for this it is already necessary to knit according to a more complex pattern and make some calculations. But if everything is done correctly, then any problem is not as complex as it seems.
Let's look at reducing loops for an armhole with knitting needles in the case when you want to tie an elegant product with a set-in sleeve. Let us dwell on two main methods.
First way
Suppose you have the right size pattern for your product. Usually in such cases, all parts of the product begin to knit from the bottom. We knit exactly the back or front part before the armhole begins. Then we attach the knitted fabric to the pattern and orient ourselves on it how many loops need to be closed. We start closing the loops at the beginning of the row. For example, in order for the edge of the armhole to fit exactly on the pattern, you need to close 3 loops first, then 2, then 1, and then it may not even have to close to the shoulder line. Or it may still have to close 1 loop, but after 3 rows - it all depends on the shape of the armhole line on the pattern - you only need to consult it. Sometimes you have to close more loops: 4, or even 5 at the beginning, then gradually reduce. I repeat, it all depends on the pattern, and also on the thickness of the yarn and the density of knitting.
It is clear that the hinges must be closed symmetrically on both sides of the part, and we close each time at the beginning of the row. Therefore: we knit, for example, the back - closed the armhole for the first time at the beginning of the front row of 3 loops and knit the row to the end, then we turn the knitting and at the beginning of the back row we also close 3 loops. We continue - at the beginning of the front row we close 2 loops, and close 2 loops at the beginning of the next wrong row, and so on. I think everything is extremely simple and clear here. If we knit the shelves separately, then for the armhole on the left shelf we close the loops at the beginning of the front rows, and for the right shelf - at the beginning of the wrong ones.
And if suddenly you do not have a pattern, or you are reluctant to mess with it, then we’re doing it even easier. Just take your factory blouse, which sits well on you, and instead of the pattern we use it. We apply knitting to the armhole line and focus on how many and where to close the loops.
Second way
This method is somewhat more complicated than the first. In it, the loops are not closed, but reduced, knitting 2, or 3 loops together. But at the same time, you can get a beautiful shaped line of reducing loops, as on factory things:
- Note: it makes sense to do such a shaped line of reducing loops along the armhole line if this happens against the background . If your main pattern is more complex, then it is better to apply the first method - just close the loops.
How to reduce loops along the armhole line using a contour line? We do this (a pattern, or a ready blouse instead of it will still be needed). According to the pattern, we determine how many centimeters you have to clean as a result of bending the armhole. Suppose it is 6 cm. Next in its own way knitted details determine how many loops you have in 6 cm - let 12 loops. Therefore, you need to reduce 12 loops. Then we divide: 12: 3 \u003d 4. We got that we need to reduce the loops by knitting 3 loops together 4 times. For beauty, this can be done every 3 rows, or first 3, then 5 to reduce the slope of the bevel line (see photo 1). Moreover, if the armhole line is more curved, for example in front, then we reduce 3 loops. And on the back this line is smoother - we decrease 2 loops each. Accordingly, we make calculations.
Before reducing loops, it is advisable to close at least once on each side of the part 2 or 3 loops in order to get peculiar “serifs” and it was then easier to sew in sleeves. Then, after 1 row, we begin to directly reduce the loops.
- Consider how to reduce 3 loops. To reduce at the right edge we knit the front parts at the beginning of the front row: 1 edge; 2 facial; then 3 together in this way: knit 2 loops together with the front inclination to the left, the loop formed as a result of this is returned to the left knitting needle, grab the next loop with the right knitting needle underneath the back wall and stretch the reticulated loop through it (the loop going along the top should lean to the right - photo 2). Next, we knit a row, as usual, and after 3 rows (or through 5 rows) at the beginning of the front row we also do it, and repeat this necessary number of times (in my example 4 times).
To reduce loops left edge the details do so. Before reaching the end of the front row by 6 loops, taking into account the edge, we knit: 3 loops together like this: remove the first loop, 2 next knit together the front with a slope to the right and stretch them through the removed loop (the loop going along the top tilts to the left), then 2 front loops and hem. Similarly, we go through 3 rows (5 rows) at the end of the front row required number of times.
- 2 loops are much easier. Just decreasing at the right edge, we knit through 3-5 rows not 3, but 2 loops together, front with an inclination to the right, and decreasing at the left edge - 2 loops together with an inclination to the left.
These are the 2 ways to reduce the loops for the armhole, we examined in this article. As you can see, everything is simple. But with a sleeve it will be a little more difficult, and we will talk about this in the next article.
Many knitters, especially not very experienced ones, have difficulty when it comes to knitting armhole. Of course, when we knit a model from a magazine, the description says how to reduce loops. But what if the model we knit is a product of our imagination and inspiration or there is no description for this model? After reading this article you will see that knitting armholes with knitting needles is not at all difficult. Here I will show you a simple diagram for calculating the reduction of loops for an armhole.
Methods for calculating loops for knitting armholes.
1. Firstly, you can knit a part in a straight line, without making reductions for the armholes
You get a model with a slightly deflated sleeve.
Such an armhole is good in products of a free silhouette. I also note that it will not be difficult to knit a sleeve either, since there will be no need to knit a buttonhole, the button line of the sleeve will be straight, without bends, and you just need to close all the loop of the sleeve. Here is an example of such a pattern.
But if you knit a tight-fitting model, then in order for it to fit well, you need to make reductions for the armholes. In fact, there is nothing complicated in calculating for knitting armholes.
2. The calculation of loops for knitting deep armholes
First . As a rule, the width of the armhole is 4-6 cm. We calculate how many loops are contained in the number of centimeters we need. To do this, simply attach a ruler to the product and calculate the number of loops in the number of centimeters you need.
Divide the obtained number of loops into 3 parts. If this number is not divisible without a remainder, then this remainder must be added to the first part of the loops, which is closer to the side seam. It turns out 3 blocks of loops, which we close as follows:
1. The first part of the loops close in one go.
2. The second part
3. The third part of the loops -we reduce one loop in every second row.
Example: the number of loops that are reduced for the armhole line is 11. Divide into 3 parts of 3, 4 and 4 loops. We close the first 4 loops of the first part, then in each second row we close 2 times 2 loops (loops of the second part), then we close 3 times with one loop (loops of the first part).
Calculation of loops for knitting armholes of products with a high density of knitting.
It is used if the closing number of loops is more than 15. The circuit is similar to the one I quoted above.
First determine how many loops to reduce. As a rule, the width of the armhole is 4-6 cm. We calculate how many loops are contained in the number of centimeters we need. To do this, attach a ruler to the product and count the number of loops in the number of centimeters you need.
Divide the resulting number of loops into 4 parts. If this number is not divisible without a remainder, then this remainder must be added to the first part of the loops, which is closer to the side seam. It turns out 4 blocks of loops, which we close as follows:
1. The first part of the loops close in one go.
2. Second part we close the loops in 2 steps: divide the loops into two parts and close them in every second row. If you again did not work out an even number of loops, then remember the rule: add the remainder to the part that is closer to the side seam.
3 . The third part of the loops close in three steps: divide the number of loops by three. We close every third in every second row.
4. The fourth part of the loops -we reduce one loop in every second row. If, in the third part, one loop was also closed in every second row, but the loops of the fourth part should be reduced by one loop in every fourth row.
Example: 25 loops must be closed for the armhole line. Divide this number into 4 parts, we get 6, 6, 6, 7 loops in the block. First, close 7 loops of the first block. Then we close the loops of the second block: in every second row we close 1 time 3 loops, then a second time also 3 loops. Next, close the loops of the third block: in each second row 3 times 2 loops. The loops of the fourth block are closed 6 times, 1 loop in each second row.
If something seemed incomprehensible to you, or you are unable to calculate the loops for knitting armholes, please contact! I will definitely help you!