

Ability to connect knitted details crochet always come in handy, even if you knit, as well as in the technique of Irish lace. These skills will come in handy even when you want to dream up, for example, create a blanket from fragments of fabric tied and interconnected.
Small subtleties
There are several options. Which one to choose depends on the size, shape and pattern of the parts. For example, the ways squares connect are not suitable for hexagonal or round elements. To combine the motifs connected by dense viscous, the same dense half-columns and single crochets are better. If you knit a lace fabric, then for the seams, columns with crochets and air loops are used - a thin mesh is easily formed from them. She will not rude knitting and make the thing thin, light and airy. An important role is played by the purpose of the product. And, of course, the decorative seam.
Despite the variety of variations, almost all connecting seams are made on the front side. From the inside - very rarely.
It is also important to try and crochet all seams with the same tension. Then the product will perfectly keep its shape, sit well on the figure and look like a thing made by a professional.
Among other things, always try to apply imagination. Then your work will be not only beautiful, but also completely individual.
Method one: using half-columns
The connection of parts in this way is best suited for large dense products (rugs, bedspreads), since a seam made with half columns or single crochet columns is also dense.
Two motifs are folded face inward. Crochet you need to capture the inner parts of the uppermost loops and knit half columns. In this case, the loop will be before knitting, and the thread is behind it.
Method two: using single crochet
A variant similar to the previous one, but instead of half-columns, crochet columns are crocheted. In this case, you will get a rougher seam. However, if you fold the details on the wrong side, then it will be visible from the front and give the product some decorative effect. There is no binding principle; just do as you like best.
The third way: using single crochet with air loops
This seam will not be rough and will give your product some softness. It is well suited for connecting small elements.
When crocheting the parts, alternate the single crochet and the air loops. You can also add motives even from the face, even from the inside.
Fourth method: flat connection (single crochet)
Two parts are not folded together with the front or the wrong side to each other, but are placed in the same plane (for example, on the table) with the wrong side up. The edges are closed, and half-columns without a crochet are tied through the last rows.
Fifth method: decorative scar
Parts are folded inside out so that the seam stays with the front. You can combine motifs with columns with a crochet or without it, as well as any decorative ones that you like.
Make a few test cases and choose the one that suits this product the most.
The sixth method: for the tips of the "picot" or the top of the columns
Details that are tied “pico” around the edge look more decorative, and, of course, I would like to combine them so that this decorativeness is not lost.
First of all, you need to connect the air loop, after which the connecting piece through the top of the “pico” of another part is knitted. So the two parts are connected. Then another air loop and one connecting loop are knitted, which is fixed on the last column.
If square elements are tied around the edge with double crochets, you can tie them together at the vertices of these columns. A hook, which is inserted in front of the junction, is captured and extended by the working loop. Then the grapple is done again and all the stitches are crocheted together. After that, the working thread is again captured and the remaining loops are knitted, and the hook is introduced to the next point and the next double crochet is knitted.
The seventh method: we connect four parts from the corners
It is convenient to connect the square details with each other from the corners, folding them inside out. The thread is fixed in the center of the corner, 3 tight air loops are knitted, then a tight loop is made with a hook inserted in the right place of the second part. After this, 3 air loops are knitted, 2 loops are skipped on the first outer edge and 1 tight is knitted, for which you need to grab 2 threads of the next loop. Repeating these elements to the next corner, you successfully connect the two parts on one side. On the next corner, you need to knit not 3 air loops, but 5, connecting 4 motives.
When you knit 4 parts in the corners a second time, knit 2 air loops, 1 tight in the middle of the chain of 5 air loops that were used the first time to connect 4 parts.
Then again knit 3 air loops, as further along the entire length of the motive.
Eighth method: we connect the elements in the course of knitting
This option for connecting parts to each other with a hook is well suited for hexagons. The seams are beautiful and smooth, which is not easy in the case of motives of this form.
The last row of the first part must be left untied. Then the two elements are connected in the corners: instead of the central air loop of the arch, make a connecting column. Next, the first double crochet is knitted into the second part. Now you have to drop the thread from the hook, and insert the hook under the two walls of the loop of the column of the first part (in the direction from the front to the wrong side). Then the removed loop is picked up again and extended, the double crochet is knitted and again the loop from the hook is reset. The hook is inserted into the next column and the loop is picked up again.
The result of this crochet will be an elegant twisted seam. He will not stand out and clutter the product, and related motives will lie neatly.
How to connect knitted parts with knitting needles for beginners
When all the details are knitted, you need to connect them. So that all the seams are invisible, durable, and at the same time elastic, various seams are used. When tightening the sleeves, be sure to keep the middle in the right place, otherwise the sleeves will not sit properly.
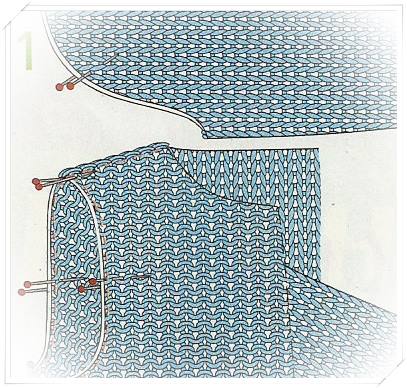
Connection of knitted details, seam "loop"
This seam is especially suitable for joining closed edges, for example at shoulder seams. This is a flat seam and it forms the so-called line of loops.
1. Place the closed edges flat against each other, the front sides of the parts are on top. Start at one end, pierce the needle through half of the hem loop of the bottom part and pull the thread.
Now insert the needle into the edge loop of the upper part and again pierce it in the middle of the next loop (below the closed edge). As shown by the arrows in the figure, stick the needle into the loop and the lower part under the closed edge and poke it out again in the next loop.
 1
1
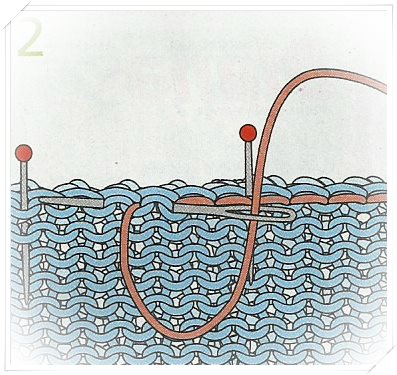
2. On the upper part, again work with offset, that is, grab one wall of the last and one wall of the next loop under the closed edge, while piercing the needle through the middle of both loops.
After about 2 cm, tighten the thread. At the same time, the walls of the loops close so that a continuous web is obtained.
 2
2
Connection of knitted parts, mattress seam
A multi-sided seam that fits beautifully flat and allows you to precisely match the colored stripes or stripes of patterns, since it is performed on the front side. It is used, for example, for joining side seams or sleeve seams.
1. Place the bevels of the sleeves in front of and the front facing up parallel to each other, and also parallel to each other.
Grab the broach with the needle between the edge loop and the first loop, pull the thread. On the other side, grab the opposite broach between the edge loop and the first loop and pull the thread.
Repeat this process alternately once on one side, then on the other side.
 1
1
2. After about 2 cm, tighten the working thread so that both parts are joined together without a transition.
 2
2
Connection of knitted parts, embroider straight sleeves
First, connect the open straight sleeve to the front and back, then with a single line sew the sleeve and the side seam.
1. First mark the middle of the sleeve. Parts are grinded face up. Fix the sleeves with pins along the edge of the front and back, the middle of the sleeve falls on the shoulder seam, which is made by a seam loop.
Grab a loop on the sleeve with the needle below the closed edge, on the front and back parts, grab, respectively, two broaches between the edge loop and the first loop. Since the loops and rows have different widths, from time to time grab only one pull.
 1
1
Connection of knitted parts, stitch sleeves with okat
First, make a straight seam of the sleeve.
1. Mark the middle of the sleeve. Attach the sleeve with the sides facing inward to the shoulder seam and secure it with pins, the middle of the sleeve falls on the shoulder seam. Starting from the middle, fix the sleeves with pins in the armhole, evenly distributing the width of the sleeve. The lower seam of the sleeve is on the side seam.
 1
1
2. Here the seam is sewn (poke out the needle, make one stitch back to the needle and poke out the needle again to the left of the puncture site). The line should go under the closed edge.
When pricking and puncturing the needle, if possible, make punctures between the loops, that is, do not puncture the thread itself. Check from time to time how the stitch fits and what the seam looks on the front side. Free course
 2
2
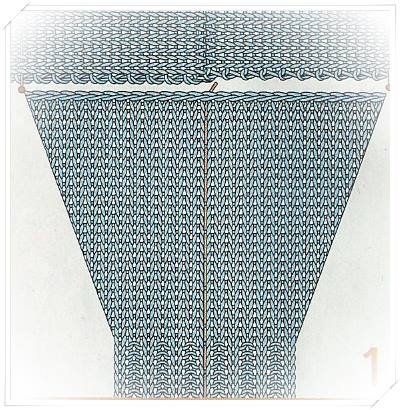
Right size
So that do-it-yourself pullovers and jackets will suit you, please take measurements! In the size chart below, you will find the size corresponding to the calculated body sizes.
In addition, to, on which all sizes are affixed. Compare this data with your favorite pullover to evaluate how the model will sit on you.
Measurement:
Chest: Measured in a circle at the height of the chest.
Waist: Measured loosely around the waist without belting.
Hips: Measured horizontally across the most prominent part of the hips.
Size Charts
The size chart will help you choose the right size. Compare the data with the values \u200b\u200bin the table.
 Buttonholes-Basic knitting needles for beginners
If you want the seam from the connecting posts to be visible from the front of the product, fold the parts with the wrong sides up. If the edge of the seam should remain invisible, fold the parts with the wrong sides together. Insert the hook from front to back through the edge loops of both parts, put a thread on it and pull out the loop. Knit 1 connecting post, then insert a hook under the next hem of both parts. Continue to the end, then fasten the thread.
Fold the joined parts with the front sides together. Insert the hook from front to back under the edge loops of both parts. Throw the thread on the hook and pull out the loop, tie 1 half-column, then insert the hook into the next edge loop. Continue to the end, then fasten the thread.
The seams made in this way are very durable, therefore they are often used for stitching large and heavy products. Fold the parts to be joined together. Pass a thread of suitable thickness into the stitching needle and sew “back the needle” as shown in the figure, piercing the needle between two adjacent loops.
By connecting seams, it is good to sew details of children's clothing or details of products from fine yarn. Fold the parts upside down and end to end. Insert a thread of the appropriate thickness into the needle and freely connect the parts by inserting the needle into the edge loops, as shown in the figure.
With half-columns, the neckline and edges of the product are often tied. Insert the hook from front to back through the edge loop. Wrap the thread around the hook and pull out the loop. Knit 1 half-column, then continue to knit along the edge of the product, introducing the hook in one row after another. Such an edge can be tied with a thread of contrasting color.
Separate the associated parts of the product before you begin to assemble should be well steamed. In this case, try not to stretch the canvas. Lay each part face down on a soft-padded surface. Fasten evenly around the edges with safety pins so that the rows and loops go smoothly.
Iron all parts with a warm iron through a damp cloth. Do not drive the iron back and forth, but raise and lower it on the canvas until all parts are well smoothed. After the cloth cools down a bit, remove the pins. Now the product parts are ready for assembly.
This post is placed in a category.
Friday, January 13, 2017 4:44 p.m. + in quote sheet
In this collection:
3. Suture loop to loop over facial loops.
9. How to sew knitwear HOOK! Perfect machine seam!
1. The choice of needles for knitted seams.
In this video about knit stitches, I’ll show you which needles to use to stitch knitwear so that you get “seamless knitting”.
Knitting without seams is a special technique that requires considerable experience and skill and is not suitable for all knitted models. For the time being, we will simply imitate this technique and our knitted seams will be practically invisible.
Choosing the right needle when working with knit stitches is very important. A needle should help with knitwear, not cause problems, right?
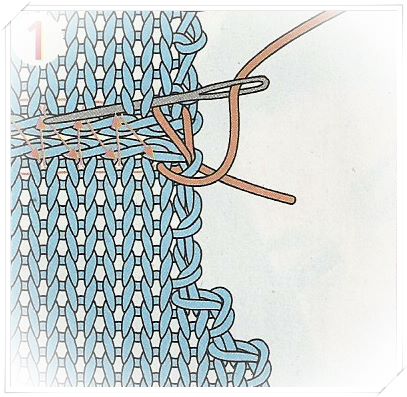
2. Knitted seams: vertical seam, horizontal seam, loop-to-loop seam, stitch seam
Knit stitch "loop into loop" is used for knitting. The seam is used to connect parts along open loops. Such a seam is completely invisible. We bring to your attention a photo and video lesson on the stitch "loop into a loop" on open facial loops (hosiery knitting).
To make a seam, you will need to leave the free end of the thread 3 times longer than the seam, plus 15 - 20 cm to hold and seal the thread. Stitched parts are folded with open loops to each other. The number of loops on both parts must be the same.
The stitch "loop into loop" can be done directly from the knitting needles or first ironed the details - depending on how convenient it is. In the latter case, they knit a row with an additional thread (better than another color) and close it. Wet-heat treatment is done and an additional thread is dissolved. Pressed open stitches remain, along which it is convenient to sew. If the seam is long, then the loops from the additional thread can not be dissolved immediately, but gradually, so that the main loops do not open. 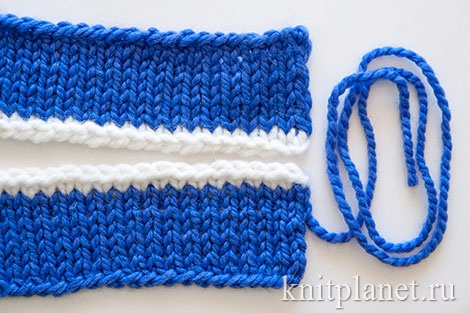
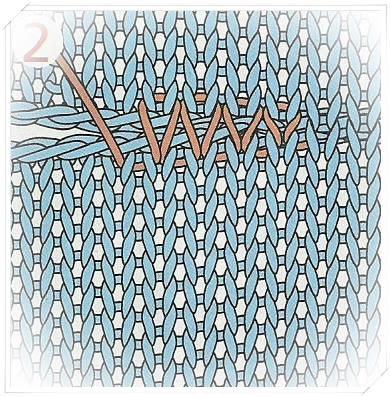
Rule: the needle enters the same loop 2 times: first from below, then from above.
The working thread is located on the bottom part. We introduce the needle from the bottom up into the lower first (edge) loop and pull the thread. 
Then we return to the lower first loop, we introduce the needle from top to bottom. Immediately remove the needle from the second lower loop with a movement from the bottom up. 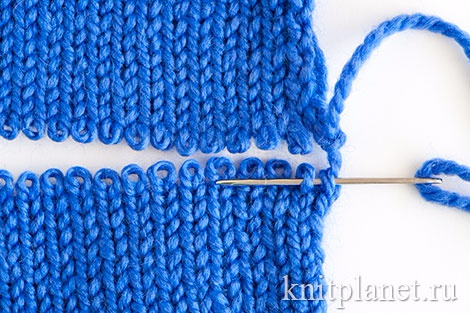
Now we return to the first upper loop, insert the needle from top to bottom and bring it to the next loop from bottom to top. 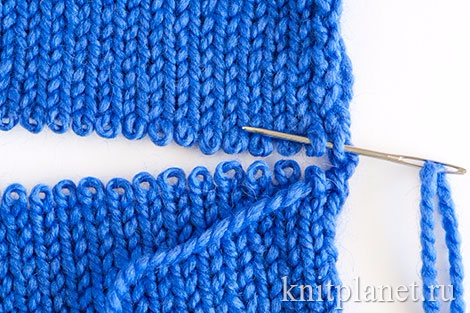
We return to the bottom row, insert the needle into the second loop from top to bottom, put it in the third from bottom to top. 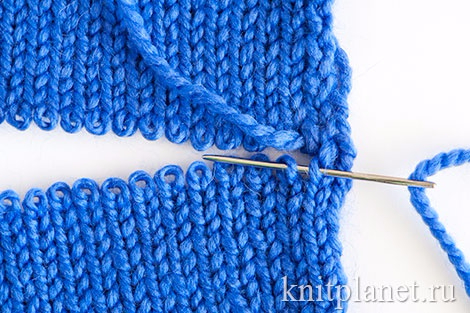
And so we continue: from the bottom up, the needle is inserted in the “own” row, from top to bottom - when moving to another row.
This is what the finished seam looks like. This is the most inconspicuous transverse knit stitch. 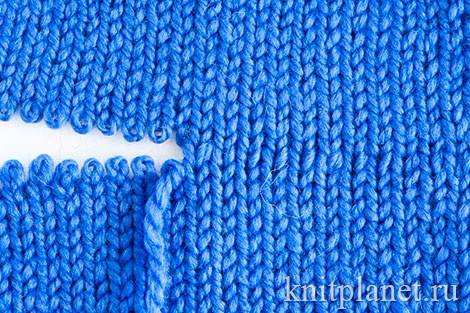
Video tutorials on the implementation of the seam "loop in the loop" on the front loops with knitting needles
In this video about knit stitches, I’ll show you how to sew knitwear with a buttonhole stitch. This invisible seam allows you to sew a sweater, or knitted sweaters for details almost imperceptibly. And also, carefully sew the details of children's knitwear so that the seam does not press on the baby. This seam can also be used to repair knitwear.
The seam is truly invisible on the product and can be used both in crochet and knitting. It is simple and you will quickly learn. Use!
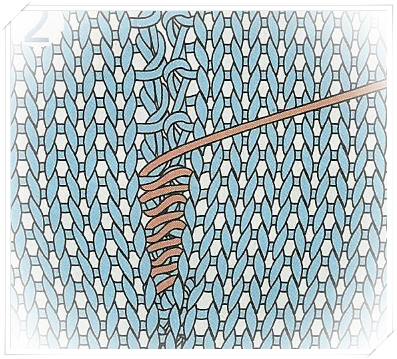
4. A vertical knitted seam along the front surface.
In this video you will see a vertical knit stitch in knitting and learn how to sew sleeves, a back and a shelf of a product when knitting sweaters with sleeves so that the seam is not visible. In this video, the knit stitch is made along the front surface.
This seam can be done not only on patterns of front loops, but also on any other knitted fabric. The main thing here is to pick up the broach not from the edge loop, but from the loop adjacent to the edge loop. When knitting, there is less opportunity to knit in a circle than when crocheting and the question of knitted seams becomes very relevant. In this video, I offer you one of the options for the vertical connection of a knitted fabric along the front surface.
5. A vertical knitted seam on a wrong side.
In this lesson, you will see a vertical knit stitch in knitting and learn how to sew, for example, hats or berets with sewn loops to sew the edges of the product so that the seam is not visible.
In this video, the knit stitch is done on the wrong side. This seam can be done not only on the patterns of the purl stitches, but also on the garter stitch (we knit the front rows both on the face and the wrong side), but also on any other knitted fabric. Here, the main thing is to pick up the broach not from the edge loop, but from the loop adjacent to the edge loop.
When knitting, there is less opportunity to knit in a circle than when crocheting and the question of knitted seams becomes very relevant. In this video, I offer you one of the options for the vertical connection of a knitted fabric on the wrong side.
6. How to sew two knitted fabrics with closed loops.
In this video you will see how to make a butt seam on a knitted fabric with closed loops. In this case, the seam technique is the same, both for the fabric connected by the front, and for connected with the purl stitches.
Bring the working thread from the inside out to the face in the middle of the front loop. To catch on a broach loop of another knitted fabric and insert the needle again into the middle of the front loop, only from top to bottom.
With this inconspicuous knitted seam, you can join two knitted fabrics with closed loops. For example, this way you can sew the back and the shelf of the product, dock (sew) the pockets to the knitted sweater. So you can lengthen (set) the sleeves and trousers of children's knitwear, because children grow so fast. Good luck, now another knit stitch in your arsenal.
7. Knitted stitch seam with a needle. How to sew a collar
In this video tutorial on knit stitches, you will see how to professionally sew (stand on) a stand-up collar to a sweater, cuffs connected with an elastic band to a child’s blouse from which a child grew up, or to a sweatshirt that you sewed yourself. With this seam, you can sew the bar to the jacket, extend the warm bologny pants for the child.
In general, there are tons of uses for this knitted stitch seam. By learning how to sew a stitch seam, you will give respect to your knitwear. This is a professional seam that special kettling machines perform in factories. You will learn how to do it only with the help of a needle and thread, and your sweaters and blouses will always amaze your friends with the accuracy and professionalism of their manufacture.
8. Professional kettelny seam.
How to sew cuffs?
In the second part of the video tutorial about the knitting stitch, you will see how to snap on the front side. I will show you the secrets and features of this knit stitch. You will learn how to fasten the extreme loop, how to hide the strings, where to insert the needle, how and for what broach to catch it and from which loop to withdraw. Now you can stick on the collar, cuffs, strap, etc. Good luck).
9. How to sew knitwear HOOK!
We sew the product with a crochet and get a machine seam - very beautiful and even.
If you have ever had to deal with needlework, then you probably know that beautifully knitting a product is only half the story. In order for the time spent on knitting not to be wasted, you need to learn how to sew parts together and carefully process the seams. It is very important at the same time that the seams are smooth, moderately tight and do not deform the resulting product.
How to stitch knit parts
There are several ways to make the seams flawless. Someone addresses to machine seams, someone performs them manually. In this article you will see two best ways., and you can choose from them yourself. The instructions are easy and accurate, the seams are invisible on the front side and neat on the inside. Checked!
The first method: we sew with a crochet
At first glance, the task may seem impossible. Do not be afraid! As soon as you deal with the little things, this method will become your favorite.
The seam is quite fast in execution, and the edge is smooth and accurate. True, the seam has one drawback - it is not suitable for products with complex edges.
It’s best to stitch them with simple parts without any reduction. Or, as an option, do the reduction and addition, but at the same time retreat one loop from the edge. In this case, everything will turn out perfectly! To simplify your task, you can place the edge loops on separate pins. So it will be easier to dissolve.
Explanation
Edge loops create a kind of pigtails on the edges of the part. On one of the parts, this pigtail needs to be dissolved using a needle. You will see the loops formed on the edge - this is the thread that needs to be sewn the product.
Fold the parts together on the wrong side. Insert a hook between the two loops of the part that remains unbroken, and pick up the loosened edge loop. Pull this loop through the upper part, with the next loop, do the same and stretch it through the first.
Continue the above steps until the end of the seam. So you get a picture of the edge loops of the lower part on the upper. This seam has an additional advantage - the things sewn to them are very easy to dissolve. You just need to slightly push the parts fastened together and pick up the seam. He will disperse himself.
Video to help.
Method two: sew with a needle
The next seam is also very comfortable. It is called a mattress. Now you will learn how to sew knitted parts with a needle.
Important tip: take this seam blunt needle. For example, a needle for embroidery. It is even better to use a needle with a curved end, similar to those used to sew balls.
The second advice, no less important: if the product is knitted from coarse, thick yarn, then it is better to take a thinner thread for the seam. Such a seam will be neat. The thread must match in color.
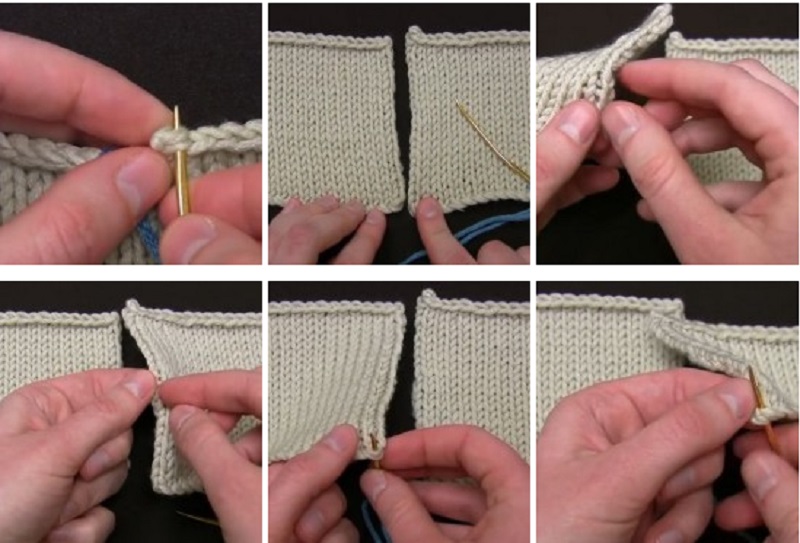
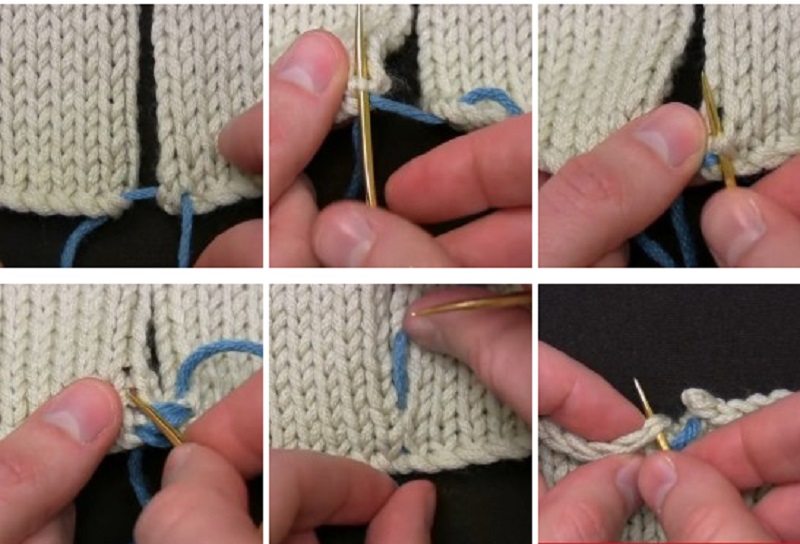
Explanation
The needle must be inserted into the jumper between the edge and the next loop. Pick up the jumper first on one part, then on the second. Continue this sequence until the end of the product. At the very end, tighten the thread.
Video to help.