

Experienced knitting lovers, starting a new job, determine in advance how it will be sewn after completion, and depending on this, execute their edges so that the seam does not spoil the knitting pattern. The choice of the type of seam is very important, because even the most beautiful knitted product will fade with an unsuitable inaccurate seam. With a sufficiently thin and dense knitting, parts can even be sewn up on a typewriter, with a large seam. But in this section we will consider the types of seams for joining knitted parts, manually.
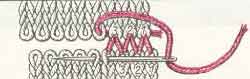
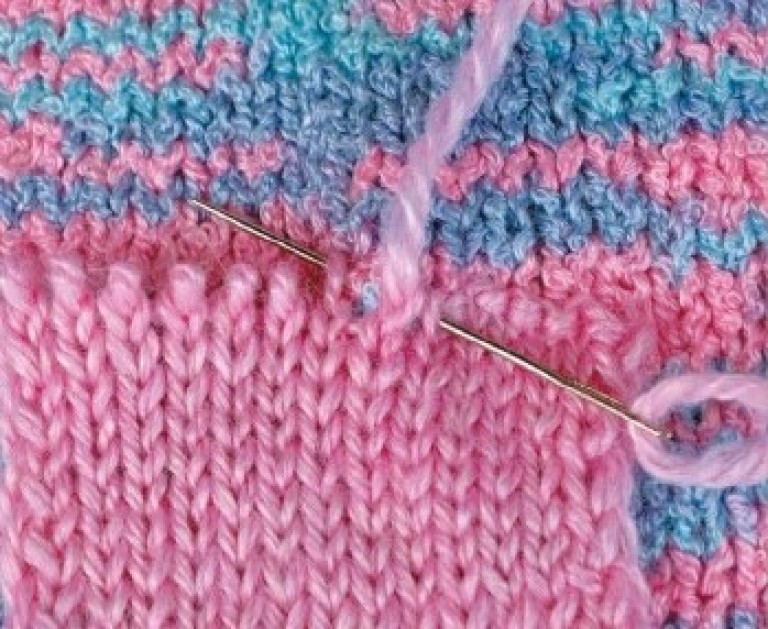
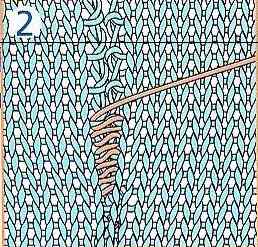
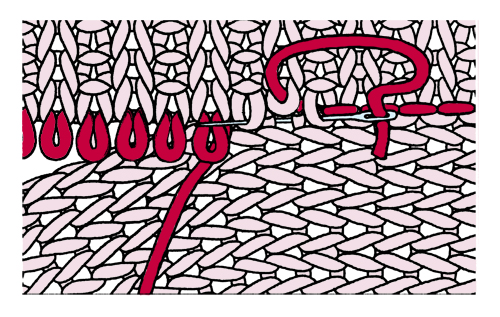
| Horizontal seam "loop in a loop" used to connect the details of hosiery knitting. With this seam you can give a second wind to your old favorite things. For example, you need to remove the part of the sleeve that is worn on the elbows. First, its boundaries are outlined - the upper and lower rows. In the upper row, the filaments on both sides of the row are cut and the thread is carefully weaved out, the same is done in the lower row, then the unnecessary part is removed. The open loops of two canvases are sewn from right to left on the front side with a thread of the same color and thickness that was knitted. It is necessary to fix the thread on the upper fabric on the right and immediately insert the needle into the 1st loop (from the wrong side), then from the right side into the 1st loop of the lower fabric, then from the wrong side into the 2nd lower loop, again insert the needle into 1st upper loop, but already from the front side and then to the 2nd upper loop from the wrong side, then again to the 2nd lower, but from the right side, and then to the 3rd lower loop from the wrong side, then again insert the needle into the upper 2, but already on the front side and pull it through the 3rd upper loop from the wrong side to the front side, etc. The seam loops must exactly match the size of the fabric loops., only in this case the seam will be completely invisible. |
|
|---|---|
 |
|
 |
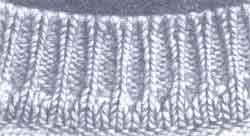
"How to sew a knitted elastic band" If the elastic is 1 * 1, then it is sewn like this. First, the front loops are connected on one side, the wrong loops are passed, then the knitting is turned over and the loops on the other side are connected. If the gum is 2 * 2 or another pattern of front and back, then the canvas is connected like this. Starting from the edge, connect the first batch of facial ones, then turn the canvas over and connect the batch of facial ones there, so turn the canvas over as much as necessary and connect the loops. |
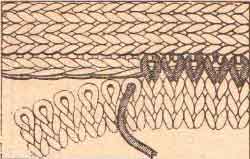 | "Connection of parts with different directions knitting " Cloths with different knitting directions are connected with a horizontal loop-to-loop seam. |
 | "Connection of stocking knitting vertically" If the parts are made in hosiery or in elastic, they are connected by inserting a needle under the arc of the front loop located directly next to the edge loop, picking up each loop of one or the other cloth in turn. |
 | "Connection of embossed knitting vertically" If the parts made with embossed viscous stitch, then the needle is inserted under the broach between the edge and adjacent loops alternately on one or the other part |
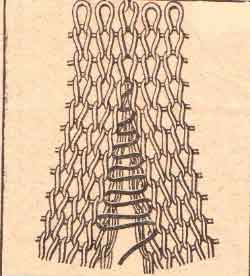
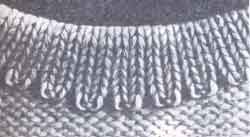
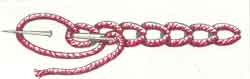 | "Tambour seam" The tambour loop is similar to the front loop, and a number of them are like a chain of air loops, crocheted and fixed to the canvas. Perform it in the direction from right to left: fastening the thread on the wrong side of the fabric, pull the needle to the front side, insert it into the hole where the thread comes from, make a stitch and bring the thread under the needle, forming a loop. The needle is pulled and holding the loop with the fingers of the left hand, tighten the working thread. For the next stitch, the needle is inserted into the previous one and made exactly the same in size. A tambour seam can be used when processing the neck of the neck, armhole and bottom of a model knitted or sewn from fabric, if an even row of loops must be gathered along the edge. To do this, sew the knitting (or fabric) with a chain stitch along a previously marked line. Then, with a knitting needle or crochet, knit new loops from the vestibule, prying them over both walls or only the front ones. Next, they knit with a 1x1 elastic band or another double-sided pattern. |
 Set of new chainstitch loops |
|
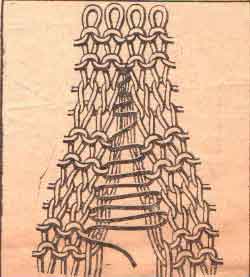
 Set of new crochet stitch loops |
|
 A pre-welded part | Kettelny seam Most often, with its help, small details are attached 6 inlets, pockets, trims. Horizontal cuts on the canvas are also treated with a stitch seam, and sometimes the loops of the last row are fixed, if you need to get a thin elastic edge. The technique of performance of hinge closure is reminiscent of the sewing "by a needle" or a machine line. |
 Stitching |
|
 Figured fillet |
In this case, double open stitches are sewn to the fabric. The principle of the seam is the same as the usual kettel. Figured fillet is most often used to decorate women's and children's clothing. |
Before stitching the finished parts, they must be steamed and ironed. Steam through 2 times folded cheesecloth or moistened cloth. Lay a thin blanket and sheet on the ironing table. Lay out the related parts, straighten and pin the contour with needles. Place wet squeezed gauze on bonded parts. Steam lightly with an iron. Leave the details on the table until completely dry.
If the part is connected by a relief pattern, then it should not be steamed. Spread the part on the ironing table and lay wet squeezed gauze on it for 30 minutes. Remove the cheesecloth and leave the part on the table until completely dry. Then proceed to stitching the parts.
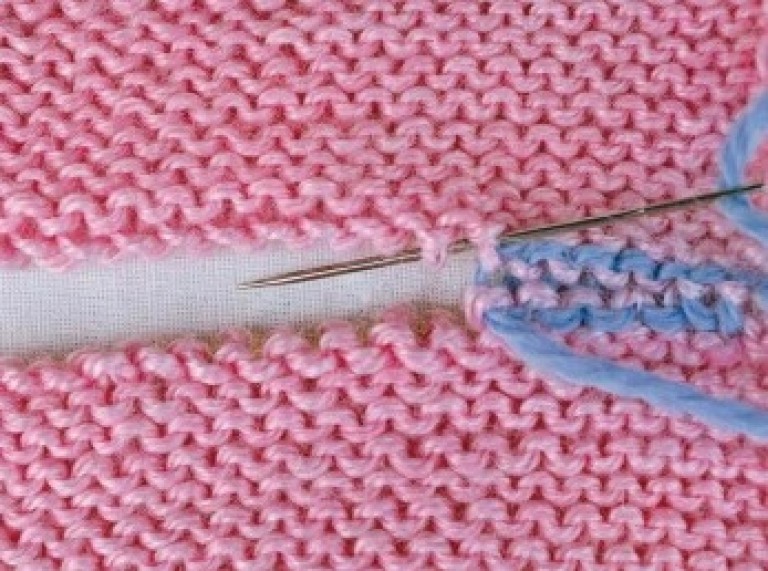
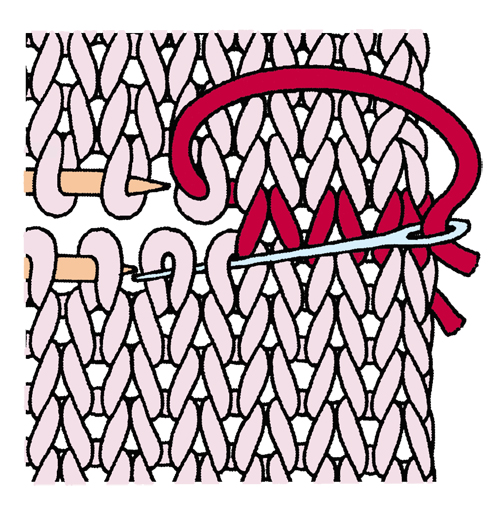
Such a seam is used for stitching parts that have sewn edges with open loops. To prevent the stitched parts from opening, knit several rows of auxiliary thread over the last row. Apply a damp cloth and iron the edges of the part. Then unfold the rows connected by an auxiliary thread. Arrange the parts with open loops opposite each other and sew on the front side from right to left with the main color threads that knitted the product parts. From the wrong side, insert the needle and thread from the bottom up into the first loop of the bottom row. Then pull it from the front side into the first loop of the upper row and from the wrong side into the 2nd loop of the upper row from the bottom up.
Pull the needle and thread from the front into the first loop of the bottom row and from the wrong side, pull the needle out of the 2nd loop of the bottom row from bottom to top.
Enter from top to bottom in the 2nd loop of the top row and stretch from bottom to top from the 3rd loop. Sew the remaining stitches in the same way. In order to make the seam invisible, stitched loops must be the same size as in knitted details.
When stitching a sleeve with an armhole, a joint of the shared and transverse web is required. A horizontal knit stitch is used here. Sew in a horizontal seam from right to left on the front side. Insert the needle into the open loop of the web and grab the loop arc located next to the edge loop of the other web. Sew the remaining stitches in the same way.

When stitching the wrong side, the horizontal knit stitch is performed according to a different pattern. Insert the needle with thread from top to bottom in the first loop of the bottom row and stretch into the 2nd loop from bottom to top. Then insert the needle from the bottom up into the first loop of the top row. Bring the needle up and down from the 2nd loop of the top row. Stitch the rest of the stitches the same way.
When stitching 1 x 1 elastic at the front, connect only the front loops to each other, and skip the wrong loops. Then turn the parts to the wrong side and sew the rest of the loops in the same way, since on the wrong side these loops will be front.
In order for the seam thread to be invisible, its color must be the same as the yarn, so parts are sometimes sewn with the same thread that was used to tie the product, or use ordinary sewing threads that are close in color.
Sew together with a vertical knitted seam knitted details from the front side from top to bottom along the edges of the canvas.
Insert a needle with a thread of the same color between the broaches of the edge and the first loop of the left part onto you. Then, in the same way, pull the needle and thread under the upper broaches on the right part. In this way, stitch the parts to the end, capturing the needle with 2 broaches, then on one side, then on the other. Do not tighten the loops so that the seam is elastic.
Kettelny seam is used when connecting small parts with the main.
Tie several rows of extra thread to the edge of the part to be sewn this way. Iron the edge, and then loosen the rows with extra thread. Bring the part to the product. Make a seam with a thread of the same color, but finer. Insert the needle and thread from the wrong side into the first open loop. Then bring the needle from top to bottom on the wrong side of the product and from the bottom up enter it into the 2nd loop, pull it to the front of the product. Insert the needle into the first loop and from the wrong side enter into the 3rd loop and pull it to the front side. Skip the 2nd loop. After that, insert the needle and thread into the 2nd loop and pull it into the 4th loop. Continue sewing the part to the product in the same way.
This seam is similar to the back-needle stitch used in sewing and embroidery.
If the bottom edges of the cuffs connected by an elastic band are frayed, you need to cut the thread above this place and pull both parts of it from the fabric. Then close the open cuff loops with a seam seam.
When all the details are connected, you need to connect them. In order for all seams to be invisible, durable and at the same time elastic, various seams are used. When screwing in the sleeves, be sure to ensure that the middle is in the right place, otherwise the sleeve will not sit properly. See how to sew knitted parts,.
Seam "loop"
This seam is especially suitable for joining closed edges, for example at shoulder seams. This is a flat seam and it forms the so-called line of loops.
1. Place the closed edges flat against each other, the front sides of the parts are on top. Start at one end, pierce the needle through half of the hem loop of the bottom part and pull the thread. Now insert the needle into the edge loop of the upper part and again pierce it in the middle of the next loop (below the closed edge). As shown by the arrows in the figure, stick the needle into the loop and the lower part under the closed edge and poke it out again in the next loop.
2. On the upper part again work with offset, that is, grab one wall of the last and one wall of the next loop under the closed edge, while piercing the needle through the middle of both loops. After about 2 cm, tighten the thread. The walls of the loops will be closed in such a way that a continuous web is obtained.
Mattress stitch
A multi-sided seam that fits beautifully flat and allows you to precisely align the colored stripes or stripes of patterns, since it is performed on the front side. It is used, for example, for joining side seams or sleeve seams.
1. Lay front and back facing up parallel to each other; also place the bevels of the sleeves parallel to each other. Grab the needle broach between the edge of the knitted loop and the first loop, pull the thread. On the other side, grab the opposite broach between the edge loop and the first loop and pull the thread. Repeat this process alternately once on one side, then on the other side.
2. After about 2 cm, tighten the thread so that both parts are joined together without a transition.
Stitch straight sleeves
First, connect the open straight sleeve with the front and the back, then with a single line sew the sleeve and the side seam.

First mark the middle of the sleeve. Parts are grinded face up. Fix the sleeve with pins along the edge of the front and back, the middle of the sleeve falls on the shoulder seam, which is made with a “loop” seam.
With a needle, grab a loop on the sleeve below the closed edge; on the front and back parts, grab, respectively, two broaches between the edge loop and the first loop. Since the loops and rows have different widths, from time to time grab only one pull.
Stitch sleeves with okat
First, make a straight seam of the sleeve.
1. Mark the middle of the sleeve. Attach the sleeve with the sides facing inward to the shoulder seam and secure it with pins, the middle of the sleeve falls on the shoulder seam. Starting from the middle, fix the sleeve with pins in the armhole, evenly distributing the width of the sleeve. The lower seam of the sleeve is on the side seam.
2. Here the seam is sewn (poke out the needle, make one stitch “back the needle” and poke out the needle to the left of the puncture site again). The line should go under the closed edge. When pricking and pricking the needle, if possible, make punctures between the loops, that is, do not puncture the thread itself. Check from time to time how the line goes and how the seam looks on the front side.
Source Sabrina magazine special issue No. 9-10 September-October 2015
Experienced knitters, before starting to create a new product on the knitting needles, first decide how all the details will be sewn after completion of work. The design of the edges of the product will depend on this, since the seam should in no case spoil the pattern.
The seam in knitting is selected relative to the texture of the knitting. There are times when items of clothing are sewn with large stitches on a sewing machine. Most often, they are connected by a knitted seam made with a special needle with a large eye. The article will offer material that tells about the types of knitted seams and methods for stitching them.
The main types of knitted seams
Vertical way
This option for sewing knitted products with knitting needles when there is a parallel direction, for example, to connect the back or sew the sleeves. In this case, variations of vertical knit stitches are used.
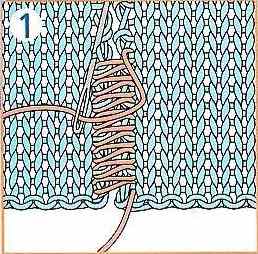
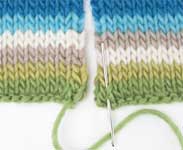
Knitted clothing parts must be laid out face up. The edges that will be joined should be evenly knit with the same number of rows. If you want to add a few stitches, step back a bit from the edge. Without an addition, it is the edge loops of the typesetting that begin to connect. The figure shows this process. It is necessary to introduce a needle from bottom to top near the edge of one stitched part, and then another.
To connect the knit front surface, you need to grab with a needle one arc of the front buttonhole, which is located near the edge, and then another located in parallel. Knitted seam should be joined without missing a single thread. All work is done sequentially. The needle moves from right to left as shown.
 Stitching is done in much the same way. knitting needles wrong side. The needle makes the capture of the arches of the loops located near the edge ones and the knitted elements are connected. This proposed seam will be slightly thicker than the following example.
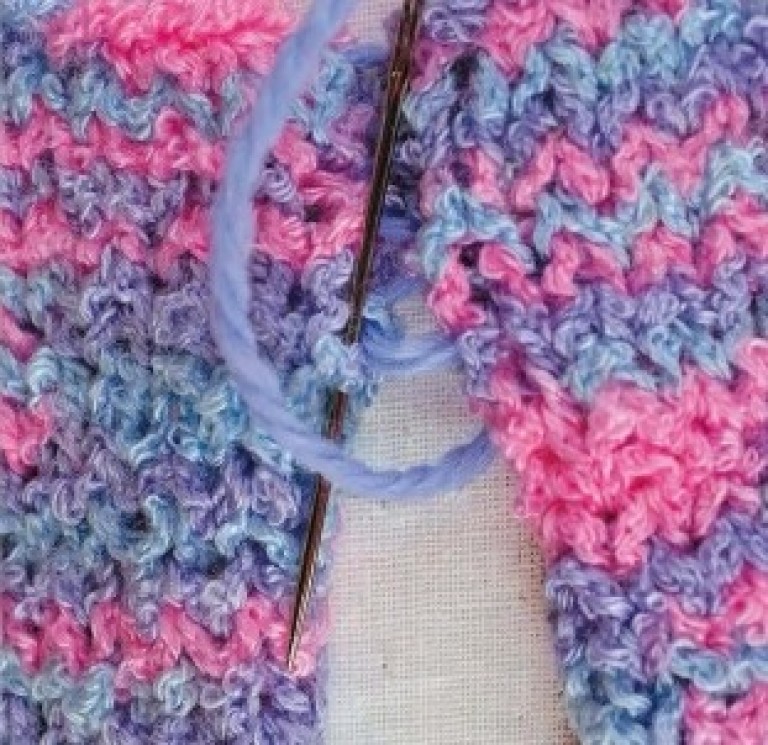
If knitting occurred with thick yarn or the joined loops are made in different ways, you must enter the tool under the broach, which is between the edge and another loop. Knitted vertical seam is done alternately, then on the one hand, then on the opposite. As a result, the line will be flat and almost invisible. This option is shown in the figure below.

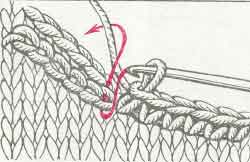
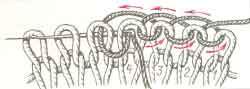
Horizontal seam
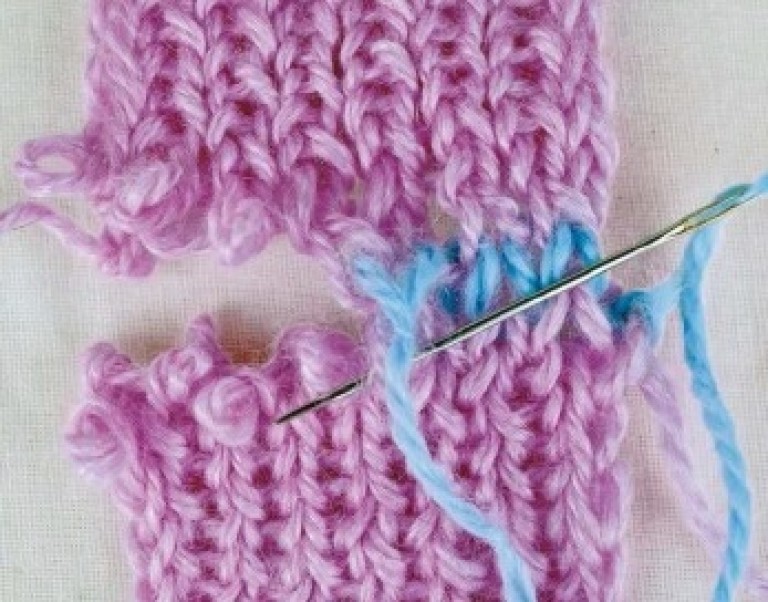
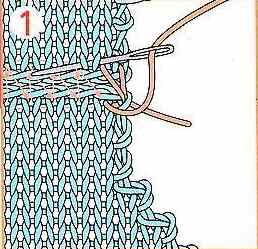
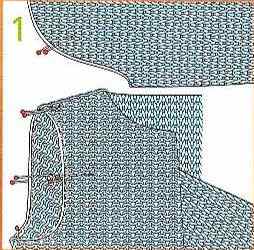
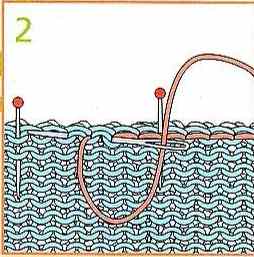
Shoulders in sweatshirts, hoods and much more join this kind of seam. The figure shows the movement of the needle, after which the seam remains invisible to the eye. The tool begins to enter into the edge loop, first from the bottom up, and then vice versa. The knitted loop is removed from the knitting needle. The second image shows how the needle sews the following loops. On the last one you can see how the knitted seam will look during the stitching process itself.

To stitch lobar and transverse elements, for example, a sleeve of a jacket with a front part and a back near a shoulder seam, it will be necessary to chop these sections with a pin first. The needle is inserted into the loops on the sleeve of the last row, and then punctures the transverse threads located between the edge loops and the adjacent knitted row. The figure shows this knit stitch.
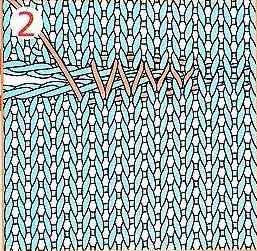
 More experienced knitters use a stitch seam. It turns out flat and also not noticeable. From the wrong side, insert the tool into the second chain, then from the top to the first. Pull the needle up from the bottom, but through the third buttonhole and again return it to the second, but doing it from above. The needle is stretched from bottom to top through the fourth and continues until the knit ends.
Video: Joining with different stitches
https://www.youtube.com/watch?v\u003drFtyr7IMMfE
 A part in the manufacture of knitwear raises the most important question: how to neatly connect all the details without visible seams. This is a problem for many, even for experienced craftswomen. When all the details of the future product are ready, you need to seamlessly and efficiently connect them. The usual seam for this is not suitable. It is too coarse and noticeable, especially on small items. For such purposes, there are special, almost invisible seams that do not spoil the future knitted product, but only decorate it.
This master class "Knitting: how to sew details" will teach unique seams that will be useful to any craftswoman. To master such seams is not at all difficult, because the lesson shows in detail how exactly they should be done.
It often happens that in the product it is necessary to connect two parts of the product connected by a garter stitch. They must be joined end-to-end and as unnoticed as possible, because any seam will quickly spoil the appearance of a thing.
Video lesson “Knitting: how to sew details”
A few tips on how to carefully and seamlessly connect two related parts:
- To make the seam invisible, each part of the product should be finished with several rows of auxiliary thread.
- On one of the stitched parts, the last row must be tied along the front side, and the second - on the wrong side.
- Before stitching, both parts of the future product should be steamed. This should be done only in the field of two or three rows connected by the main thread and in the field of rows connected by the auxiliary thread.
- When steaming, the weight of the iron should remain in the hand.
- Then the rows connected by auxiliary thread must be carefully dissolved.
- We fold the stitched parts butt to each other.
- Connecting the two parts, in the lower part it is necessary to reproduce one row with the front smooth surface, and in the upper one single seam groove.
- The seam is best done using a horizontal knit seam.
- The seam should be made with a thread of the same color as the product itself.
In this way, you can quickly and easily, and most importantly, completely invisibly, sew two knitted details.
With a cruciform set, you can not only start the product, but also finish it. To do this, there is a special seam with a seam that looks exactly the same as a cruciform set. Such a seam will decorate the product, add symmetry and accuracy to it. You can do it in a few simple steps, which are shown in this video tutorial.
These little tricks will help beginners and experienced craftsmen in knitting, make their products more beautiful and accurate. Good luck