Knitting

Knit a sweater from the neck in a circle. An excellent description of raglan knitting on top

Raglan sweater made of knitting needles from the bottom up. Simple knitting looks stylish and elegant.

Dimensions women sweaters: 34/36 (38/40) 42/44

Very effective model. will become the basic thing in your fall-winter wardrobe, it can be combined with anything. This model will add extravagance to any everyday kit.

In this shortened raglan sweater, wool yarn of gray shades looks especially expressive. This is a universal model for winter.

Finally it's time to put on warm women's sweaters. In winter, I want to wrap myself in cozy knitwear. We offer you an amazing warm raglan sweater made of wool yarn.

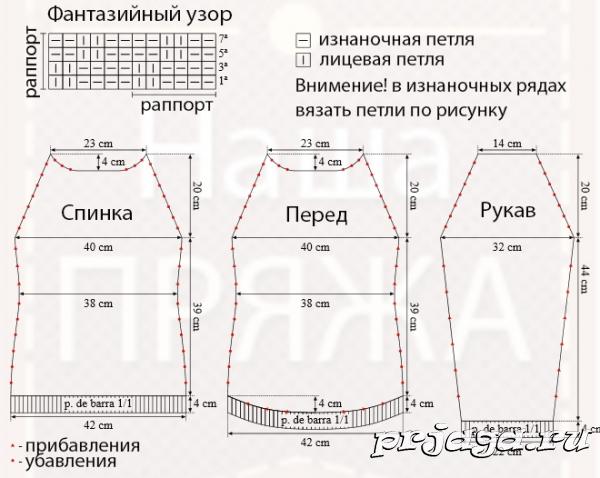
The model consists of four parts, which are then stitched together.

For knitting women sweaters  you will need:

    550 (600) 650 g of gray yarn (100% wool, 80 m / 50 g);

    straight knitting needles number 4,5.

Garter stitch: front and back rows - front loops.

Front surface: front rows - front loops, wrong rows - wrong loops.

Average knitting density: 16 p. And 35 p. \u003d 10 x 10 cm; facial smoothness: 16 p. and 24 p. \u003d 10 x 10 cm.

Description of knitting women's sweaters.

Back / front:  on the knitting needles with a cross-shaped set 78 (84) 90 p. and knit with a garter stitch. After 11 cm \u003d 38 p. from the typesetting edge continue to work with the front stitch. After 26.5 cm \u003d 64 p. (24 cm \u003d 58 p.) 21.5 cm - 52 p. from garter stitch  close on both sides for raglan lines 3 p. \u003d 72 (78) 84 p. Next, knit both the first and last two loops with a garter stitch and reduce on both sides 21 (24) 27 x in each 2nd p. 1 point as follows: knit the 3rd + 4th point together with the front on the left side, knit the 4th + 3rd from the end of the row of loops with the broach on the right side (\u003d 1 point, remove as with face knitting , knit the next loop to the front and pull through the removed loop). At the same time, after 42.5 cm \u003d 102 p. From the garter stitch, knit all the loops another 2 cm \u003d 6 p. garter stitch. The remaining 30 p. Close after 55.5 cm \u003d 146 p. from garter stitch.

Sleeves: put on the knitting needles with a cruciform set of 48 (54) 80 p. and knit with a garter stitch. At the same time, for bevels, add on both sides, starting from the set edge, 6 x 1 p. Alternately in each 10th and 12th p. .. including added loops in the pattern \u003d 60 (66) 72 p. After 20.5 cm - 72 R. from the typesetting edge, make reductions on the raglan lines on both sides, as described for the back. After 33 cm \u003d 116 p. (35 cm \u003d 122 p.) 37 cm \u003d 128 p. close the remaining 12 p.

Knitted raglan sweater with knitting needles fancy texture surface pattern

Women's Raglan Sweater Knitting

To knit such a raglan sweater with knitting needles, special knitting skills are not enough, a beginner level is enough, because such a pattern was created with the simplest knitting elements - front and back loops.

The size:  European 40/42; Russian 46/48
Materials:  7 skeins of yarn Cisne Celta 93% acrylic, 7% polyester, 100 g / 120 m.), Knitting needles No. 5.
  Knitting density:  15 loops * 20 rows \u003d 10 * 10 cm.

How to knit a raglan sweater with knitting needles, description:

Back:  on knitting needles dial 64 loops.
  Perform an elastic band of 1 person. / 1 \u200b\u200bout.


Before:  on knitting needles dial 24 loops.
  Start performing an elastic band of 1 person. / 1 \u200b\u200bout., At the same time, on each side in each second row 5 loops - 4 times \u003d 64 loops on the knitting needles.
  At a height of 4 cm, begin to carry out a fantasy pattern according to the scheme, add 1 loop on each side in each sixth row - 6 times.
Knit 6 rows without additions.
Then reduce 1 loop on each side in every sixth row - 4 times.
  At a height of 43 cm, start reducing the raglan: knit 2 faces., 2 together. Persons, knit with a fancy pattern until the last. 4 loops, 2 persons together. behind the back wall, 2 persons.
  Repeat decreasing alternately in every second and fourth rows - 13 times.
  At a height of 16 cm from the beginning of the raglan, close the central 16 loops for the neck, knit the sides of the back separately.
  Perform reductions on each side of the neck, in each second row 1 loop - 2 times, 7 loops - 1 time.

Sleeve:  on knitting needles dial 34 loops.
  Perform a fantasy pattern according to the scheme, add 1 loop in each tenth row - 7 times on each side.
  At a height of 48 cm, begin to reduce the raglan: knit 2 persons., 2 persons together., Knit with a fancy pattern until the last. 4 loops, 2 persons together. behind the back wall, 2 persons.
  Repeat decreasing alternately in every second and fourth rows - 13 times.
  Close the loop.

Assembly and decoration of the neck:  stitch one shoulder.
  Raise the hinges around the neck of the back and front.
  Perform an elastic band of 1 person. / 1 \u200b\u200bout. - 4 cm.
  Close the loop.
  Stitch the second shoulder, stitch the collar seam.
  Sew on sleeves.
  Sew the sides and seams of the sleeves.

Knitted raglan sweater, knitting pattern


Add a comment


GORGEOUS DESCRIPTION OF RAGLAN, does not squeeze, does not pull. Clear and accessible

Text of the author: “The first time I came across a reasonable description of the raglan. It’s clear and accessible, and the result is still pleasing - the preliminary fitting was 100% satisfied! I learned that this wonderful description is given in the book by Anna Alexandrovna Vlasova, a teacher of labor from St. Petersburg. thanks a lot!


Click to enlarge

here is the very description and calculation. maybe someone else will come in handy.

To knit a sweater with a raglan sleeve, you need to make a scheme.
  The calculation of loops according to the measurement of neck circumference (OR) and knitting density, which we will determine from the sample.
  EXAMPLE:
  If Osh \u003d 34 cm, the gain in freedom of fit is 4 cm, and the density of knitting is 2.5 loops per 1 cm, then you need to dial 2.5x (34 + 4) \u003d 95 loops
  Distribute these loops on all the details of the sweater.
  If each raglan line will consist of 1 loop, then 4 of them will need 4, then 95-4 \u003d 91 loops.
  Divide the remaining loops into 4 parts (front, back and two sleeves)
  Since 91 is not divisible by 4 without remainder, round it to 92.
  92: 4 \u003d 23 loops.
  It was experimentally established that 1 such part should be given to the back, 2 to the front and 1 to 2 sleeves ..
  But so that the front is not too wide, reduce it by 3cm, i.e. 2.5 × 3 \u003d 7.5 loops and get (23 × 2) -7 \u003d 39 loops.
  Of the 7 loops taken, 3 add to the sleeves: (23 + 3): 2 \u003d 13 loops, and 4 loops to the back: 23 + 4 \u003d 27 loops.

  It looks like this
  We knit 96 loops on the knitting needles and knit the first row with a 2x2 elastic, close the knitting into a ring and continue to knit a stand-up collar 3 cm high. After that, knit 1 row with the front loops and make the distribution of the loops on the part of the product: mark the first ragged loop with colored thread (let it will be at the very beginning of the row). From it to the left, count 27 loops (back), mark the next again with colored thread (ragged loop), from which count 13 loops (right sleeve), again mark the next ragged line with a colored thread, count 39 loops from it (in front), then mark colored thread last raglan line. Let's count how many loops are left on the left sleeve (there should be 13 of them, as on the right sleeve)

To prevent the collar of the sweater from being pulled back, we will slightly impose the back: we will knit a series of loops from the 1st ragged line to the 3rd or 4th loop behind the 2nd ragged line, turn the knitting and knit a row along the wrong side, going beyond the ragged line to 3-4 loops (until the increase is done here). So going into 3-4 loops at the end of the previous row, knit a few more rows until you reach the middle of the sleeves ..
  After that, we finish the imposition and knit in a circle, including all the loops located on the spoke.
  (it turns out that we impose the back in shorter rows, but in order to make the “transitions” less visible, I do this: each time I turn the work, I make 1 yarn at the end., and then I knit a row and reach the yarn, I knit it with the next loop together in a pattern.)

Now we will concentrate all our attention on knotting out ragged lines with added loops.
  We knit in a circle, the crochets before and after the ragged lines (loops) are made through a row and we knit them in the next row with the front crossed loop (behind the back wall).
  In this case, loop the raglan line while re-unbinding, leaving the thread behind the knitting.
  So we knit until the raglan line reaches 30 cm, then we will try on. If the armhole is narrow, we will knit a little more, but so that the sleeve does not turn out to be too wide, at the ragged lines on the side of the sleeve, make yarn over 2 front rows.
  Next, we proceed to knitting individual parts (backs, front, sleeves)
  I usually knit a SEAMLESS product, that is, I remove the loops of both sleeves on additional (circular) knitting needles, and on the main circular knitting needles I have back and front loops. I continue to knit (front and back) in a circle to the desired length.
  The sleeves can be knitted separately and sew a side seam, or it can be done in a circle without a seam. If during fitting it turns out that the sleeve is too wide, then it is necessary to make reductions.
  Knowing the density of knitting, we determine the number of loops on the base of the neck and distribute the loops on the back, front, sleeves and ragged lines. For example, with a knitting density of 2.5 loops per 1 cm and a neck circumference of 36 cm, 90 loops (2.5 * 36) must be put on the knitting needles. Suppose that in this example each ragged strip consists of two loops, then 4 strips are 8 loops (2 * 4). The remaining loops are divided into three equal parts - the back, front, and sleeves (Fig. 1)

  In our example, 82: 3 \u003d 27 + 27 + 28. The resulting parts must be previously distributed: 27 loops on the back, 27 loops on the front, 28 loops on two sleeves (14 loops each).
In order for the product to have a neck in front deeper than on the back, two corrections are made in the calculation.
  1. In order for the sleeve not to be wide on the chest line, it is necessary to narrow each sleeve by 1.5-2 cm when calculating, thus increasing the back and front. In this example: 2.5 * 2 \u003d 5 loops, - therefore, each sleeve will be already 5 loops, and the front and back will be 5 loops wider. Sleeve: 14-5 \u003d 9 loops, front and back: 27 + 5 \u003d 32 loops.
  2. In order to deepen the neck of the front, more rows are knitted along the back. To do this, knit the back loops, gradually adding to them in 3-5 receptions, the loop of the sleeve as follows. Closing a circle in the middle of the front, mark the ragged lines with colored thread and begin to knit in a circle (Fig. 2)

  NOTE: while it is not enough loops on knitting needles it is better to knit on stocking knitting needles (i.e. on the fourth fifth we knit)

1st row - knit the left half of the front, the loops of the left sleeve, the loops of the back, the first part of the loops of the right sleeve (since we have 9 loops on the sleeve, we divide them into 4 parts: 3 + 2 + 2 + 2 , i.e. in the first row we knit 3 loops), simultaneously adding loops in each front row near the ragged lines along the back;

2nd row - turning to the wrong side, knit the first part of the right sleeve (3 loops), the back loops, the first part of the left sleeve (also 3 loops);

3-row - on the front side knit the first part of the loops of the left sleeve (all the same 3 loops), the loops of the back, the loops of the first and second parts of the right sleeve (3 + 2 \u003d 5 loops)

Knit 8 rows, since in this example, the loops of each sleeve are attached in 4 steps. By the time of knitting all the loops of the sleeves, the number of loops of the back and front should be the same. For this, it is necessary to take into account the loops that are added along the back of the raglated lines. For example, if the loops of each sleeve are knitted in 4 steps, then each looped back line will have 4 loops added, so the number of loops on the back will increase by 8 loops. Therefore, it is necessary to calculate so that at the beginning of work the front was wider by 8 loops. In our example, from the number of back loops, it is necessary to subtract 4 loops, adding them to the front loops. On the back then there will be 28 loops (32-4), and in front - 36 loops (32 + 4). Thus, after the final calculation, the number of loops on the parts along the neck will be: on the back - 28 loops, on the front - 36 loops, on each sleeve - 9 loops (Fig. 3 a).

The smooth concave line of the neck is calculated using the following formula: the loops of each half of the neck are divided into 7-9 parts (from one to three loops in each part), leaving an even horizontal part equal to 4 cm in the center of the neck (Fig. 3 b). In our example: 36-10 \u003d 26 loops, 26: 2 \u003d 13 loops, distribute the loops into 7 parts - 1,1,2,2,2,2,3.
  After the "backing" of the back is finished, in the same way we begin to attach the neck loops: in the front row on both sides of the ragged lines we begin to make additions (recall that when backing was applied, the additions were made only on the back) and we knit as follows: we knit the left side front, left sleeve, back, right sleeve and one loop from the neck loops, turn the work, knit the wrong row and knit one loop from the second part of the neck loops and so on, attaching another one, then 4 times 2 loops and at the end 3 loops on each side. Gradually introducing all the loops into the work, we knit in a circle, continuing to add loops on the ragged lines, the length of which is approximately 28-30 cm. Their length will be sufficient if the width of the back between the ragged lines is equal to the sum of the measurements - half-circumference of the chest plus an increase in free fit (2 cm). Then each piece is knitted separately. Loops of raglines attached to the back and front. If there are many loops (for example, arana), they are divided in half and attached to all the details.
  You can knit a seamless product, separately on circular knitting needles - in front and back, by removing the loop of the sleeves on other knitting needles, and then on the hosiery (5 knitting needles) to knit the sleeves.
  When knitting a product on a full low figure, so that the ragged line does not turn out too long, the simultaneous knitting of all parts is stopped when the width of the back between the raglan lines is equal to Pog (half-circumference of the chest) minus 4-6 cm. Then each part is knitted separately, in the first the same row received the missing width with a set of air loops. For example, if the backrest width should be 56 cm (54 + 2), knit all the parts together until the backrest width is 50 cm, and the missing loops get air equally on each side. The same number of loops are also added to the front and sleeves on both sides.

When knitting a raglan with a clasp, the loops are divided into two parts and half of the loops of the strap are added to each half-loop, the second half of the strap is included in the number of loops of the shelf. If the width of the strip is 10 loops, then on each shelf there will be 23 loops (18 + 5) (Fig. 3c).
Raglan products tied on top may have different shape  neck or collar. If the product is with a collar (stand, turn-down), then knitting begins with it, and the loops are distributed after the end of the collar, marking the colored lines with ragged lines.

For a raglan product with a cap-like neck, the calculation of the loops is the same as for a product with a round neck. But in this case only the loops of the back, sleeves and four ragged lines are put on knitting needles - the front loops are added gradually during knitting according to the calculation of the triangle (Fig. 3d).

/ September 28, 2016 at 11:48

Hello! As promised, I’ll finish the description of the master class started in. Let me remind you - we learned to knit raglan with knitting needles on top and have already managed to knit almost the entire sweater, only so far without sleeves, buckle straps and neck. Let's continue.

At the base of the sleeve we attach (tie) the thread and on the circular knitting needles we begin to re-loop the stitches from the thread (until the thread is pulled out). We collect about half the loop of the sleeve:

Then we pull the needle by the end to the left so that the typed loops are closer to the other (right) end of the knitting needle, and to the left knitting needle we retrieve the remaining loops:


After you have made sure that all the loops have been successfully retaken to the knitting needles (not a single loop has been “dropped”), you can untie and pull out the thread. The position of the knitting needles should be as follows: the loops are on the left knitting needle, ready to be crocheted, the right knitting needle is extended along with the long part of the fishing line.

Now attention! Before starting knitting the first row, you need to pick up (knit) several loops from the front and back loops directly under the sleeve. If this is not done, then holes will simply form in the armpit area. We select the loops in an arbitrary order, knitting them either directly from the loops, or from the broaches between them. The main thing is to prevent the formation of holes.

We select the loops under the sleeve so that there is no hole.


Now we turn the knitting so that the working thread is on the right. We pull the other end of the knitting needle over the fishing line so that the loops on it are already ready for knitting, and we stretch the first end of the knitting needle forward with the flexible part:


Such “manipulations” with pulling up the ends of the needles must be done each time as soon as one half of the sleeve loops is knitted. This allows you to knit a sleeve in a circle using just one pair of circular knitting needles.

After knitting the first row, it is necessary to trace whether additional loops from the armhole need to be additionally selected in order to avoid holes; the “extra” loops in the next row can be knitted 2 together. Count the loops on the needles of each half of the sleeve. If necessary, redistribute the loops equally.

Now it remains to knit the sleeve in a circle, pulling the ends of the knitting needles, as described above. At the place of the alleged seam of the sleeve, it will be necessary to make reductions so that the sleeve narrows down.

Reduction we do so. At the beginning of the row, we knit 2 loops together with the front slope to the right. Having knitted 3 more rows after this row, we do the next decrease already at the end of the row and knit 2 loops together with the front one and tilt to the left.

And so we alternate every 3 rows: at the beginning of the row, 2 loops together front with an inclination to the right, next time - at the end of a row of 2 loops together front with an inclination to the left. It turns out this imaginary "seam" from the reduction of loops:


  • Note:   loop reduction can be done differently. You can simultaneously make reductions at the beginning and end of the same row every 5 or 7 rows (depending on how steep the sleeve should be made narrower), but with this method the bevel of the sleeve will not be smooth, but may look slightly stepped.

So we knit the sleeve to the desired length. In my model, the bar is intended to be knitted with a viscous one. Therefore, to comply with the plank, I decided to put on the bottom of the sleeve a small finishing strip, also from the "muddle" (6 rows) and the same as the bottom of the back and front. For this, after 6 rows of crochet knit 2 more rows of knitted front stitch, then a row for holes, cloves, alternating yarn, 2 together the front. Then a few more rows of face and closed the loop.


It is clear that you can finish knitting a sleeve in a different way. Make a regular gum, for example.

Knotting Planks

Since a blank was made on the bottom under the serrated edge, I had to finish it to the end before starting to knit the planks. That is, the edge still needs to be hemmed. We bend the edge to the wrong side in a row with holes and carefully hem the usual bobbin thread to the tone of yarn, making sure that the cloves lie evenly and the fabric does not stretch to the wrong side.


Now for the slats we will select the hinges from the edge loops of the shelves on the front side of the work. Therefore, for the right bar, we begin to select the loops from below, and for the left shelf - from above.

We select the loops as follows: attaching the thread, from the first loop of the chain of edge loops of the shelf, knit 2 loops - once we insert the knitting needle under both walls of the loop, the next time - only under the front wall. From the next edge loop, we knit already only one loop, only under both walls. And so we alternate every other time: once we knit 2 loops, once once.


This method of selecting loops is optimal if you need to choose loops from the vertical edge for subsequent horizontal knitting so that the fabric lays evenly without pulling the edge. This method is suitable if the hem knitted, removing the first loop, and knitting the last one from the wrong.

From the next (wrong) row, we already knit the bar with a "muddle" pattern (he is also "small rice"). If we knit for a girl, then on the right lath you need to additionally make welt loops (for a boy, this should be done on the left lath, to be fundamentally correct). To do this, count the number of strap loops and distribute evenly through how many loops you need to make loops, depending on their number.

I began to make loops on the 3rd row of the bar (from the wrong side of the work). For one slot, I closed 2 loops through an equal number of loops. And in the next row over closed loops I scored 2 , which in the next knitted with crossed loops in the rhythm of the main pattern.


First, at equal intervals, close 2 loops,


In the next row above the closed loops, we collect 2 air loops, which we then knit with crossed loops in the rhythm of the pattern.

Having knitted a total of 7 rows after a set of loops, on the 8th row we close all the loops of the bar in the rhythm of the “muddle” pattern on the front side of the work. Thus, after closing the loops of the right strap at the end of the row, the thread is at the top, at the neck. You can not break it off, but leave it to knit out the neckline.


Neck design

I decided to make the neckline in the form of a small stand-up collar. I admit that this is not the best design for the neck, but, as an option, it can sometimes be used. Therefore, just in case, I will describe how I did it.

We collect loops along the edge of the neck on the front side of the work. There are no special rules, just try to make it look neat, especially in the area of \u200b\u200bthe neckline in front.


1st row   (Wrong side of work): Wrong loops.

2nd row  (front side of work): Again purl loops.


After knitting the 2nd row.

3rd row (Wrong side of work): edge, then alternate 3 wrong loops, yarn, at the end of the row 3 wrong (or how many will turn out) and edge. Nakida was added to increase the number of loops, as a double elastic band will tighten the canvas.

4th row:   (we proceed directly to knitting the double elastic band), the hem, then alternate: 1 front, 1 loop unfastened (thread in front of the loop). In this case, it turns out that the yarn made in the previous row will need to be removed unbroken.


5th row and subsequent rows:   we knit like the 4th row. We remove the loop taken in the previous row from the front, and remove the loop that was the front from the previous row (thread before work).

We knit a double elastic band to the height you need (I have 6 rows, but it looks like 3 on a regular elastic band).

Close the loop on the face of the work. How to do this is described in detail in an article about a double gum, but just in case, I’ll remind you. We remove the front loop, and the one that needs to be removed when knitting a double elastic band, this time we knit the wrong one and stretch it through the removed front loop. The loop formed from knitting two loops together in this way is again stretched through the previous loop on the right knitting needle, as is usually done when the loops are closed.