

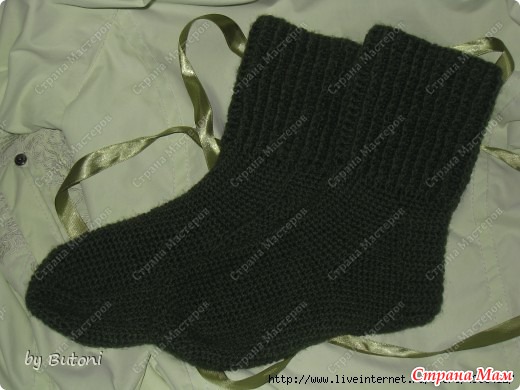
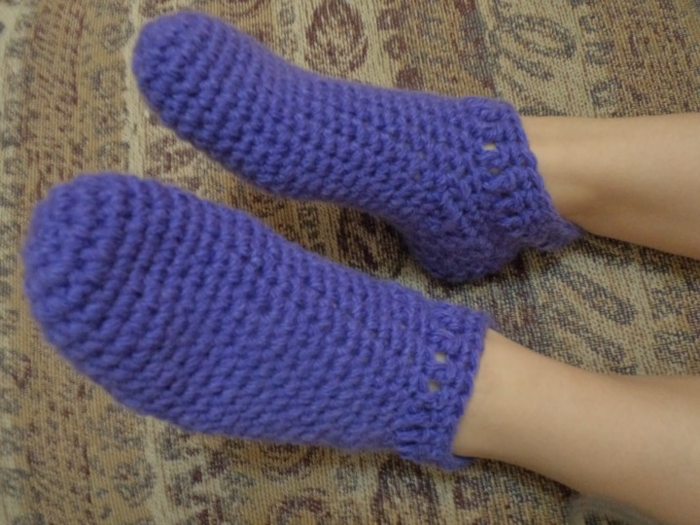
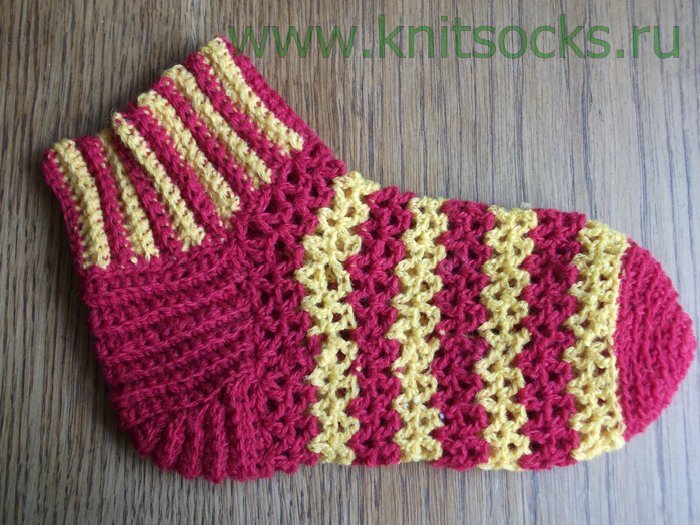
The first frosts are the harbingers of the coming winter. Looking at the thermometer outside the window, sometimes you just want to call the heavenly office, get indignant and stomp your feet. Alas, man is unable to change the vagaries of nature. This means that you will have to take care of warmth and health by known methods - warm socks and hot tea.
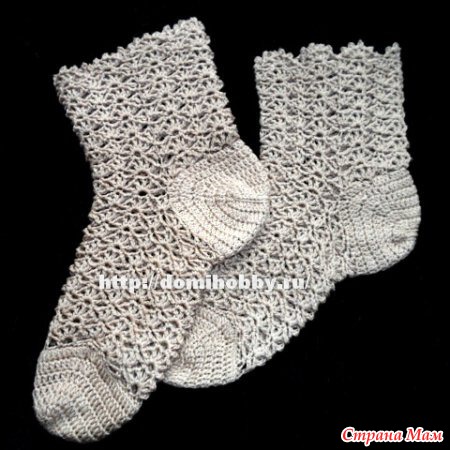
By the way, crocheted socks are a kind of baptism of fire for beginners. It is difficult to imagine a knitter who did not get a sore point on socks and scarves. For most beginners, knitting this garment is associated with knitting. There is some truth. However, today we can do without knitting needles. I'll show you how to crochet your socks, join in! For a couple of evenings, we will dress the whole family in warm and bright socks, which is especially true on New Year's Eve! So let's get started!
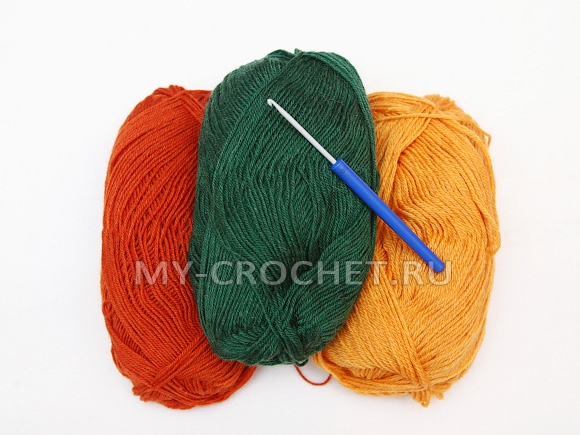
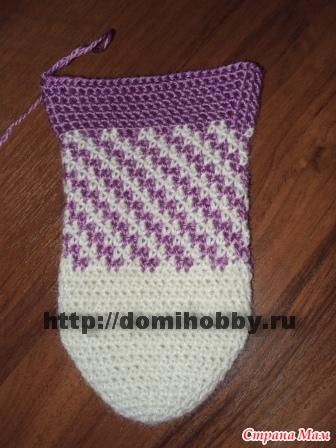
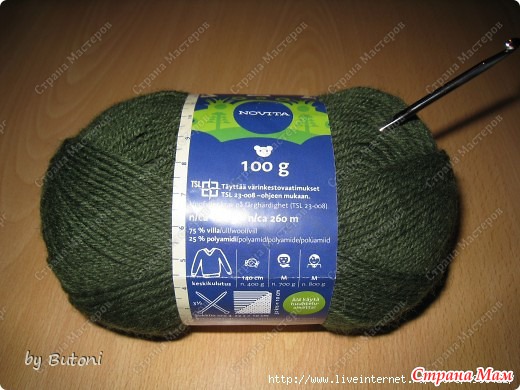
For knitting, I used yarn of three colors Pekhorka "Wool with acrylic" (composition: 50% wool, 50% acrylic, 100 g / 300 m) and hook No. 3.
Socks Size: 37-38
To calculate the product, we need 2 measurements:
1. Foot length. (I have 24 cm).
2. Girth of the leg on the rise. (I have 24 cm).
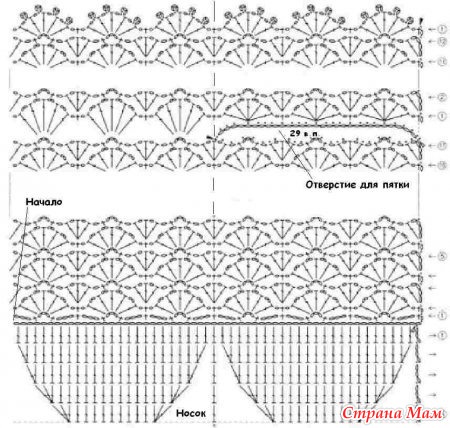
Tie a double crochet pattern and determine the knitting density.
I have a horizontal knitting density: 1 cm - 2 tbsp., Vertical: 1 cm - 1 row.
Determine how many columns we need to tie for the width of the sock we need: 24x2 \u003d 48 tbsp.
Important: for knitting a pattern, the number of loops must be a multiple of 4 (i.e., must be divided by 4).
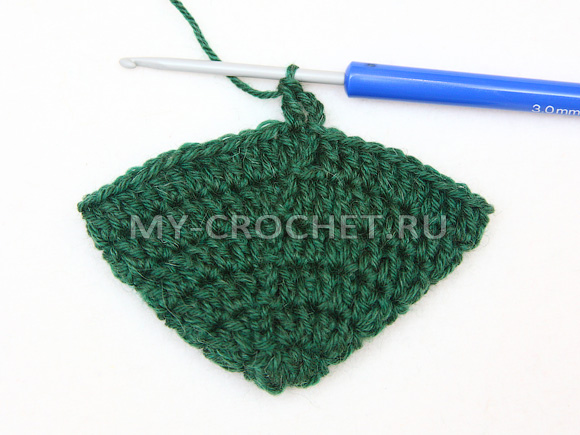
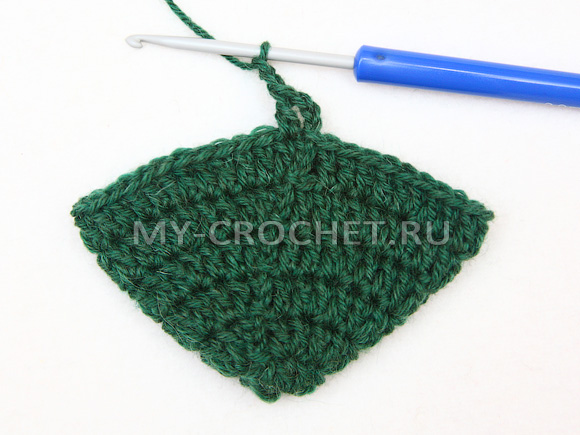
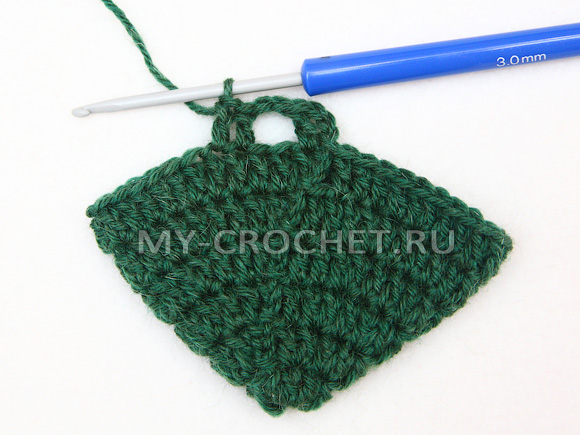
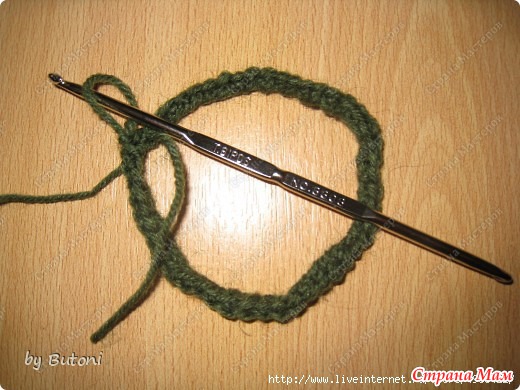
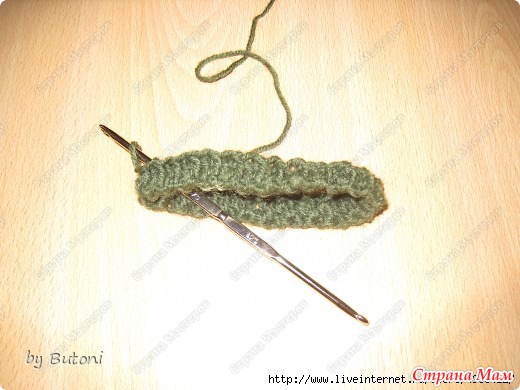
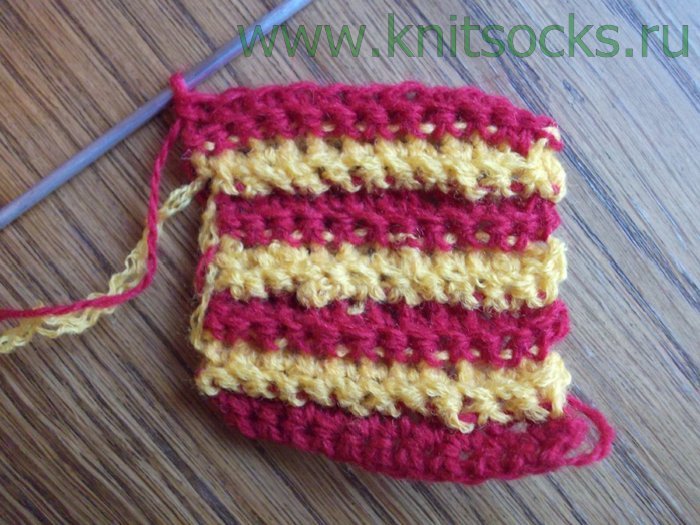
We begin to knit a sock from the toe according to the scheme:
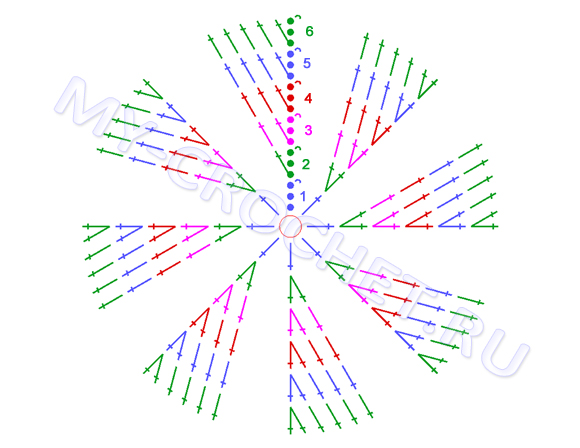
Legend:
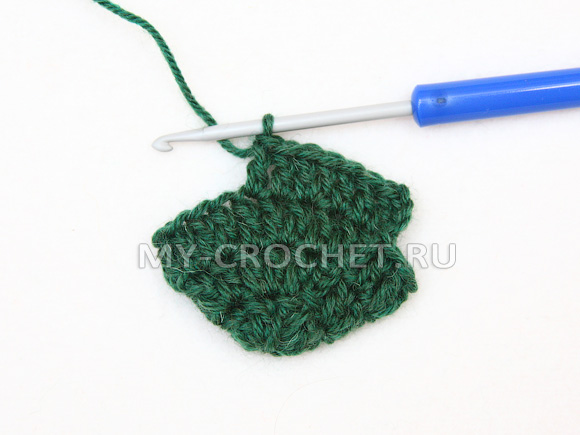
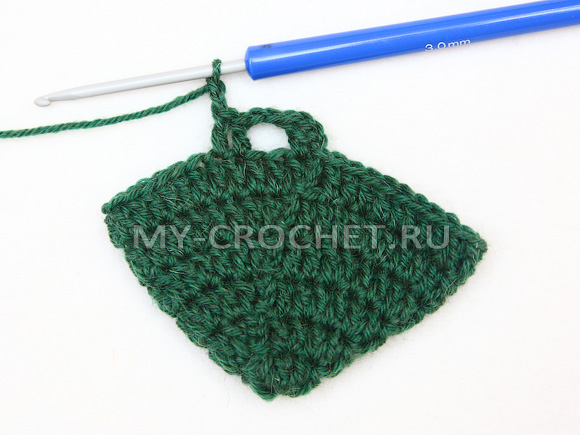
According to this pattern, we will knit double crochet with uniform increments in each row until 48 rows are obtained in the row (I need to connect 6 rows in the pattern).
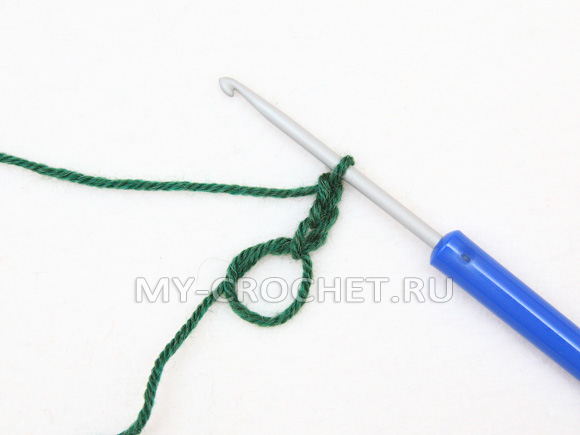
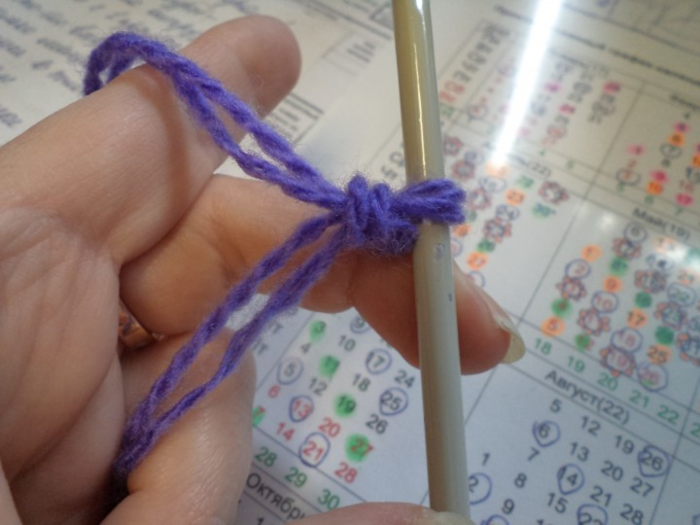
We make a ring from a thread (a sliding loop).
1st row: with a green thread we knit 3 lifting air loops that correspond to 1 double crochet,
in the ring we knit another 7 double crochet and
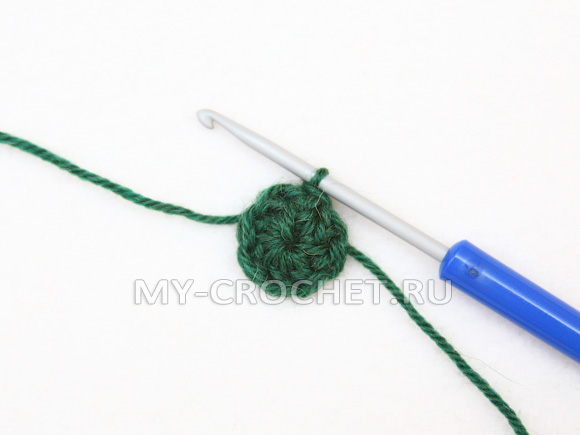
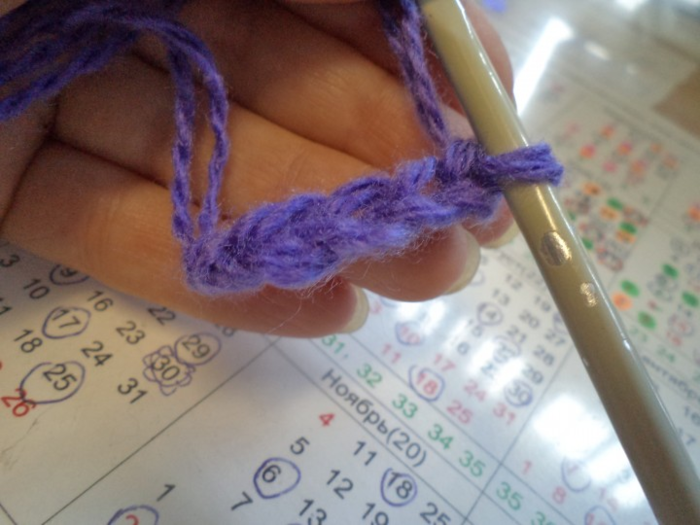
2 row: we knit 3 lifting air loops and in the same base loop we knit a double crochet,

in each next loop we knit 2 crochets to the end of the row.

We close the row with a connecting column in the 3 air lift loop. In this row, we should have 16 columns (3 air loops are counted for 1 column).
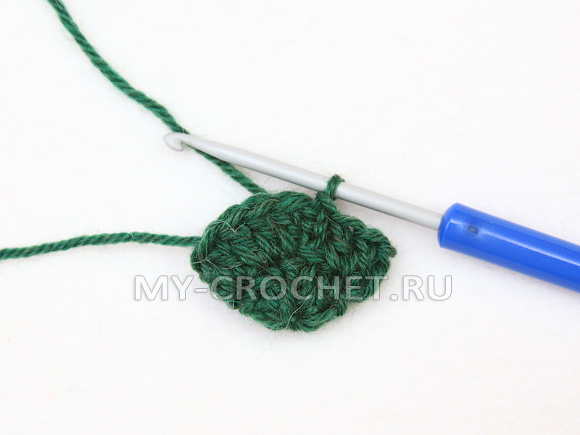
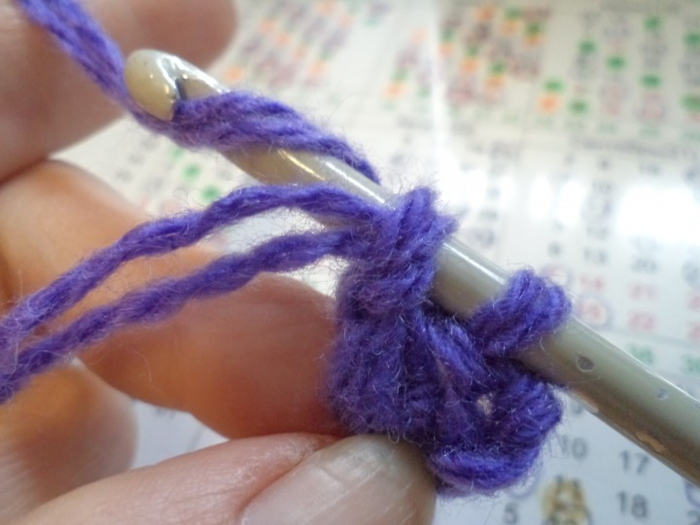
3 row:
in the next loop we knit 1 double crochet,
*in the next loop we knit 2 double crochet, in the next loop we knit 1 double crochet*,
We knit from * to the end of the row. We close the row with a connecting column in the 3 air lift loop. In this row should get 24 columns.
4 row: we knit 3 hoist air loops and a double crochet into the same base loop.
in the next 2 stitches, we knit 1 double crochet,
*in the next loop we knit 2 double crochet, in the next 2 loops we knit 1 double crochet*
We knit from * to the end of the row. We close the row with a connecting column in the 3 air lift loop. In this row, we should have 32 columns.
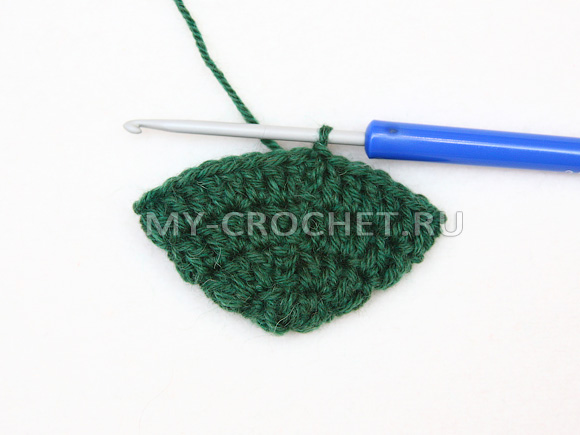
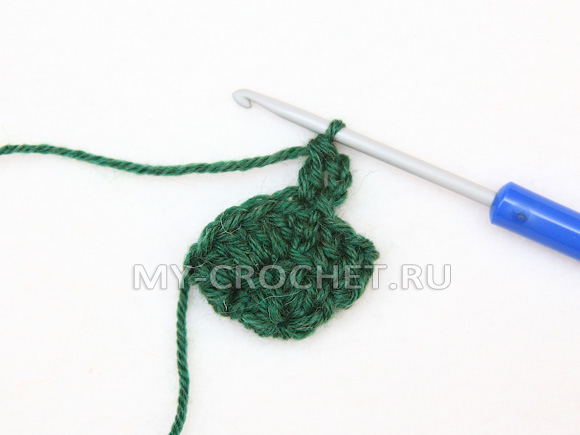
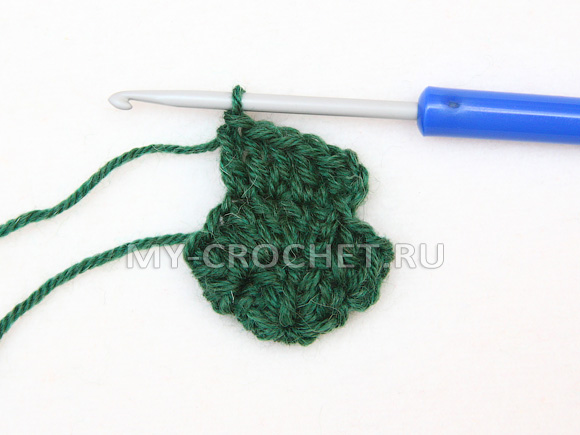
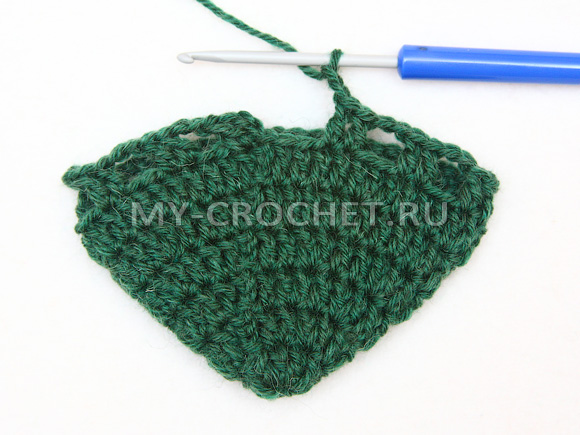
5 row: we knit 3 hoist air loops and a double crochet into the same base loop,
in the next 3 loops we knit 1 single crochet,
*in the next loop we knit 2 double crochet, in the next 3 loops we knit 1 double crochet*,
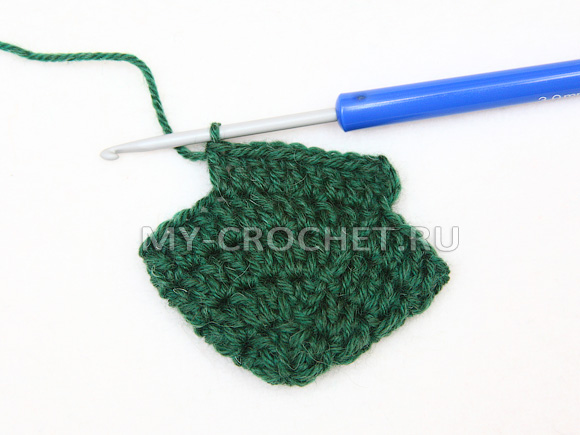
![]()
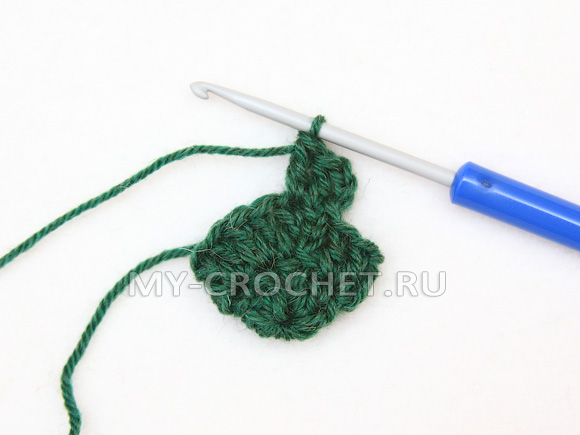
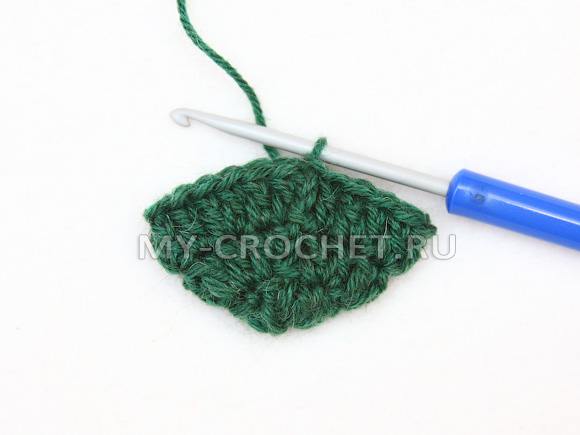
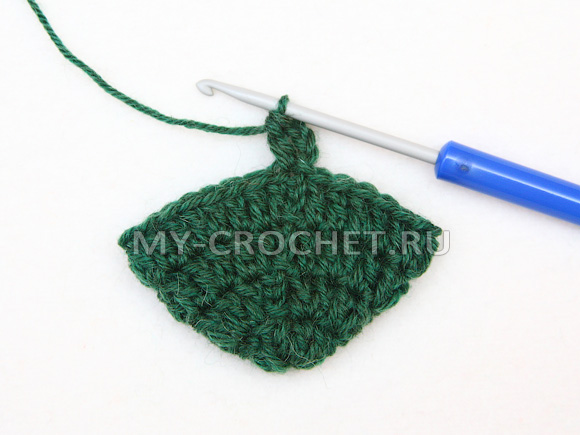
6 row: we knit 3 lifting air loops into the same base loop; we knit a crochet

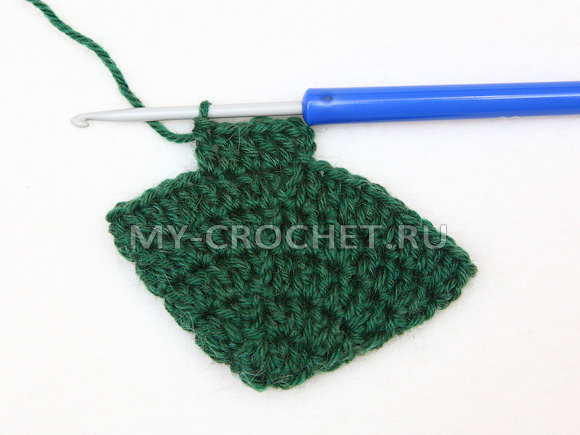
*in the next loop we knit 2 double crochet, in the next 4 loops 1 crochet*,
continue to knit from * to the end of the row. We close the row with a connecting column in the 3 air lift loop. There should be 48 columns in this row.
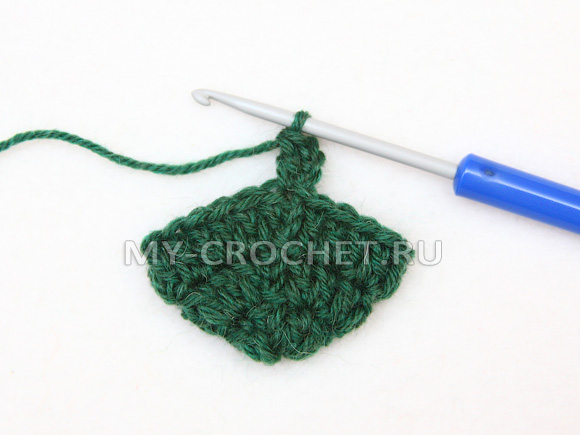
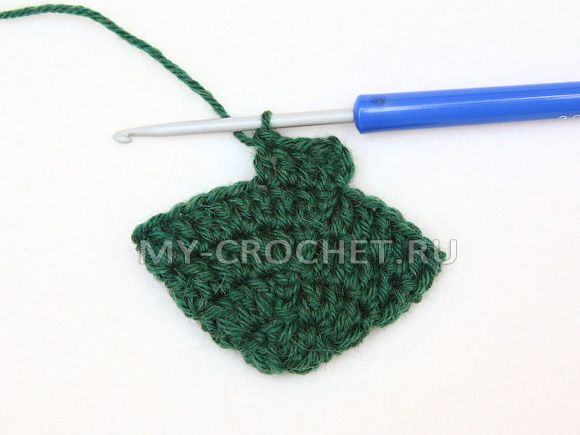
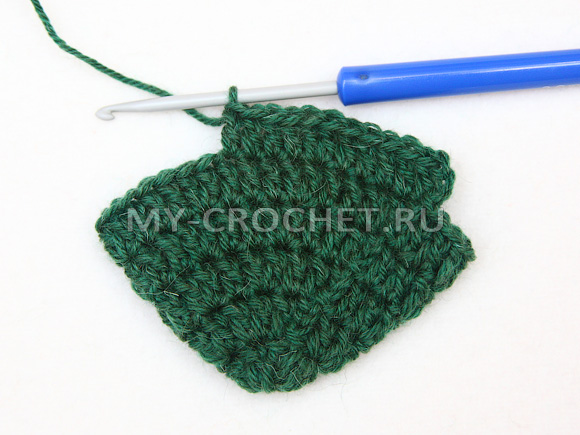
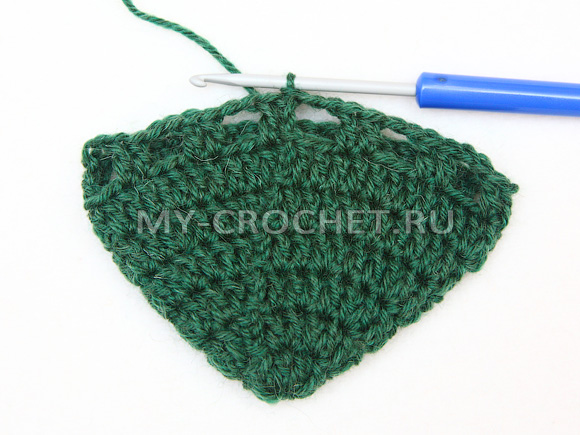
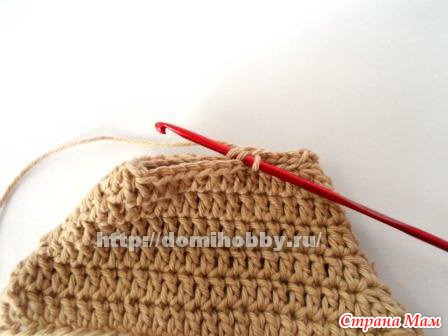
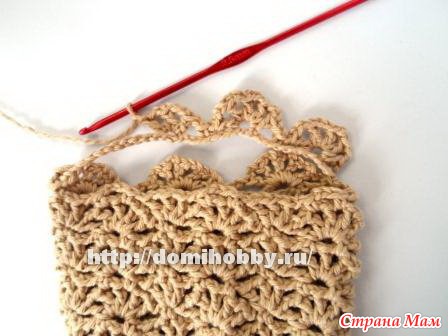
After we connected the rows with the increments to the number of loops we need, we proceed to knitting the pattern, which we knit here according to this pattern:
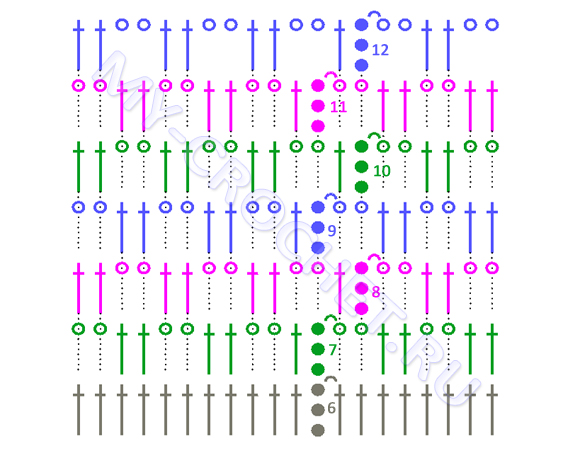
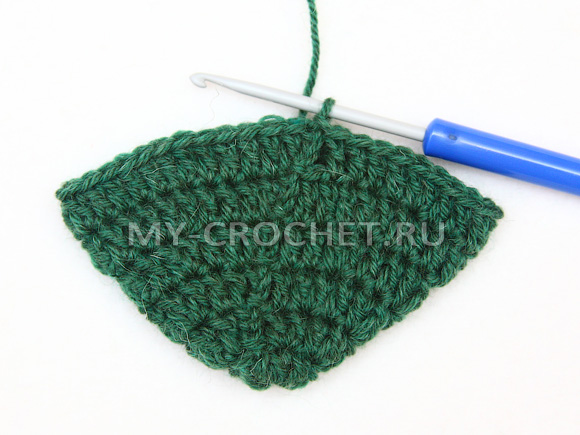
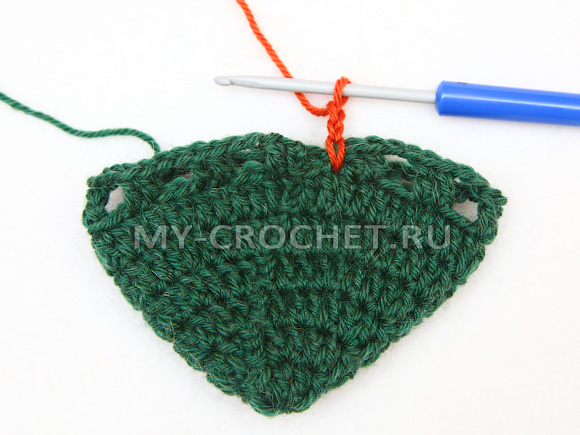
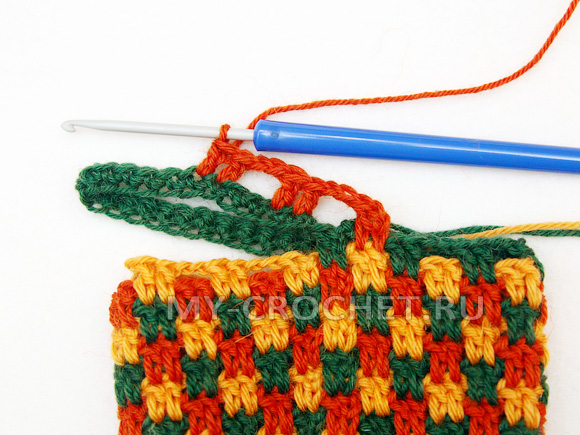
7 row: we knit 3 hoist air loops and in the next loop we knit 1 double crochet,
*skip 2 stitches of the base and knit 1 double crochet in the next 2 stitches,
we knit 2 air loops. *
So we knit from * to the end of the row.
We close the row with a connecting column in the 3 air lift loop.
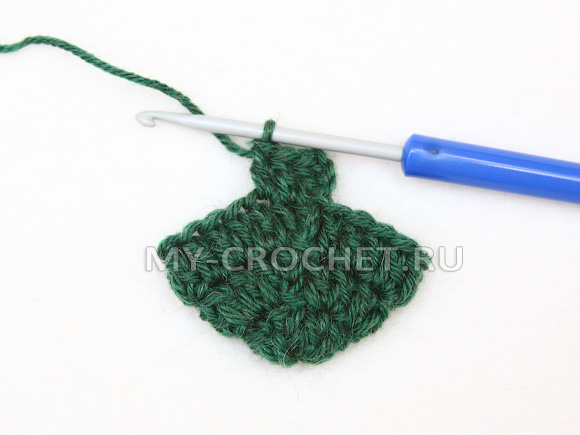
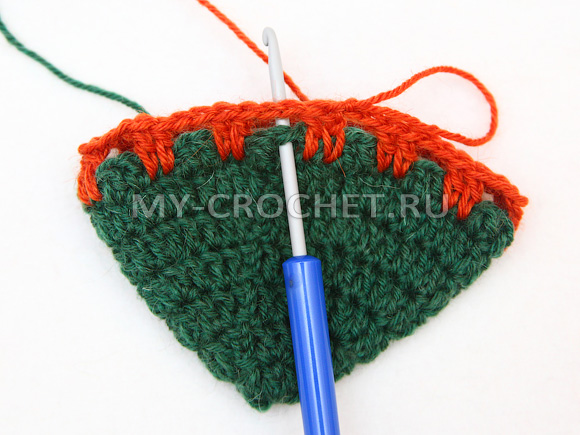
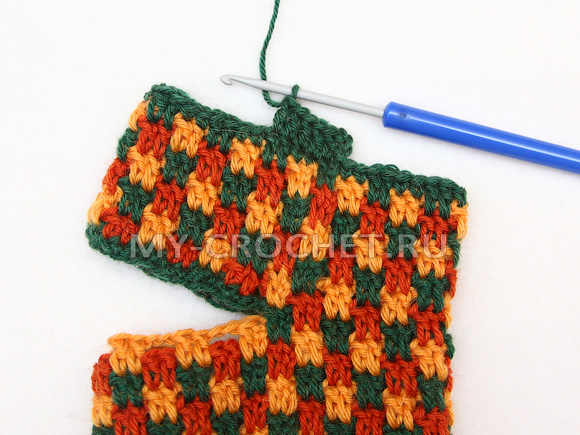
In order not to cut the thread each time when knitting the next rows, we extend the loop more authentically so that the knitting does not open or we fix this loop with a knitting marker (these loops should remain on the wrong side).
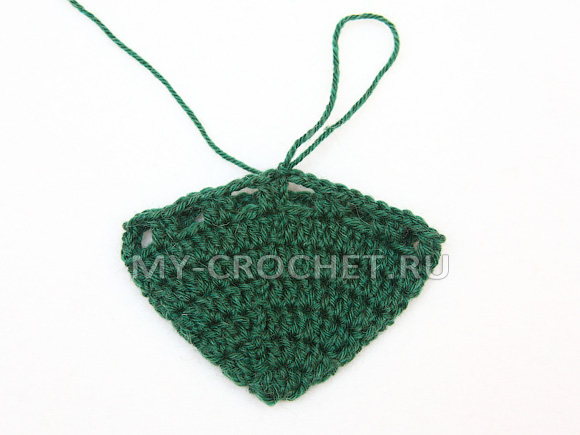
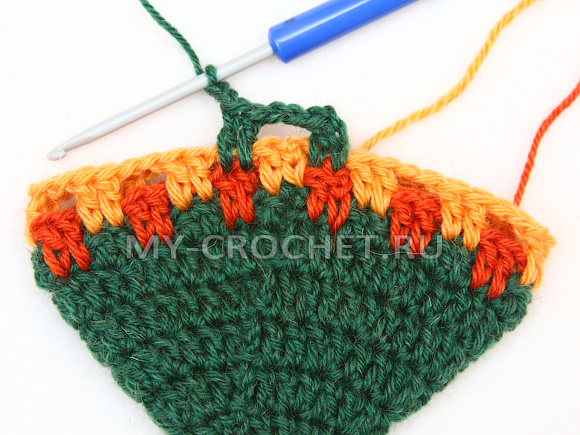
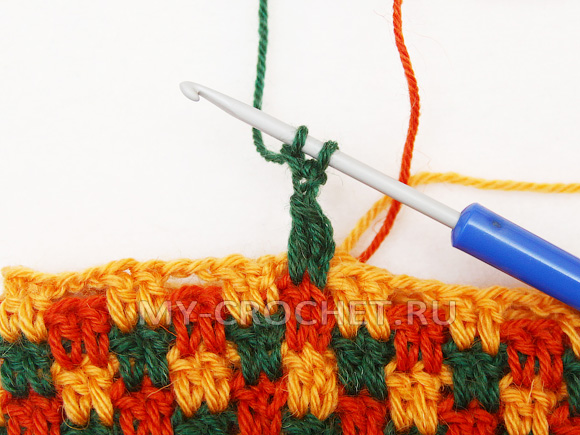
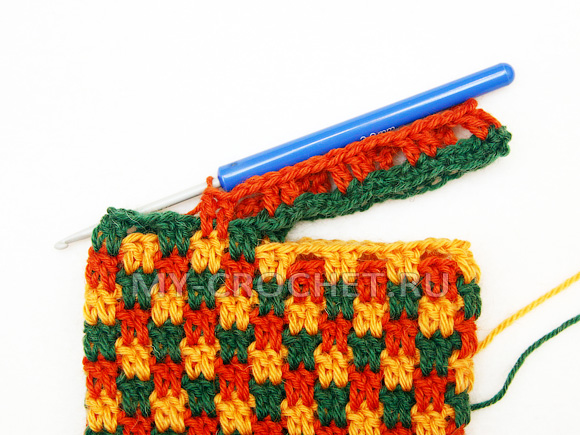
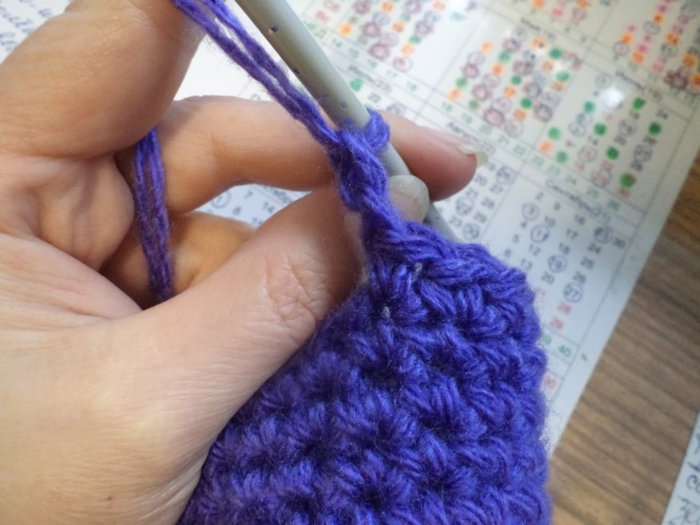
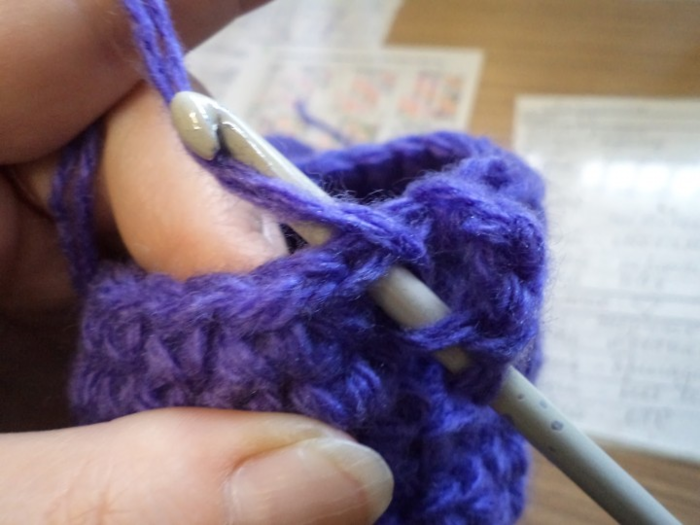
8 row: we will knit with an orange thread, go back to the previous cell (on the right), enter the hook over the first vertex of the column with a crochet of 6 rows, pull the thread and knit 3 lifting air loops,
in the next vertex of a crochet of 6 rows we knit a crochet,
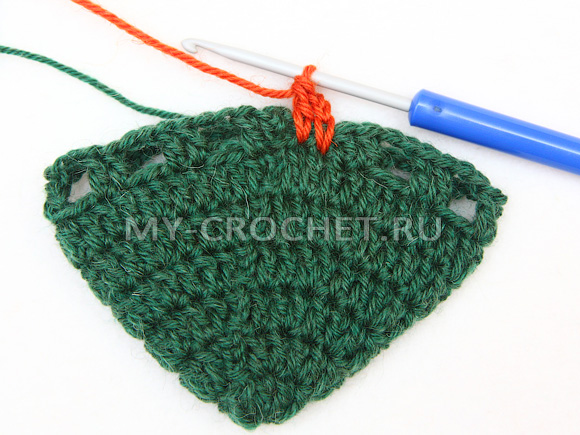
*in the next 2 vertices of double crochets of 6 rows (which are under 2 air loops) we knit 2 double crochets (1 column in each loop), then we knit 2 air loops*
We continue to knit from * to the end of the row. We close the row with a connecting column in the 3 air lift loop. Pull the loop and leave it on the wrong side.

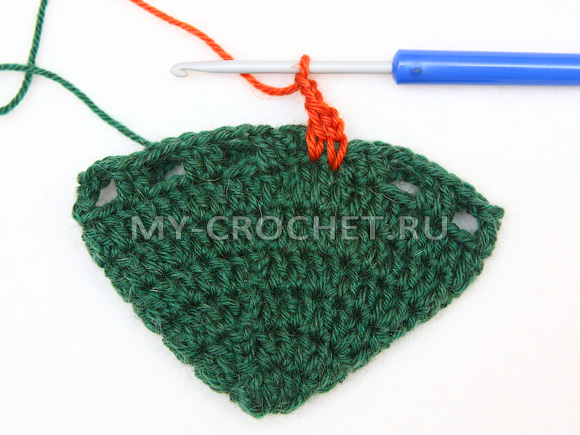
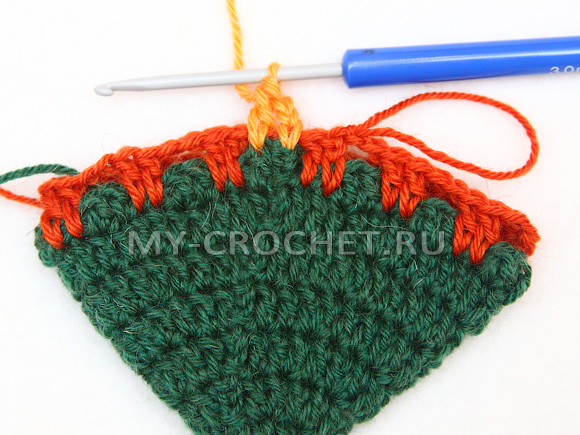
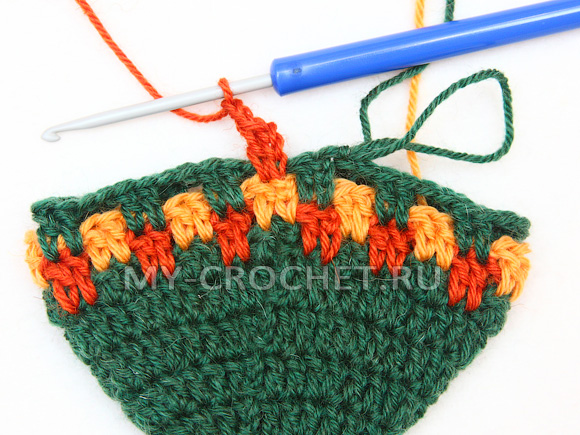
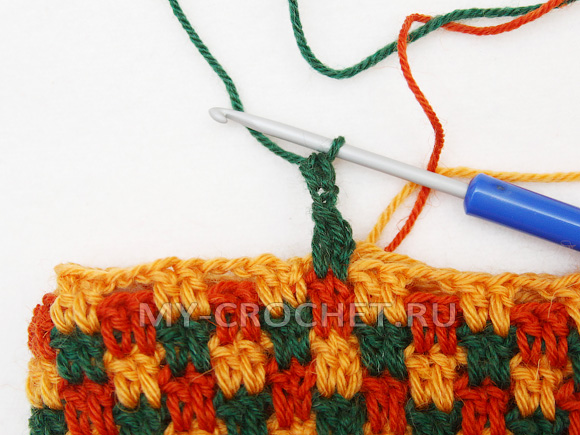
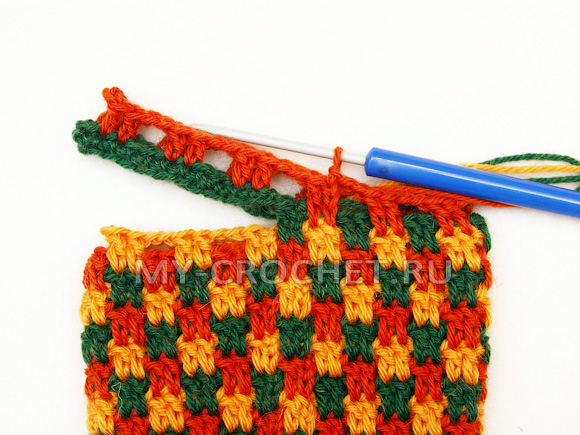
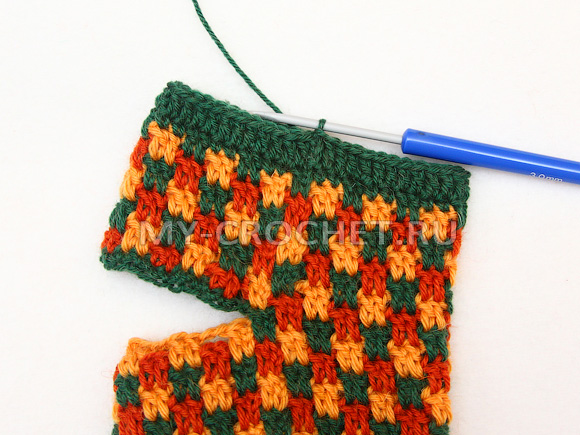
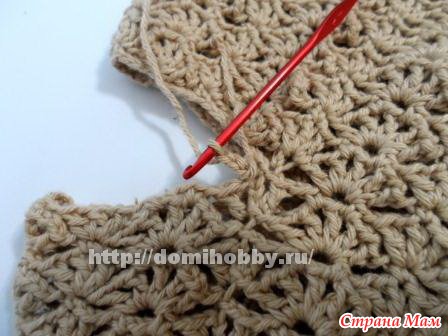
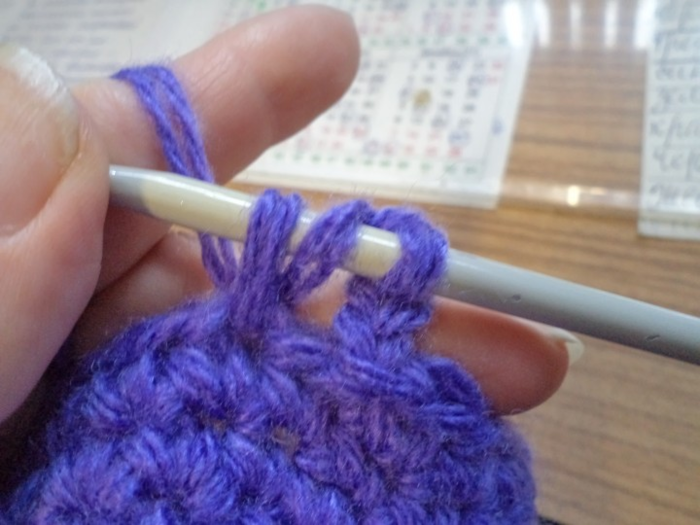
9 row: move to the cell to the left, enter the hook at the top of the column with a yarn of 7 rows,
pull the thread yellow color and we knit 3 aerial lifting loops, in the next vertex of a crochet of 7 rows we knit 1 crochet,
![]()
*in the next 2 vertices of the columns of the 7th row, we knit 2 crochets (1 column in each loop), then we knit 2 air loops*
Repeat knitting from * to the end of the row. We close the row with a connecting column in the 3 air lift loop. Pull the loop.

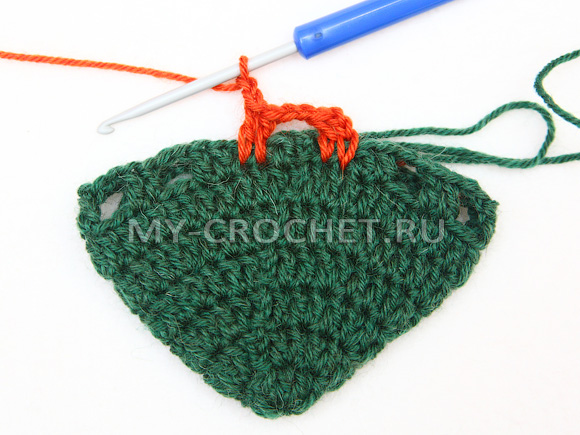
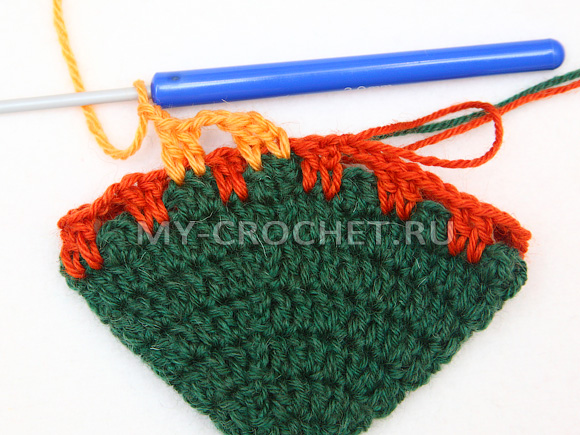
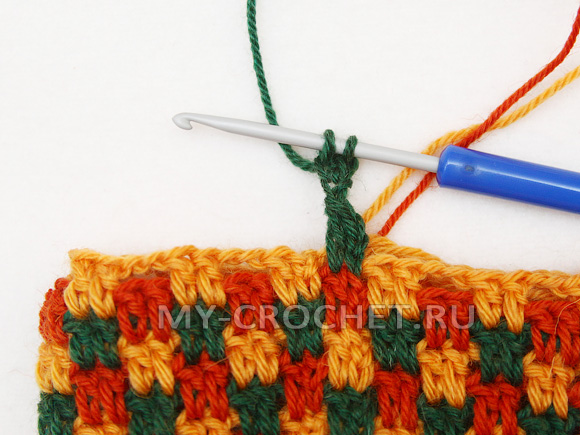
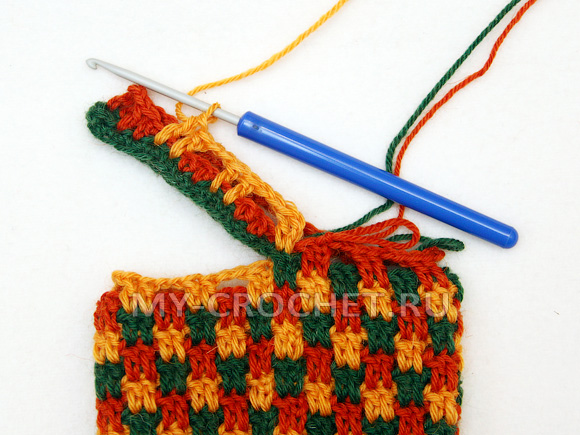
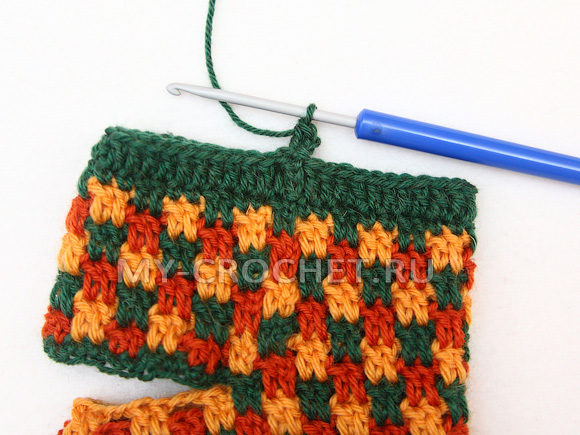
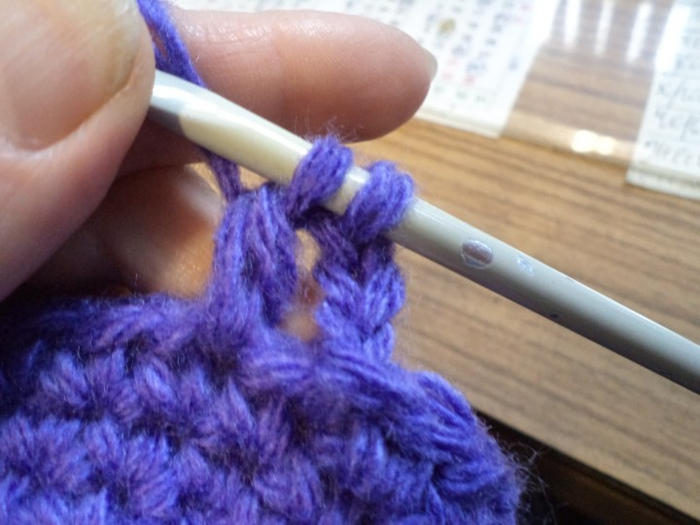
10 row: move to the cell to the right, insert the hook into the 3 air loop of the 8th row lift, stretch the left green loop to the front side and knit the 3 air lift loops and knit the double crochet into the next loop,
![]()
*in the next 2 vertices of the columns of the 8th row, we knit 2 double crochet (1 column in each loop), then 2 air loops.*
So we knit from * to the end of the row. We close the row with a connecting column in the 3 air lift loop.
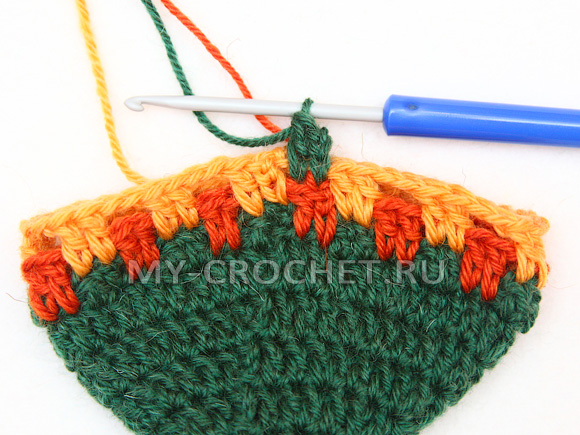
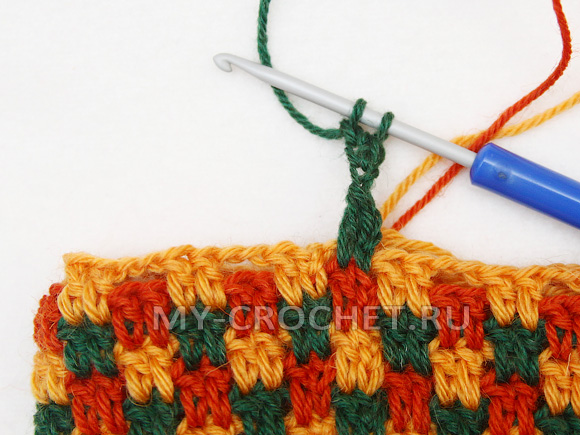
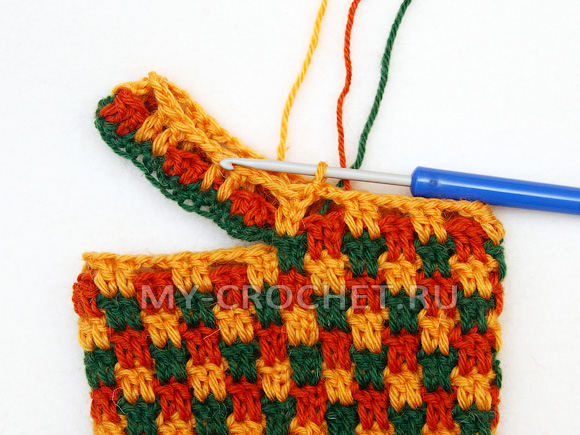
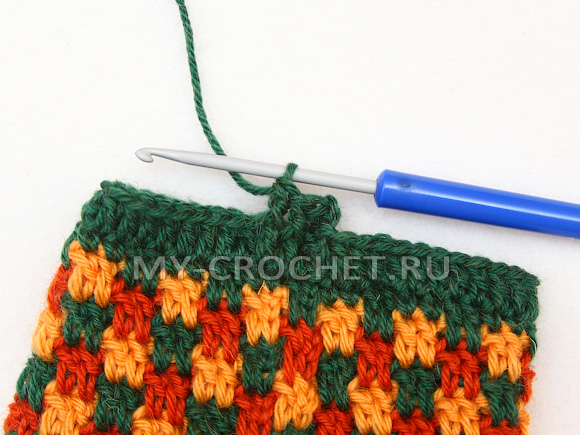
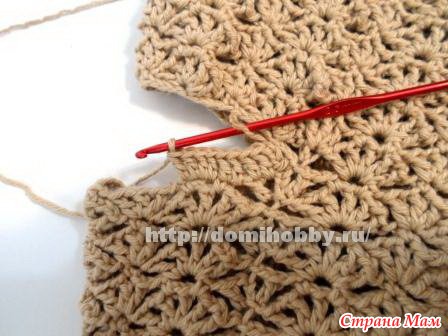
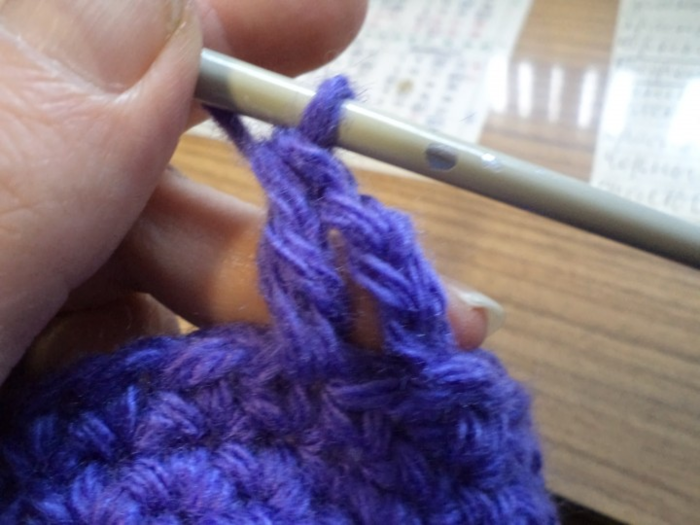
11 row: move to the cell to the left, insert the hook into the 3 air loop of the 9th row lift, stretch the left orange loop to the front side and knit the 3 lifting air loops, knit the double crochet into the next loop, then knit 2 air loops,
*in the next 2 vertices of the columns of the 9th row we knit 2 double crochet (1 column in each loop), then 2 air loops.* Continue knitting from * to the end of the row and close the row with a connecting column in the 3 air lift loop.
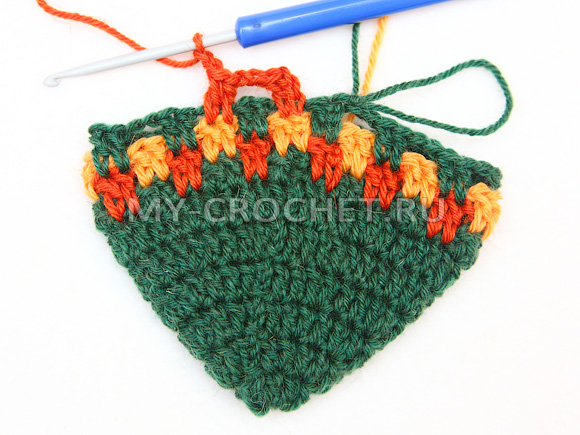
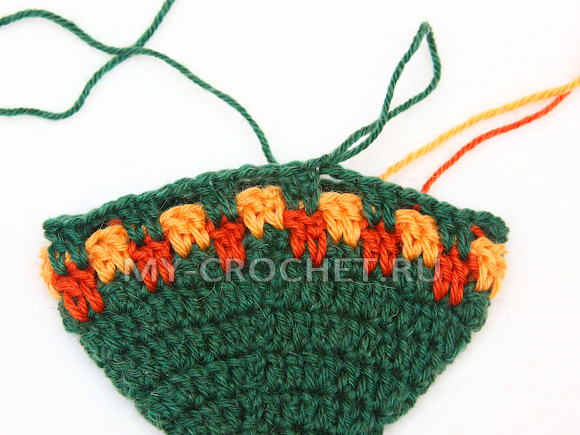
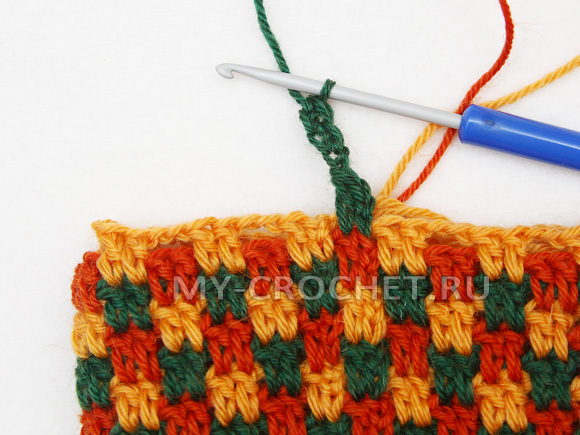
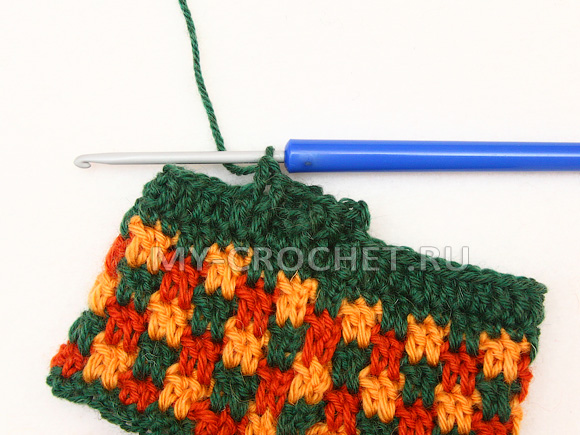
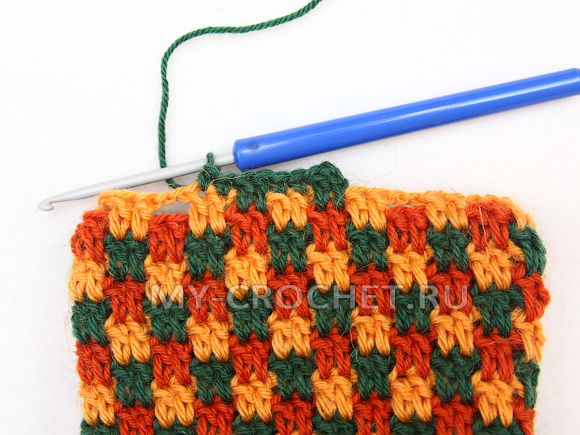
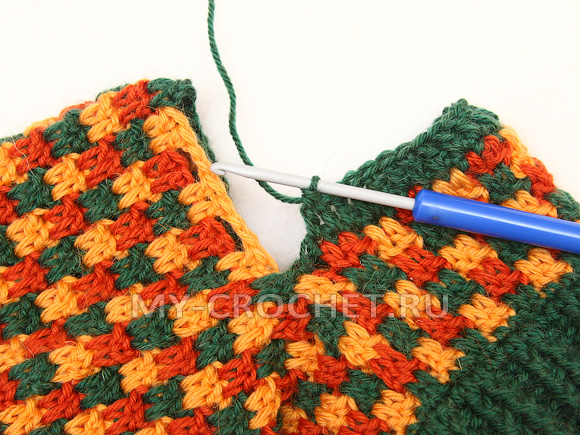
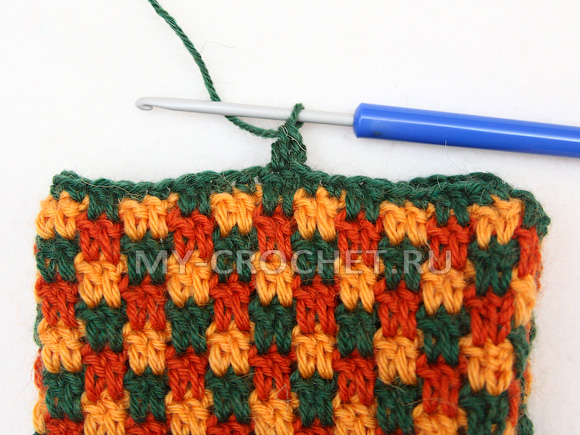
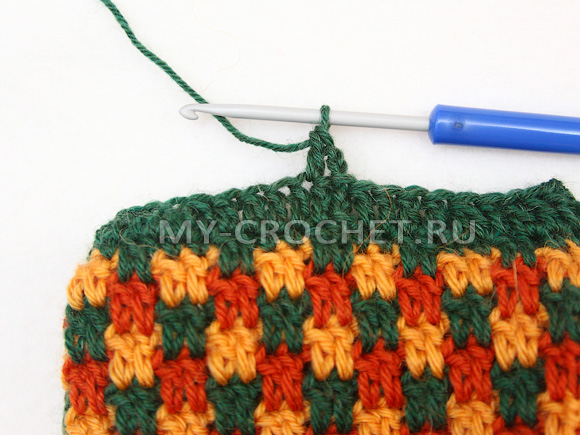
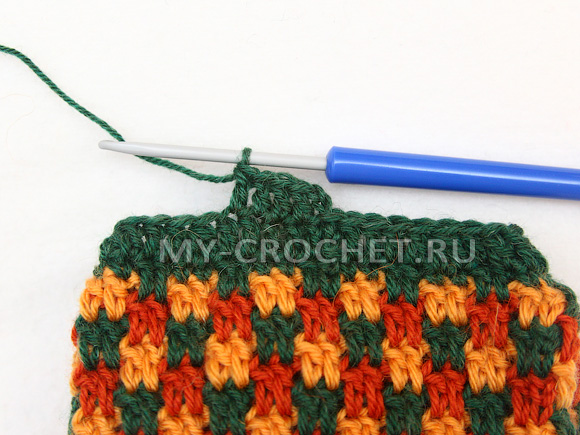
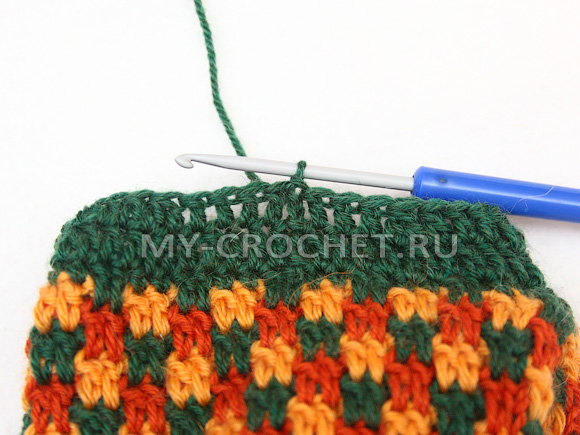
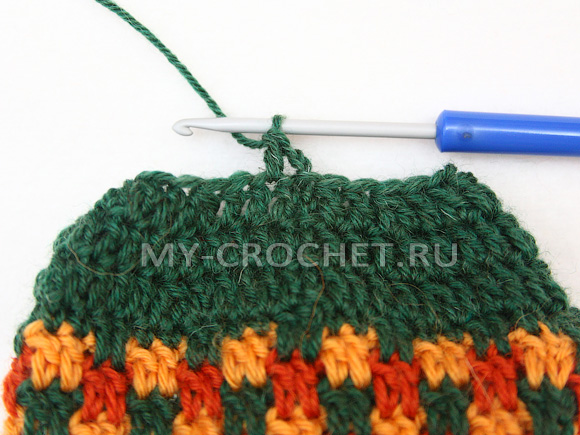
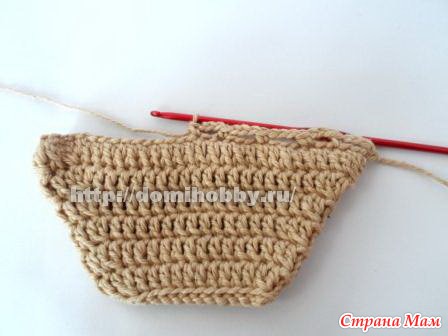
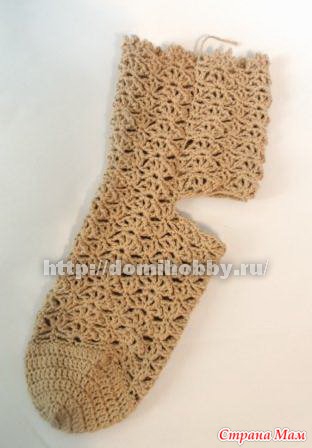
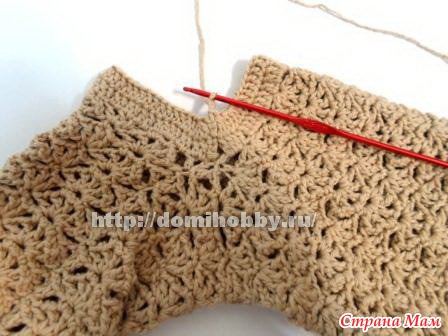
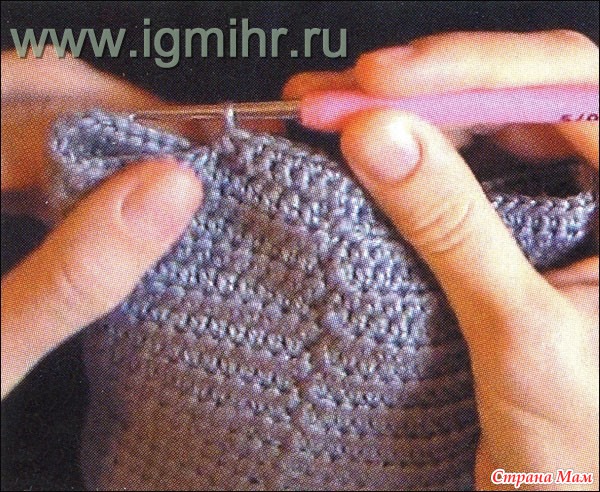
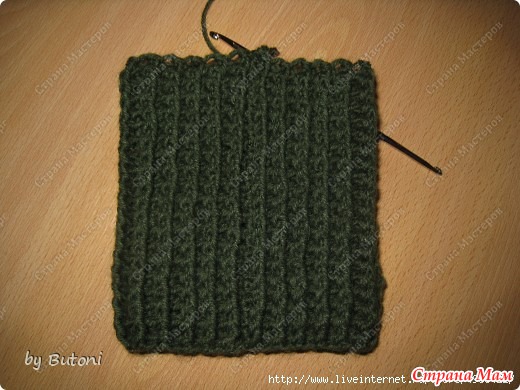
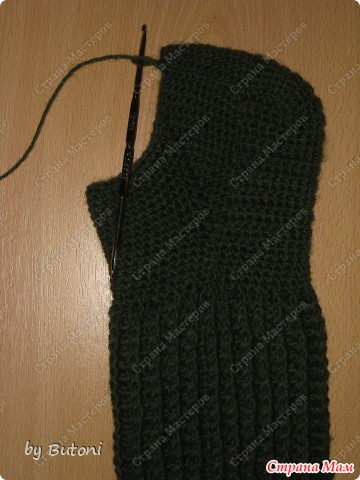
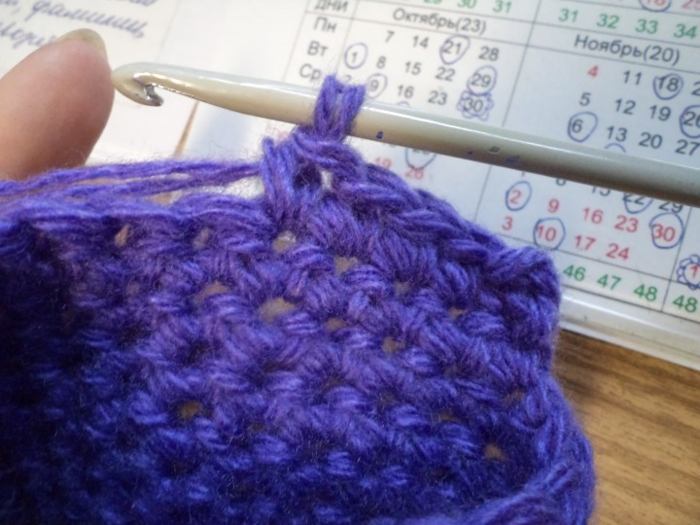
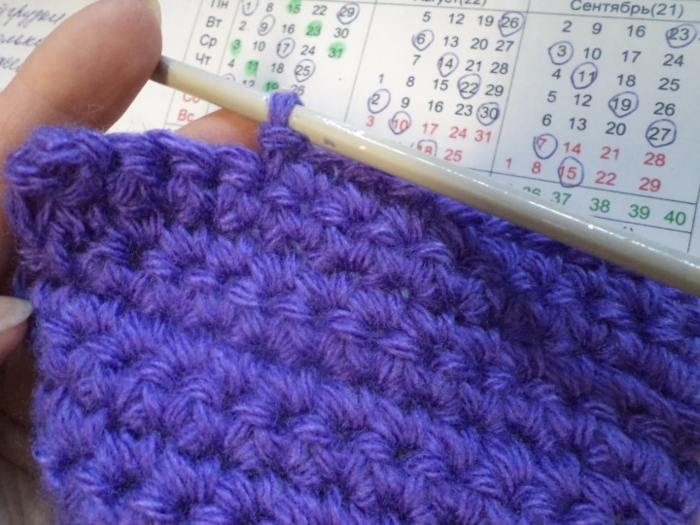
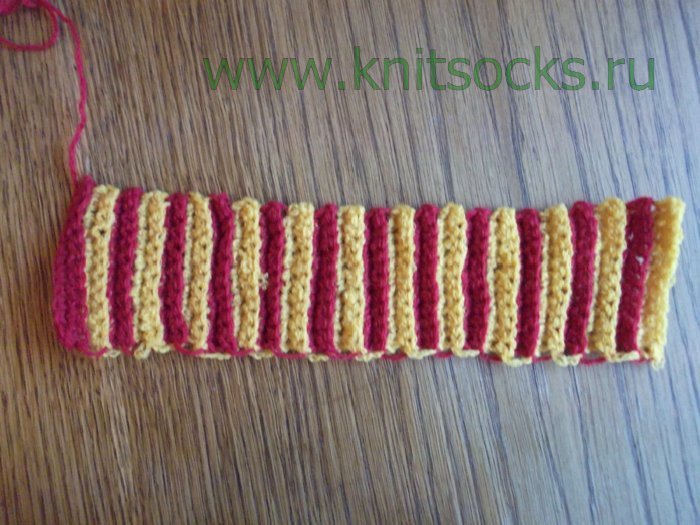
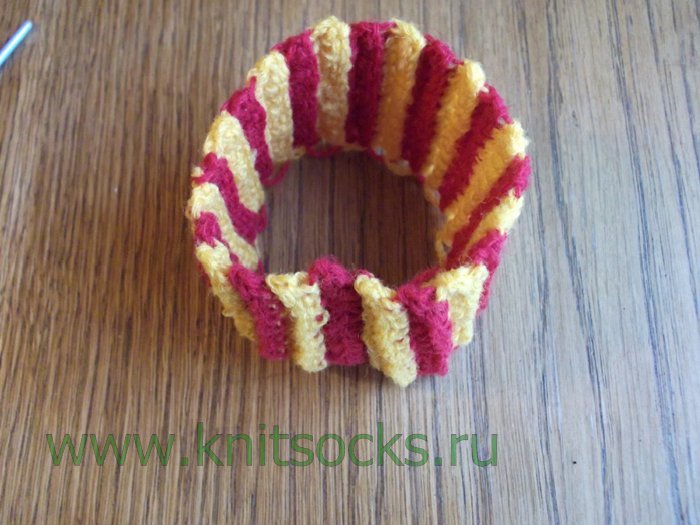
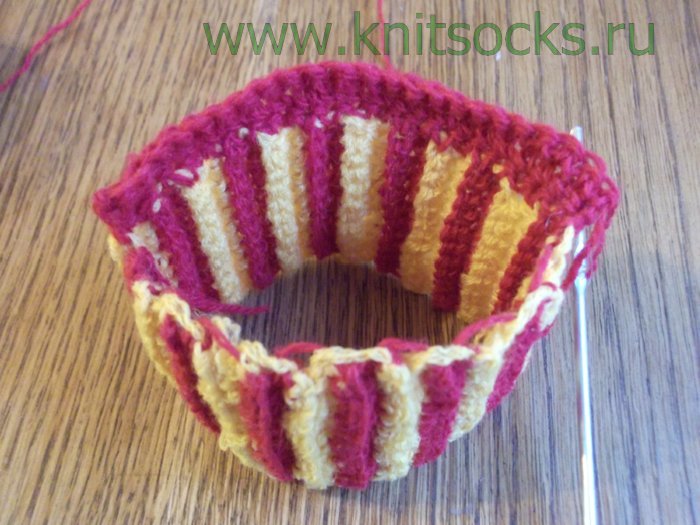
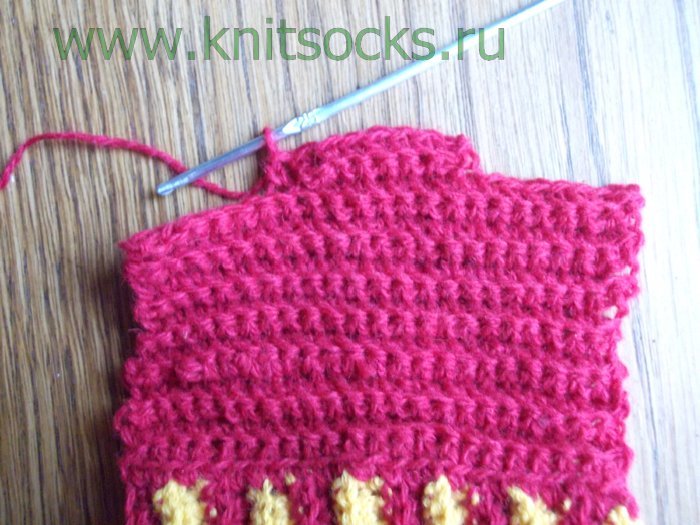
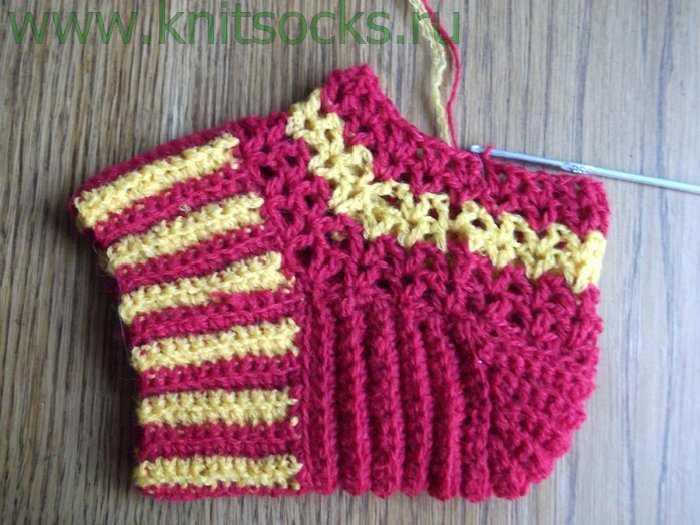
Thus, alternating the colors of the thread, we knit the length of the sock we need from the toe to the heel. I knit socks on a foot size of 37 (foot length 24 cm). 1/4 of the foot length, i.e. 6 cm. Therefore, from the toe to the heel I need to knit 18 cm.
![]()
Please note that you need to finish knitting with a yellow thread (the color that goes before the main, in my case, the main color is green).
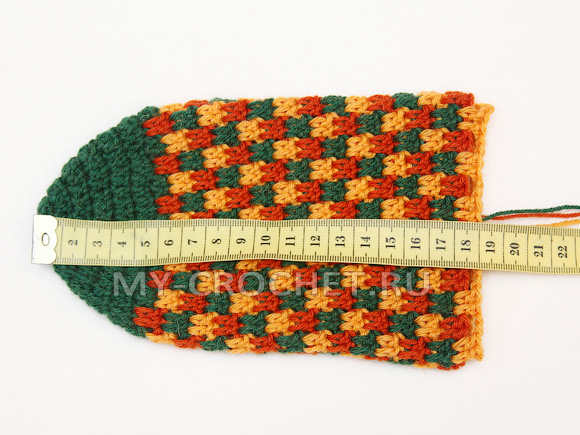
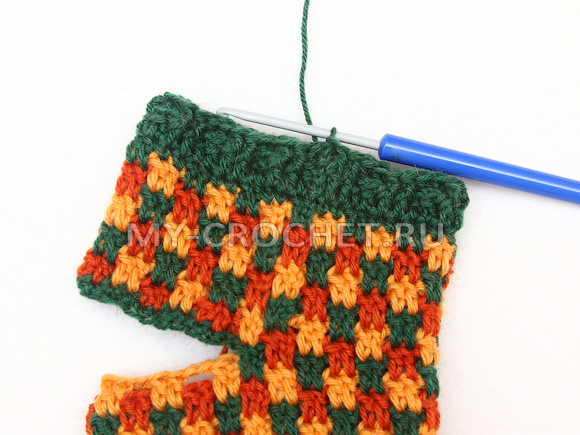
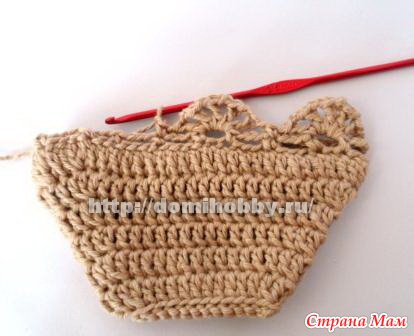
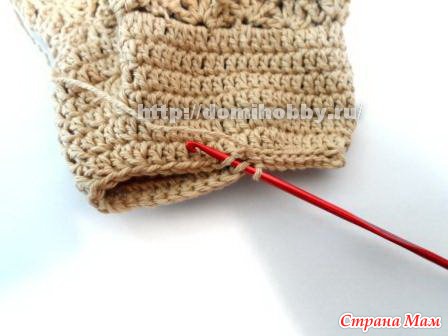
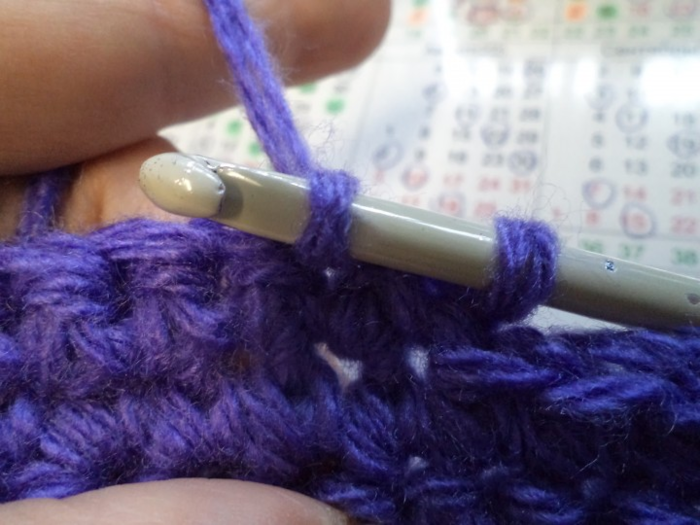
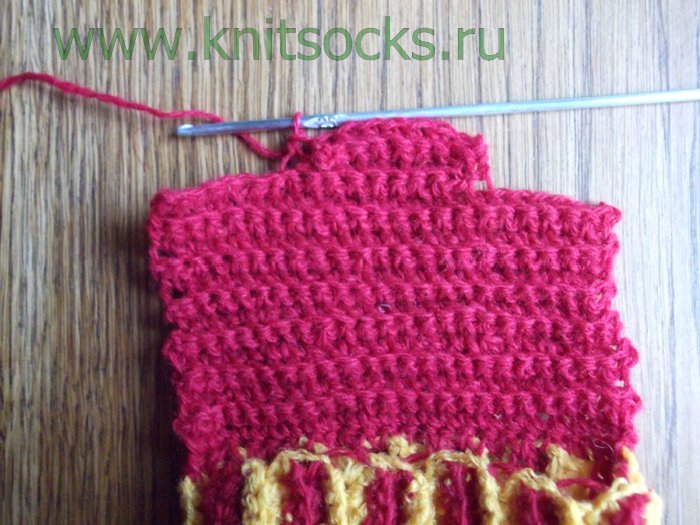
The heel usually accounts for half of the loops of the total, I have 48 loops in the row, i.e. the heel loops are 24 loops, according to the pattern on the heel, I decided to leave 26 loops. For the hole, we will not knit air loops, but an elastic row of single crochet posts.
To do this, we knit 2 air loops,
put the hook in the first loop and pull the loop,
then we knit 2 loops on the hook, we knitted the first single crochet,
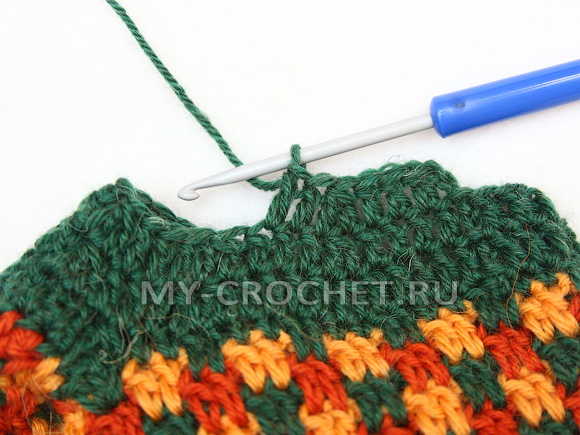
put a hook into the bottom loop of the column, pull the loop,
first we knit one loop on the hook,
then we knit 2 loops on the hook, tied the second single crochet,
Thus, we knit 26 single crochet.
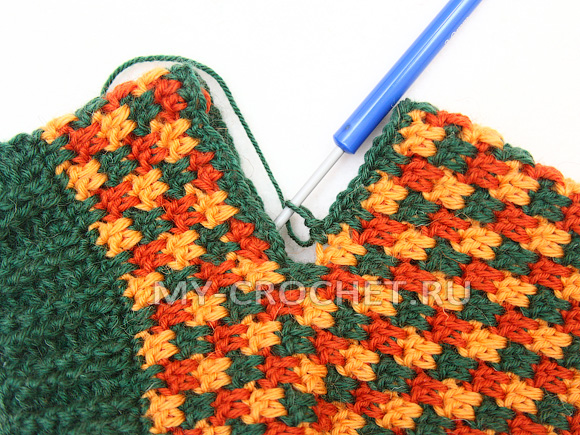
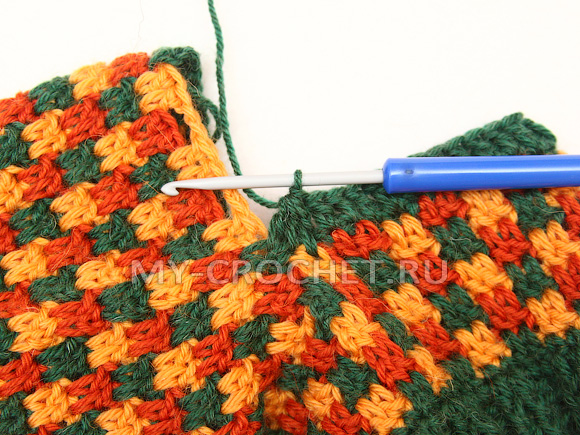
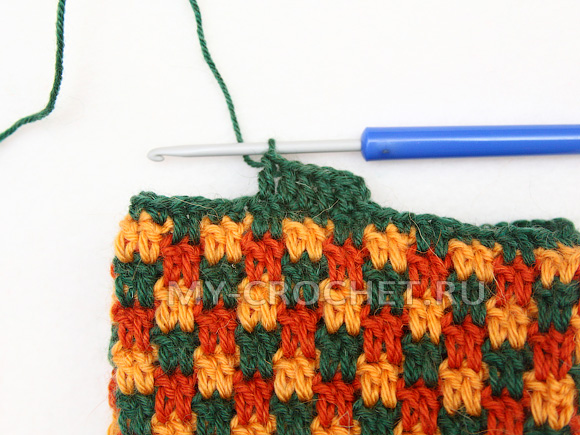
We skip 26 loops and knit 2 double crochet into the top of the columns connected by a thread of orange. If we connected 24 columns, we would have to skip 24 columns and tie the columns into columns connected by a yellow thread, which would not correspond to the pattern, so we left 26 loops on the heel.
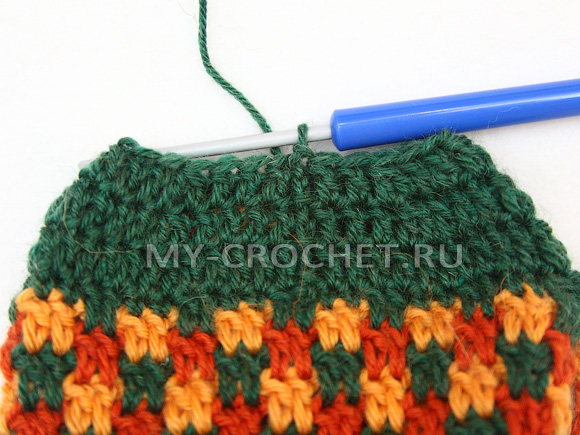
The next row moves to the cell to the right, we introduce a hook to the top of the yellow column and we knit 3 lifting air loops, in the next loop we knit a double crochet, then we knit 2 air loops, then 2 double crochets, we knit in the first and second single crochets, then we knit 2 air loops, skip 2 loops of the base and in the next 2 loops we knit 2 double crochets. Thus, we continue to knit this row to the end.
We close the row with a connecting column in the 3 air lift loop.
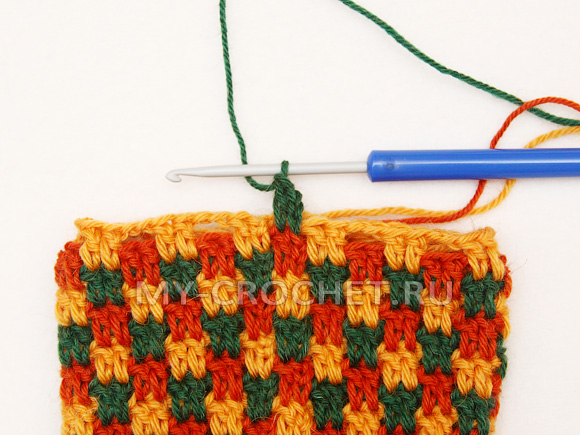
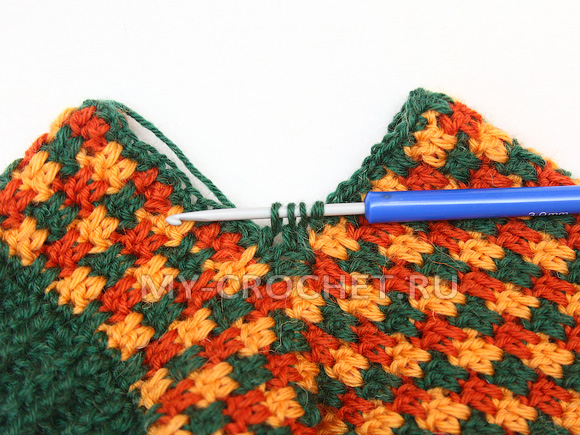
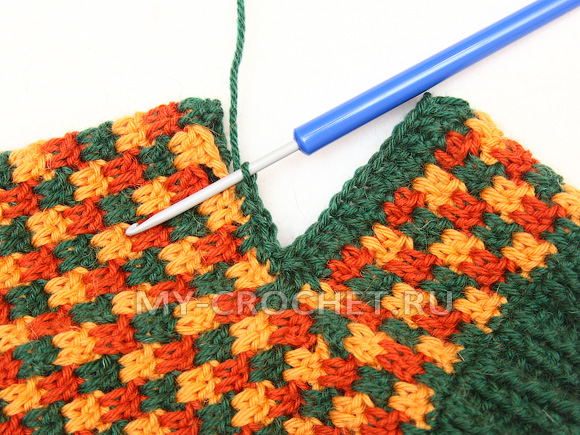
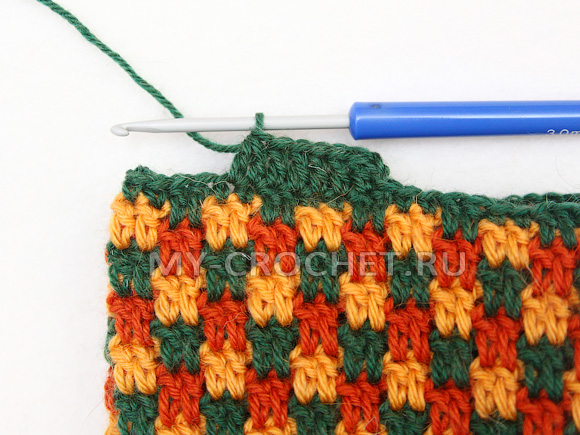
We knit the next row with a yellow thread, insert a hook into the 3 air lift loop connected by a green thread, stretch the loop and knit 3 lift air loops, knit a double crochet into the next loop, then we knit 2 air loops, and to the top of the single crochet, knitted with a green thread we knit 2 double crochet (1 column in each loop), then we knit 2 air loops, then we knit in a pattern to the end of the row.
We close the row in the 3 air loop lifting connecting column.
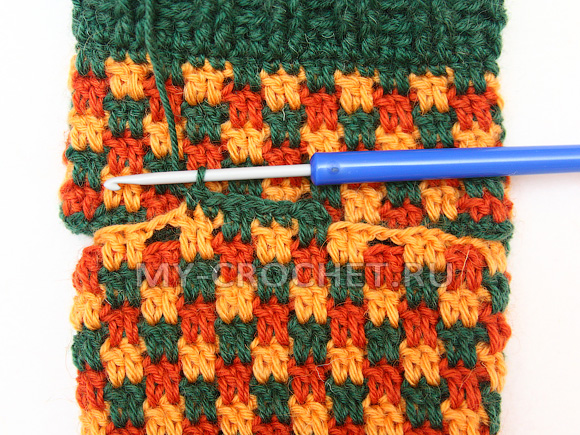
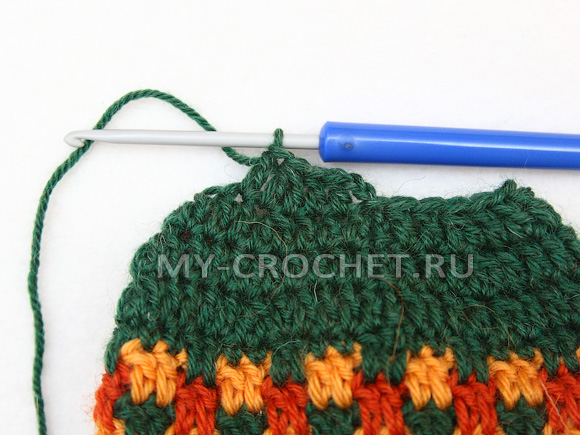
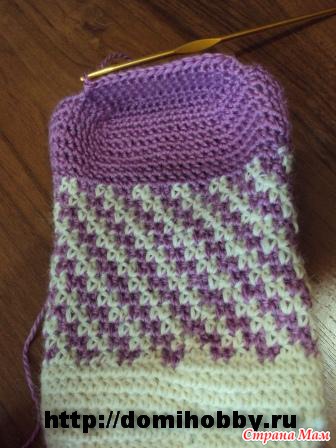
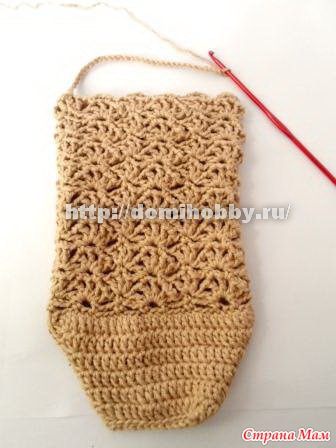
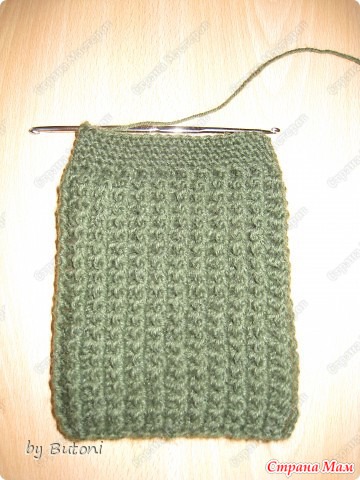
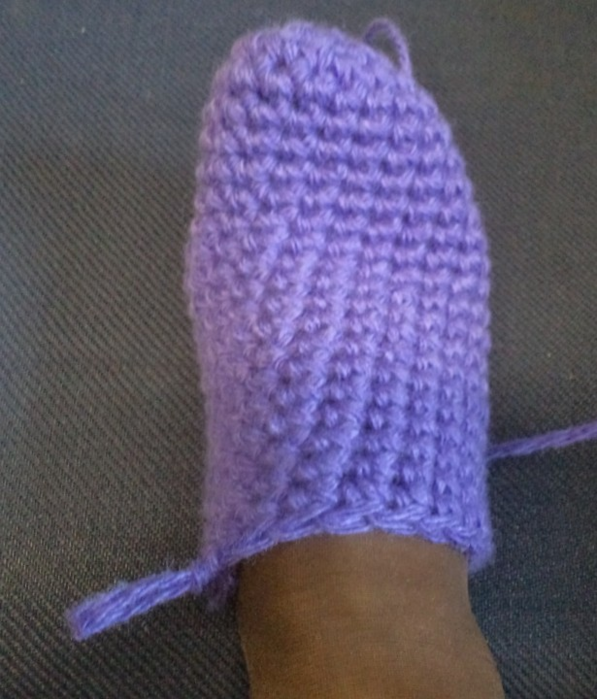
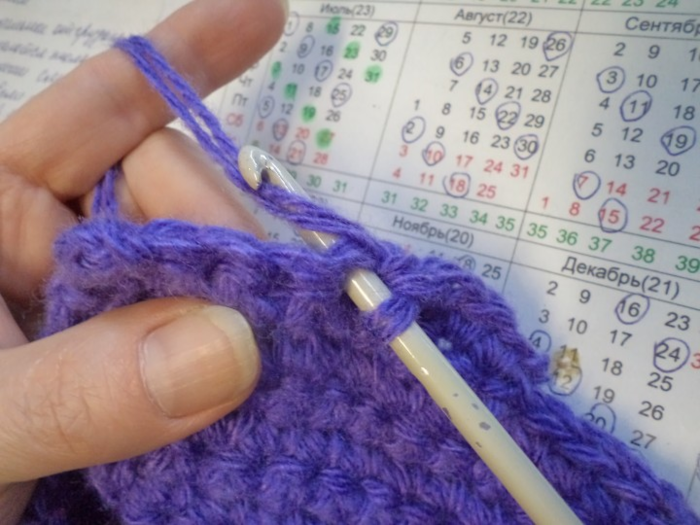
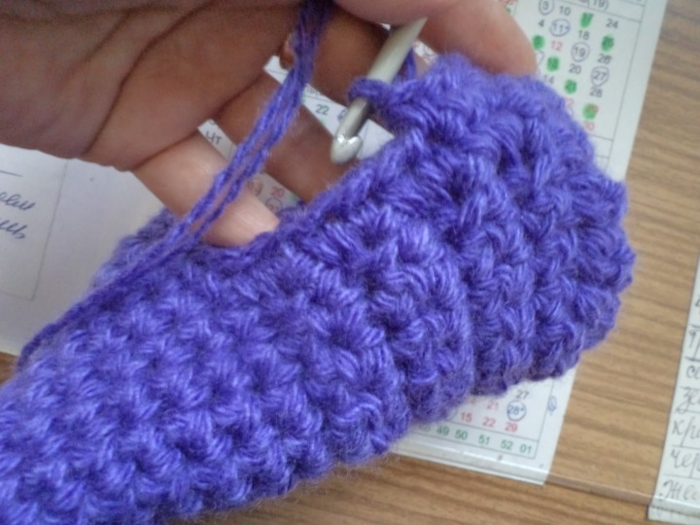
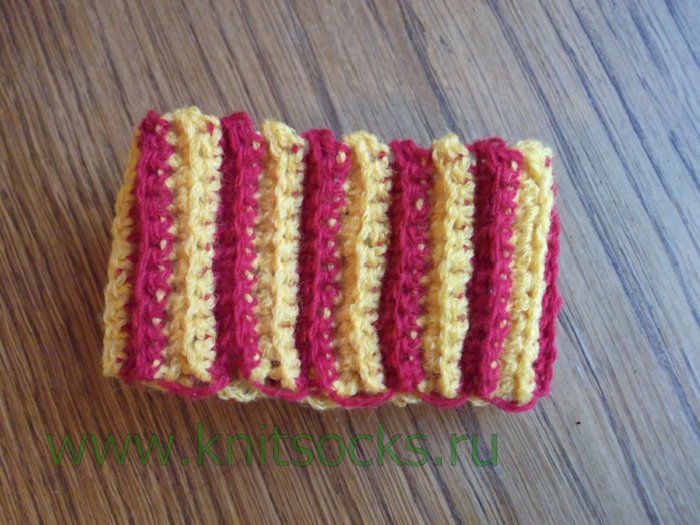
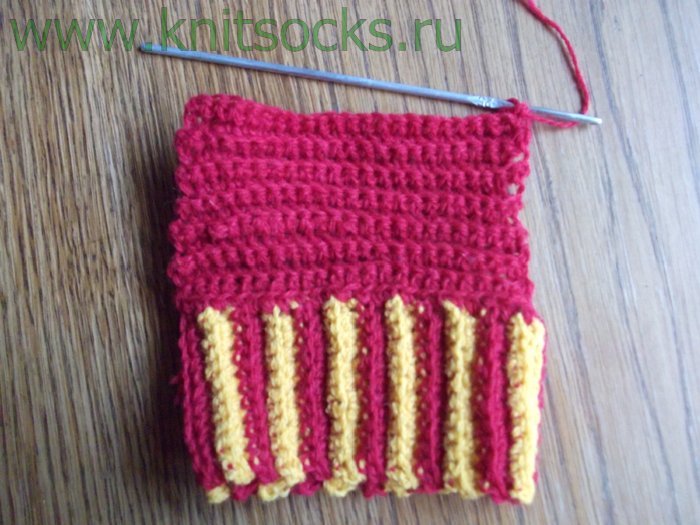
So we knit a few more cm on the pattern (I have 4 cm tied).
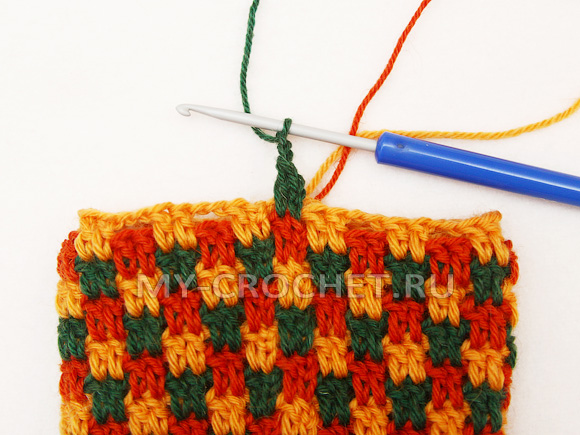
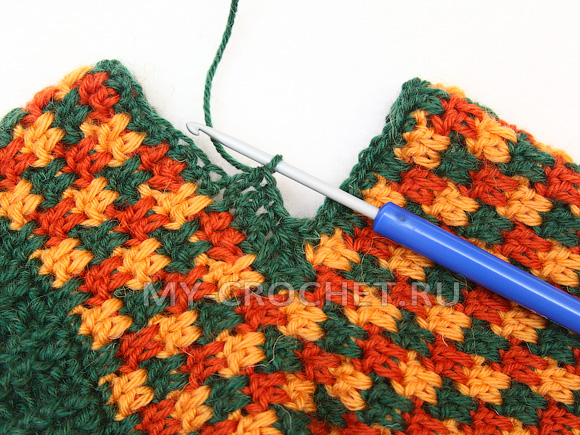
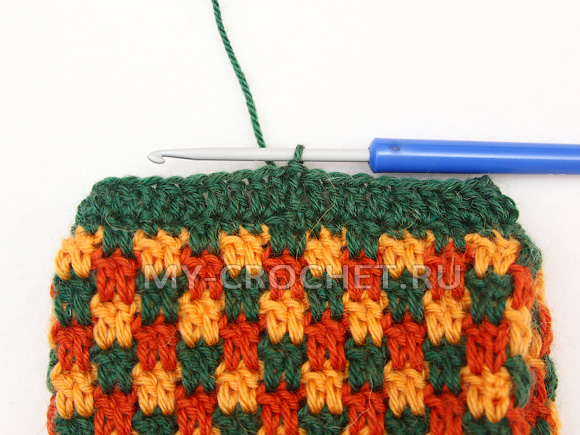
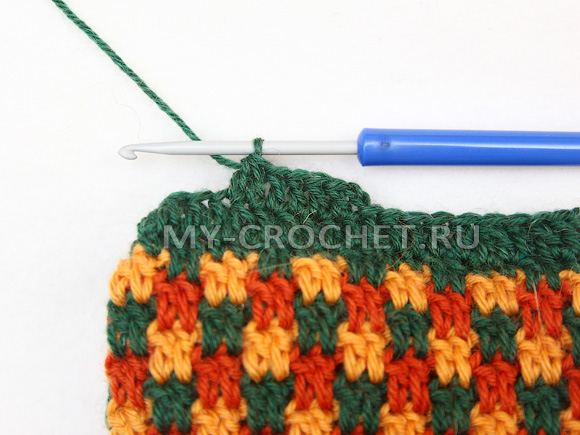
We knit the next row with a green thread in this way, knit 3 aerial lifting loops, knit a double crochet in the next loop, then we knit 2 single crochet into the tops of the previous crochet of the previous row (1 column in each loop), * then we knit 2 double crochet into the tops of the columns that are connected by an orange thread and 2 single crochet into the tops of the columns that are connected by a yellow thread*.
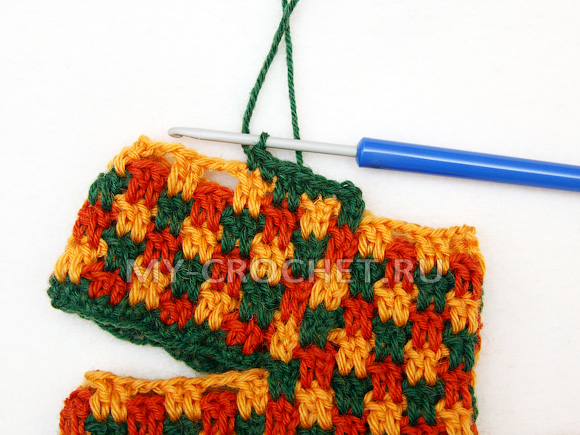
We knit from * to the end of the row and close the row with a connecting column in the 3 air lift loop.
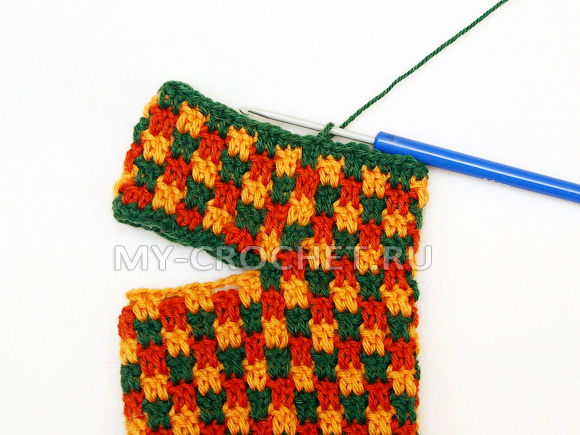
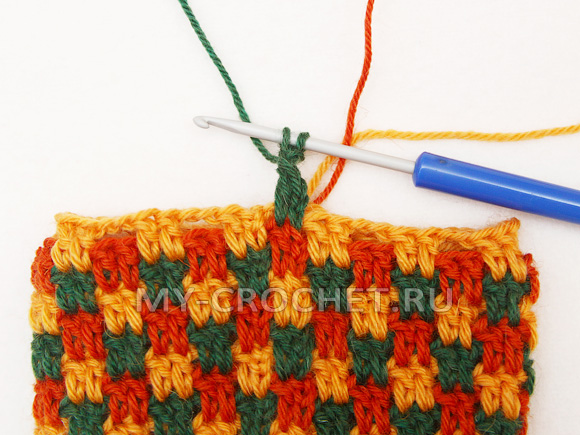
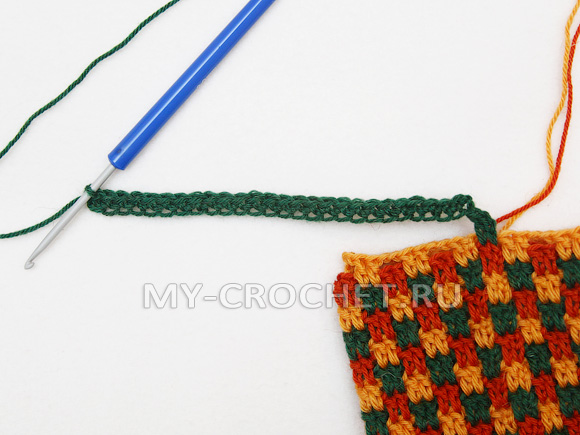
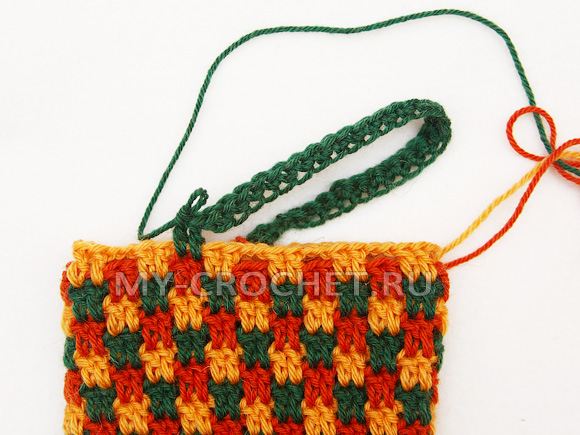
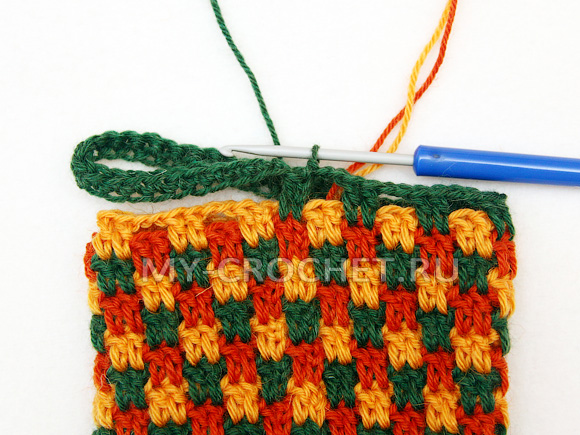
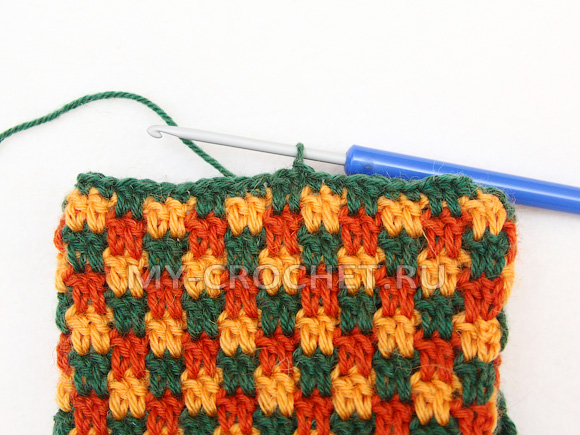
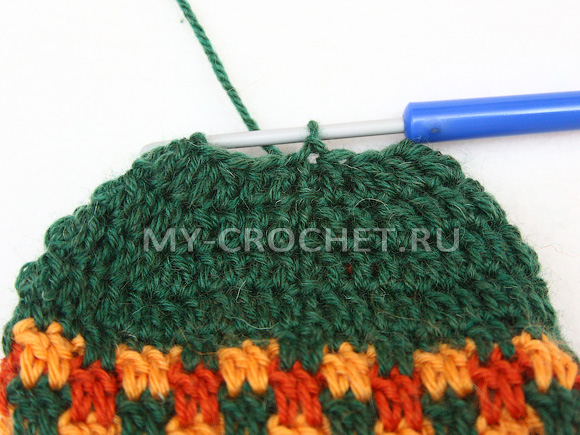
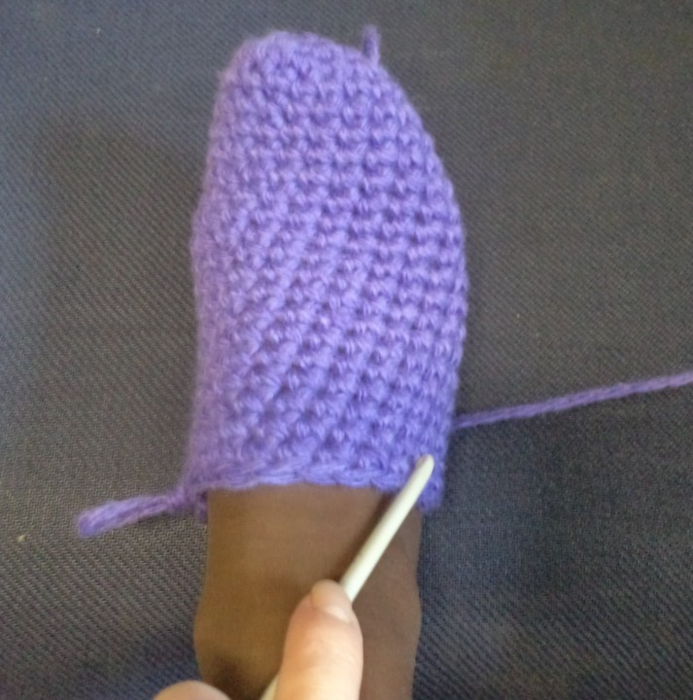
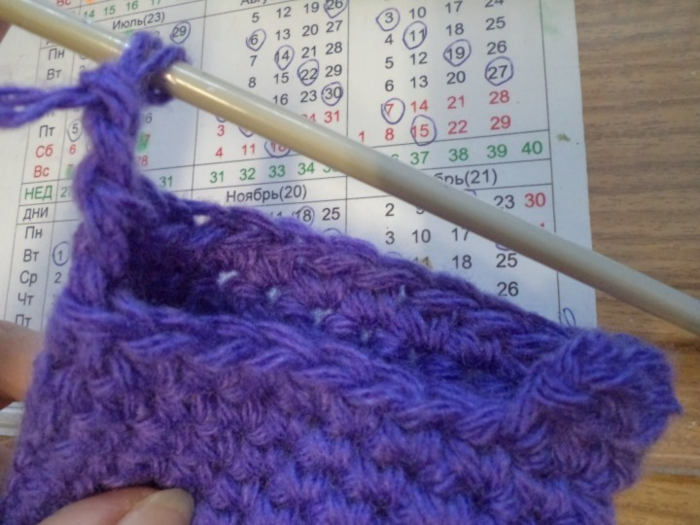
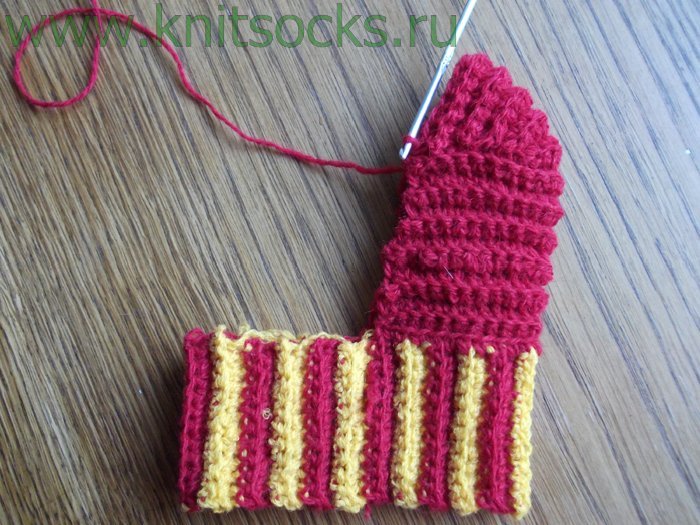
We will knit a cuff with an elastic band in relief columns. We connect the first row with double crochet. Those. we knit 3 lifting air loops and then we knit 1 double crochet into each loop.
We close the row with a connecting column in the 3 air lift loop.
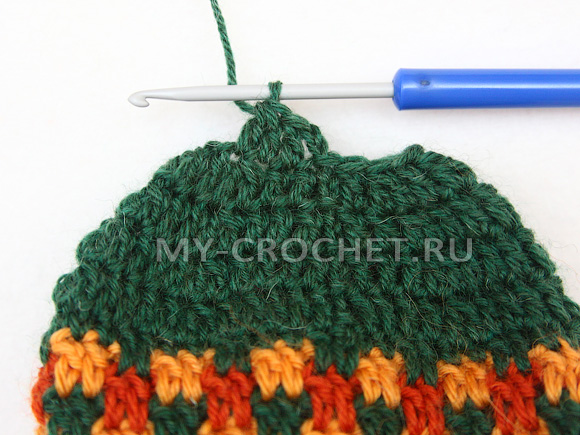
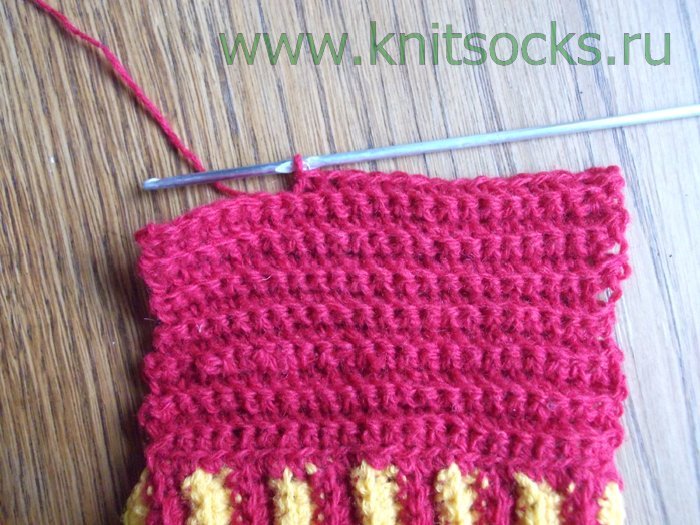
Next row: we knit 2 aerial lifting loops, and in the next loop we knit a embossed purl with a crochet,
in the next 2 loops we knit 2 embossed facial columns with a crochet (1 column in each loop),
*in the next 2 stitches we knit 2 embossed seamstresses with a crochet, in the next 2 stitches we knit 2 embossed front stitches*,
We knit from * to the end of the row, close the row with a connecting column in the 2 air lift loop.
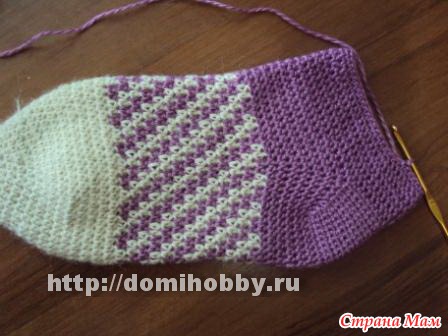
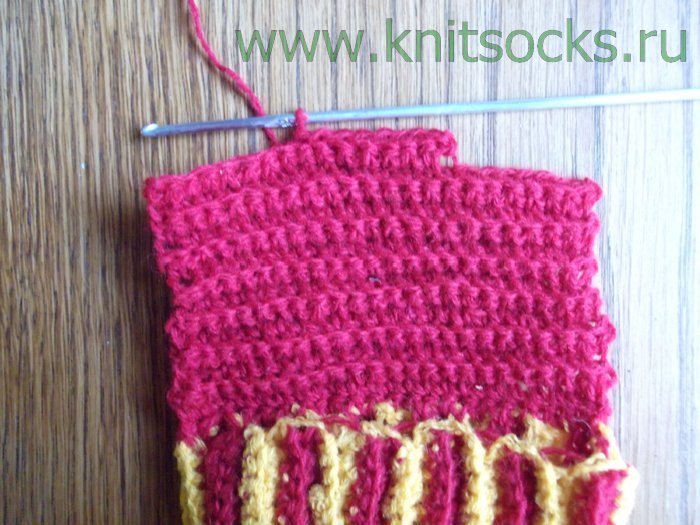
We knit the following rows in the same way, over embossed front columns we knit embossed front ones, and over embossed reverse columns we knit embossed reverse ones. I knitted a total of 6 such rows.
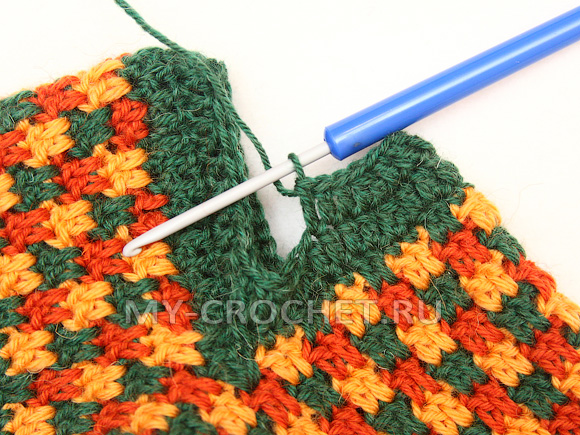
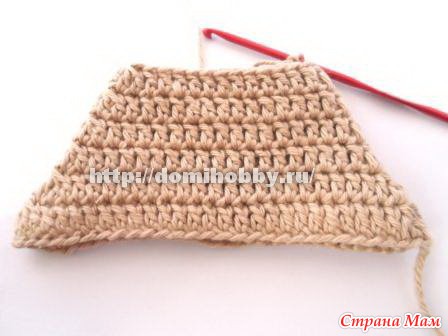
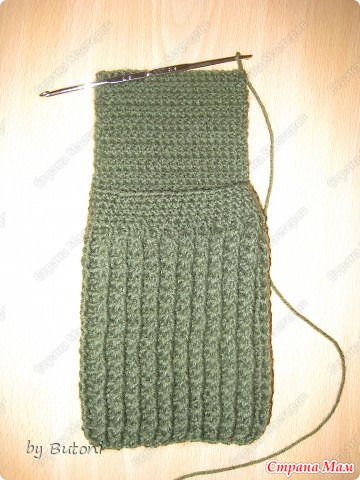
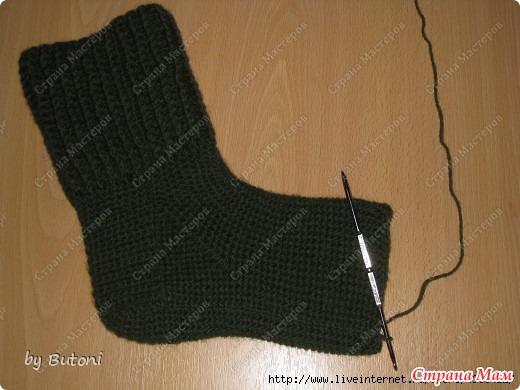
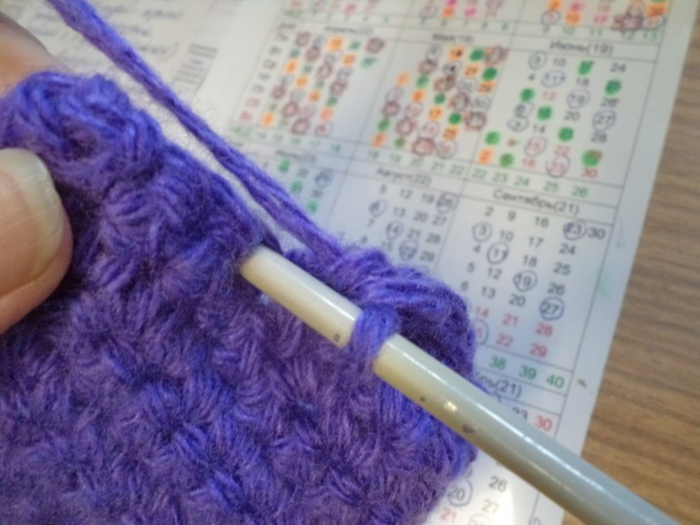
Getting to knitting heels. I have 6 cm on the heel, in my case it is 6 rows.
1st row: approximately in the middle of the foot we attach a green thread (to the top of the orange crochet), we knit 3 lifting aerial loops and a double crochet into the next loop, then we knit 2 single crochet into the top of the yellow crochet and 2 double crochet in the next tops of the orange double crochet and then 2 single crochet.
So we knit to the corner of the heel hole.
We knit 4 loops on the hook together.

Again, in the corner of the heel hole, we connect 3 double crochets with a common apex,
there will be a small hole in this place, try to insert the hook into the double crochet so that it closes (I put the first loose knot in the side wall of the yellow column), knit the other two loose knots in the green crochet.
Having knitted 3 double crochet stitches with a common top, we knit 2 single crochet stitches into the tops of the yellow stitches and continue to knit in the pattern as at the beginning of this row, 2 double crochet stitches in orange crochet stitches and 2 single crochet stitches in yellow stitches .
We close the row with a connecting column in the 3 air lift loop. In this row I got 54 loops.
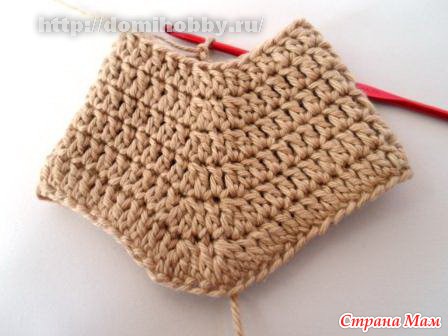
2 row: we knit 2 air loops of rise (they correspond to 1 unbound knit crochet), in the next loop we knit a crochet (these 2 columns correspond to the first decrease),
in the next 4 loops we knit 1 single crochet,
and in the next 4 loops we knit 4 double crochet (1 stitch in each loop) *

We continue to knit from * to the end of the row. We close the row not in the air loop of the rise, but at the top of the first column with the crochet of this row.
3 row: we knit 2 lifting air loops and in the next loop we knit a double crochet (we performed the first decrease),
in the next 3 loops we knit 3 double crochet (1 stitch in each loop),
in the next 3 loops we knit 1 single crochet, *
So we knit from * to the end of the row. We close the row with a connecting column to the top of the first column with the crochet of this row.
4 row: we knit 2 hoist air loops, and a double crochet in the next loop,
in the next 2 stitches we knit 2 double crochet (1 stitch in each stitch), * then we knit a decrease, knitting 2 crochet stitches together and then knit 2 crochet stitches (1 stitch per loop)*.
We knit from * to the end of the row. We close the row with a connecting column, which we knit at the top of the first column with the crochet of this row.
5 row: we knit 2 hoist air loops and a double crochet into the next loop,
in the next loop we knit 1 double crochet, * then we knit a decrease by knitting 2 double crochet together, then we knit 1 double crochet *.
We continue to knit from * to the end of the row. We close the row with a connecting column, which we knit at the top of the first column with the crochet of this row.
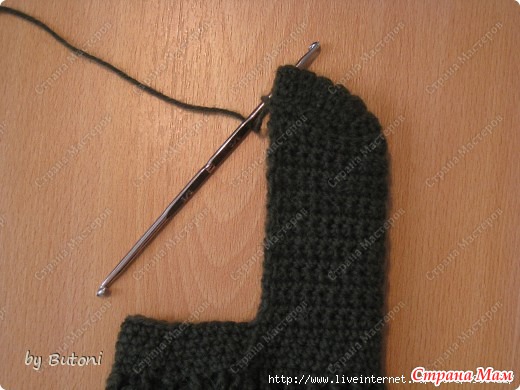
6 row: we knit 2 lifting air loops, in the next loop we knit a crochet, * then we knit a decrease by knitting 2 double crochet columns *
We knit from * to the end of the row. We close the row with a connecting column, which we knit in the first column with a crochet of this row.
![]()
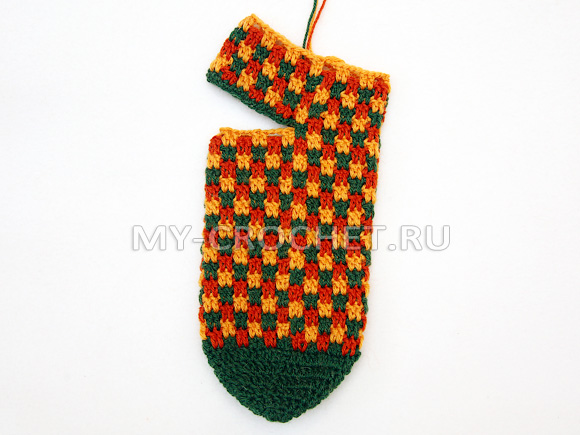
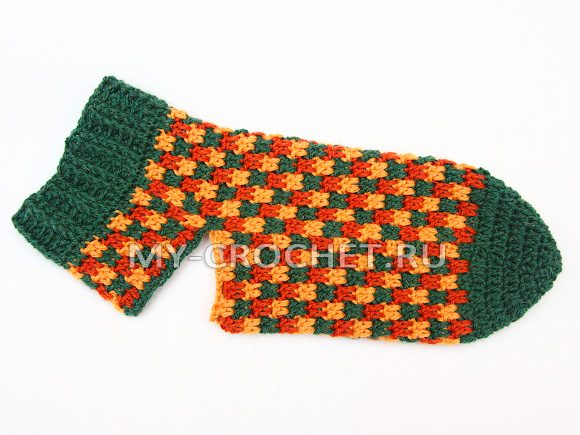
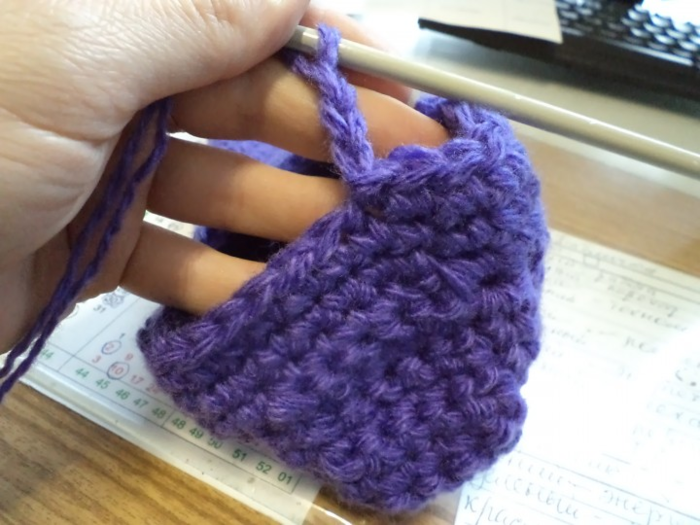
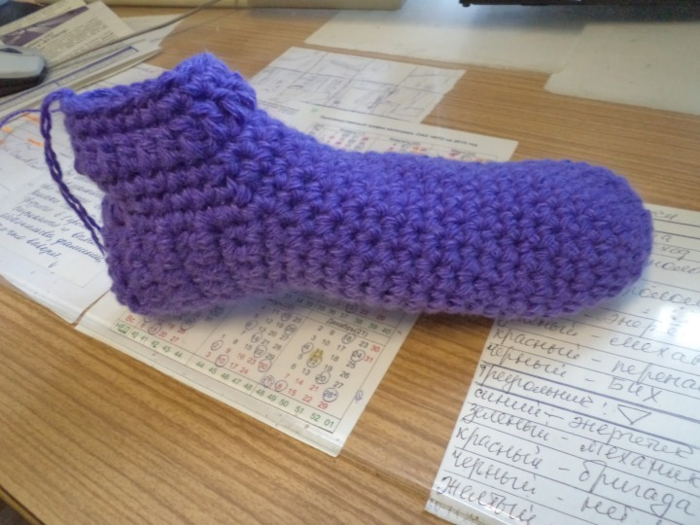
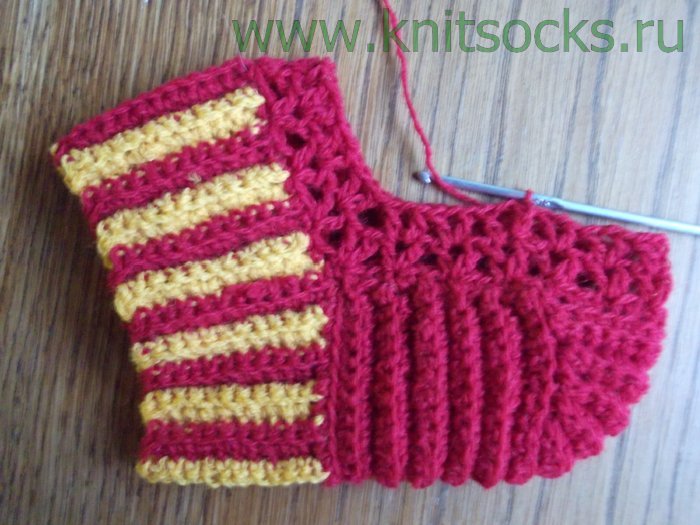
We cut the thread and sew the remaining loops with a needle.
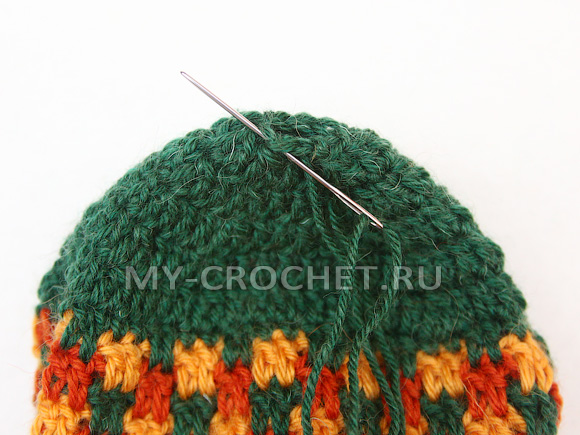
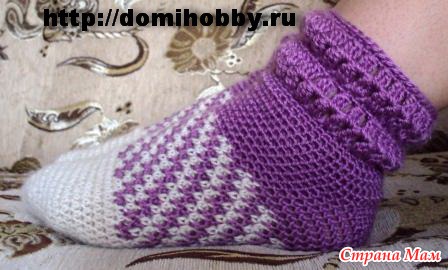
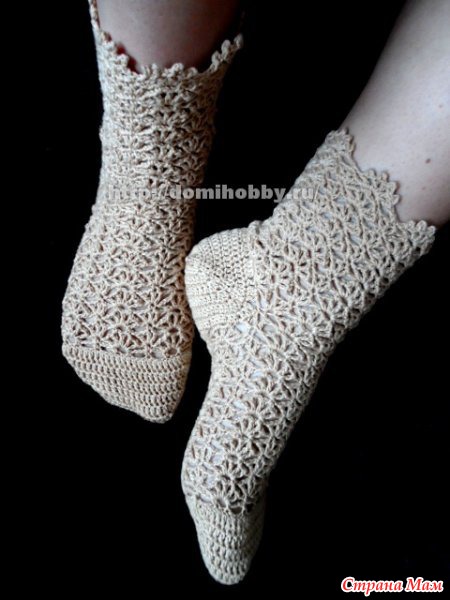
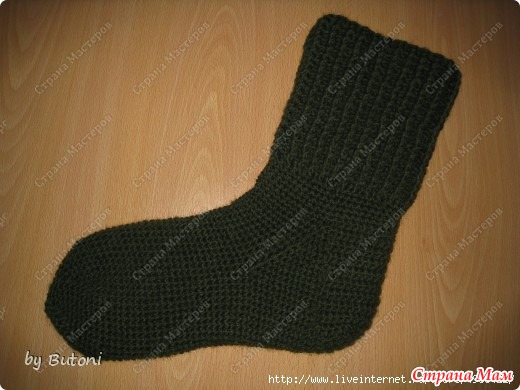
Our wonderful sock is ready.
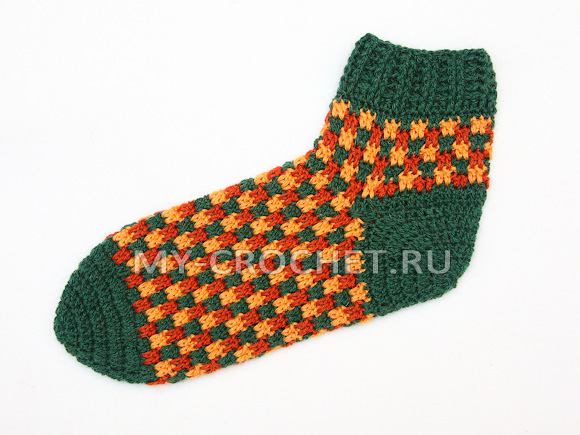
The second sock fits exactly the same.

If you have any difficulties, you can watch the whole process of crocheting these socks in a video master class.
Happy viewing!
If you want to receive fresh articles, lessons and master classes from the site site to your inbox, enter your name and e-mail in the form below. As soon as a new post is added to the site, you will be the first to know!
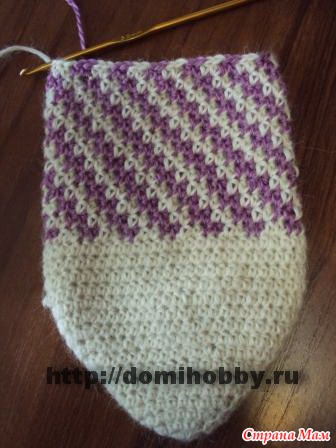
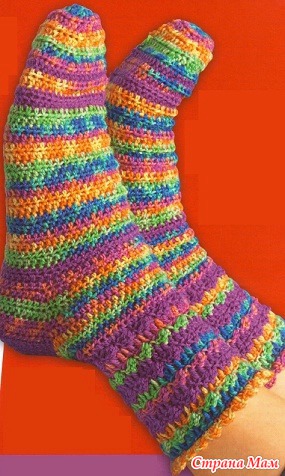
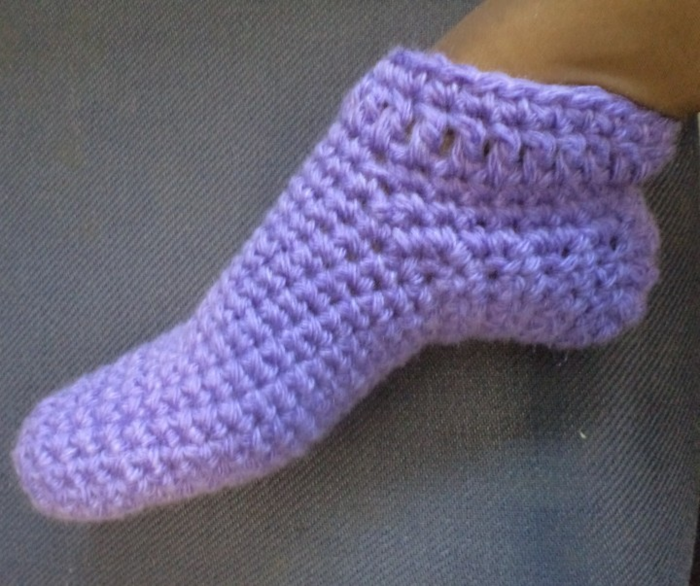
T we knit warm flirty socks with a simple jacquard pattern and a three-dimensional pattern on the cuff.
To knit socks you will need 50 grams of white wool blend yarn of medium thickness and 100 grams of light purple, hook number 3,5.
We start knitting a sock with a set of 8 ring half-rings from a thread ring, then we tighten the ring and make a connecting loop in the 1st half-column.
To knit a pattern, we introduce a light purple thread and knit with a simple pattern alternating 2 half-columns with white thread over dark loops and 2 half-columns with purple thread over white loops, knitting technique and thread change
Having knitted a sock 17-18 cm from the beginning of the work, continue knitting with one violet thread for another 5-6 rows, making additions of 1 additional half-column on the sides in each row.
Then start knitting the heel with single crochet straight and back rows according to scheme 2 on the middle part of the sole, going to the beginning of knitting with connecting columns. When tying the heel, attach it to the toe at the same time to the middle.
Having knitted 5-6 rows, knit a cuff with a volumetric pattern according to scheme 4, starting with 2 rows of single crochet columns.
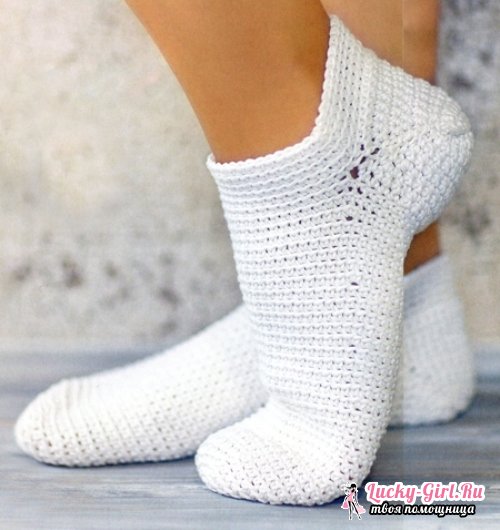
Crochet Fishnet Socks
Openwork socks are comfortable to wear in the hot season. You can learn how to crochet such elegant socks by viewing this master class in knitting socks. You will need 100 g yarn and a hook. Cotton yarn is the most pleasant to wear in hot weather, so for knitting socks, choose cotton yarn of medium thickness and a hook No. 2.5.
You need to knit socks in the following sequence: first, the toe of the sock is knitted, then the main part is made with an openwork pattern to the heel, the hole for the heel is created from an additional set of chain of air loops, along which knitting continues openwork pattern already toe cuffs. When you finish knitting the cuff, attach the thread and tie the heel in place of the heel hole.
Crochet Sock Pattern:
Now more about knitting an openwork sock according to the scheme:
Knitting toe. Dial a chain of 60 air loops and lock it into a ring with a connecting column. The opening of the initial ring should be equal to the width of the foot at the fingers.

Make 3 lift air loops and knit the first row with double crochets.
In the second row, start making reductions: 3stair. lifting point, 3 tbsp / n together (with one top), 24 tbsp / n, 3 tbsp / n together, 1 tbsp / n, 3 tbsp / n together, 24 tbsp / n, last 3 st s / n with one vertex. End each row with a connecting loop in the third lift loop.
Third row with reductions: 3 air. lifting point, 3 tbsp / n together, 18 tbsp / n, 3 tbsp / n, 3 tbsp / n together, 18 tbsp / n, last 3 tbsp / n together . As you noticed, the point of the sides is 3 air. lifting loops and double crochet before and after which decreases are made. In the next rows, make reductions, near these points, knitting together not three, but two columns together, gradually narrowing the toe to the top. After tying 6 rows of the toe, sew the remaining hole on the top or tie the connecting row, introducing the hook for half loops on both sides of the hole.
When finished, cut and fasten the thread.
To knit the main part of the sock, attach the thread to the point where the toe begins to knit. Openwork pattern knit in a pattern in a circle, ending each row with a connecting column in the last lifting loop.
Having tied the toe to the heel and finishing the openwork pattern on the odd row, make a hole for the heel. To do this, dial a chain of 30-37 air loops, trying on the lifting legs, and secure the chain with a connecting column on the other side of the toe.
Having tied the cuff to a height of 12-14 cm, finish knitting an openwork pattern even next to the pico elements in the pattern.
The last step in knitting a sock is knitting the heel on the hole left. To do this, attach the thread to the side part (the junction of the typed chain and the main part of the sock) and make 3 air. n. lifting for knitting the first row. Knit the first row in a circle around the holes with double crochets. From the second row, start making reductions as when knitting a toe from the center of the sides. In the second and third rows, make reductions by knitting 3 double crochets together before and after the lateral point, fourth, fifth and sixth, two double crochets together.
After tying the heel, sew the remaining hole or tie the connecting row. After knitting, cut and fasten the thread.
The second toe fits just like the first.
Crochet workshop
the most basic warm and comfortable socks
You will need: yarn of any thickness and a suitable hook to it.
1. Under Scheme 1, tie the toe to the widest point of the foot. Then tie a flat part to the lifting wedge, following the first table.
2. Using the second table, tie the required number of rows for the wedge of lifting and move the connecting loops to the beginning of knitting the heel.
3. In pattern 2, tie out the heel (each pattern indicates the number of columns for the heel).
4. Finish knitting the heel, picking up the first half-columns from the lifting wedge, and tie one row in a circle with single crochet columns.
5. Tie 3 rows of half-columns and knit the elastic out of the front and back st. s / n according to scheme 3.
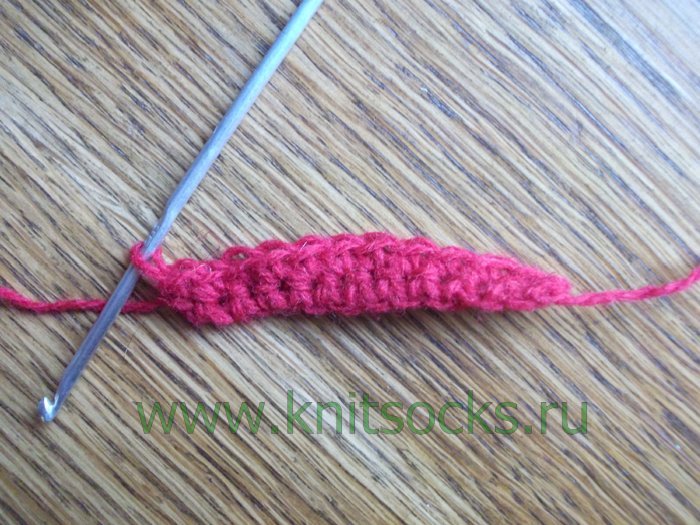
So let's get started! Knitting begins with a cuff. We collect the required number of elastic loops (I have 48) and close the connecting column in the ring.
Here's how the loops are stacked to form an elastic edge:
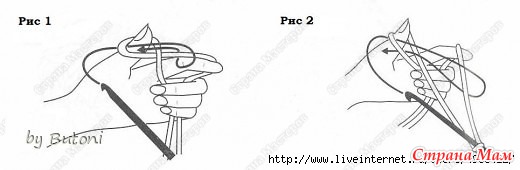
Unwind the end of the thread three times longer than the estimated size of the stacking row. Spread the thread on your left hand, as when sewing with knitting needles (Fig. 1). On the index finger, the thread is from the ball, and on the large free end of the thread. Insert the hook under the thread on the thumb, grab the working thread and pull out the first loop. Drop the thread from your thumb, tighten the knot. Grab the thread again with your thumb (fig. 2). Insert the hook under the thread on the thumb, grab the thread and pull out the loop. Drop the thread from your thumb, tighten the knot. There are two loops on the hook. Grab a working thread and knit these two loops. Grab the thread again with your thumb and repeat all the steps until you tie the chain of the required size.
Then we knit the elastic band in relief columns 1 * 1 in a circle.
We knit to the desired size of the elastic (I have 12 cm, this is 20 rows).
Then we knit 5 rows with single crochet. also in a circle.
Now proceed to the formation of the heel. We knit the back straight canvas of the heel. To do this, divide the circumference of the loops in half and knit in the forward and reverse direction with single crochet (I have 18 rows).
Now we divide the straight canvas of the heel into three parts (the middle one can be made larger, but the side ones should be the same) and continue to knit in the forward and reverse direction on the middle loops and attach the side parts (for this: we knit a series of middle loops. We introduce a hook from the front side under the top of the nearest loop of the side, grab the thread and pull through the loop of the canvas and the loop on the hook). Thus, the middle part will join the side. Here is the heel we got.
Having formed a heel, we continue to knit in a circle with crochets. To form a lifting wedge, we knit two columns with one common vertex to the right and left of the upper edge of the straight heel web. we continue the reduction to the original number of loops (I have 48 loops, I got 12 rows with contractions).
We continue to knit in a circle without changes to the base of the thumb.
Well, the final point!
We knit a toe:
We divide the loops into 4 equal parts and knit 2 columns with one common vertex at the beginning of each quarter. Having finished cutting, thread the clippings and fasten to the wrong side!
Hurrah!!! The sock is ready.
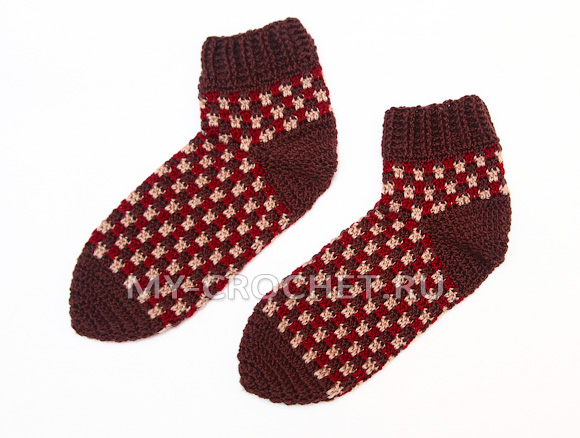
Knit the second sock symmetrically to the first!
I used Finnish threads, 100g / 260m, warm and soft!
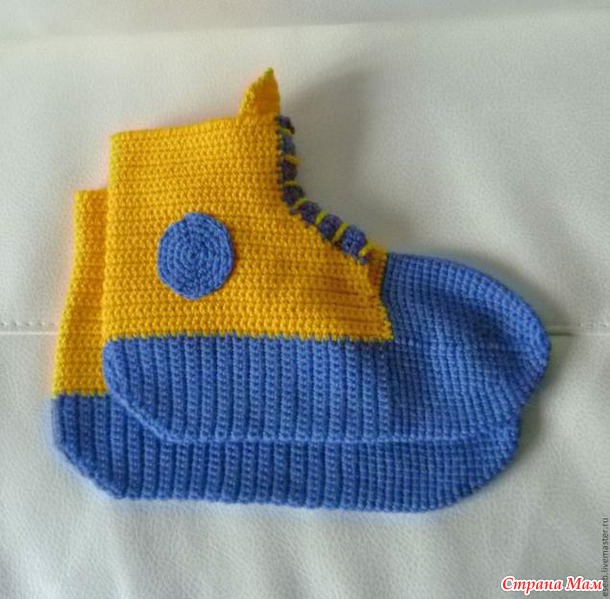
Warm socks - for dad and son
http://idi-k-nam.ru/post284220939/?upd 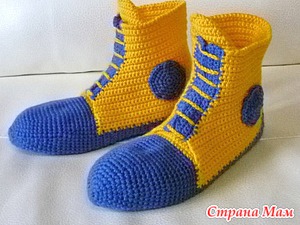
You will need (45 size - foot length 28-29cm):
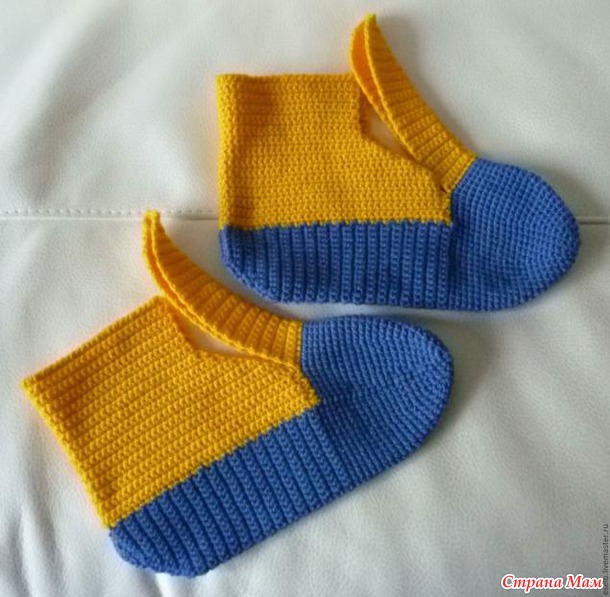
Yarn "Children's whim" (60% wool, 40% acrylic, 225 m / 50 g), 100 g yellow, 100 g jeans, hook No. 3.
Knit a thread in two additions!
Main part:
In a denim color thread, tie a chain of 3 w / p, connecting in a ring.
1 row: in the center of the ring, knit 7 tbsp. non-cash
2 row: 2 tbsp. non-cash in each art. previous row.
3 row: * 1 tbsp b / n, 1 increase (2 tbsp b / n in each tbsp. Of the previous row) *
4, 6, 8, 10, 12 rows: without additions.
5 row: * 2 tbsp. non-cash, 1 increase *.
7 row: * 3 tbsp. non-cash, 1 increase *
9 row: * 4 tbsp. non-cash, 1 increase *
11 row: * 5 tbsp. non-cash, 1 increase *
13 row: * 6 tbsp. non-cash, 1 increase *. (56 p.)
14-23 rows - knit straight.
23rd row - expand the work, knit 30 tbsp. non-cash
After that, knit 8 rows as follows: knit st b / n, reducing 2 p in the middle of each row. Finish knitting. Sew on the heel.
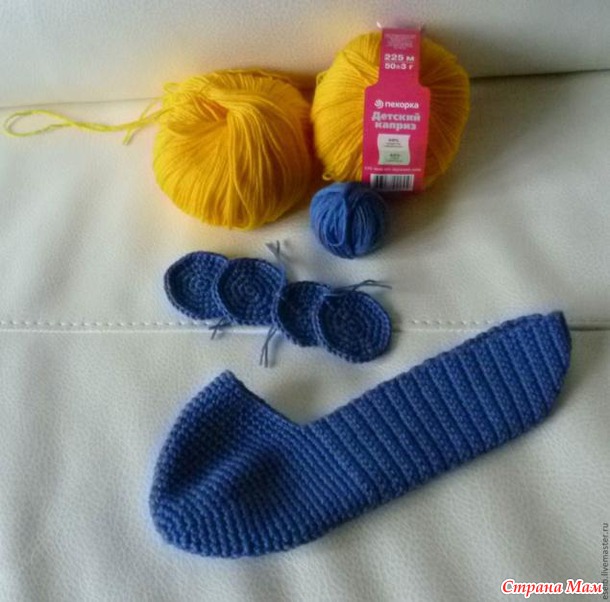
"Tongue":
Tie in the center of the line AC 16 tbsp. w / o yellow thread, knit 15 cm. In the last 4 rows, decrease at the beginning and at the end of the row for rounding.
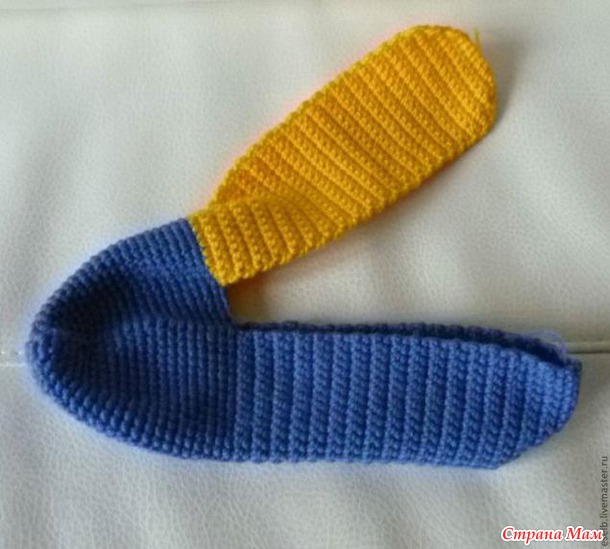
Top part:
Yellow thread on the ABC line, knit 11 rows of Art. non-cash Next, continue to knit st. b / n, not knitting at the end of each row for 3 p. Knit in this way only 4 rows. Next, knit 4 rows, not knitting at the end of each row 1 p. Then knit directly st. non-cash about 17 cm. The last row is the "step of the dog".
Assembly:
Tie the edges with denim 4 rows of st. non-cash
"Edges", referring to the front vertical parts of the "sneaker".
Tie the lace from the air. n. a yellow thread about 1.5 m long. Insert the cord with the hook, grabbing the “tongue” as shown in the photo. Then tie a circle with jeans, sew on.
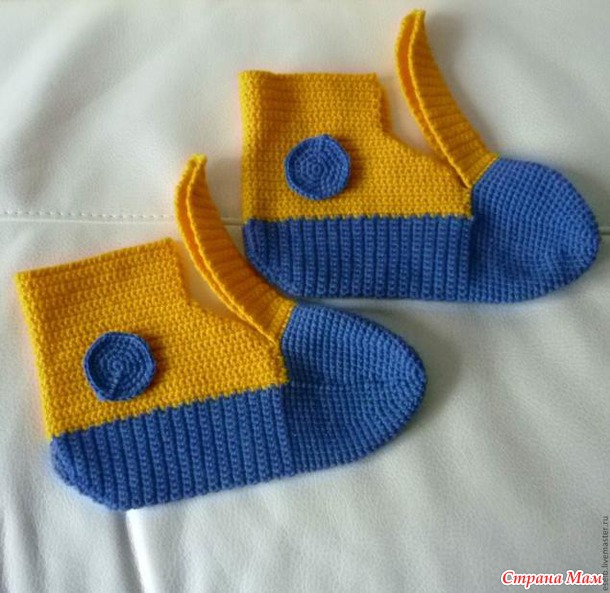
It is necessary to lace up so that the "tongue" does not hang inside, but is inside the lacing ...
Original: http: //www.garnstudio.com/lang/en/pattern.php? Id \u003d 5670 & lang \u003d en 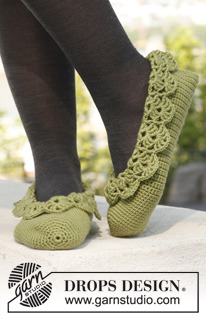
Beautiful crocheted slippers from Drops Design.
Sizes: 35/37 - 38/40 - 41/43
Foot length: 22 - 24 - 27 cm.
You will need:
Yarn DROPS NEPAL (65% wool, 35% alpaca; 75m / 50g)
Amount of yarn: 100 g color No. 0100 (white)
50 g color No. 6220 (blue)
50 g color No. 6314 (jeans blue)
50 g color No. 7120 (light gray green)
50 g color No. 7139 (gray-green)
Hook number 4.
Density of knitting: 17 tbsp. s / n \u003d 10 cm wide
In each row of Art. s / n: instead of the first art. s / n tie 3 air. p., finish the row with 1 conn. item in the third air. P.
In each row of Art. b / n: instead of the first article w / n tie 1 air. p., finish the row with 1 conn. n. in the first air. P.
Stripes
Knit by pulling a white thread from the wrong side, thread other colors to cut after each strip.
1 row of Art. non-woven thread of light gray green
1 row of Art. b
Everyone uses socks. They are worn by men and women, and children, and adults. In cold weather, socks are most relevant, and we often purchase them in stores. But if you wish, you can show creative imagination and learn to crochet your own socks.
Hand-knitted socks are much warmer, better, more beautiful and cheaper than those bought in a store. Quality socks made of natural wool in stores are quite expensive. Such socks are knitted very easily and quickly..
How to crochet socks?
This option is suitable for those who for the first time decided to knit socks not with knitting needles, but with a crochet. Before you start knitting, you need to choose a hook. The choice of hook depends on the thread chosen and the thickness of the knit. For the model that will be proposed below, hook 5 is used. Even if you knit socks loosely, they will still turn out to be very dense and reliable. When crocheting, you can use the jacquard method, in which a loose thread passes inside a single crochet. This method of knitting does not thicken the product, and during operation, you can easily change the color of the thread by linking socks with patterns.
- Sock begin to knit from the top of the product. 42 air loops are drawn onto the hook and the jacquard is crocheted in a circle. Diagonal bevels in the figure turn out by themselves. When they decide that the height of the elastic has reached the required size, go to knitting the heel. The canvas is divided in half, then they begin to knit in rotary rows to the height of the heel.
- After that, as with knitting, the heel is crocheted. This is done by dividing the heel loops into three parts, then the middle part is knitted and in parallel the loops from the loops left on the side are tied. After the formation of the heel, they continue to knit the toe in a circle. To control the size of the sock, try on it from time to time.
- Tie the product to the required length, and then start cutting the fabric. To do this, you need to divide the product into two parts and on both sides in each row, tie one column with a crochet of three columns.
How to quickly crochet socks for beginners?
Prepare some rustic wool and a hook 5.

- Start knitting from the top of the sock. Dial 42 air loops and start knitting in a circle.
- When you decide that the height is sufficient, proceed to knitting the heel. To do this, divide the canvas in half and knit to the height of the heel in rotary rows. Decorate the heel, dividing into 3 parts, knit the middle part, grabbing from the loops left on the side along the loop at the end of each row.
- After that, start knitting the bottom of the sock in a circle. As soon as you knit to the desired length, begin to reduce the knitting. To do this, divide the knitting in half and in each row on both sides, knit from 3 columns one crochet.
Crochet Socks for Beginners
First you need a hook of 6 and 200 g of yarn of any color. The knitting pattern at the sock will be a durable column.
- Tie a chain of 5 stitches. Start knitting with the toe up. In the 1st row, make 1 loop for lifting, and 12 rows in the ring. In the 2nd row, knit 2 columns from each loop of the previous row. In the 3rd row, add 1 column through each loop. Do the 4th row according to the scheme of the 3rd. In the 5th row, knit 1 column from the loops of the previous row. From 6 to 20, knit in the fifth pattern. On the 21st row, divide the loops in half in a circle. Then tie the chain with half-loop air loops. In the 22nd row, skip half the loops, and continue to knit. 23-24 rows knit again according to the scheme of the 5th.
- Start knitting your heel. In the 1st row above the column of the previous row, tie a heel hole with 1 column. In the 2nd row, knit the crochets without a crochet, reducing in the corners 2 loops on both sides. From the 3rd to the 9th row, knit as the 2nd row. On the 10th row, pull the remaining 4 columns with thread. Now you can start crocheting the second sock, since the first sock is ready.
Quote from Rainy77 A detailed workshop on crocheting seamless socks for the first time was published here - http://xvast.forblabla.com/blog/45408314616/Podrob...yu-besshovnyih-nosochkov-kryuc and even won a hundred rubles on the phone !!) )))
Already repeatedly showed these socks, and now MK!
By popular demand, I present to your court my own way of crocheting socks.
Of the many options, this is perhaps the simplest, even a beginner can handle it. And for those who knit - knitting such socks will take only an hour) Fast, convenient and comfortable.
That's what we get in the end
I knit in two threads (acrylic), I won’t say the number of the hook, but it’s rather plump, about 5. Next, the photo will be visible)
Next, I give my sizes (number of rows and loops) Exclusively as an example. Your performance may vary slightly or very much. It all depends on the size of the leg, the thickness of the thread, hook, etc. I have a 35th rr, about the thread and hook description above. No special skills are required, it is enough to be able to knit a regular column (without a crochet), to learn this is easy, there is a ton of information on the Internet, but if suddenly it is not clear to someone, I will explain it with pleasure)
So, we make the first loop and knit 4 air loops into it, then connect it to the first connecting loop (insert the hook into the first loop, grab the working thread, stretch through all the loops on the hook. Next, we make the connecting loops as in this description).
We start knitting with the toe.
The result is such a small circle. Further, moving in a circle we knit two columns in each of the formed base loops. We knit in this way 2-3 rows. The rows in this case will be conditional, since we knit in a circle without lifting loops, we look approximately. You can put a beacon. 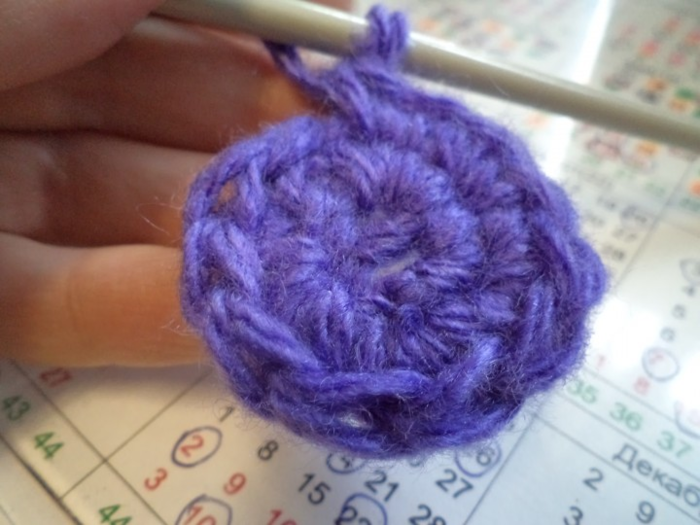
Then we knit through one - that is, in one loop of the base - one column, in the next 2 columns. Thus we add our circle. In the process, everything will become clear)
It turns out 
It is already possible to try on a leg) Smtrim that the typed loops are already enough. In my case, it turned out 22 loops. Remember the amount. In order to count - put the beacon. Advice for beginners - be sure to write down how many loops turned out !! 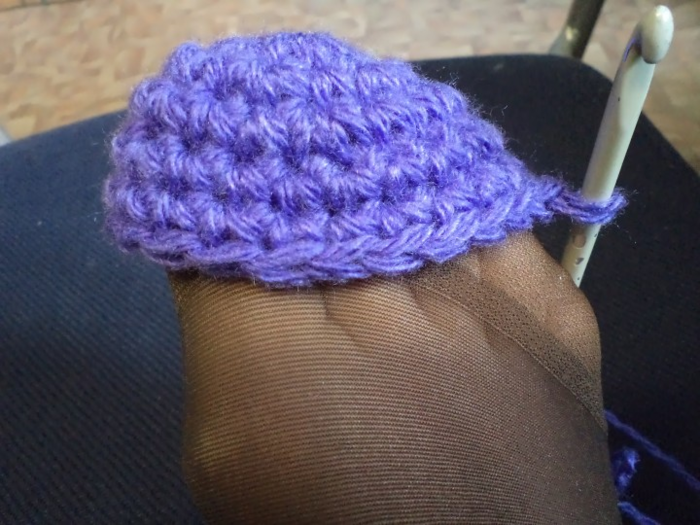
It’s better to put the beacon on with a contrasting thread, I didn’t have it at hand, sent the same one between the loops) 
Then everything is simple - we knit in a circle, periodically trying on, to the base of the foot. 
We try on, we see that it is already long enough, we begin to knit the heel.
Advice for beginners - count and write down the number of rows so that the second sock is tied to the appropriate size! I remind you that the series are conditional, but you can count them - we start from the beginning of knitting to the base of the foot. I got 22 rows.
Determine the size of the hole for the leg. We estimate approximately how much we need to leave the loops so that the leg later fits into the sock. Count the loops.
Advice for beginners - on the heel it is better to leave an odd number of loops. This is not important, but, as practice shows, is reasonable)
So, I got 9 loops left on the hole. We recall - there were 22 in total. 22 - 9 \u003d 13 - the stitches remain on the heel.
The number of left loops can be noted with beacons, but to do this, in general, it is useless, since we have already calculated how many loops we knit further.
We collect two air loops into the loop on which knitting was stopped. We unfold our knitting and knit in the opposite direction.
In the same way we do, having tied the row to the end - we collect 2 air, deploy, knit.
Attention!! We knit only loops left on the heel!
In my case, it's 13 loops.
We knit the required number of rows - we try on to determine. It should be like this 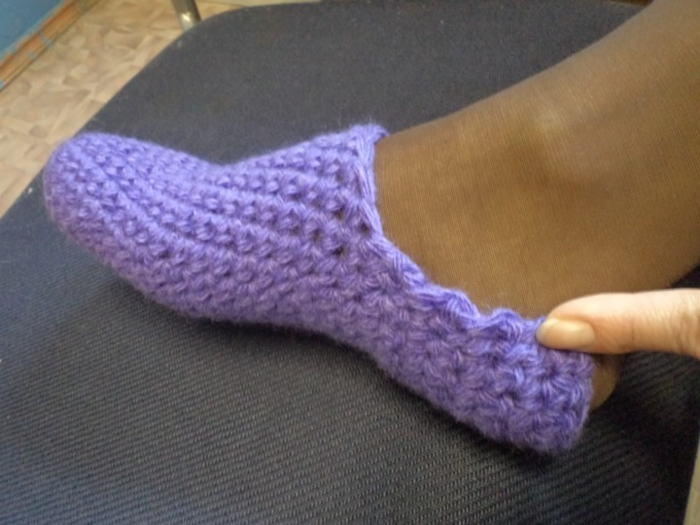
I got 7 rows. We begin to untie the heel. For this, the number of loops left on the heel is divided by 3.
In my case: 13: 3 \u003d 4 (+1) So that it’s clear why we divide by 3 - three, this is the number of sides of our heel!)) Thus, 4 loops will go along our sides and 4 +1 more - from below.
We knit the next row - the side part (4 loops), the bottom (4 loops) and make a connecting loop in the next loop of the base.
We unfold the knitting, knit the lower part (4 loops) and make a connecting loop with the next loop of the side.
Everything, the heel is ready. We make two air lifting loops and knit again in a circle, increasing the height of the sock. 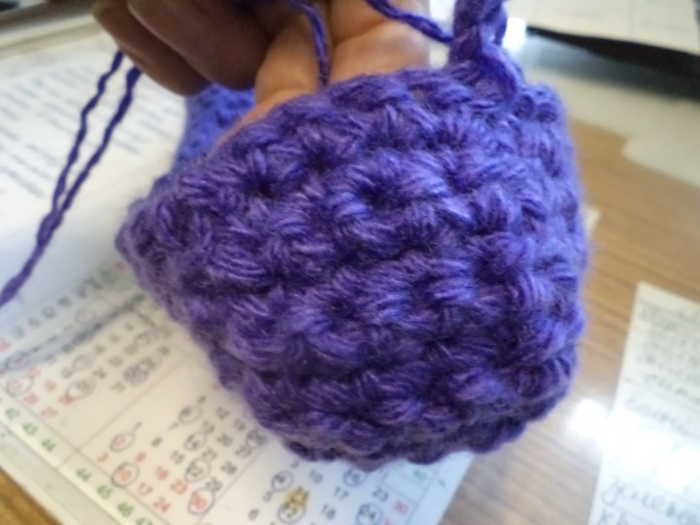
In the 2nd and 3rd row I remove one loop in the corners on the sides - for a better fit) I just do not knit them. 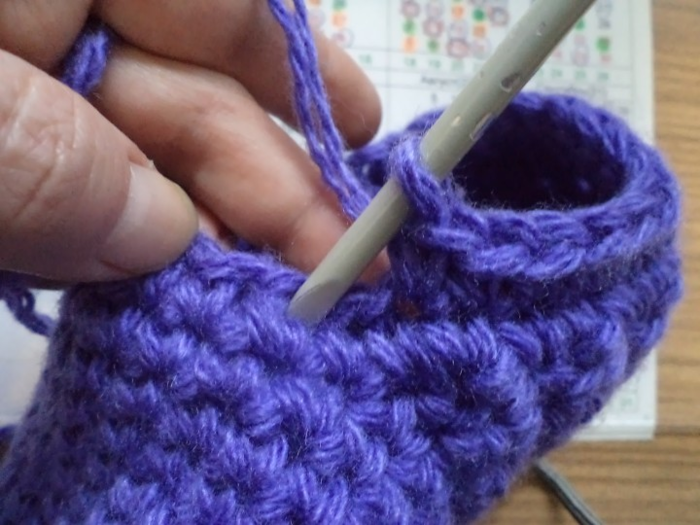
In order to quickly increase the height of the sock, I knit a series of double crochet posts. If you want high - golfs, then you can knit further, to the required height, double crochet or without. Or add some kind of picture)
To perform double crochet, you must first dial three lifting air loops at the beginning of the row.
Next, we knit a series of double crochet posts. We connect a connecting loop. 

Having knitted the required number of rows, we finish knitting. 
Voila! The sock is ready !! We knit the second in his image and likeness) 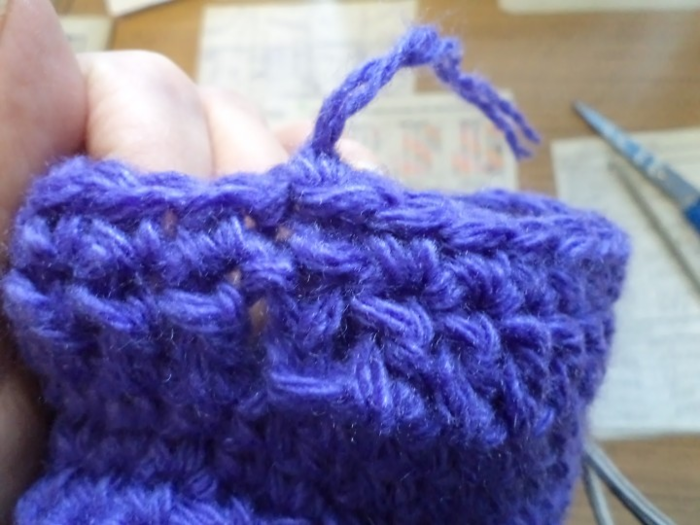
Such socks are very comfortable to wear, keep their shape perfectly, warm and comfortable)
And, most importantly, their dignity - they fit very, very quickly!


Personally, my opinion is that such socks are not only legs, but also warm the soul))
All great success and a lot of cozy, beautiful socks !!)))
Most beginner needlewomen know that socks are knitted on five knitting needles or two, followed by stitching, and for some reason they forget about such a great knitting tool like a hook. But with the help of the hook you can create various very interesting models of socks. Perhaps if you are still scared of knitting needles, this option is just for you. We will share with you today in a simple way how to crochet socks, patterns will also be provided. Such socks, crocheted using a step-by-step scheme, will look no less beautiful and stylish than the same made using knitting needles. So let's make crochet socks according to the patterns!
We will prepare everything you need
First of all, for work we will need only one hook, you see, this is more convenient for those who have not yet learned or simply do not want to knit on five knitting needles. Recommended hook size number 5. Threads in two colors. Of course, you will pick up the texture and colors to your taste.
We will tell you how to crochet your socks using detailed and step-by-step patterns.
If you are a beginner, it is sometimes very important to check each new step, not only with a verbal description, detailed photo or video.
Also, at the end of our detailed description we will be happy to offer you to watch some videos on socks, also crocheted. Perhaps, after the first academic work and watching these videos, you even invent your own model and share it with the rest.
Getting started, it is important not to forget that we start knitting socks from the very top of the sock. In the work, as a rule, you can use any pattern. But we will start with a simpler one.
First stage. We knit a sock elastic.
We collect and knit a chain of 12 air loops.
Now we have to knit a row of single crochet.
Starting from the second row, we make single crochet, for this we introduce a hook into the far half loop, each previous row, while the texture of our knitting will be more prominent. We continue to knit, changing the color of our threads every two rows.
Once you understand that the length of our knitting becomes equal to the volume of the ankle, we will need to connect the strip into a ring.
We got a rubber sock.
Take the heel.
Now we will knit single crochet, on one half of the elastic.
as soon as we tie 5-6 cm, we proceed to the formation of the heel.
We knit 2/3 rows and unfold our knitting.
In the next row, we will knit the middle part of the row and turn the work again.
Now we will knit the middle third of the row and one single crochet.
In each subsequent row we will knit 1 more column until all the loops are in operation. As a result, we get the heel of our toe.
Knit foot
It remains to tie the foot of our sock in a circle.
To make the product fit better, in the first three rows we knit 1 repeat of the pattern less than in the previous row.
As soon as the length of the foot reaches the toes, we begin to decrease for the toe of the toe.
How do we do this? We knit all the rows in a circle with single crochet, while in each next row we will reduce the number, that is, by four columns relative to the previous row. When there remains a row of only 4-5 columns, we finish our knitting. The remaining hole, as follows, tighten the thread. Here we have such a wonderful sock! Now that you have your first sock, you can safely tell your girlfriends that you know how to crochet socks for beginners by following step-by-step instructions.
Since now we are crocheting, let's see the different socks in our video.