

On the eve of the celebration of a person dear to the heart, I want to make a gift that would impress and leave pleasant memories. We offer to make voluminous postcards with your own hands, they are also called pop-up postcards. What are these wonderful postcards? At first glance, these are ordinary postcards, opening which, suddenly a three-dimensional figure or a whole composition appears in front of you! Such postcards will not leave anyone indifferent! Especially if they are copyrighted and keep the warmth of your hands!
Do-it-yourself cards with flowers inside
Even a child can make a heart-shaped card with a three-dimensional flower inside:

YOU WILL USE
We do both simple and complex creation technologies.

A lush flower for the inside or outside of a postcard can be made from colored or even plain paper, painted with watercolors or pastel crayons. You can cut flowers according to this pattern:

We print out the flower template, paint it with paints. We fold in accordance with the marked fold lines and glue the resulting flower onto the base of the card.

Undoubtedly, such a lush and bright postcard with flowers inside, made by hand, will surely please the recipient.

How to make it tells in his master class TheJulianaHappy:
The option with gentle, pastel colors, flowers looks very nice. Stamens for flowers are not difficult to make!

The original master class is in English, so for your convenience we offer a short translation of the process of creating this flower card.

Materials and tools are standard: colored paper, cardboard, scissors, glue, plastic to simulate glass in the window.
We take thick colored paper, fold it in half. In one half we cut out a square window.

We make a frame from colored paper of a different color. Glass for the window can be made from a protective film for the phone or transparent plastic. Glue the resulting window frame to the base of the postcard. You can do without "glass" at all.


Glue into the hole
We glue a flower pot out of cardboard, glue it in the middle of the postcard on the fold line. We glue the sides of the resulting pot so that when the postcard is closed, the pot folds up.


Next, cut out green stems and all kinds of bright flowers from colored paper: crocuses, hyacinths, daffodils and tulips. Perhaps your bouquet will not be spring, but summer, which means that cornflowers, daisies, pansies, etc. will appear.


Glue the flowers into the pot
The height of the flowers should be such that they do not stick out of the postcard, but are visible through the window!


The window can be decorated with a cozy curtain.

Master class original
By the same principle, you can make a postcard with flowers from felt or colored cotton pads. Additionally, insert a concise but warm congratulation along with the flowers!

In addition to flowers, balloons, stars, bows can peek out from the card.

How to make a panoramic flower card along with a greeting envelope shows in his master class TheWorkshop:
We take thick paper - the basis for our postcard. Create a rectangle in the center of the card fold line. The width of the rectangle is 3 cm, the length is 7 cm.

We make cuts along the pink lines with a clerical knife. Then we fold the resulting rectangle inside the postcard. We attach the base of the postcard to another sheet, b O larger than the original base.

Then we make a floral design: a flower pot, the flowers themselves, fluttering butterflies and grass. We combine all this and glue it on the front of our postcard.


Masterclass original.
Using the same technique, you can make an original vase postcard. You can also make flowers in such vases with your own hands from paper or other improvised means.


We bring to your attention a master class on making a very delicate voluminous postcard, which will not only congratulate the recipient, but also fit perfectly into the interior, for example, of a children's room.

First, we make a frame-box. To do this, take thick blue paper and cut out a template for the box from it. We fold the edges of the template 4 times 5 mm on each side, thereby forming a frame. We glue the resulting frames.

On top of them we glue colored or scrap paper in a color suitable for your composition.

Next, we will prepare the elements of the future composition. We glue the balloon from paper circles. We fold the circles on the floor and glue them together. Waxed cord is glued to the base of the basket and directly to the mugs that form a ball.

We cut out the clouds from scrap paper, and the sun from yellow paper. Paste the elements of the composition into the frame. We glue the balloon as follows: we glue the base of the balloon on bulk adhesive tape, and the balloon itself on glue. We glue the clouds according to the same principle: one for glue, the second for voluminous adhesive tape.

We make green grass from a simple napkin. First we cut it, then we glue it. On the right side of the box we glue a tree made with a scrapbooking hole punch. The final touch - in the free places we glue the serpentine, butterflies and a congratulatory inscription! Glue a ribbon with embroidery or lace on the bottom of the box. The original voluminous postcard is ready!

Masterclass original.
3D postcards in the Kirigami technique
Kirigami is the art of cutting and folding paper figures and cards. This is the main difference between Kirigami and other paper folding techniques and is emphasized in the name: "kiru" - cut, "kami" - paper. The founder of this direction is the Japanese architect Masahiro Chatani.

For manufacturing, sheets of paper or thin cardboard are used, which are cut and folded. Unlike traditional 3D postcards, these paper models are usually cut and folded from a single sheet of paper. Most often, three-dimensional models of architecture buildings, geometric patterns and various everyday objects, etc. are developed.

It is better to start with a simple do-it-yourself voluminous birthday card. For example, using thick paper in two contrasting colors, you can make a birthday card-cake:

To make it, use this template:

Using various templates, you can make cake cards more complicated:


How to make a kirigami cake tells in his master class OksanaHnativ:
Using this technique, you can cut out various congratulatory inscriptions. The cake can be decorated and painted to your liking.

To create it, take this template:

White embossed paper will also make a spectacular postcard:

By combining two mirror parts of the “cake” cut from different sheets, you can make a whole voluminous cake in a postcard!


Use the following template:

There are a lot of options for creating volumetric postcards! Cut and fold your paper masterpieces!
Volumetric postcards in the technique of scrapbooking
Scrapbooking is the art of decorating photo albums, but its techniques are also very popular when creating postcards.
Using the elements of Kirigami, using the Scrapbooking technique, you can also make a voluminous postcard with your own hands. We cut out and fold from scrap paper "steps" for "pop-up" candles on the second half of the postcard. We glue the candles and stick the resulting blank on the base of the postcard.

You can make a simple but original greeting card from scrap or colored paper. We cut out the flame of the candle and decorate it with sparkles, then glue it on 2-sided tape. Glue the second part of the candle with glue. The congratulation itself can be tied or glued to an elegant satin ribbon. Simple and original!

From paper of a different texture, the postcard will look completely different)

By overlaying each element of the card on top of each other, again using double-sided tape, you can create such a voluminous bright cake!

Consider Tatyana Sadomskaya's master class on how easy it is to make a voluminous most delicate postcard using the Scrapbooking technique using ready-made pictures.

To create such a postcard, Tatyana used:
- ScrapBerry’s “Favorite Pet” scrapbook set
- scissors
- thick cardboard
It is better to use scrap paper with a lot of miniatures that can be cut from a single sheet, as well as colored stamp prints and chipboards.
Before creating a postcard, you need to decide on its plot in order to choose the color of the base of the postcard and its "characters". In this case, paper with a calm beige print is taken as the basis, the components of the plot are cut out of it: kittens, a puppy, flowers, a crown on a pillow.

Before starting this work, do not forget to decide what will be in the foreground and what will be behind it!
In our case, we put a larger kitten in the foreground, this will enhance the feeling that he is closer than kittens with a dog.

We make the necessary cuts. It turns out such a design with "steps". On the resulting "steps" we glue leaves of arbitrary size. These leaves imitate a wooden fence.

Next, gradually glue our elements, starting from near to far. We start from the foreground and glue the kitten. We glue it on beer cardboard, because it gives additional volume and casts a shadow. By the same principle, several other elements can be glued, for example, balls and flowers. When the inside is ready, glue it to the base of the postcard.

Outside, we also decorate the card with an elegant floral print.

For more elegance, we decorate the elements of the card with sparkles (we use glitter).
Masterclass original.
Check out this amazing 3D cake card for inspiration:

Volumetric postcards-dioramas
We present to your attention a master class on making a 3D postcard - a small three-dimensional scene. On such a stage, everyone can arrange various bizarre figurines and decorations)

To make a postcard, we take 4 sheets of thick cardboard, in this case we take cardboard of four shades of orange. You can also choose the colors of your choice.

On sheets of cardboard with a pencil, draw the outline of the frames and cut them out. We make the outline of the frame 1 cm wide.

From the remaining fragments of paper we cut out two strips, each of which is 10 by 4 cm in size. We line each one into 4 parts of 1 cm each. We cut off all the corners of the resulting strips. We fold the strips along the lines so that we get a paper zigzag. These zigzag pieces will support the diorama fragments. Glue the zigzags to the frame on both sides.

We glue the second frame clearly along the line on the other side of the zigzag.


The top of the zigzag should cover one side of the frame. The same must be done with the opposite side. Thus, the first scene of the diorama is ready!

By the same principle, we make the rest of the frames of the diorama.
It's better to pre-decorate each of the frames (especially the last one) than to try to squeeze the decor into the finished card.
The back wall does not have to be solid, you can make a transparent diorama without a back wall.

Decorate not only the "wall" of the diorama, but every frame. Use more voluminous decorations such as beads, bows, feathers, ribbons, etc. This will make the card look more voluminous and this will enhance the 3D effect!

Masterclass original.
You can come up with absolutely any plot! Create your own little theatre!
For example, waiting Assol!

Or a balloon in fluffy clouds.

Bright glade with lupins and butterflies!

Birdhouse with birds and flowers:

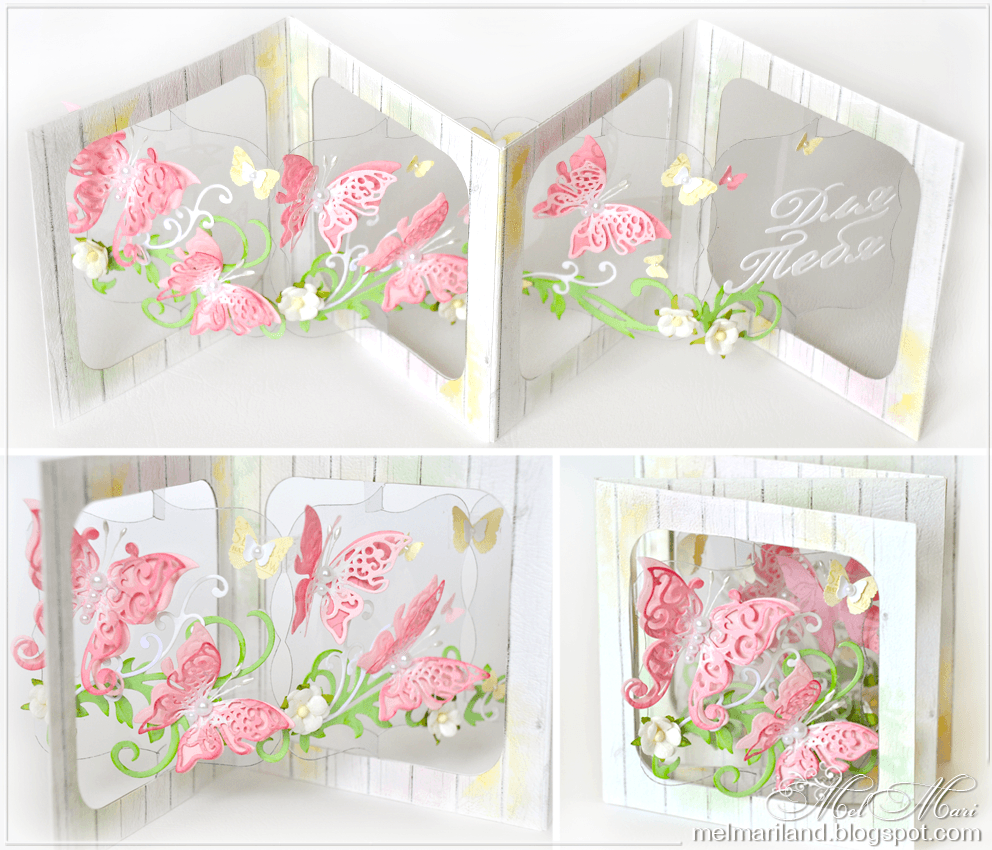
Postcard-accordion (schemes and templates)
Another type of voluminous postcards is an accordion postcard.
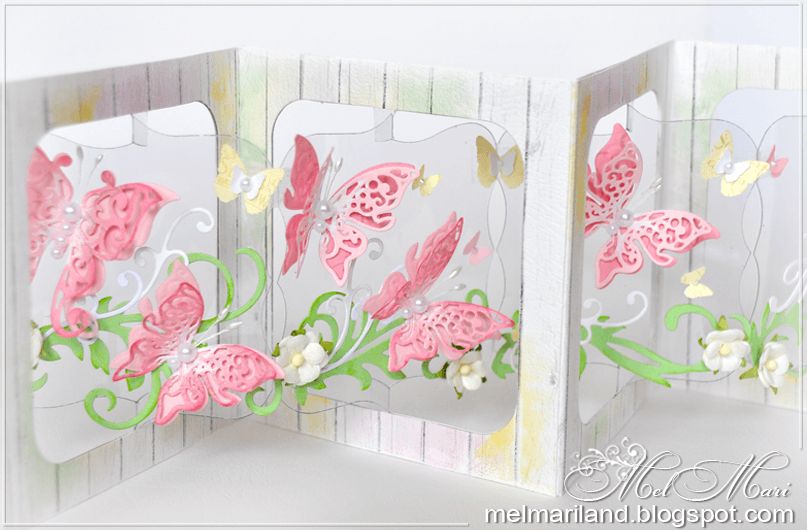
To create such a postcard, you will need: thick scrap paper for the base frame, a scrap-cutting knife or a clerical knife, transparent plastic for the internal parts, stamens, semi-pearls, etc. materials for decoration.
We take a template and make blanks for a postcard. From thick scrap paper we cut out 8 blanks for the base frame and 4 from transparent plastic.

Thick paper...
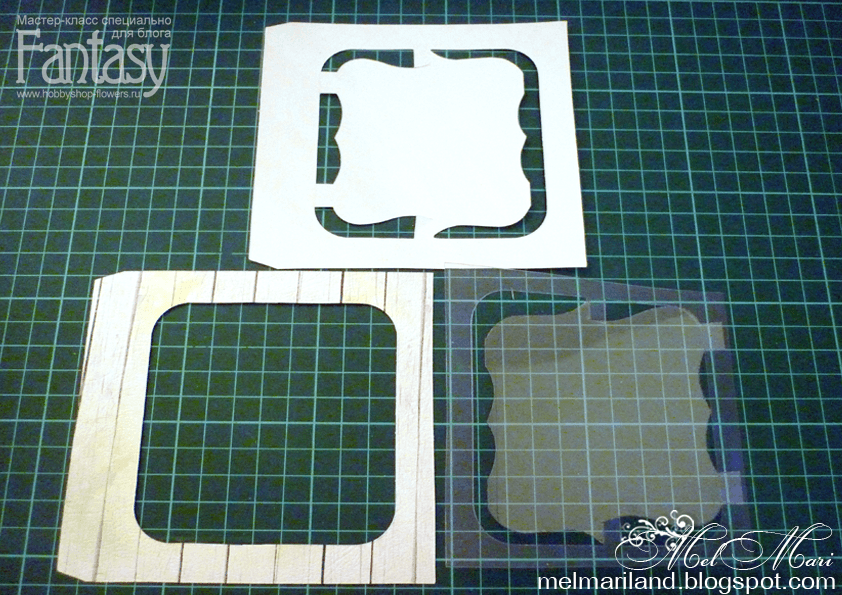
...and transparent plastic
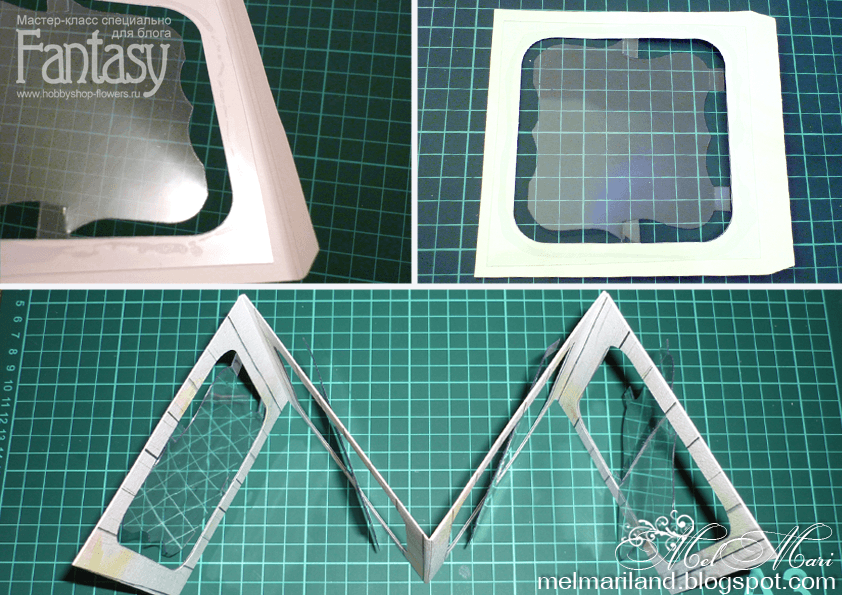
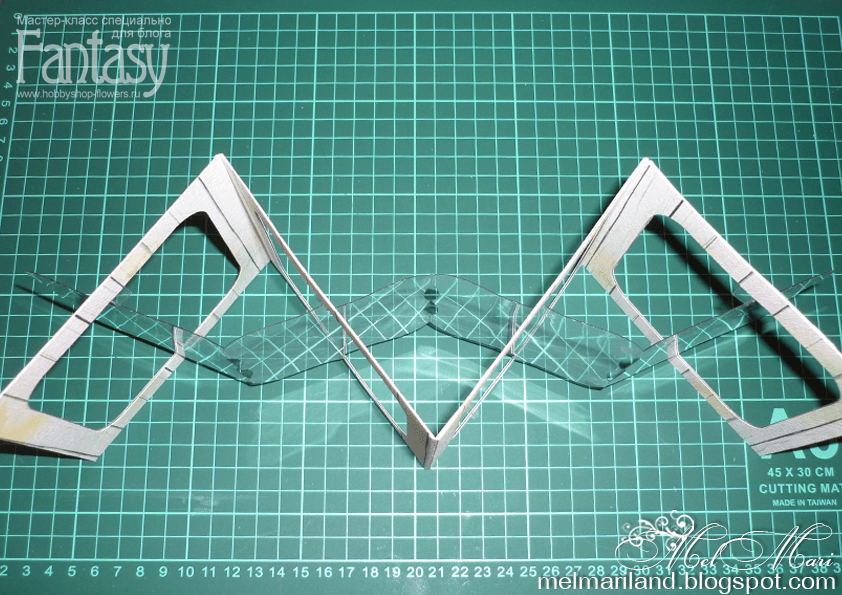
We glue the plastic blanks to the paper base. In order for the card to fold, we make a double creasing of about 2 mm on the outer folds. We connect the resulting 4 parts - glue them with glue or use 2-sided tape. Glue the remaining 4 frames on the opposite side.

Now you can start the most creative part of creating a postcard - decorating it! We glue fluttering butterflies and twisted greenery to the plastic. Postcard is ready!

Master class original
Various templates for making the bases of such postcards, see below:


Using imagination, you can create all sorts of options for such folding cards. For example, with a predominance of children's topics. The number of components may vary.


Birds, flowers, butterflies - they always look very light and airy on postcards!


Postcards for all occasions
We have already seen that handmade postcards are more original than those that you can just buy.
YOU'LL LIKE IT!
Let's give, and sometimes for no reason at all! 🙂

Sometimes, in a handicraft impulse, you want to do something beautiful with your own hands, but as luck would have it, nothing comes to mind, and so as not to suffer once again, I decided to collect a selection of examples of how to make a postcard with your own hands. Here are different examples of postcards and small descriptions of how to make this or that postcard.
I tried to select as many different images as possible, both in style and in subject matter, so that there was plenty to choose from. Of course, each postcard is just an example of how you can make postcards with your own hands.
Mom
How to make a postcard for mom? It is clear that it should be the most beautiful and touching, but I want some specifics, right? First of all, you need to focus on the reason, it can be:- unplanned card for no reason;
- mother's day or March 8;
- New Year's and Christmas;
- birthday or name day;
- professional holidays.
Of course, no one can stop you from making and giving your mother a postcard dedicated to the first snow or even to the release of your favorite series with her, but in general, the main reasons are indicated quite clearly.


A postcard to mom for the new year can be ordinary (in terms of New Year's greetings, of course), it is not necessary to somehow emphasize a special relationship. But birthday or mother's day are special holidays on which it is worth presenting a personal postcard with the signature "Beloved mother".
How to make a birthday card for mom? Draw a sketch with a simple pencil, add a little color to orient with the color scheme and understand what shades you need in the process. So, you need to buy or find in the bins:
- a blank for your needlework (thick and thin cardboard is suitable);
- background image - it can be scrap paper, colored paper, any sheet that you like with an ornament, or you can simply artistically sprinkle paint on a sheet of white thick paper or even use the monotype and marbling technique;
- chipboard for the inscription - it is better to purchase ready-made or use a special stapler to decorate the edge;
- a pair of decorative elements - flowers, butterflies, beads and leaves;
- one or two large decorative elements - flowers or bows;
- decorative tape;
- good glue;
- scalloped ribbon or lace.
First you need to glue the background image to the blank, then place large flowers, and only then add the resulting composition with small decor and lace. Dry the finished work well, decorate with small decorations and sparkles, and then sign it - mom will be happy with such a sign of attention.
Now you know how to make a card for mother's day, and you can easily figure out what a card should be for an anniversary or angel's day.
Another original option: the bottom line is that you need to cut out circles from colored paper, and then cut each circle in a spiral and twist it into a bud, you get cute flowers that you can decorate a postcard with.


dad
Do-it-yourself birthday card for dad is always very touching and cute. It's not easy to choose a particular "papal" theme, but there is a wonderful straw here to grab onto - style. If you make a stylish postcard, then the father will undoubtedly be happy to receive it, even if it does not have the usual symbols of “masculinity”, which we often include cars, weapons and fishing.
Naturally, if the father is celebrating the anniversary of his driving experience, then the little car on the postcard is quite appropriate, but it’s better to present a neutral and beautiful greeting card to dad on his birthday.

What kind of cards do men like:
- not too colorful;
- in a calm, slightly muffled range;
- with clean lines;
- in which a lot of visual effort has been invested.
Men are delighted with the process, so before making a glorious scrapbooking card, think about how you can put your work into the card? It can be work with threads or embroidery, spirography and paper cutting, pyrography and much more.
Incorporate a few hard and loving elements into your work and your dad's birthday card will be great.

So, we make do-it-yourself paper postcards for your beloved dad. Start by choosing a subject - it can be some element of a male portrait - a stylish beard and glasses in the spirit of hipsters, or the silhouette of dad's favorite pipe, you can also make some kind of heraldic flag or symbol.
Choose colors - they should be calm and beautiful, and also look good in harmony with each other.
Make a pattern for a future postcard and get to work - if this is a regular application, then cut out all the elements and carefully lay out the future composition. And in the case of artistic cutting, it is better to devote time to pattern and drawing. By the way, for such work you will need a good breadboard knife.
After all the main elements are cut out, assemble the card - if you planned it using the scrapbooking technique, then you can simply glue the composition, and if you are trying to create a thin openwork product from cardboard and paper, then select shading colors for each layer - so that work looked really openwork, you will need to choose shades that emphasize all the cuts.
Make a centerpiece on your postcard, and then put it under a press - this will help to avoid warping the paper from the moisture contained in the glue.
In honor of the wedding
Making beautiful do-it-yourself wedding cards is not an easy task, and here it is better to watch master classes.

A wedding is one of the most important events in the life of a young family, and therefore it is not enough just to draw a postcard, you need to carefully arrange and pack it, and it is also possible to add some other elements.


How to make a beautiful card for congratulations on your wedding day:
- come up with an idea;
- find out from the bride and groom the main color of the wedding, or the main theme of the celebration;
- see various options for postcards - using the scrapbooking technique, with embroidery, ribbons, and so on;
- choose some interesting lessons;
- make a rough postcard from paper and cardboard (and if you are not sure of your result, then it is better to do this step several times);
- make original postcards with your own hands;
- pick up the packaging and make it a little more unique;
- write an envelope and a postcard.
Other occasions and recipients
Be sure that handmade birthday cards will delight the recipients - after all, this is not just a do-it-yourself postcard according to the master class, this is a real man-made miracle that keeps a piece of the soul.


You can make postcards for mom and dad with your own hands, or you can make your friends happy before each holiday with an author's congratulations - this will only require free time, good master classes and a little patience.
3D postcards look especially impressive. How to make a voluminous postcard? Come up with (or peep from experienced authors) an idea how you can shape it so that you get voluminous postcards. Perhaps you want to use more decorative elements, or you decide to make a simple handmade birthday card with 3D elements.

By the way, if you are thinking about how to make a postcard for your mother or girlfriend with voluminous paper elements, take a closer look at children's books. Surely you have preserved several copies, upon opening of which carriages and castles, trees and horses appeared between the pages.
Take a close look at how these elements are made and glued - you may be able to reproduce this on your sketch.

Or try to do something in the style of shabby chic and scrapbooking with your own hands - it's not as difficult as it seems, all the main volume effect is created by layering elements. By the way, flat postcards are also good. :)
I think now you have enough ideas for creating greeting cards, postcards and tags - needlework for your pleasure and delight your loved ones!

Moving postcard - "Waterfall of Hearts":
A few more ideas for inspiration:


Original ideas are in the air. Catch and make paper art with your own hands that will delight your loved ones. The most important thing is that all your works will really appear in a single copy, which means that an exclusive hand-made postcard will be expensive not only in terms of high spiritual criteria, but also financially.

Scrapbooking
The most fashionable technique for working with paper today (scrapbooking) was invented and began its circulation around the world as one of the ways to design photo albums. But why not use it to create beautiful postcards.
It has already become common that demand, sticking out its tongue, is trying its best to keep up with the offer, and therefore the store has everything so that you and I can safely do our favorite hobby - making DIY birthday cards using the scrapbooking technique.

You will need:
- white paper for watercolor - A4 sheet;
- colored paper (lilac, purple);
- lace wide ribbon - 12 cm;
- beautiful ribbons or braid - 30 cm;
- three white artificial flowers that can be cut from hair ties;
- three small interesting buttons to match the paper;
- scissors, ruler;
- glue "Moment";
- a felt-tip pen or a purple gel pen.
How to make a scrapbooking card
- At the beginning of work, you can make paper blanks. Our greeting card "Happy Birthday!" when folded, it will have a size of 10x16 cm. Therefore, we fold a white sheet of paper measuring 20x16 cm in half. Then we cut out four blanks of colored paper with our own hands (two purple and two lilac), as shown in the photo.
- Carefully glue the lilac blanks onto the purple blanks so that equal fields of the same width remain on each side. Write the words of congratulations "Happy Birthday!" and circle the frame with a pen or felt-tip pen.
- Now you can stick all the rectangles on the workpiece, stepping back from the edge by 10-5 mm. Glue the lace and 12 cm of ribbon on it, tucking and securing the edges of the textile on the back of the scrapbooking card.
- Glue a colored postcard onto a piece of paper folded in half. Now you can make a bow out of the remaining tape, and glue it, voluminous flowers and beautiful buttons with Moment glue.
- The final touch in the design of a birthday card in the style of scrapbooking with your own hands will be drawing a picture. With a felt-tip pen or pen, draw a monogram and dots along the edge of the frame. Unfold the card and write congratulatory words.

Volumetric cards for mom on her birthday
They do not require any additional material investments, any schoolchild can do it with his own hands, at the same time, these beautiful simple voluminous works made of colored paper are very interesting and original.

You will need:
- colored paper;
- scissors, compasses;
- Double-sided tape;
- PVA glue;
- wooden stick;
- beads;
- beautiful ribbon.
The order of implementation of the idea
- Draw circles of different diameters on colored paper with a compass and cut them out. Directing the scissors from the edge to the center, make a spiral from each circle. If you use curly scissors, the edges of flowers in 3D can be made terry or carved.
- Twist each spiral with a wooden stick from the edge to the center, fixing the resulting flower with a drop of glue on the center of the spiral circle. Try not to make very dense buds so that the bouquet is lush.
- Fold the pretty cardboard rectangle for the base of your birthday gift in half and try it on for the first time.
- Cut out a flower pot from brown paper and stick double-sided tape to its wrong side.
- Glue green paper 1-2 cm smaller on the background of the card. Now you can make a composition of a pot and flowers for your birthday.
- Tie a bow and attach it to the pot. Glue the inscription "Happy Birthday!" and you can give a handmade card to your loved one.


Postcard folding bed "chicken"
- To implement this idea, you will need two sheets of cardboard or thick paper. Bend one sheet measuring 12x12 cm, retreating 3 cm from the edge.
- The second sheet of cardboard measuring 15x18 cm must be folded in half. This will be the base of the postcard. Therefore, you can decorate it by pasting it with beautiful paper on both sides.
- Cut 6 lines on the fold of the first workpiece. Step back from each edge by 3 cm. The side 4 lines should be 3 cm long and symmetrical to the fold. The middle strip is cut 1.5 cm high from the fold axis, 2.5 cm down. The width of the resulting strips should be 1 cm. Bend them in the opposite direction to get three steps of the same height, but of different lengths. They will serve as stands for paper figures.
- Cut out two brown eggs from colored paper, decorate them with appliqués and glue them to the outer steps.
- Draw a chick in egg pattern on paper. On it, you must first cut out a newborn chick with paws and a scallop from yellow paper, and then a shell from white paper. Glue them together, draw a beak, eyes and glue to the middle step. Drape the backdrop with pretty appliqué and chicken feathers.
Postcard in quilling technique
Elegant, voluminous decorations on a postcard do not look at all like paper ones, but are made very simply. You just need to cut narrow strips of colored paper and fold them into spirals in a certain way.

The quilling technique is well described in many sources. You can learn the simplest tricks quickly. For such a picture, you need to make 4 “closed spirals” of green paper, 4 “off-center spirals” of yellow and 8 pink, as well as 14 green leaves in the shape of an “eye”.
Start decorating with a large flower. Its center is also made from a strip of paper folded into a spiral, previously cut to the middle of the width into a fringe. Then glue the petals and leaves.

Attach the butterfly details in the upper left corner. Without gluing, lay out the details of the picture with a congratulation and a ladybug on a postcard, observing the proportions. It remains only to add "twigs" and fix the still life.
Gift Ideas
In order to make the voluminous postcard even more voluminous, you can make not a flat pot, but a bag with a bow. Fold an accordion fan out of pink paper or, as in the photo, a bag. Fix the edges of the fan on paper and glue the bottom of it with a corner. To prevent the fan from opening, limit its volume with a white ribbon with a bow.

To the inscription "Happy Birthday!" looked original on the postcard, it can be made with silicone. Next, you need to paint the background with a brush with dry paint, and then carefully remove the silicone film from the paper. There will be a white inscription on a colorful background.

There is no simpler and more original idea than an “endless” postcard. Write congratulatory texts, torn and connected in the process of folding, prepare applications, drawings. Decorate this postcard made by yourself according to the master class shown in the video.
Use natural material: leaves, dried flowers, flattened straws, ears of corn. This will enliven the gifts and give them natural living warmth.
And some photos of the process: Congratulations are written in advance and the words that will be replaced are highlighted
It was easier for me the other way around: to browse and buy sweets with cool names roughly on the topic and then compose a text.
Parts of the words in the names were sealed (if they were not needed.) Chocolates are located on the sheet
Written words:
All! candy bars are attached with double-sided tape:
Beauty! And remember that there are sweets-hearts in foil ("Lubimov") and chocolate bears - everything goes into business here))
The idea for an addition to a gift is simply Wow!
Let's take a breath and for a change, here you are DIY card idea number 25- for lego fans.
I confess honestly: I collected Lego only as a child, but it seems to me that everything is quite simple here.

Photo happystampingdesigns.blogspot.com

And here is an idea that will suit you if you want to make a chalkboard (what if)
Just kidding! Now I will explain my idea))

Found on idealkitchen.ru
The fact is that if you make the board yourself, then
And it turns out a BIG postcard. Can you write notes to each other?

Source lost
You can paint a metal tray with paint - then you will get even more interesting: you can hook something there with magnets

Source m-class.info
2) or you can cover a piece of paper with graphite paint (on a stencil) and write wishes on top with chalk or a white pencil
Let's move on to paper cards
DIY card idea number 26- In the photos you see cards with the names of the guests. And the same idea can be applied to congratulate many people (on March 8, for example) or one person whom you will congratulate on a large scale (why not ... yes!)
Very cool, see for yourself:
Choose symbols (butterfly - good luck, suitcase - a lot of travel, etc.)
- type in google images "bird free template paper" and please - here are how many options for contours
- cut out, write a wish inside
- lay out everywhere (in the room where you invite the birthday person, in the apartment, on the colleague's desktop) all these bird butterflies and (suitcases of course!)
And it's a great surprise! instead of one postcard - a lot!
DIY card idea number 27- Postcards-books. The shape of the postcard can be infinitely different. It's simple: whatever you write a congratulation on, it will be a postcard - because in order to wish something truly sincere, good, real, you need to open your heart!
So here are some ideas:
And a postcard folded according to the principle of one of the basic forms in origami. How to do see and
And here I would like to add a couple of ideas for application on cardboard: a little diligence and the card is ready (everything is very simple, the main thing is to buy good glue - moment crystal or moment for paper)
Postcard-strawberry, postcard-apple and so on
Get well!

Source: annikartenl
And the option is simpler: we just buy plasters (you can take colored ones for children) and glue the eyes (sold in sets, I bought mine in the supermarket in the holiday goods section, I also have them in different colors, they have an adhesive layer)

Source T o w n i e
Postcard from individual hanging letters. There are many "Happy Birthday" garlands on sale now, but still, let the shorter handmade version be more interesting!
You can use the application, you can print the elements - this is creativity!

Source lost
And here is a postcard-handbag (with sweets-nishtyachki) for mom, sister, girlfriend. We put a leaf of congratulations on the bottom and a small pleasant surprise is ready!
Manufacturing master class
DIY card idea number 28- An open congratulation from the letters that we give separately and ask them to compose what we want. To make it easier, we give a blank with a part of the words "... dear ... Congratulations ... ... Birthday!"
The letters are easy to print and cut out! Especially men will love this action!
Attention! Letters can be replaced with whole words and decorated with glass pebbles with magnets. About it
They will look like this:

Source made-inukraine
DIY card idea number 29- Postcard-crown. How do you like the idea of being crowned on your birthday? It's YOUR day and YOUR holiday!
Let you hear what you are good at, what you are better at and what makes people around you happy!
This idea can be formalized in this way - in Sinton it is called a "white chair" - you sit on a chair and only good things are said to you.
and now they put a crown on your head and it is announced to everyone that this means that everyone will say all kinds of pleasant things to you.
For realists, you can make a "golden crown" when they say both bad and good, but (Birthday!) Of course, there is MORE good.
Let me clarify right now: By bad, I mean - what you should change, what is better to transform into something else))
Crowns might look something like this:
Where can I find templates for the crown? For the one you will see under the links, you can download the template
DIY card idea number 30- Postcards with embroidered words. Such postcards are periodically found in our collections, but this one is a little different.
As a basis - photography. I really like it)) You can choose a landscape for the words: let's say take a photo of the mountains and wish wisdom, or a photograph with a view of the ocean and wish strength.
On March 8, on a birthday or an anniversary, I would like to congratulate my beloved mother sincerely, from the bottom of my heart.
Buying a ready-made postcard in any design is currently not a problem.
But how many emotions will mom get if you give her a handmade card?
Handmade postcard is not just a small bonus to the main gift, but a real testament to the love and appreciation of a sweet mommy. Such a souvenir will be kept by mom in a conspicuous place for many years.
Such a postcard is always very beautiful, elegant, original, easy to make and does not require much time and material investments. Be sure to find a suitable option for yourself and create a postcard with your own hands - please your loved one!

As a basis, you can take cardboard of a soft cherry shade, cut a rectangle out of it. Next, we take cardboard in a box and cut out a figure from it in an arbitrary form up to half of our cherry base, glue it, decorate the place of gluing with exquisite white lace. We decorate the card with bows, beads and buttons, add good sincere congratulations and our surprise for our beloved mother is ready!

The basis of the postcard will be the same cardboard. We glue two strips of fabric of different widths onto the base. On the upper wide strip, you can stick the words "mother" with letters cut out of different cardboard. We leave the bottom strip for decor and warm words of congratulations. The decor can be ribbons, beads, pieces of lace, various flowers, in general, everything that your imagination tells you.

The basis of the postcard will be white or other light cardboard. On top of the cardboard we glue flowers, leaves, hearts, ladybugs, cute birds, etc. in the form of an application. colors must be chosen very competently - no more than 3 shades so that your postcard looks harmonious. For volume, you can add beads, laces, buttons.
Do-it-yourself birthday card for mom from paper in stages.
For this we need:

To work, you still need to print on a printer vase template.

Do you like such a miracle made on your own?
Unusual and voluminous
If you have a desire to make a complex and unusual birthday card, there are many such options.
Which one is right for your mom is up to you. Each of them is original, beautiful and easy to perform in its own way.

Gorgeous and original
If you really want to give mom something more complex, give her something that will truly surprise and give positive emotions.
Take some of your precious time and create a 3D postcard, or postcard from unusual materials. This is not at all difficult to implement, but it will take a little more time, as well as patience and perseverance, attention and painstaking work. But such a masterpiece will be really appreciated and will cause a flurry of positive emotions!

Master class "How to make an endless postcard?" see our video:

You can bring your own flair, change colors or materials, add missing decor elements in your opinion, etc. but most importantly - kind, warm and sincere words for your beloved mother!

Beautiful birthday card for my beloved mother
In order to create such an unusually beautiful postcard, you will need:
- double-sided cardboard coated white;
- paper with verses, it is possible with notes, with the effect of aging;
- - artificial leaves and flowers;
- - two round stickers with congratulatory inscriptions;
- - blue ribbon
- - colored sequins;
- - a sticker or a pre-printed inscription "Congratulations!";
- - pencil, scissors, ruler, double-sided tape, glue.
Let's get to work.

In conclusion, I would like to note that in your own handmade card for your beloved mother, the most important thing is not paper, ribbons or rhinestones at all, and not even the wishes that you write on the spread of the card. The most important thing is your sincere desire to please your mother, to show care and attention!
Viewed: 9 265