

In childhood, home-made bows were supplied with an elastic band from shorts (according to the principle of action - the energy for a shot comes not from the shoulders of the bow, but from pulling the string), or from fishing line (the energy comes from the shoulders of the bow). Simply, as a rule, there was no other material for making bowstrings in the country, and the child does not need it.
But we need a good powerful bow that can hit a target at a distance, so we can’t do without a solid bowstring.
How to make a string for a bow.
As a rule, in the modern world, the bowstring is made of synthetic materials such as Kevlar, kapron, nylon. A bowstring made from these materials will last longer than those made from traditional materials created by nature, such as linen, hemp, other vegetable fibers, animal tendons, silk, rawhide.
Therefore, choose the material for making a bowstring, depending on the conditions in which you make a bow (if it is possible to make it qualitatively, make it from synthetics, if you have an emergency, then from what is at hand, as a rule, survivalists always have at hand there is a line).
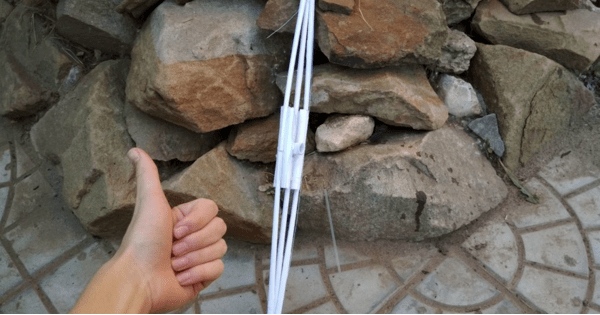
In order to make a good bowstring, we need a "machine". It can be a board with two pins, a board with four pins, a stool, a log with two knots in the end.
The dimensions of our bowstring machine are: L3 (string length) = L1 + L2, with L1 = 15-20 cm.
Further, on the lugs of the bowstring, in places where the bowstring is put on the bow, it is necessary to make a winding to protect the bowstring from wear. For this, the option with four pins is convenient. If you have two pins, use a spacer. You need to wind the winding tightly, laying the turns as tightly as possible arcs to each other.

The winding is applied from both ends of the bowstring by about 15 cm, and it is necessary to adjust it so that in one of the two places of the winding the winding hides the knot connecting the threads of the bowstring to each other (the knot that is obtained while tying the ends of the thread when we wind it on the pins) .

The next step is winding the bowstring in the center. In the place where the arrow will lie, it is necessary to make another winding 10-15 cm long on the bowstring. This thickening of the bowstring will both give energy when fired and save your fingers. You can also make a saddle (groove) for the arrow so that it sits better on the bowstring.

How to make arrows for a bow.
We all understand that the straighter the arrow, the more even and accurate it will fly. Therefore, always the basic rule for making arrows, no matter if you make them at home, or in the wild jungle - the shaft of an arrow should not be a boomerang !!
If you are making an arrow in a calm “home environment”, then you can use a square straight-grain glazing bead without knots with a side of 10 mm. If there are round glazing beads - buy, you are very lucky. And you can buy a good straight-layer board, go to a carpentry workshop and order cut glazing beads for you (or yourself, with handles, handles).
If you choose between pine and birch, then birch is much more preferable. Yes, it is more difficult to process than pine, but in the end you will get much better arrow shafts.
To make a high-quality arrow in "home" conditions, you will need the following tool:
Drill, saw for wood (or electric jigsaw), saw for metal, sanding paper of various calibers, needle file, file, metal scissors for making a tip.
The manufacturing process itself:
We calculate the length of the arrows according to the figure, respectively, we cut the glazing beads along this length.

We take our glazing beads and begin to process them. First, we give them a perfectly round shape, then we grind them first with a coarse sandpaper, then with a fine one.
Now we need a tip. You can do it simply: hammer in a nail and wrap that place with copper wire. But this design is from deep childhood.
You can cut the tip out of tin, compress it along the shaft, as shown in the photo, and secure it with wire.

Noah, I advise you to make this tip:

It can be cut from steel with a thickness of 1.5 - 2 mm. It wouldn't hurt to cut it out with a knife. At the end of the bow, you need to make a slot, and attach the tip to the glue there, then wrap it with thread.
Next, you need to make a cut under the bowstring. It must be done very carefully. First, we make a cut with a hacksaw for metal perpendicular to the annual rings to a depth of about 7 mm. Expand with a file and round the corners. Next, with a round file at a distance of about 1.5 cm from the heel (see figure), we make two round “dimples”.

The next stage in the manufacture of an arrow is plumage. It can be made from bird feathers, plastic, paper and tape.
From one bird feather, you can make two or three plumage for our arrow (depending on its length). The length of the plumage is in the range from 5.0 to 9.0 cm. The best feathers for arrows are turkey.
The feather is cut with scissors along the trunk, and then pieces of a given size are cut from it. For plumage, the best part of the feather, closer to the base of the trunk, should be used. Feathers can be dyed in the colors you need before gluing.
The plumage trimmed with scissors has a barrel that is uneven in structure, which must be processed so that it can be glued to the arrow. To process the plumage shaft, it is necessary to use sanding paper. Grinding is done like this: the plumage is compressed between two metal plates with a thickness of about 0.5-0.7 mm. The part of the pen barrel remaining outside is sanded along the emery cloth, which is located on a flat board. Since the plates are held perpendicular to the board, after grinding the end of the plumage will be pressed against the arrow evenly. The side faces of the plumage rod are also polished.
The feathers made in this way are glued to the arrow. The selection and sticker of plumage on one set of arrows must be made from feathers of the wing of the same name.
Incorrectly glued feathers (for example, taken from different wings) can lead to differences in the flight of the arrow compared to other arrows.
The feathers glued to the arrows are fired with hot wire to give them a certain shape, for which a special machine is used.
Currently, archers use feathers purchased from various companies, which are of high quality made for any arrows and various types of shooting.
Feathers can be wound with strong threads (silk, nylon, etc.)


You can use paper glued with tape to make plumage. It will turn out just like in the photo.

Actually everything, the arrow is ready.
Now you know how to properly make a bow and arrow. Don't kill each other.
Now it has become very fashionable to be able to shoot from some ancient weapon. Most practice with the bow. You can make it yourself. Now we will study in detail how to make a bow and arrows with our own hands from wood.
bow material
It is better to harvest material when there is little juice in the wood, the ideal time of year for this is autumn and winter. You need to find a young, even tree. It could be:
- Maple.
- Ash.
- Poplar.
- Acacia.
When a weapon is planned for an adult, then the barrel width should be at least 10 cm, but if the bow and arrows are for children, then just a flat branch will do.

The cut places on the material must be painted over or varnished so that the wood does not crack due to the rapid loss of moisture due to evaporation. In this form, the workpiece should lie for a year in a dry and dark place. If you want to do everything faster, you can reduce the drying time to a month. To do this, paint over the cuts and set aside the material for two weeks. Then you should remove the bark from the middle of the trunk, but leave it 10 centimeters at the edges. In this form, he should lie for another week. After that, the workpiece is sawn in half and dried again for a week.
For a bow, it is worth taking the part of the trunk on which the fibers are thinner. This is the northern part, so the wood is denser there and ideal for use.
Tools
To make a homemade bow and arrow, you will need:
- Sharp knife.
- Plane.
- Sandpaper.
Beginning of work
First of all, you need to cut the core. If it is not removed, then in the process of shooting from a finished bow, cracks may appear in this place. It is convenient to do such work with a planer, but if there are a lot of branches, then it is better not to risk it and use a knife.

Then the middle and the handle are outlined. When everything is ready, proceed to the formation of the shoulders of the bow. From the handle you need to gradually descend to the edges. In the process of work, you need to constantly check the uniformity of the bending of the bow arms. To do this, take a rope, at the ends of which loops are made. This will be an auxiliary bowstring. She is put on a bow and pulled to see its bend. If in some areas it does not bend, this place is marked with a pencil and the material is removed until everything is even. When pulling the string, all errors are immediately visible. If according to the instructions to make a bow and arrow, the photos help to clearly understand all the subtleties of production.
If the limbs of the bow bend evenly, the entire surface can be sanded with sandpaper. After that, you should put aside the bow and take up arrows.
Making arrows for a bow

For them, young shoots a meter long are chosen. In order for the rods to be perfectly even, they are suspended by tying a load from below. In hot weather, a week is enough for them to dry well and become even. Some prefer to make arrows from a thick piece of wood 1 m long. It is sawn into arrows.
What to make a tip
For tips, take pieces of metal, nails, wire and sharpen. After that, a slot is made in the shaft of the arrow and this metal part is inserted. It is important that it be heavy enough for good arrow flight. It can also be made from stones, glass, in general, from anything that is hard enough. Any tip is inserted into the shaft and wrapped with a thread, after which everything is carefully coated with glue or resin.

For smooth flight, arrows need plumage, it can be made from pieces of plastic, adhesive tape or large bird feathers. There are two mounting methods. The first is when the shaft is sawn, and plumage is inserted into it, wrapping it with thread at the end. The second option is to simply tie on top. In the case of large bird feathers, they need to be cut in half and tied on top of the shaft.
We continue to make weapons
We figured out how to make a bow and arrow with our own hands, now it remains to carefully fit and complete the product. The wood has dried even more, and now you can make a bowstring to shoot. To do this, take a board that will be as long as a bow. After that, half-drive pegs 1 cm thick and 4 cm long into it. The distance between them should be equal to the length of the bowstring. Its size is determined so that in the taut state the distance from the bowstring to the bow handle is 20-25 cm.
After this stand is created, we take a nylon thread and wrap it around the pegs in a circle. When the sum of all the threads becomes 3 mm thick, we begin to wrap this long oval with the same thread. The gap between each turn should be 2 mm. When the threads are wrapped, you need to form a loop near the peg, connecting the two parts into one and wrap tightly. Then continue the same along the entire length of the bowstring to the next peg, where you also strengthen the second loop. After that, the segment of the bowstring where the arrow will lie down is additionally wrapped.
When the bow is ready, you need to determine the place for the arrow on it. Approximately it is known, but to know its exact location, you need to aim the weapon. After a long enough shooting, it is easy to understand where the arrow lies with accurate hits. Having decided, a recess is made in this place and the handle is wrapped with cloth or leather. We have fully understood how to make a bow and arrow with our own hands, and now any owner of such a weapon has a desire to give it a look.
It is not necessary to varnish or wax the onion immediately after making and testing it. Especially if the humidity is high. The wood must be completely dry before being coated with a protective compound. If it is even a little wet, then this dampness will be sealed in the material and will lead to further damage to a thin instrument. The same goes for arrows. Only when there is confidence that the tree is absolutely dry, you can cover it with a protective compound.
Here it was fully described how to make a bow and arrow with your own hands, it remains to discuss how to wax or varnish the product. For waxing, wax is used, which is diluted with turpentine, and then the surface is covered with it. You can also do without turpentine by simply rubbing it with a thick cloth or felt into the wood. You just need to do this with intense movements so that the wax melts during the friction process. And it is better to varnish with several layers.
Archery can be attributed to those activities that almost everyone can master. This is a very unusual, at the same time affordable hobby, but at the same time it is a prestigious and fashionable hobby all over the world.
For many centuries, people have continued to practice archery. Once essential for hunting, today it is also used for sports and entertainment. But few people thought, looking at this weapon, that it had practically not changed since our ancestors invented it. It is still the same bowstring stretched over an elastic rod and pointed arrows.
Buying a sports bow can cost you quite a lot, and not everyone who wants to buy it is an athlete or a hunter. Perhaps this is your hobby in your free time, you want to pick up arrows and try to hit the target, or maybe you want to get a bow for your child and play Indians with him. In this case, the best solution would be to make a bow and arrows yourself. This is a really exciting and creative process, no less interesting than the shooting itself. In addition, the indisputable advantage of a homemade bow will be the ability to save the budget from a serious blow. So, let's figure out how to make a bow and arrow with your own hands.
Materials for DIY bow making
The bow itself can be made from various improvised materials:
- Tree. The most popular and, perhaps, the most reliable option for self-production. A bow made of wood will have strength and durability. The best species are ash and white locust, you can also use maple, oak or poplar. At the same time, the stick should not have knots, processes, cracks and other flaws. Do not use coniferous trees.
- PVC pipe. Another material that you can use to realize your idea.
- An unusual, but quite suitable material can be ordinary skis. To be more precise, the upper segments of the bow arms are made from skis.
- Plywood, like skis, can be an option for bow limbs.
- Even an old car spring can become suitable for shooting.
- For a small toy, you can use, oddly enough, plain paper.
The next element of the bow is the string. It is important to understand that the choice should be made on a durable, elastic material that can withstand a lot of pressure. Suitable options for her:
- Polypropylene rope
- Nylon thread or cord
- Nylon thread
- Twine or regular thin fishing line
- Thin climbing sling
Of course, we must not forget about the arrow! The best choice of material for its manufacture would be wood. As a rule, these are birch and pine branches, slats or boards. Processing birch is somewhat more difficult, but the result is better.
The arrowhead must be made sharp so that it can pierce the target. For a simple option, a nail wrapped with wire may fit. For a more serious approach, a thin steel tip should be used.
Do not forget to glue feathers or make notches for your fingers at the end of the arrow.
What do you need to know before getting started?
Even if you are making a bow and arrow for fun or as a gift to a child, there are certain sizes that you should consider:
The classic version of the bow consists of:
- The main part, i.e. the handle
- Shoulders
- bowstring
After making the bow, it is necessary to ensure proper care. Don't worry, care is simple and won't take much time:
- Onions should be stored upright.
- The bowstring is put on only when shooting, and after that it is immediately removed. Before shooting, you need to "spring" the bow and string in order to develop.
- You can't pull the bow.
- Store only in a dry place, preferably with a case.
Bow and arrows made of wood
Wood is perhaps the best and most affordable option for making onions. For this you will need:
- Drill
- Axe
- jigsaw
- Metal shears
- Sandpaper
- Regular file and file for working with wood and metal
- slipway
- Plane
To make a bow, you need to stock up on time and patience.
- First, we need to find a branch that matches the parameters. This is best done on a cold day. It is important that the selected branch has as few growths and small processes as possible, and the length is at least 180 cm.
- There is no need to touch the bark. And the sawn ends must be coated with oil impregnation for wood or a special varnish.
- Leave the base of the future onion to dry for a couple of months, placing it vertically in a room with a temperature of 20 to 28 degrees.
- It is necessary to give the workpiece a rectangular shape, this can be done with a well-sharpened knife and a sharp ax.
- Both shoulders of the onion are simultaneously steamed over boiling water.
- To give a bend, we install the freshly steamed workpiece in a slipway for two weeks.
- When placed in a slipway, the bark should come off, but if this did not happen, then at this stage, carefully clean it off with a knife.
- We cover the product with wax.
- We make notches for the bowstring only after drying.

It is necessary to pull the bowstring on our preparation of the future bow. It's not at all difficult to make it. You will need the following materials:
- Silk or nylon (#10) thread
- PVA glue
- rubber adhesive
- Moisture protection, e.g. wax
- Board
- thick nails
It is necessary to take two round short pegs with a thickness of 20 mm or more. On the board, the dimensions of which are 200 * 40 * 40, in accordance with the distance of the bowstring, we drill two holes and set the pegs. The next step is to wind the thread on the spool for the future bowstring. Wind the thread around the pegs, which will be used as a base. Enough 3 turns. Tie the ends of the thread firmly and coat with PVA.
Spread rubber glue immediately on a nylon thread, coat with PVA when winding. Make the winding as tight as possible. At the ends, make loops for pulling the bowstring over the shoulders of the bow.
Before you string the string directly over the limbs of the bow, bend it a little about 15 times. This will allow the product to get used to the movement.
You can't do without arrows either. Since we make a bow with our own hands, let's look at how they are made. At least we need 4 arrows.
You will need for the future arrow:
- Laths or boards about 3 cm wide and 85 cm long

Manufacturing process:
- Using a planer, narrow the workpiece (rail or board) to 1.5 cm.
- Saw it into squares of 1.5 cm on each side.
- With sandpaper or a grinding machine, give a round shape, with a diameter of not more than 8 mm.
- We can also attach feathers. Crows are best suited for this. Cut the feather in half and use a thread to attach to the end of the arrow.
- The tip is better to buy in a special store. You can make it yourself by cutting it out of a thin sheet of iron or by winding a sharp nail with a strong fishing line.

Homemade bow from PVC pipe
Despite the fact that wood is the most suitable and affordable material for onions, it can also be made from PVC pipes. Making a wooden bow takes a long time, and it will take much less to work with a pipe.
You will need:
- PVC pipe
- Building hair dryer
- knife for metal
- Blocks
- molding board
- slipway
Manufacturing process:
- First, you need to select a pipe.
Please note that we require PVC pipe, not PP or PE.
- Mark the center in the middle of the future bow and set aside 6 cm from it in each direction. This will be the pen.
- Also, you need two bars in height like a pipe.

- Now you need to heat one shoulder of the bow with a building hair dryer until it becomes evenly soft.
- Lay the molding board and attach with clamps.
It is important to recall that the board lies on the bars at the handle.
- The board is removed after the pipe has cooled.
- All the same is repeated with the other shoulder.
- The next step is to shape the handle. It also heats up and forms in a plane perpendicular to the compressed shoulders.
The handle should be shaped to fit the palm so that it is comfortable to hold.
- Not without a bowstring. Therefore, the next step is to fasten the bowstring. From the very edge at the end of the shoulder, retreat about 8 cm. Heat and bend at an angle of 60 degrees.
- After cooling, cut out the "holder" for the bowstring.
- We do the same with the second shoulder.
- For a bowstring, you can use a rope made of polypropylene.
The material for arrows is still better to choose wood. For their manufacture, you will need boards or slats, the diameter of which is up to 15 mm. The manufacture of arrows is discussed in detail in the previous version of the wooden bow. ***** Instead of bird feathers, you can use reinforced tape *****! PICTURE 43 - “Plumage of arrows”!

Do-it-yourself bow from old skis
Skis- An excellent material for making bows. They have their undeniable advantages: already prepared curved ends, while the bending of the shoulders is the same.
To work you need:
- Bolts, nuts
- Thick wooden block
- Thread made of nylon or some other material that does not stretch well
- Drill
- Scarring
- Hacksaw
- Hammer
- Chisel
- File
- Sandpaper
- You may need a band saw and planer
Work process:
- First you need to make a handle template. It is important to understand that it is necessary to take into account the place for gripping by hand and the presence of flat surfaces at a slight angle for attaching skis.
- We transfer the finished template to the bar and carefully cut out the future handle.
- The skis can be very long and not suitable for the bow in size. Therefore, according to the parameters given at the beginning of the article, the length of the bow is calculated, and the extra piece is cut off from the length of the skis.
- With the help of bolts, shoulders obtained from skis are attached.
- Then, you need to cut out the grooves for the bowstring. The edges must be rounded, otherwise the bowstring may rub against them.
- The selected thread, if it is too thin, it is desirable to twist. This will give it additional density and extend its service life.
- Arrows are made similarly to the previous versions of the bow.
That's all, the bow from the old skis is ready to shoot.

Bow and arrows with their own hands from reinforcement
This requires the following:
- Fiberglass reinforcement with a diameter of 8 mm and a length
- Profile pipe 20 cm long, with a section of 20 * 25 mm
- Plywood, 40 mm thick
- Steel cable for bowstring, the diameter of which is 1 mm
- Furniture bolts
- clamps
- thick thread
- Heat shrink tubing for decoration, you can do without them
Manufacturing process:
- For each shoulder, it is necessary to prepare two pieces of reinforcement 50 cm long and one 70 cm long.
- Fold the reinforcement together so that there is a long section in the middle and wrap it tightly with synthetic thread.
It is important to do this along the entire length so that the pieces of reinforcement become a single whole.

- Then it is necessary to impregnate the shoulders of the future bow with epoxy.
- For beauty, you can prepare a heat shrink tube. Putting it on your shoulder, blow it with a hairdryer. Do the same with the second shoulder. It is possible that this may cause a slight decrease in the elasticity of the shoulders, and apart from a decorative function, this procedure does not give anything.
- Then it is necessary to cut the profile pipe along. Measure the middle, and after making cuts, fold in half. Next, you need to drill holes and, using bolts, compress the resulting boxes. The figure shows what should be the result.

- Without delaying your shoulders, you can immediately make bowstring holders. To do this, it is enough to step back from the edge of the shoulders by 1 cm, wind the wire and strengthen it with electrical tape. Get a kind of tubercle for fastening.
- The handle is best made from wood.
Do not use conifers, as they will not withstand the load. Oak will do. Or you can get by with plywood at least 4 cm thick.
- Cut out the handle blank according to the template chosen on the Internet. Sand and paint.
- Using furniture bolts, connect the shoulders and the handle of the future bow.
Then you need to move on to making a bowstring. It can be made from a steel cable, the diameter of which is 1 mm. Fasten the loops with crimps, and stretch the heat shrink film over the entire length of the cable.

Arrows can be made from window glazing bead and tape. With the help of a planer, plan the bead, and make plumage from adhesive tape. Instead of a tip, it will be enough to sharpen the arrow and dip it in paint. Such a bow cannot be used for hunting or professional shooting. But it's perfect for outdoor activities!
Homemade bow from a car spring
If a car spring is suitable for making a crossbow, then why not try using it as a material for a homemade bow? Anything can be at hand, and you should not neglect it.
To work, you will need an automobile spring, for example, from an old Lada or Muscovite, and a grinder.
- The spring needs to be sharpened. The narrower it is, the more pliable the bow will be. In this case, it is necessary to ensure that the shoulders of the bow are the same.
- The handle can be made of foam. To do this, you need to cut a piece of foam and tape it to the spring with electrical tape.
- Towards the ends, the shoulders of the future bow need to be narrowed even more with the help of a grinder, as well as to make shallow recesses for the bowstring.

Now we turn to the manufacture of arrows. This requires thin fittings. It must be sharpened, but in such a way that it does not lose its elasticity and does not bend. On the one hand, the arrow is sharpened a little sharper, and plastic plumage is attached to it. A linen cord is suitable for a bowstring.
A bow made from a car spring is very tight and may not be suitable for everyone. But it will be an excellent tool for developing hand strength.
When using this version of a homemade bow, do not forget about thick gloves so as not to injure your hands.
Homemade paper bow
This option also has the right to exist if you have paper at hand and a desire to shoot. For hunting, of course, it is not suitable, but it is suitable for fun.
You will need:
- Paper
- Scissors
- Rods from handles
- Scotch
- Rope
- cocktail straws
How to make a paper bow:
- Cut out a square shape from a sheet of paper.
- Take 2 identical rods from the handle.
- Wrap one of the rods in a square piece of paper. Then, twisting from the corner of the workpiece, make sure that the paper fits snugly. Secure with tape. Do the same with the second rod.
- Gently roll up the paper not to the end. A couple cm should remain free. It is necessary to squeeze these ends so that they become flat.
- Put them on top of each other and secure tightly with tape.
- For the bowstring we fix the elastic rope.
For arrows, you can use straws from cocktails, wrapping them in the same way with electrical tape.
That's all. Paper bow and shells are ready!
It doesn't matter what kind of bow you want to make. Whether it's elvish, asian, short or whatever, it's important to stick to the basic rules and then everything will work out!
You will need
- wooden blank (hazel, pine, oak, ash, etc.);
- strong thread (cord);
- plane;
- file;
- sandpaper;
- insulating tape;
- copper wire;
- a strip of tin;
- bird feathers.
Instruction
It is better to cut down the onion blank in the winter. It is even advisable to choose a frosty day, and in order not to look for a suitable tree, shivering from the cold, you can look after it in advance,. The criteria for choosing a workpiece are as follows: it should not have outgrowths and large knots, mechanical damage. The blank should be 30 cm longer than the future onion. It does not need to be immediately processed, the bark removed.
The ends of the workpiece must be covered with oil paint. To avoid internal defects, make sure that it dries evenly. It is best to dry it vertically at room temperature. It takes quite a long time, but after 2 months the base should dry completely.
Now you can proceed directly to the process of creating a bow. With the help of an ax and a sharp knife, you need to give the desired section (lentil or rectangular, depending on the thickness of the workpiece) to the bow along the entire length. You can pre-soak the workpiece in special infusions and decoctions to make it easier to give the onion the desired shape. However, a tree treated simply with water vapor will gain the necessary flexibility and pliability. The limbs of the onion will become pliable and easily take the desired shape if they are first steamed (it is better to steam both limbs at the same time).
Then the bow must be placed in a curved slipway. Thus, when dried, the onion will take the desired shape. This drying process will last about a week, after which the bow is taken out, and its ends are shaped in such a way that it is convenient to strengthen the bowstring on them.
The bark should separate from the base of the onion when steaming. If necessary, separate it with a wooden knife, taking care not to damage the wood fibers. To protect the product from the negative effects of the environment, impregnate it with wax or melted fat.
The string should be put on the bow immediately before using it and removed immediately after. For the best preservation of the onion, store it in a special, keeping its vertical position, at room temperature.
Now it remains to make arrows. For their manufacture, it is better to use pine boards. The wood base must be seasoned, at least 2 cm thick. Make sure that there are no knots or damage on the workpiece. Prepare all the necessary tools: a file, planer, saw and sandpaper. The length of the arrow depends on the draw strength of the bow and physical data. Usually it is 70-80 cm. On the board, measure the required length and saw off the workpiece. With the help of a planer, bring the thickness of the workpiece to 1.5 cm. In width, the board must be marked into parts of a square section and sawn along it. With a file, give the workpiece a hexagonal shape and sandpaper to round off the section.
For plumage, you will need three crow feathers. They must be cut along the groove and cut the rod to the beginning of the pile. With scissors, a pile of about 0.5 cm is cut off from the tip of the feather. The feathers are installed on the shaft of the arrow at an angle of 120 degrees to each other. They need to be secured with a thread, placing it turn to turn.
The tip is made of a triangular metal plate. To do this, in the front of the shaft, you need to make a recess for the shank and insert the tip of the tail into the recess there. Fasten coil to coil with a thick nylon thread.
Another way to make a bow involves using a large rod. When choosing a rod, look for a dry, crack-free stick. Deciduous trees are well suited, namely oak, yew, teak, black locust. The length of the rod should be about 1.8 m. A good base for the bow should not have knots, branches, or damage. She must be flexible. Young, green rods are not recommended, they are less reliable and durable, like dry ones.
It is equally important to choose the right bowstring. A suitable material would be rawhide, thin nylon cord, hemp rope, fishing line, ordinary twine. Before you pull the bowstring, you need to make safe knots on both sides. The string must be shorter than the bow so that it is pulled tight.
To draw the bow, you need to hang it upside down. Check the bend by slowly pulling down and adjusting if necessary. The bowstring should be drawn a distance equal to the gap between the fully extended arm and the jaw.
Now you can start making arrows. As a basis, you need to take straight, dry branches. The length of the arrow must be at least twice the length of the bow. Green branches are also suitable as arrows, but you will need to wait until they dry out. A good option would be branches of goldenrod, which can be found in the fields. To shape the arrows, peel the branch until it is completely smooth. At one end of the arrow, make cutouts with which it will cling to the bowstring. You can sharpen the tip of the arrow with a knife, and then you need to lightly burn it on warm coals (this will give the arrow rigidity).
If desired and possible, make arrowheads from metal, stone or glass. To strengthen the tip, split the tip of the arrow, you can optionally secure it with a rope.
Feathers for arrows are optional, but they will contribute to a stable flight. Feathers are glued to the back sides of the arrow. Another way to secure the fletching is to split the back of the arrow and insert the fletching into the groove, securing it with tightly wrapped thread.
If you love archery, then you need a lot of arrows, because they break, they get lost. You can, of course, buy them, but it’s better to save money and make arrows with your own hands, which differ from others in design. Arrows for bows are wooden and plastic, aluminum, carbon. In sports, aluminum and carbon arrows are used, and those for whom archery is a hobby use plastic and wooden ones.

Photo. Plastic fletching of arrows
What are the parts of an arrow? The arrow consists of a shaft, plumage, a tip shank. We will tell you how to make arrows for a hobby, with your own hands.
bow arrow material
Let's prepare the necessary tool, namely:
- saw,
- plane,
- rasp,
- file,
- files,
- sandpaper, grit No. 16 or No. 25.
Arrows can be made from birch, beech, oak, pine and other tree species.
Selection of the optimal length of the future arrow
For each person, the length of the arrow is purely individual. It is determined in this way: the hands must be put in the position of pulling the bowstring. One arm is bent at the elbow at a right angle, and the other is extended. Fingers take position, as during real shooting. The size of the arrow will be equal to the distance between the palms and plus another centimeter.

Photo. Determination of the required boom length
For making arrows for bows with your own hands it is recommended to use glazing beads. Choose straight-layer glazing beads, without knots, with a side of 10 mm. You will be very lucky if you find round beads. You can buy a good board, and dissolve it into glazing beads in the carpentry. Of course, you can dissolve it yourself, manually, but it will take longer. Very good arrows are obtained from birch.
Now the process of making arrows for the bow begins.
According to the measured size, we cut blanks for the shaft of arrows. We make a shaft of round section from glazing beads.

Photo. Making an arrow shaft

Photo. Cleaning wood with sandpaper
In the process of processing, we first obtain an even workpiece, and then we bring it to an ideal state with sandpaper, first coarse, and then fine-grained.
How to make an arrowhead at home
The second stage is the manufacture of the tip. We make the tip of thin steel, up to 2 mm thick. We make a nest at the end of the bow. We drip glue there, and plant the tip, and wrap it with thread.
Another option is to take a piece of aluminum tube with a diameter slightly larger than the shaft, cut off a piece from it, clamp it flat on one side, cut it at an angle from the edges and sharpen. Next, grease the shaft with glue and insert it into the finished tip.

Photo. Metal arrowheads

Photo. Arrowhead made of aluminum tube
After that, we make a cut under the bowstring. To do this, very carefully and slowly, we make it with a saw for metal, we cut it across the growth rings. We make a cut with a depth of 7 mm. We expand this cut with the help of a needle file, and round the corners.
How to make real good arrows with moisture protection?
Yes, arrows need to be protected from moisture, because arrows warp from moisture and lose aerodynamics. This can be done in several ways.
- Waxing. To do this, take a piece of felt, and rub it with wax on the shaft. After that, the arrows need to be slightly heated so that the wax is absorbed. Do this procedure in the oven. Place the arrows in it first on one side, and then on the other. Then we rub again.
- Using lacquer paint. This method has a drawback. Lacquer and paint peel off periodically, and you need to monitor this.
- Left-handed way. Sticking wood with tape. Take a piece of tape equal to the length of the arrow. Carefully wrap the shaft in tape. But it won't work the first time. You need to practice first.
We make plumage for arrows with our own hands
Now for the arrow for the bow with our own hands, we make plumage. Arrow fletching can be made from plastic, paper, tape and bird feathers. You can take any feathers: goose, turkey, capercaillie and other birds. It is not recommended to only make plumage from crow feathers. Crow feathers are fragile, and plumage will quickly become unusable. Turkey feathers are the best option. The length of the plumage should be in the range of 55-90 mm.
For one arrow, the feathers of one wing of a bird, either the right or the left, are taken. Before making arrow plumage, feathers can be bleached or dyed.
Before painting, feathers must be degreased. To do this, they need to be washed well with any detergent. Then they need to be rinsed with clean water and dried. If the feathers are not white, they should be sorted and bleached with a few bottles of hydrogen peroxide. After that, you can start painting. The best coloring result is obtained when using food coloring.
Feathers are placed in a hot dye solution for 30 minutes. After half an hour, remove the feathers from the paint, rinse, and dry, spreading out on paper in one layer. When the feathers are dry, they are gently combed with a toothbrush.

Photo. Ready-made natural arrow feathers
If you don't want to bother with natural feathers, it's better to make a plastic feather from a laminated business card. You can cut it into any streamlined shape. We insert “feathers” into the hollows pre-cut in the girl and fix them with glue.

Photo. Do-it-yourself plumage for arrows
Do-it-yourself plumage of an arrow for a bow is ready. It remains only to give shape.
Long and wide plumage dampens the speed of the arrow, but at the same time, it aligns the arrow in flight. The pile, on the fly wing, is slightly wrapped around the edges. It is this place that determines the maximum height of the plumage. Choose the shape of the plumage at your discretion. There are several forms of plumage: triangular, pear-shaped, banana-shaped and highly profiled triangular.

Photo. Drawing an arrow for a bow - forms of plumage of arrows
There is another type of plumage - from adhesive tape. We cut the tape 17 centimeters long. Take one piece of tape and place it with the sticky side up. We put an arrow on it, and on top of it is the second piece of adhesive tape, sticky side down. We smooth everything and cut it according to the stencil. After that, we wrap the ends of the adhesive tape with a narrow strip of adhesive tape or electrical tape.
The arrow for the bow, made by hand, is ready. You can go shoot. As you can see, making an arrow for a bow is not particularly difficult.
Video on how to make your own bow arrows