

SAFETY DRIVING TESTIMONIAL FOR BEGINNERS
home
Learning to drive a car is not as difficult as it might seem at first. The professional level of the driver is very different. As in any other business, in driving you can be a master, or you can just be a driver. But a prerequisite for anyone who decides to get around in a car is to learn how to drive in a reliable, safe way. We must always remember that the car is a source of increased danger, therefore, it is necessary to take training seriously.
The main goal of this tutorial is to help future drivers acquire driving skills. These skills can be independently worked out at any safe site for yourself and others. As for the driving training drive on the roads, here you will need an assistant with at least three years of driving experience. The tutorial provides recommendations for driving a car in various conditions. Its task is to minimize the role of your voluntary assistant driver, that is, only to insure your actions on the road.
It is recommended to devote so much time for classes so that it is not a burden for you, but a pleasure, but no more than two hours at a time. Otherwise, you will get tired.
We address our last wish to not very determined people. Less listen to skeptics who may question your ability to drive a car, discourage learning, and destroy your faith in yourself. We give a typical example. Suppose one of the drivers you know suggested you try to learn how to drive in his car. After explaining how and what to do, you do "everything is wrong." As a result, listen to the categorical conclusion: “You are not given to drive a car, it’s not worth starting.” Do not attach importance to this. After all, it is known that you can be a good driver, but not every driver is able to teach another person how to drive. The old adage is true: "There are no bad students - there are bad teachers."
Section I. INITIAL TRAINING
A brief idea of \u200b\u200bthe car you are going to drive
Kinematics "href \u003d" / text / category / kinematika / "rel \u003d" bookmark "\u003e kinematic diagram of a classic layout car
1 - engine
2 - clutch
3 - gearbox
4 - cardan transmission
5 - main gear
6 - differential
7 - semiaxis
ENGINE(Fig. 2) sets the car in motion 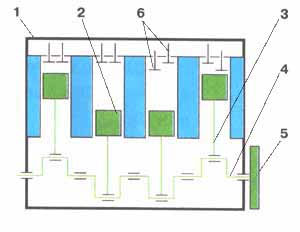 Fig. 2. The engine
1 - cylinder block
2 - piston
3 - connecting rod
4 - a cranked shaft
5 - flywheel
6 - inlet and exhaust valves
CLUTCH(Fig. 3) provides the transmission of torque by means of friction from the engine to the drive wheels, serves for short-term separation of the engine from the drive wheels and smooth their connection. 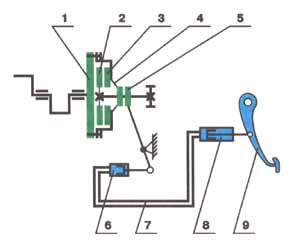 Fig. 3. Grip
1 - engine flywheel
2 - driven friction disk
3 - leading pressure plate
4 - disk spring
5 - release bearing
6 - working cylinder
7 - a hydraulic highway
8 - the main cylinder
9 - clutch pedal
Gearbox(gearbox) is used to convert the torque in magnitude (I, II, III, IV gears), change the direction of movement (reverse gear) and prolonged separation of the engine from the drive wheels (neutral gear).
In the diagram shown in Fig. 4, the principle of torque conversion in one of the gears is shown. 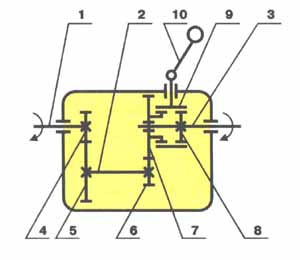 Fig. 4. CAT
1 - drive (primary) shaft
2 - an intermediate shaft
3 - driven (secondary) shaft
4, 5, 6, 7 - gears of constant gearing
8 - synchronizer hub
9 - gear (connecting) coupling
10 - gearshift lever
CARDAN TRANSMISSION(Fig. 5) is used to transmit torque at a varying angle. 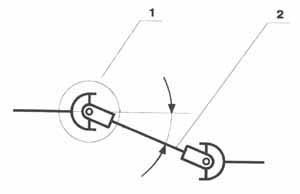 Fig. 5. Cardan transmission
1 - cardan joint
2 - driveshaft
MAIN GEAR(Fig. 6) is used to transmit torque at a right angle and increase it. 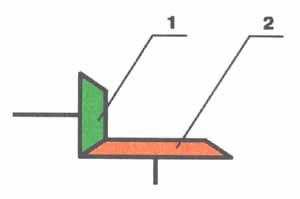 Fig. 6. Main gear
1 - pinion gear
2 - driven gear
DIFFERENTIAL(Fig. 7) serves for the possibility of rotation of the driving wheels with different angular speeds (cornering). 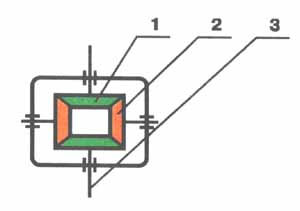 Fig. 7. Differential
1 - semiaxial gear
2 - satellite
3 - half shaft
Preparing the driver’s workplace
Any car is necessarily equipped with an adjusting device for the driver's seat (longitudinal movement of the seat and tilt of the back) and rear-view mirrors (interior and side).
So, we get into the car and adjust the driver's seat "for themselves". When adjusting, one should proceed from the following: the legs should freely reach the pedals, and the bend of the legs in the knees should be small at any position of the pedals (Fig. 8). This is easily felt with the left foot controlling the clutch pedal. To do this, put the foot on the pedal without pressing it. If you have a tiny foot and the heel does not reach the floor, it’s not scary - the foot will work on weight. 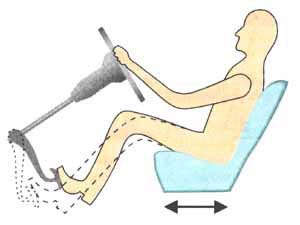 Fig. 8
In this position, the leg should not be uncomfortable. Then the clutch pedal is fully depressed (to the stop), while the leg should not stretch. A slight bend in the knee is maintained. This we achieve by longitudinal movement of the seat. 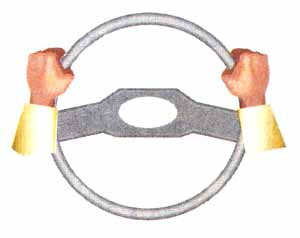 Fig. 9
The backrest is adjustable so that the hands on the steering wheel lie comfortably. The correct position of the hands on the wheel rim is shown in fig. 9. 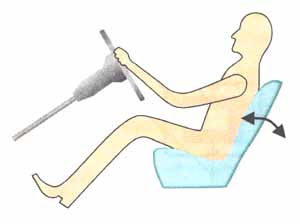 Fig. 10
Hands should also be slightly bent at the elbows (Fig. 10).
The next thing to pay attention to is the rear view. The rear-view mirrors are adjusted so that the rear window of the car is maximally visible in the interior mirror, and the side of the car is tangential in the side mirror.
The main governing bodies:
* steering wheel
* clutch pedal
* brake pedal
* accelerator pedal
* gearshift control lever (gear shift)
* parking brake lever ("handbrake").
Management bodies also include:
* direction indicator
* parking light switch
* headlight switch
* wiper switch
* ignition switch (lock).
Now we will get acquainted with each governing body separately.
Steering wheel. We already know how to properly hold the steering wheel. In the figure. In the 9th position, the hands have the greatest freedom of control, are ready for any quick maneuver and do not get tired, because they weigh on the steering wheel with their weight. The steering wheel must be held with two hands, avoid control with one hand. To tear off the hand from the steering wheel should only be necessary, for example, when grabbing the steering wheel in a bend, when shifting gears, when engaging wipers on the go, and so on. Fiddling in one-hand operation can lead to trouble: when an automobile wheel runs over an obstacle or during a puncture wheel steering wheel with one hand can not hold.
CLUTCH PEDAL. Driven by left foot. When the pedal is released, the disks in the clutch are closed; when the engine is running and the gear is engaged, torque is transmitted from the engine to the drive wheels through the clutch. When the pedal is depressed, the discs are open and there is no connection between the engine and drive wheels. At this moment, we can freely switch on the desired gear. 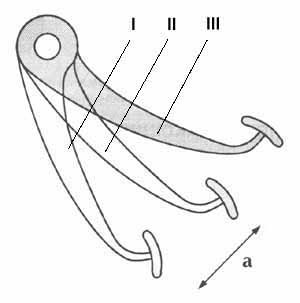 Fig. eleven
The clutch pedal operates as follows. The pedal is depressed completely (fully) and quickly enough. The clutch pedal is released smoothly, as if in two stages (Fig. 11).
The first stage - when releasing the pedal from position I to position II, the gaps between the disks in the clutch are selected. This movement is fast enough. Distance ais approximately 1 / 3-1 / 2 of the full stroke of the pedal and depends on the correct adjustment of the clutch.
The second stage - when releasing the pedal from position II to position III, the clutch discs are pressed against each other. Torque transmission occurs. This movement is done smoothly with a slight delay.
BRAKE PEDAL. Driven by the right foot. Unlike the clutch pedal, the brake pedal cannot be squeezed all the way to the floor. We will feel the pedal stop in an intermediate position when the brake pads abut against brake drums or discs. The force of pressing the brake pedal determines the braking performance. The lower the speed of the vehicle, the less force must be applied to the brake pedal. Otherwise there will be an unpleasant "nod" of the car.
ACCELERATOR PEDAL. It is controlled in the same way as the brake pedal - with the right foot. The right leg copes with two pedals. We need either movement (accelerator) or deceleration (brake). The accelerator pedal operates in a very small range. The operating mode is smooth. When the engine is running, the pedal will respond by increasing the speed.
Gearbox control lever. It is controlled by the right hand. The lever is set by the driver to the position corresponding to the particular gear. In the neutral position (gear is not engaged), the lever has quite tangible freedom of movement in the transverse direction. With the transverse movement of the lever, we choose which gear to engage. The gear is engaged by longitudinally moving the lever forward or backward. 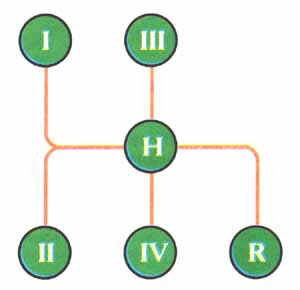 Fig. 12
For a 4-speed gearbox, the circuit shown in Fig. 12. For your car, the gearshift scheme is indicated in the car's operating instructions.
PARKING BRAKE LEVER. It is controlled by the right hand. When the car is moving, the lever should be fully lowered down, which corresponds to the unbraked condition of the rear wheels. The parking brake is equipped with a ratchet device that holds the lever in the braked position (pulled up). When tightening the lever, characteristic clicks of the ratchet device are heard (they should be 3-4). To release (release) the lever, a button is provided on its front end. To make the button easier to press, the lever should be pulled up, then press the button and lower the lever down.
Testing controls with an inoperative engine
Having familiarized ourselves with the car’s controls, we’ll start the exercises to refine the controls. So,
* sitting comfortably and freely
* The view from the car is good both in front and behind
* hands comfortably and correctly lie on the steering wheel
* Feet reach the pedals freely.
We train the left leg.Depress the clutch pedal quickly and completely to the floor. Quickly release it for 1/3 of the turn and then smoothly and slowly until it is completely released.
We will do this exercise several times: let the foot get used to the elasticity of the pedal.
We train the right leg.While the engine is not working, we will not press the accelerator pedal. The right leg is above the accelerator pedal, touching it lightly. We put our foot on the brake pedal and press it. To coordinate the right leg, we will do this exercise several times with different efforts to depress the brake pedal.
We train to include transfers.Depress the clutch pedal. The right leg should be above the accelerator pedal without pressing it. Calmly and clearly translate the lever into position I gear. Next, with the clutch pedal depressed, we make gear changes sequentially in ascending and in any order.
Remember: the mechanism loves clarity and smoothness.
Recommendation.For ease of engaging second gear from first gear, it is not necessary to shift the lever to the neutral position. It is enough to press slightly towards you (to the left along the way), move it to the end back.
Performing these exercises, you inevitably looked at the controls of the car. Now do the same without looking at the controls, get used to them. This will help you afterwards.
Engine starting
After making sure that the car is on the parking brake, depress the clutch pedal and set the gear lever to the neutral position (or make sure that it is in this position). The fact is that the gear engaged when the engine is idle is sometimes used to hold the car in place (instead of the “parking brake”). In this case, if we try to start the engine without turning off the gear and not squeezing the clutch, the following will happen: when you turn on the starter, namely we start the engine, the car will make a leap forward. This is fraught with trouble. After making sure that the gearshift lever is in the neutral position, turn the ignition key (Fig. 13) clockwise until the starter fires. As soon as the engine starts, the ignition key must be immediately released. 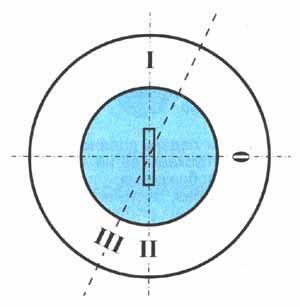 Fig. thirteen
Key Positions:
I - ignition off, you can turn on the dimensions and headlights
Oh - everything is disabled
II - ignition on
III - starter position (spring-loaded)
Recommendation.If you are not sure that the gear is neutral, squeeze the clutch and in this position start the engine. When the engine is started, do not drop the clutch pedal, but slowly try to release it. In case the car jerks, immediately depress the clutch pedal and turn off the gear. And in order to avoid any accidents, before starting the engine, check whether the "handbrake" is tightened. This precaution will prevent the vehicle from moving if the gear is engaged. The engine will then simply stall.
You should be aware that enriched combustible mixture is required for reliable starting of a cold engine. In the case of an injection engine or a carburetor with automatic control of the air damper, the composition of the mixture at startup is automatically adjusted. In a car with a conventional carburetor for starting a cold engine, a manual air damper drive is provided, which must be covered to ensure an enriched mixture at the time of start-up. This is achieved by extending the control knob. Pulling out the choke control knob, we start the cold engine, as discussed above. After a few seconds of operation, the engine speed will increase as it warms up. At the same time, it is useful to correct revolutions (by ear) by the position of the control knob, i.e., slightly depressing the knob, to achieve stable, but small revolutions (about 1500 rpm).
When starting a warm engine, the air damper must be fully open (the handle is recessed) to avoid over-enrichment of the mixture and “throwing” spark plugs.
Driving off the car, moving in a straight line, braking and stopping
Until that moment, we were self-educating in our car at the place of its parking. Starting a vehicle requires compliance with certain safety conditions. To acquire the initial driving skills, you need to choose any platform free from people, cars, etc. If this site has a size of at least 30x30m, this will be enough for a start. Of course, driving the car to this site should be carried out by the driver.
Before you try to move the car from a place, you need to clearly imagine how to stop it. To stop the car, the following is done: the left foot quickly squeezes the clutch pedal, the right foot acts on the brake pedal (the degree of depression is determined by necessity). The squeezed clutch eliminates further forced movement of the vehicle by the engine. The brake pedal will naturally stop the vehicle from moving.
It is psychologically very important to convince yourself that you know how to respond to a process that has gone out of control. If something is not clear, something is wrong - the clutch pedal is “on the floor”, the brake pedal is depressed. After that, turn off the transmission.
So, your car is on the site. Moreover, in such a way that there is a lot of free space in front of him. After making sure that the car is in neutral gear with the handbrake tightened, we start the engine.
Exercise 1. Working out the moment of clutch
The right leg is above the accelerator. Depress the clutch pedal and engage the 1st gear. Keeping the clutch squeezed, remove the car from the parking brake. The car is prepared for the exercise.
In order not to miss the moment the clutch is triggered, the clutch pedal starts to be released very slowly, observing the behavior of the car. You will feel the clutch actuation moment by engine speed. When the clutch engages, the engine will be loaded, its speed will fall (decrease).
The left leg should remember this trigger position.
As soon as you feel that the engine has responded by lowering revolutions, you do not need to release the clutch pedal further (in this exercise). After some delay, depress the pedal “to the floor” again and turn off the transmission.
If the engine has reduced speed, but not stalled, the goal of the exercise is achieved. If the engine stalls, then before restarting it, do not forget to turn off the transmission.
Repeat this exercise several times.
Exercise 2. Starting the car
To start a car, the engine needs a certain power, which depends on its speed.
At idle, at which the engine is running without load with the accelerator pedal released, its power is minimal. At the moment of starting the car, the engine is loaded, overcoming the rolling resistance of the car, and so that it does not stop, you need to add speed to it by slightly pressing the accelerator pedal.
For starters, let’s try to simply increase the momentum, i.e., work only with the right foot. Press the accelerator pedal very carefully. An engine without load will be responsive. Turnovers are controlled by ear.
Now proceed to the exercise. Preparatory operations are the same as in exercise 1:
* depress the clutch pedal;
* turn on I gear;
* By releasing the clutch pedal, we find the response position (engine speed has fallen somewhat).
Then, adding speed to the accelerator pedal, we release the clutch pedal literally by 1-2 mm, keeping the left leg in tension. In this case, the car will begin to move forward. At the moment the car begins to move, the accelerator pedal is slightly released (with steady motion, the engine no longer needs power), and completely release the clutch.
Having rented a car in a straight line several meters, squeeze the clutch and brake with the right foot. After stopping the car, immediately turn off the transmission.
If the car “nodded” during braking, the brake pedal was depressed too much.
Do not rush to try again, calmly analyze your actions.
1. When starting, the car jerked - the clutch was released too sharply
2. The engine stalled - when releasing the clutch, the speed was insufficient
3. The engine "roars" - the speed is too high and added before the clutch worked, that is, without load
After analyzing your actions, try again, but do not forget to make sure that there is a lot of space in front of the car. Lack of space can scare you and provoke a mistake at the beginning of the movement.
If there is not enough space in front of the car, this exercise is performed when moving backward. No need to be afraid of reversing. You are required to smoothly touch the car, without interfering in the trajectory of its movement, i.e. the same thing that you just did when moving forward.
When moving back, you need to sit so that it is comfortable and clearly visible where the car is moving. To do this, turn around on the seat half a turn to the right. We put our left hand on the steering wheel rim from above in the center, we throw the right hand over the back of our seat, leaning on it freely. We are convinced that we can clearly see through the rear window of the car all the space behind it. In this position, without looking at the pedals, try to squeeze the clutch and release it gently (not including the gear). With your right foot, slightly add revolutions (by ear). Imagining a car moving backwards, we simulate its stop: we squeeze the clutch and apply the brake. If it turned out, then everything you did is right.
Getting Started Exercise. Squeeze the clutch and engage reverse gear. Holding the grip squeezed, we sit comfortably. The car and we are ready to move. We do the rest in the same way, paying attention to leg work and engine speed.
We emphasize once again that before starting the movement it is necessary to remember your further actions, that is, clearly imagine what you need to do to stop the car.
Exercise 2 is very important in the learning process. Try to achieve good results in performing it, but do not drive yourself to fatigue. Fatigue dulls attention.
To practice starting the car, an intermediate exercise in which the clutch pedal is not fully released can be recommended. The initial steps are the same as in the previous exercise.
We depress the clutch pedal, engage the 1st gear, release the clutch, find the position of its operation (the engine responded by lowering the speed). Further, adding speed by ear, we release the clutch pedal by 1-2 mm, thereby achieving a slow movement of the car, the clutch is no longer released. After rolling the car 1-3 meters, the clutch must be completely squeezed out and the gear off.
We must say right away that the implementation of this exercise makes the grip work in an unfavorable mode (the driven disk works longer with slipping), but from the training point of view it gives the best result in training the legs on grip control.
Trajectory movement, maneuvering
Exercise 1. Movement in a circle of arbitrary radius
The starting place for this lesson is the same as in the previous exercise.
Having outlined an arbitrary trajectory, we smoothly touch the car in 1st gear and slowly move in a circle, first counterclockwise.
When practicing taxiing skills, it is important that the assigned task does not distract you from the main thing - the ability to stop the car in any situation. The fact is that at the initial stage of training, the car, quite possibly, will not move exactly along the trajectory that you intended. In this case, correction in taxiing can be safely carried out only with full control over the movement of the car. If at the time of the exercise you suddenly did not have enough time to make the right decision, you should calmly stop the car without spraying on other actions.
Now let’s specifically talk about what you need to pay attention to when doing the exercise.
1. You should not look directly in front of the "nose" of the car directly, but to the place where the car you are heading (in Fig. 14 is shown by arrows). 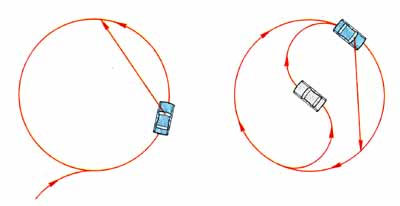 Fig. 14
2. It is necessary to take into account some inertia of the car’s steering (unlike a motorcycle, bicycle), since the steering mechanism has free play (backlash) within 10 ° provided by the design. During taxiing, this play is selected quite quickly.
3. When driving along a curve, one does not have to strive to turn the steering wheel all the time in the direction of rotation. The desired trajectory is provided by a certain position of the steered wheels.
When doing the exercise, it is useful to make intermediate stops. After driving a few laps (5-6), change direction and do the same exercise clockwise.
Exercise 2. Acquisition of taxiing skills while driving the G8 (Fig. 15).
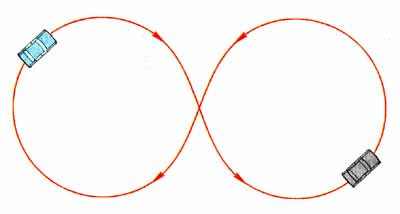 Fig. 15
In this exercise you need to pay attention to the correct steering. Steering turns are carried out freely with interception, approximately as shown in Fig. 16a and 16b. 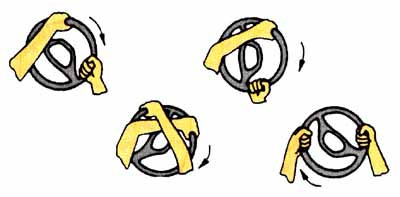 Fig.16a. Turn right
 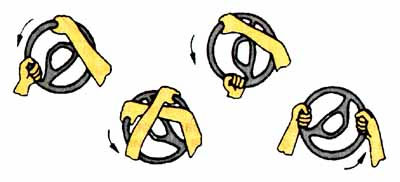 Fig.16b. Left turn
During the exercise in question, make intermediate stops.
To successfully complete subsequent maneuvering exercises, it is very important to be able to move the car to any smallest distance. This is achieved by competent grip.
When you release the clutch pedal, it takes some time for the car to travel a certain distance. In other words, if you try to start the car by releasing the clutch pedal, immediately squeeze it out and apply the brake, you can make sure that the car will ride for several meters during this time. But it may be necessary to promote the car quite a bit, literally by centimeters. How to do it? To do this, just move the car on a half-clutch, and then immediately squeeze the clutch pedal. 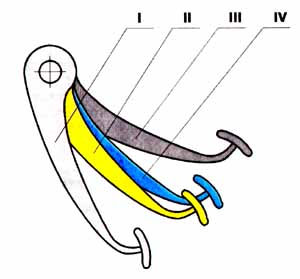 Fig. 17
I - fully depressed pedal
II - clutch response position
III - fully released pedal
IV - pedal position (conditional) at which the car will begin to move
As we already know, position II (Fig. 17) determines the moment the clutch engages. From position II, the car will begin to move. Therefore, the less we release the pedal from position II with the subsequent squeezing, the smaller the distance the car will go. This will be the goal of our next exercise - to move the car to a minimum distance.
Exercise 3. Moving the car to a minimum distance.
We engage the 1st gear and find the clutch response moment (position II, Fig. 17). Further, while adding a little engine speed, we release the clutch pedal to the conditional position IV, literally a few millimeters. After the car moves, the clutch pedal is fully depressed. At the same time, it is not necessary to use the brake pedal, because if you do everything right, the car will not have time to roll out and will stop under its own weight.
In this exercise, you need to set for yourself the task of phasing the car to the smallest possible distance (10-20 cm).
Try the same thing when moving backward. After completing this exercise, you will gain confidence that the car can be tamed. There will come a pleasant feeling of complete control of the car.
Exercise 4. Maneuvering using reverse gear.
The trajectory of movement is chosen arbitrarily, for example, as shown in Fig. 18. In this exercise, the main thing that you need to pay attention to is taxiing when reversing. We have already considered reversing in a straight line.
In the proposed exercise, when reversing, we make a turn. It is very important for the driver to choose such a position behind the wheel that it is convenient, the movements were uninhibited, the zone where the car should be directed was clearly visible. 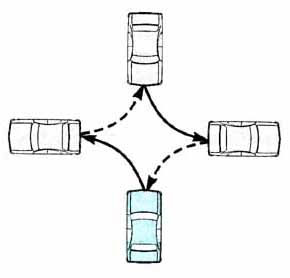 Fig. 18a
  Fig. 18b
In fig. 18a shows the reverse movement of a car with a right turn of the steered wheels. In this case, the driver should turn slightly to the right so that the glass area of \u200b\u200bthe rear right door and the rear window of the car is visible. You can turn the steering wheel with either one, with your left hand, or with both hands. It depends on the steepness of the turn and the speed of movement.
In fig. 18b shows the car reversing with a left turn of the steered wheels. In this case, the driver must choose a convenient position for himself: or turn around, as in the previous case, but much more so that the area of \u200b\u200bthe rear window and partially the glass of the rear left door of the car are visible; or, which is probably more convenient for a sharp turn, turn to the left side and look through the side window of the left rear door. Try both options. Moreover, the driver can change the position during maneuvering in reverse. If you feel that you are uncomfortable while moving, change position, but stop the car first. The main thing is to see the area into which the car is heading.
Gear Shift Driving
For the movement of the car in different road conditions and at different speeds it is necessary that the drive torque is variable. This provides the gearbox (gearbox).
Each gear has its own range of speeds, having lower and upper limits and defined by the engine speed.
The approximate speed range in each gear for a 4-speed gearbox looks like that shown in the table. 1.
I - 0 - 40
II - 10 - 60
III - 30 - 90
IV - 50 - max
When driving, the driver selects a speed mode convenient for himself, and uses the transmission according to the selected speed. To accelerate the car to the desired speed, it is necessary to sequentially accelerate the car in each gear in ascending (I, II, III, IV gears). For example, the selected speed mode in 4th gear is 60 km / h. The final speed is not maximum for the car, therefore, the acceleration in each gear should not be maximum:
* moving away from a place in I gear and acceleration to 20 km / h;
* Switching to II gear and acceleration to 40 km / h;
* Switching to III gear and acceleration to 60 km / h;
* Switching to IV gear and maintaining the selected speed - 60 km / h.
In this case, the engine will work in each gear in approximately the same speed range: from idle speed (700-800 rpm) to medium (rpm).
Exercise 1. Movement with switching to II gear.
There must be enough space to complete this exercise. You will move in a straight line, without being distracted by taxiing.
Recommendation.The process of switching to II gear is divided into several stages for ease of implementation.
1. Starting the car and smooth acceleration in I gear.
2. Squeeze the clutch pedal while releasing the accelerator pedal.
3. The calm transfer of the gearshift lever from 1st gear to 2nd gear.
4. Fast enough, but smooth release of the clutch pedal.
5. The addition of engine speed for subsequent acceleration.
As you acquire skills, the 4th and 5th stages can be combined.
At the 1st stage, during acceleration, a speed sufficient to switch to 2nd gear can be controlled not by the speedometer. and visually, by eye, and by engine speed (the speed should be average).
At the 2nd stage, do not rush when squeezing the clutch pedal, be sure to immediately shift gear. Squeezing the clutch and dropping the revs, you will move by inertia enough time for a quiet shift of the gearshift lever (3rd stage). The 4th and 5th stages are a matter of technology.
Possible errors and their causes:
1. After acceleration at the moment of switching, the engine “roared”, that is, it gained excessive speed without load - when releasing the clutch, they forgot to release the accelerator pedal.
2. After acceleration at the time of switching, the car drastically slowed down. - clutch release belated. You let go of the accelerator pedal and the clutch remained engaged. The engine worked as a moderator in I gear.
Practice this exercise.
Switching upward from II to III and from III to IV gears are similar to those discussed above. Just keep in mind that driving in higher gears is possible at high speeds. Therefore, more space is required for training. It can be any traffic-free road. However, when driving along it during the training process, an experienced driver should sit with you.
Exercise 2. When lowering the speed, shift to the lower gear.
Returning to Table 1, we pay attention to the lower speed limit in each gear. It shows that moving at a speed lower than the lower limit is unacceptable for a particular gear. In this case, the engine will work intermittently at a speed lower than the idle speed and may even stop. At the time of operation, the engine will experience a very harmful “oil starvation” for it.
If during the movement a situation has arisen requiring a decrease in speed, then, having reduced the speed to the minimum permissible for a given gear, it is necessary to switch to the lower gear suitable for this speed. However, downward switching in the reverse order is not necessary.
Here are some examples.
First. We are moving in IV gear at a speed of 60 km / h. Ahead is the intersection where we need to turn. When braking, we reduce the speed to about 50 km / h (lower limit in IV gear), squeeze the clutch, continuing braking. We turn on the second gear, since the speed that we chose to go through the turn is about 10 km / h.
Second. We are moving at the same speed in IV gear. Ahead is a traffic light prohibiting movement. We reduce the speed to 50 km / h, squeeze the clutch, continuing to brake until it stops before the traffic light. We put the gear in a neutral position.
From the two examples shown, intermediate gears were not required.
Try the above exercise with the transition:
* from IV to III
* from IV to II
* from III to II gear.
Switch to 1st gear only if the speed is practically zero.
Check-in to the garage
For further studies, you will need overall hangers - wooden, plastic, ski poles, etc. The main thing is that they should be about one meter in size or slightly larger; so that in case of accidental collision with them, damage to your car is not caused; so that the bearings on which they will be installed do not damage the wheels of the car. They are enough 7-8 pcs.
We put the car on the site and place the milestones around it, as shown in Fig. 19. 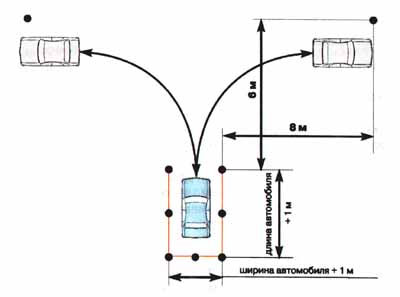 Fig. 19
The task is to leave the garage and drive into it in reverse. Moreover, this exercise must be done from different angles.
When leaving the garage, please note that when turning the trajectories of the front and rear wheels are different. The rear wheel runs along the inner radius. Therefore, when leaving the garage, do not rush to turn right away, otherwise the front pole (Fig. 20) will be shot down (and if this is a real garage, the side of the car will suffer). To prevent this from happening, roll out the car in a straight line about halfway, and then turn in the selected direction, controlling the inside of the car.  Fig. 20
Exercise 1. Departure from the garage with a turn to the right and reverse check-in in reverse.
When leaving the garage, you need to focus on the right front corner (right front pole). We leave the garage to the right and put the car, as shown in Fig. 20.
To check into the garage, turn around at the driver's seat so that it is clearly visible. The race itself is divided as it were into three stages.
At the 1st stage, we focus on the nearest landmark, which you need to go around at a distance of 30-40 cm from the side of the car along a steep radius. At the end of the 1st stage, the car should be located at about 45 ° to the garage, the nearest pole should be visible in the glass of the rear right door and be 30-40 cm from the side of the car, the steered wheels are fully turned to the right (Fig. 21a).  Fig. 21a
At the 2nd stage, all attention is focused on the middle target of the milestones, which the car must go through in the center. Observing the movement of the car along a steep arc inside the garage, we wait until the rear of the car will be centered on the center of the middle alignment (Fig. 21b).  Fig. 21b
At the 3rd stage, focusing on the back target (or the central pole), we align the car so that inside the garage it moves strictly in a straight line.
It should be noted that correcting a possible error inside the garage by taxiing will not bring any benefits, it can only worsen the situation.
In the final phase inside the garage, the car should not go in an arc. Correction of the rear of the car even by a small distance will entail a significant shift towards the front (controllable) part of the car (Fig. 22). 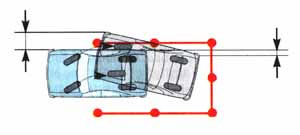 Fig. 22
Exercise 2. Departure from the garage with a left turn and reverse check-in in reverse.
This exercise differs from the previous one only in the driver's orientation in place.
Work on driving into the garage will require patience. It is useful when training, setting guidelines for yourself, stop the car in intermediate positions, get out of it to analyze your actions.
U-Turn
To conduct classes on the site, we will make a corridor of milestones, as shown in Fig. 23. 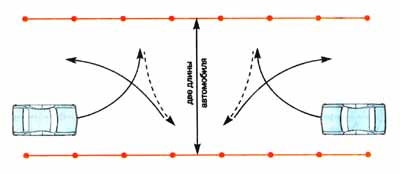 Fig. 23
Exercise 1. U-turn to the left using reverse gear.
In order for the spread to be most effective, three conditions are necessary:
* use of the corridor across the entire width;
* steering wheel operation over the entire range;
* preparation of the car before stopping by turning the steered wheels for movement in the other direction.
So, we will try to perform a reversal rationally. We drive into the corridor, clinging to the right side (about half a meter from the milestones). In the middle of the corridor, we turn the steering wheel to the left to failure and in this position we pass 2/3 of the corridor width. We pass the rest of the way, quickly twisting the steering wheel in the other direction. i.e. right. It is necessary to stop the car about half a meter from the restrictive landmarks.
Starting to reverse, continue to rotate the steering wheel to the right to failure. Thus, we also pass 2/3 of the width of the corridor. The rest of the way to a stop, we turn the steering wheel in the opposite direction, that is, to the left. After stopping, we resume forward movement with the steering wheel turning to the left.
Recommendation.When performing exercises on maneuvering, one should not be afraid to use the “reel”, that is, movement with clutch release. In this case, the car can move slower and will be easier to drive.
With the acquisition of skills and experience, your movements will be more rational.
Car parking
Car parking can be carried out in three ways (Fig. 24): 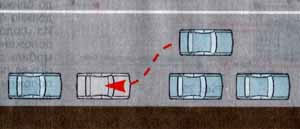 Fig.24a, parallel to the roadway;
 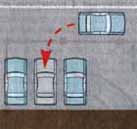 Fig.24b, perpendicular to the roadway;
 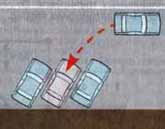 Fig.24c, at an angle to the roadway.
Parking perpendicular to the carriageway is similar to entering a garage. Parking at an angle to the carriageway is not difficult if you are dealing with perpendicular parking.
Let's stop at the car parking parallel to the roadway. If between the cars standing at the sidewalk the place for your car is limited, but enough, it is advisable to call back into this gap. The fact is that with the help of the front steered wheels the “nose” of the car is easily drifted.
Exercise 1. Parallel parking.
We set the landmarks and the car relative to them, as shown in Fig. 25.  Fig. 25
For example, we will use a graphic image of the phased arrangement of the car during the race (see. Fig. 26). 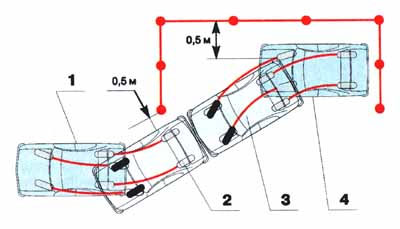 Fig. 26
In position 1, the steer wheels must be turned to the right. In position 2, the distance from the vehicle to the nearest pole should be ~ 0.5 m. From position 2 to position 3, the car should move in a straight line. In position 3, the steer wheels must be turned to the left. The distance from the rear right corner of the car to the line of milestones is ~ 0.5 m. When moving from position 3 to position 4, it is important to control the right wing of the car. Position 4 shows the result that you must achieve after your workouts. From position 4, correction is possible with the vehicle moving forward.
Check-in overpass. Driving a car standing on a rise
For a successful check-in, you must:
* properly coordinate the car;
* maintain straightforwardness upon arrival at the overpass;
* be able to stop the car in any position on the flyover, preventing it from rolling.
Training in car coordination should begin without checking into a flyover.
Exercise 1. Arrival on the flyover.
We put the pushpins (without thrust bearings) relative to the car, as shown in Fig. 27. At the same time, the landmarks will determine the track gauge. 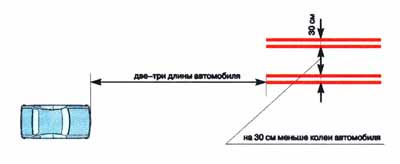 Fig. 27
Keep in mind that with close proximity to the flyover, the car should move in a straight line. That is, maneuvering must be performed in advance. Otherwise, correctly placing the front wheels on the flyover, but continuing to move along the arc, you will not fall into the tracks of the flyover with the rear wheels.
Repeat this exercise several times. Now try to do the same with the displacement of the car relative to the laid landmarks in the other direction.
Exercise 2. Stopping the car on a flyover.
To perform the exercise, select the natural slope (approximately 16 °) and lay the pins on it in the same way as described above.
Aiming the car at an impromptu flyover. stop it on the rise. In order for the car not to roll back after stopping, continuing to hold the brake pedal tightly, we apply the parking brake. When stopping on the rise, we pay attention to the sequence of actions: when the clutch pedal is depressed and the brake is pressed, the “handbrake” is first tightened, and then the gear is disengaged and the pedals released.
Exercise 3. Starting the car on the rise.
So, the car is on the rise with a parking brake. Our task is to release the car from the parking brake at the initial moment of its starting.
The sequence of actions is as follows.
1. Turn on the 1st gear and put the right hand on the “handbrake”.
2. We find the clutch actuation moment and in this position we hold the left leg (remember that at the moment the clutch is acted upon, the engine will respond by lowering the speed).
3. Having increased the speed, we lower the brake lever all the way down, after pressing the ratchet button.
4. Then we do everything as with ordinary pulling.
If your actions are correct, the car will not roll back.
Possible errors and their causes:
1. When starting, the engine stalled - the handbrake was not released on time
2. The engine “roars”, the car rolled back - the “handbrake” is released ahead of time (the clutch has not yet worked). When rolling the car back involuntarily there is a desire to move the car forward due to more pressing the accelerator, while forgetting about the clutch
So, if the goal is clear, we must begin to practice the action. The main thing at the initial stage of training is not to rush to do everything at once without fail. Learn how to do things in a consistent way, as reviewed by us.
Recommendation.If the vehicle rolls back, you must calmly continue to smoothly release the clutch until it operates. At the same time, at the moment the clutch engages, the car will first pause and then begin to move forward.
In this exercise, the greatest attention should be paid to the work of the clutch.
Section II. ROAD DRIVING
Start of movement and stop at the curbstone (at the sidewalk)
Having acquired sufficient skills in driving, you have met only one of the requirements of the 21st section of the Rules traffic.
In order to go on the road in order to continue training, you must fulfill the following requirements.
1. Know and strictly follow the rules of the road.
2. The car must have front and rear markings for driving instruction and be equipped with a rear view mirror for the trainer:  3. You must have a driving instruction with at least three years of experience.
When training on the road, you should be wearing seat belts.
In addition to the general prohibition of driving
on motorways marked with the sign below, in cities there are roads that are also prohibited training ride.  In Moscow it is:
* center within the Garden Ring, including the ring itself
* all station square Berezhkovskaya embankment ave. Vernadsky
* Vnukovo highway
* Volokolamskoe highway
* B. Dorogomilovskaya st.
* Ilyinskoye highway
* Novoarbatsky ave.
* Komsomolsky ave.
* Krasnogorsk highway
* Kutuzovsky Ave.
* Leninsky prospekt
* Leningradsky prospekt
* Leningradskoye highway up to 29 km
* Lomonosov Ave.
* Minsk st.
* Minsk highway up to 19 km
* ave. Of the world
* Michurinsky Ave.
* Mosfilmovskaya St.
* Mozhayskoye highway
* Proletarsky Ave.
* Podushkinskoe highway
* Rublevo-Uspenskoe highway
* Rublevskoe Old Highway
* Smolenskaya st.
* Tverskaya (Gorky) st.
* Tverskaya-Yamskaya (Gorky) st.
* University Avenue
* Assumption Second Highway
* emb. Shevchenko
* Sheremetyevskaya st.
1. Start of movement and stop at the curbstone (at the sidewalk)
Before you start moving you must:
* make sure that you do not interfere with other participants in the movement;
* turn on the direction indicator.
Recall that a warning signal (direction indicator) does not give the driver an advantage in movement.
If the car is standing on the sidewalk and the road is clear in front of it, it is convenient to start driving at a very sharp angle without making sharp maneuvers. In this case, you will not create inconvenience for a moving vehicle. Whether your car is standing on the sidewalk or moving at low speed in the immediate vicinity is almost the same for the driver of another vehicle (Fig. 28). 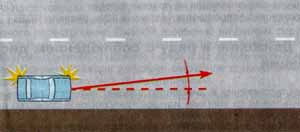 Fig. 28
If there is an obstacle in front of your car (for example, another car), then maneuvering the start of movement requires great care. The advantage is vehicles moving on the road. In this case, you will need acquired grip skills so that the exit is slow and controlled. Such departure implies, in the event of a change in the situation, suspension in any position (Fig. 29, item 2). 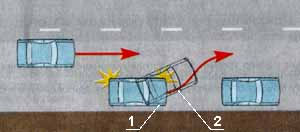 Fig. 29
In order to safely make a stop at the sidewalk, you must:
* clearly know in advance where we can do this;
* give a warning signal in advance (right turn signal);
* Slowly reduce speed and, if possible, approach the curb at an acute angle.
It is very important that the approach to the curb is after a decrease in speed. Drive to the sidewalk at high speed can lead to a mistake and unpleasant consequences. Contacting a wheel with a curbstone can damage the wheel or, even worse, lose control of driving because of increased resistance on the right wheel.
Where stopping is prohibited is indicated in the 12th section of the SDA
Movement in line with distance
The speed and distance should be chosen so as to prevent collision with a vehicle in front, even in the event of a sharp braking.
When choosing a distance, the following factors must be considered:
* speed of movement (the higher the speed, the greater the distance);
* visibility (light, fog, etc.);
* the condition of the road surface;
* the condition of your vehicle;
* own state (fatigue, decreased reaction, etc.).
Traffic in its lane on the road is the easiest and safest. In this case, you are required to maintain distance and proper use of gears when changing high-speed driving modes.
Lane to Lane Movement
This maneuver requires increased attention from the driver. In this case, two conditions must be met. It is necessary:
* Give way to a vehicle moving in its own row.
* Give a warning signal.
Let's consider some examples of rebuilding.
1. The speed behind the car in the next row is more than yours.
Rebuilding is currently not possible. If the rebuild is caused by the upcoming turn and this turn is already close, you need to reduce the speed in advance and wait for the opportunity for a safe rebuild. The main thing (especially at first, while there is no experience) is not to rush, not to succumb to impatient displays of other drivers (beeps, headlights) and not to make rash actions. Remember! Each action associated with a change in driving mode should be controlled.
2. The speed behind the running car is approximately equal to yours, and there is sufficient distance to it (Fig. 31).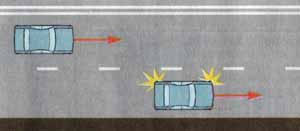 Fig. 31
Rebuild is possible. In this case, for greater security of rebuilding, the speed of movement can be slightly increased (if the situation allows).
3. The speed of your car is higher than the speed of a car moving in an adjacent row (Fig. 32).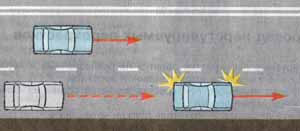 Fig. 32
In this case, the rebuild is possible after the car in the next row will be visible through the rear window in the rear view mirror.
If you need to rebuild on a multi-lane road with overcoming several rows, you should not "cut" the road diagonally. In this case, there may be a mistake in estimating the speed and distance of several vehicles moving in adjacent rows at once.
It is safer to perform this maneuver in stages from row to row, i.e., after rebuilding into the next row, assess the situation in the next, etc. (Fig. 33). 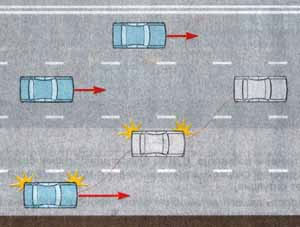 Fig. 33
Driving through unregulated intersections
Unregulated intersections are divided into equivalent and unequal, i.e. with main and secondary roads.
Driving through an unregulated intersection is one of the most difficult elements on the road.
When approaching the intersection, the driver must clearly know:
* further direction of their movement;
* Who has the pre-emptive right to drive at this intersection.
The direction of traffic at the intersection requires the appropriate location of your vehicle in front of it. For example, when driving in the forward direction, the car can be located in any row. When moving at the intersection to the right or left, it is necessary to take the right or left lane, respectively.
If the directions of traffic intersect, the following shall prevail in the traffic at the intersection:
* vehicle with flashing light on;
* vehicle located on the main road;
* tram;
* A vehicle without interference on the right.
Here are some examples. 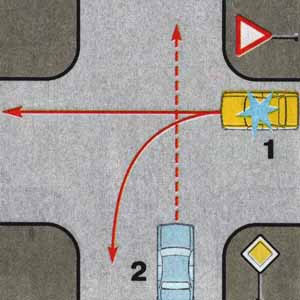 Fig. 34
In Figure 34, although a vehicle with a flashing light is on a secondary road, it has an advantage. 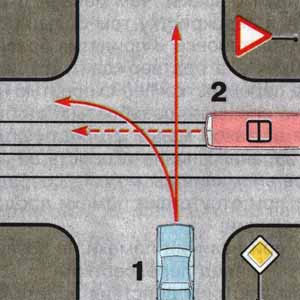 Fig. 35
In Figure 35, a vehicle on the main road has an advantage in movement. The tram also obeys this rule.  Fig. 36
In Figure 36, with an equal right to drive (an equivalent intersection), the tram takes precedence (despite the fact that the tram has an interference on the right). 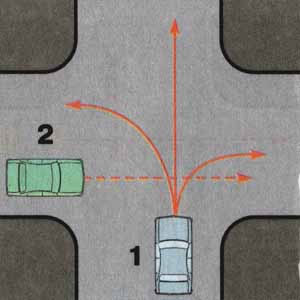 Fig. 37
As Figure 37 shows, on equivalent roads, the advantage is that of one that has no interference on the right (in the absence of a tram and a vehicle with a flashing light).
In order to properly assess the situation at the intersection, time is needed. The lower the speed with which we will approach the intersection, the more time will be for assessing the specific situation and making the right decision.
Practice confirms that traffic in a 15-20-meter zone in front of the intersection with a speed of no more than 10 km / h allows the driver to calmly understand the situation. We know that for driving at such a low speed, gear II must be selected. If, after lowering the speed in advance, in 15-20 m you turn on II gear, then you can focus all your attention on the main thing:
* in the absence of interference, continue driving in the intended direction;
* in the presence of interference that does not allow moving further, stop in front of the intersection.
Consider the actions of the driver on the example of specific intersections.
Crossroads with a STOP Sign
In the presence of a sign prohibiting the passage of the intersection without stopping, the position of the driver is greatly simplified. He faces a specific task - to stop. It must be completed, and then solve other problems. Question: where to stay and how? 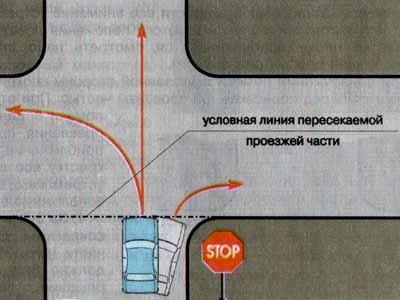 Fig. 38
According to the SDA, in the absence of the STOP line, it is necessary to stop in front of the intersected roadway. It should be noted that leaving the conditional line (Fig. 38) without stopping is unacceptable. If you stop long before this line, the intersection will be less visible, which will create inconvenience when resuming traffic.
When you stop, in addition, you should consider how to position the car. If the further direction of movement is straight or left, the car must be coordinated strictly perpendicular to the intersected roadway (moreover, when turning left - in the left lane); when turning right, the car should be stopped on the path along which the movement is planned.
Crossroads with the sign “Make way”
As in the previous case, we are on a secondary road. The difference is that this sign does not require an unconditional stop. Therefore, there is a temptation to overcome it on the move.
In order for the intersection to be safe and confident, it is recommended that you proceed as follows. 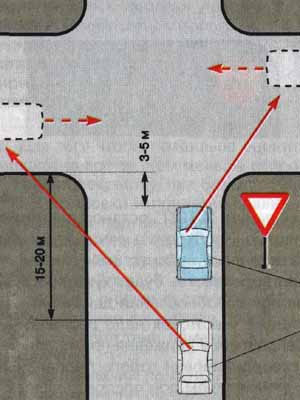 Fig. 39
1. For 15-20 m, reduce the speed to about 10 km / h and engage 2nd gear (Fig. 39, item 1).
2. Moving at low speed, first turn all attention to the left side (if from this position the left side of the intersection is poorly visible, you must first look towards better visibility).
3. If interference is detected from the indicated side, we calmly stop in front of the intersected roadway. In the absence of interference from this direction, continuing to approach the intersection, we focus all our attention in the opposite direction.
4. 3-5 m before the intersected roadway (Fig. 39, item 2), a decision must be made on the possibility of continuing the movement.
If you did not have time to correctly assess the situation at the intersection, it is unacceptable to travel outside the intersected roadway. Nothing will happen if you, without being oriented in time, unnecessarily stop in front of the intersected roadway.
Equal Crossroads
At an equivalent intersection, in the absence of a vehicle with a flashing light and a tram turned on, the “interference on the right” rule applies. Therefore, you must give way to all vehicles on your right.
The most difficult maneuver at an equivalent intersection is a left turn. In this case, the interference can be from two directions - to the right and towards. To pass the vehicle from the right direction, your car must be in front of the intersected roadway. When turning left to pass an oncoming vehicle moving directly or to the right, the car should be stopped at the intersection in the position from which the turn will begin, that is, in the middle of the intersection. Steered wheels should stand upright to avoid unauthorized access to the oncoming lane at the time of waiting.
Regulated intersection
The intersection is adjustable if the traffic order on it is determined by the traffic controller or traffic light.
Fig. 41a  Fig. 41b
In fig. 41a, 41b show the permitted driving directions for two basic positions of the traffic controller.
The traffic controller, who raised his hand with the rod up, requires attention from vehicles. The actions of drivers should be the same as with a yellow traffic light.
When regulating traffic lights, special attention should be paid to traffic lights with an additional section. The included additional section allows movement in the indicated direction. But in this case, when the main section of the traffic light prohibits movement (red or yellow), moving in the direction permitted by the additional section, it is necessary to skip vehicles from other directions. For example, we need to turn right, as shown in fig. 42.
Fig. 42
Remember that the main red (or yellow) section of the traffic light indicates that traffic from another direction is allowed. A driver moving on a green traffic light may not be aware that the permission arrow is on from your direction. He knows one thing: red light from your direction. If there are additional sections in the traffic light that you don’t need to drive towards, do not occupy the rows corresponding to the sections. Otherwise, you can interfere with other vehicles and, according to the Rules of the road, you will be required to clear the corresponding row by driving in the direction indicated by the section (Fig. 43). 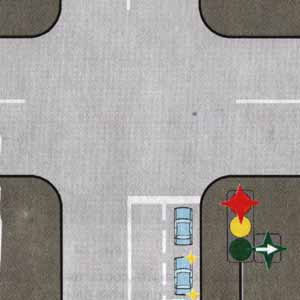 Fig. 43
Another recommendation. Never rush to touch the car when you turn on the green traffic light. An attempt to start moving as soon as possible so as not to delay anyone will result in a mistake being made and the engine stalling. With quiet actions, the delay at the intersection will not be more than 2-3 seconds.
Overtaking
Overtaking, i.e., getting ahead with the exit from the occupied lane, is one of the most dangerous actions on the road. It requires increased attention from the driver, if committed to the oncoming lane.
In addition to the general requirements listed in the rules of the road, when making overtaking it is useful to know a number of technical methods that help to make overtaking safely.
If you decide to overtake the vehicle in front, you should advance to move your car to the left a little (approximately half the width of the car) so that the oncoming lane area is clearly visible. With such a small displacement, you will not interfere with oncoming vehicles (Fig. 44).
Fig. 44
In addition, it is necessary to maintain a sufficient distance to overtake, not to drive too close to it. When the oncoming car equals your traveling companion whom you are going to overtake, this distance can be used to increase speed.
The greater the difference in speeds between the overtaking and the overtaking, the less time is required to make overtaking and the safer will be overtaking with going to the oncoming lane.
Figure 45 graphically shows the competent overtaking.
The speed of overtaking and overtaking in Fig. 45a are equal, the distance is maintained, since the oncoming lane is occupied. In this case, the overtaking is slightly shifted to the left for better visibility of the oncoming lane.
Fig. 45a
In figure 45b, the oncoming car caught up with the overtaking one. At this moment, the overtaking driver increases speed, the distance decreases (if the lane is clear behind the oncoming car).
Fig. 45b
In Fig. 45c, the oncoming band is freed. The speed difference between overtaking and overtaking is sufficient. Safe overtaking occurs.
Fig. 45c
Rebuild in your row after overtaking should not be earlier than the one you have just overtaken will be visible in the rear view mirror.
It should be borne in mind that for a quick increase in speed, higher gear is not always useful. For example, you are moving at a speed of 50 km / h in 4th gear. A vehicle moves ahead with a slightly lower speed, suppose 45 km / h. Overtaking it with a speed difference of 5 km / h will require a lot of time and a large stretch of track. During this time, the situation in the oncoming lane may change. You can increase the speed to 60 km / h on the same IV gear, but the increase will be slow (transmission is weak). If we use III gear (it works in the speed range of 30-90 km / h), the acceleration will be more intense, with the cost of much less time to increase speed.
In this chapter we will talk about what the controls of a modern car are, how to use them, how to start moving and moving away, which means the concept of “driving culture”, as well as much more.
First driving skills
You must perform your first driving exercises with the engine turned off and the vehicle stationary. Remember that before you drive, you must fully study the traffic rules and other regulatory documents governing traffic in the Russian Federation (see chapters 6-10) as well as, just as importantly, to deal with car controls. This will be discussed in the next section.
Car controls
Any car is equipped with the following main controls:
steering wheel;
clutch, brake and gas pedals;
gear lever;
the parking brake lever (popularly known as the “handbrake").
Also, no car is complete without additional controls, which include:
direction indicator switch;
parking light switch;
headlight switch;
wiper and washer switch;
egnition lock.
Let us consider in more detail each of the listed governing bodies (Fig. 1.1).
Fig. 1.1. Car controls
Steering wheel(Fig. 1.2) is intended to give the vehicle the necessary direction while driving. Note that in accordance with the applicable traffic rules, in the event of a steering failure, any further movement of the vehicle is prohibited. In other words, if steering is out of order on the road, it is strictly forbidden to drive further, as this can lead to disastrous consequences. The only way out in this case is towing a car by partial loading or transporting it using a tow truck specially designed for this purpose.
Fig. 1.2. Steering wheel
Remember!Manipulate the steering wheel with two hands. It is no secret that on the roads you can often see drivers who, with a defiantly dismissive look, operate the steering wheel with just one hand. Please note - this is unacceptable and very dangerous! After all, if the car suddenly bumps into an obstacle, or the wheel is punctured while driving or even bursts, the steering wheel in one hand can not be held, which is fraught with a serious traffic accident.
In the event of a steering malfunction, vehicle operation is prohibited.
Attention!On the steering wheel there is always a key or a button for a sound signal. In accordance with the applicable traffic regulations, in populated areas the sound signal is prohibited and is possible only to avoid accidents.
It is not permissible to operate the steering wheel with one hand.
Remember!Often, drivers put a cover on the steering wheel, which supposedly helps to increase convenience and comfort. In reality, everything is exactly the opposite: such “baubles” do not add any convenience - all this is nothing more than cheap advertising tricks of their sellers and manufacturers. But slipping such a cover when turning the steering wheel can cause serious accidents.
In settlements, the sound signal is allowed only to avoid accidents.
Attention!Each car has a standard anti-theft device - a steering lock that fires when the driver removes the key from the ignition and turns the steering wheel a little. At the same time, a click is heard, and the steering wheel is blocked. So: if the steering lock is faulty, you cannot drive the car: after all, if the steering wheel suddenly locks up while driving, the consequences can be disastrous.
When the steering cover slips, the driver does not immediately have time to understand what is happening (many are simply lost), and such a delay can play a fatal role.
Attention!Speed \u200b\u200bcontrol is carried out using the gas, clutch and brake pedals (Fig. 1.3).
It is dangerous to operate the vehicle with a defective steering lock.
Clutch pedalonly available on vehicles equipped with mechanical gearbox gear changes (which, however, the vast majority), and is designed to turn on and off the clutch. Clutch mechanism - This is a device that, with the help of friction, provides torque transmission from the engine through the gearbox to the drive wheels. The clutch pedal is designed to briefly disconnect the engine from the gearbox, as well as for their subsequent connection. This should be carried out smoothly and without sudden movements.
By the way, the most famous mistake made by novice drivers is that they “throw” the clutch pedal too abruptly (this applies to all newcomers), and, as a result, the motor stalls immediately. This is very harmful for the clutch mechanism and can cause serious damage, requiring complex and expensive repairs.
With the clutch pedal depressed, the motor is disconnected from the drive wheels of the machine. Remember that the clutch pedal is only allowed to be pressed with the left foot.
Brake pedalit is used to activate the vehicle's brake system. Note that any car is equipped with a working and parking brake systems: the working one is designed to reduce the speed and stop the vehicle while driving, and the parking one is designed to ensure its immobility during parking.
When the brake pedal is pressed, the force through the hydraulic drive activates the braking mechanisms of all the wheels of the vehicle.
Only the right foot is allowed to manipulate the brake pedal (and in general, each driver must remember - the left leg is intended solely for grip). A characteristic feature of the brake pedal is that it is impossible to squeeze it to the floor. If this pedal is completely squeezed out, this indicates a malfunction of the brake system (brake pads are worn out, the tightness of the hydraulic mechanism, etc.) and the need for urgent repair.
Fig. 1.3. Clutch, brake and gas pedals
Remember!To reduce the speed or stop the vehicle completely, the driver presses the right foot on the brake pedal located between the gas and clutch pedals. This force is transmitted via the rod to the piston of the brake master cylinder, which exerts pressure on the fluid used in the brake drive. Further, from this fluid, the force through the brake tubes and hoses goes to the brake mechanisms of the wheels, as a result of which the brake pads are pressed against the brake drums or discs (there are two types of wheel brake systems - drum and disk, both types can be used in the same car). Since the brake disk (drum) is connected to the wheel, under the influence of the friction force of the brake pads it slows down the rotation and, if the force does not stop, it stops. As soon as the brake pads are pressed to the discs (drums), the brake pedal should become resilient and not give in to further pressing (otherwise, as we noted earlier, the brake system is faulty).
If the brake pedal is fully depressed, the brake system must be repaired.
Attention!Gas pedal (accelerator)it is designed to regulate the fuel supply to the engine: the more the pedal is depressed, the more fuel enters the combustion chamber, and therefore, the higher the engine speed.
Do not forget that traffic rules prohibit any movement of a car with faulty brakes. Therefore, even if a failure of the brake system happened on the road, you need to stop all movement and either eliminate the malfunction on the spot or call a tow truck.
Gear lever(Fig. 1.4), as a rule, is located on the right and at the same time - in front of the driver's seat. The driver selects the gear, guided by the current need, pre-squeezing the clutch for this. The desired gear is engaged by shifting the lever to the appropriate position.
Fig. 1.4. Gear lever
When the gear lever is in neutral, the drive wheels of the vehicle are disconnected from the engine. In this case, the lever moves freely in the transverse direction.
Most modern cars use a 5-speed gearbox (this refers to a manual gearbox). This means that this car has five gears for moving forward and one for reversing.
The most powerful are the gears with which the car begins to move - this is the first and reverse gears. The fact is that there is a pattern: the lower the transmission, the more power it has, but also the lower the speed it can develop. Therefore, when the first or reverse gear is engaged, the engine rotates the wheels easily, the motor will operate at high speeds and quite loudly, but the car will not go faster than 10–20 km / h.
Therefore, as soon as the car started off and accelerated a little - you need to switch to second gear - not so powerful, but more speed. It allows you to go at a speed of already 25–45 km / h, then you can switch to third gear - even faster, but not as strong, etc.
Note that on cars equipped with an automatic gearbox, the gearshift process is carried out without the participation of the driver in automatic mode.
Parking brake lever(Fig. 1.5) is usually located between the front seats of the car. The parking brake system is activated by raising the lever to the upper position - as a result, the rear wheels of the vehicle will be blocked, which will ensure its immobility during parking.
Now consider additional controlscar, which also play an important role and without which the operation of the vehicle is prohibited.
Traffic regulations require that before performing any maneuver, the driver give the appropriate signals with the help of light indicators. Therefore, each car is equipped direction indicator switch. As a rule, this switch is made in the form of a lever and is located on the steering column (Fig. 1.6). The turn indicator is turned on by moving this lever to the appropriate position (up or down), and the shutdown (when the lever is turned to the neutral position) often happens automatically - when the steering wheel is rotated in the opposite direction after the completion of the maneuver.
Fig. 1.6. Direction indicator, parking light and headlight switch
Fig. 1.5. Renault parking brake lever
Upon the occurrence of certain conditions (twilight, fog, etc.), the driver must indicate the dimensions of the car by turning on the appropriate lighting devices. To do this, in the passenger compartment is provided parking light switch, which, depending on the particular vehicle, can be located, for example, on the steering column, on the control lever of the direction indicators, on the dashboard, etc.
In order to turn on or off the headlights, as well as select the mode of their operation (dipped or main beam), in the cabin of any vehicle there is headlight switch, which is usually located on the steering column.
The necessary devices that no car can do without are windshield cleaner and washer.
With their help, the driver gets good visibility during precipitation and when driving on dirty roads (when the windshield is constantly splashing). By the way, do not forget that the operation of vehicles with faulty data devices is prohibited. To turn on, off and select the operating mode of these devices in the car, there are toggle switches located, as a rule, on the steering column.
Note that on some modern cars, similar devices are also available for cleaning headlights. True, their availability and serviceability are not regulated by traffic rules. To control these devices in the cabin also has an appropriate toggle switch.
Attention!Egnition lock - the device necessary to start and stop the engine of the vehicle, as well as to turn the ignition on and off. It is driven by the ignition key.
Do not use a vehicle with a defective wiper and a windshield washer.
Car starting and starting
Getting started is a complex and responsible process, during which even experienced drivers sometimes make mistakes (especially if you have to drive in someone else's car). What can we say about newcomers! Each driver remembers how, in the first driving lessons, his car twitched and stalled several times with almost every attempt to move.
By the way, often beginners start the engine, barely having time to take their place. This is a serious mistake, which is fraught not only with the fact that you get tired very quickly (it starts to “break” your back, etc.), but also with a limited view, because, as it soon becomes clear, the rear-view mirrors are unregulated and nothing is visible in them. All this happens because you did not take a comfortable position and did not adjust the driver's seat (Fig. 1.7 and 1.8) so that it would be convenient for you to drive the car.
Fig. 1.7. Driver seat back adjustment lever
Fig. 1.8. Horizontal driver seat adjustment lever
Therefore, sitting on the seat, adjust your seat in relation to yourself (move the chair forward or backward, raise or lower the back, etc.). Be sure to check that the position of the rear-view mirrors guarantees maximum visibility.
If before starting the engine you were not convinced that the gear lever is on the “neutral”, then immediately after turning on the starter the car can jerk forward, bumping into some kind of obstacle (a car in front, a pillar, a garage wall, a pedestrian etc.). This happens if the car was in the engaged gear with the handbrake down (that is, the parking brake did not work).
Therefore, be sure to check whether the "handbrake" is down. If so, lift it by applying the parking brake. Thanks to this, the car will remain in place even if you lose control over it (starting the engine with the gear engaged, spontaneous start of movement on a slope, etc.).
Next, make sure that the gear lever is on the “neutral”. If everything is in order - turn on the ignition and making sure that all devices are working properly (for this, pay attention to the dashboard indicators) - turn on the starter and start the engine.
TipAfter the engine has started - once again make sure that the gear lever is in neutral position, and smoothly release the clutch pedal.
When starting the engine in frosty weather, it is recommended that the clutch pedal be pressed all the way before turning on the starter. This simple way makes it easier to start the engine.
Now your car is ready to start driving. Before starting off, make sure that there are no obstacles to movement, looking around, backward, as well as in the rearview mirror, and turn on the left “turn signal” to notify others about the imminent start of movement.
Then press the clutch pedal all the way and engage first gear, remove the machine from the handbrake and put your right hand on the steering wheel.
Attention!After that, smoothly release the clutch pedal, while paying attention to the operation of the motor. When you notice that the engine speed is falling, it means that the clutch starts to work. At this moment, you need to hold the clutch pedal a little in this position, while at the same time pressing the gas pedal. If everything is done correctly, the car will go slowly, and you should completely release the clutch and press the gas pedal a little harder.
Do not forget that before you start, you must give way to all other participants in the movement.
First independent trip
If you have fully mastered the process of starting the movement, you can begin the first independent trip while driving a car.
Remember!The first driving skills are recommended to be acquired at the training site, and if it is not nearby, then on the road with little traffic (Fig. 1.9).
Without a driver’s license, you do not have the right to drive a motor vehicle without the presence of an experienced instructor.
Fig. 1.9. Learning to drive better on a deserted road
After the car has started and is moving at minimum speed in first gear, increase the fuel supply and accelerate it to approximately 20 km / h. Remember that when you press the accelerator pedal sharply, the car abruptly "start-no", it is possible that with slipping wheels. This is completely unacceptable: the motor suffers from such overloads, “rubber” wears out, moreover, such a car’s behavior will be unexpected for you, and you will lose control over it (simply put, you may get lost).
Having increased the speed, remove your foot from the accelerator pedal, and simultaneously fully squeeze the clutch. Then switch to second gear. It is recommended that you momentarily hold the gearshift lever in the neutral position (this will allow the gearbox gearboxes to synchronize the rotation speed).
After that, completely release the clutch pedal and at the same time add “gas”. If everything is done correctly - the car will go faster, and already in second gear.
After that, it is recommended to drive a bit in this gear in order to get comfortable in the driving mode at a higher speed. One of the most common mistakes made by beginners at the initial stages of training is that they look anywhere (on the pedals, on the hood, on the speedometer, radio, etc.), but not on the road.
Remember!Moving in second gear, learn to “read” the road, that is, to see everything you need: traffic signs, traffic lights, roadside objects, obstacles on the roadway, etc. Analyze the traffic situation not only in front of the car, but also on the sides, and also behind, using rear-view mirrors for this.
All attention while driving the vehicle should be directed to the road.
Practice riding in second gear several times, each time starting off again and then stopping completely. At the same time, pay attention to how much time the machine manages to travel from the start of braking to a complete stop - this will allow you to evaluate the braking distance.
Having mastered the movement in second gear, you can go further and move to third. Technically, the shift process looks similar, with the difference that the gearshift lever needs to be moved to the position corresponding to third gear, and before that the car will need to be dispersed to about 25–45 km / h.
After practicing in third gear, switch to fourth (accelerating to 45–55 km / h), and then to fifth (at a speed of 60–70 km / h, if such a gear is available in your car).
NoteMost modern cars are equipped with a very useful instrument - a tachometer (Fig. 1.10). It shows the frequency of rotation of the crankshaft, and these indications are convenient to use in order to correctly determine the moment of switching to overdrive.
The speed characteristics given in this section are conditional and may depend on the model and brand of a particular car.
Fig. 1.10. Tachometer
As a rule, a rotation speed of about 2500–3500 rpm is best suited for gear shifting, but 1500–1700 rpm is enough to get started. With the vehicle standing (that is, at idle), the crankshaft should rotate approximately 600-800 times per minute.
NoteIt should be noted that gear shifting can be carried out both in the direction of increase, and in the opposite direction. A typical example is engine braking (we will talk about what it is later). Downshift is as follows:
If additional equipment is included (the same air conditioner), then at idle the crankshaft speed can increase to 900-1000 rpm.
fully release the gas pedal;
slow down the speed so that it corresponds to the gear you need to switch to (when braking by the engine, this step is usually skipped);
press the clutch pedal all the way;
shift the gear lever to the position corresponding to the current speed;
release the clutch pedal.
It is worth noting that it is necessary to shift to higher gears, strictly following the sequence (for example, it is unacceptable to “jump” from the first to the third or from the second to the fourth), but when switching to lower gears it is possible to break the sequence (this is especially true when braking the engine) .
When making test trips, it is important to be able to stop properly. This is done as follows: first you need to look in the rear-view mirrors (salon and right), and also look to the right (mandatory, since not everything can be seen in the mirrors!) To make sure there are no obstacles (for example, a cyclist can ride along the curb). Then you should turn on the right turn indicator and turn the steering wheel a little to the right to occupy the maximum right position on the roadway. After that, smoothly braking, it is necessary to stop the car, turn off the right turn indicator, turn off the engine and raise the parking brake lever (handbrake) to the stop.
What is a driving culture, or set of unwritten driver rules
The fact that traffic management issues are regulated by the Rules of the Road, as well as some other regulatory legal acts (Regulation on the admission of vehicles to use, the Code of Administrative Offenses, etc.), is known to all. However, a number of unwritten laws also apply on the road, which every cultural and disciplined driver tries to follow. Nobody will punish you for violating them, but their non-compliance can greatly complicate the situation on the road, and simply demonstrate your bad manners. In addition, drivers often use special conditional signals and gestures among themselves, which allow you to communicate and transmit information to each other while driving.
All this in a complex is a kind of set of unspoken rules of behavior on the road, the secrets of which we will try to reveal.
Each cultural driver must adhere to such concepts as driver solidarity and ethics, correctness and calm on the road, respect for other participants in the movement. If everyone on the road behaved appropriately - there would be much less traffic accidents.
Always be ready to help drivers in an unpleasant situation: help out with a small amount of gasoline (if someone just “reached” the gas station), help the “teapot” replace the wheel, lend the right tool, help start the car if not with the “pusher” ", Then the method of" lighting ". After all, no one can guarantee that you yourself will not fall into one of such unpleasant situations. The help will be especially valuable if in the car of the driver whom you decided to help, small children sit, there is a pregnant woman or the disabled person.
Do not rush the driver of the car standing in front of you with a sound signal if for some reason he has not started moving into the green light of the traffic light. It will be better if you just “blink” his headlights - he will definitely notice this in the rearview mirror.
NoteSometimes on the road you can see the following picture: the car is in the right lane, a red signal is lit at the traffic light, and in the right additional section at the same time there is a green arrow that allows you to turn right. However, the driver does not react to this in any way and calmly waits until the green light in the main section lights up, because he needs to go straight, although the drivers of other vehicles who need to turn right impatiently signal him from behind. Of course, this is very ugly in relation to drivers of cars located behind.
Do not forget that within the village, the sound signal is only allowed to prevent a traffic accident. Therefore, if you stand at a traffic light, you will beep for no apparent reason, you can be fined by a vigilant traffic police inspector.
A decent person will always somehow tell the other driver about the problems of his car, which can be seen only from the outside: a flat or wagging wheel, a loose door, luggage rickety on the roof, etc.
If you park your car where the number of available seats is limited, do it so that your car is compact and does not occupy two places at once. Complete disgrace - "back up" another car and leave.
Attention!A polite driver will always give way to a woman with a child, a disabled person, and indeed to any pedestrian, even if he violates the rules of the road and crosses the road not at the crosswalk, but wherever he wants.
If you like to “prop up” other people's cars and leave for a long time without leaving contact, be prepared for the fact that you will sooner or later get revenge: put a nail under the wheel, break off the outside rearview mirror or scratch the body with a nail. Before this, the “Avenger” will find a way to go around you (on the lawn, through the curb), so it will be useless to look for him.
Remember that when driving in inclement weather on the right lane, you can accidentally spray pedestrians with dirty water from the roadway.
TipIt is no secret that a decent person behaves properly in any circumstances, including driving a car. The same can be said about ill-mannered people: if a person behaves ugly in everyday life, then he will flaunt his essence at the wheel of a car and disrespect not only the Rules of the road, but also other traffic participants.
Try to remember what actions (or inaction) of the drivers of other vehicles you do not like when you are a pedestrian, and do not do it yourself when driving. And vice versa, note for yourself that in the behavior of pedestrians you as a driver do not like it, and never do it yourself.
In no case do you need to respond to the tricks of aggressive drivers - you will not change anything in them, just unnecessarily ruin your mood. Moreover, answering them with the “same coin”, you sink to their level.
Respect other road users, follow the rules of ethical driving and solidarity, do not let yourself get annoyed while driving - and your ride will be comfortable and safe.
Now let's talk about what signals and gestures drivers use to inform each other about certain events while driving. Note that this information is beyond the scope of the curriculum taught in driving schools, although every driver must own it.
The most famous signal, about which even people far from motoring have heard a lot, is a “blinking” of headlights by drivers of oncoming vehicles in order to warn about the traffic police dress. How and when this custom was born is not known for certain. However, the legend says that this happened rather curiously: it seems that some forty years ago some police officer in an interview with the newspaper was outraged by the fact that in some Western countries, drivers warn each other about a meeting with the traffic inspector blinking headlights. Soviet drivers did not need to repeat twice, and they all, as one, adopted the "best practices of foreign colleagues."
However, drivers blink each other not only about an imminent meeting with the traffic police, but also about the danger, for example, severe ice, fog, a traffic accident.
If you have twice blinked headlights twice, then you are given the opportunity to drive first. Taking advantage of the courtesy, say “thank you” to the short alarm blinking that missed you (this is a common acknowledgment signal used in a variety of cases).
The high beams of the headlights of the car moving behind you are on - please give way. In such a situation, you should restructure to the right. Continuing on your own lane at the same speed is considered bad form, because a person can rush to an urgent matter (for example, being late for the airport). If you cannot change immediately (another vehicle may be on the right, which will have to either overtake or skip ahead), turn on the right turn indicator so that the driver behind the car will see that you miss it as soon as possible.
By the way, in Western countries, the request to give way is expressed differently - by turning on the left direction indicator. In the CIS countries in this situation, mainly used high beam headlights.
If the driver of the oncoming car several times switched the high beam headlights to the low, then it signals you that the headlights of your headlights are blinding him. Switch to the dipped beam immediately. A blinded driver who drives a car in the oncoming lane may not be able to control and jump into the oncoming lane, which will lead to a collision. However, it should be borne in mind that if the headlights are poorly adjusted, you can even dazzle with low beam.
If the car that is moving in front of you, for no apparent reason, blinks the left turn signal, then its driver signals you about a danger that you, due to your position on the road, cannot yet notice. This technique is usually used by drivers of large vehicles (road trains, trucks) on country roads, when the driver behind the car was going to overtake, not knowing about the danger ahead. The fact that the danger has passed, you may be informed by briefly turning on the right "turn signal".
It happens that during the movement of a car suddenly any devices, aggregates or mechanisms fail. For example, the brake system may fail, the wheel may break, the wipers will stop working during rain, etc. In such a situation, it is necessary to immediately turn on the emergency light signaling, thereby informing drivers of other vehicles that you had an emergency situation .
However, drivers transmit information to each other not only with the help of light devices, but also using special hand gestures. Example: the door of a vehicle moving nearby is not tightly closed, and if it opens while driving, it can lead to a traffic accident, and it will be the driver whose car it was found to be guilty of. Therefore, if possible, it should be warned by a gesture in the form of an outstretched hand (index finger) in the direction of the open door. True, you should not be too distracted from driving your own car, otherwise your good intentions can lead to a traffic accident, but with your participation.
If you see that a car trunk has opened, address the driver with the following gesture: slam your hand through the air. In fairness, I note that the driver, as a rule, notices a fully open trunk quite quickly.
Sometimes, at dusk, drivers do not turn on the lights, as prescribed by the Rules of the Road. This is usually due to forgetfulness. You can signal the driver that it is time for him to turn on at least the side lights or the dipped headlights, with a gesture that resembles a flashing light (sharply straightened fingers).
If the driver of a vehicle moving near you clearly points to the roadside or edge of the roadway with your hand, you will most likely have to stop - you are informed that the car has a breakdown visible from the outside.
Sometimes cobblestone gets stuck between trucks and buses between the rear wheels, which is very dangerous (because it can fly right into the back of a running car). You can warn the driver of a car about a cobblestone stuck between the rear wheels by showing him a fig (yes, a simple Russian “cookie”). The gesture, of course, is unsightly, but in this case it is the only way to signal danger.
Good to know: safe braking methods.
The ability to brake correctly is one of the key conditions for maintaining road safety. In this case, it is not trivial pressing the brake pedal (and even more so - not convulsively pressing it into the floor when a danger is detected), but the use of truly effective and safe methods of braking. We will talk about some of them in this section.
Even beginners probably heard this expression: engine braking. Experienced drivers call this term a braking method in which the brake pedal is either not used at all or is minimally activated (for example, only to stop the vehicle completely when driving at low speed). Engine braking is usually used in difficult road conditions, the most typical example being movement on a slippery road.
The essence of this technique is as follows: a reduction in vehicle speed is achieved by switching to lower gears, for example, from fourth to second. Since in the second gear the car will not be able to move faster than 40-60 km / h (depending on the make and model of a particular car), then there will be a decrease in speed, which is called “engine braking”.
As we have already noted, this technique is actively used by experienced drivers when driving on slippery roads, since in this case wheel lock is excluded (unlike traditional braking), therefore, the probability of skidding is minimized.
Another effective and safe technique is called “intermittent braking”. It is also convenient to use on roads with slippery road surfaces, as well as for braking when driving at high speed.
In this case, the driver slows down by briefly pressing the brake pedal, without locking the wheels (to put it simply, I pressed - let it go). It should be borne in mind that if during such braking it is necessary to adjust the direction of movement of the car with the steering wheel, this can only be done with the brake pedal released, when the wheels of the machine rotate freely.
How to “feel” your car
An experienced driver feels his car, as they say, “like himself,” feeling himself and the car almost as a whole. However, newcomers to the road are usually slow, unsure of themselves, slow, and sometimes it seems that it is not the driver who drives the car, but the car that drives the driver. In fairness, we note that at first it is quite normal and explainable. However, the “adaptation” period should not be delayed: the road of mistakes does not forgive.
The ability to feel the car consists of two components:
work with governing bodies;
determining the dimensions of the car.
Let us consider in more detail each of these elements.
As noted earlier, not a single beginner can do without his car stalling at least several times when starting off. This is the most characteristic example, showing that a person does not “feel” the car’s controls (which is understandable at the initial stage). First of all, this applies to the gas and clutch pedals: after all, the driver manipulates them at the beginning of the movement. Only after several trainings is it possible to more or less feel the moment when the clutch begins to “grab”, but it is also necessary to be able to smoothly release the pedal and increase the fuel supply as much as necessary.
Many beginners also have difficulty working with the steering wheel. A striking example is an attempt to turn: even with a sufficient width of the carriageway, an inexperienced driver can rest against the curb on the opposite side of the road with the wheels of the car. Why? Yes, because he either turned the steering wheel too little to the left, or did it insufficiently energetically and was late.
You can learn how to feel the steering wheel by working with it to start with a standing car (you can start the engine because the hydraulic power steering only works when the engine is running), and then do several maneuvers at low speed on some deserted road. Try to make a U-turn, a left and a right turn at a speed of about 5-10 kilometers per hour, practice manipulating the steering wheel when reversing. After just a few training sessions, you will feel that you are steering more or less confidently and know when, how much and with what energy you need to turn the steering wheel to perform one or another maneuver.
It is very important to be able to correctly and competently handle the gear lever. To do this, you need to “feel” the engine of your car and, as the drivers say, “catch” its speed. For example, on one machine, the second gear allows you to accelerate to a speed of 60 kilometers per hour, and on the other - only up to 40. If the engine is too loud and the crankshaft rotates at a speed of more than 2500-3000 rpm - the time has come to switch to high gear . If this is not done, the engine will consume more fuel, and its parts and mechanisms will wear out much faster.
TipIn this sense, cars with an automatic gearbox look more attractive. True, many experienced drivers do not like such cars and prefer to drive cars with a manual gearbox. Their main argument is just that the "mechanics" allows you to "feel" the car much better.
As we noted earlier, if it is still difficult for you to determine at what speed the engine crankshaft rotates and, in particular, when it is time to switch to the next gear, use a special device - a tachometer (see Fig. 1.10). It is available in every modern car on the dashboard. Also study the manual for your car: there should be a table that indicates at what speed limit you can go in each gear and when it is recommended to switch to higher or lower gear.
As for the dimensions of the car, here the situation is somewhat more complicated. If you learn to handle the controls with regular driving in a month or two, then you can really feel the dimensions of the car much later. True, a lot depends on driving conditions and parking places. For example, if you go to work every day on a narrow road with one lane in each direction, and you have to park in the morning and evening, squeezing into a narrow place between cars standing next to you, you will soon feel that you are a little with the car if not as a whole. On the other hand, if you constantly drive along a wide avenue with several lanes in each direction, there is enough space for free parking near the office, and in the evening, park the car just near the curb or on the side of the roadway - you can drive your whole life, but really dimensions never feel the cars.
When reversing (for example, when entering a garage or when diagonally parking in reverse between cars standing parallel to the curb), it is useful to use a concept such as safe turning point. It is available on any vehicle and is defined as follows: from the driver’s eyes it is necessary to draw a straight line to the right rear wheel of the car. Since the driver does not see the right rear wheel, the place where this line intersects with the car body is the point of safe turning. When, for example, you park in reverse between cars standing parallel to the curb (curb), you should turn the steering wheel to the right when this point is aligned with the rear left corner of the front car. Here you will not be mistaken - it is checked.
To better feel the dimensions of the car, as far as possible pay attention to the position of its corners relative to other objects when performing different maneuvers. For example, if you are learning to call back into the garage, try to remember where the left or right rear corner of the car is located relative to the gate (neighboring garage, standing next to the post) at the moment when you need to turn the steering wheel or align the wheels. Look for similar landmarks in other places where you have to perform complex maneuvers or park - and you will quickly learn to feel the dimensions of the car.
Secrets to driving effectively
There is such a thing as motor vehicle driving efficiency. Its essence is to quickly arrive at a given place with maximum security and minimum travel costs.
The main criteria for the effectiveness of driving a car are: uniformity of acceleration and deceleration, deceleration during curvilinear movement, average speed, fuel consumption, etc. In the light of constantly increasing prices for automotive fuel, one of the most relevant criteria is economy, that is, fuel consumption for a certain vehicle mileage .
It is no secret that experienced drivers consume much less fuel than those who have just recently gotten right and got behind the wheel for the first time. Why? First of all, because experienced drivers drive much more calmly and evenly than "dummies". For example, when driving in a dense traffic stream, they adhere to the general speed mode and gain (decrease) speed smoothly.
NoteIf there is no need to force the movement, it is recommended to drive in high gears without reducing the crankshaft speed too much. Keep in mind that when driving smoothly, the car uses almost all of its power only to overcome the resistance of oncoming air and road.
Many experienced drivers almost never use the brake pedal. Rather, they use it only to stop the car completely (they do not need it in the process of reducing speed), as well as in emergency cases when it is necessary to urgently stop the car. This is achieved primarily due to the ability to choose the right speed, as well as to timely and adequately assess the road situation.
On many modern machines, fuel consumption is controlled using the on-board computer (Fig. 1.11).
Fig. 1.11. The on-board computer shows: current fuel consumption - 8.3 l / 100 km
Many drivers illiterate perform such a seemingly uncomplicated maneuver as a stop in front of an intersection for a prohibition signal from a traffic light or traffic controller. The mistake is that they drive at a relatively high speed and sharply slow down just before the intersection. How could this be fraught?
The main danger of such actions is that the next car behind will not have time to stop in time and will surely hit a lover of sudden braking. Of course, nobody canceled the well-known “always guilty back” rule, but in any case, you will have to spend time on a traffic accident, subsequent repairs, insurance, etc. Do you need extra problems? Moreover, the amount of insurance does not always cover the real cost of repairs. And, of course, the most important thing is that in such an accident people can suffer, not only those who are in the cars, but also pedestrians (from the impact the front car can go to the crosswalk and seriously injure pedestrians).
It should be noted that such a sharp braking is the reason for the rapid wear of brake pads and brake discs, as well as parts and suspension mechanisms. The results of numerous studies convincingly testify: for those who ride evenly and calmly, brake pads and discs serve twice as long as among lovers extreme driving. In addition, with this braking, tire wear increases.
Do not forget that even on a technically sound car the brakes can fail: any equipment can fail at any time, and often this happens at the most inopportune time. Needless to say, what catastrophic consequences can happen if the car at full speed drives to the intersection at the prohibition signal of a traffic light or traffic controller! Not only pedestrians will suffer (they will get the most), but also innocent drivers and passengers of other vehicles. Therefore, it is necessary to determine in advance whether you manage to drive the intersection to the traffic light permitting signal or not. In the latter case, start lowering the speed in advance, and it is recommended to do this smoothly and almost without using the brake pedal - by shifting to lower gears or simply letting the car coast (of course, if you are not going downhill). In such a situation, you will approach the intersection at minimum speed and you only need to press the brake pedal a little to stop completely. If, approaching the intersection, you see that a forbidding signal is lit at the traffic light, reduce the speed: it is very likely that you will approach the intersection just at the moment when the green light comes on at the traffic light and you won’t need to stop.
If the “green wave” rule applies to the road on which you are moving, adhere to the recommended speed so that you do not have to stop at intersections once again. This will most favorably affect both the economy of the car and its technical condition.
NoteOf great importance from the point of view of the efficiency of driving a power-driven vehicle is the ability of the driver to ride “coasting” correctly when the car travels by inertia when the gear is off (that is, the gear lever is in the neutral position). The driving wheels of the car are completely disconnected from the engine, so the torque is not transmitted to them.
The “Green Wave” is a way of organizing traffic when, when driving on a given road at a recommended speed, the driver is guaranteed to get a green light at all intersections. This method is an effective method of dealing with traffic jams and is used in many countries.
Attention!The ability to ride “coasting” is of particular importance where frequent stops or a decrease in speed with subsequent acceleration are required, as well as when driving on roads with many ups and downs.
As you know, you can also disconnect the engine from the transmission by fully depressing the clutch pedal. However, it is strongly discouraged to go coasting with the squeezed clutch - be sure to turn off the gear and release the pedal. Otherwise, you can quickly disable the clutch mechanism, which will lead to complex and expensive repairs.
What is so useful "roll"? The fact is that when driving in this mode, the engine idles and there is completely no traction. This is the most economical mode of operation of the internal combustion engine, so the fuel consumption in this case is minimal. Of course, with a single use of the engine, serious fuel economy is not discussed, but with its regular use, you can slightly increase the efficiency of the car.
I’ll tell you about one common mistake that drivers often make in an effort to save fuel. Usually this happens when there is very little fuel left in the tank and it is necessary, by hook or by crook, to reach the gas station. In this case, the driver proceeds as follows: he accelerates the car, and then turns off the ignition, turning off the engine. The machine is coasting, the engine does not work, so fuel is not consumed. It creates the illusion that in this way a lot of fuel can be saved, but in reality this has nothing to do with reality.
After all, after the car starts to reduce speed, it will have to be accelerated again. Namely, during acceleration, the engine consumes the most fuel, since it works at high speeds! Thus, all (or almost all) of the saved fuel will be spent on acceleration. Consequently, the savings will be so meager that it is not even worth talking about.
In addition, this method of transportation has its own dangers. Indeed, almost every modern car has a built-in anti-theft device, the essence of which is to lock the steering wheel. By the way, for an experienced hijacker this device is not a serious obstacle. But if you turn off the ignition while driving, it can work, and you can’t change the direction of your car’s movement.
NoteThe appearance on the roadway of a car with idle steering can lead to serious consequences. In the best case, you will drive into a ditch, in the worst case, you will be taken to the oncoming lane, which will lead to a head-on collision, and in the worst case, you simply will not be able to go around a pedestrian who suddenly appears on the carriageway.
The built-in anti-theft device in different cars works differently: sometimes the steering wheel is locked only after the key is removed from the ignition, and sometimes after the ignition is turned off.
Do not forget that the hydraulic power steering and vacuum brake booster function only when the engine is running. If you turn off the engine, they will stop working, therefore, you will have to make a lot more effort to turn or brake.
The most important control element of any car is the gas pedal. The ability to correctly apply this pedal (in other words, to correctly use the traction force) often allows you to get out of many unexpectedly arisen difficult situations. The fact is that when driving on the coast, the driver does not have the option to use the gas pedal: the drive wheels are completely disconnected from the engine and turning the gear on takes a little time, but sometimes every second is expensive on the road.
To increase traction, you need to increase the engine speed in time, while the lower the gear, the higher the speed should be. For experienced drivers, this technique has been worked out to be automatic (sometimes they use the so-called "gas rebate", due to which engine throttle response is increased).
Therefore, when the car is coasting, the driver must be able to quickly switch on the required gear. To learn how to accurately perform this technique, you will have to practice. We should not forget that when coasting the car moves by inertia and, if at that time to perform emergency braking, due to instability, it can become uncontrollable.
Based on the foregoing, we conclude: fuel economy is, of course, good, but do not get carried away, especially if the actions of drivers who want to save fuel can adversely affect traffic safety.
Tired - take a rest! Or what is fraught with overwork of the driver
Many drivers tend to underestimate such a dangerous phenomenon as overwork. We'll talk about why overwork and how to get rid of it in this section.
However, first we decide: what is meant by the term "fatigue". Various experts define this concept in different ways (someone associates it only with physical activity, someone only with mental). We will adhere to the following: fatigue is a natural reaction of the human body to a prolonged engagement in any business requiring high attention and concentration.
A tired person feels tired. It is becoming increasingly difficult for him to continue to do the same thing, he is straining more and more, but his work efficiency is noticeably reduced.
A characteristic feature of the process of driving mechanical vehicles is that a person experiences little physical stress. The main reason why a driver may experience muscle fatigue is that he has to be in almost the same position throughout the trip. Since the person driving the car is somewhat constrained in movement, during a long trip his blood circulation worsens, therefore, the tissues are not adequately supplied with oxygen. As a result, the driver begins to “ache” his back, his neck, shoulders and arms get tired, his lower back hurts, his legs “ache”.
Therefore, before starting the movement, be sure to adjust your driver's seat to the characteristics of your body. You should freely reach with your feet to the pedals, with your hands to the steering wheel, while your legs and arms should bend slightly at the knees and elbows, respectively. Adjust the rearview mirrors, try working with the controls with the engine turned off.
Please note that if your seat is too far forward (that is, it is too close to the steering wheel), you will have to bend your arms and legs very much, which significantly limits freedom of action, and does not allow you to quickly work with the controls.
If the driver's seat is too far from the controls, you will have to pull forward all the time, the back due to the lack of constant support will be tense all the time. The hands will also be in constant tension, since it is with the help of the hands that you will either stay at a constant distance or pull yourself closer. All this in the most negative way will affect not only the efficiency of driving, but also on road safety in general.
If the back of the driver's seat is too deflected back, then the muscles of the neck, arms, as well as the lumbar spine will be in constant tension, which contributes to rapid fatigue.
Know, if you do not prepare the driver's seat properly - you will feel fatigue and muscle aches soon after the start of the movement.
However, the nervous system of a person is exposed to the greatest load during driving. This is due to the fact that the driver is forced to promptly and accurately respond to all changes in the situation on the road. Such a psychological burden can cause fatigue - both mild and severe (up to overwork).
By the way, overwork and fatigue are two completely different concepts, which many mistakenly consider identical.
Fatigue at the end of the working day is experienced by the vast majority of us, it is quite natural. As a rule, fatigue completely disappears after a night's sleep, and in the morning a person feels full of strength and ready for work.
Overwork is a somewhat different kind of phenomenon. It manifests itself in the form of a constant bad mood, poor health, insomnia, fatigue even after a short occupation with some not the most difficult job. We can say that overwork is the accumulated remnants of a fatigue that has not passed. The state of overwork not only reduces the efficiency of work, but also greatly harms health. In such cases, doctors recommend that their patients urgently go on vacation.
Driver fatigue has a direct impact on road safety. Very often, traffic accidents occur for reasons such as distraction, carelessness, negligence, lack of driving skills. All these reasons, with the possible exception of the latter, are in most cases the result of driver fatigue.
As the results of the studies show, a tired driver not only underestimates the danger that comes from traffic events, but is also convinced that he drives a vehicle no worse than always. In reality, everything looks different: if at first the driver is even late in performing certain actions, but at least performs them correctly, then after a while these actions themselves become erroneous. The reaction to a change in the traffic situation occurs with a noticeable delay, road signs, markings, traffic signals (traffic controller), a person notices much later than driving a car in normal condition. It becomes much more difficult for the driver to maintain a constant speed, and also to observe the direction of movement of the car.
The muscles of a tired person, as a rule, are in working condition and are quite capable of doing their job, however serious problems arise with concentration and concentration. Here is the most characteristic example: a tired driver noticed a speed limit sign, but he is no longer able to realize what this sign requires, and therefore continues to move at the same speed.
There is another common type of error - these are errors whose occurrence is somehow related to visual illusion. For example, a driver may notice objects or obstacles on the road that in reality are not there. In most cases, such hallucinations occur when a person is struggling with drowsiness or is in a “borderline” state (that is, he is not yet sleeping, but he is not awake anymore). With such a degree of fatigue, it might seem to the driver that a pedestrian unexpectedly ran out onto the roadway or another car suddenly pulled out of the nearest bend. Under the influence of such hallucinations, the driver can, for example, apply emergency braking or go into the oncoming lane.
It is scientifically proven that such visual illusions act as a kind of protective mechanism. The driver’s nervous system in this way seeks to convince him to stop moving and rest for at least a short period of time, since it is very dangerous to drive further in this state. Moreover, not only a tired driver, but also other road users can suffer.
Many people are convinced that under no circumstances will they fall asleep while driving and will always be able to cope with fatigue and drowsiness. Unfortunately, statistics convincingly prove that this is not so.
Attention!It is generally accepted that the fatigue of drivers is due to continuous movement, moreover, monotonous and monotonous. This, of course, is true, but there are a number of factors that are causing fatigue: this is an uncomfortable position of the driver, and adverse weather conditions, and insufficient rest before a long trip, and poor lighting of the road in the dark, etc. By the way, the driver’s rapid fatigue is “promoted” by a number of medications that are strongly discouraged prior to travel. Before you go on the road, you should not eat too much, otherwise drowsiness may come very soon.
Often the driver falls asleep for only a few seconds, such a dream comes suddenly. A person does not even realize that for some time his machine was completely uncontrollable. In other words, he does not feel the moment of falling asleep and the subsequent waking up, it seems to him that he was awake and controlled the situation all the time. Often the driver dreams that he still drives the car on the same road and under the same circumstances.
All causes of fatigue can be divided into three categories, depending on whether the driver can influence them or not: fully controlled, partially controlled and completely uncontrollable.
For example, a driver can completely control his condition: you cannot drive while being overworked, drunk, after taking potent drugs, etc. The driver can partially control the vibration and noise of the vehicle, which also causes fatigue - you can do this try to choose a different driving route, as well as adjust the engine or replace a burnt out muffler. But the presence of factors such as poor lighting of the road in the dark or an unsuccessful design of the driver’s seat cannot be controlled by the driver.
The results of a number of studies suggest that the likelihood of a traffic accident due to driver fatigue increases many times after 8 hours of continuous driving, but many drivers begin to feel very tired after 2-3 hours of continuous driving. The latter is due to insufficient rest before the trip. To fully recover from severe fatigue, you need a full sleep for at least 8 hours, but to relieve a little fatigue, a short sleep (within half an hour) is enough.
Fatigue among drivers causes night driving. To a certain extent, this is due to the fact that driving a car at night violates the established vital rhythm of wakefulness - sleep, so deviation from this rhythm, and even associated with the difficult process of driving a vehicle, leads to rapid fatigue.
NoteWhen driving at night, the driver is forced to simultaneously drive the car and fight constantly rolling drowsiness. It is especially difficult to overcome a tendency to sleep for drivers over 45 years of age (according to statistics, they get into accidents at night twice as often as during the day). The main reason for this state of affairs is that over the years, a person's psychophysiological functions deteriorate, which are of great importance when driving a motor vehicle. At the same time, it is impossible to compensate for these functions even with the solid driving experience that most drivers have by this age.
The average person achieves his greatest performance in the time intervals from 8 to 12 and from 14 to 17 hours.
Fatigue also occurs relatively quickly with prolonged monotonous movement - for example, along a suburban highway. This is largely facilitated by the false impression of the ease of driving on such roads. The uniform movement, in which the driver very rarely has to react to certain stimuli (turns, oncoming cars), can provoke inhibition of the cerebral cortex. In the end, the driver may fall into a state of peculiar hypnosis, which in many ways is very similar to overwork. Many drivers, in order to "shake oneself" and force themselves to get out of this state, specially increase their speed, while simultaneously solving another task - to arrive at their destination as soon as possible.
Particularly dangerous is the adoption of alcohol in order to relieve accumulated fatigue. Besides the fact that driving by itself while intoxicated is a gross violation of the Rules of the Road and deadly, solving the problem of fatigue in this way still does not work. At first, however, some relief may come, but after a short period of time the fatigue intensifies many times and it will be impossible to deal with it.
It is extremely important for each driver to understand in time that he has developed a state of fatigue. Do not engage in self-deception, trying to convince yourself that there is no fatigue and that you can continue to move - this can lead to tragic consequences. As a rule, drivers don’t notice fatigue until it becomes quite strong, but the quality of driving significantly deteriorates even at its first symptoms.
All the time you need to remember the golden rule of motorists: tired - take a rest! If you get tired, do not hesitate to choose a suitable place, stop and rest.
Specialists distinguish three degrees of driver fatigue. A mild degree manifests itself in the form of yawning and the severity of the eyelids. With an average degree, there is a pain in the eyes, a dry mouth, some fantasies may appear, a warm wave can pass through the body, and the false impression is created that other cars are moving at a very low speed. With a strong degree of fatigue, the head leans forward, hands slide off the steering wheel, ripples in the eyes, the driver sweats and it seems to him that all this is not happening to him.
To get rid of light fatigue, it is enough to wash with cold water, or relax a bit, or drink strong tea. From moderate or severe fatigue only sleep helps.
Tip
If you are planning a long trip, before you leave sleep at least seven hours and do not take sedatives. Be sure to rest on the road from time to time (you need to stop, get out of the car, do a couple of gymnastic exercises).
Conclusion
Studying this chapter helped you master (and someone, remember) your first driving skills. Now we know what the car controls are, how to start the engine and start driving, how to learn to “feel” your car, what is the driving ethic and culture of driving, and what is dangerous when overworking the driver while driving.
In the next chapter, we will talk about how to perform basic maneuvers, what the driver should remember when driving in standard road conditions, what dangers can lie in wait for us on the road, and much more.
Getting Started
- Adjust the seat to your comfort.
- Adjust the mirrors "for yourself."
- Fasten your seat belt.
- Squeezing the clutch, put the gear lever in neutral.
- Start the engine by turning the key clockwise. Two to three seconds after starting, release the key.
Start of movement
- Turn on the turn signal.
- Press the clutch pedal all the way and engage first gear.
- Release the handbrake (parking brake).
- Look carefully in the mirrors, make sure there is no interference.
- Slowly release the clutch pedal. When the car goes a couple of meters, release the pedal completely.
- Turn off the turn signal.
Gear shift
- Accelerate the car to 20 km / h by smoothly pressing the gas pedal.
- Sharply release the accelerator pedal and press the clutch abruptly.
- Shift to second (next) gear, releasing the clutch smoothly.
- Similarly, switching to the next gear is performed, only the acceleration speed changes. For the third gear - up to 40 km / h, for the fourth - up to 60 km / h, for the fifth - 80 km / h.
- You can also determine the moment of gear shifting by the tachometer: at 2.5 thousand revolutions you need to switch to the next gear in order.
Vehicle Stop Procedure
- Turn on the right turn signal.
- Look in the side mirror, and then in the rearview mirror.
- Release the gas pedal.
- Shift your feet on the brake and clutch pedals.
- Drive closer to the right edge of the road.
- Squeeze the clutch.
- Gently press and hold the brake pedal until it stops.
- Turn off the turn signal.
- Shift into neutral.
- Release the clutch pedal.
- Raise (“tighten”) the handbrake (until a few clicks).
- Release the brake pedal.
Combined braking (with gear engaged)
- To remove a foot from the gas pedal, rearrange the brake pedal.
- Gently depress the brake pedal, suppressing the vehicle speed.
- Before stopping the car, sharply squeeze the clutch to the floor, press the brake pedal - to a complete stop.
- Enable neutral gear.
- Release clutch.
Start of movement on the rise
- Engage the turn, depress the clutch pedal all the way and engage first gear.
- Add engine speed to the level of 1.5-2 thousand, keeping the pedal in this position.
- Raise the clutch pedal until the gearbox engages the engine (the hood rises at this moment), hold the clutch.
- Release the handbrake.
- Add revs by pressing the gas pedal.
- Slowly and smoothly lift the clutch until the start of movement and hold it in this position until the start of movement.
Passage of sharp turns (from 90 degrees)
- When approaching a turn, remove your foot from the gas and shift to the brake pedal.
- While depressing the brake pedal, extinguish the speed up to 20-25 km / h (second gear shift speed).
- Depress the clutch and engage second gear.
- Gently lift the clutch. If the turn is carried out from the descent, then release the brake only after the clutch is released.
- Enter the turn.
- When entering a turn, do not press the accelerator pedal. Add engine speed only when exiting a turn.
These and other tips were compiled by private car instructors in Moscow of our service. Classes with private driving instructors will help to develop all the skills necessary for driving a car. The instructor will explain what was incomprehensible in theory and teach everything that he can do.