

Drawing begins to interest children from a very early age. Only the inconsistency of the picture on paper with what they wanted to depict can stop novice artists. Therefore, parents should show the kids how to draw different animals in stages.
The main mistake of novice artists is that they first of all draw a single part of the main object of their picture. The drawings of most peanuts are images of animals.
For some reason, almost all the little ones begin to reproduce their beast from the head. An oval is drawn, which is overgrown with ears, eyes, mustaches, horns - depending on which animal the little one wants to draw.
But on this, the crumbs have a stupor: what to do next? How to attach everything else to this magnificent head? Often the kid does not come up with anything better than attaching a few sausages - legs or paws, and a tail.
To teach the heir to draw correctly, you need to explain to him what step-by-step drawing is, how a drawing scheme is built. Well, if you yourself are not a very skilled artist, then you have a unique opportunity to learn this art with your children.
From this article you will learn
Where to begin
How to depict animals step by step so that they are easily recognizable can be explained to both a three-year-old baby and a schoolchild. Of course, the scheme of a kindergartener will differ from the instruction of a child of 12 years old, but some common features will be traced.
- To teach a child to depict animals in stages, it is necessary to explain what shapes (circles, ovals, rectangles) this or that animal consists of.
- Show how to make sketches that will later grow into details.
- Start training novice creators with simple plots. We learn as we go, so don't expect your little one to succeed right away. Gradually, the baby will learn step by step to recreate more complex objects.
Before proceeding to the process, stock up on paper, an eraser and pencils: simple ones for sketching and colored ones for coloring.
Pictures for kids
You can show your baby how to draw step by step those animals with which he is already familiar. The most simple technique drawing - circles. True, for this you need your child to master these simple shapes.
There is a simple algorithm for teaching crumbs to draw basic shapes: you need to take the child's hand in yours and draw a circle with a pencil. If the little one has mastered the outline of a circle, show him how you can draw funny little animals with this figure:
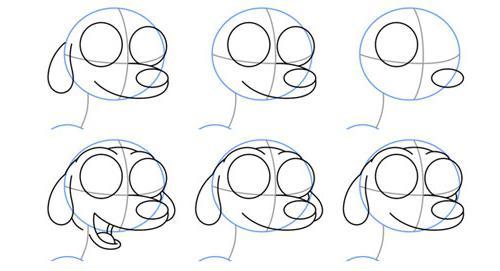
In this way, you can learn to portray not only funny cats and dogs, but even your favorite cartoon characters (for example, Smeshariki).
Drawing for children 4-7 years old
At this age, the guys know how to draw different geometric figures, and their drawings based on natural motifs are already quite recognizable. Now the fidget is able to comprehend how to draw animals step by step.
The scheme is not particularly complicated: we learn to draw several circles (head and torso), which will serve as the basis; then we schematically depict the paws (legs), after that we add details and erase the auxiliary lines with an eraser.


You should teach beginner artists that the first step in the work should be to determine the composition: where the main object will be located, which objects will be in the foreground and which - in the background.
As you can see, the drawings of animals are still quite simplified, not burdened with details. All these nuances will need to be explained to the knights of pencil and paper when they grow up a little.
Drawing with children of middle school age
Starting from 8-10 years old, boys and girls are much more interested in depicting not only domestic, but also wild animals. At this age, you can teach children to give animals realism.
The bunny for the kindergarten child was round and cartoony and consisted mainly of circles. We learn to draw a hare for older children in stages a little differently: it has long paws with claws, body proportions correspond to real ones, the skin is not monophonic, but with traced wool.

Similarly, we learn to depict other animals: first, a sketch, then the main figures are complemented. After we erase the sketch lines, we detail the drawing.
The final touch is to add volume to the drawing using hatching (if this is a drawing with a simple pencil, like a horse) or painting the beast according to its real color (lion).


Be sure to teach your child to work with a simple pencil. If some lines did not come out quite well, they can be easily erased. Having mastered the technique of drawing with a simple pencil, a novice artist can move on to more complex drawing methods.
Not every person can boast of having seen a fox near him. This is a predatory beast, so it is unlikely to get close to it. The fox has a very fluffy coat that has orange hues. The fox looks like a wolf or a dog, but there are a few distinguishing features. The main ones are pointed eye slits and a narrow muzzle. In this step-by-step lesson, you will learn how to draw a fox on a graphics tablet, but you can also use a simple pencil and paper. The sequence of all steps will remain unchanged.
What kind of small and cute animal, whose back is covered with sharp needles that protect it in case of danger? Guessed? This is a hedgehog, which is often spoken of in children's poems and fairy tales. When frightened, it curls up into a ball, exposing its spines outward, so predators cannot get close to bite or eat it. Its needles serve not only as a defense, but also as a help during the transfer of fruits, and other food, to their mink. His black nose and eyes cause only affection, but if you manage to inspire confidence in this baby, you will be able to touch his soft paws with sharp claws. Here we will draw such a cute animal in this step-by-step lesson using a graphics tablet. But you can also use a regular pencil.


The bald eagle is more commonly known as the "American". Such an association appeared because the image of a bird is depicted on the US coat of arms and other state elements. The image of the eagle was not taken by chance, because this predator lives in North America near water bodies and the eagle's diet mainly consists of fish, which it grabs with its strong beak and powerful paws. American eagles are also very loyal birds, despite their powerful appearance. It is believed that a bald eagle can fall in love once in a lifetime and be faithful until the end of days. Isn't it a worthy example of strength and reliability? There is a lot to learn from this bird, but in this step-by-step lesson, we will learn how to draw an eagle with a pencil easy and simple even for children.

A person who has been at least once in the forest, on the mountains or in the field, probably thought about meeting snakes. Few of us want to face a venomous snake like a cobra one on one. Cobra is one of the most poisonous, dangerous, but also the most beautiful snakes on the planet. In case of danger, she opens a howling hood, sticks out a long forked tongue, hisses and makes deadly lunges towards the enemy. The attacking image of a cobra is used in many cultures as a symbol of strength and lightning speed. In this step by step lesson for kids, I will teach you how to easily draw a cobra with a simple pencil.

She is often called a red cheat, and her image is used in fairy tales to show cunning, ingenuity and deceit. Did you know what it's about? I think without much difficulty, we are talking about a fox, whose appearance is unique and liked by many. Some children say that the fox is like a dog and a squirrel. Foxes have a red color with white elements, and on the paws there is a transition to a black tint. Today we draw a fox v full height. Our fox will stand sideways so that its entire body and tail are visible, and its head is turned to the left. She is clearly looking for someone in the distance, perhaps her prey. In this lesson for children, we will learn how easy it is to draw a fox with a simple pencil step by step.

A large and strong animal with thick hair - usually this is how a person imagines the image of a bear. Often they like to portray him in illustrations for children's books, as well as a cartoon character, giving him a funny clumsiness and kindness. But today we will draw a bear in a completely different way. This step by step lesson will tell how to draw portrait bear simple pencil. He will be depicted with his mouth open, which will allow you to see sharp fangs. With just a pencil and paper, we will draw a realistic menacing growling bear.

The owl is a nocturnal bird. She was lucky to gain popularity among people and became a household name. Usually "owls" are called people who lead a predominantly nocturnal lifestyle, and prefer to relax during the day. But the owl stands out not only for its nighttime wakefulness, but also for external data. She has large round eyes and a sharp little beak, and her whole body is covered with feathers. Our traditional question: how to draw an owl with a pencil Very simple! After studying this step-by-step lesson for children, you can draw beautiful owl with just one pencil!

The wolf is a dangerous predator, including for humans. But he also has a number of outstanding features for which the wolf fell in love with people. His bravery and loyalty are legendary. Therefore, the image of a wolf is often used in films, cartoons and books. Also, you can see paintings, posters and even tattoos with various images of a wolf. Today we will devote our lesson to the question " how to draw a wolf with a pencil?, the lesson will be very detailed and step-by-step so that even children can draw a wolf easily and simply.
All children love to draw. And this is not surprising: after all, this creative process is interesting, young artists master pencils and paints with enthusiasm. At first, these are, in the words of the children themselves, kalyaki-malaki. Toddlers like to just learn colors first. Further, the young artist depicts his family and everything that he sees around. You can teach children to draw with different techniques: let them try pencils, paints, felt-tip pens ... And it often happens that there is nowhere for a wide imagination to roam - is it possible to express something on an album sheet? Then wallpaper, walls, tables and various other surfaces that are in the danger zone, where the child can get, are used. Just give him a task, in any case, to occupy the baby with something - safe for him and for furniture, but also useful and exciting. For example, show him step by step with a pencil - according to all the rules. At first, of course, it may not work out, but training is the key to success. So, we draw animals in stages: everything is very simple and fast.
Stage one: preparation for work
Of course, you can just draw an animal in the center of a white sheet and leave it in the album. And you can make this work a real pride. First, decide what you will draw: for paints, for example, it is better to make a larger sketch. Teach your child how to use a brush or sharpen pencils and erase unnecessary lines with an eraser. Then choose which animal you want to portray. If the artist shows interest in a particular animal, then draw it. In the process of drawing, you can tell the child about this animal. Next, decide on what background you will depict the animal. If this is, for example, a cat, then create a homely atmosphere, place a ball next to it. But if you have to portray the king of animals - a lion, then draw it in the savannah. The wolf will live in the picture, but the dolphin will live in the waters of warm seas. On the Internet you can find many master classes on this topic. There are also lessons in illustrations that advise animals in stages - but they also need to be voiced so that the artist understands why he draws certain lines. You can draw, or you can invent an image yourself. So, we draw animals in stages. Consider the lesson on the example of several animals.

Learn to draw animals step by step. Step two: one circle, two circles ...
Nobody starts drawing a cat from the eyes. Therefore, to begin with, create a frame. Its basis is always simple. One figure is the body, the second is the head. A dog, for example, has a rectangular body and an equally angular head. But the cat's body is elongated or round. Pig has a very round shape. And the fish has an oval. In order to draw a turtle in the first step, draw a semicircle as part of the shell. For convenience, outline the lines of symmetry on the muzzle. When doing this, consider the posture of the animal, tilt and turn of the head, and so on. And for starters, do not overdo it with the complexity of the figure of the beast. Next up is the paws. In a cat, they are soft: make small curved semi-ovals, and on them - 4 more small circles-fingers. In a dog, they are usually longer, and the foot itself is rectangular. But the piglet has hooves. In the painted turtle, the paws expand downwards. Remember what shape the tail can be on the beast. For guide lines, when we draw wild animals step by step, use or don't press too hard on the paper. After all, they still have to be removed.

Stage three: down with everything superfluous!
Since we draw animals in stages, take your time with the image of the whole animal. When the outline is ready, unite all the shapes with a smooth line. Don't forget about skin folds. Do not blindly follow the guide lines: they only suggest. In this step, when we draw the animals step by step, you can erase the lines where the legs connect to the body. Draw the neck. If you are depicting a kitten or any animal with hair, then consider whether to make the cheeks smooth (then correct the auxiliary circle) or add wool (then the cheek will be triangular). You need to remember about the ears: after all, the same muzzle without them or with ears different shapes may belong to a frog, dog, cat, fox or bear. When drawing the eyes, try to pay a lot of attention to the pupils and highlights. If you draw then the eyes should be large. In general, a circle of the correct shape is enough (to place the eyes, use cross curved lines on the face) and another semicircle inside - the pupil. Approximately at the intersection of these lines, build a nose: rounded for a dog, triangular for a cat, or a round snout for a pig. Down from the nose go the mouth and cheeks. You can do this with two curved lines. Don't forget about the facial expression of your beast. When all the main things are worked out, you can safely erase the auxiliary lines and proceed to finer details and work on the background.
We draw animals in stages. Step four: beauty is in the details
If you are done with the muzzle, then think about what you would like to see directly next to the animal: a bowl, a toy, a bone, a tree branch ... Maybe your kitten is holding a mouse in its teeth or a burdock in the dog's fur? Or are there not enough colors to complete the picture? Next, work on the background: forest, yard, aquarium, beach. It is very important to remember - when we draw animals in stages, then we need to depict trees, stones, mountains in proportion to the beast, we must take into account how far these objects are. When you confidently put aside a simple pencil, start decorating.
Step Five: So we took the paints in hand ...
Here, for starters, when we are just learning how to draw wild animals in stages, it is easiest to use pencils. Teach your child not to go beyond the contours of the animal's body. Let him not try to capture as much space as possible. Explain that the coat grows in a certain direction, so it looks much better when the hairs can stand out and still be neat and tidy. On the folds, the coat is darker, on prominent places - lighter. Then move on to the background. Start work from above. Color the sky evenly and horizontally so that no strokes are visible. For foliage, try all sorts of spirals, squiggles.

Create your zoo!
The main thing when we learn to draw animals is to learn that the construction is important, which always has the same basis and principles. Move with your child from simple animals to more complex ones. Try to depict them in motion, combine how many individuals in one drawing: fish and dolphins playing kittens. Soon your zoo will grow, and the imagination of the young artist will not run out.
Pencil drawing is a beautiful art. It's hard to believe that with such a simple tool you can create whole pictures on paper.
Even if you are not going to become professional artists, the ability to make pencil drawings may be useful to you later. For example, when you have children. The ability to draw will help in their education and training. Drawings of animals in this case will be most welcome. Of course, drawing beautifully is not so easy, but if you try, everyone can learn it.
Animal Pencil Drawings for Beginners: Photos


To finally complete the work on the drawing, erase all the auxiliary lines and mark the shadows in the drawing.
Read also:
Dolphin Pencil Drawing for Beginners
Drawing this amazing animal is not at all difficult. The most important condition for obtaining a beautiful drawing of a dolphin is the observance of proportions.

The first step in drawing a dolphin is that right now you must lay in your future drawing his grace and plasticity. To do this, you will have to try as accurately as possible to depict the arched body, elongated muzzle and fins.

At the first stage, draw the upper line of the body in an oval shape, and also outline the location of the fins and tail.
At the second stage, be careful with the proportions of the torso and head. Almost parallel to the upper contour of the torso, which you depicted in the first step, draw the line of the belly. At first, you can use simple straight lines for this, placing them at an angle.

If you are sure that you have kept all the proportions correctly, you can begin to give the dolphin a streamlined shape. To do this, you have to smooth the outline, that is, the angle formed by the two lines should become smoother, and the straight lines themselves need to be slightly bent.

Remember that the main task of our drawing is to show the grace of the animal. This effect can be achieved by using smooth lines and respecting proportions. First of all, we must ensure the exact proportions of the head and fins.

Speaking of fins. They should not be too large or small in relation to the dimensions of the entire drawing. Try to make sure that the fins are depicted in your drawing as accurately as possible. It will be better if you begin to draw the fins in a certain sequence: first draw the fin that is on top, then the two side fins, and then the tail fin should take its shape in the drawing (remember that the tail fin is divided into two parts). Then you need to make the dolphin's nose more rounded and draw the line of his mouth.

In order for the drawing to acquire volume, it is necessary to impose shadows and correctly position the light. To do this, you should use hatching. As soon as the dolphin acquires its visible volume, you can consider your drawing complete. If you are not satisfied with a simple drawing of a dolphin, come up with some kind of landscape that will surround it. Then you get the whole picture.
Drawing a cat with a pencil for beginners
The cat is one of the most common pets. In addition, cats can be found on the pages of many fairy tales. It is not surprising that this particular character is often found in children's drawings.

Like any animal, a cat should be drawn step by step so that the image is more reliable. The structure of the drawn cat is based on three circles. You need to start the image with a circle designed for the head of the animal. In this circle, you should also add a few lines to get the correct shape of the muzzle.

The next detail will be a large oval, which will later become the body of the purr. The last detail will not be quite rounded. You need to draw two curved lines that will connect the bottom, which is a line, at the bottom. This figure is a blank for the hips of a cat.

Now start working on each detail separately. The first such detail will be the head. You need to outline the shape of the animal's head. Do not forget to draw a few lines on the front side of the neck and head that serve as protruding fur. The animal must be with ears and cheeks. Draw them. Sketch the eyes and mouth of the cat along the contours drawn earlier.

On the ears of the cat, draw lines that will help to directly shape the auricles. You also need to add some wool and fluff on the cat's forehead. An integral part of the drawing of the animal should be a mustache.
Start drawing the front paws. To do this, first outline the support from which they will come out. When the base of the paws is outlined, draw a small bone that comes out of the cat's chest.

To complete the drawing, you have to outline the back of the animal's body, back and front legs. Then draw the cat's tail and hind legs. Now you can delete all auxiliary lines that are no longer needed in the figure.

When the line drawing is finished, don't forget to add some chiaroscuro to it, which will make your creation more attractive.
The hare does not always white color fur. He changes his gray "coat" to white only in winter, so as not to stand out in the snow and not attract the attention of a fox and a wolf.
In this tutorial we will draw a gorilla monkey step by step. If you need a drawing of a different species of monkey, you can draw it from a photograph.
Let's try to draw this amazing and beautiful animal correctly. This is a very graceful animal and a novice artist must first of all draw the grace of a jaguar.
This picture of a beaver was made by me on a tablet and you can use it to color the beaver with paints. But first, let's draw a beaver with a simple pencil in stages.
You can draw a tiger only from a picture or photo. It will not be possible to see the Ussuri tiger live. This is an endangered species of animals (no more than 500 individuals), and besides, the tiger is a cautious predator. There are several types of tigers, but we will choose for our drawing the Ussuri tiger living in the Far Eastern taiga.
The koala bear is a very cute animal, and therefore, in any picture, the koala always looks so cute and kind, which makes every person smile. If you can draw animals, be sure to try drawing a koala.
Drawing a giraffe will not be difficult for you online lesson if you have previously tried to draw animals from a photo, such as a horse or a zebra.
Drawing a bear requires some preparation, practice in drawing animals. The fact is that in addition to external similarities, first of all, in the drawing of an animal, its character must be reflected.
A drawing of a king cobra made on a graphics tablet can be a good picture for decorating your computer desktop.
As a rule, foxes have a small body size and short, mundane paws. Their body is slightly elongated like a dachshund. All this must be remembered in order for children to learn how to draw this animal correctly.
With the help of this lesson you can draw a cartoon fox. If you need to draw a realistic fox, check out another tutorial on how to draw a fox step by step on my website.
The grin of a wolf can express the character of a wild beast in your drawing. Wild animals are always dangerous for people and in realistic pictures of animals you need to take this into account. In this lesson we will learn how to draw a wolf in stages with a pencil.
The elephant has a very large body and limbs that are different from other animals. His large ears, simple in appearance, are very difficult to draw to match reality. But the elephant has parts that are easy to draw - these are its legs and torso.
When a deer is alarmed by something, its legs should be slightly bent, ready to jump. Drawing a deer, even in stages, can be difficult for beginners, since it is necessary to be able to reflect the gracefulness of its movements and forms.
Color pictures of a non-existent animal - a dragon, and even in the Chinese national style, of course, are difficult to draw. In fact, the dragon is a symbiosis of a lizard and a bird, and in the drawing of the dragon it is necessary to reflect the plasticity of these two animals.
Drawing this animal from the first drawing lesson may not work. Then look at your cat first and even draw it, then it will be easier for you to draw a lion.
For the drawing lesson of this animal, we will choose a tarantula spider. This spider has hairy limbs and a black and white body, so you don’t need to paint the drawing with paints, it’s enough to make a tone color with a soft simple pencil.
The snake inspires panic fear in many, since some snakes are very poisonous. But in fact, this is an ordinary animal from the reptile family, using poison for self-defense.
Kangaroo is a unique animal. Firstly, the kangaroo lives only in Australia, and secondly, the mother of the kangaroo for feeding the cub has a "bag" on her stomach, in which he sits until he grows up. A distinctive feature of this animal are huge powerful hind legs and a long thick tail.
Drawing for children with a simple pencil is best done in stages, at first outlining only the general contours of the frog. And then, step by step, draw the whole picture.
bees have a lot small parts, which complicates drawing, but drawing a bee is a good lesson for children who are fond of drawing, as it develops attentiveness and the ability to maintain proportions.
If you need to make an illustration for a fable or draw this insect for a biology lesson, I suggest that you complete this task together.
How to draw this unusual animal, for example, to illustrate the cartoon Hedgehog in the Fog or to draw on the theme "From the Life of the Forest", because it has so many needles? Let's try to do it step by step with a pencil. And perhaps this lesson will seem quite easy for you.
This lesson is designed for children who want to draw a panda. The drawing is made in stages with a simple pencil. If desired, he can help you draw a panda from a famous cartoon.
The crocodile is a very dangerous and predatory animal, and in order to convey the character of this animal in the picture, first of all, you need to draw an open long mouth, widely spaced paws and a tail bent from tension.