

Page 9 of 15
Throwing
Exercises in throwing objects develop the eye, accuracy, coordination of movements, strengthen the muscles of the arms and body. In preschool age, they are taught throwing objects at a range and at a target from a place.
For children 3-4 years old, throwing exercises present considerable difficulty, since they require good coordination of movements, the ability to calculate the strength and accuracy of the throw depending on the distance to the target and its placement (horizontal or vertical). At this age, exercises that prepare the child for throwing are recommended: rolling, throwing and catching balls, balls and other objects with one or two hands from behind the head. The main goal of these exercises is to teach the child to energetically push or throw an object in a given direction.
An interesting exercise for children of primary preschool age is tossing the ball up and catching it with both hands. In this case, the ball is held with both hands, lowered down, tossed it up above the head by 0.5 m, and then caught with both hands, not pressing against the body.
Preschoolers also master catching the ball after bouncing it off the floor. They need to show how to hold their hands while catching the ball: fingers are slightly bent with a “cup”, hands are bent, in front of the chest.
Children 5 years old practice rolling balls or balls with objects (pins, cubes) from a distance of 1.5-2 m.
Widely used throwing balls, snowballs at a distance and at a target (wood, shield, hoop, which is laid on the floor, basket) from a distance of 2.5-3 m.
When throwing an object with his right hand, the child turns his left side to the side of the throw, puts his right foot back and transfers the weight of the body onto it, while performing a wide swing with his hand; during the throw, the mass of the body is transferred to the left leg (Fig. 17).
Exercises in throwing objects for children 6-7 years are much more complicated. At this age, the child must master the elementary skills of passing the ball in pairs, in a circle, throw the ball against the wall and then catch it 6-8 times in a row, toss it up, turning around, catch it, etc. Preschoolers improve throwing skills objects at a range and to the target in a way from behind over the shoulder. The distance for throwing at the target is increased to 3.5-4 m.
Most children prefer to throw objects with a stronger hand (usually the right one), as a result of which there is a significant difference in the results of throwing with the right and left hand. Therefore, they propose to perform exercises with both the right and left hand. This will provide a uniform load on the muscle groups of both sides of the child’s trunk and will contribute to harmonious development.
In the future, skills in throwing objects at a distance and in the target are improved in a variety of outdoor games and when performing interesting tasks for children of a playful nature.
Exercises for children 3 years
1. Rolling a large ball with both hands from a distance of 60-100 cm and catching it when it rolls back.
2. Sitting on the mat, legs apart, roll the ball to each other from a distance of 100 cm.
3. Throw a big ball with both hands from below from an adult from a distance of 70-100 cm and catch it.
4. Throw the ball on the floor (ground) and catch it with both hands after the rebound.
5. Roll the ball, the ball with both and one hand on the floor (ground), trying to get into the object (cube, pin) from a distance of 1-1.5 m.
6. Throw a large ball with both hands from the chest and from behind the head to a range and to a horizontal target (box, basket) from a distance of 1-1.5 m.
7. Throw a small ball, a bag of sand (weight 100 g) at a distance and into a vertical target (shield, wall) from a distance of 1.5-2 m with your right and left hand.
Exercises for children 4 years old
1. Roll the ball, ball (diameter 20-25 cm) with both hands to the adult and back (position - squatting) from a distance of 1.5-2 m.
2. Roll the ball, the ball with both hands between the legs of the chair (collar of two cubes 50 cm wide) from a distance of 1.5 m.
3. Roll the ball, the ball with both and one hand on the floor (ground), trying to get into objects (cubes, pins) from a distance of 2 m.
4. Throw a large ball with both hands from below and from the chest to an adult from a distance of 1.5-2 m and catch it.
5. Throw a large ball up (slightly above your head) and onto the floor (ground) and catch it.
6. Beat the big ball with the palm of your right and left hand on the floor (ground) several times in a row.
7. Throw a large ball with both hands from the chest and from behind the head to a range and to a horizontal target (hoop on the floor) from a distance of 2 m.
8. Throw objects (balls, sandbags weighing 100 g, balls, snowballs) with one hand from behind the head into the distance and into the vertical target (shield, wall) from a distance of 2–2.5 m.
Exercises for children 5 years
1. Roll the ball, the ball with one and both hands into the goal (40-50 cm wide) from two objects (cubes, pins) from a distance of 2 m.
2. Roll the ball, ball with one hand on the bottom (ground), trying to get into objects (pins, cubes) from a distance of 1.5-2.5 m.
3. Throw a large ball with both hands from below and from the chest to each other from a distance of 1.5-2 m and catch it.
4. Throw a big ball up with both hands from below and catch it when it bounces off the floor (ground).
5. Throw the big ball up and to the floor (ground), clap in the palm of your hand in front of the chest and catch it.
6. Throw a large ball with two hands from below into the wall from a distance of 1.5-2 m and catch it.
7. Use your palm to hit the big ball on the floor (ground) several times in a row.
8. Throw objects (balls, sandbags weighing 150 g, snowballs) into the vertical (shield, wall) and horizontal (box, hoop) targets from a distance of 2.5 m from behind the head with left and right hands.
9. Throw objects (balls, sandbags, cones, snowballs) at a range from behind the head with the right and left hand.
Exercises for children 6 years
1. Roll the ball, the ball with one hand on the floor (ground), trying to get into objects (pins, cubes) from a distance of 3–3.5 m.
2. Roll the ball, the ball with one hand on the floor (ground) into the goal (35-40 cm wide) from two objects (cubes) from a distance of 2.5 m.
3. Throw a large ball with both hands from below the chest and from behind the head of each other from a distance of 2–2.5 m and catch it with your hands.
4. Throw a large ball with one hand to each other from a distance of 2–2.5 m in a random way and catch it.
5. Throw a big ball with both hands and one hand up and catch it when it bounces off the floor.
6. Throw a large ball into the wall with both hands, clap a hand in the palm of your hand and catch it.
7. Throw a large ball into the wall with one hand; and as soon as he falls to the ground and bounces, catch him with both hands.
8. Beat the big ball with the palm of your hand on the ground, slowly moving forward at a distance of 4-6 m.
9. Throw a big ball with both hands from the head to the ground; the second child or adult catches him after a jump (distance between children 2–2.5 m).
10. Spray rings on the rod (ring-throw) with the right and left hand from a distance of 2.5-3 m
11. Throw objects (ball, 200 g sandbags, snowballs) from behind over your shoulder into a vertical and horizontal target from a distance of 3–3.5 m.
12. Throw objects (balls, sandbags, snowballs) from behind over your shoulder to a range with your left and right hand.
Exercises for children 7 years
1. Throw a large ball with both hands with one hand to each other from below, from the chest and from behind the head from a distance of 2.5–3 m and catch it.
2. Throw a big ball with both hands and one hand up above your head, clap your hands and catch it.
3. Throw a small ball into the wall with one hand, clap it in the palm of your hand and, when it falls to the ground and bounces, catch it.
4. Throw the ball up, turn around and catch it.
5. Beat the big ball with the palm of your hand on the ground, moving forward with a quick step or running for a distance of 6-8 m.
6. Spray the rings onto the rod (ring throw) with the right and left hand from a distance of 3–3.5 m.
7. Throw a large ball with one and both hands from below and behind the head into the ring, which is attached at a height of 2 m from the ground.
8. Throw objects (balls, sandbags, cones, pebbles, snowballs) from behind over your shoulder to a range with your right and left hand.
9. Throw objects (balls, sandbags, snowballs) from behind over your shoulder into a vertical and horizontal target from a distance of 3.5-4 m with your right and left hand.
When walking in a park, field, forest or near a river (especially in the warm season), preschoolers widely use natural conditions to improve their basic movements.
When choosing a place for walking, you need to take into account the terrain so that children have the opportunity to jump from stumps, exercise balance while walking on a log, throw cones at a distance and into a target, play on a clearing, etc. At the same time, you should not forget about safety rules.
Consider some exercises for improving the basic movements of preschoolers in natural conditions. They are distributed in accordance with related age groups (3-4, 5-6, 6-7 years). If, for example, a child of 6 years old confidently performs exercises for preschoolers of 5-6 years old, he can be recommended more complex ones - for the next age group of 6-7 years old.
MBOU secondary school No. 11, the city of Belgorod
Athletics Training - Running
S.V. Ponomarenko
physical education teacher
school No. 11, Belgorod
Belgorod 2012
The effectiveness of the training process in throwing primarily depends on the correspondence of the weight of the projectile and the complexity of the exercise to the forces and capabilities of students, their preparedness. If this condition is met, then students basically quickly and correctly master the technique of throwing exercises, although the movements in throwing are not as natural as when walking, running or jumping.
Throwing a small ball through the back from behind the shoulder is the main exercise for all age groups of students. Students need to acquire the skill of throwing a small (tennis) ball from behind their heads, facing the direction of the throw. At the initial stage of training, the ball is thrown into a 1x1 m target from a distance of 2 to 8 m; at the next stage - sideways to the direction of the shot at the target or through an obstacle (volleyball net or a rope stretched at a certain height) from a distance of 6-8 m.
For the formation of throwing skills, classes with children in primary school I start using light balls (rag or pads). Only after acquiring a skill lung throwing balls go to throwing tennis balls.
Consider possible errors and exercises to eliminate them (see table), and then - special preparatory exercises for mastering the technique of throwing the ball and grenade.
Special preparatory exercises.I start training in throwing technique from the final phase, which is a sharp movement of the “throwing” hand.
Shake the brush sharply, as if shaking something off your fingers (Fig. 1).
Take the right projectile (Fig. 2).
Roll the ball to the floor by moving the forearm and hand. Here, at the initial stage of training, students can hold their elbows (Fig. 3).
Flexion and extension of the arm with the ball, facing the direction of the throw (Fig. 4).
Throwing the ball at a goal or through an obstacle (volleyball net or a rope stretched at a certain height), facing the throw direction (Fig. 5 a, b),
Training in the implementation of the “bow tie” position (Fig. 6).
Throwing a ball (grenade), standing sideways to the direction of the throw, with rotation in place (Fig. 7 a, b).
The same exercise, but with a step (Fig. 8).
The same exercise, but with a run. At the initial stage of training with 3-5 steps, gradually moving on to speed up and increase the number of steps in the take-off run (Fig. 9).
10. Exercises to improve the ability to perform the final effort when throwing the ball, which can be used as homework. Exercises can be done in pairs or with a rubber band, with weights in the form of steel balls, dumbbells, etc. (Fig. 10).
11. To improve throwing techniques and develop motor qualities, exercises with stuffed balls are used in a large volume (Fig. 11).
|
When grabbing the ball, the ball is held too tightly or too weakly |
Study the grip well based on the explanations and figures given by us. Exercise Grip Properly |
|
The pelvis and right leg are too turned to the right |
Focus on taking the toe of the foot forward. Strive for "twisting" in the belt |
|
Throwing arm not fully extended |
Focus on putting your hand back. Practice throwing the ball more often |
|
When throwing the ball, the throwing arm is too far away from the body |
Do exercises for the muscles of the shoulder girdle (stretching and mobility); throwing a goal, throwing the ball from behind |
|
When throwing the ball, the head and upper torso deviate to the left |
Perform long ball throws through high obstacles. At the same time, follow the path of the ball |
|
The left leg “stops”, as a result of which the thrower bends in the lower back |
Throw the ball with the execution “Throwing” step. In this case, put your left foot on the ground, and then straighten |
|
The right leg is set forward, so normal transfer of effort is impossible |
Exercise slowly and count correctly |
And a few more comments about the interaction of the teacher and student in the learning process.
Since the teacher’s activity is aimed at transferring knowledge to the student and guiding the process of assimilation of knowledge, the formation of motor skills, training can only be complete when the teacher plays the role of a leader based on scientifically based theoretical training. The teacher must know the scientific foundations of the theory of physical education, the techniques of sports motor actions and teaching them. This also includes knowledge of the fundamentals of the psychology of learning, the physiological patterns of adaptation of the body to stress (taking into account age-related characteristics), and the optimal ways to use them in the learning process.
The educational process will become effective only if all the elements of its organization are systematic and didactic, including educational material, and the effectiveness of mastering the material depends on how accurately the student presents the learning objectives and ways to solve them. If the goal of learning is comprehended by the student relatively simply, then the particular tasks of learning depend on conditions that are hidden and clear from him only to a professionally trained teacher who provides guidance in solving them.
Despite the fact that the strength of the assimilation of the material largely depends on the properties of the student’s memory, the teacher can affect the effectiveness of memorization. It helps the student to form an attitude to memorize educational material, teaches memorization techniques, offers tasks that promote voluntary and involuntary memorization of motor actions. First of all, what is relevant for the student and has applied value for him is remembered and firmly assimilated.
In conclusion, I note that in my articles I consider only the basic exercises in training in running, jumping and throwing, which can be useful to teachers of all specializations, are quite accessible for schoolchildren to perform them and are quite effective when used in other classes of sports (basketball, volleyball).
If homework on the topic: »Athletics Training - Running It turned out to be useful to you, then we will be grateful if you post a link to this message on your page in your social network.
& nbsp
Categories
news
Compositions on the subject
- Test on the topic "Information" 1. Information in the everyday sense is most often understood as: a) all kinds of information, messages, knowledge; b) information transmitted to
- Unified State Exam in Chemistry Reversible and irreversible chemical reactions Chemical equilibrium Answers
Reversible and irreversible chemical reactions. Chemical equilibrium. The shift of chemical equilibrium under the influence of various factors 1. Chemical equilibrium in the 2NO system (g)
Niobium in a compact state is a brilliant silver-white (or gray in powder form) paramagnetic metal with a body-centered cubic crystal lattice.
Noun. Saturation of the text with nouns can become a means of linguistic visualization. The text of the poem by A. A. Fet "Whisper, timid breath ..." in his
(Document)
n1.doc
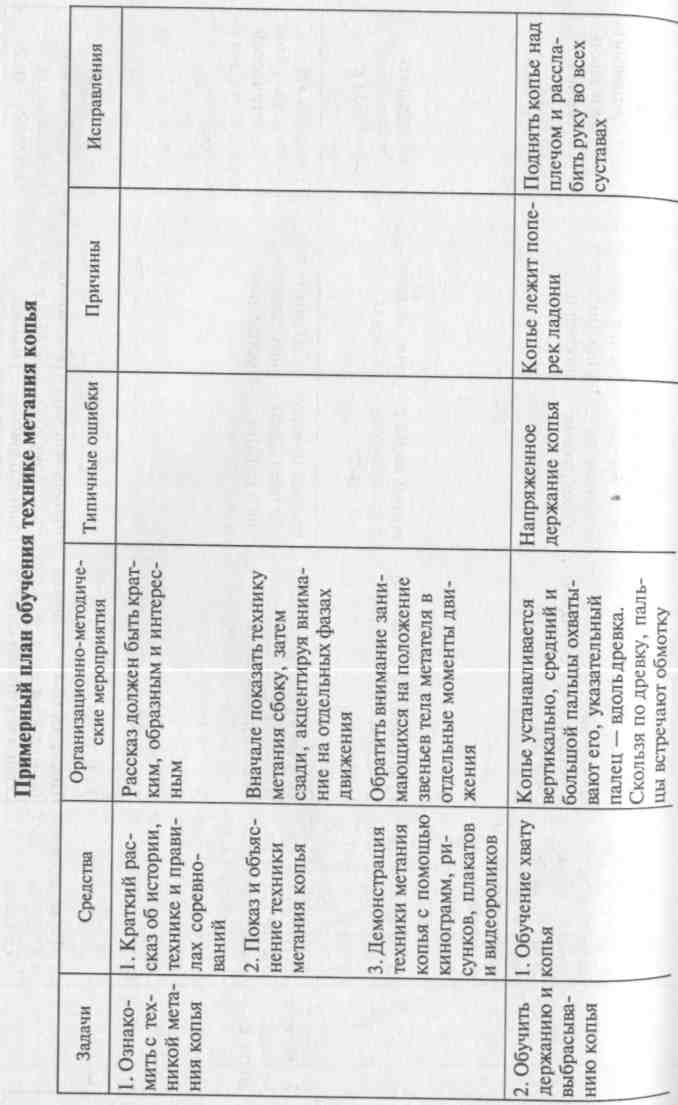
Chapter 10TRAINING TECHNIQUE
METANIUM
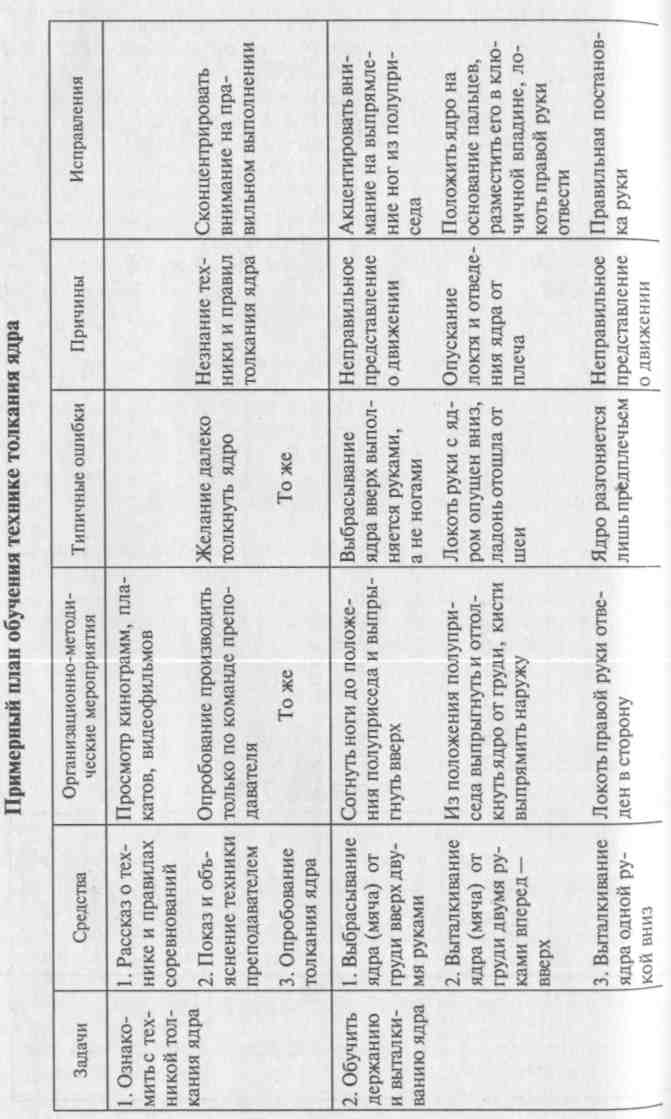
10.1. Shot put technique
The most significant motor skills in throwing include the interaction of the legs with the support and among themselves, the sequence of using individual parts of the thrower body to disperse the projectile, overtaking the projectile to activate the final effort. In order to master throwing movements and be able to apply effort to the projectile, it is necessary to begin training with special exercises using stuffed balls, sandbags and cores of various weights, for example:
pushing the ball with two hands from the chest upward, bending and straightening the legs;
pushing with one hand up, bending the legs first;
pushing with one hand forward - up to the partner, standing facing him, then sideways;
throwing the ball with two hands from different positions (bottom-forward-up, from the head-forward, side-forward-up, etc.). Having studied the basics of throwing movements, we can proceed to learning the technique of shot put.
The correct motor and visual representation of the shot put technique is created by methods of explanation and display. This briefly explains the sequence of movements, including data on the shape, weight of the projectile and the rules of the competition. Typically, explanations are preceded by a demonstration, but depending on the conditions, you can do the opposite.
Demonstration of technology is made by a teacher or a student who is well versed in it. In addition, visual aids, movies, posters and videos are used.
Task 2Teach you how to hold and push the core.
Learning directly about the shot put should begin with its holding and the final effort - pushing. After showing and explaining the holding of the core, the correctness of its implementation by the students is checked. The nucleus is placed on the base of the fingers with the vertical position of the forearm.
To solve this problem, we present the following exercises:
the transfer of the core from hand to hand;
pushing the core up to a small height, followed by fishing;
pushing the nucleus forward-up and forward-down;
shot put through various objects.
Task3. Teach the technique of pushing the core from the spot (or the final effort).
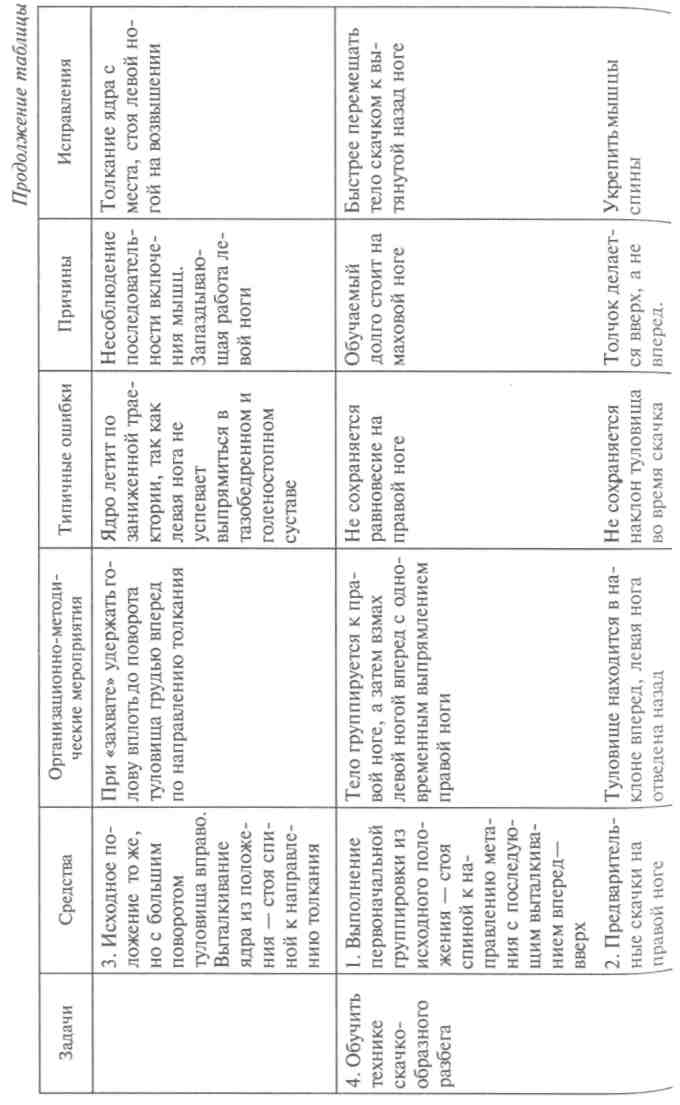
Mastering the shot put from a place can be started from a standing position, facing, and then sideways to the direction of throwing, but with a preliminary turn of the shoulder girdle to the right. These exercises are transitional to pushing from the starting position, with your back to the direction of throwing. The legs are slightly bent, the left leg is in front, the body weight is mainly on the right leg, bent at the knee. The foot of the left leg is slightly turned inward. The push begins with the left foot on the ground.
Auxiliary exercises for mastering the technique of pushing the nucleus from a place will be pushing the stuffed balls with one and two hands from different starting positions (Fig. 110).
Task 4.Teach a jump technique.
To master the technique of a jump, there are a number of simulation exercises.
1. From the starting position - with your back to the throwing direction:
The body is grouped to the push right leg, the bent left
■ the south is placed on a support close to the right on the fingers;
Swing left foot forward in the direction of the push
while straightening the right leg;
The left leg returns to a position close to the original,
w with a lower grouping.

This exercise allows you to create conditions for starting from a stable starting position (initial grouping).
2. The next exercise is a continuation of the previous one. After the initial grouping, a swing with the left foot in the direction of pushing is performed, with a vigorous repulsion of the right foot and then a shortened jump, by low sliding movement on the right foot, with the active pulling of the repelling right foot under the body. This exercise fulfills the start, gives the “pusher-projectile” system a certain horizontal speed, allows you to overtake the projectile with your legs and pelvis and master a stable grouping to the push leg.
In order to create a sense of correct performance of the push, it should be done with the help of a partner. For this, the trainee takes the previously described position in a forward bend and in a step with the left foot laid back. The partner, lifting his leg at the lift, easily pulls the student in the direction of pushing. The trainee, using the force of traction, makes short jumps on the right leg and then tightens the lower leg, putting the foot on the toe.
When training a jump, you should avoid strong pushing with your right foot, which is the cause of a high and distant jump, and often a pause.
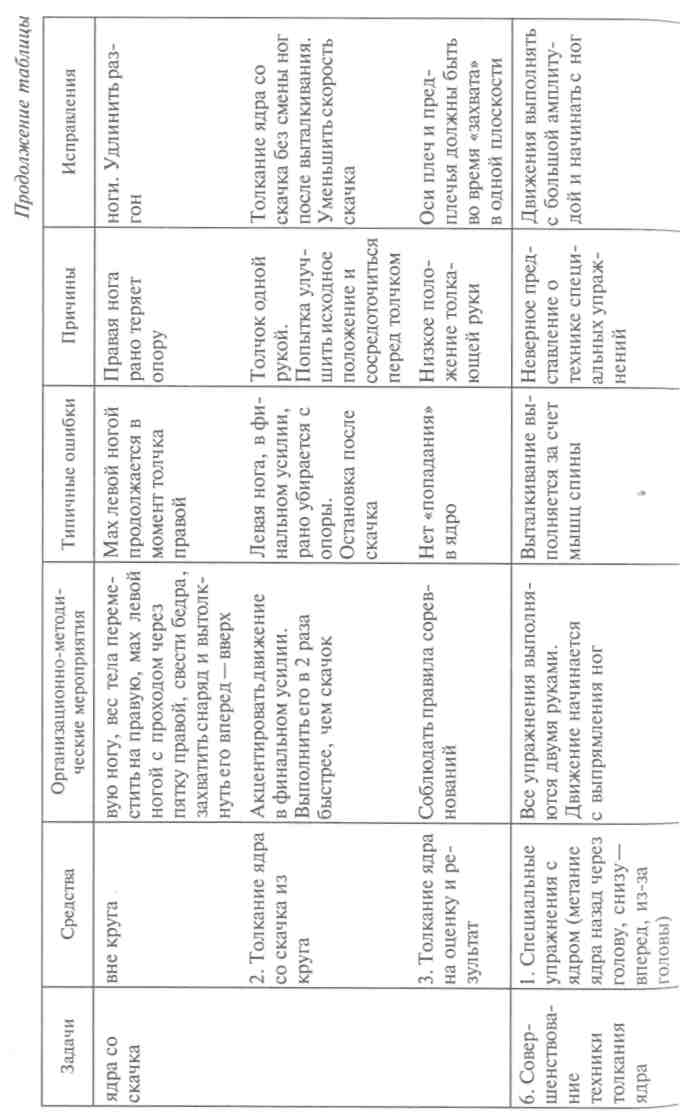
Task 5.Teach a shot put technique from a jump.
In each lesson with the trainees, the shot put should be repeated from the spot and the jump simulated. In addition, the following exercises will be the means to solve the problem:
imitation of a shot put from a jump and without a shell;
shot of the core of light weight from the jump;
shot put from the jump from the circle, observing the rules of the competition, and the result.
Task 6.Improving the shot put technique.
With the improvement of the shot put technique as a whole, the main means for solving this problem will be:
special exercises to improve individual phases without a projectile, with a projectile and on simulators;
pushing cores of various weights from a circle;
shot put on the result.
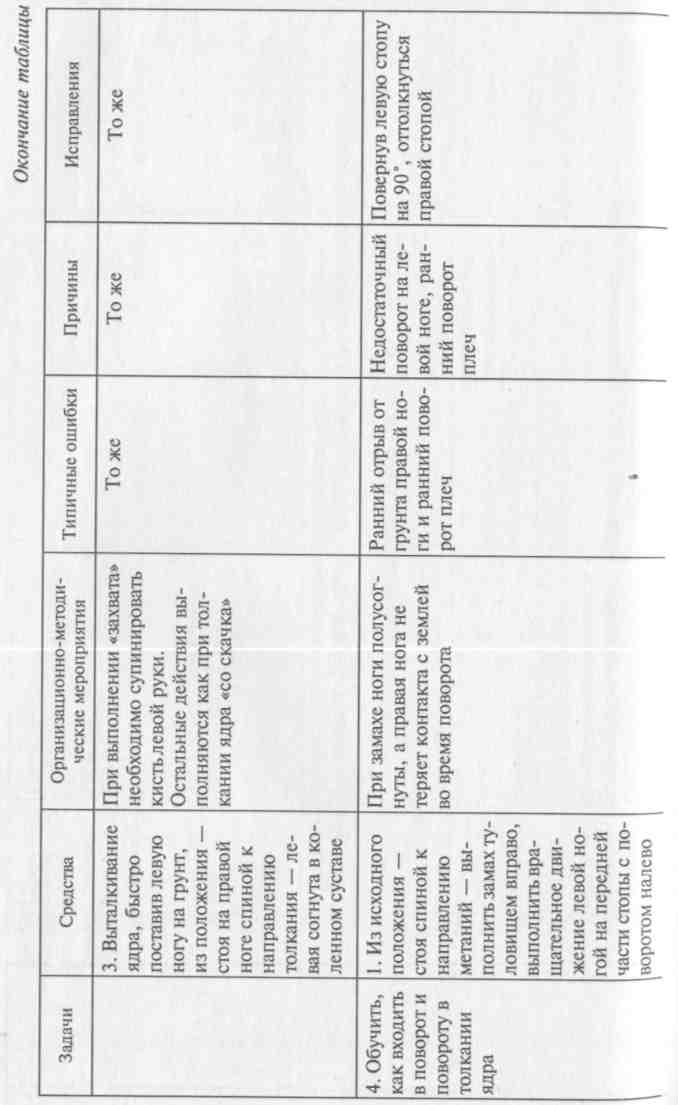
At present, the method of pushing the nucleus of nuclei from a turn is widely used. The use of one or another option depends on the individual abilities of a person to throwing movements -


300

The discus throw training sequence is basically identical to the shot put training sequence. A feature of the discus throwing technique is that the preliminary and final movements in it are rotational-translational, and as a result, the force builds up in the horizontal plane. When starting training in discus throwing, one should take into account that the readiness of those involved in rotational movements, as a rule, is insufficient, requires special training and the necessary precautions. So, to avoid accidental injuries in the classroom, discs are thrown in only one direction. Places for classes, including throwing circles, are located as far as possible from each other or fenced with a grid. During group training, it is necessary to clearly establish the sequence of throwing and going out to the field for shells.
Task 1Familiarize yourself with discus throwing techniques.
Solving this problem, the teacher briefly explains the technique of disc throwing and then shows how to throw a disc with a full rotation. When demonstrating the movements again, the teacher performs them in slow motion and stops at the most important points. The show is complemented by brief explanations and viewing visual aids: movies, posters, drawings, photographs and videos. Discus throwing training begins with the first practice session.
Task2. Train on holding and releasing a disc.
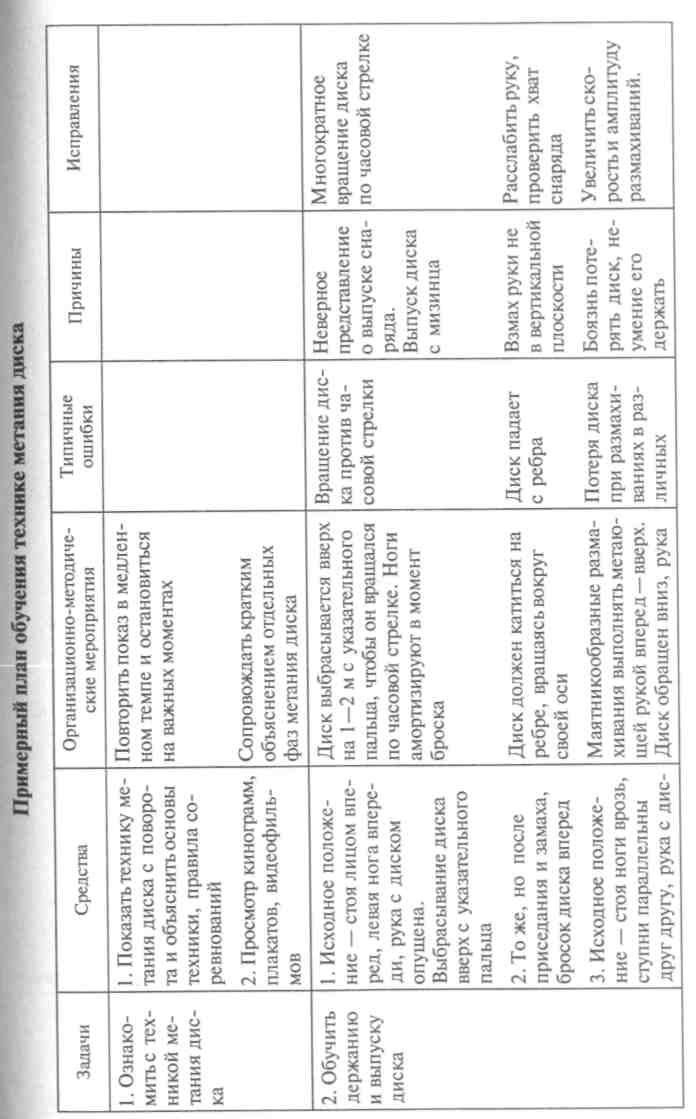
The grip and holding of the disc is first explained and demonstrated by the teacher. Shows the peculiar holding of the disc with the extreme phalanges of the fingers and pressing it with the thumb. Then the release of the disk is mastered practically using exercises:
facing forward, left foot in front, disc hand down. The disc is thrown up 1 - 2 m from the index finger so that it rotates clockwise. At the time of the throw, the legs are slightly cushioned. The disk should rotate without vibrating and fall to the ground exactly on the edge;
the starting position is the same, but after squatting and swinging the disc, a forward throw is performed so that the disc rolls on the rib, rotating around its axis (Fig. 112);
the initial position is the same, but the disc is thrown up and down;
standing face in the direction of throwing, put your feet shoulder-width apart, left side - in the direction of throwing, body weight is distributed on both legs. To swing a hand without a disc and with a disc in different planes, transferring body weight from one

Feet on the other and twisting the torso to the right. In this case, the body weight is completely transferred to the right leg, the body is slightly grouped to it, the leg is bent at the knee joint;
From the same starting position, but twisting the body to the right
with a swing of the right hand with a disc (stick, ball with a loop) and bro
juice forward. Exercise can be performed after several pre
varietal wave of hands.
Exercises in the release of the disc, imitation of arm movements in the horizontal plane, dynamic grouping to the right leg, twisting and returning the torso - all these actions are the beginning of mastering the technique of disc throwing from a place.
Task 3.
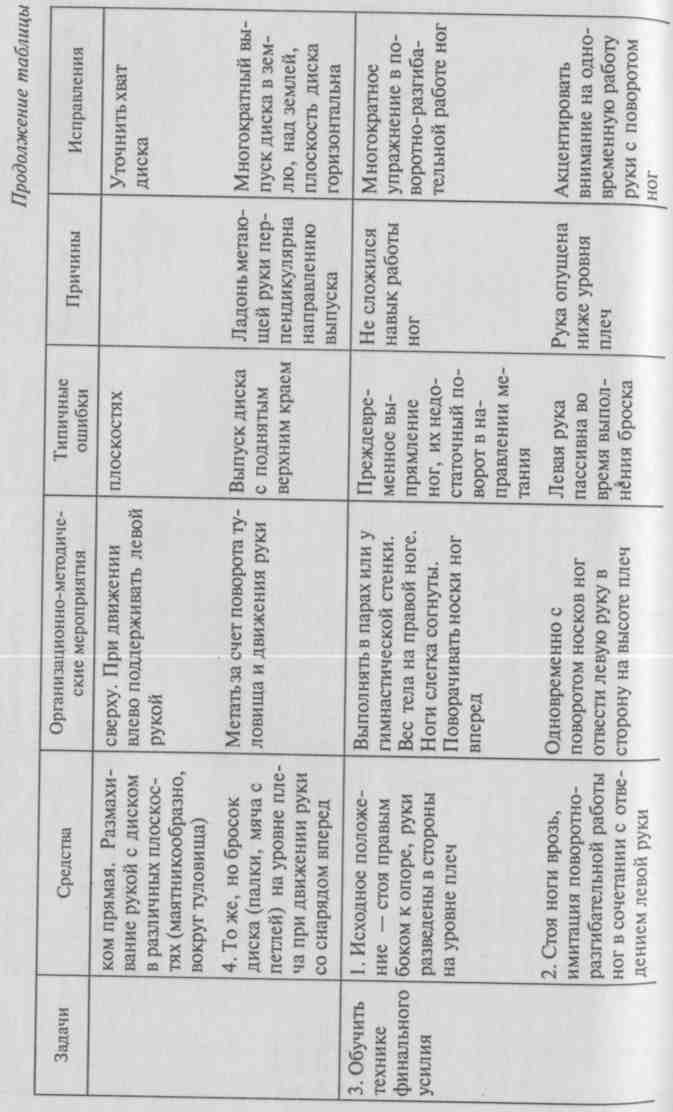
The final effort when throwing the disc is the final movement that is performed after the turn. As you master the exercises in the release of the disc, students must master the final effort, which is the main link in projectile throwing. Therefore, the attention of practitioners is focused on overtaking movements of the legs and pelvis relative to the projectile and on the grip. In this case, the knee of the right leg moves outward and mainly forward - up. The left part of the body is shifted to the supporting leg, becoming the axis of rotation and the main reference point when the projectile is thrown. Basic exercises for teaching the final effort:
standing legs apart, with your left side to the direction of the throw, simulate the swing-turn work of the legs in the final phase of throwing;
the same, but with a projectile (gymnastic stick, tennis racket, ball with a loop, light drive);
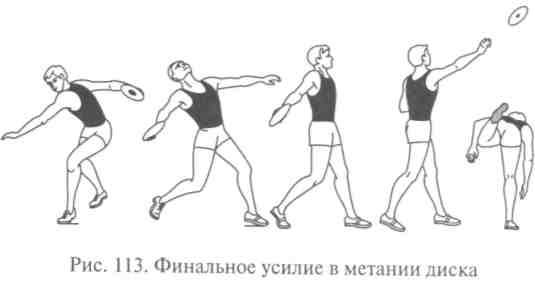
discus throwing from the starting position, standing sideways and back in the direction of throwing (Fig. 113).
The study of turning in discus throw should begin simultaneously with the development of projectile throwing from a place. First turn It is studied without a disk, and then with a disk or objects convenient for Holding (tennis racket, gymnastic stick, ball
With a loop, dumbbell). The most convenient learning aid is a disc with a strap made of a strong wide braid that covers the plane of the disc on one side and is attached with the ends to the other side. To use such a projectile, the hand sticks between the braid and the plane of the disc. The main exercises to solve this problem:
imitation of turning parts;
simulation of rotation as a whole without a disk and with a disk;
turns with various auxiliary objects.
Task 5.Learn the technique of disc throwing with rotation.
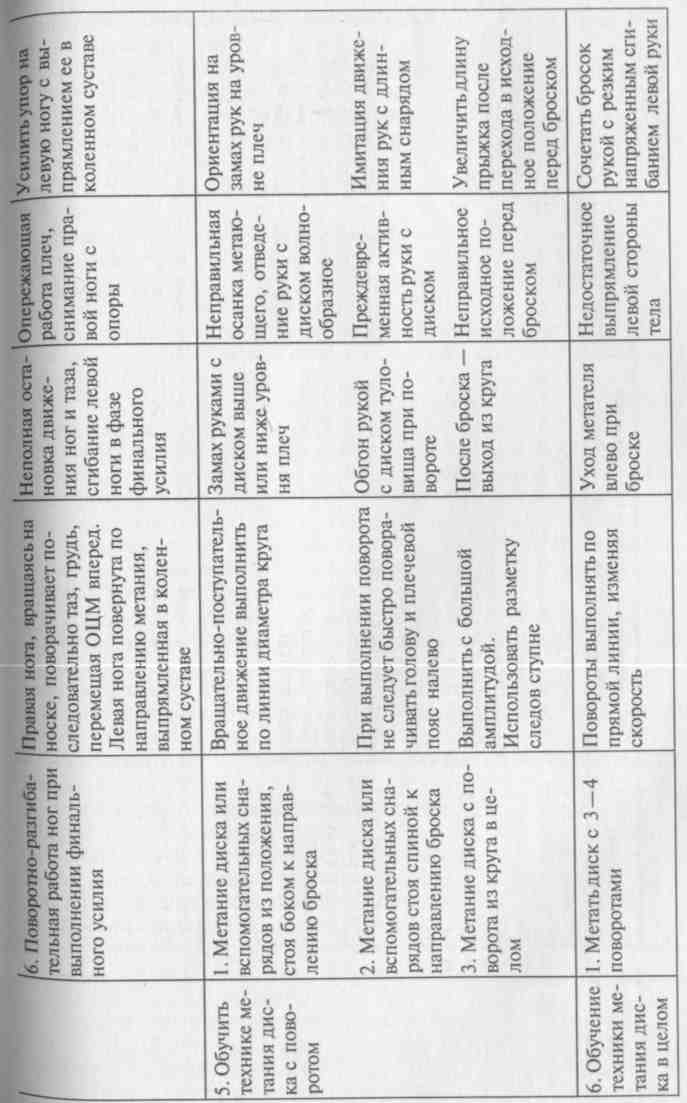
When learning the technique of throwing a disc with a turn, at first the movements are performed without a disc, then with a disc without a throw and with a throw, outside the circle and in the circle. The speed of movement can only be increased gradually, as you master the elements of this throwing technique. Perform rotational-translational motion along the line of the diameter of the circle, smoothly accelerating the transition of rotation in the direction of the throw, while the arms and body are allotted to the right. The left leg is swiftly carried forward with subsequent straightening in the knee joint.
To accomplish this task, the following exercises are required:
Throwing a disc with a rotation from its original position, standing
sideways to the direction of the throw;
discus throw with a turn from the starting position, standing with your back to the direction of the throw;
discus throw with a turn from the circle, observing the rules of the competition.
Throwing a disc with a turn from various initial positions will help to solve this problem, throwing a projectile with high speed at the result and in competitions. The teacher must take into account the individual capabilities of students to search for the most rational forms of movement. In the process of improvement, attention should be paid to correcting deficiencies in technology and the study of their details. In parallel with improving the technique of discus throwing, it is necessary to apply special exercises with weights for the development of speed-power qualities of throwers (see. Fig. 114).
10.3. Method of teaching projectile throwing techniques: small ball, grenades, spears
10.3.1. Methods of teaching the technique of throwing a small ball, grenades
■ The specific features of the javelin throwing technique require those involved in good coordination of movements, elastic muscles, sufficient joint mobility and flexibility, dynamic and explosive strength, the ability to control individual parts of the body and a sense of rhythm. All this makes serious demands on general physical and special preparation for javelin throwing. Therefore, special exercises with auxiliary projectiles, balls and grenades should take a special place in the study of throwing techniques. This will help beginners avoid the many mistakes that arise when learning the technique of throwing spears, if from the very beginning the students begin to use the main projectile, i.e. they begin to learn spear throwing techniques after they have mastered throwing a small ball and a grenade.
The sequence of tasks and the appropriateness of exercises are determined by the nature of the type of throwing, including both individual exercises and a group of similar exercises that have the closest structural connection with the main motor action.
![]()
310

312

314
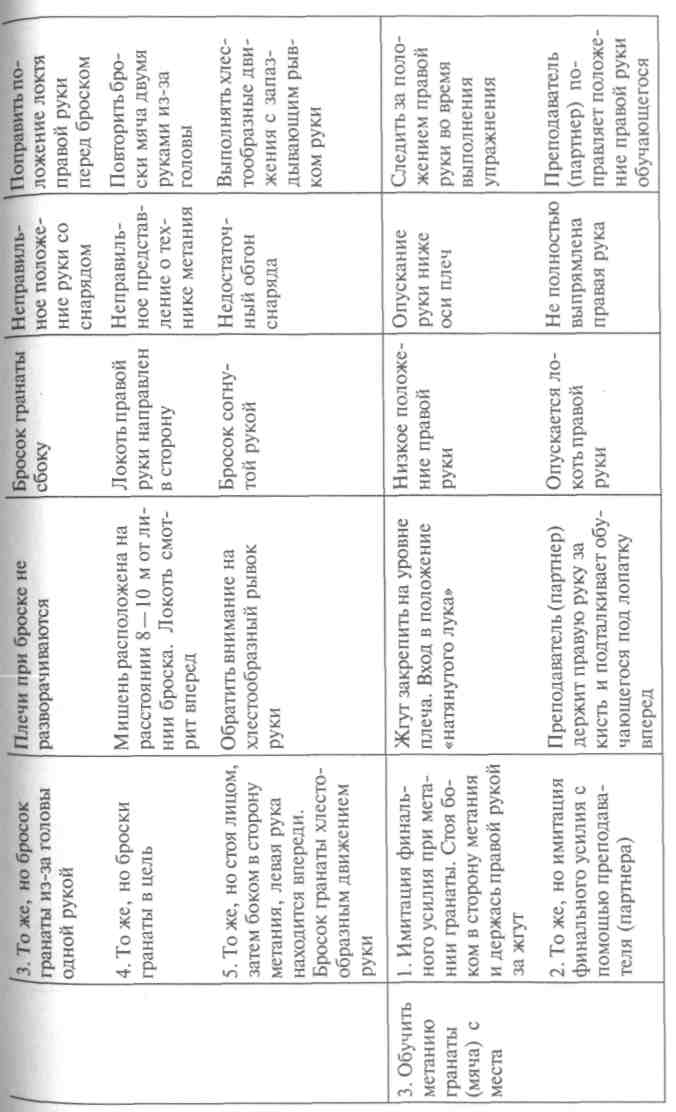
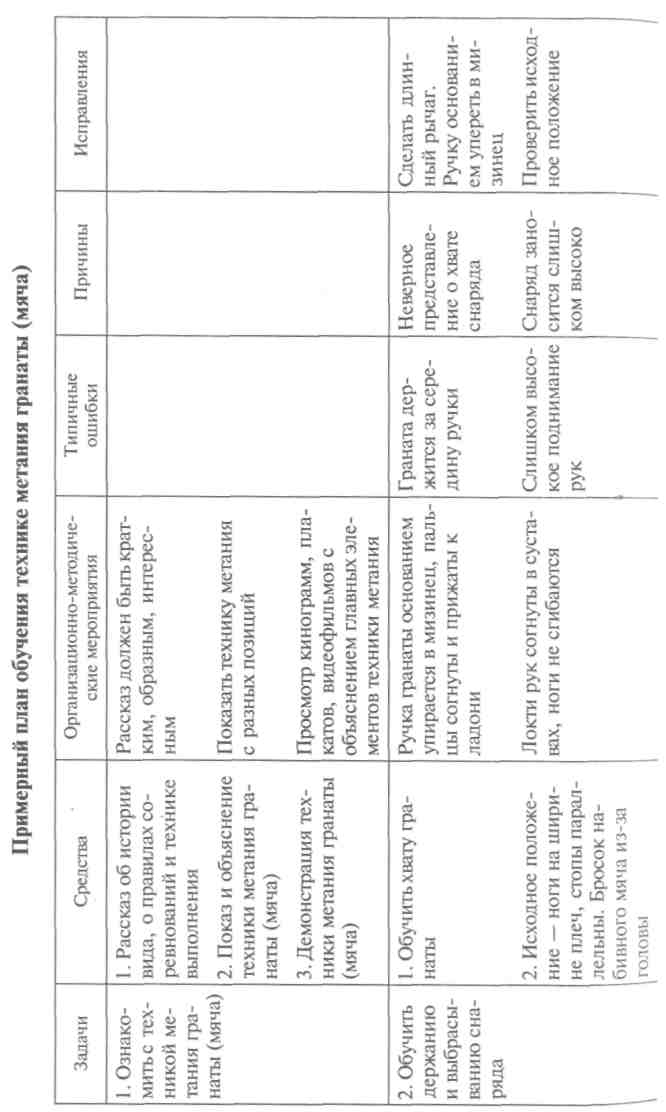
Task 1. Acquaintance with the technique of throwing a grenade (ball).
Solving this problem, the teacher shows the technique of throwing a grenade and ball with a full take-off, explains the features of the individual phases of throwing, offers students to watch movies, posters, videos, introduces the rules of the competition.
Task 2. Teach you how to hold and throw a projectile.
For a correct and accurate throw, the correct holding of the projectile is necessary.
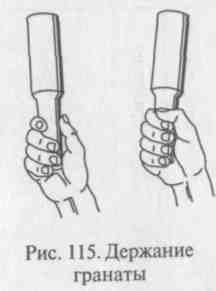
The grenade is held so that its handle rests on the little finger, bent and pressed to the palm of its hand, with the rest of the fingers tightly gripping the grenade's handle. In this case, the thumb can be located both along the axis of the grenade (both when holding the spear), and across (Fig. 115).
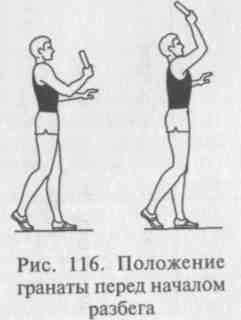
The ball is held by the phalanges of the fingers of the throwing hand. 1 finger is placed like a lever, behind the ball, and the little finger and thumb support the ball from the side. When learning the correct grip, you must ensure that students do not hold the ball too tight. I keep the ball and the ball in front of or at the upper edge of the skull, this position makes it possible to more rationally perform the subsequent projectile abstraction in the take-off run (Fig. 116).
Small ball throwing training can be carried out in the gym and throwing grenades and spears is carried out at the stadium or sports ground, but if you equip the gym with a special net, then throwing darts and spears can be done in the hall. During the training, the teacher must observe [Precautions:
- allow throwing grenades, spears only at the signal of the teacher
one way;
Have practitioners at a sufficient distance from each other;
Collect abandoned shells only
after the signal, make sure that the spears are
kali vertically, with the tips up.
To learn the technique of holding and throwing a projectile, the following exercises are used sequentially:
Legs shoulder width, body weight pre
property on the front of the feet,
hand with a small ball in front over the shoulder,
bent at the elbow, free
puppy down. Imitation of a succession throw

straight and continuous straightening of the arm forward-up (without a break 8-10 times). Then the hand continues to move down, to the side, back and to the starting position;
from the same starting position throw a small ball on the floor and catch it after a rebound;
the same, but throwing a small ball at a wall, and then at a target (a circle with a diameter of 1 m, located at a height of 2.5 m) from a distance of 3 -5 m (Fig. 117);
standing face and then sideways in
The purpose of these exercises is to master the movement of the arm with a whip-like jerk, learn to relax the muscles of the arm, precisely carry it over the shoulder and sequentially straighten forward - up in the direction of the throw.
Task 3.Train throwing a grenade (ball) from a place.
Throwing a grenade and ball from a place should be started after the practitioners have worked out and fixed the muscular movements with the chest forward and the whip-like movements of the throwing arm with good support on the legs. These sensations are created using the following exercises:
imitation of the final effort when throwing the projectile, standing with the left side to the side of throwing, the left leg is in front, holding the rubber band (tape, expander) with the right hand, fixed at the shoulder level to the gymnastic wall;
throwing a small ball ( stuffed ball) into the wall from the starting position, sitting on the gymnastic bench: with two hands; with one hand with a preliminary turn of the body to the right;
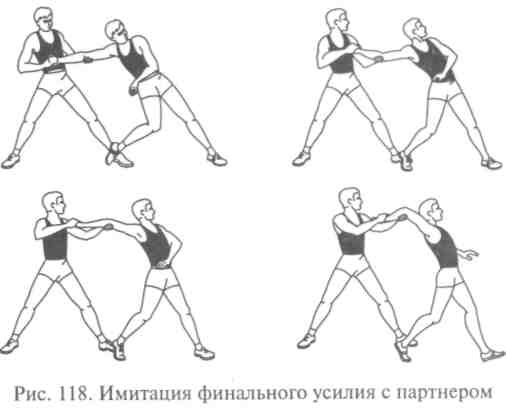
imitation of the final effort with the help of a partner (teacher), standing with the left side to the side of throwing, the left foot is in front, the foot is turned with the toe inward at an angle of 45 °, the right foot is in a bent position. The teacher (partner), holding the student by the right hand, pushes him under the shoulder blade forward, makes you feel the muscles work in this position (Fig. 118);
imitation of entry into the position of a "bow tie". Standing with your left side to the gymnastic wall, with your right hand grab the bottom of the rail at shoulder level, with your left hand - in front of the rail with a grip from above at shoulder level. Exit to the position of the “stretched bow” is carried out due to the efforts of the right leg, pelvic and trunk muscles;
standing with your right side against the gymnastic wall, with your right hand with a grip from the bottom, grasp the bars at shoulder level. Turning and straightening the right leg, the pelvis back and forth, turn left;
throwing a projectile forward and upward. Standing with your left side to the side of throwing, bend the right leg, turn the body to the right and turn the axis of the shoulders.
throwing a grenade (ball) in one step. Put the left foot in the position of the step for throwing from a place, with a turn of the body in the direction of the throw, come to the position of a “taut bow”;
imitation of performing a cross step. Standing with the left side to the direction of the throw, the straightened right hand is laid back and is at shoulder level. Body weight is on the right bent leg, the left leg is straightened and placed on a support at a distance of 2.5 - 3 feet from the right, and the left arm is in front of the chest. Make an easy jump from the left foot to the right with the left foot on the support;
performing cross steps with the right foot, after which the left leg is put in the step position and throw a grenade Or ball. The exercise is performed at the expense of the teacher;
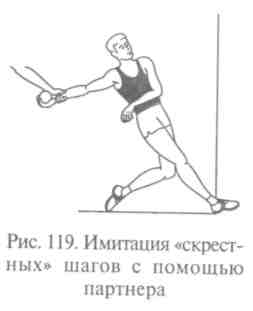
imitation of performing a cross step with the help of a teacher or experienced practitioners. During this exercise, the student is held by the right straightened arm. This is done so that the legs overtake the body (Fig. 119);
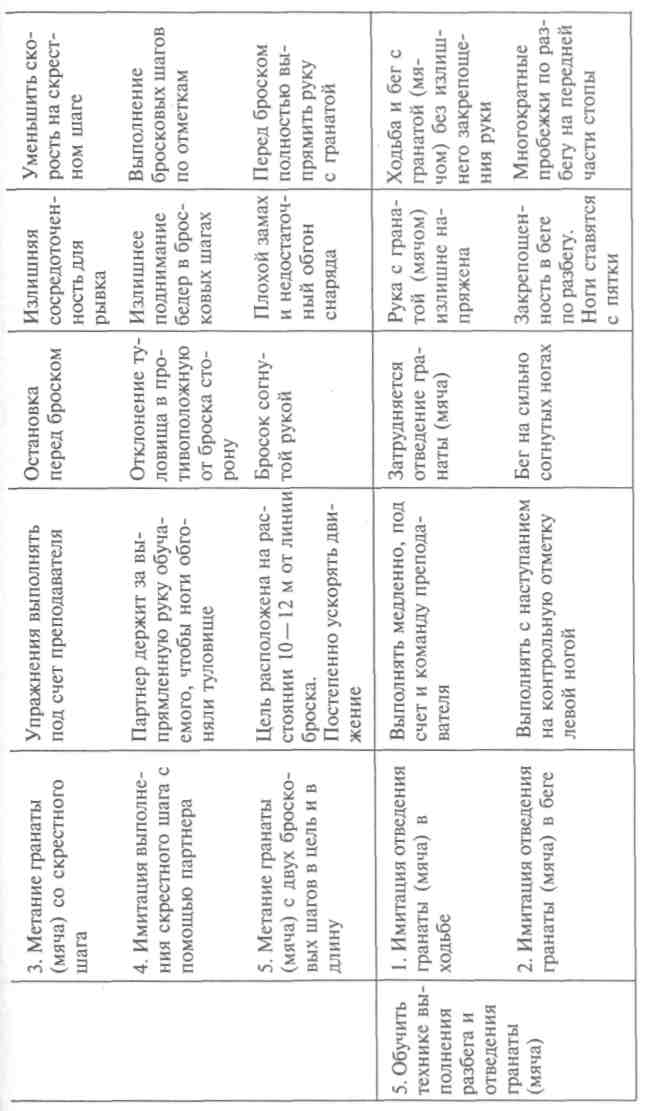
throwing shells with throwing steps at the target. The target is located at a distance of 10-12 m from the throw line.
Task 5.To teach the technique of running and releasing a grenade (ball)
Several versions of throwing steps and methods of projectile abstraction are used. Consider them.
I variant: throwing with 4 throw
steps with the discharge of a grenade (ball) on
2 steps in a straight-back way;
IIoption: throwing with 4 throw
steps with the abduction of the projectile in 2 steps
way "up-back arc";
IIIoption: throwing with 4 throws
exit steps with the abduction of the projectile on
2 steps in a way "forward - down - back";
IV option: throwing from 5 throwing steps with the ball relegating 3 steps in a forward-downward-backward manner.
The first option is more suitable for girls with great mobility in the shoulder joints. The most common option is the third. Training in how to discharge the projectile should begin with the position "standing still" with the help of exercises:
simulation of the abduction of the projectile at 2 steps walk. Students, standing in a row, hold a grenade (ball) over their shoulders. The projection is carried out in 2 steps under the teacher’s command, and then independently;
the simulation of the removal of a grenade (ball) while walking, and then on the run. Perform in 2 steps - abduction and in 2 steps - return;
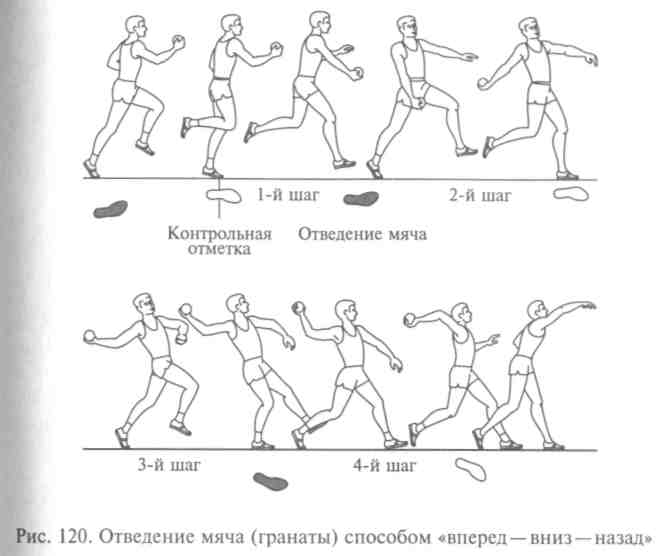
projection of the projectile 2 steps in a forward-down-backward manner, followed by a cross-step and a left-foot step, i.e. performing 4 throwing steps in general and returning to the starting position before the throw without throwing and with throwing (Fig. 120).
from the starting position, standing face in the direction of throwing, the left leg is in front, the projectile is above the shoulder, the approach is made and the left foot hits the control mark, in combination with the discharge of a grenade (ball);
the same, but with the addition of performing the cross step;
the same, but with the execution of throws, emphasizing the acceleration AND the rhythm of the throwing steps after the control mark and paying attention to the coordination of movements of the legs, body, arms in the phase of the final effort.
For proper movements, it is necessary to increase the length and speed of the take-off run to the control mark. Takeoff run -the path from the reference mark in the opposite direction with respect to throwing. In the starting position, before the take-off, the practitioners stand with their left foot on the control mark, a grenade (ball) over the shoulder. Take-off starts from the right foot. A mark is made at the place of the foot. By repeated runs, the length of the first part of the take-off run is specified. Then, the practitioners stand with their left foot on this mark with their faces in the direction of throwing and run in the Whole. Correction of the run is carried out by repeated run-Mi without a throw and with a throw of a projectile.
Task 7.Improving the technique of throwing a grenade (ball).
To improve the technique of throwing a grenade (ball), it is necessary to familiarize those involved with various variants of the Technique. The growth in the results of throwing these shells depends not only on the improvement of technology, but also on the development of physical qualities, primarily on strengthening the ligaments of the elbow * Shoulder joints.
Studying the technique of throwing the ball and grenade prepares those involved in the development of javelin throwing.
ZHILKIN 471
322

324

10.3.2. Spear throwing training technique
Task 1Familiarize yourself with spear throwing techniques. This task is similar to the technique of throwing a grenade (ball).
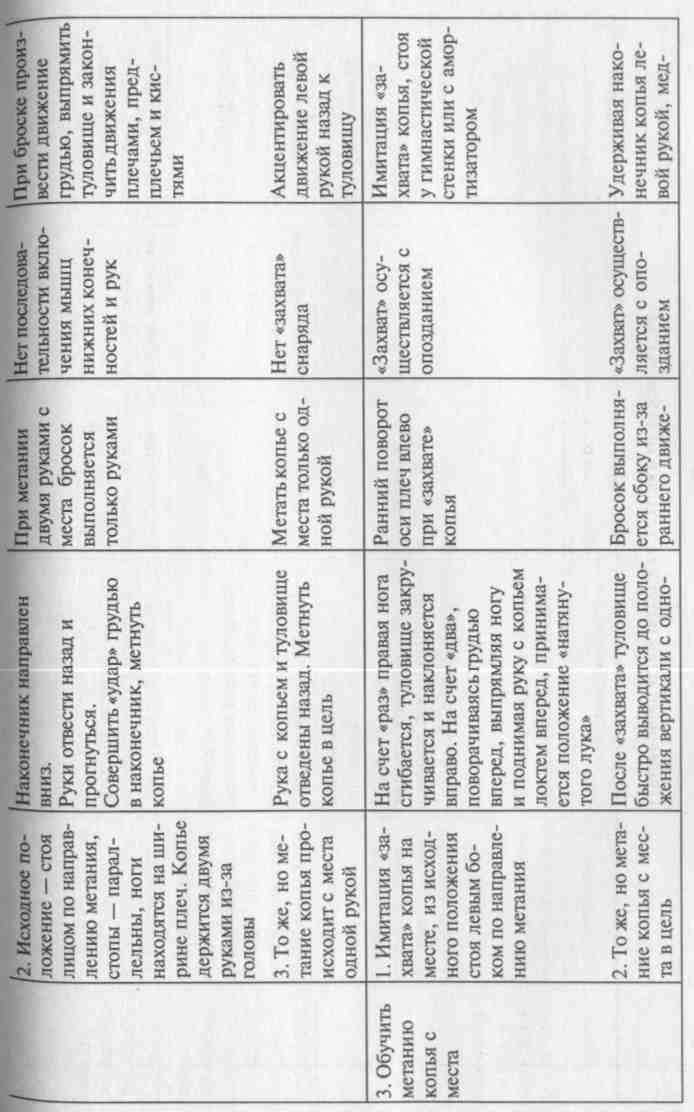
Task 2Teach how to hold and throw a spear.
When choosing a way to "grab" spears should take into account the personal feelings of those involved. To determine a comfortable grip, it is necessary to stick the spear in front of you at arm's length and grasp the shaft, placing the fingers of the right hand on top and along the cover to feel good emphasis. Next, the following exercises are performed:
throwing a spear with both hands from different positions with the direction of the spear into the ground. When throwing a spear with both hands, the projectile is held above the head, the left hand is behind the right;
throwing a spear from place to target with one hand. The spear is held above the shoulder, the forearm is as close as possible to the spear shaft, the left arm is extended forward.
Task3. Train javelin throwing.
Basic learning tools:
imitation of the final effort from the starting position - standing with the left side in the direction of throwing, the left foot in front, the hand with the spear over the shoulder is pulled back down, the right foot is bent to the count of “times”, the body is twisted and tilted to the right. At the count of “two”, turning chest forward, straightening a leg and raising a hand with a spear with an elbow forward, students take the position of a “taut bow”;
throwing spears at the target. The starting position is the same, but lightweight shells are used;
throwing a spear from a place from the same starting position, but the throw begins with the extension of the right leg and with the subsequent withdrawal up-forward throwing hand. The throw ends with a whip-like movement of the forearm and hand without lowering the elbow.
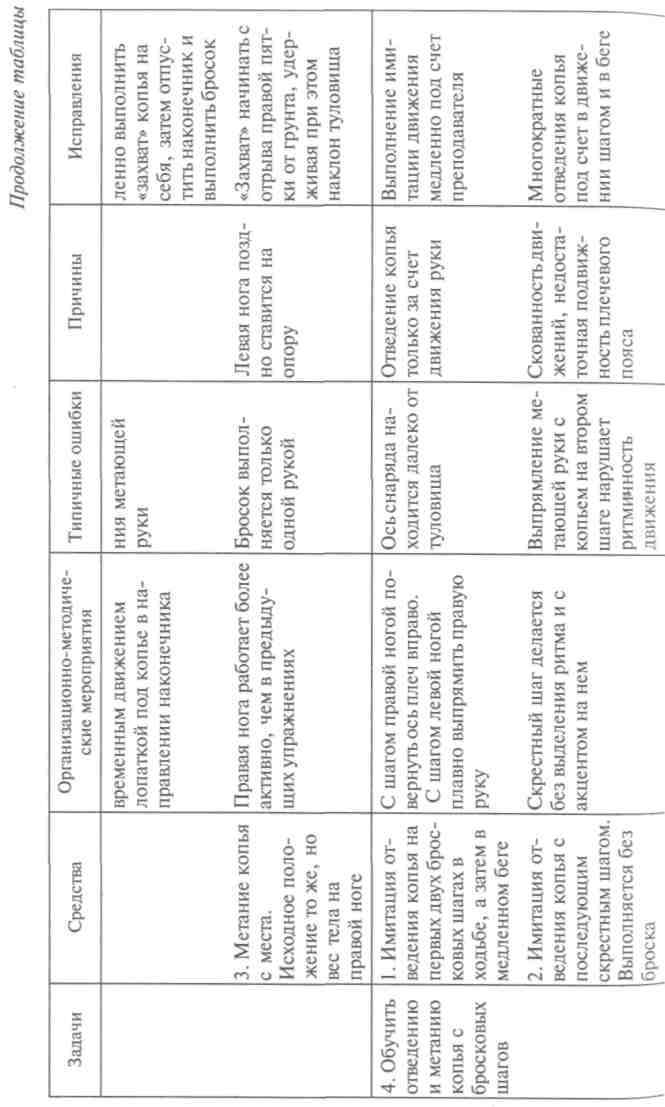
Task 4.Train leaping and javelin throwing.
Most of the basic elements of this task are mastered by exercises in lightened conditions. Leading the spear is closely related to the implementation of throwing steps, with the rotation of the body to the right and moving sideways. Basic training exercises:
K - imitation of spear lead in various combinations without throwing. From the starting position - standing face forward, left foot in front, chest facing in the direction of throwing, hand with a spear - above the shoulder, wrist - at the level of the head, spear point directed forward-down. Next, a step is made with the right foot and at the same time the body turns to the right, the arm is retracted directly - back; step with the left foot - a full turn to the right and straightening the arm with a spear from behind at shoulder height, the spear point is at face level;
from the same starting position, the hand with the spear is relegated 2 steps in the same way, then returns to its previous position above the shoulder;
imitation of spear abduction followed by a cross step without rhythm and with emphasis on it. It is carried out without a throw and in combination with it. From the starting position - standing facing forward, the left leg in front, the arm with a shell under the shoulder is relegated to the first 2 steps, after which the cross step is emphasized, the left leg is lowered to the support and assumes a throwing position, but without throwing;
the same, but with a subsequent light throw and a gradual increase in effort, depending on the mastery of individual elements and their combination.
Exercises are first performed at a slow pace (walking), and then on the run, but without stopping so as to achieve coherence.
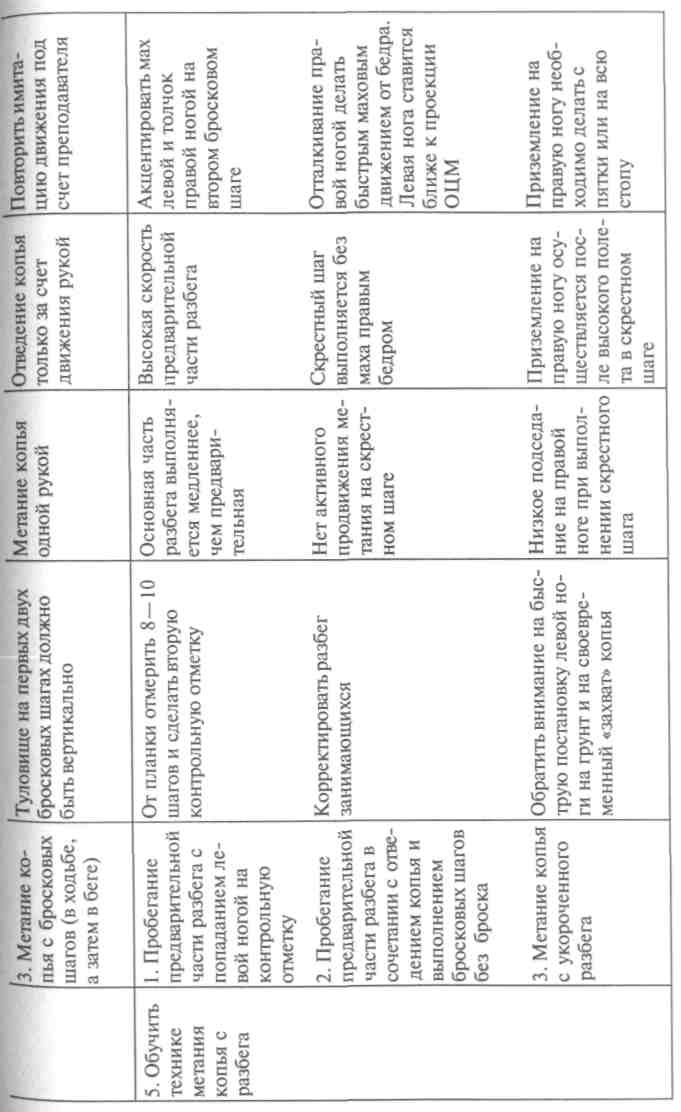
Task 5.Teach a technique for javelin throwing.
The length of the run is determined for each athlete individually and depends on the growth data of the participants and the speed that they develop.
First, the take-off markup is made, and in the process of improvement, it is specified. Marking the take-off, it should be noted 3 - 4 spear lengths from the arc for throwing the spear in the direction opposite to the take-off run. At the end of this segment, a mark is made, and 6–7 copies are measured from it. The initial mark, which is the start of the take-off, is made.

The following exercises are used to master the take-off technique:
running the preliminary part of the take-off with the left foot hitting the control mark. Facing forward, right leg in front, hand with a spear above shoulder. Several times, students run the distance to the second control mark with the specification of where the left leg will fall;
running the preliminary part of the take-off run in combination with deflecting the spear and taking throwing steps without throwing. Thus, the stopping place of the thrower from which he throws is specified;
javelin throwing with a shortened run. The run-up is not yet fully established, but it allows you to gain the necessary speed that you need to maintain during the throwing steps and perform the rhythm of the last steps associated with the final, decisive effort;
selection and testing of individual run, its correction. After finding the second control mark, each student repeatedly runs through the preliminary part of the run, followed by its correction by the teacher. Then the distance from the first control mark to the second is measured in feet or tape measure and is remembered;
javelin throwing with a run with continuation of refinement of distance. The main thing that a teacher should focus on when solving this problem is to perform throwing steps in the appropriate rhythm and in combination with the final effort. Other, more secondary elements of technology will be mastered by students for a long time.
After mastering the basics of the javelin throwing technique, the grip of the projectile, the variant of carrying and retracting the spear in the take-off run, the characteristics of the throw steps, the movements of the shoulder girdle and the body, the rhythmic structure of the throw, the length of the full take-off are specified.
To improve the technique of javelin throwing, it is necessary to familiarize those involved with various options for performing the abduction of the projectile and the methods for conducting the final effort. The establishment and improvement of an individual version of the spear throwing technique requires a long time. Participation in the competition allows you to determine the level of special preparedness and the effectiveness of the javelin throwing technique, as well as determine ways to further improve this sport and athletics (Fig. 121).
332
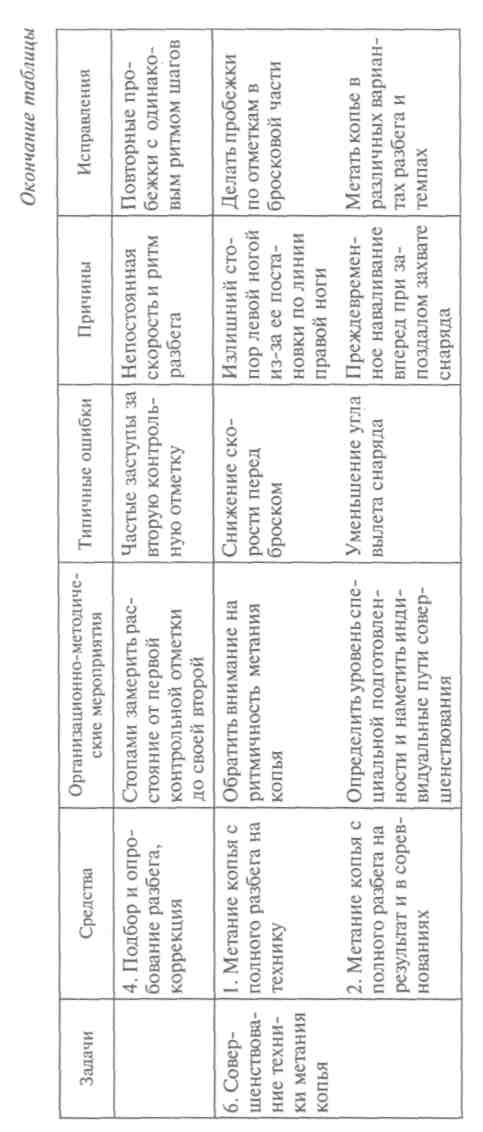
336
10.4. Methods of teaching hammer throwing techniques
Hammer throwing is a complex motor coordination, requiring great physical strength from the practitioners. Therefore, training in hammer throwing techniques should be built taking into account the characteristics of physical development and the motor experience of those involved.
The weight of the projectile during training should correspond to the weight and strength of the student. When mastering the technique of throwing a hammer, auxiliary projectiles are also used.
When learning the hammer throwing technique, safety precautions must be observed. Hammer throwing should only be performed on specially equipped sites and sectors.
Task 1Familiarize yourself with the hammer throwing technique.
This problem is solved by showing and explaining the hammer throwing technique in general and in parts. The story about the main points of the technique of throwing this projectile is accompanied by a screening of movies, photographs, drawings, posters and videos. In order to demonstrate the hammer throwing technique, training and competitions can be used. Students are introduced to the rules of the competition and the equipment of places for classes.
Task 2To teach how to hold the hammer and the technique of preliminary rotations.
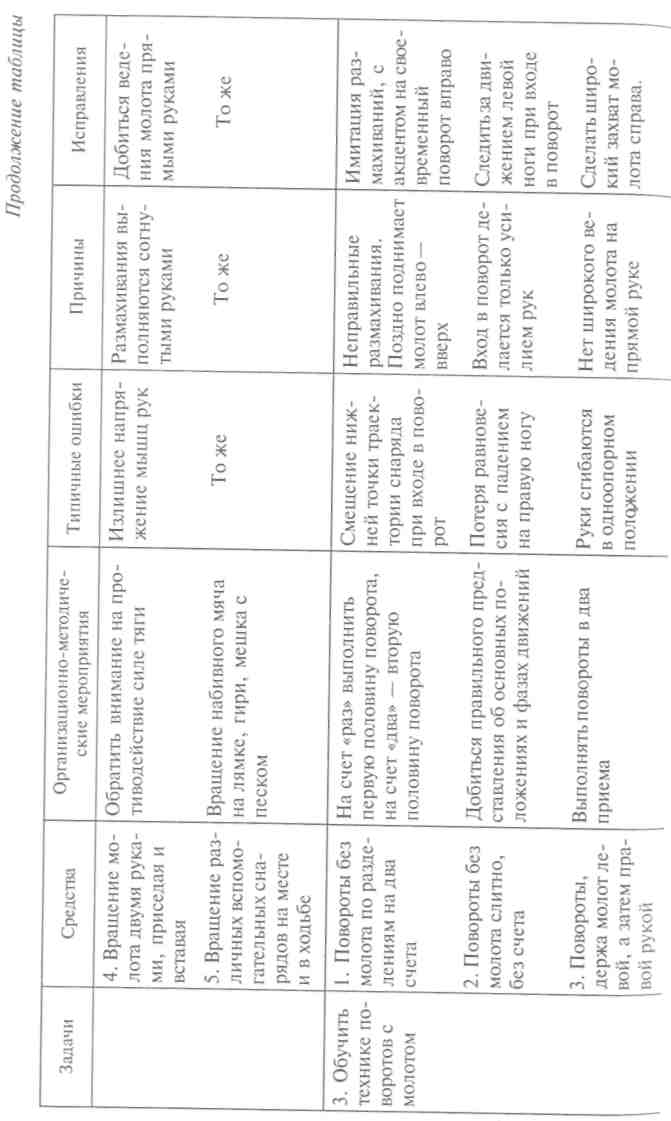
After familiarizing students with the technique of hammer throwing in general, it is necessary to study the method of holding the projectile. To do this, first grab the handle of the hammer with your left hand, then put your right hand on it to feel the grip. Then the hammer is raised in front of the chest and shaken
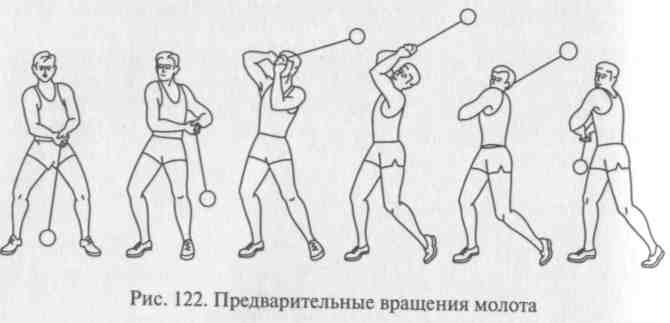
Preliminary rotations should be performed in a semi-squat, transferring body weight from one leg to another, in the direction opposite to the position of the hammer (Fig. 122).
To master the technique of preliminary rotations, it is necessary to apply the rotation of the hammer with squatting and standing up, holding it with one or two hands. For this purpose, auxiliary projectiles are also used (stuffed balls on the straps, weights, bags with
Sand, sticks).
To study the preliminary rotations, a whole
A number of special exercises:
Rotating the hammer with your left hand creates the right
the presentation of the work of the muscles of the trunk during the preliminary
rotation, accustoms to the correct counteraction to its force
rotation of the hammer with his right hand will improve balance and possession of the projectile;
rotation of the hammer with two hands, crouching and rising;
Rotating the hammer with two hands while walking. Take a step left
foot when the hammer passes above, and step with the right foot when
hammer below;
Rotation of a variety of shells in place and in walking.
Having mastered the technique of preliminary rotations of the hammer, you can
proceed to increase the speed of unwinding of the projectile.
Task 3.Teach the technique of turning with a hammer.
Learning the technique of turning in hammer throwing should begin with studying the movement of the legs, performing simulation exercises without a shell in two counts.
At the expense of “one”, the first half of the rotation (two-pore position) is performed, at the expense of “two” - the second half of the rotation (single-bearing position).
Then this exercise should be performed without counting, together, with uniform speed. Hands, when making turns, should be kept joined together, raised forward - down - to the right. The head must be held directly facing the shell, do not look at the legs.
To develop a "sense of balance", cornering exercises with eyes closed are performed.
When learning the technique of turns, it is necessary to apply a variety of special exercises with open and closed eyes.
Only after mastering these exercises can you study turns with a hammer.
Task 4.Teach the technique of the final effort.
The main exercise for learning the technique of the final effort is throwing a hammer with one turn.
To master the technique of the final effort, as well as the development of strength and speed, the following special exercises are used:
Throwing a core or kettlebell with both hands through the head back;
throwing a core or a weight with two hands to the left - back - up;
throwing the core with two hands with one turn;
throwing weights with two hands with one turn;
throwing weight with one turn;
throwing a stuffed ball on a strap with one turn;
pulling out a weight with a left hand with a turn;
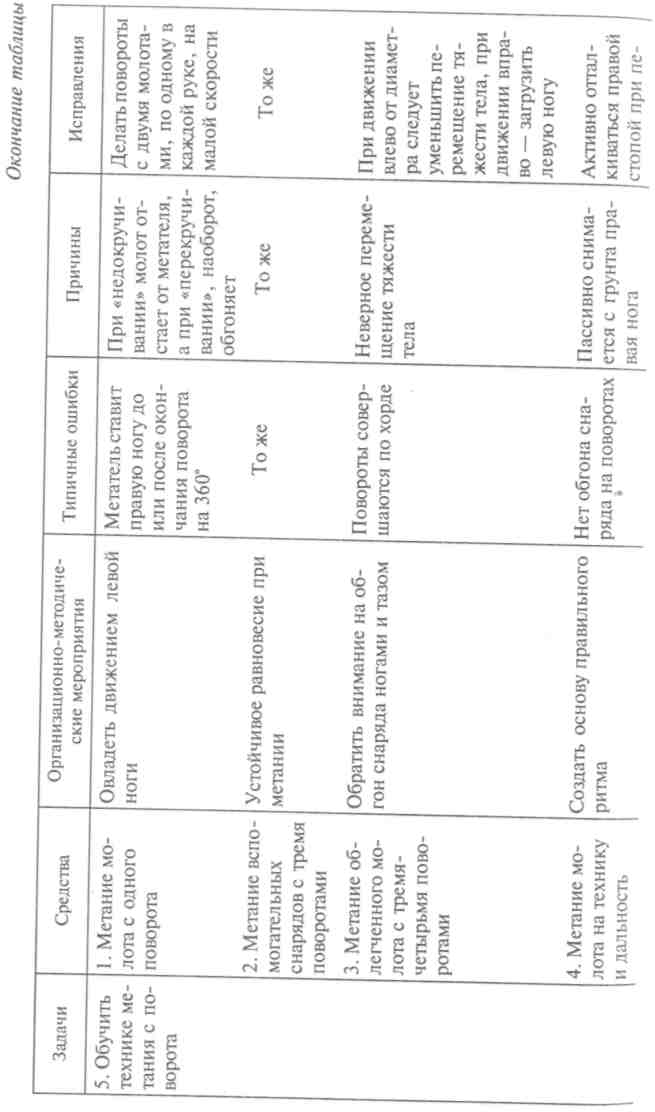
hammer throwing from one, two, three turns. Task 5.Learn the technique of throwing with turns.
Throwing a hammer with one turn;
throwing different shells (stuffed ball with straps, kettlebell, weight and others) with three or more turns;
throwing a lightweight hammer with three to four turns;
hammer throwing on equipment;
Initially, these exercises are performed without a final effort,
And the hammer is released by inertia. Then all throwing is carried out in full coordination.
When mastering the technique of throwing with turns, the following tasks are solved:
Master the movement of the left leg to create a holistic rotational-translational motion.
Maintain a stable dynamic balance due to the transfer of body weight to the left leg and the transition to it.
Perform movements without pauses in the work with the left foot and timely place the right foot on the support, without losing balance on it.
Master the overtaking of the legs and pelvis by the projectile due to the accelerated setting of the right leg on the support.
To create the basis of the correct rhythm due to the faster execution of the second and third main turns.
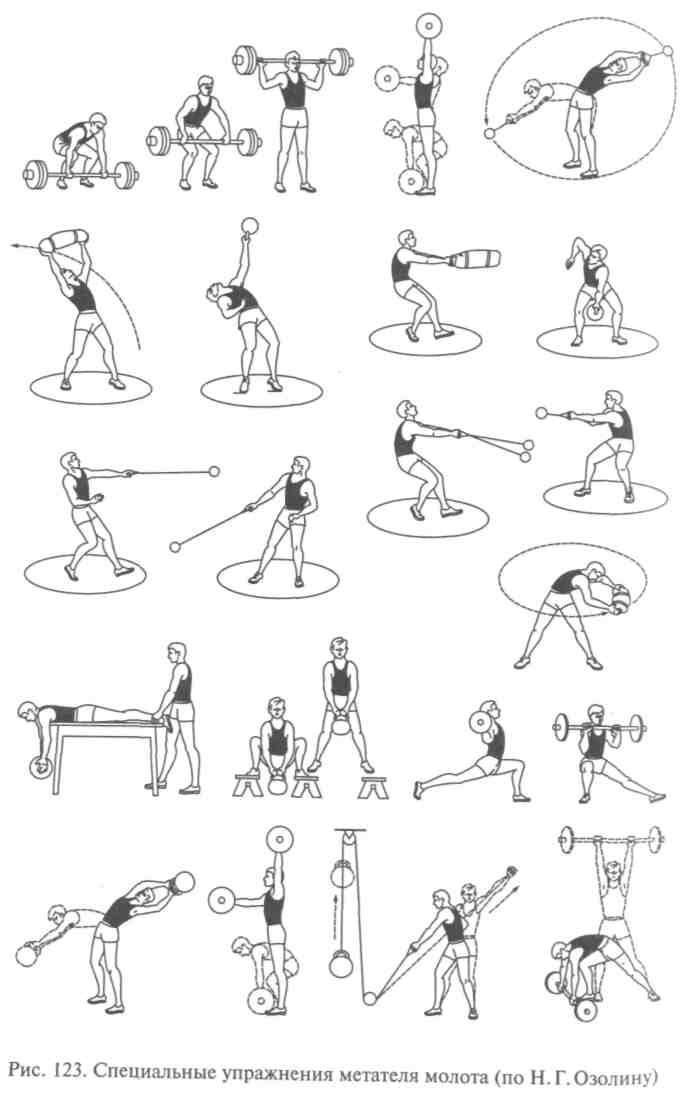
In the future, throwing alternating between the result and the technique should be alternated (see Fig. 123).
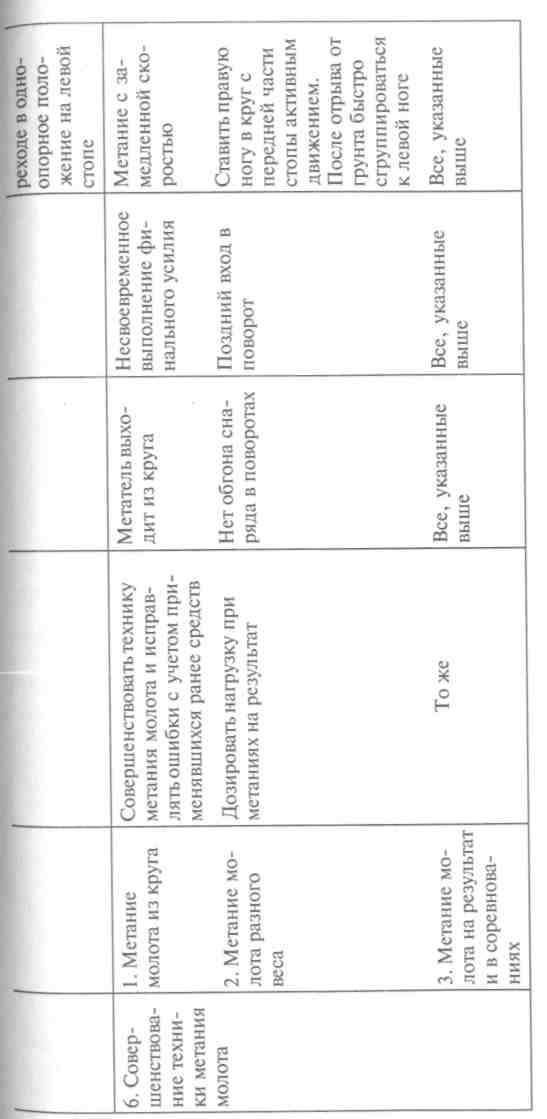
Task 6.Improving hammer throwing techniques.
To improve the hammer throwing technique, you can use all the exercises described above, as well as:
throwing a hammer from a circle, while observing the rules of the competition;
hammer throwing of different weights and with different intensities;
Recommends a detailed review of the “Model Learning Plan
the hammer throwing technique. ”

340

342
344
Test questions and tasks