Circular raglan from top to bottom
HOW TO DISTRIBUT HINGES for knitting raglan top to bottom.I can, but I found some little things that I didn’t know about here.
Before doing the calculations for raglan (however, as for everything else), it is necessary to tie a control sample to determine the density of knitting. Important! To avoid errors, do not be too lazy to tie a sample with a size of at least 15cm x 15cm. After that, we determine how many loops are in 1 cm. To do this, we count the number of loops in 10 cm. Suppose that 10 loops have 30 loops. Then 1cm \u003d 3n.
We measure the circumference of the neck \u003d 36 cm.
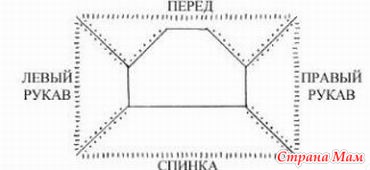
These loops must be distributed on the sleeves, front, back and ragged lines.
Let the ragged line will consist of 1p. Because four ragged lines, then 4 * 1p. \u003d 4p. set aside for raglans. Remains 108p. -4p. \u003d 104p. We divide these loops into 8 parts: 104p.: 8 \u003d 13p. We take one part on the sleeves (13p.) And three parts on the front and back (13p. * 3 \u003d 39p.). For myself, I note all the calculations in the diagram, it turns out more clearly and clearly.
Important! If a pattern is used in knitting, the pattern must be taken into account when distributing the loops. To preserve the beautiful addition of the pattern along the ragged lines, you can slightly change the calculation of the loops in the details, while maintaining their original number.
In order to prevent creasing in the finished product from the front on the neck and not pulling the product back, it is necessary to make calculations for the neck
CALCULATION OF THE REGLAN FOR KNITTING THE NECK IN EXTENDED ROWS
In order to prevent creasing in the finished product in front of the neck and not pulling the product back, it is necessary to knit the neck in elongated rows, i.e. to turn on all the loops gradually, following the corrected raglan calculations. About it now and will be discussed.
A bit of theory. The neckline consists of the following parts: the back, front and top of the sleeves. The neckline is a straight line. The upper part of the sleeve is a curved line. It is divided into 3-4 parts. The front neck is a curved line. In the middle of the neck of the front, the horizontal part \u003d 4 cm is left (for an adult). Each part from the middle is divided into 3 equal parts. If there is a residue, then it is added to the 1st part, counting from the middle of the front. Further, the loops of each part are divided into groups: the first part is divided into triples, the second part is divided into two, and the third part is divided into units.
Knotting begins with the back with two back raglan lines and gradually the loops of the sleeves and the front are included in the work. By the time all the loops are turned on, their number on the back and front should be the same. It should be remembered that while only the back and sleeves are knitted, the loops are added in the ragged lines of the back, and the number of loops in the ragged lines of the front remains the same. In order to avoid this difference, it is necessary to recalculate the loops: add the number of loops \u003d the number of parts into which the sleeve line is divided into the front loops, and subtract the number of loops \u003d the number of parts into which the sleeve line is divided from the back loops. From a practical point of view, the number of parts into which the sleeve line is divided is the number of tricks for which all sleeve loops will be included in the work. ![]()
Now let's move on to adjusting the calculations.
The initial calculations were as follows: 13 loops per sleeve and 39 loops per back and front. The loops of the sleeves are divided into 3 parts: 13: 3 \u003d 4 and the remainder is 1 loop, so the layout of the loops on the sleeve is 5, 4 and 4 loops. Then for the back you get 39 loops - 3 loops \u003d 36 loops, for the front 39 loops + 3 loops \u003d 42 loops. The middle of the neck of the front is 4cm * 3loops \u003d 12 loops. The remaining number of loops 42p-12p \u003d 30p is divided by half, it turns out 15 loops for each half of the neck of the front. We divide 15 loops into 3 groups: 15: 3 \u003d 5p in each group. Further, following theoretical calculations and slightly adjusting the breakdown by groups, we obtain the following combination of loops: 3p 3p 2p 2p 2p 1p 1p 1p. All changes are reflected in the scheme for raglans.
HOW TO KNIT THE NECK
All calculations and adjustments are made, now you can proceed directly to knitting. It is convenient to start knitting with short circular knitting needles, if none are available, they can easily be replaced with stocking knitting needles (they are also called knitting needles for knitting socks, 5 pieces are included). Later, when the number of loops during knitting increases so that they do not have enough space on the knitting needles, it is necessary to switch to circular knitting needles with a long fishing line. Ideally, it is good to use knitting needles with an adjustable fishing line, but so far I have not come across such. We also need marking rings to mark the raglan loops and the beginning of knitting. If you don’t have them, you can do this: make several rings from contrasting yarn and use them for marking.
So. We collect 108 loops on the knitting needles. In order to make it easier to understand the principle of raglan knitting, we will knit with facial stitch. I remind you that we will knit in a circle, so we close the knitting in a circle and knit one row of facial. Why do this, you ask? This technique will better fix the knitting needles and they will not dangle and twist so much. Personally, my attitude to knitting with stocking needles spoils precisely this initial moment. And after 3-4 rows connected, the fabric rigidly fixes the knitting needles and knitting becomes a song. It’s just worth a little patience, and there it will go on the thumb. Therefore, if you are just learning to knit, I advise you to knit this zero row, we will call it that. We knit further, following the principles of partial knitting in elongated rows.
1st row. We put a ring on the knitting needle, this marks the beginning of knitting. We knit: 5 persons left sleeve, double crochet, put a ring (thereby marking the raglan line), 1 person. raglana, nakid, 36 l.p. backs, yarn, put a ring, 1 l.p. raglan, double crochet, 5 l.p. right sleeve. We are knitting.
2nd row. Knit: 5 p.p. of the right sleeve, the crochet we knit p.p., 1 p.p. raglan, double crochet. outp., 36 outp. backs, crochet. outp., 1 outp. raglan, double crochet. outp., 5 outp. left sleeve. We are knitting.
3rd row. Knit: 6 persons left sleeve, double crochet, 1 l.p. raglana, nakid, 38 persons.p. backs, double crochet, 1 l.p. raglan, double crochet, 6 l. right sleeve + we include 4 more individuals in the work. right sleeve. We are knitting.
4th row. Knit: 10 p.p. of the right sleeve, the crochet we knit p.p., 1 p.p. raglan, double crochet. outp., 38 outp. backs, crochet. outp., 1 outp. raglan, double crochet. outp., 6 outp. of the left sleeve + we include 4 more outp. left sleeve. We are knitting.
5th row. Knit: 11 persons left sleeve, double crochet, 1 l.p. raglana, crochet, 40 l.p. backs, double crochet, 1 l.p. raglana, nakid, 11 l.p. right sleeve + we include 4 more individuals in the work. right sleeve. We are knitting.
6th row. Knit: 15 p.p. of the right sleeve, the crochet we knit p.p., 1 p.p. raglan, double crochet. outp., 40 outp. backs, crochet. outp., 1 outp. raglan, double crochet. outp., 11 outp. of the left sleeve + we include 4 more outp. left sleeve.
At this stage, all loop hoses are included in the work. Next, we include in the work the loops of ragged lines of the front and the loop of the neck of the front according to the same principle. When all the loops are included in the knitting, we knit in a circle and continue to knit in a circle, adding in every second row the loops along the ragged lines to the desired size of the fabric.
Knitted on circular knitting needles by raglan
Lovely needlewomen !!

Collar subtleties very often confuse even experienced knitters and serve as the main cause of setbacks and fears when knitting raglan from above.
After all, when knitting a boat collar, the front cutout is not made deeper, because of this, most of the calculations simply become unnecessary, while when knitting a sweater with a V-shaped collar, you need to make small corrections in the calculations when adding. All these subtleties are not so complex that they refuse to knit such a convenient model and are further described in detail about each of them.
So:
1. A raglan sweater with a boat neckline in the simplest version fits in without a groove in the front, so all loops are immediately typed on circular knitting needles. You just need to use a centimeter tape to measure the total length of the collar in cm, for which it is freely placed on your shoulders, imitating the cutout with a boat. The result is multiplied by the density of knitting and begin to knit the trim in a handkerchief or another selected pattern from the calculated number of loops. It should be remembered that the inlay should not be narrower than 2 cm. After the neck has been formed, the loops of the inlay are divided into the front, back and two sleeves: 1 part for each sleeve, three on the front and back and plus 4 corner loops. Next, the yoke is knitted with additions in pairs in each second row near each of the corner loops. This option looks very good when knitting summer dresses, light sweaters and smart blouses. 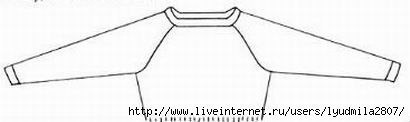
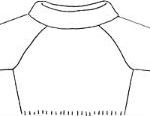
2. A golf raglan sweater with a collar can also be connected with the same back and front, as high golf can simply be bent in front more. The loops for the collar should simply be loosened up and tied with an elastic band or other chosen pattern of 15-20 cm, then proceed to knitting the yoke in the same way as when knitting a sweater with a boat collar. Children's models are often knitted with a collar, and the same back and front give practical mothers another additional opportunity: a sweater can be worn on either side, so elbows are not rubbed so quickly. 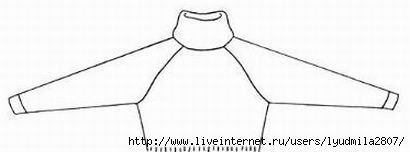
3. A wide-necked raglan sweater is a match. To determine the total length of the collar along the outer edge, you need to lay a centimeter tape around the neck where you want to get the edge of the collar, and multiply by the horizontal density of knitting. Again, a freely calculated number of loops is drawn onto the knitting needles and knitted from the outer edge of the collar to the inside, uniformly reducing about 10 loops every 3-4 rows until the collar is of the desired height and the number of loops is reduced to the required neckline. Next, several rows of the collar are knitted without decrease evenly, then the loops are divided and they begin to knit raglan according to the described principle. ![]()
4. V-neck raglan sweater. In this case, all the calculations for the neck, which were mentioned earlier, are needed. It starts to be knitted like a classic raglan, with only one difference: along the neckline, loops are added in each 3 or 4 rows, depending on how deep you want to make a neckline. So they continue to knit in straight and reverse rows until the number of loops of both shelves becomes equal to the number of back loops minus 1 or 2. Having gathered the missing loops on the knitting needles, they close the knitting into a ring and then knit in a circle.
Important: when performing the finishing inlay, it is necessary to perform a double reduction in the center of the front in each second row so that the inlay does not puff. Most beautifully looks 3 together with the front middle loop on top. If the neckline is very sharp, then similar reductions may be required in each row. A raglan sweater with a V-neck is considered to be a classic both in knitting for women and for men. 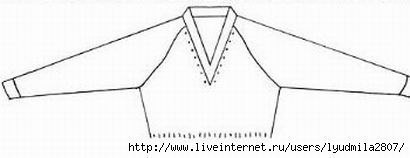
5. Raglan sweater with a square. One of the easiest options for the design of the collar, the loops along the neckline of the front end are not added at all, but simply typed onto the spokes all at once when the required depth of front is reached, their number is calculated based on the difference between the front and back widths. It is also important not to forget when making the finishing trim to make reductions in every second row in the front corners of the square neckline. So most often they knit summer sports models.
Here are such small collar subtleties, the knowledge of which will help to avoid unnecessary disappointments when knitting a raglan from above. It's all simple when you know. 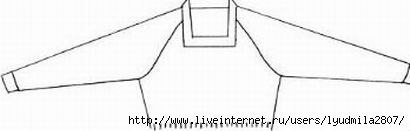
Raglan schemes, as well as more detailed information can be found here.
Collar subtleties very often confuse even experienced knitters and serve as the main cause of setbacks and fears when knitting raglan from above. After all, when knitting a boat collar, the front cutout is not made deeper, because of this, most of the calculations become simply unnecessary, while when knitting a sweater with a V-shaped collar, you need to make small corrections in the calculations when adding. All these subtleties are not so complex that they refuse to knit such a convenient model and are further described in detail about each of them.
![]() Boat Neck Raglan Sweater in the simplest version, it fits in without a groove in the front, so all loops are typed immediately on circular knitting needles. You just need to use a centimeter tape to measure the total length of the collar in cm, for which it is freely placed on your shoulders, imitating the cutout with a boat. The result is multiplied by the density of knitting and begin to knit the trim in a handkerchief or another selected pattern from the calculated number of loops. It should be remembered that the inlay should not be narrower than 2 cm.
Boat Neck Raglan Sweater in the simplest version, it fits in without a groove in the front, so all loops are typed immediately on circular knitting needles. You just need to use a centimeter tape to measure the total length of the collar in cm, for which it is freely placed on your shoulders, imitating the cutout with a boat. The result is multiplied by the density of knitting and begin to knit the trim in a handkerchief or another selected pattern from the calculated number of loops. It should be remembered that the inlay should not be narrower than 2 cm.
After the neckline is formed, the loop of the neckline is divided into the front, back and two sleeves: 1 part for each sleeve, three on the front and back and plus 4 corner loops.
Golf Collar Raglan Sweater can also be connected with the same back and front, as high golf can simply be bent in front more. The loops for the collar should simply be loosened up and tied with an elastic band or other chosen pattern of 15-20 cm and then proceed to knitting the yoke in the same way as when knitting a sweater with a boat collar.
Children's models are often knitted with a collar, and the same back and front give practical mothers another additional opportunity: a sweater can be worn on either side, so elbows are not rubbed so quickly.
 Wide Neck Raglan Sweater It seems to fit in. To determine the total length of the collar along the outer edge, you need to lay a centimeter tape around the neck where you want to get the edge of the collar, and multiply by the horizontal density of knitting. Again, a freely calculated number of loops is drawn onto the knitting needles and knitted from the outer edge of the collar to the inside, uniformly reducing about 10 loops every 3-4 rows until the collar is of the desired height and the number of loops is reduced to the required neckline . Next, several rows of the collar are knitted without decrease evenly, then the loops are divided and they begin to knit raglan according to the principle described above.
V-neck Raglan Sweater. In this case, all the calculations for the neck, which were mentioned earlier, are needed. It starts to be knitted like a classic raglan, with only one difference: along the neckline, loops are added in each 3 or 4 rows, depending on how deep you want to make a neckline. So they continue to knit in straight and reverse rows until the number of loops of both shelves becomes equal to the number of back loops minus 1 or 2. Having gathered the missing loops on the knitting needles, they close the knitting into a ring and then knit in a circle.
Important: when performing the finishing inlay, it is necessary to perform a double reduction in the center of the front in each second row so that the inlay does not puff. Most beautifully looks 3 together with the front middle loop on top. If the neckline is very sharp, then similar reductions may be required in each row.
A raglan sweater with a V-neck is considered to be a classic both in knitting for women and for men.
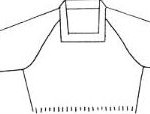 Raglan Sweater .One of the easiest options for the design of the collar, the loops along the neckline of the front end are not added at all, but simply typed onto the knitting needles all at once when the required depth of front is reached, their number is calculated based on the difference between the front and back widths. It is also important not to forget when making the finishing trim to make reductions in every second row in the front corners of the square neckline. So most often they knit summer sports models.
Here are such small collar subtleties, the knowledge of which will help to avoid unnecessary disappointments when knitting a raglan from above. It's all simple when you know.
Comments
5 comments to “Collar details when knitting raglan top”
Calculations when knitting raglan on top
Raglan knitting on top or from the neck is built on a few simple calculations. The main reason for all the failures, and hence the fear of knitting models based on it, lies in the desire to immediately execute a rather complex model without understanding where and where these or other numbers come from. In this case, some calculations are superimposed on others and the result is something that looks a little like raglan. Therefore, it is easier and more reliable to move gradually from simple to relatively complex. The simplest in this case is a sweater in which there are no fasteners and it fits from the neck with a single cloth.
First, determine the width of the neck of the back, which is equal to the distance between the upper points of the posterior lines of the raglan. It should be remembered that for a child aged 9-14 years, it is from 11 to 13 cm, for women 14-15, and for men 16.5-18 cm. There simply cannot be more. Now we multiply this figure by the knitting density (for example, the knitting density is 2 loops per cm, and the width is 15 cm, so you should dial 30 loops or 29 or 31 if necessary, the central loop for the pattern or the requirements of the pattern report). But that is not all.
The width of the sleeve is one third of the width of the back, that is, in our case, 10 loops or 11 or 9, again if you need a central loop or the pattern requires it. Already obtained 50 loops (two sleeves and a back).
Next, add another 6 loops for corner loops. This is a constant amount for any calculation. It turns out 56 loops (front loop — corner loop — 10 sleeve loops — corner loop — 30 back loops — corner loop — 10 sleeve loops — corner loop — front loop).
The calculated amount is put on the knitting needles, but they are not closed in a circle, because there is still no front, and they knit. The neckline is cut in straight and reverse rows. The first row is knitted with the back loops and then in each front row 10 loops are added in the following order: 1 loop at the beginning and at the end of knitting, two loops on both sides of the corner loops. There are dozens of options for the implementation of raglan lines, which will be considered separately, but for now you should not be distracted from the calculation.
Having tied 5-7 cm, try on a cloth in the form of a crescent and see if knitting has reached the jugular fossa. If there is no, you need to knit further, if so, then stop and count the loops. The number of front loops is still smaller than the backs, and for further knitting the coquette it should match, so they simply get the difference by gaining the missing amount between the two “crescent horns”. Knitting closed in a circle. Now the addition goes only along the corner loops. and this is 8 loops in every second row. The number of loops on the spoke is growing, so for the convenience of fitting and working, it is advisable to switch to knitting needles with a longer fishing line.
The raglan line should end 3-5 cm below the armpit. For most women, the length of the raglan line ranges from 25 to 28 cm, men 30 - 33 cm, for children knit with a solid margin for growth. These numbers can be slightly increased when knitting for broad shoulders.
Important: often yoke knitted openwork or with multi-color patterns. If the first expands the canvas, then the second noticeably pulls it together. therefore, the rhythm of additions can change, it can be through 3 or 4 rows of knitting. This is valuable for the possibility of fitting during knitting, which allows you to make corrections.
Often, especially ladies of luxurious sizes, get a few more cm (sometimes even up to 8-10) for a better fit in the armpits (sometimes even 8-10) and continue to knit the front and back in an increased amount. Sleeves are knitted to the desired length with a gradual habitual reduction of loops. It is advisable to knit the back and before with a single fabric to avoid side seams.
That's all the basic theoretical wisdom of calculating when knitting a raglan sweater from above.
Tips With Osenki
raglan top and neckline knitted from the neck
You can knit both top and bottom. It must be borne in mind that when knitting from above, you must first knit a fewshortened rows
so that the neckline on the back is higher. The collar is knitted after the main product is knitted.
If you knit on top, that is, suchadvice:
Draw the required number of loops on the knitting needles with an auxiliary yarn, knit several rows directly, then with any sufficiently strong and slippery thread (a bobbin is suitable for several additions), knit 1 row. Then knit 1-2 yarn with the main yarn and then knit according to the picture.
Once the product is ready, steam it off and pull out the slippery thread. A piece of auxiliary thread will fall off. Put loose loops on knitting needles andknit the collar up
.
If the neck is too big, then tie the first 3-4 rows with front stitch, evenly removing the extra loops. This will allow you to avoid a seam along the neck and give more stretching.
It is necessary to knit 1 row with the main thread with facial loops, it is on these loops that the collar will be typed. Then we knit to the middle of the row + 10 loops, unfold knitting, 20 loops, spread, knit to the last knit in the previous row +5 loops, spread, in each row we knit 5 more loops. We continue this until a difference is obtained in the height of the neck of the back and front (5-7 cm). We knit the remaining stitches to the end, then everything is worn on circular knitting needles and in a circle to the end.
raglan calculation from top to bottom
If simple, then please. Using the sample connected by the main pattern, calculate the number of loops \u003d neck circumference (décolleté). The resulting number of loops is divided by 3 -
2 parts on the front and back and 1 part on the sleeves. For example: loop number 90: 3 \u003d 30. This means that there are 30 loops on the front and back, and 15 on two sleeves. To this number add 4 or 8 loops, on both sides of which you will make additions. So you have 94 (98 loops.
If you want to make a fastener in the raglan line or on the back (front), add loops to the trims, say 5 and 5. Now you have 104 (106) loops.
Gather the desired number of loops on the annular short knitting needles and knit an elastic band or, if the sweater is without elastic, several rows without adding, approximately 2 cm in height, depending on the thickness of the threads. Hinges that play the role of raglan lines are best indicated with colored threads or special pins. So you will not lose them. We begin the increase. Since there are no wrong rows in knitting, in the first row add 1 loop before and after the raglan line loops, knit the crochets in the next row, then add again.
And so on, until you dial the number of loops on the front and back \u003d chest volume + 5 cm. (The sweater, according to your desire, can be more spacious).
Now, the front and back can be transferred to long circular knitting needles, and the sleeves can be replaced. Knit in front and back round to the desired length, close the loops and go on to knitting the sleeves. Sleeves can also be knitted round on short circular knitting needles. In this case, a vertical line to reduce the loops will go from the armpit. On both sides of the central loops of the armpit, decrease the loops through an equal number of rows, for example, in each 6 row. But if it is difficult, you can knit with a fabric, in the usual way, to the desired length, and then sew the inner seam.
I wish you success!
1. The neck in the products "raglan" and "kimono" when knitting "top" is best done by partial knitting (in this case, "elongated rows"). That is, the required number of loops is typed, which is gradually, in parts, introduced into the work (if necessary, I can describe it in more detail). Thus knitted neck Looks a lot neater.
2. V neckline in products connected "from above", it is possible to perform, but this requires a more complex and thorough calculation. I would first associate a full-size sample with a round neck (in width, a couple of centimeters greater than the estimated depth), and then mark it on the sample V neck and performed the calculation. But still, products with such necks are recommended to be knitted “from the bottom”.
“Elongated rows” is a type of partial knitting, the meaning of which is the gradual introduction of loops into knitting (“shortened rows” - a gradual withdrawal of loops from knitting)
I explain by the example of the execution of the neck.
1. Dial the required number of loops (calculation - the perimeter of the neck, in the simplest case - girth of the neck + increase)
2. Knit the front row, simultaneously marking the lines of raglan. You also need to make additional markup: divide the loop of the sleeves into 4-6 parts, and the shelves into 6-8.
3. We begin to carry out partial knitting from the WRONG row (so that the last loops are introduced in the front row, after which the knitting can be closed in a circle). We knit the hinges of the shelf, sleeve, back and the first portion of the second sleeve. We turn work
4. We make a crochet, knit, not forgetting to make increases on both sides of the raglan lines, to the first portion of the opposite sleeve. We turn the work.
5. We make a crochet, we knit until the first crochet, it must be knitted together with the next loop so that the crochet itself is turned out from the inside (in classical knitting, so: swap the crochet and the next loop so that the crochet is on top and knit them together with the wrong) . Tie to the end of the second portion of the loops. Turn the job.
6. The crochet, we knit until the crochet on the opposite side (do not forget to add to the raglan lines), the crochet and the next loop we knit together the front. We tie to the end of the second portion of loops. We turn the work.
So knit until all the loops are put into operation.
Raglan when knitting from the neck, i.e. top down
Behind:
- sweaters can be carried out in a circle "pipe", sweaters on the clasp-rotary rows "back and forth";
- work can be started from the collar and down, going to the main canvas, or to tie the collar up from the neck, or to sew (sew on) a separately connected collar;
- at the beginning of work, when there are still a few loops, the loops can be placed on four stocking knitting needles, knitting with the fifth knitting needle; then go to the circular (circular) knitting needles of the same number;
- the back, front and sleeves to the side seams are knitted with one fabric, no need to stitch along the raglan lines;
- the opportunity to try on during the work and make adjustments;
- makes it possible to extend the thing if necessary, it is enough to dissolve the elastic band of the cuffs or bottom, put the opened loops on the knitting needle and tie the details to the desired length;
- if it is necessary to dissolve such a model, then we get the minimum number of nodules.
against:
- work without a blind pattern, not according to the drawing, but according to preliminary calculation; outgoing from measurements of the volume of the base of the neck;
- it is harder to knit, the work is bulky and the fabric is heavier than when knitting with individual details;
- inconvenience when processing parts at the end of work;
- restriction when choosing patterns, because knitting is directed from top to bottom.
CALCULATION AND KNITTING
Be sure to knit a control sample of the main knitting and a sample of the pattern for raglan lines. According to the sample, we calculate the density of knitting.
The number of rows of 10 cm in both samples should be the same, otherwise the raglan lines "pull" the work. Remember that when knitting from the neck around raglan lines do increase
, and when knitting raglan products from the bottom - decrease
along the raglan section on both sides of the back, front, and sleeve parts.
The girth of the neck at 48 r is equal to an average of 36 cm. We measure the girth of the head and check the density of the control sample when it strong tensile, how many loops you need to dial so that the head, taking into account the plasticity of the canvas, crawls into the calculated neck, because neck circumference - 36cm, and head circumference - an average of 55-57cm.
Example No. 1 for a sweater.
Suppose, according to the sample, the calculated number of loops for starting work \u003d 126p (36cmx35p: 10cm \u003d 126p with the sample 35p in 10 cm and 30 rows). For 4 raglan lines, leave 3 loops each, total 12p. For knitting parts, 114 points (126-12) remain, which we distribute, dividing into three equal parts - 114: 3 \u003d 38p. On the front and back there are 38 loops and 38 loops on two sleeves, i.e. on 19 loops. If we get the remainder when dividing, then we add it to the loops of the front. Having performed the preliminary calculation, we will introduce two corrections so that the product better fits the figure.
Amendment No. 1. It is performed to reduce the future width of each sleeve in its widest place (armhole level) by 2-3 cm. Add down loops equally to the front and back, respectively. If, for example, we reduce one sleeve by 2 cm (i.e., by 7 loops per sample), then we redistribute the calculated loops as follows: on one sleeve 19-7 \u003d 12p, on the second - 12p., And to the back and front we add 7 loops each, i.e., to 38n + 7n \u003d we get 45 loops each.
Amendment No. 2.
It is counted when knitting a "sprout". It is made to determine the number of loops and rows for the correct knitting of the neck in front and back. The neck of the back should be higher than the neck of the front on average from 6-7 cm or more cm. If this is not done, the product will be pulled back, "pressed" on the neck, and horizontal folds (creases) will be collected in front.
We determine from our pattern the difference in the height of the neck of the front and back. Let's say it's 9cm. We check according to the control sample, for how many rows (here 30x9: 10 \u003d 27r., We divide into 2 halves and we get that the loops need to be put into operation in 13 steps) we must complete the neck by introducing the loop of the sleeves and the loop of the neck halves into the work. In the center of the neck of the front leave an even horizontal part equal to 4-5 cm or 18 loops (5x3.5) in our case. The smooth concave line of the neck is calculated using the following formula: the loops of each half of the neck are divided into 7-9 parts (from 1 to 3 loops in each part), leaving the loops of the straight section in the center of the neck.
We do the calculation. In our example, the number of loops of each sleeve after the 1st amendment is 12p, we divide it into 5 parts (2 parts of 3 loops, 3 parts of 2 loops) and we knit the sleeves in elongated rows (partial knitting, elongated / shortened rows, see. This runs like this:
1p. - we knit all the back loops (from right to left), adding before and after raglan lines (which are between the back and sleeves) in one loop, then we knit the 1st part (from 5 parts of the increase) from 3 loops of the left sleeve.
2p. - turn to the wrong side (with a yarn to avoid the formation of holes), knit the 1st attached part of the left sleeve, the raglan stitches with the first increments, the back loops, the raglan stitches and the 1st part of the right sleeve. We make a crochet in order to avoid holes when turning the work and turn the product to the front side.
3R.- we knit as the 1st row with the addition of the 2nd part of the left sleeve, etc.
We add all five parts of the left and right sleeves.
At this point, the number of back loops will increase by 10because we added loops on raglan lines (5 times in a loop on the left and on the right, i.e. by 5x2 \u003d 10p). After the first amendment, there were 45 loops in the front and back, and after putting the sleeves into operation, there will be 55 loops
To keep the number of loops at the front and back, we redistribute the number of loops for the back and front, i.e. carry out the 2nd amendment.
To do this, subtract half of the added loops (10: 2 \u003d 5) from the back loops (45-5 \u003d 40) and add half to the front loops (45 + 5 \u003d 50).
The final calculation after the introduction of two amendments is as follows: 126 loops - commonly .; by 3 p. on 4 regulation lines 3x3 \u003d 12 p .; 40p.-back; 50 p. - before and 12 loops on the sleeves.
After all the calculations and corrections we knit like this:
1. We collect on circular knitting needles (ring knitting needles, knitting needles on a fishing line) all 126p. right away.
2. We mark with a colored thread the loops of raglan lines.
3. We knit from left to right:
1p. - half shelf loops + increase loops and loops of the 1st regulation line + 1st sleeve + increase loops and loops of the 2nd regulation line + back loops and attach loops of the 1st part of the sleeve. We turn the work and knit the wrong side, knit the attached loops of the 1st part of the sleeve, the loops of the back and attach the loops of the 1st part of the second sleeve. We turn on the face side and knit further, attaching each of the 5 parts of the sleeves after the back loops, alternately, not forgetting to make additions on both sides of the raglan lines in the front row.
We attach the neck of the front for (13-5 \u003d 8) parts (the number of parts to increase the sleeves and the front is calculated by the number of rows of the sample in cm to the depth of the neck). The larger the number of parts, the greater the curvature line and the depth of the neckline. Remember that in the center of the neck of the front we leave an even horizontal part of 4-5 cm (we count the number of loops according to the sample, here 5x3.5 \u003d 18p)).
In our case, we have 50p in front, we subtract the number of loops of the horizontal part (50-18 \u003d 32) and divide it into two parts - left and right. 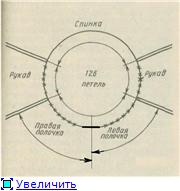
Half of the neck curve is 32: 2 \u003d 16 loops. We knit them in parts. We distribute the loops into 8 receptions of 2 loops and we introduce these loops as when knitting sleeves - by partial knitting, making increases before and after 4 raglan lines. Then we add the loops of the straight section and from this place we continue to knit all the parts together not in rotational rows, but in a circle, not forgetting to add loops at the raglan lines.
For sweaters. When executing a product with a fastener, add half of the loops to each half of the front loops, which are half the width of the strap (protruding parts of the straps, the second part of the loop loops is included in the number of shelf loops):
When making a product with a fastener, we do not work in a circle, but in rotary rows - we knit on the front side with trims, if the trims are seamlessly knitted, we turn the work to the wrong side and we knit on the wrong side.
We knit until the length of the raglan is equal to 28-30 cm for 48 solutions.
We control the work as follows. If we have the 48th rr, then back width at the level of the armhole should be equal to POG / 2 + 2-3cm for free fit \u003d 50cm, i.e. 35phx50cm: 10cm \u003d 175p.
On the neck of the back we scored 40 loops. 175-40 \u003d 135p -1p \u003d 134p
On each side of the back part we add 67 loops per 28 cm of the length of the ragged lines. 28cm of ragged lines in the pattern are 30 rows x 28cm: 10 \u003d 84 rows. Similarly, we control the width of the sleeve and front. We make adjustments to the rhythm of the increase in loops if necessary.
Example 2 for a sweater.
at a density of 2.5 loops in 1cm
raglan for stoop
Nadezhda F
Tip
to eliminate stoop:
As you pick up the neck, immediately knit a few shortened rows so that the throat does not rise much in front, and then, in the places of stoop (everyone has different stoops), still crochet shortened rows on the back, as is done in female models on the chest, just do not overdo it ! To do this, measure the length along the front and along the back, then calculate according to the sample how many shortened rows you need to add. You can knit capturing and loop sleeves.
just don’t do the same length, it’s better to start with the shortest, and then a few loops longer and longer.
and on the back - there are already according to the features of the figure.
Here, in the striped figure, you can see how the shortened rows go.
Maybe a little help to understand
such a calculation:
From the number of loops in the neckline we subtract 4 times, for example, 2 loops (ragged lines, you can run one loop and more as you want), i.e. 4x2 \u003d 8. Mark with colored thread or markers.
Further, the remainder is divided into three parts. 1/3 on the front and back, and 1/3 in half - 1/6 - on the sleeves. If there is an indivisible residue, add it either to the back, or to the front, who has wider, or chest with a wheel, or back stooped
All. Then the same shortened rows went so that the neckline would not rise up the neck if the neckline was cut out. Nakida, or air loops (whatever you want), fit before and after each rowed line, through a row. Those. in one row they added, in the other they faded according to the drawing, etc. Measure, do not press armpits - remove for extra. knitting needles / pins. Raglan lines can be sent to the hinges of the sleeves, or to the hinges of the back / front, or divide both there and here. Next, knit either seamlessly or individually - this is how you see fit. If the product is not solid in front, but, for example, on a fastener and the strap is seamlessly knit, then do not forget to add strap loops to the initial set of loops. Then transfer the loop of the sleeve to the knitting needles and knit the sleeve. You can also with a seam, or without.
Yes, so that later, when the product is tied, do not tear your hair literally and figuratively,it is necessary to correctly calculate the initial number of loops so that the head crawls through.
Raglan and methods (direction) of its implementation
The name of this cut sleeve came from the name of the English lord, who returned home after the Crimean campaign with a severe wound in the shoulder. He ordered an obscure tailor coat, the seam of the sleeve of which would not injure the wound with his seams and does not constrain movements. Since then, raglan sleeves have become classic and never out of style. However, one must remember that he visually narrows his shoulders.
1. The implementation of products with sleeves cut raglan when knitting from the bottom (with or without armholes):
1.1. Raglan separate details, stitching, knitting from the bottom, without decoration armholes and sprouts:
1.2. Raglan whole detail (sweaters, made in a circle with one detail in front and back of the pipe without seams) or sweaters on the clasp (rotary rows) before joining separately connected sleeves (in a circle to the armholes, rotary rows to the armhole):
In this case, the back, before (with or without a fastener), and the sleeves are knitted with individual parts, round-the-clock rotary rows. The parts are executed, assembled into a fabric, steamed, stitched in the necessary places.
1.3. To get models with in-depth(extended) raglan line
, we knit, adding loops along raglan lines until their length is 27 - 32 cm, i.e. until we reach the desired length. The frequency of increases along the lines of the elongated raglan is less often than with a regular line. The longer the raglan line, the lower the armhole and the wider the sleeve. The increases on the part of the back-front parts and on the side of the sleeves are not made equally and require individual calculation according to the associated pattern and pattern. In models with elongated raglan lines, it is necessary to control the length of the line of the side seam + lower seam of the sleeve. Their total length should be such that they can freely move their hands, so it is impossible to lower the raglan line to infinity without expanding the details of the back-front. The main thing is to determine for yourself the degree of fit and location of the armhole. It's clear that fitting option
with a low armhole it will not work - there will be nowhere to move your arms, you will walk with your arms down, as if you were swaddled. The model will take on shape close to bat-type sleeves.
Ways to accomplish raglan cut (raglan lines)
a lot, but using any of them, you should remember that the edge is elastic and the raglan line is not tightened - the extreme loops (edge) at the beginning and end of the row on the parts must be knit evenly throughout the entire cut chained
(see) according to preliminary calculation.
2. Execution armhole and undercuts in raglan from below (or in reverse when knitting from above).
2.1 Raglan, executed from below by individual parts or an integral part (sweaters, made in a circle with one part in front and back without a seam pipe) or sweaters on a fastener (rotary rows) before joining separately connected sleeves (in a circle to armholes, rotary rows to armholes):
1. Tie up the “carcass” armhole level from the bottom up, divide the loops into the front / back. Details of the front / back are made out either:
- with armholes (gradually reduce armholes on the front on both sides of the part from a separate ball, on the back on both sides of the part from a separate ball;
- with undercuts - close loops to the width of the armhole in one row (straight lily);
- without armholes.
2. Tie both sleeves to the armhole line and do the same with them.
3. Then, after all the armholes have been completed, all 4 parts are collected on circular knitting needles, highlighting the raglan line at the joints of the parts, to think how many loops to leave on the decoration of the raglan decorative line, or not to select the raglan line. At the edges of each part, we will make a decrease on raglan, i.e. back - two times, sleeve1 - two times, before - two times, sleeve2 - two times, Only 8 points of decrease along a circular row!
In total, we get conditionally on circular knitting needles "X" loops. At the end of the work around the neck, according to the pattern and measurement of the length (girth) of the neck line, it should remain "U"loops
4. Next, calculate how many rows of work
make reductions (decrease in 8 places along the circular row at the calculated interval), i.e. Xminus At = Z - loops reduced along the raglan line for L ranks of work.
To properly fit the product with the raglan sleeve when knitting from below, its details can be performed in any direction indicated above, but with the armholes designed so that in the armpit area the sleeve "sits" in place without creases and creases. Armholes make out in the form of:
- undercuts
- a direct section of loops closed to the armhole and, in fact, the design of the
- armhole
with smooth reduction of loops. The armhole is measured by the difference between the measurements of the POG and the width of the front or back on the pattern of its size.
Text of the author: “The first time I came across a reasonable description of the raglan. It’s clear and accessible, and the result so far pleases - the preliminary fitting satisfied 100%! I learned that this wonderful description is given in the book of Anna Vlasova, a teacher of labor from St. Petersburg. thanks a lot!
here is the very description and calculation. maybe someone else will come in handy.
To knit a sweater with a raglan sleeve, you need to make a scheme.
Calculation of loops according to the measurement of neck circumference (OR) and knitting density, which we will determine from the sample.
EXAMPLE:
If Osh \u003d 34 cm, the gain in freedom of fit is 4 cm, and the knitting density is 2.5 loops per 1 cm, then you need to dial 2.5x (34 + 4) \u003d 95 loops
Distribute these loops on all the details of the sweater.
If each raglan line will consist of 1 loop, then on 4 lines they will need 4, then 95-4 \u003d 91 loops.
Divide the remaining loops into 4 parts (front, back and two sleeves)
Since 91 is not divisible by 4 without remainder, round it to 92.
92: 4 \u003d 23 loops.
It was experimentally established that 1 such part should be given to the back, 2 to the front and 1 to 2 sleeves ..
But so that the front is not too wide, reduce it by 3cm, i.e. 2.5 × 3 \u003d 7.5 loops and get (23 × 2) -7 \u003d 39 loops.
Of the 7 loops taken, 3 add to the sleeves: (23 + 3): 2 \u003d 13 loops, and 4 loops to the back: 23 + 4 \u003d 27 loops. 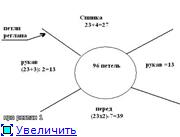
It looks like this
We knit 96 loops on the knitting needles and knit the first row with a 2x2 elastic, close the knitting into a ring and continue to knit a stand-up collar 3 cm high. After that, knit 1 row with the front loops and make the distribution of loops on the part of the product: mark the first rag-stitched loop with colored thread (let it will be at the very beginning of the row). From it to the left, count 27 loops (back), mark the next again with colored thread (ragged loop), from which count 13 loops (right sleeve), again mark the next ragged line with a colored thread, count 39 loops from it (in front), then mark colored thread last raglan line. Let's count how many loops are left on the left sleeve (there should be 13 of them, as on the right sleeve) 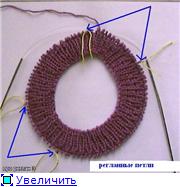
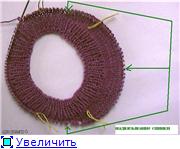
To prevent the collar of the sweater from being pulled back, we will slightly impose the back: we will knit a row of loops from the 1st ragged line to the 3rd or 4th loop behind the 2nd ragged line, turn the knitting and knit a row along the wrong side, going beyond the ragged line to 3-4 loops (until the increase here is done). So going into 3-4 loops at the end of the previous row, knit a few more rows until you reach the middle of the sleeves ..
After that, we finish the imposition and knit in a circle, including all the loops located on the spoke.
(it turns out that we impose the back in shorter rows, but in order to make the “transitions” less visible, I do this: each time turning the work, I make 1 yarn at the end., and then I knit a row and reach the yarn, I knit it with the next loop together in a pattern.) 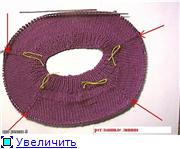
Now we will concentrate all our attention on knitting the ragged lines with increments of loops.
We knit in a circle, the crochets before and after the ragged lines (loops) we make through a row and we knit them in the next row with the front crossed loop (behind the back wall).
In this case, loop the raglan line with a non-knit one, leaving the thread behind the knitting.
So we knit until the raglan line reaches 30 cm, then we will try on. If the armhole is narrow, we will knit a little more, but so that the sleeve does not turn out to be too wide, at the ragged lines on the side of the sleeve, make yarn over 2 front rows.
Next, we proceed to knitting individual parts (backs, front, sleeves)
I usually knit a SEAMLESS product, that is, I remove the loops of both sleeves on additional (circular) knitting needles, and on the main circular knitting needles I have back and front loops. I continue to knit (front and back) in a circle to the desired length.
The sleeves can be knitted separately and sew a side seam, or it can be done in a circle without a seam. If during fitting it turns out that the sleeve is too wide, then it is necessary to make reductions.
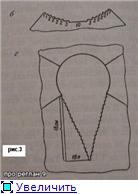
Knowing the density of knitting, we determine the number of loops on the base of the neck and distribute the loops on the back, front, sleeves and ragged lines. For example, with a knitting density of 2.5 loops per 1 cm and a neck circumference of 36 cm, 90 loops (2.5 * 36) must be put on the knitting needles. Suppose that in this example each ragged strip consists of two loops, then 4 strips are 8 loops (2 * 4). The remaining loops are divided into three equal parts - the back, front, and sleeves (Fig. 1) 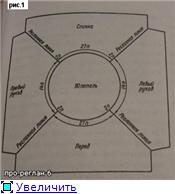
In our example, 82: 3 \u003d 27 + 27 + 28. The resulting parts must be previously distributed: 27 loops on the back, 27 loops on the front, 28 loops on two sleeves (14 loops each).
In order for the product to have a neck in front deeper than on the back, two corrections are made in the calculation.
1. In order for the sleeve to not be wide on the chest line, it is necessary to narrow each sleeve by 1.5-2 cm when calculating, thus increasing the back and front. In this example: 2.5 * 2 \u003d 5 loops, - therefore, each sleeve will be already 5 loops, and the front and back will be 5 loops wider. Sleeve: 14-5 \u003d 9 loops, front and back: 27 + 5 \u003d 32 loops.
2. In order to deepen the neck of the front, more rows are knitted along the back. To do this, knit the back loops, gradually adding to them in 3-5 receptions, the loop of the sleeve as follows. Closing a circle in the middle of the front, mark the ragged lines with colored thread and begin to knit in a circle (Fig. 2) 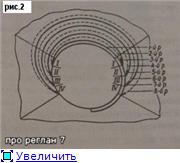
NOTE: while it is not enough loops on knitting needles it is better to knit on stocking knitting needles (i.e. on the fourth fifth we knit)
1st row - knit the left half of the front, the loops of the left sleeve, the loops of the back, the first part of the loops of the right sleeve (since we have 9 loops on the sleeve, divide them into 4 parts: 3 + 2 + 2 + 2 , i.e., we knit 3 loops in the first row), simultaneously adding loops in each front row near the ragged lines along the back;
2nd row - turning to the wrong side, knit the first part of the right sleeve (3 loops), the back loops, the first part of the left sleeve (also 3 loops);
3-row - on the front side, knit the first part of the loops of the left sleeve (all the same 3 loops), the loops of the back, the loops of the first and second parts of the right sleeve (3 + 2 \u003d 5 loops)
Knit 8 rows, since in this example, the loops of each sleeve are attached in 4 steps. By the time of knitting all the loops of the sleeves, the number of loops of the back and front should be the same. For this, it is necessary to take into account the loops that are added along the back of the raglated lines. For example, if the loops of each sleeve are knitted in 4 steps, then each looped back line will have 4 loops added, so the number of loops on the back will increase by 8 loops. Therefore, it is necessary to calculate so that at the beginning of the work, the back was wider by 8 loops. In our example, from the number of back loops, it is necessary to subtract 4 loops, adding them to the front loops. On the back then there will be 28 loops (32-4), and in front - 36 loops (32 + 4). Thus, after the final calculation, the number of loops on the parts along the neck will be: on the back - 28 loops, on the front - 36 loops, on each sleeve - 9 loops (Fig. 3 a).
The smooth concave line of the neck is calculated using the following formula: the loops of each half of the neck are divided into 7-9 parts (from one to three loops in each part), leaving an even horizontal part equal to 4 cm in the center of the neck (Fig. 3 b). In our example: 36-10 \u003d 26 loops, 26: 2 \u003d 13 loops, distribute the loops into 7 parts - 1,1,2,2,2,2,3.
After the "backing" of the back is finished, in the same way we begin to attach the neck loops: in the front row on two sides of the ragged lines we begin to make additions (I recall that when backing was applied, the additions were made only on the back) and we knit as follows: we knit the left side front, left sleeve, back, right sleeve and one loop from the neck loops, turn the work, knit the wrong row and knit one loop from the second part of the neck loops and so on, attaching another one, then 4 times 2 loops and at the end 3 loops on each side. Gradually introducing all the loops into the work, we knit in a circle, continuing to add loops on the raglan lines, the length of which is approximately 28-30 cm. Their length will be sufficient if the width of the back between the raglan lines is equal to the sum of the measurements - half-circumference of the chest plus an increase in free fit (2 cm). Then each piece is knitted separately. Loops of raglines attached to the back and front. If there are many loops (for example, arana), they are divided in half and attached to all the details.
You can knit a seamless product, separately on circular knitting needles - in front and back, by removing the loop of the sleeves on other knitting needles, and then on the hosiery (5 knitting needles) knit the sleeves.
When knitting a product on a full low figure, so that the ragged line does not turn out too long, the simultaneous knitting of all parts is stopped when the width of the back between the raglan lines is equal to Pog (half-circumference of the chest) minus 4-6 cm. Then each part is knitted separately, in the first the same row received the missing width with a set of air loops. For example, if the backrest width should be 56 cm (54 + 2), knit all the parts together until the backrest width is 50 cm, and the missing loops get air equally on each side. The same number of loops are also added to the front and sleeves on both sides.
When knitting a raglan with a clasp, the loops are divided into two parts and half of the loops of the strap are added to each half loop, the second half of the strap is included in the number of loops of the shelf. If the width of the strip is 10 loops, then on each shelf there will be 23 loops (18 + 5) (Fig. 3c).
Raglan products tied on top may have different shape neck or collar. If the product is with a collar (stand, turn-down), then knitting starts with it, and the loops are distributed after the end of the collar, marking the colored lines with ragged lines.
For a raglan product with a cap-like neck, the calculation of the loops is the same as for a product with a round neck. But in this case only the loops of the back, sleeves and four ragged lines are put on knitting needles - the front loops are added gradually during the knitting process according to the calculation of the triangle (Fig. 3d).