

A school uniform for a girl is ideal clothing for studying at an educational institution - whether it be a school or a lyceum. Firstly, the school uniform disciplines, encourages knowledge, and secondly, the modern school uniform looks very stylish!
Sew the school uniform for the girl yourself according to the pattern below.
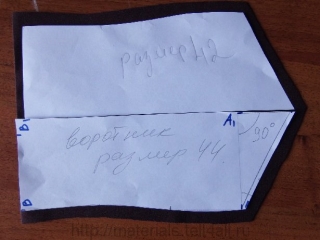
School uniform pattern for a girl
Pattern-basis of a school dress for a girl. Click to Enlarge
The pattern of the school uniform for the girl is given for the 40th size.
To build a school dress pattern, you need to take the following measurements:
…………………………………………………1/2
Chest circumference - 80cm 40cm
Girth above the chest - 76cm 38cm
Hips - 84cm 42cm
Back length to waist - 33cm
Shoulder Length - 11cm
Neck circumference - 33cm 16.5cm
Waist - 68cm 34cm
Sleeve length - 56cm
Building a school uniform pattern
1st stage of building patterns of school uniforms.
Draw a rectangle ABCD.
The length of the school dress. AD \u003d BC \u003d 80cm - dress length to be measured.
The width of the school dress. 43cm (half-chest by measure plus 3cm for freedom of fitting for all sizes): 40 + 3 \u003d 43cm.
The depth of the armhole of a school dress. The depth of the armhole can be measured and the measured value can be postponed from point A down to point G. (see How to measure armhole depth).
From point G to the right, draw a horizontal line to the intersection with the BC line - point G1.
Waist line of a school dress. From point A down, lay 33 cm - the length of the back to the waist by measurement - point T. From point T, draw a horizontal line until it intersects with the BC line - point T1.
Hip line of a school dress. From point T down lay 16 cm for all sizes - point L. From point L to the right, draw a horizontal line until it intersects with the BC line - point L1.
The side line of the school dress. The segment AB is divided in half and through the resulting point draw a vertical line - the side line of the school dress.
The width of the armhole of a school dress. The dress armhole width is calculated according to the formula: ¼ chest circumference by measurement plus 1cm for all sizes: 40/4 + 1 \u003d 11cm - put 5.5 cm to the left and right of the side line - points G2 and G3.
Raising the shelves of a school dress. From the point G1 up, lay aside 20.5 cm - point W (1/2 of the half-circumference of the chest by measurement plus 0.5 cm for all sizes): 40/2 + 0.5 \u003d 20.5 cm.
From point G3 draw up a straight line 0.5 cm long - point P1. The point of intersection with line AB is denoted by point P2. Connect the points P1 and W.
School dress armhole descent line. The PG2 and P2G3 lines extend down by 1-1.5 cm for all sizes and connect them.
Auxiliary shoulder lines and armholes. The PG2 and P2G3 lines are divided into 4 equal parts.
2nd stage of building a school uniform pattern
Building the back of a school dress
Neckline of a school dress. From point A to the right, put aside 6cm (1/3 of the half-circumference of the neck by measurement plus 0.5cm for all sizes): 16.5 / 3 + 0.5cm \u003d 6cm.
From point 6, lay aside 2cm. Connect points 2 and A with a concave line.
Tilt the shoulder of the school dress. From point P down, set aside 1.5 cm.
Shoulder line of a school dress. From point 2 (neck) through point 1.5 (shoulder tilt) draw a shoulder line 11 cm long (shoulder length by measurement).
Line armhole school uniform. From point 1-1.5, dividing the angle in half, set aside 3cm. Draw a line of the armhole of the back from point 11 through the midpoint of the division of the PG2 line, point 3 and G4.
From the point T2 to the left, postpone 2cm. Draw a line of the side seam through points Г4, 2, Л2 to the intersection with the line DC. The intersection point is H1. Draw the side line along the curve slightly arched on the thigh section.
The bottom line of the back. Set aside 1cm from point H1. Draw the bottom line according to the pattern.
3rd stage of building a school uniform.
Building patterns in front of a school uniform
Neckline of a school dress. Set aside 6cm from point W to the left (1/3 of the half-circumference of the neck by measurement plus 0.5cm for all sizes): 16.5 / 3 + 0.5 \u003d 6cm.
From the point Ш down, put aside 6.5 cm (1/3 of the half-circumference of the neck by measurement plus 1 cm for all sizes): 16.5 / 3 + 1 \u003d 6.5 cm.
Connect points 6 and 6.5 with a dashed line, divide it in half and draw a line 6 cm long through the division point. Connect points 6, 6 and 6.5 along the pattern.
The length of the shoulder of the school dress. Postpone 3cm from point 6 to the left, then postpone 0.5cm from point 3 down. Connect the points 0.5 and 6.
From the G1 point to the left, postpone 8cm (1/2 of the distance between the high points of the chest by measurement). Connect points 8 and 0.5.
Breast tuck. Divide the right side of the tuck from point 0.5 to point 8 in half and put 2cm to the left from the division point (the difference between the half-girth of the chest and the half-girth above the chest): 40-38 \u003d 2cm.
The left side of the tuck is carried out with a length equal to the right side of the tuck - point P3.
Shoulder length from breast tuck to the armhole. Connect point P3 with a dashed line to the upper point of division of PG2 (dress back patterns). On the dashed line to the left, postpone 8cm - the shoulder length by the measure minus 3cm (shoulder length to the chest tuck for all sizes): 11-3 \u003d 8cm.
Point 8 is connected by a dotted line with the lower point of division of P2G3. From point 8 down, set aside 1.5 cm. Connect points 1.5 and P3.
Armhole line of school dress. Divide the dashed line from point 1.5 to the bottom point of division P2G3 in half and put 1cm from the point of division to the right. From point 1.5 (lower right corner), dividing the angle in half, put aside 2cm. Draw a line of the armhole in front of the dress through points 1,5,1, the lower division point P2G3, point 2 and G4.
A line of a side seam of a school dress. From the point T2 to the right, lay 2cm. Draw a line of the side seam through points Г4, 2, Л2 to the intersection with the line DC. The intersection point is H2. Draw the side line along the curve, slightly arched on the hip.
Draw a waist line, dropping 2 cm from the point T1.
Draw the hips line, dropping 2cm from point L1.
The bottom line of the back. Set aside 1cm from point H2. Sun lengthen by 1cm. Draw the bottom line according to the pattern.
Tuck at the waistline. From point 2 (waist line) to the left, put aside 6.5 cm: 8-1.5 cm \u003d 6.5 cm.
From the point 6.5 to the left, postpone the depth of the tuck - 2cm. Draw lines of arbitrary length through the marked points.
Side tuck at the waistline. Divide the distance from the first tuck to the side in half and put 2cm to the right from the division point.
In addition to the pattern-based school dress, it is necessary to build a single-seam sleeve pattern.
Pattern of a sleeve for a school uniform for a girl
The pattern of the sleeve for the school dress for the girl is based on the pattern of the front and back of the school dress. The same measurements are used as for the pattern of the front and back of the school dress.
……………………………………………………1/2
Chest - .............. 80cm ... ... ... ..40cm
Girth above the chest - ..76cm ............. 38cm
The distance between the high points of the chest - 16cm
Back length to waist - 33cm
Shoulder Length - 11cm
Neck circumference - …………… .33cm ……… ..16.5cm
Waist circumference - ………… .68cm ………… 34cm
Hip circumference - ………… ..84cm ………… 42cm
Sleeve length - 56cm
Dress length from waist to bottom - 47cm
Dress length from the seventh cervical vertebra to the bottom - 80cm
Hello, friends!
Very soon, the next school year will begin ...
Someone is waiting for him with a joyful anticipation of a new, unknown, someone is concerned about the upcoming homework and routine activities.
And some are still able to search for high-quality school uniforms.
If you find one on sale, it’s not possible, an excellent solution would be - to sew a school uniform with your own hands.
So the reader of the project “You Can’t Prohibit Sewing Beautifully!” Asked me what to do. how to choose and sew a school uniform and what are the requirements for a school uniform?
The question of Julia (as well as other readers at different times) about the criteria for choosing a school uniform prompted me to make this publication.
Even if you are not going to sew clothes for school, but there are schoolchildren in the family, it’s probably not out of place to find out - what are the requirements for school uniforms?
I will quote part of Julia’s letter and give my answers from which you will learn: what materials are best suited for school uniforms, what silhouette and color to choose for school uniforms, and are there universal options for school clothes ...
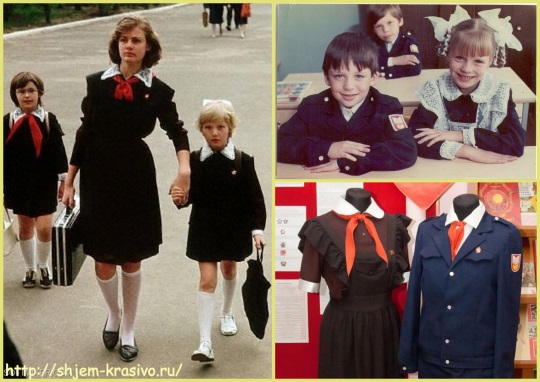
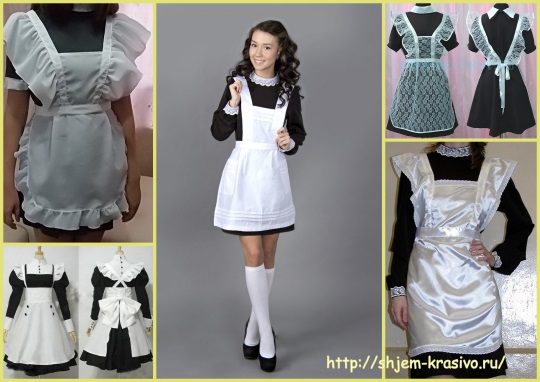
"…Good day, Elena! I want to ask you for help. When my youngest daughter went to first grade, the director at the meeting recommended that parents switch from a business blue suit to an old-school uniform (brown dress, white apron and black apron).
I made a decision - I need to sew, but where, from what, on what pattern? I learned that the fabric for the mold must be natural, but when I came to the store, I was advised to take gabardine from 100% synthetics. I was completely at a loss and do not know what to buy.
Please advise:
1) What to take on a dress? After all, in summer it should not be hot, in winter not cold, the fabric should not wrinkle strongly, should not roll and be at least half natural. Maybe you need two summer and winter dresses?
2) What to take on a black apron?
3) What to take on a white apron? After all, it must be beautiful and practical, not look wrinkled, be stain resistant and withstand frequent washing.
4) A separate question on the cuffs, whether they can be made removable, and not sew as we did.I would like to make such a universal option that I threw it in the washing machine in the evening, then hung it on my shoulders, and put it on in the morning without ironing (our little blue suit is just like that now). This is very important for us, since the child is busy all day in school and in the pool (daily), in the evening the uniform may turn out to be dirty, and there is no longer time for care.
Thank you very much in advance!…"
Thank you Julia for the question!
Indeed, the choice of a school uniform is a crucial stage in collecting a child for school. Indeed, in uniform, the child spends many hours a day. therefore it is better to pay increased attention to the quality of school uniforms!
Also, new education law, establishes a general approach for school uniforms throughout the country, according to which, it should be secular in nature and comply with generally accepted standards of business style.
Excerpt from the law:
“... Students’ clothing must comply with sanitary-epidemiological and hygienic standards, the venue, the weather, and the temperature of the premises.
Fashion style - generally accepted business. The uniform for schoolchildren should be secular.
Unacceptable clothes, shoes and accessories with traumatic fittings, informal symbols that promote illegal behavior and the use of psychoactive substances .... "
Comfortable, not restricting freedom of movement, cut, natural materials, ease of care - these are the main components of a high-quality school uniform.
From the letter of Julia noticeably, she is from those parents who approach the choice of school uniforms responsibly and not formally. For her in it’s important that school clothes are of high quality and beautiful,but at the same time, it was easy to care for her.
In order, I’ll try to answer the questions that were raised in the letter to Julia and find out - is it possible to combine in a school uniform - quality, comfort, beauty and ease of care.
Note: Julia’s question concerns a school uniform for girls, but the considered criteria for choosing school clothes are suitable for boys too.
- What materials are suitable for a dress and in general, school clothes?
During the Soviet Union, the school uniform was made exclusively of woolen or half-woolen fabrics. In my opinion, this is a reasonable choice.
Wool, material with remarkable properties - it absorbs water, perfectly retains and gives off heat, it is wrinkled to the best of our ability and comfortable to wear.
disadvantages natural wool fabrics have wear resistance (remember how quickly the form was rubbed on the elbows?) and the formation of so-called “spools” (or peeling, scientifically).
But, with the addition of a small amount of synthetic fibers (semi-woolen fabrics), these shortcomings go away.
The use of natural materials (wool, silk) for sewing school uniforms is ideal!

Although, now it is not very easy to find such fabrics in stores and / or they are very expensive. Alternatively, you can search for fabric in newspapers or in the "network", for ads.
Surely, someone left similar materials from the "Soviet era". So you can buy an excellent natural fabric (sometimes sellers keep labels where the full composition of the fabric is painted!) At an affordable price.
If the fabric of the mold does not come in contact with the skin of the child - the second or third layer of clothing, for example, a jacket or vest - the use of synthetic material is permissible.
By the way gabardine will do too if it contains a small amount of synthetics. It is, indeed, easy to maintain and process (of the shortcomings, I note its high electrolysis, which, however, depends on the composition).
But, if the tissue is in contact with the body (especially in the warm season), it is better to choose natural materials with a low content of synthetic fibers or viscose for sewing school uniforms.
For reference:
The optimal composition of fabrics used for the manufacture of:
Upper layer - not less than 35% consists of natural fiber (for example, wool) or viscose.
Lining - 100% natural fiber or viscose.
Shirts & Blouses must be made of fabrics with a content of natural fiber or viscose of at least 65%.
 By the way, as a lining for children's clothing and in the manufacture of school uniforms, you can use staple sheets containing natural cotton fibers or with the addition of viscose.
Anyway, try to keep the synthetic materials in the school uniform fabric as small as possible. So you reduce the risk of allergic diseases and general fatigue of the child - this is proved by scientists!
Of course, a great option would be two types of school clothes - for warm and cold days.
Temperature differences are sometimes significant and it is more comfortable to dress children in accordance with weather conditions.
If there is such an opportunity - sew / buy a uniform of different types or use form with the possibility of combining (see below).
- What material to take on a black apron?
Requirements for related items of children's clothing, in practice, the same ones - comfort, easy maintenance and minimal synthetic content.
But, apron - second / third layer of clothingTherefore, less stringent requirements can be applied to the composition of the material.
If needed tight apron, you can use the same fabric as for the top, if you need an apron easier, guipure, lace, etc. will do. The main thing is that the look of the apron is combined with the overall style of the school uniform.

- What to take on a white apron?
Depending on the model and your wishes for the appearance of the student ....
The apron can be lace or smooth fabric. Fit - quality poplin, shirts (now there are many types of cotton that are treated with special impregnations - water-repellent, softening, etc.), different types satin or satinif shine is allowed.
Need to look for your option.
- Cuffs - can they be made removable and not sewn on as we did?
If desired, anything is possible. Sew removable cuffsproviding them, for example, with small buttons or hidden loops and buttons.
Go to the store (if you don’t have one in your wardrobe) and take a look at models with detachable collars - there is a very good little sketch - in the seams of the loop, and on the collar or cuff there are small buttons.
Use lightweight hidden zippers, when you can unfasten the cuff, wash and fasten again. Or Velcro tape (Velcro), although the tape is not the best option - it is quite dense, which is not very comfortable.
Perhaps you will come up with your own option, for example, beautiful lacing, soft lace cuffs on an elastic band or removable cuffs on ties-ribbons, why not.

- Is it possible to choose or sew a universal school uniform - beautiful, comfortable and easy to care for?
Of course, using only natural materials, it will not work - to wash, dry and dress. Ironing clothes and smoothing zaminy folds have.
But you must admit the price, for the natural composition of the fabric and the well-being of the child, is not so great.
What is the way out of the situation when there is very little time to care for the form?
The optimal, in this case, will be option of school uniforms with the possibility of combining. When you can easily solve puzzles with changing weather and caring for uniforms.
For girl: 2 types of school dress + related items - an apron, a removable collar and cuffs; or two types of skirts (straight, flared / pleated) + blouse / turtleneck + vest / jacket;
For boy: 2 types of trousers (for cool and warm weather) + shirt / turtleneck + vest / jacket / sweater;

Such a combined composition of the school wardrobe will help the student always look neat and tidy. Just change one thing and wash the other.
| Summarize!
When choosing a school uniform be sure to focus on the age of the student and his taste preferences. Remember the comfort of the child - clothing should not hamper movement, be tight, or vice versa very loose. Both options create discomfort when worn. Fabrics: preferably natural (wool, cotton, silk, linen), rayon and a low content of synthetic fibers are allowed. Silhouette: optimally, moderately free, with the ability to adjust the length and width of the product. Colors: for the basics- blue, gray, brown, burgundy, avoid black (difficulty in care) and bright, flashy colors; for blouses, turtlenecks and shirts - white and pastel colors (light, warm shades of pink, pale yellow, pale blue, beige, etc.) |
IMPORTANT! Give preference to products with a pre-arranged ability to change the length, taking into account the age jumps of the child's growth.
If you sew a school uniform with your own hands, lay additional allowances for lengths and widths of clothing.
The choice of a school uniform is best taken with utmost responsibility: paying attention to cut, style and materials.
Remember that the child will have to spend most of the day in school uniform throughout the school year, which means that it is better not to save on clothes (although oh, how easy it is ...).
Finally, infographics - how to get your child to school - what you need and how much it costs.
A master class for the website "Casket" was prepared by Nina Kuznetsova.
This year, my eldest daughter moved to 11th grade, so we started having a nice time getting a real school dress and a white apron. The daughter categorically refused the purchased dress, knowing the capabilities of her mother. And we all started !!!
The choice of model and fabric I entrusted to my daughter. Everything was taken into account here: the convenience of the model, the lightness of the fabric, so that the fabric does not wrinkle, the spools do not roll, and much more, and most importantly, that it is in a single copy.
Two dresses were sewn at once: size 44 for a daughter and size 42 for her girlfriend.
We bought Pikachu fabric (100% polyester) 3.5 m and a width of 1.5 m on both dresses. There was another version of the fabric, gabardine, but it is denser and not very pleasant for the body.
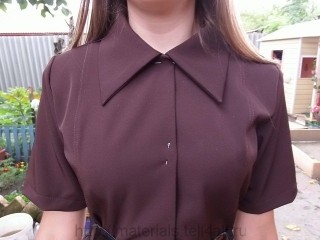
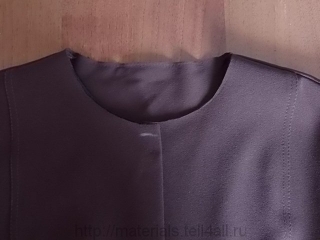
When I completely assembled the dress for my daughter (I did not sew on buttons yet), it had a collar, as in the following photo. By comparing the overlying and underlying photo, the difference in the throat area is clearly visible.

After a walk in the dress, for some time, my daughter asked me to change the collar on the stand-up and turn-down. Still, she was cramped in the neck, or rather, the little stand itself is located high on the pattern. If someone uses this option, I would advise to lower the neckline in the middle of the front by 1 cm. Accordingly, add a little on the collar and on the stand itself.
I tried to depict the above on the pattern itself (line in blue). Having put a rack (edge) to the neck, you can see the missing difference. Add this difference to the collar and stand.
Stand-up collar.The construction and drawing itself I will describe separately. You can see.
And it will look like in the photo:
buttoned collar
and the collar is unfastened
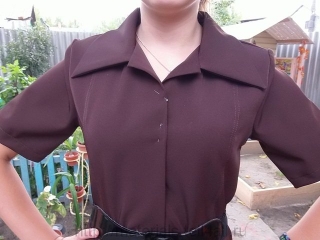
The daughter really liked the buttoned collar and she feels more comfortable in it.
In the next photo you can see the finished pattern of the collar itself, as well as the difference between the sizes.
We cut a collar with a seam allowance. Start on the sides, turn out so that you get a beautiful neat corner. Fold the finished collar in half. Both angles must strictly coincide.
Since size 44 was almost completely assembled, I carefully ripped off the collar. Previously, when trying on, I put a mark where the collar would be convenient for my daughter. We look at the photo:

Just this is the same 1 cm that I spoke about before.
In general, I cut along the neck of the back all the allowance that I did when cutting, and in the front (in the middle) I cut a little more. From the mark 0.5 cm up. I also tucked half of my shoulder and freed up the underboard, since when stitching the collar on the counter, the underboard was stitched into the shoulder.
At size 42, when trying on, a mark was also set for the collar.
BASIC DRESS FOR GIRLS OF SCHOOL AGE
The styles of dresses for girls-schoolgirls are more diverse than for preschool girls, these are already dresses, as a rule, pull along the waistline. Any material can be taken for them, if this dress is not for school.
To build a drawing of the main dress pattern, we take the following measurements:
OR \u003d 16 cm AL \u003d 16 cm DT \u003d 33 cm CI \u003d 75 cm DR \u003d 50 cm
About G \u003d 36 cm
OT \u003d 32 cm
OB \u003d 40 cm
To the taken measurements we find additional data:
1. The depth of the armhole of the back: OG: 3 + 6, that is 36: 3 + 6 \u003d 18 cm.
2. Armhole width: OG: 4 + 3, that is: 36: 4 + 3 \u003d 12 cm.
3. The width of the dress along the chest: OG + 8, that is 36 + 8 \u003d 44 cm.
4. Depth of armhole in front: OG: 2 + 2, that is 36: 2 + 2 \u003d 20 cm.
5. The side seam is 3-4 cm from the back.
6. The width of the sprout: OSH: 3 + 0.5, that is 16: 3 + 0.5 \u003d 6 cm.
7. The height of the sprout 2 cm
8. Decrease in the back shoulder: OG: 10-1.5 cm, that is 36: 10-1.5 \u003d 2 cm.
9. The shoulder shoulder protrusion is 1 cm.
10. Auxiliary on the armhole of the back from the chest line up to 1/3 of the depth of the armhole of the back, that is 18: 3 \u003d 6 cm.
11. Auxiliary on the armhole from the back corner 3 cm.
12. The recess of the side seam of the back at the waist line of 2 cm.
13. The extension of the side of the back on the hips 2 cm.
14. The slope of the bottom of the side of the back is 2 cm.
15. Depth and width of the neckline: take the width of the sprout + 1 cm. That is, 6 + 1 \u003d 7 cm.
16. Lowering the front shoulder 4 cm, we postpone it on the back after the point of lowering the shoulder back.
17. Auxiliary on the armhole of the shelf from the chest line up to 1/3 of the depth of the armhole in front, that is, 20: 3 \u003d 7cm.
18. Auxiliary on the armhole from the corner of the shelf 2.5 cm.
19. The recess of the side seam of the shelf at the waist line of 2 cm.
20. Extension of the side of the gulochka on the thigh line 3 cm.
21. Bevel of the bottom of the side of the shelf 2 cm.
22. Elongation of the front floor at the waist line of 2 cm, at the bottom line of 3 cm.
Drawing a pattern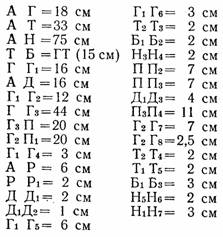
Draw a grid plan. At point A, we construct a right angle. From point A, down the line, we lay the depth of the armhole of the back 18 cm, put the point G, waist length 33 cm, put the point T, and lay the entire length of the dress 75 cm, put the point N. From point T down the line, lay the distance equal to the line GT , that is, 15 cm, set point B. From points A, D, T, B, H, to the left we draw straight parallel lines. From the points A and G to the left on the line, we postpone the width of the back 16 cm, put the points D and G1, connect them. From the point G1 to the left on the line we postpone the width of the armhole 12 cm, put the point G2, and from the point G to the left along the line we postpone the entire width of the dress 44 cm, put the point Gz. From the point H to the left, on the line, we also lay 44 cm, set the point H1 and connect it with a straight line with the point G3, continuing it upward from Гз by 20 cm - the depth of the armhole is in front, put the point P here, at the intersection of the waist line we put the point T1. From the point G2 upwards in a straight line we also lay 20 cm, set point P1 and connect it with a straight line with point P. From the point G1 to the left along the line we postpone the top of the side seam 3 cm, put the point G4, from it we go down in a straight line, onto at the intersection of the waist line we set the point T2, at the intersection of the hips line point B1, on the bottom line point H2. We get the grid plan of the expanded drawing.
Draw the back. From point A to the left, on the line, set aside the width of the germ 6 cm, put the point P, from
we put the height of the germ 2 cm upwards in a straight line, put the point P1 and connect it with a concave line to point A. We get a cut of the germ (Fig. 1).
From point D down the line, postpone a decrease in the shoulder shoulder of 2 cm, set point D1. The point P1 is connected by a straight line e to the point D1, continuing it beyond the line by 1 cm, here we put the point D2. We get a shoulder section of the back.
From the point G1 up the line, lay the auxiliary along the armhole of 6 cm, put the point G5, from the corner from the point G1, lay the auxiliary along the armhole of 3 cm, put the point G6. Points D2 and G5 are connected by a straight line, and point G5 by a concave line with point G6, continuing it to the middle of the width of the armhole. We get a cutout armhole back.
From the point T2 to the right on the line, lay 2 cm, put the point T3, connect it with a straight line with the point G4. We get a side cut of the back of the bodice.
From point B1 to the left, on the line, lay 2 cm, set point B2. Point T3 is connected by a straight line.
with point B2, continuing it to the bottom line, here we set point H3. We get a side cut of the back of the skirt.
From the point H3 upwards along this line, lay 2 cm, put the point H4 and connect it with a smooth line with point N. We get the lower back section.
Draw a shelf.From point P down the line we postpone the neck depth of 7 cm, put the point P2, and to the right along the line we postpone the neck width, also 7 cm, put the point P3 and connect it with a concave line to the point P2. We get the neckline of the front.
From the point D1 down in the line, we postpone the reduction of the front shoulder 4 cm, put the point D3, connect it with a straight line with the point Pz. From the point Pz to the right along this line we postpone the length of the front shoulder 11 cm, put the point P4. We get the shoulder section of the shelf.
From the point G2 up the line, lay the auxiliary along the armhole 7 cm, put the point G7, and from the corner from the point G2 we lay the auxiliary along the armhole 2.5 cm, put the point G8. Points P4, G7 and G8 are connected by a concave line to the middle of the armhole. We get a cutout armhole shelves.
From the point T2 to the left, put off the line 2 cm, put the point T4, connect it to the point G4. We get a side cut of the bodice of the shelf. From the point T1 down the line, postpone 2 cm, set the point T5 and connect it with a smooth rain with the point T4. We get the front waist line.
From point B1 to the right on the line, postpone 3 cm, set point Bz. We connect the point T4 with the point Bz, continuing it to the bottom line, where we put the point H5. We get a side cut of the front skirt.
From point H5 up on this line, lay 2 cm, set point H6. From point H1, in a straight line, set aside 3 cm, set point H7 and connect it with a smooth line with point H6. We get the lower cut of the skirt of the shelf.
Draw a sleeve. To build a drawing of the pattern of the main sleeve (Fig. 2), you need to have the following data:
DR \u003d 50 cm.
Sleeve width: OG: 3 + from 5 to 7 cm, i.e. 36: 3 + 6 \u003d 18 cm.
The height of the sleeve rounded is equal to the line GDZ in the drawing, that is, 12 cm. 
We build a rectangle along the length and width of the sleeve 50x18 cm, put points A, B, H1, N. From points A and B down the lines, lay 12 cm, put points O and O1, connect them with a straight line. We divide the AB line in half, put the O2 point, divide the OO1 line in half, put the Oz point, connect it with a straight line with the O2 point, continue this line down. From the points O and O1 to the left and to the right, we postpone the segments equal to OOz, put the points O4 and O5. We postpone the same segments below the points H and H1, put the points H2 and H3. We connect the points O4 and H2, O5 And H3, we get the front (O4H2) and rear (O5O3) sections of the sleeve.
From the point H3 down, lay 1 cm, put the point H6. From the point H1 down, lay 2 cm, put the point H5. From the point H2 down, lay 1 cm, put the point H4. Connect the points H5, H, H6 and H4 with a broken line. We get the bottom cut of the sleeve.
Point O2 is connected by a straight line with point O4. Then in the middle of the lower segment we go down 2 cm, put the points O6 and O7, in the middle of the upper segment we go up 2 cm, put the points O8 and O9. The points O2, O9, O7 and O4 are connected by a concave line, as shown in Fig. 2. Get the front cut of the sleeve okat.
We connect the point O2 with a straight line with the point O5, in the middle of the upper segment we go up 1 cm, then set the points O10 and O11, in the middle of the lower segment we go down 1 cm, put the points O12 and O13. Connect the points O2, O11, O13 and O5 with a concave line, as shown in the figure. We get the back section of the sleeve okat.
Draw a collar. To build a drawing of a turn-down collar (Fig. 3) we have the following data:
1. Collar length: OSH + 1, that is 16 + 1 \u003d 17 cm.
2. Width is 8 cm.
3. Notch middle 2 cm.
4. The protrusion of the angle of 5-6 cm.
vv1 \u003d 17 cm vv2 \u003d 8 cm
vzv5 \u003d 6 cm
v1v3 \u003d 8 cm
vv4 \u003d 2 cm
To build a drawing of the collar of the "straight rack (Fig. 4) we have the following data:
1. The length of the rack: OSH + 3 cm at the entrance, that is 16 + 3 \u003d 19 cm.
2. Width 3-4 cm. Vv1 \u003d 19 cm vv2 \u003d 4 cm