The content of the article:
Since ancient times, the female braid was not only a symbol of the beauty of its wearer, but also spoke of her vitality, honor. Having passed through the centuries, this type of hairstyle not only has not lost its popularity, but also has gained many new forms. Today, the braid is a fashionable element of the image, which can be part of almost any style. From a conservative classical model to intricate designs braided around the head, the braid always emphasizes individuality and gives femininity to a lady.
Types of braids
There are many varieties of braids. The most popular are species such as French, fishtail, Greek and simple classic. All of them are quite easy to weave and comfortable to wear both on their own and as part of complex hairstyles.
French braid
Such an elegant braid is convenient not only for everyday wear, but also for going out. The world stars have repeatedly proved the latter: Jessica Alba and Amanda Seyfried often appeared on the red carpet with exquisitely collected hair in the manner of a French braid.
You can even braid such a braid to girls with not very thick hair. Due to its airiness and shape, the braided braid will create the necessary volume. Thrown over her shoulder, it will help visually correct a certain asymmetry of the face.
French braid is ideal for creating a romantic image in the style of Provence. It creates the illusion of a light and warm breath of the wind, slightly touching the girl's hair.
In addition, you can use satin ribbons, weaving them into a braid. So you give the hairstyle a festive. And hairpins with rhinestones or stones will perfectly complement such a braid as an element of an evening look.
Scythe "fish tail"

A braid of this type is also called a "mermaid." The bends of its form, easily released strands, playfulness are associated with the grace of the forms of mermaids. Ideally, the fishtail will look on the owners of long and straight hair.
If you have wavy, curly or sparse hair, don’t be upset: the braid adds appeal to any hair and will look more “artistically” on such curls. Thin or affected by various factors (sun, sea water, color, perm) hair gains a second wind in this hairstyle. Deficiencies in the elegant braid will be almost invisible.
The braid “fish tail” will add pretty features to women with a triangular face, make the face more symmetrical. If you want to visually stretch out a wide or round face, it is worth placing the "fish tail" as high as possible on the top of the head. It looks interesting on asymmetrically dyed hair, hair with highlighting or coloring.
The Little Mermaid Spit is a frequent “guest” of the catwalks and red carpet. Especially loves this hairstyle Nicole Kidman. A medium-sized braid, easily thrown onto the shoulder, a pair of elongated strands and bangs, falling in waves on the face - this is the secret of the charm of many stars.
It is also good for children, because it does not compress and do not pull the hair. It is convenient to use it in the gym, because the fair sex tend to look feminine even during training. In addition, all hair will be securely collected. Girls who prefer a strict office style, beautiful braid will help to "dilute" the image, make it softer.
Simple braid

Scythe can and is called "simple" or classical, but because of this it does not lose its charm. It’s simple according to the weaving mechanisms and the time that the girl spends on him. Most often, such a braid can be seen on young girls. In the morning, when mothers collect girls for school, there is absolutely no time for weaving sophisticated hairstyles. And then this one comes to the rescue simple braid.
Women also weave such a braid, because it performs not only a practical function - to collect hair during work, sports, home cleaning, during sleep, etc. It adds accuracy to the image, balances the image if the other elements (clothing, shoes, accessories, makeup) look too bright.
A simple braid is also used during cosmetic procedures on the hair. After applying a mask or oil, it is categorically not recommended to squeeze hair, squeeze it with an elastic band. Braided braid will not only ensure uniform penetration of nutrients, but also protect against hair loss.
Greek braid

One of the most popular types of braids that smoothly transitions from one fashion season to another is the Greek braid. With its name, it sends to us ancient Greece, at the time of the goddesses and gods. In its form, it resembles a crown that gracefully frames the woman's head.
Its waves run along the forehead, pass neatly on the top of the head, wrap around, like a vine, the whole head. The hairstyle is suitable for absolutely every hair: for thick and thin hair, for smooth and fluffy. Variations of this braid - a huge amount. Here are just a few of them: braided and laid around the head, with the upper weave, braids braided on the sides and connected on the parietal part.
Fashion house Moschino has repeatedly used the Greek braid in the shows of spring-summer collections. Dakota Fanning, Jay Law, Marion Cotillard - these beauties know exactly what zest to add to your image.
Step-by-step instructions for weaving different types of braids
Weave each girl’s own braids. The main thing is to be patient and follow the instructions. It is important to remember that there are some rules that will facilitate independent weaving. So, with independent weaving, the hair will hold perfectly for 2 days after washing, and if they are naughty, constantly fall out of the "braid", it is worth using special styling products - mousses, gels and foams. Wax provides softness and suppleness of hair.
How to braid a French braid
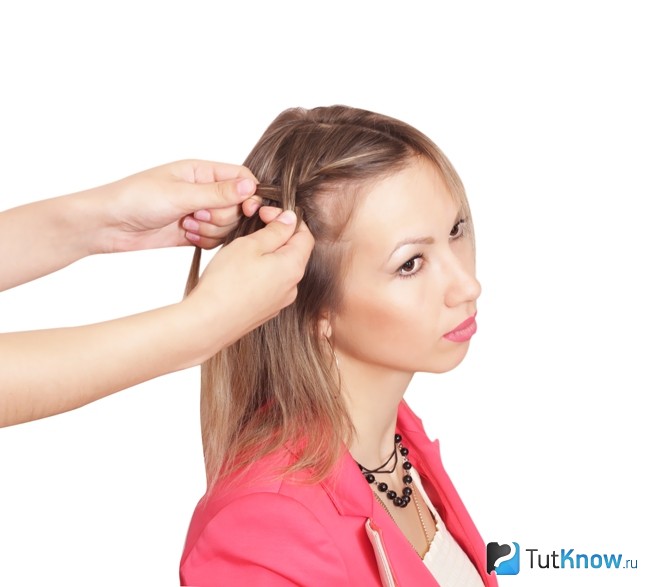
French braid has several varieties. Consider the methods of weaving the most popular types: braid on the side, braid with weaving part of the hair, braid on the contrary.
In order to braid a French braid, in addition to patience, you will need: a massage comb, a comb with a pointed rod at the end, an elastic band for hair, invisible if hair middle length and strands are pulled out of the hairstyle.
Weave a French braid on its side according to this pattern:
- Carefully comb the hair, after which we separate the lock of hair from the parting on one side.
- We divide this part into three equal ones.
- We begin to weave a pigtail, and after each new round we add a little hair from the extreme strand. Weaving pattern - top-down. Thus, we provide an inconspicuous interweaving of strands.
- After we have used all the hair on one side, we take the hair that remains, as well as the base of our braid and collect it in the tail with an elastic band.
- We wrap the base of the tail formed in a strand to hide the elastic.
- To make the braid airy and voluminous, we draw several thin strands from the total mass of hair. Finally, we decorate the braid with flowers or invisible stones.
- As in the previous case, we separate part of the hair and divide it into three equal ones.
- We start weaving, adding a new curl to the upper strand all the time.
- Add as long as our braid "moves" diagonally. If you see that the movement begins vertically, you need to stop adding curls and continue to weave like a normal braid.
- We fix our pigtail at the base with an invisible one. If the hair is naughty, you can fix it with a varnish or a small amount of gel.
- Separate a small amount of hair above the forehead, divide into three equal parts.
- We connect the left part of the hair with the middle one and bring it down.
- Repeat the movement, but with the right strand.
- Using a thin comb, we separate the curl from the left side (perpendicular to the braid) and add it to the left strand.
- We do the same with the right side.
- We continue such movements until free hair remains on both sides.
- The finished braid can be fixed with a simple rubber band or a beautiful hairpin inlaid with stones.
We braid ourselves a simple braid
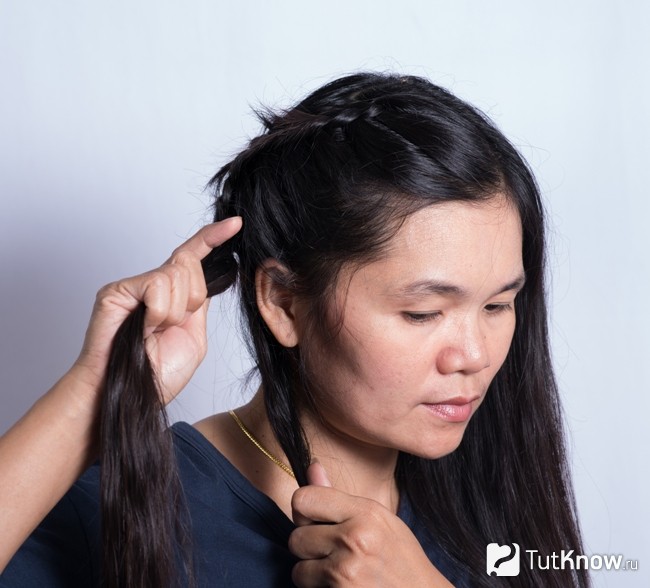
A simple braid is the most versatile hairstyle. Therefore, it is especially important to know the principles of its weaving for oneself, as well as for the child. Weave in this order:
- Comb the hair along the entire length and divide them into three parts.
- In the left hand we hold the left part of the hair, in the right - the right.
- Alternately impose the side parts on the middle. The strand from the left hand will remain in the center, and the one that was in the center will move to the left.
- Change the new middle strand on the right. We repeat the movement from the very beginning.
- Be sure to iron the hair during weaving, make sure that they are not confused.
Everyone determines the length of the braid. You can stop in the middle of the hair, leaving a playful ponytail at the end. And you can weave to the very end, crowning the hair with a beautiful decoration at the base.
How to weave a Greek braid

It is easy to make a beautiful braid, like in Aphrodite herself, with your own hands, it is only important to follow the rules, and also to know the secrets of weaving this elegant antique hairstyle. We carry out weaving according to this scheme:
- Comb your hair well. We divide them into two parts, forming a parting. It can be classic or asymmetric, of your choice.
- We select a lock of hair on the right side above the ear.
- We fix the hair on the left side with a hairpin or tie it with an elastic band (thus, they will not interfere with our weaving).
- The selected part is again divided into three equal. Of these we weave a classic simple braid.
- In the direction of movement, add curls on the left side, so that our extreme strand is more dense.
- Thus, we bring our weaving to the right ear.
- Having reached the ear, we fix the pigtail with other curls.
- Giving the hairstyle a complete and neat look, we form a bundle at the end that we decorate with accessories.
Braid "fish tail"
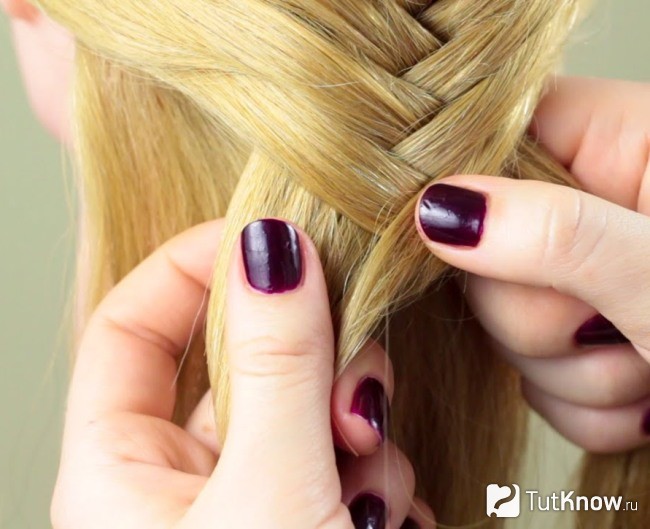
To weave this hairstyle, we need a classic set of hairdresser tools: a brush (preferably with natural bristles), elastic bands, hairpins and hairpins, a tool for smoothing hair (or plain water), accessories for decorating hairstyles.
Weave according to this scheme:
- After moisturizing the hair along its entire length, comb it back.
- On both temporal zones we select one strand (width - up to 2.5 cm).
- We bring these strands to the back of the head and bring them down with a cross.
- With one hand we hold crossed strands, and with the other we select a new curl. We cross it over the upper strand of our weaving.
- It is important to keep the center of the weave at the back of the head. We move the weave in the other hand to select a curl from the other temple and place it above the upper strand.
- We repeat these actions until we get to the beginning of hair growth at the neck.
- Now we select the curls from under the tail and cross exactly the same way.
- Having finished the movements, we fix our fishtail braid with an elastic or a hairpin.
How to braid a braid - look at the video:
Scythe has a lot of varieties, it is a fashionable attribute. You can easily make such a hairstyle yourself. Any girl, having mastered the basics of classical weaving, will find the author's method, the most convenient and suitable for her hair type, face shape, as well as style. Do not forget that pigtails will save your time. Having done a braid in the morning, a woman can forget about constantly correcting her broken curls.
The method of weaving braids “half spike”
Braiding for semi-long and long hair looks especially beautiful on fair hair.
The hair is parted from the top of the ear through the crown to the other ear and parted from the center of the forehead to the previous parting. They begin to weave pigtails from the ear “half-ear”, weaving strands from the hairline on the temple to the parting from the middle of the forehead (Fig. 210).
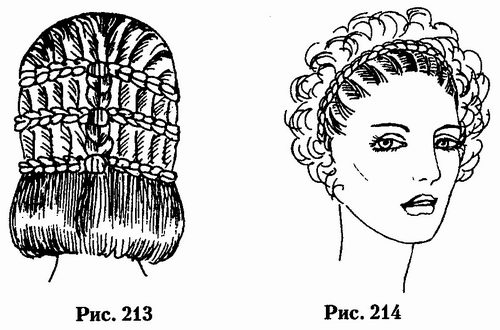
At more short hairax in the “square” the distance between the rows of weaves is made shorter, while the line of the square is kept below and the hair is bent to the head (Fig. 213). An element of weaving of this type will complement the hairstyle from not very short hair to the shoulders (Fig. 214).
The braid “half-spikelet” goes from the ear to the center of the crown. Strands of hair are woven from the hairline at a distance of 2 to 5 cm.
You can weave two rows of braids “half spikelets” (Fig. 215 a, 6). The rest of the hair is curled in fluffy strands in the form of a crescent or in curls and laid above the weave (Fig. 215 b).

The flagella from the hair or “karakul” from the strongly twisted flagella of the hair harmonize well — so much that they begin to lie in loops similar to the “astrakhan ″ curl.
First, 5-6 cm is separated along the hairline and a tail is tied at the crown (Fig. 216), then a braid “half spikelet” is braided from the center of the crown of the head or from the ear (you can also start from the back of the head). Strands of hair are extracted from the “tail”, the hair is twisted and laid over the head. Fasten with invisible.

The size of the flagella can vary - take a strand of hair thicker or thinner, which makes the hairstyle more effective. Such flagella are made of hair 25-30 cm long.
Braiding “Spikelet” and “Half-stripe”
Hairstyles with hair weave type “Spikelet" or " Half stripe”Are not only decorative, but also very comfortable, practical, well preserved all day and do not require care. Therefore, they are often resorted to when working with young clients - children, adolescents, girls.
1. Comb hair.
2. You need to start weaving with three strands with your forehead, moving to the back of the head and weaving small thin strands to the left and right of the main braid (Fig. 229). Hair length 12-15 cm or more.
3. You can weave from the back of the head in the direction of the forehead. If the hair is long enough, lay the ends on the crown of the head in curls or secure with a decorative hair clip (Fig. 230).

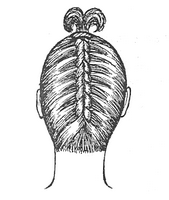
Weaving technique: half-stripe and spikelet
This weaving with the inclusion of strands on only one side (Fig. 231). Small strands are usually grabbed from the hairline. You can weave from the crown (Fig. 232) down to the hairline, and braid the entire head. Remove the end of the braid under the previous braid or pin it with a decorative hairpin. In fig. 231 shows an embodiment of using ple-Tenia with freely falling hair. The head is divided into strands and each weave is parted from ear to ear and pin with a hairpin.
braiding of braids "src \u003d" http://mtdata.ru/u25/photo9F97/20682166199-0/original.gif#20682166199 "alt \u003d" (! LANG: braiding of braids" width="150" height="180">!}
Variant of braiding Half stripe") from shoulder length and below. The head is divided into several sectors from the center of the crown of the head or crown and weaved using only hair in the sector, braiding strands on only one side (Fig. 233). Then the "half-spike" is reduced to a common braid around the perimeter of the head to the back of the head. In fig. 234 shows some applications of weaving in hairstyles. Weaving begins on the left and right of the ear in the direction of the central parting from the forehead to the back of the head.


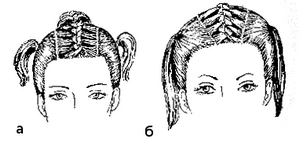
At the central parting, the “spikelets” are connected into a common pigtail, fastened with a hairpin or a horizontal parting is made and a second row of “spikelets” is woven. Weave from the ear, first on the left, then on the right thin strands. At the center of weaving are found, and then they are connected into a common braid. They tease with a decorative clip the places of their connection. The ends of the hair are left free. You can make several rows of such weaving, to the bottom of the occipital area, as your imagination and desire of the client suggests. In fig. 235 a, b weaving lead along the perimeter of the head in 2 rows. In the upper zones, air locks are laid. Such a hairstyle can be easily made of short hair up to 10 cm long. The weave is fixed with hairpins or invisible in several places or by means of strong fixation.

At long hair partings and strands with weaving can be arranged on the crown of the head as shown in Fig. 236 a, b, c, d, d. The arrangement of parting may be different: as your imagination prompts. "Spikelet" - a braid of hair is braided only in the center of the forehead. You can weave braids in all sections of the crown of the head. Fasten with clamps. If the hair is long to the shoulders or lower from the spikelet, weaving goes into a regular braid of three strands. In the occipital zone, three braids are connected into one common braid and fastened with clamps or a bow tied (Fig. 237).

Spikelet weaving can be used with rollers, dividing the head into sectors, as shown in fig. 238 a, b. Fasten the strands on the crown at the base with clamps, and lay the “tails” of the strands in the form of air curls or ropes, folded into “snails” or “columns” if the length of the hair allows. Attachment points are covered with hair or decorative ornaments: flowers, hairpins, veil, ribbons, etc. Such hairstyles are original and beautiful with careful execution.
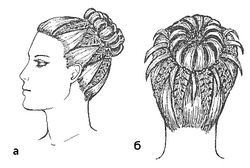
Weaving "Spikelet" and "Half-stripe" gives truly inexhaustible scope for your imagination. It can be used along with other elements, for example, with Negro pigtails instead of loose hair, flagella, "astrakhan" curls, etc. Thanks to this, you can create your own version of the hairstyle.
Hairstyle for semi-long hair by twisting strands of hair into bundles.
Comb hair. Separate part of the hair on the crown between the two temporal partings; hair for a bun - you need a forehead. The third parting can pass from ear to ear or closer to the forehead (Fig. 190).
Divide the hair into strands and comb the hair at the base to increase volume. It is possible to lay on the crown of the hair, without combing, wave (Fig. 191,192).
The ends of the hair on the crown are pinned into a ponytail and twisted into a braid. Pin the base of the tail with an invisible or hairpin. Tail-harness lead to the right (or left - optional) and attach (fasten) the temporal strand (Fig. 193).
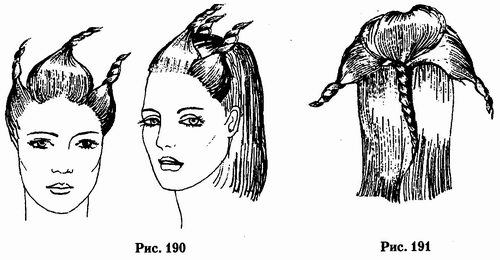

Then lead the end of the tourniquet to the left, lay on the head and screw the hair of the temple on the left, twisting the end of the strand into the tourniquet. Fasten with a hairpin (Fig. 194).
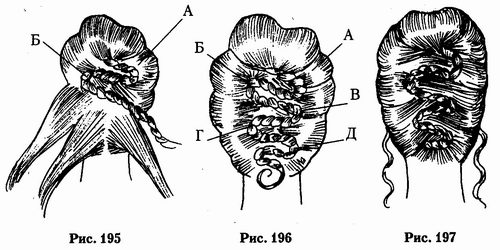
Harness lead and lay to the right on the head. Separate a new strand of hair to the right of the temporal or lateral strands down. Screw this strand to a previously made harness (Fig. 195).
Again, lead the tourniquet to the left and, separating the new strand from the left side down, fasten to the general tourniquet - and so on to the bottom of the neck. Fasten the harness with pins and invisibles at points A, B, C, D, D, etc. (Fig. 196).
At the bottom of the nape, lay the end of the tourniquet with a “snail”, a ring, a curl. If there is a forehead, you need to lay it in bulk, in accordance with the appearance of the person. At the temples below you can leave the pace, curling the pace with forceps in curls. When performing hairstyles for shine, use a modeling spray or other hair styling product.
This hairstyle is well preserved for a long time (up to several days) in any weather and this hairstyle does not require special care (Fig. 197).
Hair Weave Hairstyles
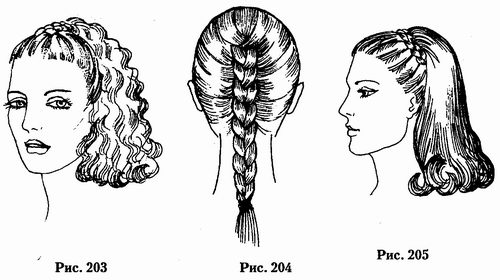
Hair weaving is used very widely, especially in children's hairstyles. A hairstyle may consist partly of braided hair and partly of hair left loose (Fig. 203).
Braiding hair "spikelet" begins with three strands - like a normal braid. Strands of hair are separated above the forehead, then small strands are separated from the hairline by left and right, weaving them into a braid (Fig. 204).
“Half-stripe” also starts from three strands, but the strands are braided only along the hairline, but on the other hand, they are not braided. Part of the hair can be left free. The end of the braid is fixed with a clip, tape, elastic or any decorative hair clip (Fig. 205).
Elements of braiding hair “spikelet” and “half-stripe” are often used in different hairstyles.
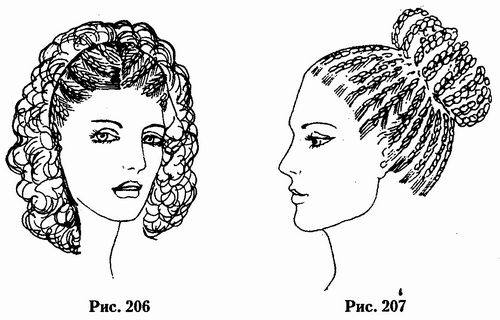
Parting from ear to ear through the crown, part of the hair is separated, which is divided by a central parting from the forehead. From the central parting, the hair is divided into a number of bands by diagonal parting. From these diagonal locks of hair, “half spikelets” are braided to the parting from ear to ear and fastened with small clips. The rest of the hair behind the parting is left free (Fig. 206).
The hair throughout the head is separated by radial partings from the hairline to the crown and is braided into a “half-strip”. The end of the hair weave goes into a regular thin pigtail. The number of braids is equal to the number of sectors into which the head is divided. Braids are laid in the form of a bundle of air loops and fixed.
This hairstyle is well preserved for many days. You can wash your hair without braiding. So that the ends of the braids are not braided, they must be fixed with a thread. After the hair dries, the top of the bundle is laid again. The hairstyle is perfect for highly curly black hair. An elastic wire can be woven into a pigtail. She will keep the bend attached to the pigtails, and more firmly maintain the shape of the beam (Fig. 207).
You can create a hairstyle by braiding one or two braids. There are two ways to weave: ordinary and reverse French weaving.
First we get acquainted with the usual way of weaving. Carefully comb dry or slightly moistened hair in the direction of natural growth and comb it back. Divide the hair into approximately equal strands and start weaving.
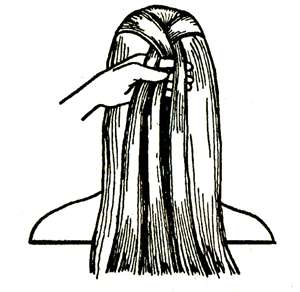
Put the left strand on top of the central one, now it will be in the center, put on it the strand that is on the right - this is the basis of the braid.

Now lift the left lock, connect it to a small lock and extend over the central one. Repeat the same procedure with the right strand. Similarly, you need to weave until all hair is braided, and the strands need to be held very tight so that the braid does not fall apart. Then continue weaving in the usual way.
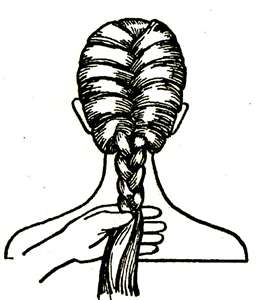
This hairstyle is especially suitable for young girls and girls.
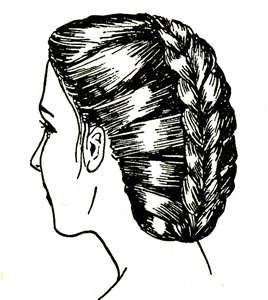
You can wrap the braid by hiding the protruding ends and fixing it with invisibles.
Women can braid two French braids and fasten them upstairs.
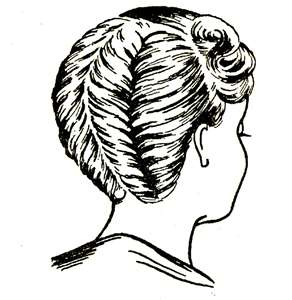
To do this, the hair must be divided into two equal parts along the vertical parting and braided sequentially. Then fix and style in the hairstyle.
Reverse French weaving is performed so that the braid itself is outward.
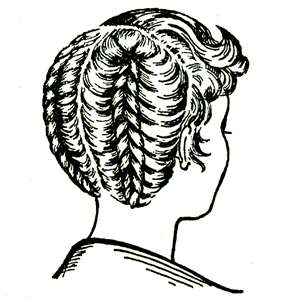
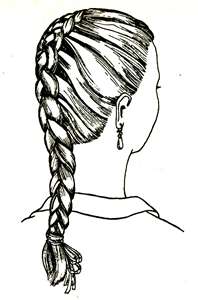
In order to perform such weaving, the strands are not placed on the central strand, as in the previous method, but under it.
One braid can also be braided.
This version of the French braid will look very impressive.
Thoroughly comb dry or slightly moistened hair and comb it on the forehead. Divide the hair into three approximately equal parts.
Take the central part and braid the “French” braid in one of the ways described above. Fix the braid with an elastic band. Gather the rest of the hair on the back of your head, lift it up and shape it in the form of a shell, a roller or a bun.
Fix the hair with invisible and hairpins. Hairstyle is complete.

This hairstyle looks very impressive and elegant and will allow you to be irresistible at any party and in the theater.

Step 1. Comb all the hair back. To start weaving, separate two thin locks of hair, one from the left temple and one from the right. Each strand should be approximately 2.5 cm thick.
Step 2. Working on the back of the head, cross the strands - right over left.
Step 3. Holding the strands with your right hand and pressing them to the head, grab a new strand from under the left strand with your left hand. The new strand should be the same size as the previous one.
Step 4. Cross the new left strand with the right strand, laying it on top, and press it to the head with your left hand.
Step 5. With your right hand, grab a new strand on the right side. Cross the new right strand with the enlarged left strand, laying it on top, and press it with your right hand to the head.
Step 6. Repeat steps 1-5, braiding the braid to the neck.
Step 7. Continue to weave the “spikelet”, pulling the lower strands from under the “ponytail” and cross them in the center.
Step 8. Secure the ends of the braid with an elastic band.
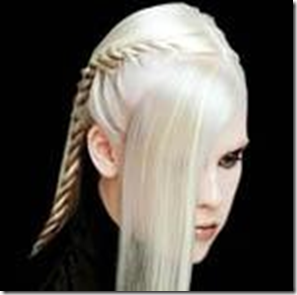
Before the fall of the Berlin Wall, all our knowledge about hair braided into braids fit into a simple concept - a blond Russian braid. The concept was simple for those who did not wear or braid braids. But those for whom braiding braids was a matter of girlish honor, for a long time weaved not just a braid in 3 strands, but went on records - 5, 8, 12 ... 16 strands. All this you will see in our photos - weaving braids.
So, the wall fell and it turned out that on the other side, braids too were being woven. And it’s very diverse - French braids, Greek, revolutionary orange braids. On the shores of the Baltic, they are engaged in weaving braids, called the fish tail, and those who wear braids far from the sea, call this braid weaving - spikelet. Looking at the elegant “oblique weaving” in our photos, many are surprised to learn that the braid is upside down, braided on the sides. But the French braid is also weakly braided. All patterns of weaving braids, we have diversified a large number of photos. However, undoubtedly, for those who have not yet decided which braid weaving to choose, we recommend starting with a photo review of high quality braiding.
Beautiful hair is the main decoration of a woman. A braid is a diamond among the hairstyles that adorn a woman. Braids provide a woman with the opportunity, on the basis of braiding, to create an infinite number of hairstyles with minimal time and effort. You will learn about hairstyles based on the ability to weave a variety of braids! All hairstyles on this page are united by a braid. We will teach you how to braid a simple braid, a French braid, a braid braided on the sides, a fishtail braid, a braid of spikelets, etc. In the photographs you will see how to braid a braid not only from 3 strands, but also from 5 strands, 8 strands and even from 12 and 16 strands.
You braided braids when you went to school or kindergarten, and therefore think that the braid is a symbol of childhood and adolescence. No, braided hair will adorn you at any age.
And what is Scythe? A braid is a hairstyle in which several locks of hair on a person’s head are woven together. With a simple braid, the hair is divided into three identical strands. The outer strand (alternately left and right) is interwoven with the middle strand. The end of the braided braid is fixed with an elastic band, hair clip, ribbon or other device.
Since ancient times, braids have been used not only as a practical way of styling long hair, but also served as decoration of an elegant female head (and not only female). For example, the biblical hero Samson wore seven braids on his head, in which his strength was enclosed.


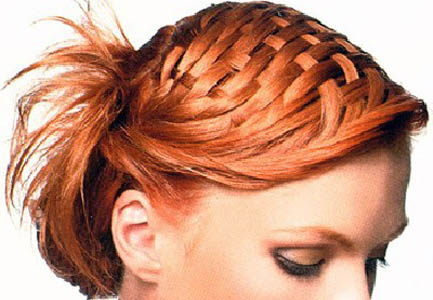
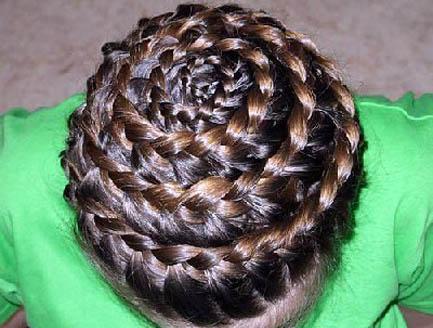


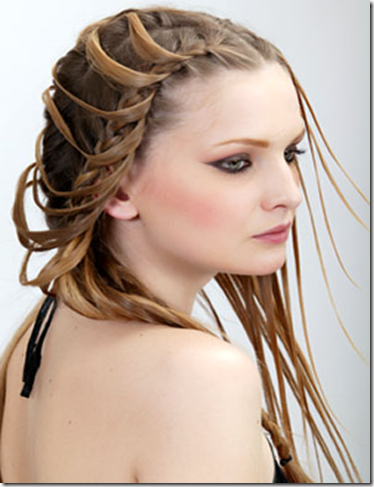

FRENCH SHOES WITH TAPE
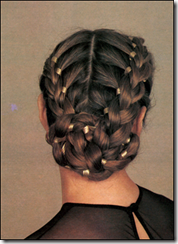


You like this intricate hairstyle for special occasions. Ask a friend to braid you with small, tight and even pigtails. For this hairstyle you need a ribbon, best with metal thread. She gives the hairstyle a shine and holds on to her hair more firmly than a satin ribbon. As soon as your friend learns how to braid braids with ribbons, the hairstyle will be done very quickly. And you yourself will see that the result is worth the effort expended on it.
MATERIALS
fitted elastic, hair clips
PERFORMANCE
1. Make a parting at the front diagonally, starting from the side and then at an angle of 45 degrees to the middle of the crown. Next, parting down exactly in the middle of the head.
2. You need to perform French braids alternately on each side of the parting. The strands should be thin, tight and fit snugly to the head. To begin with, put one tape under the first strand, leaving 15 cm above. In the process of forming the braid, pass the tape under each newly added strand. In this case, the tape will be woven into the braid, passing from one side to the other, back and forth across the braid.
3. From the neck, continue to weave a simple braid and weave the tape, placing it under the strand that another strand crosses. Secure the end of the braid with an elastic band.
4. Repeat steps 2 and 3, braiding the hair on the other side of the head.
5. Cross the braids at the beginning of the neck (a) and tuck each braid to the center. Pin it carefully with bobby pins (b). Tie the ends of the ribbons with a bow.

Thoroughly comb clean, slightly moistened hair and comb it to the back of the head. Divide the hair into four strands, approximately equal in size.
Start weaving from the right extreme strand. Take it in your right hand and lay it on the next strand. Holding the strands with your right hand, take the penultimate strand on the left side in your left hand and lay it on those that you hold with your right hand
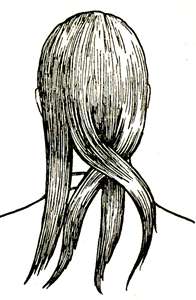
Now take the leftmost strand and skip it under the former rightmost strand.
Then take the adjacent strand and lay it on the former penultimate strand of the right side. Thus, braid the braid to the desired length. 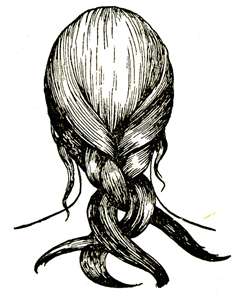
Now collect the “hair” in the temporal zones of the head and attach it to the upper “tail”.
Then attach to the “tail” the remaining hair of the occipital part of the head and fix it.
Fix the braid with an elastic or a hairpin

6. A braid from plaits
Comb the hair and collect it in a “tail” on the back of the head. Fix the “tail” with an elastic band.
Divide the hair in the “tail” into 3 equal strands: right, left and center.
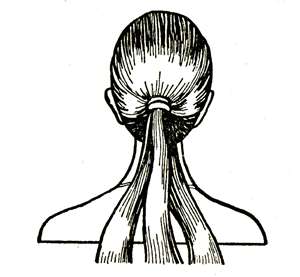
Take the right strand and twist it with a tourniquet to the left counterclockwise.

Lock the harness or ask someone to hold it.
Now proceed to the central strand. Twist the strand into a tourniquet in the same way.
Then twist the hair of the left strand into a tourniquet.

Put the left strand on the other two clockwise.
Take the strand that is now on the left side and lay on the rest. In the same way, continue to weave the braid to the end.


Rose (flower) from an openwork braid.
A rose (flower) from an openwork braid is obtained if it is twisted in a spiral around the hair collection center under the braid into a “tail”. The center is formed from a braid (Fig. 237 a) in the form of a bud (Fig. 237 b). To twist, spreading the petals, and fasten with hairpins to the underlying hair (Fig. 237 c) or mini-clips.
To process the “socket” additionally with hair styling agent. In the center of the "outlet" instead of the "bud" you can install a rhinestone or decoration to your taste.
Highlighted strands of hair or individual artificial colored strands woven into an openwork braid will give an additional effect of elegance and sophistication to the hairstyle.
Openwork braid can be made separately from the hair, like a shepherd, and put on the head, decorating the hairstyle. Fasten with invisible hairpins to underlying hair.
The width of such a lace braid can be from 3 to 12 cm or more.
Hairstyle with incomplete (partial) pulling out strands of hair from flagella
Lightly twist a lock of hair into a flagellum (Fig. 218 a) and pull out a little hair from different places (Fig. 218 b).
Get the original lock, fluffy with different lengths of half-pulled hair. Pre-soak a strand of hair with a fixing agent for styling hair.
The locks of hair are left hanging freely down or pin up, the locks of hair are laid over the head in the hairstyle (Fig. 219).


1. Comb your hair very well, you can pre-wet the brush with water, or use a spray with a little wet hair, or apply a little cream or oil on your hands to make your hair obey.
2. Separate the hair area approximately 5 cm from the parietal zone to the back of the head. Comb again.
3. Now we begin to weave a spikelet. Comb the remaining right side and braid with backings to the main braid, do the same on the left side of course.
4. To keep the hairstyle well you need to use hairpins. They need to pin two side braids to the main.


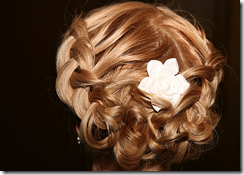
Hair Weave Hairstyles
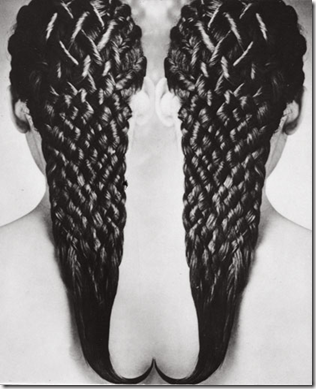
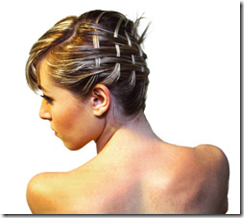
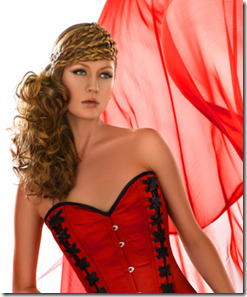
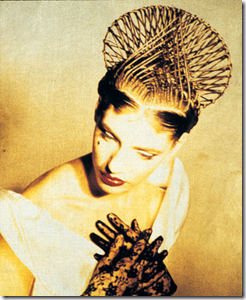
Weaving can be various kinds, and, sometimes, braided hair takes on a very bizarre, unusual shape, but at the same time the beauty of the hairstyle with weaving is amazing. Many options for hairstyles with weaving are limited only by the imagination of the master and your wishes. When creating such a hairstyle, the master uses not only such well-known types of weaving as: a simple braid of three strands and spikelets, but also various options for decorative weaving using a large number of strands, creating a stunning, original and exquisite hair pattern. It is worth noting that hairstyles with hair weave are suitable not only for holidays and special occasions, but also good for everyday life. Such a hairstyle will add chic and effect to your look. In addition, hairstyles made by a professional master over a long period of time do not lose their shape. In addition, a braided hairstyle can complement any look, emphasizing elegance and your unique style. For example, a neat braid “spikelet” or a simple braid will bring diversity to a strict, business style, while it will look quite appropriate. A hairstyle with intricate interweaving of strands, decorated with graceful hairpins, flowers, a thin, graceful rim, beautiful hairpins or a diadem can make the image romantic, sensual or impudent.
Hairstyle "Little Dragon"

We comb all the hair forward. Weaving begins with the occipital part. Weave a French braid, capturing all the hair. Finish the weaving on the crown.
After the French braid, weave an ordinary braid. We fix the end with an elastic band. We fill the braid under the French, we hide it.
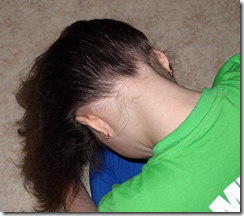
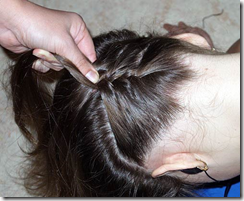




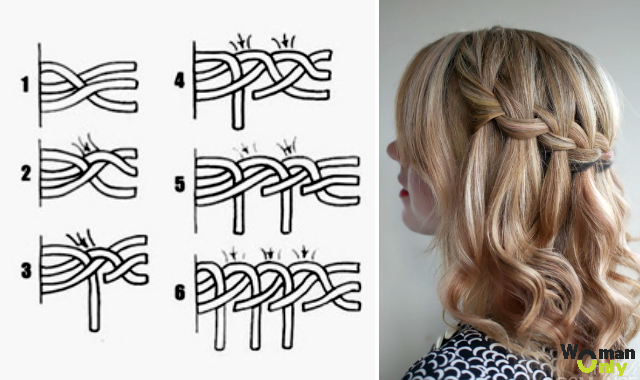
Let's start with one of the simplest patterns of weaving braids, but at the same time very popular among girls - a French waterfall. It is done very simply.
1. It is necessary to fix the lower part of the hair by parting in the parietal part of the head.
2. To give more volume to the hairstyle, you can comb each strand of hair remaining on top.
3. Start braiding the temples from the hair left below. At the same time, every time, capturing new hairs for weaving, the old ones must be left to hang quietly.
4. The same thing to do on the other hand.
5. Connect 2 braids with an invisible or any other hair clip you like.
6. The hairstyle is ready.
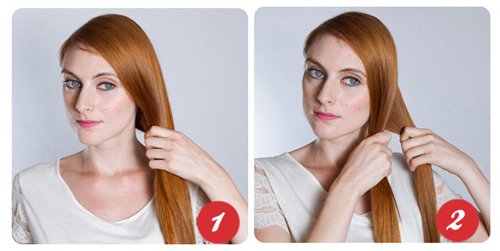
">Fishtail Hairstyle, also known as a braid of two strands (in the center) is perfect for both everyday stylingand for a special occasion. The fishtail braid weaving pattern is one of the simplest and fastest.
"\u003e 1. On the top or back of the head, highlight 2 main strands.
2. Separate a little hair from the left strand and shift it to the right side.
3. From the right strand, separate the hair bundle and shift to the left side.
4. Weave until it reaches the edge of the head. After this, the hair from the side ends, you will need to continue to weave the braid to the end in the same way.

A simplified version of the hairstyle "fishtail"
1. Divide all hair into two strands.
2. Start weaving a regular fish tail, but finish already at 7-10 reps.
3. Two tails should form on each side. Fix them with thin rubber bands, preferably to match the color of the hair.
4. Separate the strand from one of the tails and twist it so that the gum is completely covered (the strand should not be twisted). Secure the end of the strand with an invisible.
5. The same with the other tail.
Scheme of weaving braids "French spirals"
1. At the top, separate the part of the hair in the form of a check mark.
2. Move the hair to the left, grabbing another strand, and twist in a spiral clockwise.
3. Transfer the resulting spiral to the right.
4. Take the lock on the right and wrap it around the spiral.
5. Repeat the same several times, continuing to twist the strands in a spiral.
6. Tuck the end of the hair under the final spiral and secure with an invisible or a crab.
7. For greater brightness, the hairstyle can be decorated with hairpins, hairpins or fresh flowers.

French braid vice versa (Danish braid)
1. You can start from either side or in the center - it depends on the wishes.
2. Separate 3 strands, the left strand under the middle, the right under the middle, picking up a small strand on the left.
3. On the right to do the same.
4. It is necessary to slightly loosen the braid to give additional volume and splendor.

Hairstyle "Scythe-wreath"
On every day. Simple and easy. This hairstyle can be done in various ways. Use weaving patternsknots, an ordinary braid, a pigtail on the contrary, and various others.
1. Start weaving from the temple.
2. "Bring" the hair up and move it around the head.
3. “Get the hair” either clockwise or counterclockwise.
4. Finish weaving in the same place where we started from, securing with invisibility.

Side braid weaving pattern
You can see the method of weaving the original braid on one side in the video (see top of the page).
1. Divide hair into 2 strands.
2. Starting from the temple, weave the braid out of the small strands, grabbing hair on one side only.
3. No need to “wind” the hair to the side. Weave strictly down.
4. On the other hand, braid a small braid outward without grabbing excess hair.
5. Take a large braid and connect with a small one so that they touch on the side of the small one. A large braid should cover the entire head, thus adding volume.
6. For a romantic hairstyle you need a small accessory (flower, hairpin, hairpins).
Before you begin to study interesting hairstyles with weaving, read the basic recommendations on how to weave pigtails on the video.
Weaving should be done tightly so that the hair does not come out of the hairstyle and does not interfere with the child in the classroom.
Try to learn how to make your daughter interesting and beautiful hairstyles with braids. This will give her self-confidence, increase her self-esteem, which means she will have a positive effect on her studies.
Please note that a hairstyle with braids should be chosen so that it takes no more than 15 minutes to create it. So that you calmly manage to collect your child in kindergarten or school in the morning.
With ribbons
Comb the hair and separate the part near the forehead. Take a thin strand and tie the selected ribbon.

Divide a separate part of the hair into three strands. Add a strand with a ribbon to the central strand.

Start the traditional braid weaving. But do not forget to pass a ribbon between the strands. Now take the left and middle strands with your left hand. Put the tape on the middle strand, hold the right strand with your right hand.
![]()
Put the right strand on the middle and skip the tape between them. In your right hand you should have a ribbon and a middle strand. Now put the ribbon on the right strand. The left strand should lie on the tape under the right strand. Take the ribbon in your left hand and wrap it under the left strand.

Put the middle strand on the left. Pick up the free lock on the right side and add it to the left lock. Put the ribbon on the middle strand so that you have the left strand and ribbon in your right hand.

Now bring the right strand under the left and grab to it on the left side. The new strand should be slightly thicker than the strands already in use.

Put the left strand on the right, now there should be a ribbon under it. To the right strand, grab on the right side and put a ribbon on top. Bring the middle strand under the left and grab a free lock near the left temple. Take the middle strand with your right hand, and grab the tape with your left.
In the same pattern, continue braiding, gradually adding loose strands on the right and left sides. In the end, you should get a braid, in which the left side will protrude outward, and the right side will be inside. Gently pull the braids of the pigtails to give volume. Fasten the ribbon at the end with a beautiful bow, and fix the braid with an elastic band.
Festive version of the "Waterfall"
- Apply mousse to the strands of hair, then use a curling iron to wind them.
- You should get soft, gentle waves.
- Let the curls cool.
- Use your fingers to comb the strands lightly and divide them on the sides into two large parts.
- Start braiding on the right side.
- Separate the strand, divide it into three parts and begin the classic weaving.

On the second weave, you need to let go of the lower strand and take a new one.
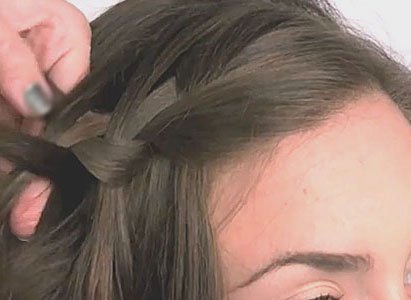
Further weaving occurs according to the following principle: weave the upper strand into the pigtail, and release the lower one and immediately pick up the lock of loose hair. Weave should be diagonal.

Braid the same pigtail on the left side. Then weave two braids on the back of the head and secure with invisible ones.

Gently stretch the braids of the braids to get a voluminous hairstyle.
At the end, lightly spray the hairstyle with varnish.
Fish tail
- Comb your hair thoroughly.
- If you have curly hair, you need to straighten it with an iron.
- To make your hair tidy, spray your hair with a moisturizing spray.
Divide the hair into two identical strands.
Separate a small strand from the outer edge of the left part of the hair, transfer it to the center on top of the strand and connect it to the right part of the hair.
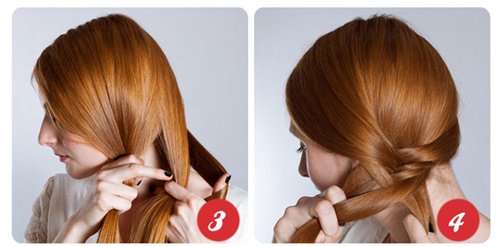
Do the same with the right side. Separate the strand from the outer edge of the right part of the hair, transfer it to the center on top of the strand and connect it to the left part of the hair.
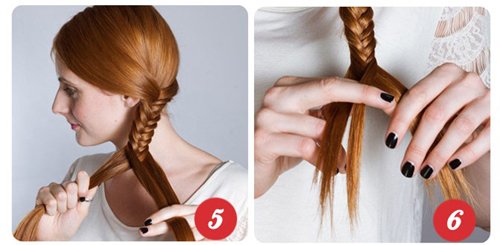
Continue weaving until the end of the hair. Fix the tip with varnish or rubber.

To make the braid openwork, carefully pull the loops out of it. At the back of the head, weaving should be weakened, but the closer to the end, the tighter the weaving.


Inversion
Apply mousse to clean and dry hair. If you want the hairstyle to be voluminous, then curl the strands with a curling iron.

Take a strand of hair at the crown. The thicker the strand, the more voluminous the braid will turn out. Divide it into three parts (1 - right; 2 - middle; 3 - left).

Weaving should begin with the right strand (1). Take it and place it under the middle strand (2).

Take the left strand (3) and place it under the right one (1), it is now centered between the right and left strands.

Take a free lock on the left side and connect it to the middle lock (2), it should now be on the left side.

Now put the middle strand (2) under the bottom.
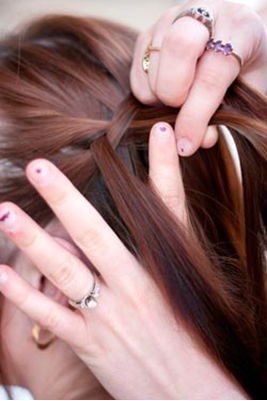
To the central strand, add a new strand on the right side.

Continue weaving with grabbing until you braid all loose strands. In the end, you should get an elegant pigtail on the contrary.
Tighten the braid tail with an elastic band, carefully pull out the loops. Fix the braid with varnish.
Spikelet
Separate a small strand at the base of the hair.
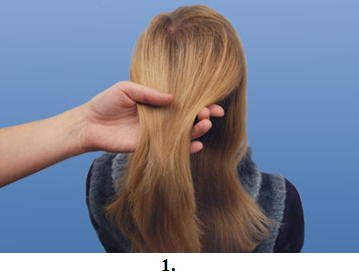
Divide it into three strands.

Start weaving a traditional braid. Cross the strands and grab a free strand from one side. Add a new lock to the center of the pigtails.
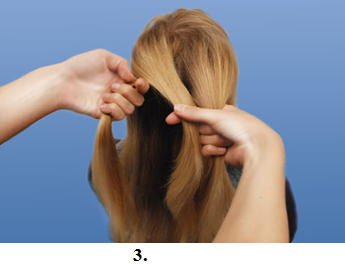
Grab strands alternately on each side. Keep in mind that the finer the strands you take, the more elegant the braid will turn out.
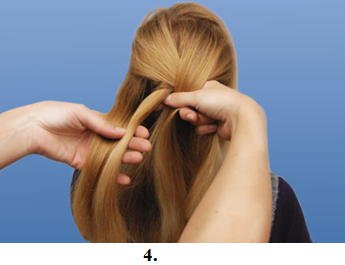
By the same principle, continue weaving until free strands end.
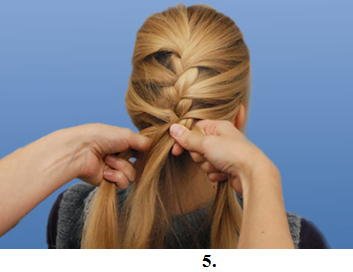
Now you can braid your hair in a traditional braid or fishtail.

African pigtails with photo
"Classic"
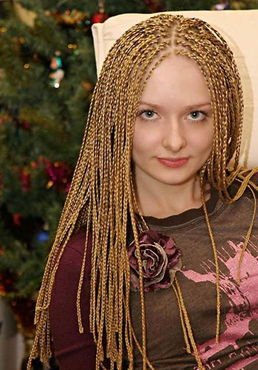
Brady
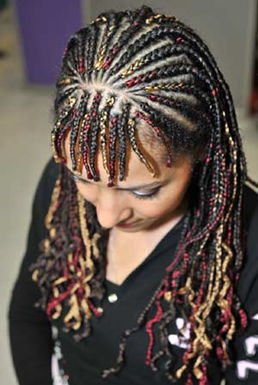
Pony Tail
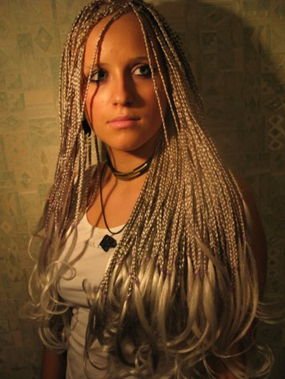

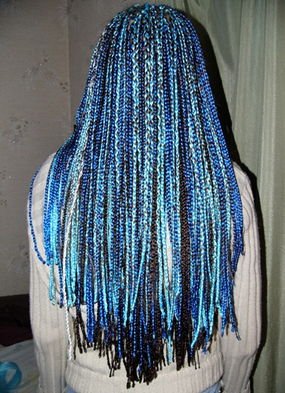
Senegalese Braids (tourniquet or rope)
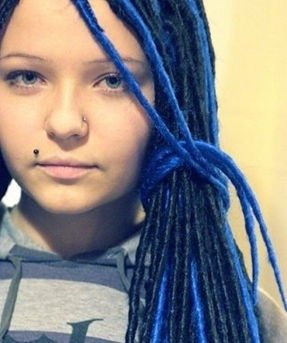
Recently, pigtails have returned to fashion. Depending on how to weave braids, a finished hairstyle will complement any look. She will be relevant for a business woman and for a romantic girl. A neatly braided pigtail goes well with any style of clothing.
The fashion for pigtails gives rise to a large number of weaving methods, varieties of the braids themselves and hairstyles with them. Therefore, all those women who are always in trend should learn to weave pigtails using the described methods.
____________________________
Method One: Classical Scythe

This is the easiest way to braid long hair and medium length hair. Everyone is familiar with the classic braid. It is she who appears in fairy tales, illustrations of ethnographic books. It was this scythe that adorned the Slavs at all times.
The technique of weaving a classic pigtail is that the hair from the back of the head is divided into three strands that are intertwined. This is the basic braid for all the others that are now known.
Step-by-step weaving of a classical braid:
- Apply styling agent to clean hair or moisten them with water a little.
- Carefully comb your hair and collect it in a tail, remove all the “cocks” and bumps.
- Divide the tail into three strands of the same thickness.
- Take the rightmost strand, from which the braiding begins. This strand must be placed on the central strand so that it also becomes central and lies between the left strand and the central.
- We repeat a similar action with the left strand and so on in order, but not to the very end. You need to leave about five centimeters to the end, and fix the pigtail with an elastic band.
In this way, you can weave one, two or more braids. You can put pigtails in the crown or leave it hanging.
- Tip 1. Weave braids, slowly, this will help to braid a neat braid.
- Tip 2.
Method Two: Swiss Braid

Weaving braids in this way is not at all difficult. And the result is original hairstyle, which can be "worn" and "to a feast and to the world, and to good people."
The technique of weaving this braid is similar to the technique of weaving a classic braid. The only difference is that the strands before weaving are twisted into dense bundles.
Step-by-step weaving of a Swiss braid:
- Comb the hair on the back of the head and collect it in a ponytail. Secure with rubber band to simplify operation.
- Divide the hair into strands and curl them into tight braids.
- Starting with the right strand, a braid begins to weave braids according to the classical technique. In this case, you should not rush and make sure that the harnesses do not unwind.
- Remove the gum from the tail and fix it with the pigtail below, retreating five centimeters from the end.
Such a pigtail can be left “as is”, or you can decorate it with ribbons and other decorations.
- Tip 1. Weave braids, slowly, this will help to braid a neat braid without "cocks" and make the hairstyle beautiful.
- Tip 2. To prevent the harnesses from loosening, use several rubber bands, pulling the hair along the length of the harness.
- Tip 3. Train until the result is perfect.
Method Three: French Braid

This is one of the most exquisite braids that weaves in a wide variety of variations. It is this pigtail at the peak of popularity and is in demand in beauty salons among girls and women.
French braid, also known as a "braid on the head" or "weaving on the skin." These names are based on the technique of weaving such a pigtail, which results in a braid that fits tightly to the head and forms an original ornament.
The advantage of the French braid is its versatility: it is good both on short and long hair, suits everyone and keeps its shape for a long time.
Step-by-step weaving of a French braid:
- If the hair is not obedient, first apply a styling agent. Comb them back, divide the large strand near the forehead into three parts. If you need a volumetric braid, then you need to take the strands thicker.
- Starting from the forehead, weave the braid according to the classical technique - from the right strand to the center and from the left strand to the center, weaving together. But, unlike the classics, during weaving, from the sides you need to take additional strands and weave them into a braid.
- Crossing the extreme strands at the same time, leaving the central strand always in the center, spin the braid to the very end.
- Fasten the braid with a hairpin or pin it under you.
In addition to the fact that the braid can be completed by fixing with a hairpin, it can be continued to weave to the side. This will turn out the original hairstyle.
Popular hairstyles from the French braid are: inside-out braid, French waterfall, crown and others.
The braid inside out is a volume braid that is woven in the classical technique, but at the same time, the strands overlap not on top of the central strand, but on the bottom.
French waterfall - hairstyle that will decorate long hair. It is woven using the spikelet technique, but at the same time, the strands do not weave into the hair, but flow freely. This hairstyle looks especially good on curly hair.
- Tip 1. Weave braids, slowly, this will help to braid a neat braid and make the image flawless, showing good taste.
- Tip 2. Train until the result is perfect.
- Tip 3. Experiment with variations of the braid and get new hairstyles. So you will have your own collection of hairstyles based on braids for all occasions.
- Tip 4. For the convenience of weaving French braids and spikelets, pick up additional strands with your little fingers. The remaining fingers perform a locking function.
Fourth Method: Spikelet
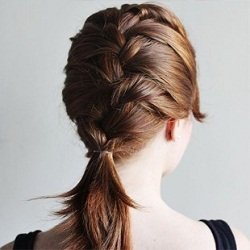
This method is more time-consuming, requires little experience and has a complex structure.
Weaving braids in this way is necessary from two strands, weaving strands from the sides. A spikelet can be braided alone, or several, and thereby diversify the hairstyle.
Stepping weaving:
- Divide the hair into two parts, start weaving on one side.
- On the selected side (for example, on the right), separate the thin strand of hair and weave it with a thicker right strand so that the thin one is under the thick strand.
- Attach it to the left side of the hair and repeat step two.
- Weave these thin strands tightly than to facilitate weaving and make the hair more accurate. Then again continue weaving the spikelet, adding new strands from the right side to the left side and vice versa, braiding to the end. Secure the weaving with an elastic band.
- Tip 1. Depending on the thickness of the strands, the spikelet structure is different. The thinner they are, the more spectacular the hairstyle is. True, it will take longer if weaving braids from thick strands.
- Tip 2. Hairstyle from the "thick spikelet" is suitable for lovers of careless hairstyles, such a "creative mess" on his head.
Fifth Method: Afro-braids

A popular way to decorate yourself and emphasize your image. Today is more fancy Hairstyle for young people, than a way to protect your head from the heat.
Weaving braids as in African people can not only women but also men. The main condition is a hair length of at least seven centimeters. Everything else is "built up" with artificial material - canecolone. Due to this, the length of the braids can be very different.
The number of small braids depends on the thickness of the hair and the desire of the client. The thinner the pigtail, the greater their number.
The weaving technique is similar to the classical technique, plus weaving canekolon.
Step-by-step weaving of afro-braids:
- Comb your hair well and thinly divide your hair into zones.
- Fix each zone except one with forceps so that the hair does not interfere with work.
- Prepare the canecolon by hanging it on the back of the chair so that it is convenient to take. If desired, canecolon can be taken in tone with the hair, either colored or contrasted with respect to the hair.
- Comb the hair of one of the zones and take a thin strand. At the base of the strand, knit the canekolon thread and start weaving in the classic way. Weave must be tight, which will make the pigtails neat, and the hair will turn out voluminous.
- In turn, braid thin pigtails in each zone.
- The tips can be left loose and curled, or left straight. And you can weave braids to the end, fixing kanekolonom.
- Tip 1. Afro-braids are an excellent choice for those guys and girls who do not like to devote much time to styling. After all, this hairstyle does not lose shape for about three months.
- Tip 2. Tie braids in tails, decorate with ribbons and various accessories.
- Tip 3. This hairstyle will help save hair from the scorching sun and salt water, so it should be done for those who plan a long vacation in hot countries.
- Tip 4. Protect your hair from high temperature appliances and places. For example, after swimming in the sea you do not need to blow dry your hair with a hairdryer. It is also not recommended to visit the bathhouse.
- Tip 5. You also need to be prepared for the fact that weaving will require at least three hours. And if the hair is thick, and even more.
Sixth Method: Side Pigtails
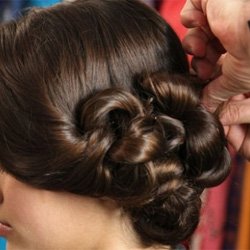
This method is derived from the French and Swiss braid weaving method. It consists in the fact that the strands twisted into bundles are intertwined by the addition of strands from the sides. As a result of weaving, a relief hairstyle with an original structure is obtained.
Step-by-step weaving of braids-plaits:
- Divide the hair into two parts, parting to the middle of the head. Then continue it at the back of the head.
- Comb the hair on one side of the parting towards the back of the head, and then on the other side. To isolate a lock of medium thickness in front from the temple to the parting. The size of the strands can be adjusted, which determines the stiffness of the braid. Twist this strand into a tourniquet and fix it.
- Separate the strand on the same side, but under the strand already twisted into a bundle and repeat the first step. This strand should be the same length as the first and pass from the temple to the parting.
- Twist both strands together.
- Separate these strands and twist again. Squeeze strands with your fingers so that they do not unwind. Take a new strand from the side and screw it into the first bundle. Then take a new strand on the other side and screw it into the second bundle. Twist both strands with new strands together.
- Repeat these steps until the end of the strands. Then fix the finished braids, harnesses and bandage them with a tape.
- All this to do with the second half of the hair.
You can complete the hairstyle in different ways: leaving two braids separately tied with bows or connect them with bows together, knitting at the top.
- Tip 1. To make the pigtail even and smooth, the strands should be the same in length. That is, the hair should be groomed.
- Tip 3. To make it easier to separate the strands, do this with the little finger nail from the ear to the scythe along the oblique line.
- Tip 4. In order to weave a tight pigtail, the strands should be narrow.
- Tip 5. Weave braids need to try painlessly and accurately. To do this, in the process of weaving, adjust the tension and periodically pull the hair down. The result is a perfectly smooth braid.


