

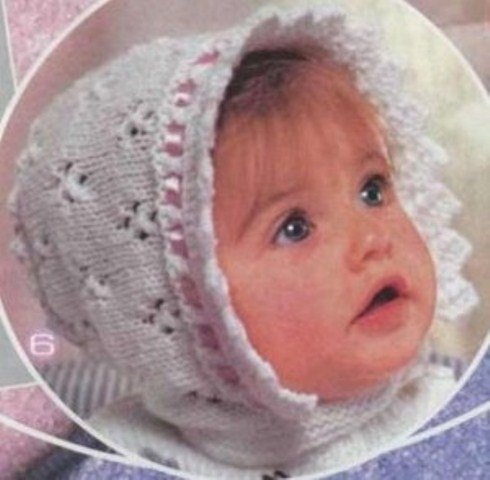
To knit an openwork hat for a girl with knitting needles is even the strength of a beginner needlewoman. For this simple kind of needlework, you only need to know the basic loops, be able to read the patterns and hold knitting needles in your hands. Such light and very beautiful children's hats serve more for decorating young fashionistas than for other purposes. To connect this or that model, it is necessary to master the implementation of the simplest techniques: the front and back loops, as well as the yarn. Ready-made headgear looks extremely impressive, stylish and will definitely appeal to your baby.

How to knit an openwork hat for a girl for the summer? Creating such a beautiful headdress will require a little perseverance and desire to create, as well as the presence of straight knitting needles No. 2.5 and No. 3, a hook, 25 g of white yarn (cotton or linen). This hat is suitable for 3-5 years old and head circumference - 48-50 cm.
Threads with a color gradient will also look good, or you can alternate two shades of yarn when knitting.


Knitting patterns:
- garter stitch;
- stockinet;
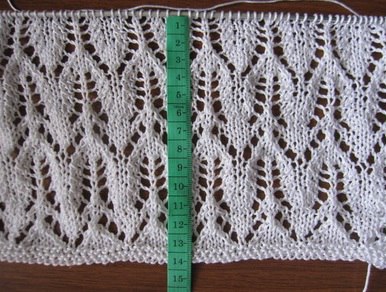
- gothic lace pattern.
We start with a simple
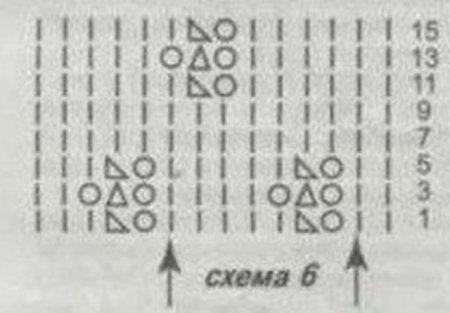
The diagram is presented in the photo below:
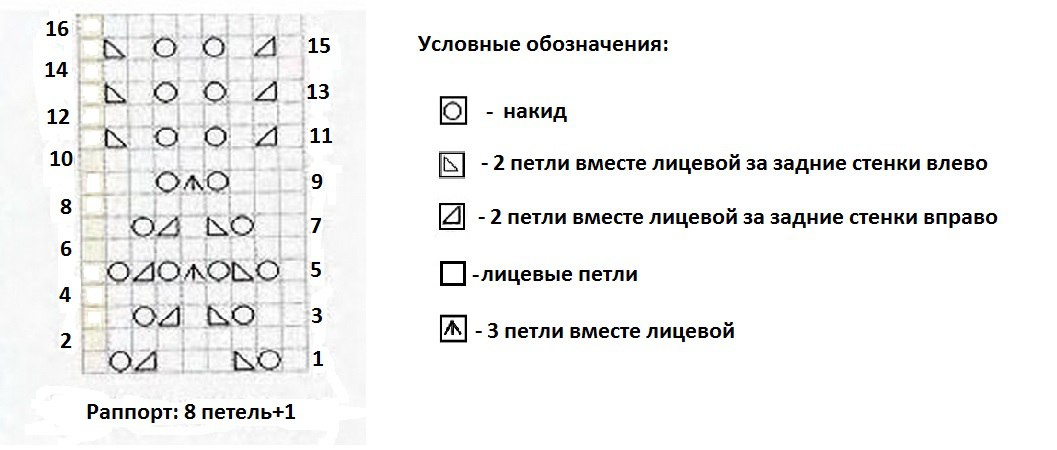
First, knit a pattern sample and calculate the required number of loops for it to work on.

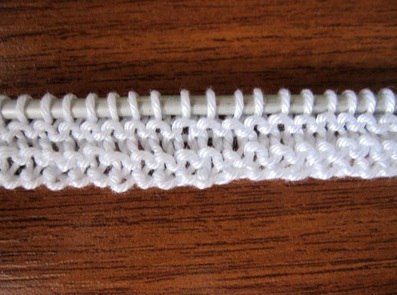
Detailed job description. To begin with, we use knitting needles No. 3. With their help, we collect 91 loops and knit 4 rows of garter stitch (all loops are facial) - this will be the edging of the headgear. Then we take knitting needles number 2.5 and begin to knit openwork, using the scheme. From the first to the fifteenth row of the pattern, we repeat knitting three times.
To make the top of our cap on the entire canvas of the product, we make reductions: evenly in the three front rows we knit together the central three loops of each rapport. In the outermost row of the cap, we knit all the loops in two together. Those loops that remain, transplanted onto the hook, cut the thread, while leaving the end of it 25-30 centimeters. Now we pass the thread through all the loops and tightly tighten. The hat is ready!


Honeycomb pattern
The advantages of a do-it-yourself children's headdress are that it is made exactly to the size of the baby’s head, the color and texture of the thread are selected at will, and as a result, a unique and inimitable thing is obtained. Consider another option for hats for spring, knitting simple openwork pattern from hundred.
What do you need? To knit such a hat, you will need: 100 g (400 m) of wool mixture and knitting needles No. 2.5.

Working process. With twelve loops, rapport consists in the pattern of the product. We knit two loops before it, and then four. Eight rows in height. First, you need to knit several rows of elastic or garter stitch. To avoid mistakes, be careful! From the ninth row, it is already clearly visible which row of the pattern is knitted next.
Knit the hat to the desired height, then for the bottom and flower we knit 28-30 cm of a flat cloth. You will get a triangle that needs to be sewn, tighten the top with a thread about 5 cm from the edge to form a flower. After finishing work, you need to wash and dry the hat by putting it on a mannequin or jar. This wonderful product is sure to appeal to your young lady!
Hats for babies
Newborn babies should be dressed in such a way that they retain maximum warmth. Knitting hats for babies are a great option, as they look very beautiful, warm the baby’s head, and cover their ears tightly. The photo below shows a handmade hat for a newborn girl, but this model can also be connected for a newborn boy, changing only the color of the ribbon or thread as a whole.
This model is very simple to manufacture, with a light pattern.
Necessary materials for work: 100 g of yarn (cotton), knitting needles No. 3, ribbon. For knitting we use such patterns: front rows, wrong rows and openwork pattern, which is shown in the diagram.
Description of work. We collect 73 loops and knit 2 rows of front stitch.
We knit the next row according to this pattern: * double crochet, 2 p. Together persons * - and so on to the end. This is how we form the holes for the satin ribbon. The next 2 rows are the front surface. Then we knit one row as follows: * yarn, 2 p. Together of persons. * Next, we continue according to the pattern with an openwork pattern. When the height reaches 12 cm, you need to evenly reduce 17 loops, knitting 2 p. Together through an equal number of loops.

As a result, 56 loops should remain on the knitting needles. We also knit 2 rows of front stitch and evenly add 17 loops. Another 4 rows - the front surface and another row according to the scheme: * yarn, 2 p. Together faces. * (Holes for tape). Then we knit 2 more rows with front stitch and close the loops. Sew our hat, turn the edge over the second row of holes. The resulting "teeth" are fixed. The first row is decorated with a ribbon, which will serve as the ties. Cap bottom: through the extreme row we also stretch a satin ribbon and pull it together. Try to knit such an original bonnet for your baby, because nothing warms anything better than mother’s love!


We offer you to watch an inspiring selection of video lessons that will help you easily cope with the task.
Video on the topic of the article
Every mother knows what is in the sunshine with her head uncovered is completely unprofitable for health. Therefore, on all babies from an early age put on bonnets and panamas, allowing without fear to take sun baths. As a summer headdress, you can use panama hats, baseball caps or just scarves. And you can independently knit openwork caps made of natural cotton, which will allow the skin to breathe, but at the same time they will protect it from sunstroke. So, today we will learn how to crochet openwork hats.
For the manufacture of children's knitted panama need
- cotton threads (white, green and pink)
- knitting hook number 2
Below is a knitting pattern for children's openwork hats.

How to knit a baby knitted panama hat
1) To start, we collect a chain of six air loops.
2) The first level we start with three lifting loops. We knit them in a circle of 16 columns with a crochet.
3) The second level: first of all, we collect three lifting loops, and after them - one air loop. After that, in all the columns of the first level we knit a block from one column with a crochet and one air loop. So we continue to knit until the level is over.
4) The third level: in all the air loops of the second level we knit two double crochet columns, alternating them with the air loops.
5) The fourth level: fits the same way as the third, but we make three columns with a single base.
6) Fifth level: we collect three lift air loops, then we connect the next block “two double crochets, one air loop, three double crochets” into the combined fourth level air loop. After that, we perform “one air loop, three columns with a crochet in each air loop of the fourth row”, and through three air loops of the fourth level we knit such a block “three columns with a crochet, one air loop, three columns with a crochet”.
7) Sixth level: it fits in the same way as the fifth, but at the same time we knit blocks of the fifth level not in the fourth, but in the fifth air loop of the fifth level.
8) Seventh level: start with the lifting loops, then two columns with a crochet in the air loop of the previous row, then repeat the block “one air loop, three columns with a crochet in the air loop of the previous row”.
9) Eighth level: fits in the same way as the seventh.
10) Panama fields are knitted according to the pattern, while first you need to connect the arches of six air loops through four loops.
11) Openwork children's panama is ready! This hat is suitable not only for the summer, but also in the spring, if the weather is warm.

Panama women of this type will look great on children up to a year old. For newborns, it is especially important to use natural materials and it is better not to sew additional jewelry from beads or beads.
As well as lace knitted panamas, you can knit not only for babies, but also for older women.
To make a female openwork hat you will need
- mercerized cotton cherry yarn (110 m / 50g)
- knitting hook No. 4 (you can also take hook No. 3, but with hook No. 4 the finished product will be more elegant and airy)
Ready-made panama is suitable for a head circumference of 55-57 cm.
Below is presented step by step instructions and a description of how to knit each row.

How to tie a women's openwork hat (bottom)
1) We start knitting with the manufacture of the bottom of the panama. We collect six air loops and close the circle. Next, we knit with double crochets, the first level - we knit eight crochet columns in a ring.
2) Second level: we knit 16 crochet columns in a ring.
3) Third level: in every second loop of the previous level we knit two double crochet columns.
4) Fourth level: through two loops of the third level, we knit two double crochet columns. At the fifth level - every fourth, etc. So we knit until a circle of the right size is ready (an average of eight is next for the bottom diameter of 17 cm).
How to knit a female openwork hat (patterns)
1) Next, we knit openwork knitting according to the pattern (the schemes are presented below), we do not add. If the threads are thin, columns with two crochets are knitted, but if the threads keep their shape well, then you can do with single crochet columns.
2) We knit the first level of the pattern: the main difficulty of this level is the crossed columns.
3) The second level of the pattern: we collect three lifting air loops, then we knit the crocheted column in the third loop of the row, then the crocheted column in the second loop of the level - we got a cross column. We repeat once again the air loop and knit with such blocks to the end of the level. This level consists of thick columns, between which are three air loops.
4) The third level of the pattern is knitted similarly to the first.
5) The fourth level of the pattern completes the rapport. The whole level is crocheted in each loop of the previous level. Make sure that no loop remains missing. We knit these rapports in such a quantity that the hat is of the required size. On average, two rapports and one more level should be released. Thus, the entire depth of the cap was ten levels.
6) We knit the last three levels in single crochet columns, forming the edge of the cap.
7) A charming women's panama hat is ready for the summer.
Related videos
Below are interesting video tutorials that explain in detail how to knit cute openwork panamas for girls of any age.
Even a novice knitter can knit an openwork hat for a girl with knitting needles. It’s not at all difficult. You only need to be able to hold knitting needles in your hands to know the main loops and be able to read schemes at least a little.
Fishnet cap
A hat for spring knitted with a simple openwork pattern of honeycombs. For her knitting, we prepare: half-wool 400 m. × 100 g and knitting needles No. 2.5.
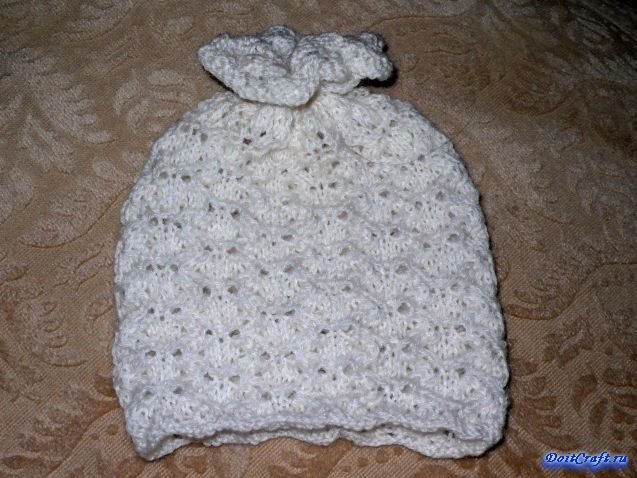
The rapport in the product pattern consists of 12 loops, before it we knit 2 loops and after 4. The height is 8 rows. First, we will knit several rows with an elastic band or garter stitch, which is more like it. We knit the initial row of the pattern very carefully in order to avoid mistakes, from the 9th row it already becomes clear which row of the pattern fits the next.
After the height of the cap is connected to the bottom and the flower we knit 28-30 cm of a flat cloth. Sew the resulting rectangle, tighten the top with a thread about 5 cm from the edge to make a flower. The hat is ready, it remains only to wash it and dry it by putting it on a mannequin or a jar (this is done to maintain the volume of the picture).
Cap for baby based on a bonnet
You can knit such a hat both for a newborn girl and for a boy. After all, it is knitted from delicate yarn, has ties and closes the baby’s ears well.

For work we will prepare: threads for children's products 260m × 100 gr, circular knitting needles No. 3 and hook No. 2.5. The calculation of the loops in our work on the girth of the head 42-44.
- On knitting needles we collect 76 p. + 2 hem, it turns out 78 loops.
- Now we knit 6 rows with an elastic band 1: 1, about 2 cm are knitted. After the elastic, we knit a number of facial and a number of purl stitches.
- We start knitting the pattern: remove the edge, “we knit 1 front, 3 times 2 loops together, front, make a crochet, 1 person loop, so you need to make them only 6 when you put on the last one, we knit 2 loops 2 times together after it, 2 together . n, 1 persons loop ”. From “to” we repeat 4 more times to the end of the row. The rapport contains 19 loops.
- We sew all the wrong rows with purl loops.
- We knit 10 rows and proceed to the formation of the occipital part of the cap. To do this, we divide the total number of loops on the needles by 3, we got 26.
- We will continue to knit only the middle 26 stitches. At the beginning of each row we remove the hem, and we knit the last loop of the nape and the extreme loop of the side part together according to the figure.
- When all the side loops are tied, the remaining central ones are closed.
- It remains only to tie the laces so that the hat can be tied. To do this, on the hook number 2.5 we collect 50 air. p. (air loop) and attach the chain to the corner of the cap with a single crochet (art. b / n). Then we tie the lower edge of the bonnet art. b / n and at the corner we will again pick up 51 air. p. Now we knit and knit along the entire length of Art. non-cash At the end of the tie, we tear off the thread and hide the ends. Openwork hat for the newborn is ready.
Cotton hat
A hat for the summer for a girl can be knitted not only with a crochet, but also with knitting needles. For knitting children's things you need to take natural threads. For summer panamochki better light.
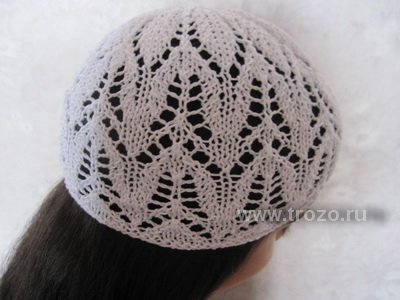
For knitting hats you need: 25 gr. thread cotton (169m × 50g) and knitting needles 2,5 and 3. To calculate the size, take two measurements: head circumference (here 49 cm) and from ear to crown (here 16 cm). for a more accurate calculation of the loops for the desired size, you need to tie the sample and calculate how many loops you need according to it.
- On knitting needles No. 3 we dial 91 loops and we knit 4 rows with a garter pattern. This bezel will replace the elastic around the edge.
- To knit a pattern, go to knitting needles No. 2.5 and knit 45 rows according to the pattern (the pattern will be repeated 3 times).
- After the main part of the panama hat is ready, we transgress to knitting the top. To do this, 3 times in the front rows you need to reduce the middle three loops of the pattern.
- We finish knitting with the front row knitting all the loops in pairs. We remove all the loops that are on the knitting needles on the hook and cut the thread, leaving the tail about 25 cm long, then pull it through all the loops on the hook. Sew the product with the same thread. The hat is ready.
Knitting hats is quite an interesting and useful lesson here you can experiment with the pattern, the size of the knitting needles in color or the composition of the yarn and knitting of various elements. So you can tie a hat with ears or ponytails on the sides, you can still, if the hat fits for a girl with a scythe, leave a neckline behind so that it is more convenient to put a hat on a pigtail. For a little princess, you can make a crown application on a hat or just knit a pattern with threads. Kids will love hats with different faces or animals. You can also make not one, but several pompons by sewing them in the form of a pattern or several pieces on different sides. A variety of styles is limited only by the imagination of the knitter herself.
Related videos
We offer you a detailed video master classes on knitting openwork hats for girls.
Head circumference: 50 cm
Yarn: "Ivushka" Semenovskaya yarn (50% cotton, 50% viscose, 430 m / 100 g).
Hook: № 1,5
Description:
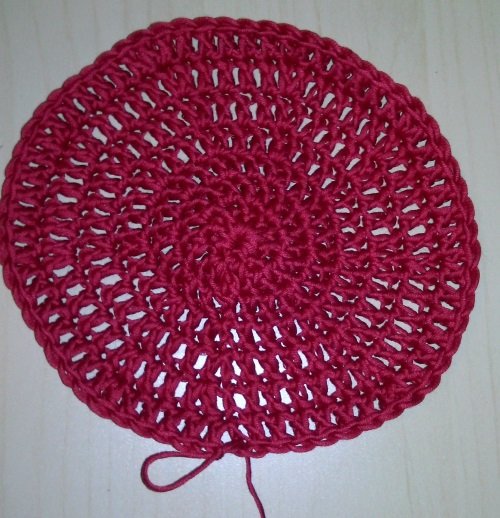
We start knitting hats with the crown. Hook number 1.5
To do this, fold the thread into a ring.
1 row: we tie a ring of thread. 3 lifting air loops, 16 double crochets, connecting loop (we close the knitting in a circle). Tighten the ring by pulling the non-working end of the thread.
Next, we knit according to the scheme. 
Crochet openwork cap scheme.
The last 2 rows are knitted the required number of times (to the desired depth).
![]()
Then tie a hat with 3 rows of single crochet.
Photo: Crochet openwork hat. 
Attention! If you liked our model of an openwork hat with a crochet and you knitted it for yourself, and now you want to show your work - you can place it on this page under the description of this model yourself - click on the green button "Add photo of your work". From you, brief information is desirable - what is your name (name or nickname), from which city, what materials you used and how the work progressed (easily or were there difficulties), wishes and suggestions.
Waiting for your work!
Your works
 Tamara
 Janchik I
I really like your hats, thanks for sharing your experience. My name is Zhanna, Kharkov, Ukraine. I took a string of Papillon from Lanoso (210m 50g.) 50% cotton, 50% viscose. I started with a hook 1.5, after the bottom I took a hook 1.75 Here is my result
 dvornik
Good afternoon! My name is Ekaterina. I use yarn "Semenov Yarn. Tenderness", 47% cotton, 53% viscose, 100 g., 400 m, hook No. 1. I started to knit a hat and saw that the crown turned out not as in the picture, but as if in a spiral. She began to get confused when moving to the next row, since it is very difficult to determine the end of the previous row in order to go to the next. What have I done wrong, what is the mistake? Maybe you need to do three lift air loops at the beginning of the row and a connecting loop at the end? But this is not shown in the diagram. Please help me, I really want to tie this hat.