

Knitted men's hats have long been entrenched in the world of men's fashion. Of course, there are courageous people who flaunt without hats even in the cold. Most men do not like to freeze. We have collected the most fashionable brand models and we will knit with our own hands.
Knitting a men's hat is a short and interesting process. Our models are all with diagrams and descriptions. Try to knit a hat using our master class and you will appreciate our work and conscientiousness. All hats are youth branded. We will start knitting with the simplest model - beanie hats.
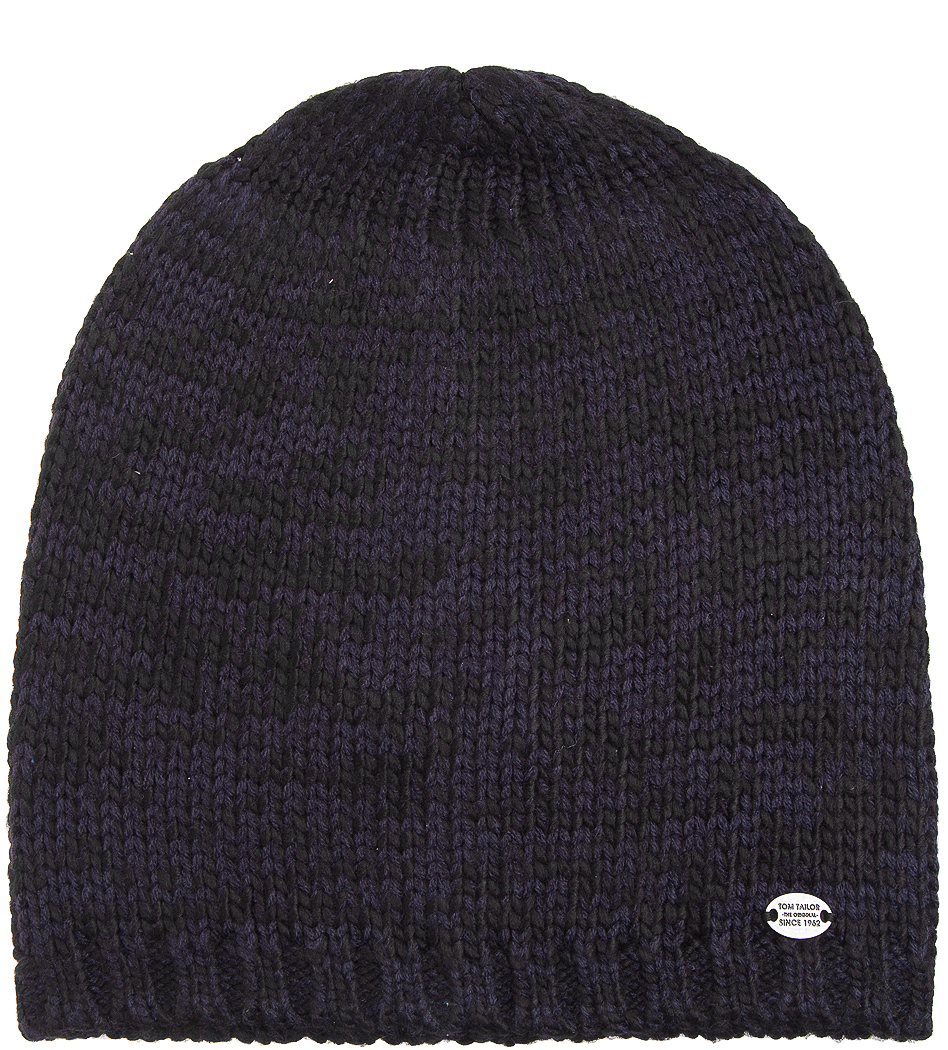
A beanie hat is the simplest and most democratic hat, knitted with the most ordinary viscous - face stitch, without pompons, ruffles, ties. It is also called a stocking hat or hat-bag. This hat fits snugly on the head and can be of different lengths. It can be of normal length (26-28 cm), or it can be like a cap (30-32 cm). We will make a hat 28 cm long.
To work you need:
- Yarn (wool or wool with mohair), 100 grams, thread in 2 additions.
- Knitting needles number 2.5 mm.
- Centimeter
When choosing threads, give preference to those with 100 grams of weight containing 250 meters of length. We do not need thick threads. Let the threads be thinner, then the hat will look neater. The knit should be tight, without gaps. Determine the density of knitting.
Knitting density is the number of loops and rows that are needed to knit a 10/10 cm fabric.
It is very important to correctly calculate the density so as not to bandage again. Tie a control sample and see how many loops you got in 1 cm. Measure your head circumference and multiply by the resulting number. Here are the number of loops you will be knitting. We will knit on two knitting needles, then we will sew the fabric. For size 57, I take 142 loops (2.5 loops in 1cm * 57 cm) \u003d 142. We add 2 edge loops. We scored 142 loops on 2 knitting needles and began to knit with an elastic band.
1 row: 2 front - 2 wrong, 2 persons., 2 out. etc.
2 row: how the knitting looks.
3 row: as the first.
We knit with an elastic band to the 7th row. From the 7th row, we begin to knit the facial ones. We knit the front surface of 17 cm. Next, we begin the decrease. We decrease 2 loops together in every third row. We collect the rest of the loops, tighten together tighter. We leave the end of the loop, put it into the needle and sew the side seam carefully.
On the video: a fashionable men's hat with knitting needles, a detailed MK.

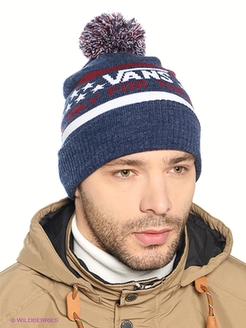
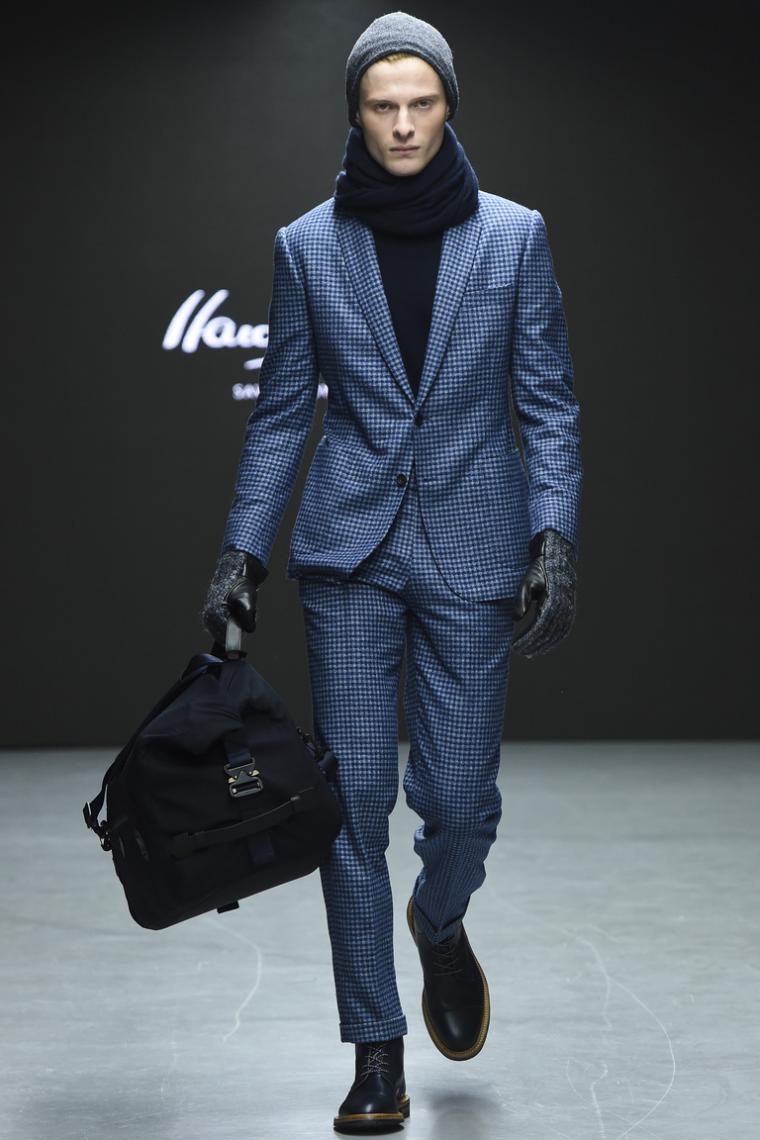
Fashionable men's brand hat. We knit with an elastic band 1 person, 1 out. Hat with a lapel. Lapel - double elastic band. Maybe more of blue color, with a red and white stripe. Knit on 4 knitting needles.
To work you need:
- Yarn (wool or 50% wool, 50% acrylic) 150 grams, in 2 threads. A little red and blue.
- Knitting needles 3 mm.
- Centimeter.
Tie the sample with facial 2/2 and count how many loops are in 1 cm of the sample. For example, we need to knit a hat of size 56, 1 cm. It turned out 2 loops. So you need to dial 56 * 2 \u003d 112 loops. We collect 112 loops on 4 knitting needles with red thread and knit 2 rows with a 2/2 elastic band:
1 row: 2 facial, 2 wrong, 2 facial, etc.
2 p.: How the mating looks.
3 p., White yarn: 2 facial, 2 wrong, 2 facial, etc.
4 p.: How the mating looks.
5 p.: Blue yarn: 2 persons., 2 out., Etc.
1 row: 1 persons, 1 out. 1 persons, 1 out. etc.
We knit 15 cm. Elastic 1/1, we begin to decrease. We begin to decrease: we divide the canvas into 6 parts, we begin to make decreases in each 3 row. We knit 2 loops together throughout the row. After 9 cm, the remaining loops are pulled together with a thread.

Sew the pompom to the hat. If it is difficult for you to knit on 4 knitting needles, you can knit on 2 knitting needles and sew.
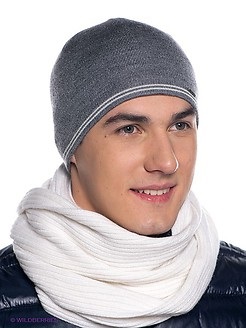
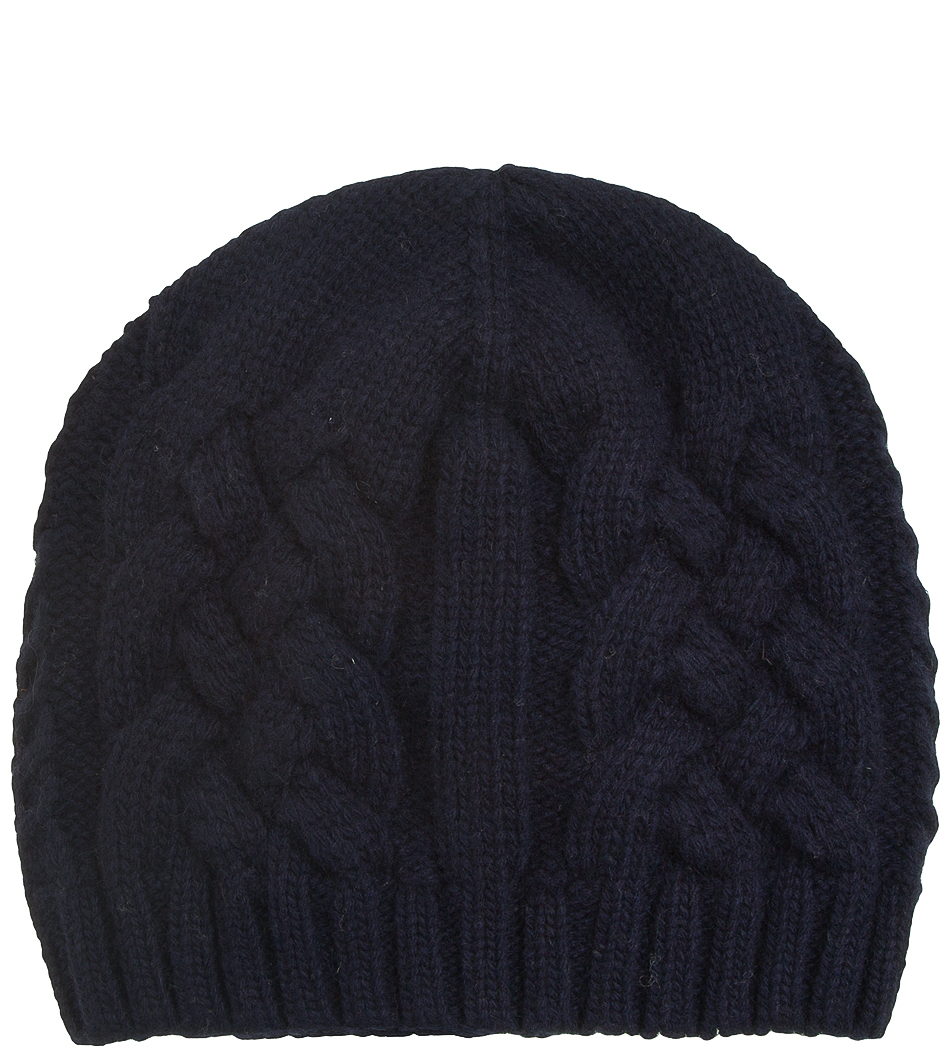
The cap is fashionable, branded, original, 28 cm high. We knit from gray or dark blue yarn.

To work you need:
- Yarn (70% wool 30% pan) is gray or dark blue.
- Knitting needles 2.5 mm.
- Centimeter.
- Needle.
Tie a 2/2 cm gum sample. See how many loops are in 1 cm. Measure the head volume with a centimeter. For example, you get 1 cm 2.5 loops. Therefore, in 56 centimeters there will be 56 * 2.5 \u003d 140 loops. We knit a hat 56 sizes.
The pattern is called "Celtic braid":
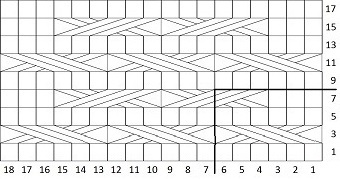
Pattern Description:
- 1 and 5 rows are knitted with facial loops.
- 2 row and all even are knitted purl.
- 3 row - 6 loops to cross with a slope to the left.
- 7 row - 3 persons, 6 loops to cross with an inclination to the right, 3 facial.
Explanations for the pattern:
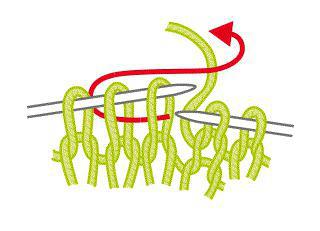
- Cross 6 loops to the right (3 loops reassemble on the auxiliary knitting needle and leave 3 front loops before work, then knit 3 facial loops from the auxiliary knitting needle).
- Cross 6 loops to the left (3 loops are removed to the auxiliary knitting needle and leave at work, 3 facial ones, then knit 3 facial loops from the auxiliary knitting needle).
We will knit on 2 knitting needles, as the pattern is complex. We found it with difficulty. We collect on the needles 1Z8 loops. We knit 12 rows with an elastic band of 2 persons - 2 out. (2/2).
- 1 row: we knit the whole row with facial loops.
- 2 row: we knit the whole row purl.
- 3 row: 1 out, 3 faces, 1 out, 6 loops to cross to the left (see Explanations for the pattern), 6 loops to cross to the left, 6 loops to cross to the left, 1 out, 3 faces, 1 out, 6 loops cross left, 6 points cross left, 6 loops cross, 1 out, 3 faces, 1 out, 6 points cross, 6 points cross, 6 loops cross, and repeat from the beginning of the row. The result should be 138 loops.
- 4 row: all wrong.
- 5 row: all facial.
- 6 row: all wrong.
- 7 row: 1 life, 3 persons, 4 out, 6 loops cross with an inclination to the right (see explanation), 6 loops cross to the right, 4 out, 3 persons, 4 out, 6 loops cross with an inclination to the right, 6 loops cross to the right, 4 out , 3 persons, 4 out of 6 stitches to the right, 6 st. Cross to the right, 3 out., And repeat from the beginning of the row
- 8 row: all wrong.
- 9 row as the 1st.
After knitting 20 cm from the beginning of the cap, begin to decrease. Only the front surface. Divide the knitting into 4 parts, marking these places with bright thread. Decrease by knitting 2 together, as a result, the cap should turn out to be 27-28 cm.
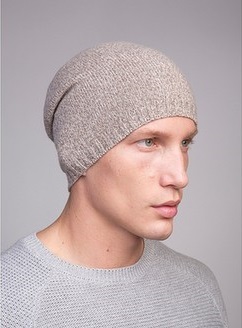
A hat with a satin stitch, a handkerchief or an elastic band - this is perhaps one of those things that are knitted by both beginners and experienced craftswomen. For beginners, this is a great way to practice and learn the basics. For experienced (at least for me), this is a break from complex projects, especially if you have interesting yarn in your hands that does not require intricate patterns. For a couple of hours, you can tie a new thing to yourself, your child or husband, and, if necessary, an original gift.
For knitting, you can use any yarn, but the volumetric, slightly fluffy yarn, rovings or lace looks especially impressive. The melange and printed yarn looks interesting, especially if the sections different colors not very long.
1 option. Facial surface and decreases by 4 wedges.
To knit this hat, Drops Cloud yarn, 1 skein of 50 grams, knitting needles No. 6 (for knitting elastic bands) and N8 for knitting the main fabric were used. The beginning can be anything, at your discretion - an elastic band 1x1, 2x2, but you can tie the entire cap with the front smooth surface and slightly twist the edge.
The number of loops - 56 - should be a multiple of 4. Each wedge on the crown consists of 14 loops, with the decrease being carried out next to two sides of the 4 loops (they are visible in the photo).
The reduction scheme for a wedge with an even number of loops (14) is as follows (the scheme is given for circular knitting):
The reduction scheme for a wedge with an odd number of loops (15) is as follows (the scheme is given for circular knitting):
The loops that we reduced are highlighted in color; you do not need to pay attention to these cells. Pull the remaining 8 loops down with a working thread, hide the tip of the thread in the fabric so that it is not noticeable. Also hide the tip of the thread remaining after a set of loops. Then the hat will turn out bilateral.
The total length of such an elongated hat is about 22-23 cm. If you want to tie the hat exactly on the head, then the length should be about 20-21 cm.
An example of a hat with 4 wedges of sectionally dyed yarn,
2. Facial surface and decrease in 6 and 8 wedges
The scheme of decreases is as follows (the scheme is given for circular knitting):
The wedge loops are highlighted below, the loops that we have reduced are highlighted in color, you do not need to pay attention to these cells. Decreases are performed across a row, in
the beginning of the wedge. The loops remaining after performing the reduction (6 or pull together with a working thread, hide the ends of the threads in the canvas.
By the way, decreases can be performed by knitting loops with an inclination to the left (broach), they also look very interesting.
3. Shawl knitting
Shawl knitting is a great option for knitting from thick yarn.
When knitting in a circle, one row is knitted with facial loops, and the second is purl.
Decreases are performed uniformly as follows:
1st row: * 5 faces, 6th and 7th together front *, repeat from * to * to the end of the row
2 and all even: purl loops
3 p: knit all loops
5 p: * 4 faces, 5th and 6th together facial *, repeat from * to * to the end of the row
7 p: * 1 persons, 2nd and 3rd together facial *, repeat from * to * to the end of the row
9 p: * 2 together front *, repeat from * to * to the end of the row
Pull the remaining loops with a working thread, hide the ends of the threads in the canvas.
4. Gum 2x2 is often used for knitting men's hats.
The number of loops must be a multiple of 4.
Reductions are performed as follows:
1 p: \u200b\u200b* 1 persons, persons + out of front together, 1 out *, repeat from * to * to the end of the row
2-4 p: knit according to the pattern
5 p: * 2 together front, 1 out *, repeat from * to * to the end of the row
6-8 r: knit according to the pattern
9 p: * faces + out together front *, repeat from * to * to the end of the row
10 p: all loops face
11 p: * 2 together front *, repeat from * to * to the end of the row
Pull off the remaining loops.
I hope that on the basis of these descriptions you will knit beautiful and warm hats.
I will be glad to answer any questions.
Contact me on VK
Double men's hat with knitting needles
Continuing to prepare for the winter, I want to boldly declare that the turn has finally come to my husband - she knitted a double-sided cap with knitting needles. Once again I felt like a squirrel, who was trying to provide her family with everything necessary for wintering.
The work is quite easy, and the most important thing in it is to be able to knit the front and back loops, be able to reduce and increase the number of loops, and also know how to dial and close the loops.
The threads used black YarnArt Merino de luxe / 50 100g / 280m (50% wool / 50% acrylic) and Export brown brown 100g / 285m (100% acrylic). Knitting needles number 3.
She began the work by gaining 109 loops on her knitting needles.
I knitted the first 2 cm with an elastic band 1x1 (1 front, 1 wrong side, etc.). After this, you need to add 13 loops evenly (a total of 122 loops should be obtained), knitting the next row of facial ones. If you make the usual yarn, adding a loop, you get a big hole after knitting the next row. I made this loop as an addition.
As you can see, there are practically no holes after knitting. After the front row, I knitted with purl stitches, then again a series of front and a number of purl stitches - hosiery.
So I knitted 7.5 cm.
The next knit is a 3x1 elastic (3 loops of the front, 1 wrong, etc.). The next row is 1 front loop, 3 purl, etc. according to the drawing. I knitted with such a pattern a black thread - 2 cm, then changed the thread to brown and knitted 1.5 cm, then a black thread - 1 cm.
Again I changed the thread to brown, knitting 1.5 cm. All these rows, changing colors, knitted with 3x1 elastic.
Once again I changed the thread to black and knitted with a stocking knit 5 cm.
Then she divided the canvas hats by 6 equal parts, one of which was divided in half (only 7 parts). The first and last loop are hem for the formation of the back seam. She marked all the loops with threads (11, 31, 51, 71, 91, 101, 122).
Continuing to knit with stocking, I began to cut the hinges of the cap according to the pattern, where x is the front loop, o is the wrong loop, xx under the arc are 2 loops together front (knit for the back walls).
I sewed the edges of the cap with a needle and thread.
I gathered the upper loops on a string and tied.
She bent part of the cap inward (along the line of the beginning of the 3x1 elastic) The edge of two layers was sewn with a thread in a blind seam.
That's all - the hat is ready for the winter!
Many novice craftswomen learn to knit (with knitting needles or crochet), making scarves or just plain cloths. This is logical and quite justified, but sooner or later they have to get acquainted with other techniques, such as reducing and adding loops, the formation of shoulder bevels and necks, shortened rows and other “charms”. This is not to say that it is simple and affordable for absolutely everyone, because only the most diligent girls with well-developed spatial thinking can really knit really well.
The specifics of hats
Having mastered all the necessary techniques, you can begin to manufacture such products as sweaters, sweaters, dresses and, of course, hats. To knit hats, you should carefully study how it happens On the hat, only if it is not a simple “stocking”, there should be a rounded crown. In addition, it should be connected symmetrically, avoiding the formation of folds or a protruding cone.
How are the simplest caps made?
The basic algorithm is worth considering on the example of a product from the one shown in the photo below.
This cap is tied with front stitch, and so that the canvas does not curl, the belt is made with a garter pattern. The usual one is 55-57 cm in diameter and 17-20 cm in height. The main fabric knits evenly (if it does not take), and then begins to taper.
The reduction of loops with knitting needles is performed when the part is about 12-15 cm high. Traditionally, cuts are made in six places in a row, following this sequence:
If the craftswoman chose a thin thread for work, then the reduction of loops with knitting needles on the cap is done both before and after the marked loop. Thus, twelve loops are shortened, not six. Alternatively, you can reduce only on one side, but in each row, and not just in the front. 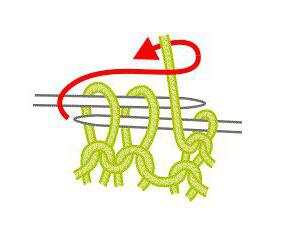
- When the number of loops is reduced to 6-10, they should be pulled together with a strong thread and finish knitting. If you try to cut them further, you can get a sticking top.
The described method should be studied by the craftswomen before using circular knitting needles.
Work with an openwork pattern
In the photo below you can see a very beautiful autumn-spring hat, connected openwork pattern. 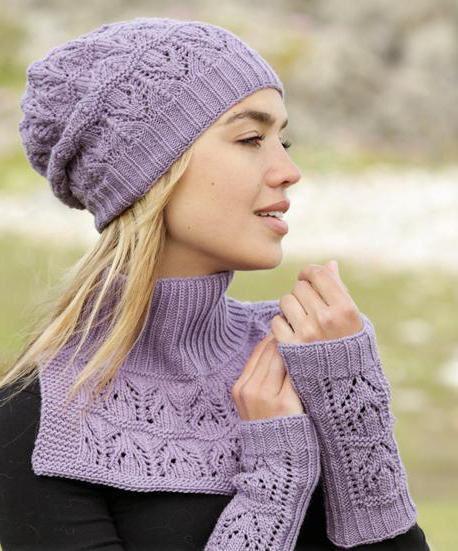
For work, a thread of medium thickness was used. Here it will not work to knit round, only straight and return rows can be applied. 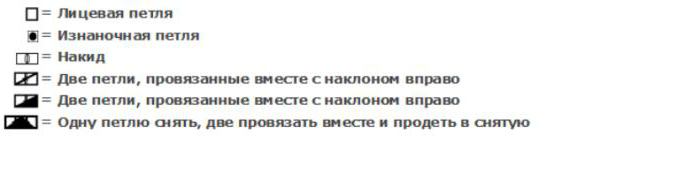 The lower edge of the cap is connected with an elastic band so that the product fits snugly to the head, and the ears are covered with a dense (rather than openwork) cloth. Next, an ornament is used, the scheme of which is described below (left side of the figure).
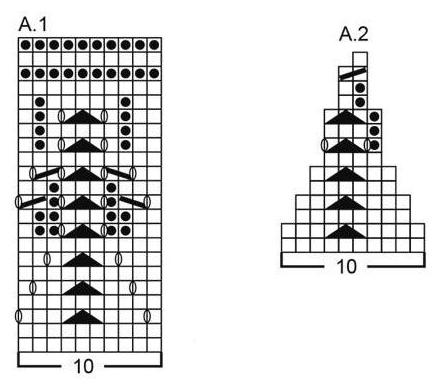
Depending on the thickness of the yarn, you need to repeat the rapport two, three or even four times. To get such a hat as in the photo, from the typesetting edge to the beginning of the cuts, you should knit about 20-22 cm. If you make a cloth 12-15 cm high, then the product will fit your head tightly, and the crown will not hang.
How to beautifully reduce the loops on a hat with an openwork pattern?
The most difficult thing when cutting the loops is that the craftswoman must preserve the beauty of the pattern and at the same time get a neat rounding of the bottom of the cap. For many patterns, these are incompatible concepts, so most often resort to such techniques:
- They work according to the scheme drawn up by the designer.
- Knit the top with a simpler pattern.
- Just collect all the loops into a bundle and fasten the thread.
The last two methods are quite simple, but such hats have a not very neat appearance. Of course, reducing loops with knitting needles on the cap is not for the faint of heart, but professionals, as you know, are not looking for easy ways.
The scheme (on the right) is designed taking into account the design features of the cap. Following it, you can get a hat of the correct shape.
Knitting hats with jacquard
It's a shame, but knowing how to reduce the loops on the cap does not help much when working with jacquard ornaments. In this case, the craftswoman can only look for a special scheme. 
The photo below shows an excellent version of such a development.
Here, the saturation and density of the pattern are preserved, and the bottom of the product is round.
The designer recommends that after knitting several rows, add two loops to each rapport, since jacquards can pull the fabric a little (due to broaches on the wrong side). 
Important: before work, it is advisable to knit a control sample and find out the density of knitting your canvas. This will avoid an unpleasant situation when it suddenly turns out that the pattern is only half-knitted, and the cap is already longer than necessary.