

New Year is a holiday that gathers all relatives and friends at a common table near the New Year tree. A bottle of good champagne will be an excellent gift this night. But a gift can be made not only useful, but also beautiful. In this article you will see detailed instructions on how to make a bright Christmas tree from a bottle of champagne.
Before you start, you need to buy everything necessary materialsNamely: thick paper, a bottle of champagne, hot glue gun, stapler, scotch tape, organza fabric and green tulle, small sweets, red satin ribbon and New Year's beads in different colors.

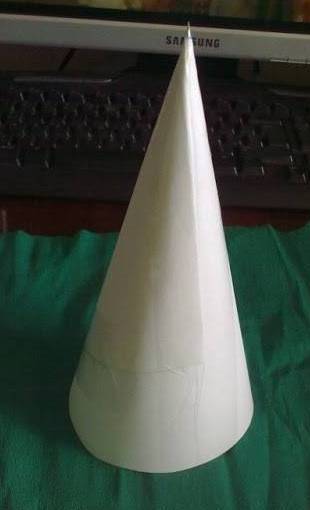
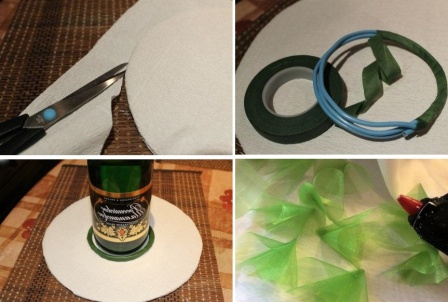
First you need to prepare the basis for our Christmas tree. To do this, take a piece of paper, if you have A4 sheets (20 * 30 cm), then they will need two. Take one of them and wrap it around the neck of the bottle and secure it with tape.
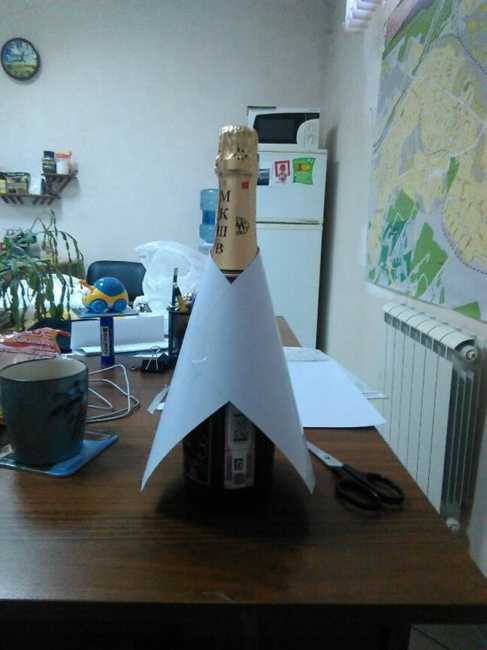
On the fastening side, an empty triangle will remain below, it should be covered with a piece of paper cut out in the shape of a triangle from the second sheet, also secured with tape. Surplus will appear on the bottom edge of the paper, cut them with scissors. Try to make 2-3 cm between the table and the edge of the paper. This will allow in the future to fix the fabric without problems.

Having prepared the basis, we proceed to the processing of the fabric. For such a Christmas tree, you need one meter of each material, provided that the width is 145 cm. 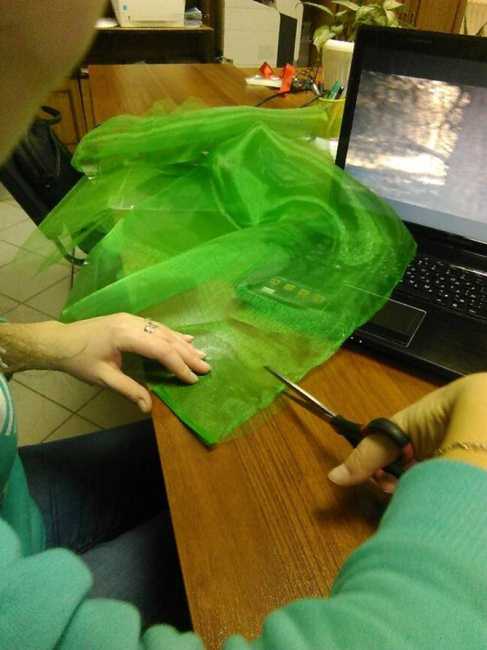
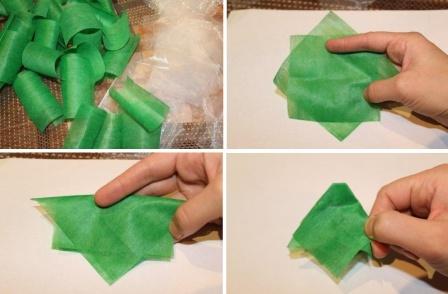
Take organza and tulle and cut into squares about 5 * 5 centimeters in size.

Having cut all the fabric into squares, we proceed to the formation of blanks. For this, each piece of fabric is folded in half.
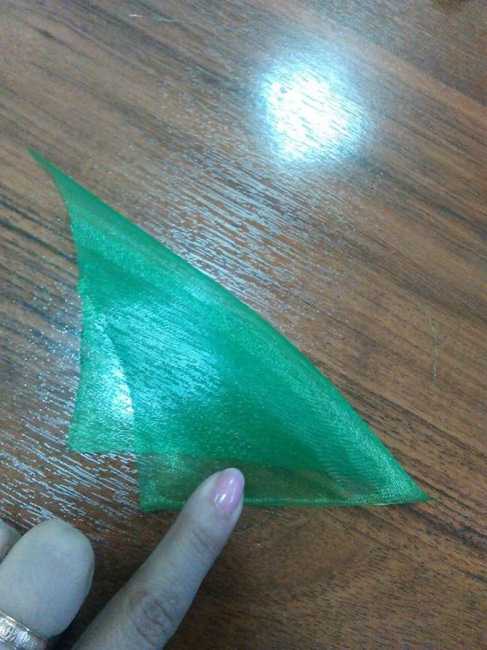
Then fold the square in half again and, if necessary, fold the fabric again.
And in this position, we fix it with a stapler. Instead, you can use a needle and thread, but it takes much more time and effort.
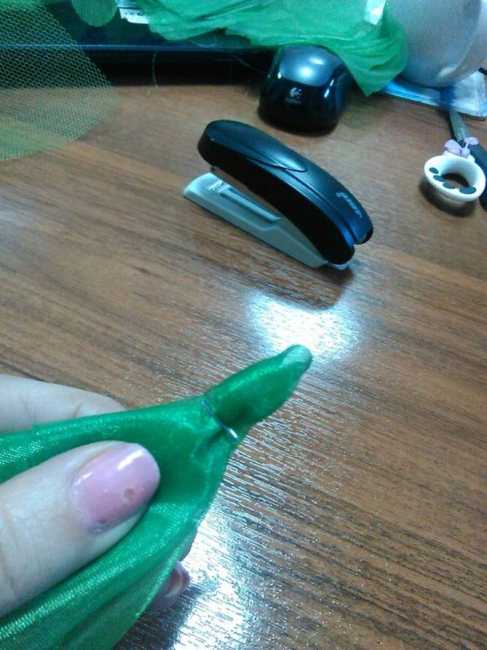
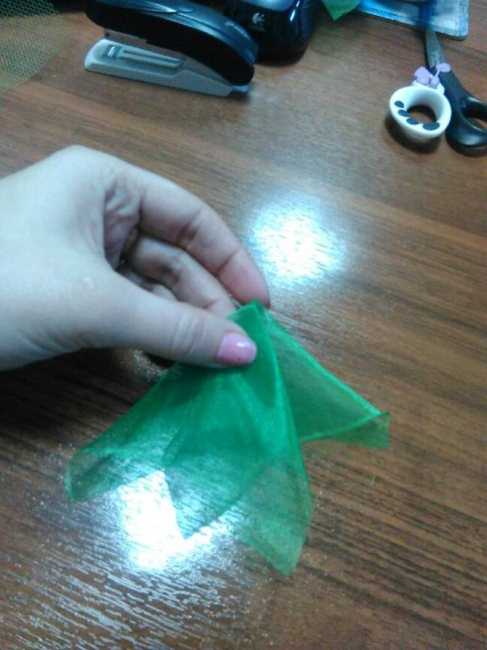
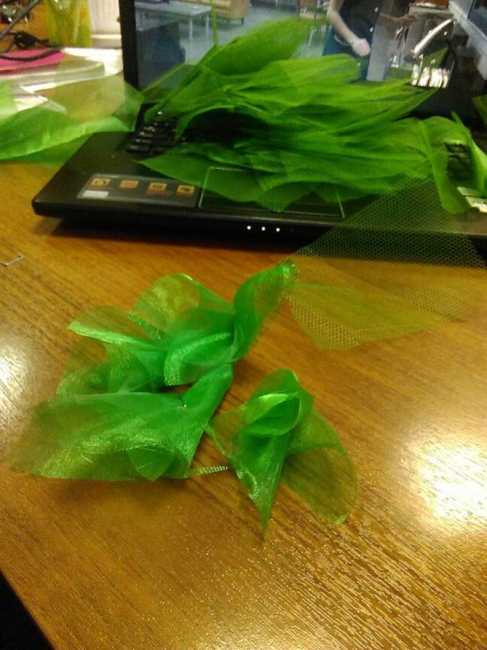
As a result, you should get a lot of lush blanks.
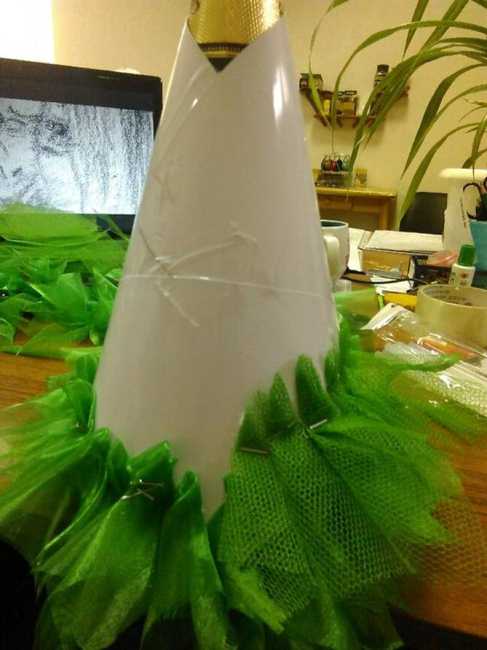
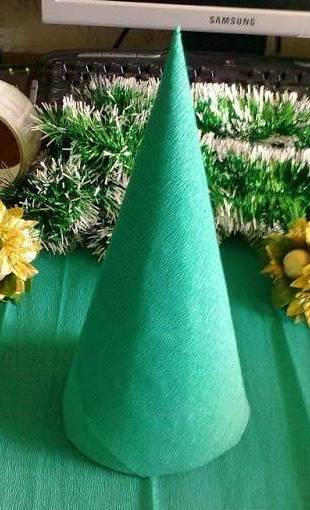
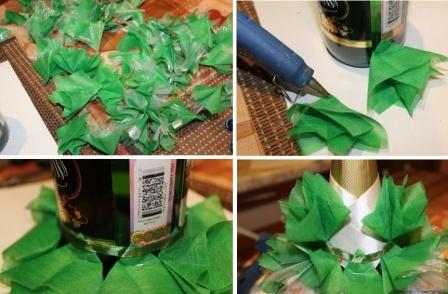
Using the glue gun, begin attaching the fabric to the paper base. First, glue the bottom layer, adjusting the glue height so that the fabric barely touches the table.
![]()
Having finished the first row, proceed to the second, then the third and so on. Make sure that there are blanks of the same material in the row, the rows themselves alternate: organza - tulle - organza.
When you stick the top row, the corners of the fabric will extend beyond the edge of the paper blank. Bend them inward and secure them with a stapler.
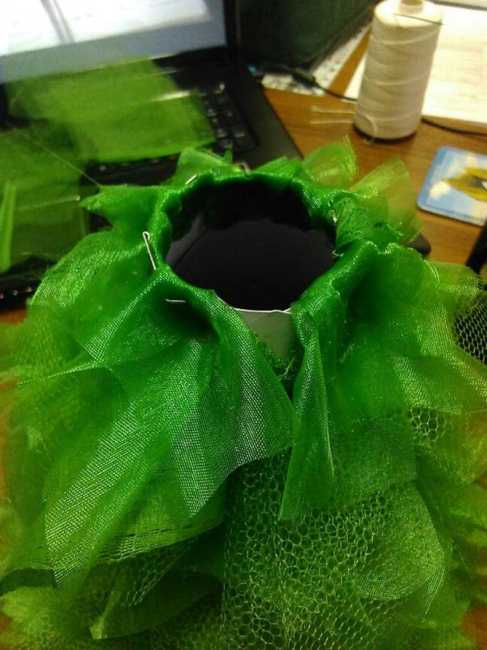
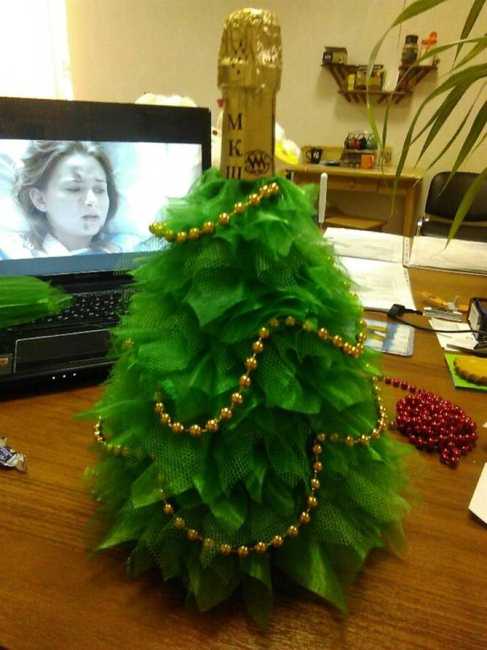
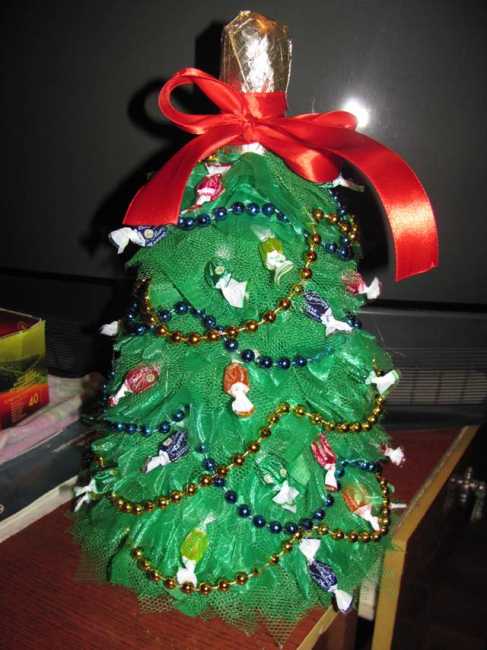
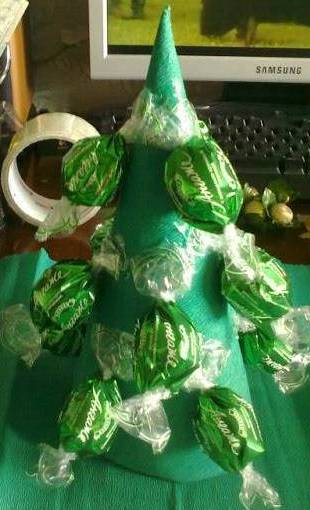
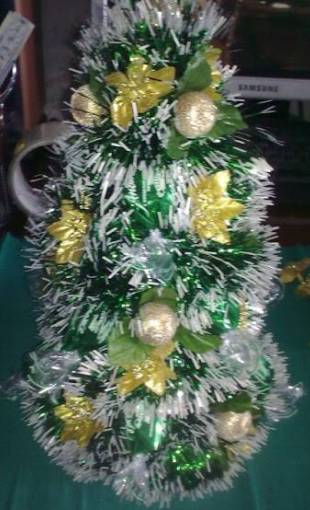
Our Christmas tree is almost ready, it remains only to decorate it with beads and sweets.
![]()
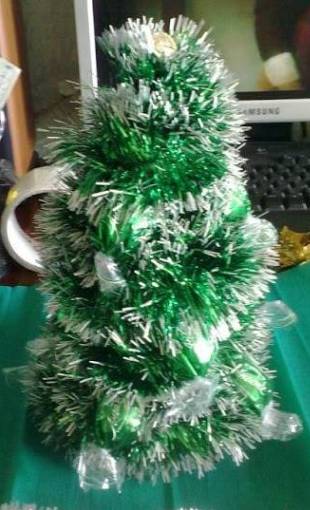
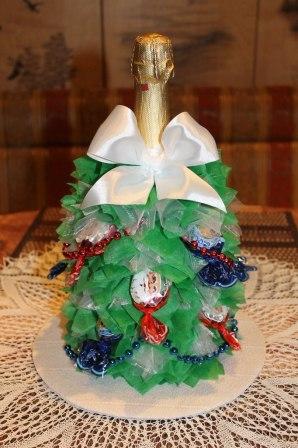
Take one strand of New Year's beads and start gluing it from top to bottom. Attach them with the glue gun closer to the paper under the cloth. Arrange them in small waves in a spiral around the bottle.
Then take the beads of a different color and fasten it also from top to bottom in a cross direction.
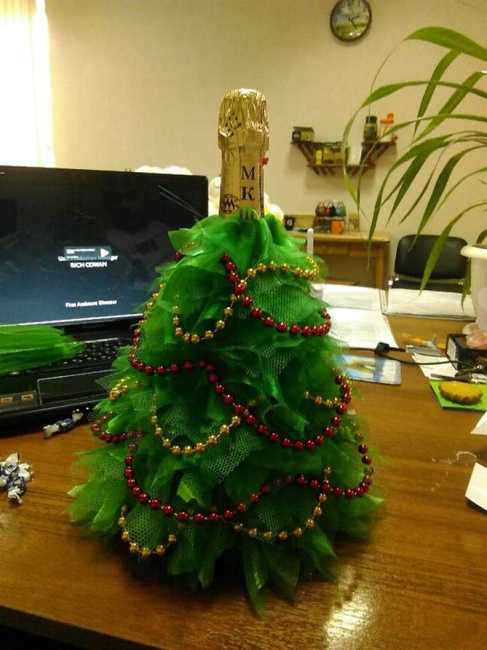
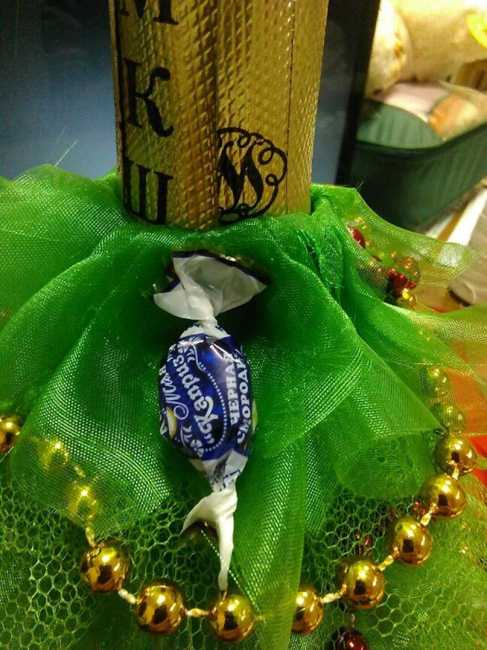
Then proceed to hanging toys. Take the sweets (preferably if they are small) and use the same glue gun to fix them on the Christmas tree. 
Now it remains only to tie the bow to the neck.
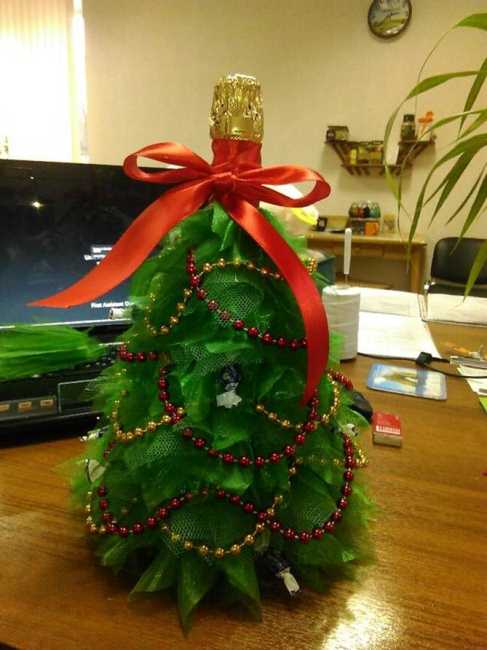
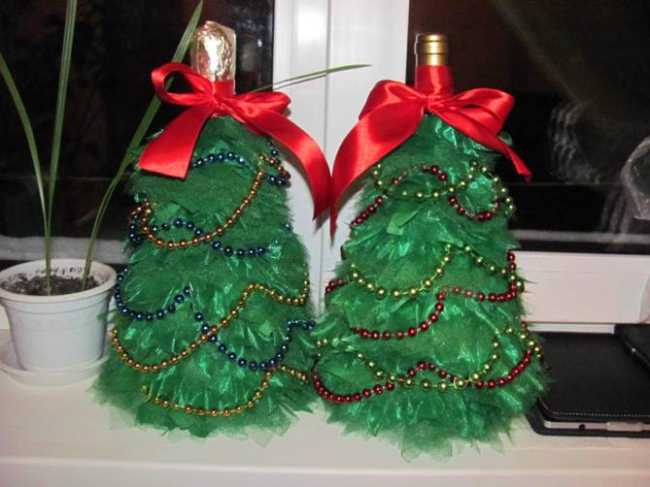
The number of beads, their color and quality can be very diverse.
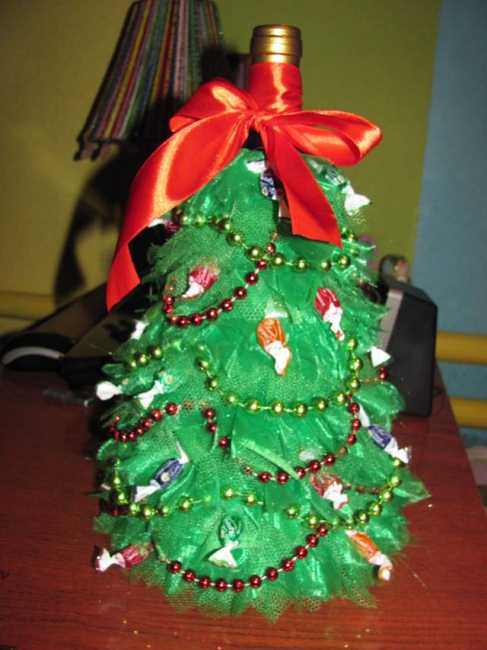
You can decorate the tree with sweets, nuts, small toys, or leave some beads.
Useful Tips
On New Year's Eve, you can surprise your friends and relatives by giving them beautiful giftDIY made.
Since the tree is one of the main symbols of the New Year, it is ideal as a gift.
You can make just a beautiful Christmas tree, or you can decorate it with sweets, so you will get not just decoration, but a useful element of the New Year's sweet table.
On our site you will also find:
Here are some of the most interesting ways to make a Christmas tree from sweets with your own hands:
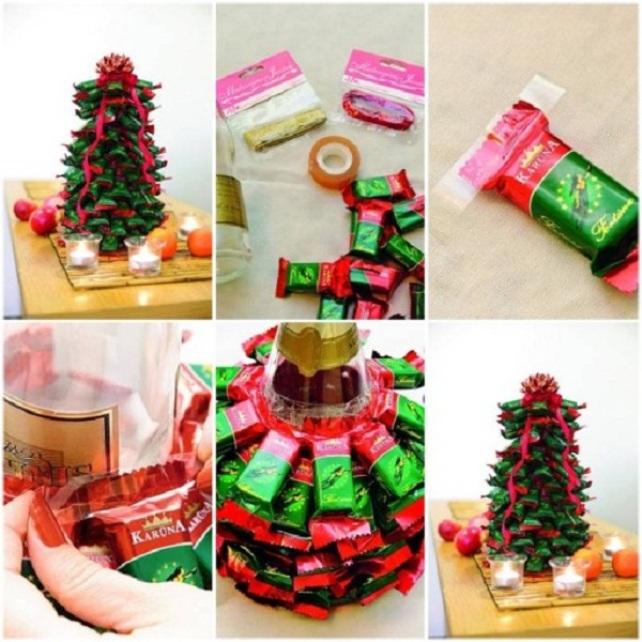
Christmas tree made of sweets and champagne bottles
You will need:
Empty champagne or wine bottle
Scissors
A lot of small sweets
Bright ribbon.
1. Glue a piece of tape to each candy.
2. Start sticking candy to the bottle using tape, starting from the bottom and moving toward the neck of the bottle.
* Make sure that one end of the candy touches the end of the adjacent candy.
3. Each next row glue a little higher than the previous one so that the candies overlap each other - so the tree will be more magnificent.
4. There should not be more than 4 candies on the top of the head. You can also add a bow or stick an asterisk with tape.
5. Pull the curled ribbon from the top of the tree down.
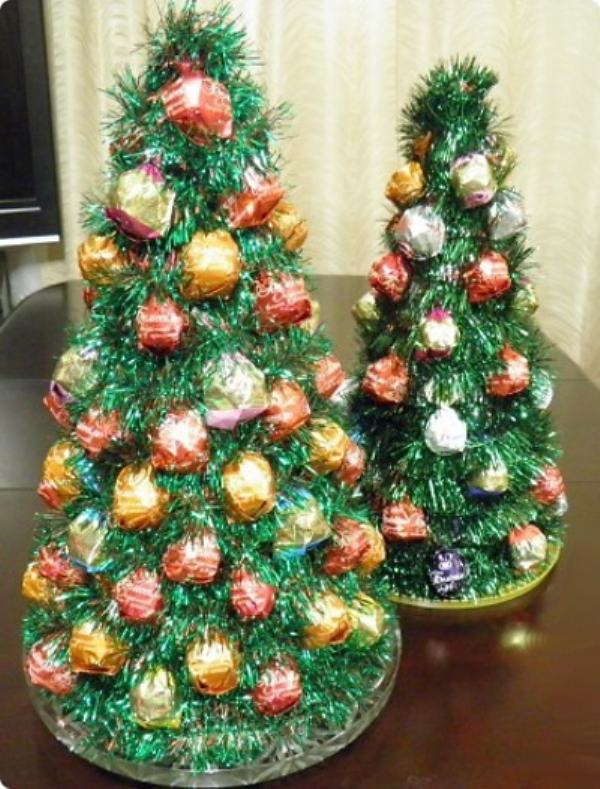
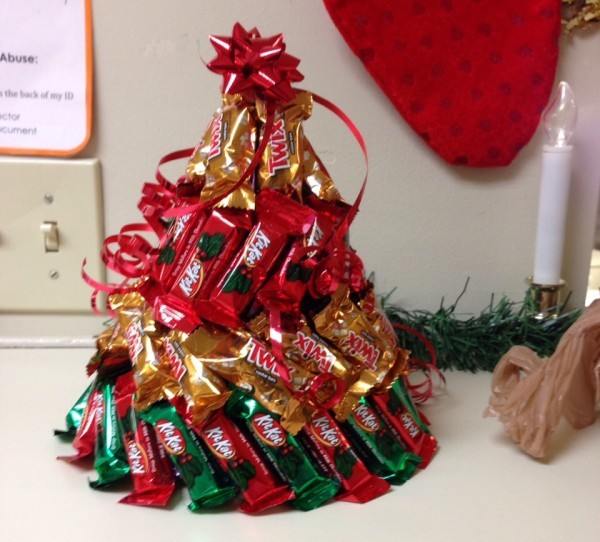
Christmas tree made of sweets and tinsel (master class)
You will need:
Double-sided tape
Plain tape
Small candy
Cardboard and scissors (for making a cone)
![]()
1. Using a simple adhesive tape, glue candies to the cone, leaving small spaces for tinsel between the rows of sweets.
2. Glue the double-sided tape in between the rows of sweets and start gluing tinsel to it.
3. Glue 3-4 candies to the crown of the cone and also wrap them with tinsel.
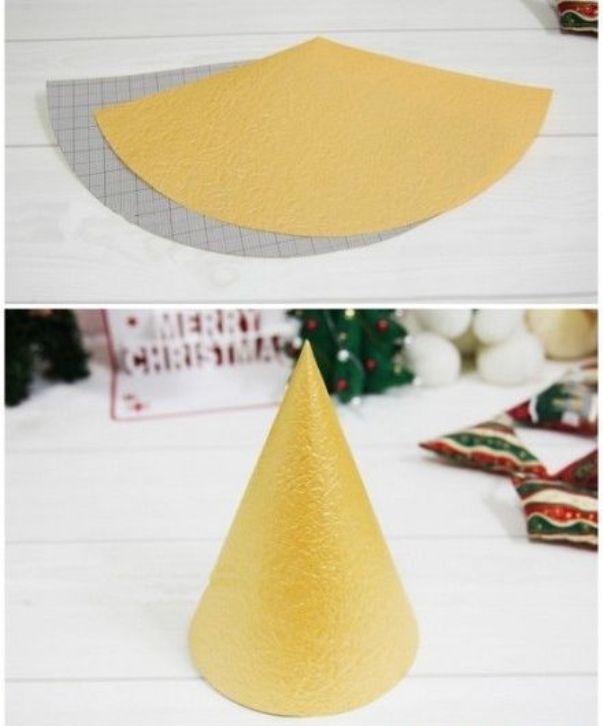
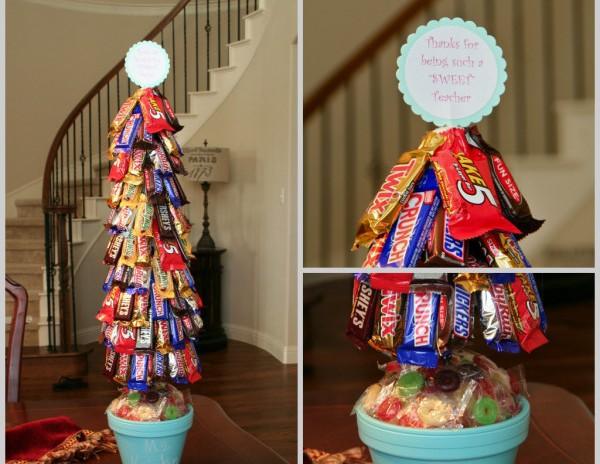
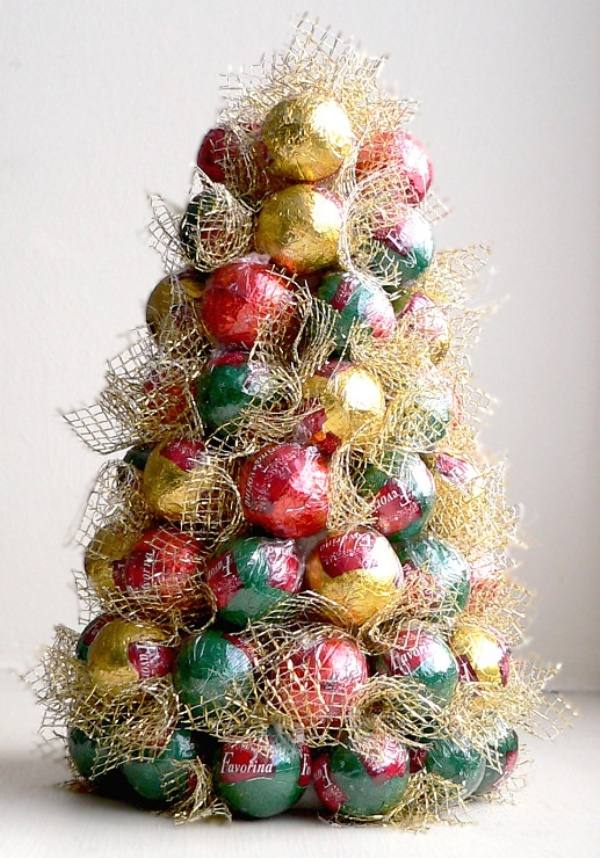
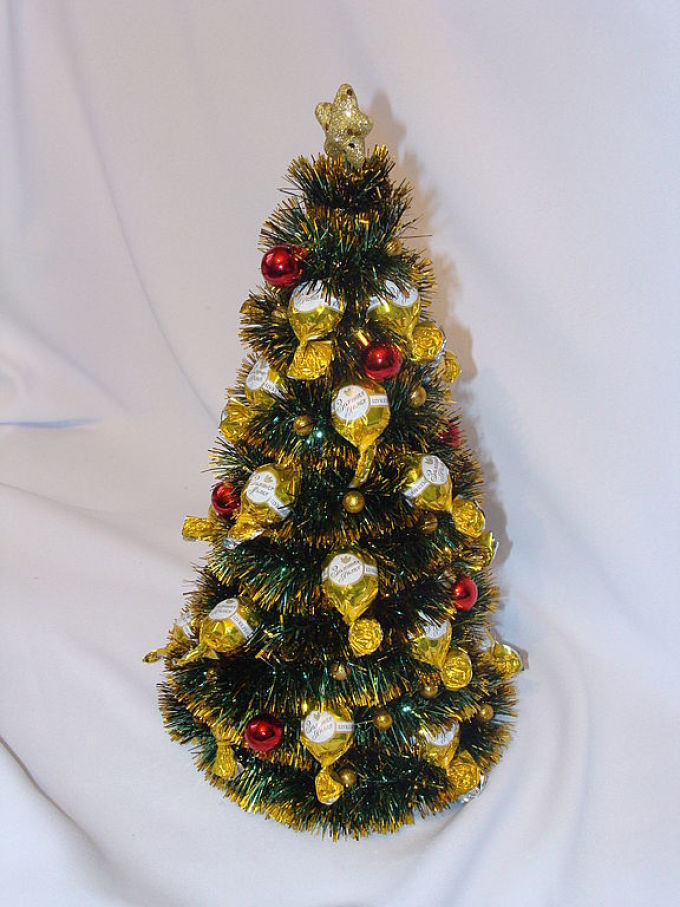
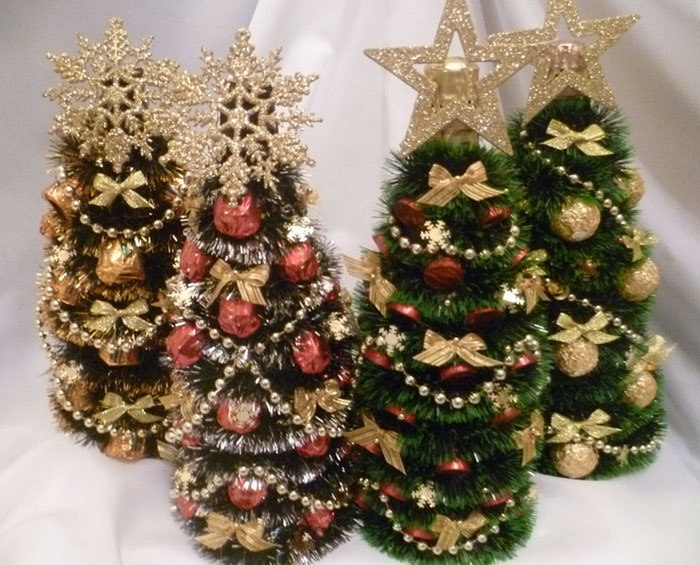
Do-it-yourself golden Christmas tree made of sweets (photo instruction)

You will need:
Cardboard and scissors (to create a cone)
Double-sided tape or glue (PVA or hot)
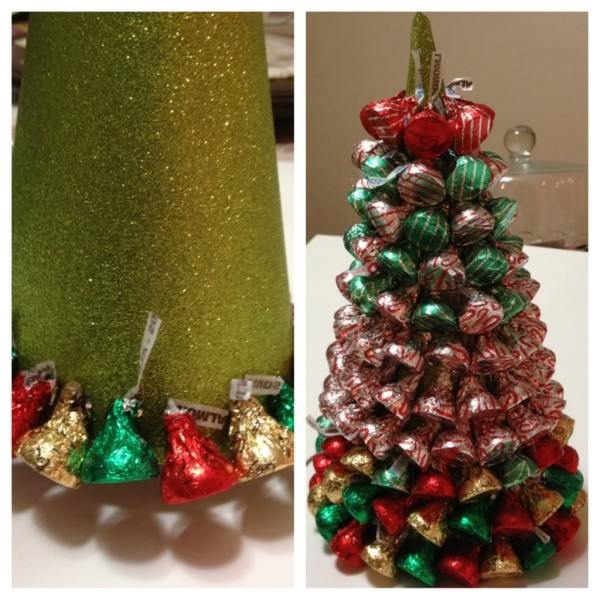
Candies wrapped in gold foil (if desired, other candies can be used)
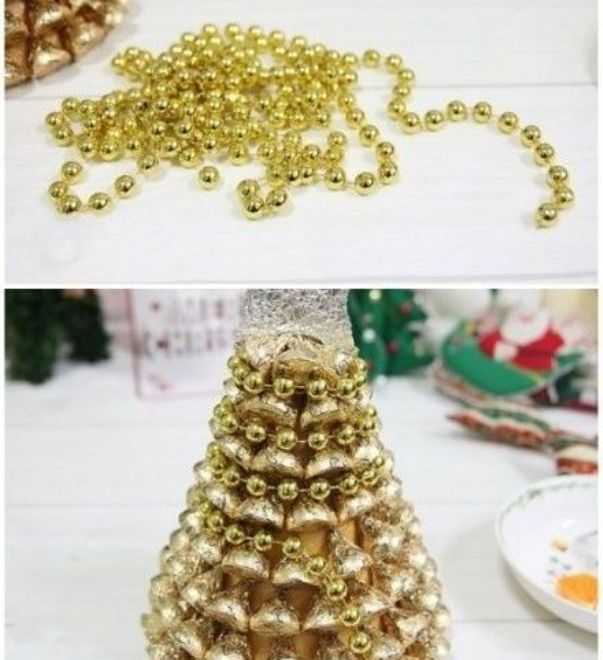
Beads on a thread.
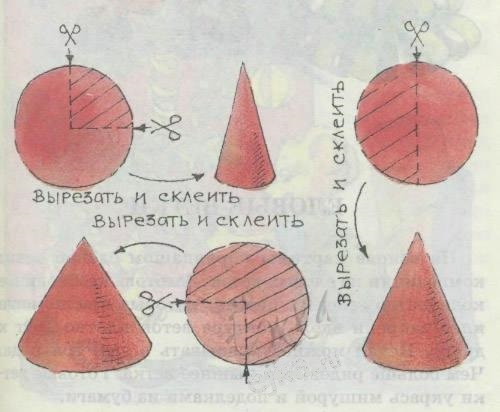
1. Cut out a piece of circle from cardboard, twist it to make a cone, and fix the ends with glue.
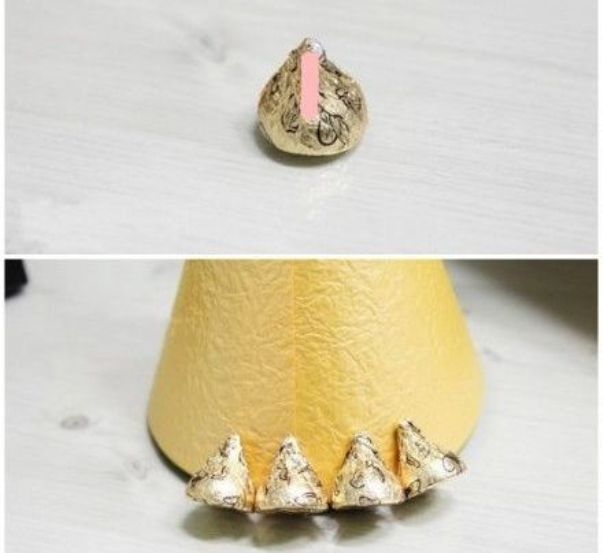
2. Using double-sided tape or glue, begin to glue (from the bottom up) the golden candies to the cone. They should be close to each other to hide as many empty spaces as possible.
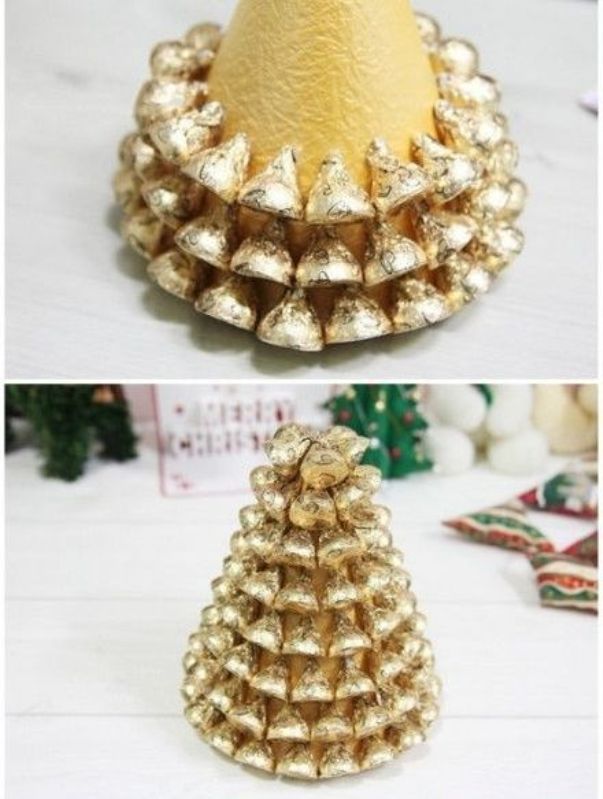
3. The gaps between the candies can be covered with beautiful beads on a thread or tinsel of a suitable color.
4. You can make a star, and, if necessary, paint it or cover it with foil. You can add a bow.

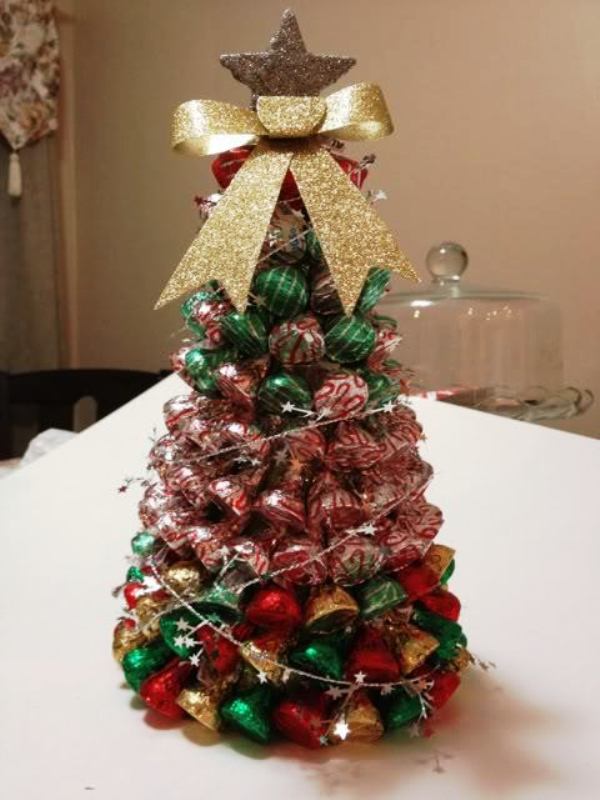
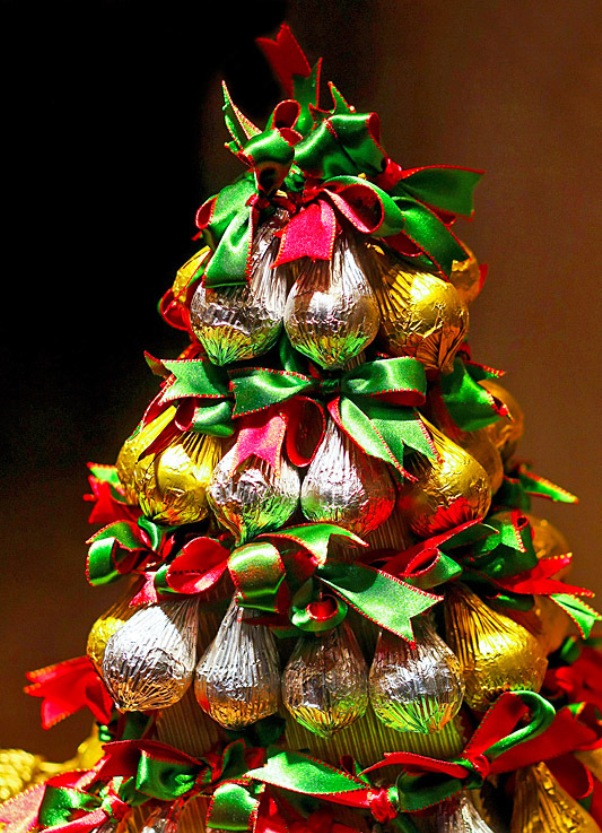
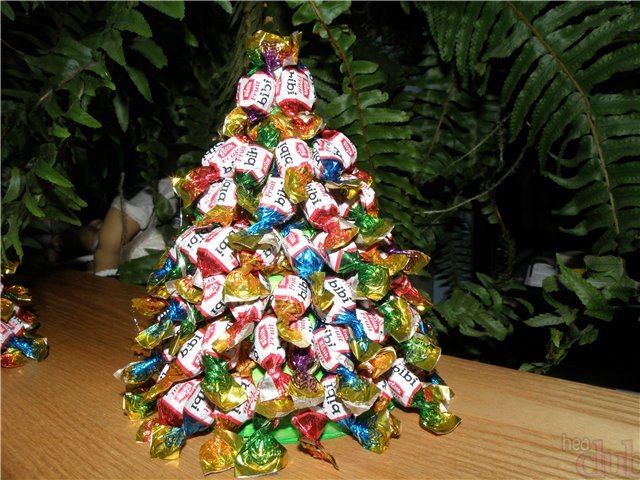
DIY Christmas tree of chocolates (master class)
You will need:
Thick cardboard and scissors (to create a cone)
Glue (PVA or hot) or adhesive tape
Scissors
Chocolate candies (truffles) in a shiny wrapper.

1. Twist the cone out of cardboard and fasten the ends. Cut off all the excess so that the cone stands flat on the table.
2. Using tape or glue, begin to glue the candy to the cone. Cover the entire surface of the cone with sweets.
3. Start decorating the tree to your liking. You can use beads, tinsel, bows, ribbons, "rain", and you can attach an asterisk from paper or foil to the crown.
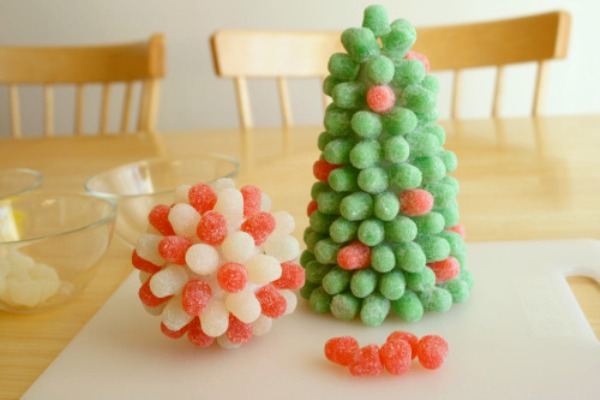
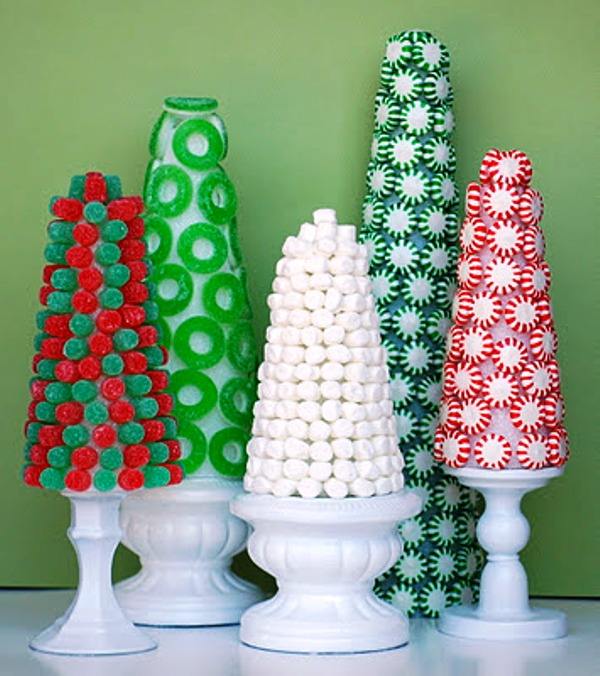
How to make a Christmas tree from soft candies
You will need:
Styrofoam cone
A lot of soft (jelly) sweets of different colors
Toothpicks.
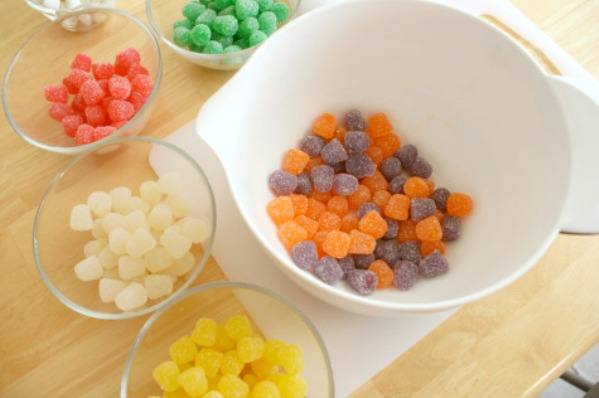
Use a toothpick to attach candy to the cone.
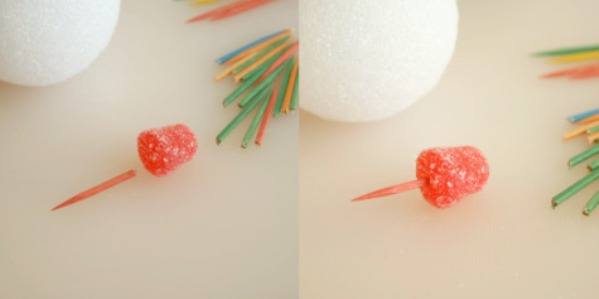
You do not have to use the entire toothpick - you can break it into two parts.
Just stick one end of the toothpick into the candy and the other into the cone and fill the whole tree with sweets.
How to make a DIY Christmas tree made of sweets
You will need:
Some sweets
Green cardboard
Scissors
Red ribbon
PVA glue.
Text instruction after the video.
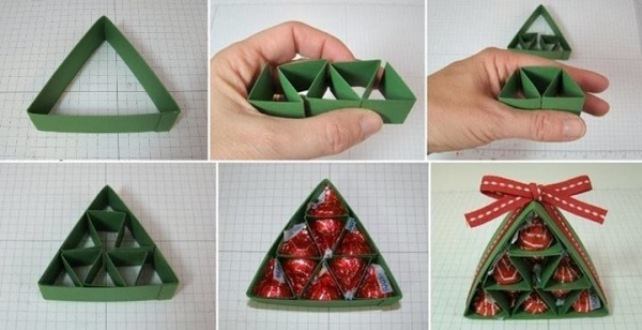
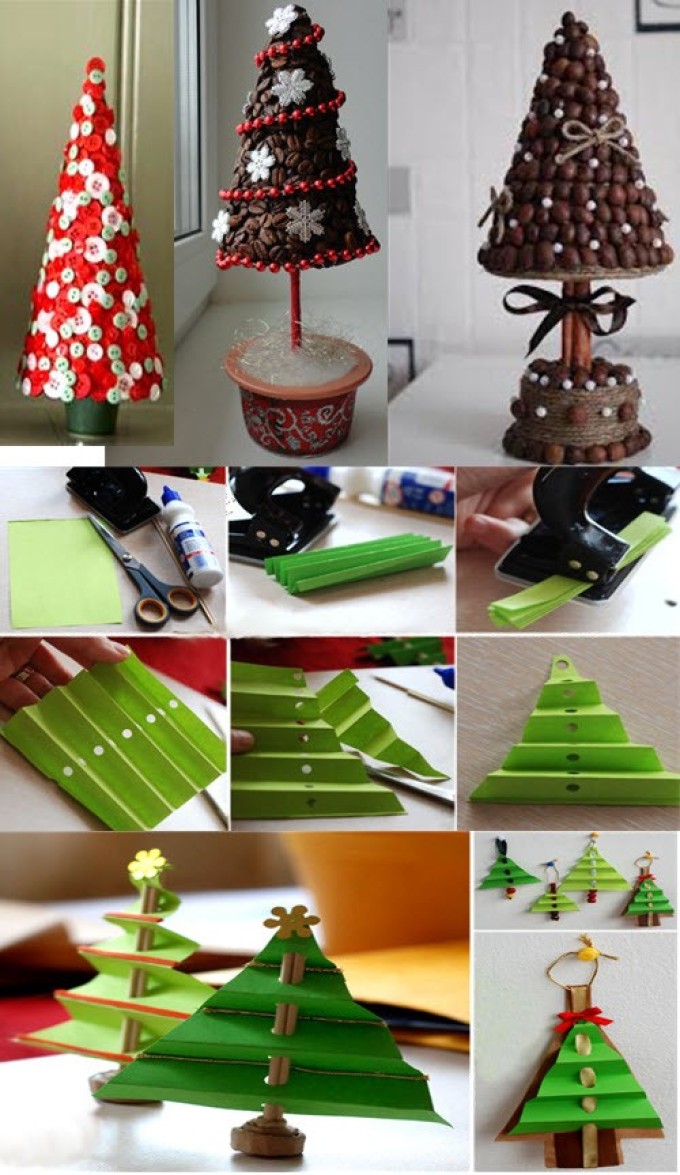
1. Cut a strip of 25 cm x 5 cm from green cardboard.
2. Divide this strip into three parts, which will then need to be bent - mark future bends by 8 cm, 16 cm and 24 cm.
Also divide this strip halfway.
3. Bend the strip in half, apply PVA glue to one half and glue both halves.
4. Using the marks made in step 2, fold a triangle from the strip. You got a frame for future candy packaging in the form of a green Christmas tree.
5. We make shelves for sweets inside the package:
5.1. Prepare a paper strip measuring 25 cm x 5 cm, and make marks on it every 2.5 cm (i.e. 2.5 cm, 5 cm, 7.5 cm, etc.).
5.2. Cut the strip in half lengthwise.
5.3. Cut one of the halves halfway across at the 10 cm mark.
You will have 3 strips: 10 cm, 15 cm and 25 cm.
5.4. Fold each strip as shown in the image (zigzag) to get several triangles.
6. Insert your shelves inside the frame (Christmas tree): the long strip is folded into the shelves for the bottom row, the middle for the middle and the small one is folded into a triangle and inserted into the crown of the "Christmas tree".
7. Start inserting sweets into the cells of your tree.
8. Take a ribbon 45 cm long and tie it to the Christmas tree.
If you wish, you can make a trunk for your Christmas tree from brown cardboard. You can also put candies in it (see video). It can be glued using double-sided tape.
* You can decorate the tree as you like more.
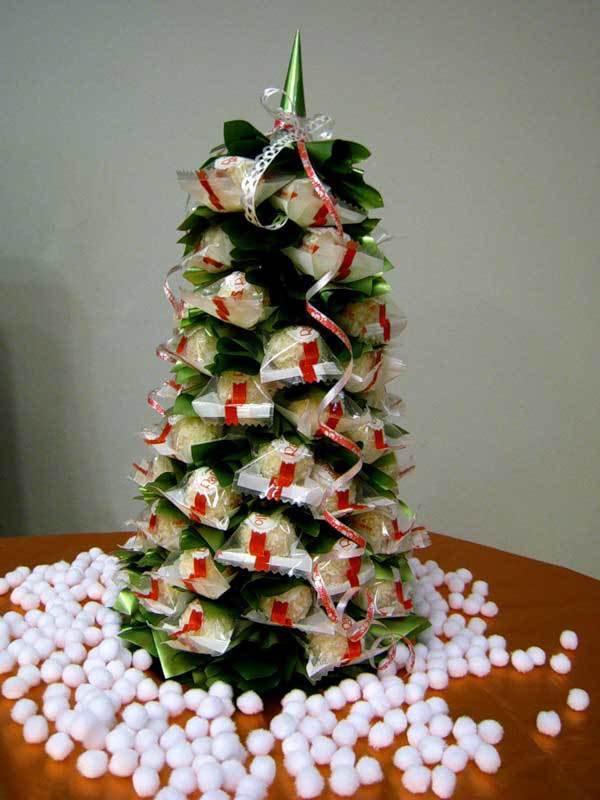
Simple Christmas tree made of sweets (step by step photo)
You will need:
Paper cone
Corrugated paper
Candy
Jewelry to taste (ribbon, beads, artificial flowers, Christmas toys).

Candy Christmas tree: use lollipops

You will need:
Styrofoam cone
A lot of lollipops
PVA glue
Double-sided tape hot glue or super glue
A small bucket or pot.
1. Glue the cone to the pot or bucket using hot glue or double-sided tape.
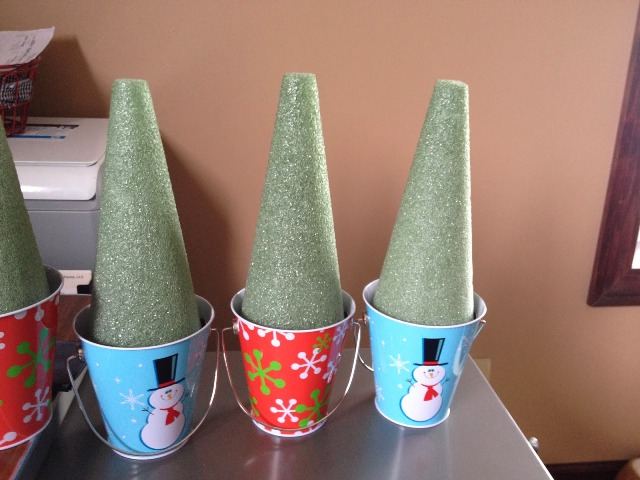
2. When the glue has dried, start decorating the cone with lollipops. Insert sweets in a cone in a circle, moving towards the top of the head.
![]()
3. You can decorate the tree as desired. Add tinsel or ribbons.
DIY Christmas tree made of tinsel and sweets (video)
Christmas tree made of sweets and champagne for the New Year (video)
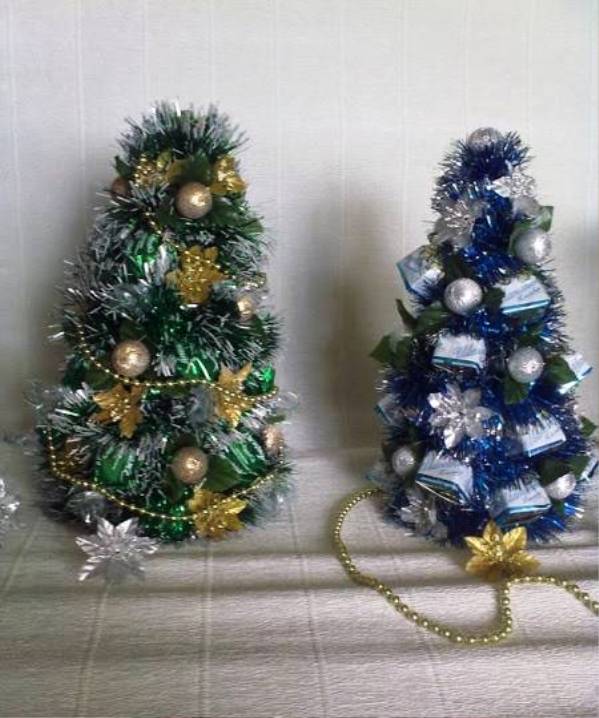
DIY Christmas tree made of sweets (photo)
![]()
Beautiful crafts can become not just an interior decoration, but also an original festive table decor or a creative gift. In recent years, the practicality of gifts has been appreciated, so even for a wedding, newlyweds are given not flowers, but champagne and sweets. If you are going to visit or for a wedding in winter time, then try to make a bottle of champagne in the form of a Christmas tree. To make such a craft is very simple, the main thing is not to be afraid to fantasize.
How to make a Christmas tree of champagne and sweets
To make such a craft, you will need:
- glue gun;
- a bottle of champagne;
- wire;
- tape tape;
- beads;
- candy;
- stapler;
- organza;
- corrugated paper.
From a thick cardboard cut a circle with a diameter of 24-25 cm. It will serve as a stand for the Christmas tree. After that take corrugated paper and cut such a piece so that you can decorate the circle on both sides. Glue it with a glue gun to the cardboard. After that, cut in a circle, but so that 1-2 cm are left to wrap on the other side.

Then take the rest of the paper, glue it to the circle, and cut off the excess. In order to make the tree stable, make a wire retainer. Wind the wire around the base to determine the size of the retainer. Decorate the wire with tape or any other material.
Now start making Christmas tree needles. You will need a floral felt and organization. Cut the materials into squares with a side of 10 cm. After that, take two green squares of floral felt and fold them obliquely. Fold the sides to make an envelope. Secure the workpiece with a stapler. Combine felt and organza squares to create an original craft.
When you have a lot of blanks, proceed to decorate the bottle. Start gluing envelopes from the bottom with hot glue. You should leave 8 blanks on the first row, and then see for yourself. The main thing is that the tree turn out magnificent. You can additionally tape a number of envelopes for strength.
Do-it-yourself Christmas tree on the table


After that, you can proceed to gluing the blanks. Fasten the largest at the bottom, and the smallest at the top.

As you can see make a Christmas tree from a bottle of champagne and chocolates it is possible for one hour. Today there are a lot of DIY crafts ideas that will help you show creativity.
New Year is a holiday that gathers all relatives and friends at a common table near the New Year tree. A bottle of good champagne will be an excellent gift this night. But a gift can be made not only useful, but also beautiful. In this article you will see detailed instructions on how to make a bright Christmas tree from a bottle of champagne.
Before you begin, you need to buy all the necessary materials, namely: thick paper, a bottle of champagne, a hot glue gun, stapler, scotch tape, organza fabric and green tulle, small sweets, red satin ribbon and New Year's beads in different colors.
First you need to prepare the basis for our Christmas tree. To do this, take a piece of paper, if you have A4 sheets (20 * 30 cm), then they will need two. Take one of them and wrap it around the neck of the bottle and secure it with tape.
On the fastening side, an empty triangle will remain below, it should be covered with a piece of paper cut out in the shape of a triangle from the second sheet, also secured with tape. Surplus will appear on the bottom edge of the paper, cut them with scissors. Try to make 2-3 cm between the table and the edge of the paper. This will allow in the future to fix the fabric without problems.
Having prepared the basis, we proceed to the processing of the fabric. For such a Christmas tree, you need one meter of each material, provided that the width is 145 cm.
Take organza and tulle and cut into squares about 5 * 5 centimeters in size.
Having cut all the fabric into squares, we proceed to the formation of blanks. For this, each piece of fabric is folded in half.
Then fold the square in half again and, if necessary, fold the fabric again.
And in this position, we fix it with a stapler. Instead, you can use a needle and thread, but it takes much more time and effort.
As a result, you should get a lot of lush blanks.
Using the glue gun, begin attaching the fabric to the paper base. First, glue the bottom layer, adjusting the glue height so that the fabric barely touches the table.
![]()
Having finished the first row, proceed to the second, then the third and so on. Make sure that there are blanks of the same material in the row, the rows themselves alternate: organza - tulle - organza.
When you stick the top row, the corners of the fabric will extend beyond the edge of the paper blank. Bend them inward and secure them with a stapler.
Our Christmas tree is almost ready, it remains only to decorate it with beads and sweets.
![]()
Take one strand of New Year's beads and start gluing it from top to bottom. Attach them with the glue gun closer to the paper under the cloth. Arrange them in small waves in a spiral around the bottle.
Then take the beads of a different color and fasten it also from top to bottom in a cross direction.
Then proceed to hanging toys. Take the sweets (preferably if they are small) and use the same glue gun to fix them on the Christmas tree.
Now it remains only to tie the bow to the neck.
The number of beads, their color and quality can be very diverse.
You can decorate the tree with sweets, nuts, small toys, or leave some beads.
An article on how to quickly and unusually make a Christmas tree with your own hands. This craft will be a great decoration at home or a gift to your loved one.
Do-it-yourself gift is considered more and more relevant. With great interest, parents do crafts in kindergarten, school with their children, give unique things to relatives, colleagues and friends. Naturally, the Christmas tree made of paper, sweets, tinsel glasses or napkins is considered the most optimal New Year decoration of the house.
Today we will get acquainted with some ways with which you can make not an ordinary, but very beautiful Christmas tree with your own hands. We will use the simplest and most inexpensive materials.
The list of materials:
- Base (cone),
- Candy,
- Tinsel,
- Glue,
- Scissors,
- Decorations (bows, balls, stars).
For the base, you can take everything that the cone will hold:
- special foam shapes
- cardboard
- colored paper
- an empty box from the same candies that are planned to be used as decoration
- Everything that comes to mind and falls under the arms
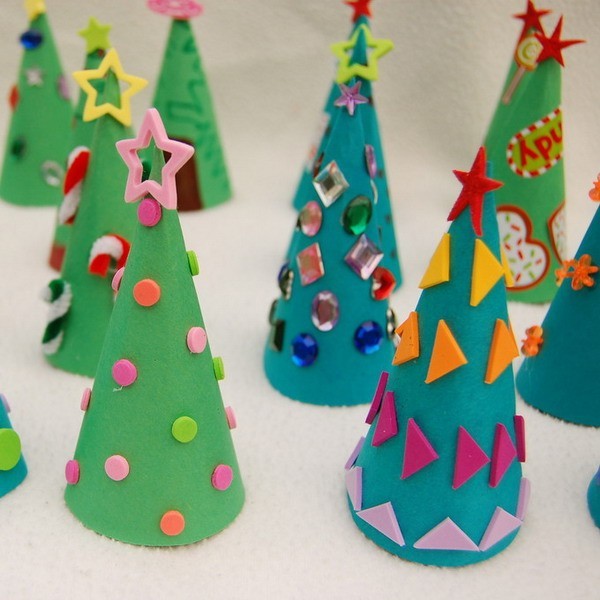
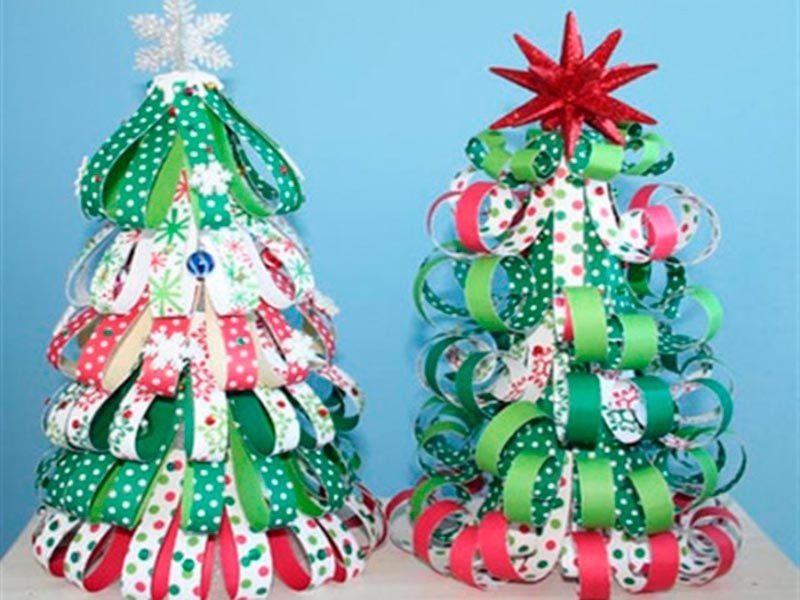
Option Christmas tree with a cone of plain paper and sweets
- We take any colored sheet, fold it to make a cone, fix the edge with glue and remove the excess with scissors. The base is ready.
- We pass to tinsel. Starting from the base, we pass with glue in dashed movements and from above, we wind tinsel spirally to the top of the head. If there is an asterisk in size suitable, then you can fix it.
- Sweets are attached to the tree around with glue or thread. It is advisable to use 1-3 colors of sweets, so that it is harmonious and not bulky.
- If there are any balls, bows or other decorations, then we attach them at the very end. Specially fixing in those places where space was visually formed.
This is the fastest way to make a Christmas tree with your own hands. Estimated production time - up to 10 minutes.
- The base of the tree can be decorated with cotton, thus creating a "snow effect".
- For lovers of the American style, red bows around the entire perimeter are ideal.
- We do not limit our imagination and do as our inner voice tells us.
This is a gorgeous gift for New Year grandmother, teacher, aunt, sister. Candies such as raffaello, ferreroshalthough from ordinary caramels it turns out a sweet, cute Christmas tree.
To make a paper Christmas tree, we need:
- Paper (the more paper, the better)
- Glue,
- Scissors,
- Pencil or pen,
- Decorative materials for decoration.
- We cut out a circle from paper with the help of which we make a cone for our Christmas tree.
- The easiest option is to paint the tree with any colors and
add several beads for volume, fixing them with glue.
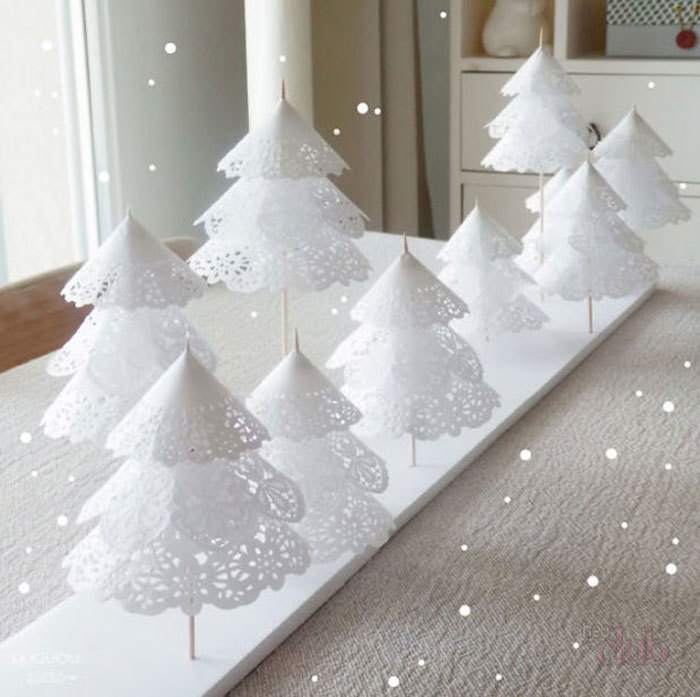
The tree is ready.
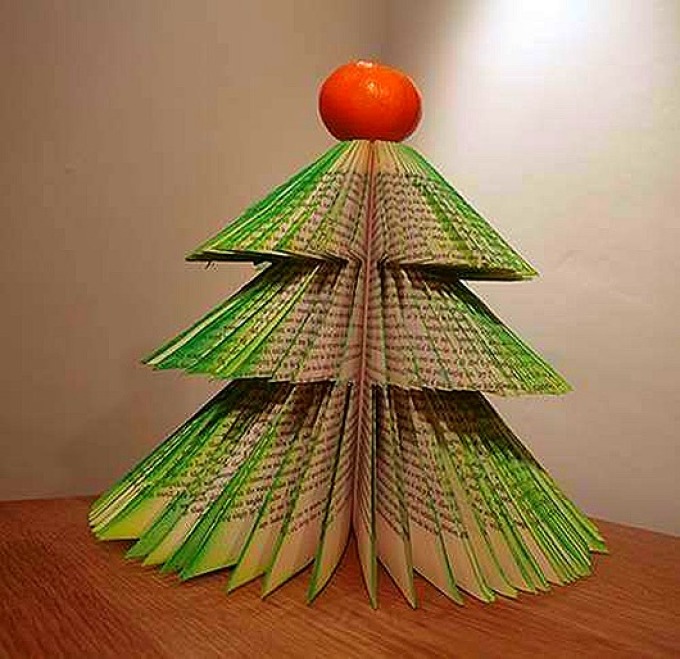
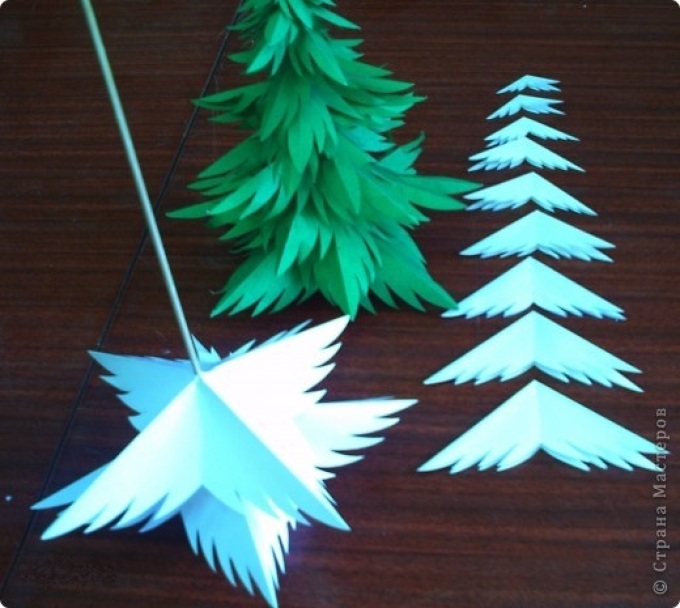
Also, after we made a cone, you can cut a huge number of small circles, each of which we attach to the tree with glue, smearing only half of it, and slightly bending the second one. As a result, we get a voluminous Christmas tree.

Interesting and unusual can be called a "Christmas tree of palms." It can be the pens of family members or students of a school, a particular class or group.
There are many options. The ideological goal of such a tree is to unite a certain number of people.
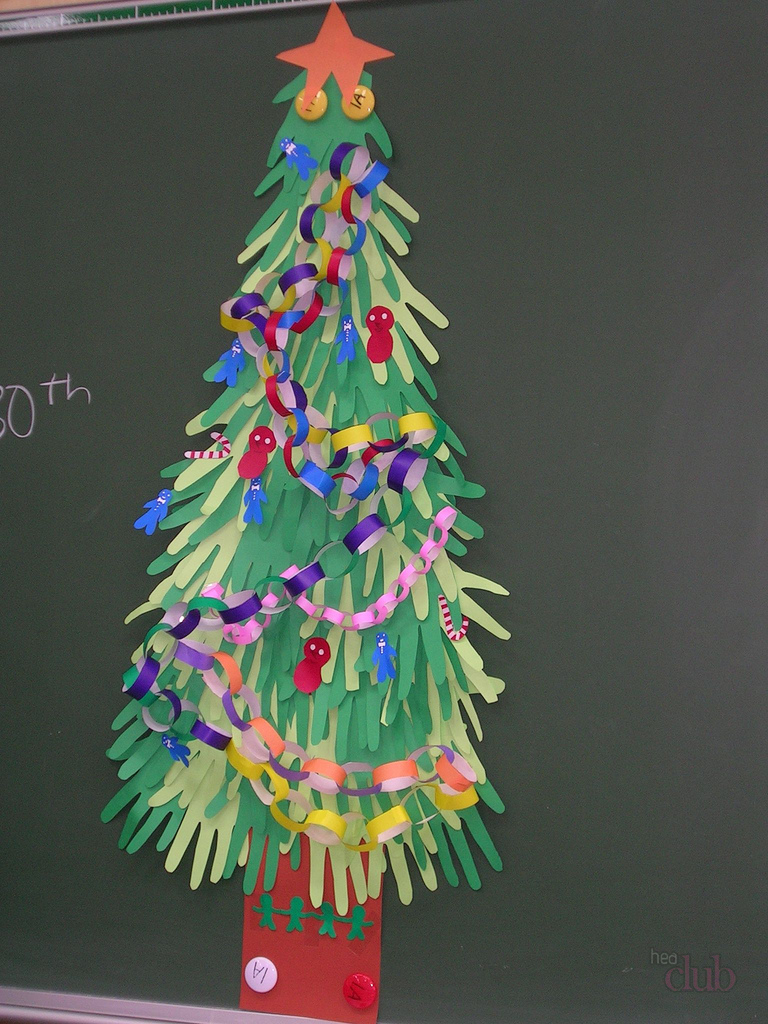
In order to make a Christmas tree from the palms we need:
- glue,
- felt-tip pen
- scissors and
- several sheets of paper (the amount depends on which tree in the end we want to see). Small - up to 7 hands, medium - 12-15, large - more than 20.
We take a person’s hand, draw a outline, cut it out and paste it on a wall, whatman paper or something else. We do this until the size of our Christmas tree suits us as much as possible.
For the top, you can cut a star, and around the entire perimeter decorate with tinsel or small balls made of contrasting paper color. Thus we will create the effect of an elegant Christmas tree.
From such hands you can make various figures for decorating houses, kindergartens and schools.
 Craft - Christmas tree from the pages of the magazine
 Another of the unusual crafts - "Christmas tree from the magazine."
A magazine with at least 200 pages and glossy pages is ideal. Thick cover can be removed. And now patience and time.
- We bend each upper right corner of all pages to ourselves at 45 degrees.
- We wrap all the lower corners that go beyond the borders.
- Further pages of the magazine are added in the same way.
- It turns out an accordion. When it comes to an end, we see an interesting Christmas tree that can decorate any office all year round.
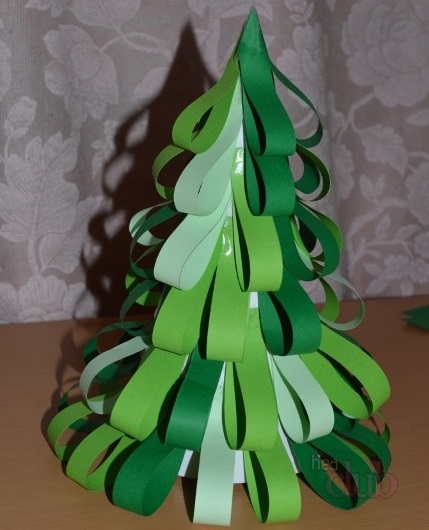
Do not rush to throw out your child’s already colored magazines, because the New Year is ahead and everything will come in handy. So,
- we take the usual cone from paper, which we have already loved,
- glue,
- scissors and
- coloring, which we cut as long as possible stripes, a width of 3 cm.
From it we will now make a garland. We fold our strips and glue them together in a horizontal form, after that we make vertical cuts half the width along the length of the entire garland and with a frequency of not more than 5 mm.
Create the “comb” effect, then simply stick it around the cone of the whole Christmas tree. Thus, “comb teeth” turn into “prickly needles” of our Christmas tree.
There are a lot of ways to make a Christmas tree out of paper with our own hands, we considered the simplest and, at the same time, the most unusual ones.
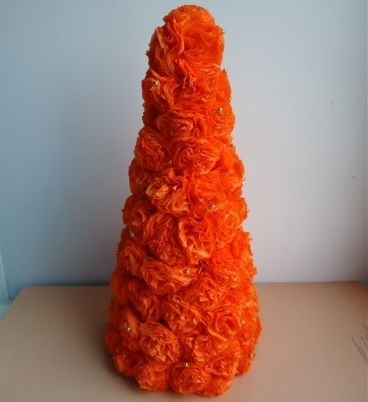
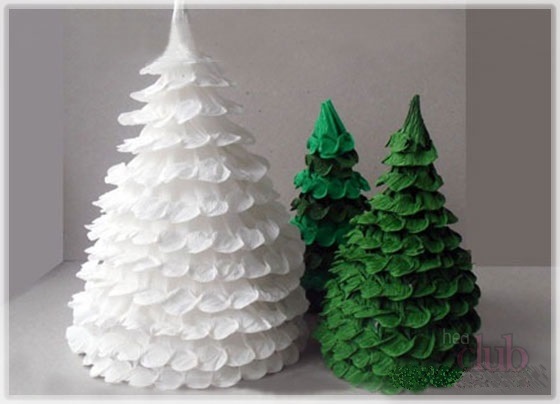
I want to say right away that the Christmas tree made of napkins always differs from other crafts by its visual airiness and tenderness. Some do not immediately understand what material it is made of.
Topiary lovers will love this option of creating a do-it-yourself Christmas tree. In order to make a Christmas tree-topiary, we need the following materials:
- Napkins
- Styrofoam cone
- Glue gun
- A decorated rod that will hold our tree (often they take an ordinary tree branch and mask it under decorations),
- Little potty
- Gypsum (gypsum plaster also works)
- Beads on a thread or other jewelry.
- We mix the gypsum with water, pour the mixture into the pot, strengthen the holder for the Christmas tree in it and put the cone of our Christmas tree on it.
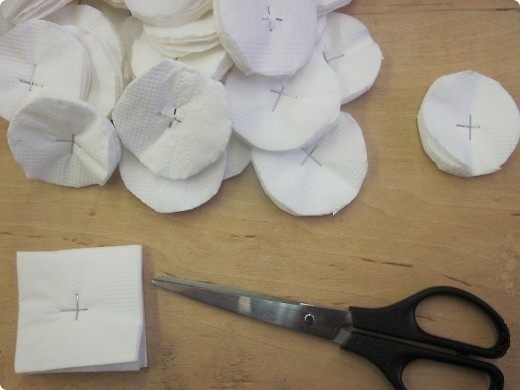
- Using templates, draw circles on napkins and bending the edges, we make “mini-roses” from each napkin.
- Next, each decoration, using a glue gun, apply to the cone, fill the entire space.
You can put a few of these “Mini roses” on top of our pot in order to compose all of our craft in style. We wrap tinsel (beads on a thread) around the entire perimeter of our Christmas tree, everything that looks beautiful will do. Our do-it-yourself Christmas tree from napkins is ready.
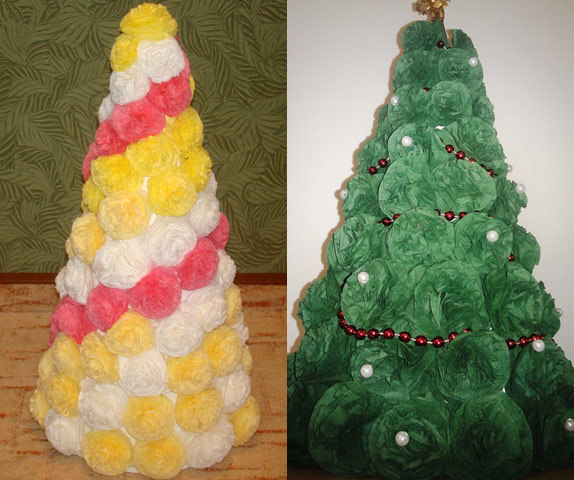
Napkins for such a Christmas tree can be of the same color or you can take 2 colors and combine them beautifully. Inclusion of your imagination in this project will give excellent results.
If you are not a fan of topiary, then a tree of napkins can be made on a regular cardboard cone, completely repeating the above process. Another option is a Christmas tree made of napkins.
For the manufacture we need the following materials:
- Bottle of champagne
- Tinsel,
- Glue gun and glue itself.
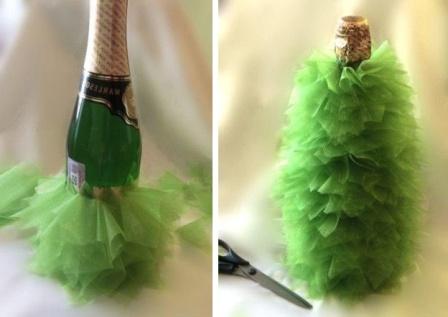
A simple gift can be originally decorated if you take a bottle of champagne, glue it on glue with tinsel and decorate it with additional accessories.
We will succeed, inside of which there will be a surprise - a bottle of champagne.
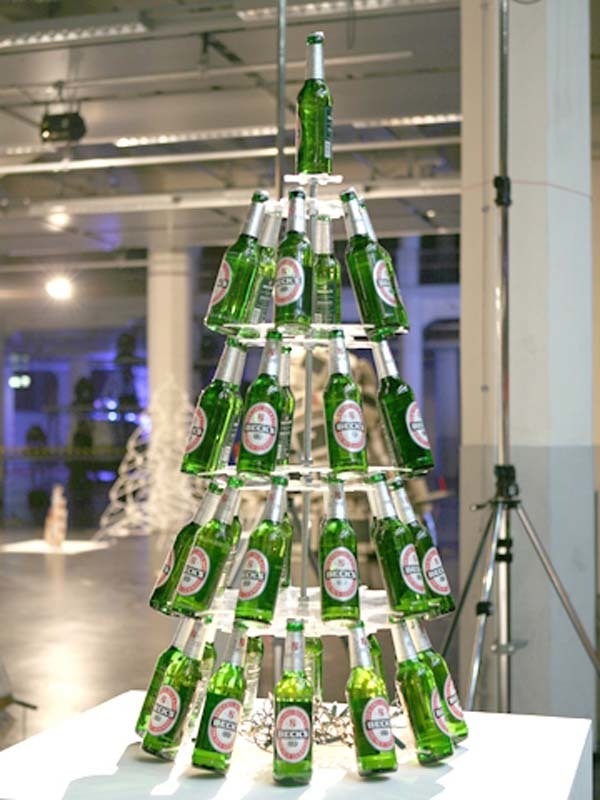
It is also very important in the wine and vodka departments and stores to make a Christmas tree from a large number of alcoholic beverages.
To do this, we need to take bottles of the same size and shape and put out a pyramid in the form of a Christmas tree, on top we can decorate with tinsel and balls, and for the final moment - fasten a star on the crown.
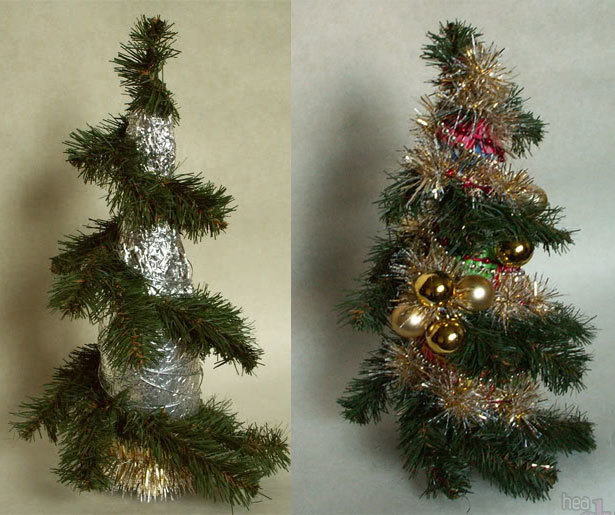
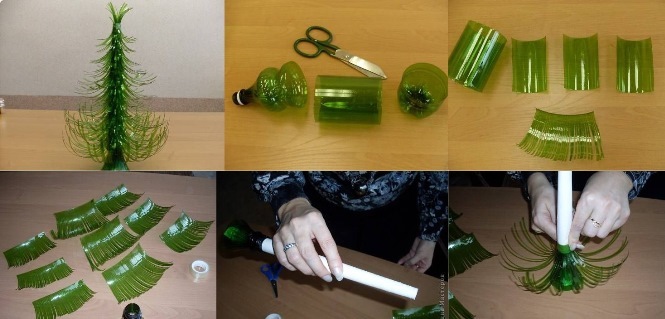
At home, the most common is the method of making a Christmas tree from plastic bottles. The list of necessary:
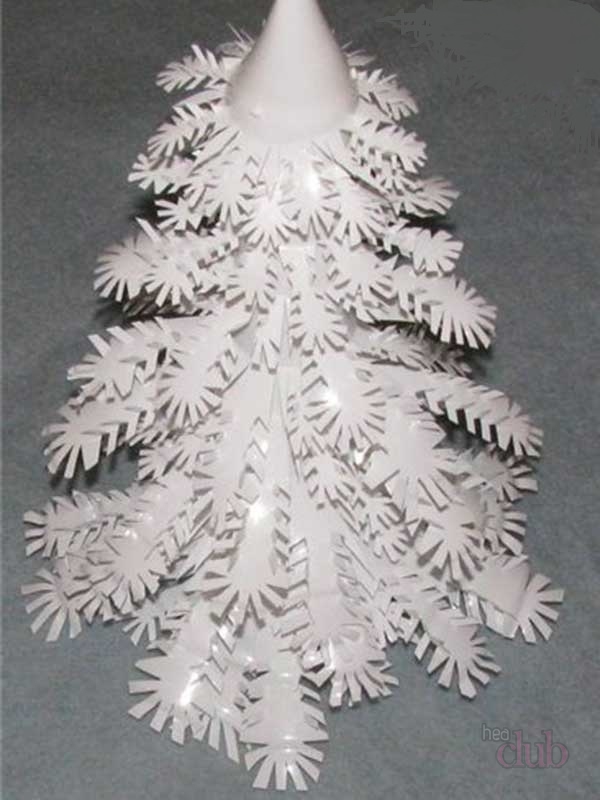
- Green plastic bottles
- Paper,
- Glue gun and glue stick.
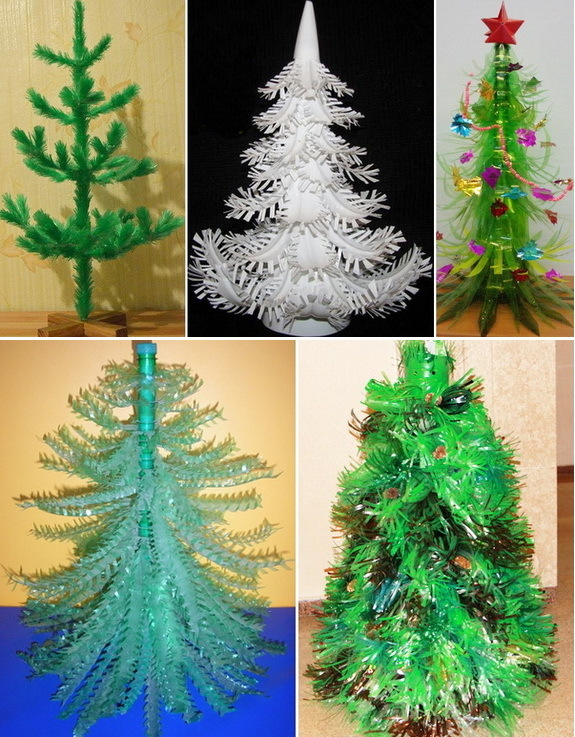
- We roll up the sheet with a tube to get a diameter of 1-2 centimeters.
- We cut the bottle into strips 2-5 centimeters wide and no more than the length that wraps our paper tube.
- We cut the plastic strips perpendicularly to get a “comb effect”.
- Dip the even edge with glue and attach it around the paper tube.
- The longer the needles of our tree, the more beautiful.
- It is advisable to calculate the length so that the bottom is wider than the top, while maintaining the proportions of a real Christmas tree.
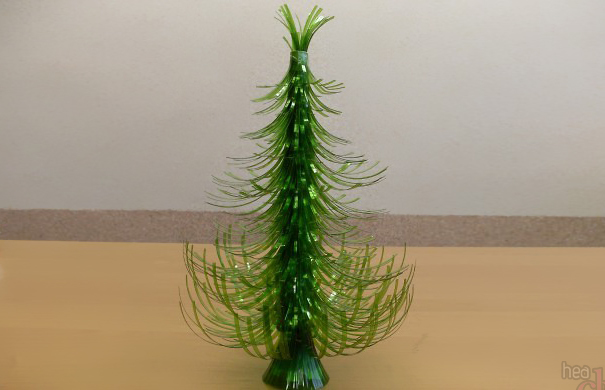
The craft can be left as it is, or it can be decorated with additional accessories made of paper, cardboard or other materials.
You can hang real Christmas balls on such a tree, only of a small size, so our craft will look more real.
In conclusion, I would like to say that there are many ways to make a Christmas tree with your own hands.
The main thing is to show imagination and try.
Always do-it-yourself gifts please much more than ordinary figurines bought in a store.
Making crafts together with the children brings not only joy, but also real benefits, because during such classes a mutual understanding of the parent and the child is formed, tactile sensations develop.
 DIY paper Christmas tree options