

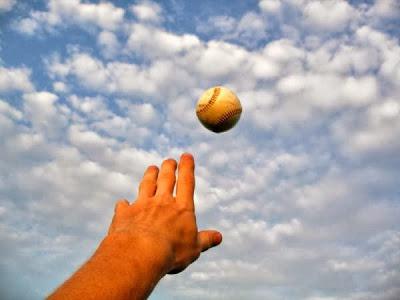
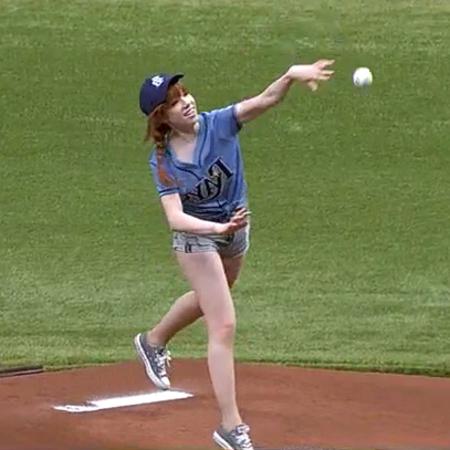
Throwing the ball.


Throwing technique
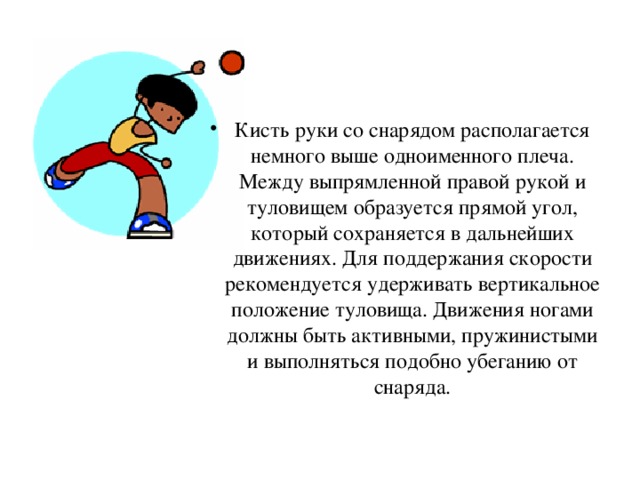
The index, middle and ring fingers, like a lever, are placed behind the ball, and the thumb and little finger hold it on the side. Before the start of the take-off, the thrower holds the projectile over his shoulder in a bent arm.


The range of the ball is affected by:
- Ball Departure Speed.
- Departure angle.
- Departure Point Height.
- Air resistance.
- Ball Departure Speed depends on the effort exerted by the student on the ball, on the length of the path traveled by the ball in his hand, on the time during which the ball goes this way. The larger the path and the shorter the application time, the higher the initial speed of the ball and the higher the result. This is achieved by taking off and overtaking the ball in the final part of the takeoff.
- Reducing the time the student takes on the ball depends on his strength and the speed with which he acts on it. Therefore, one of the main tasks of training a student is to improve strength and speed.

- Ball relegation angle for the greatest range is 45 degrees. In practice, the angle of departure is less (from 30 to 40 degrees).
- Ball relegation point height depends on the length of the hands and the height of the student.
Air resistance reduces horizontal speed and flight range of light tennis balls; the molten rubber balls (grenades) have a slight effect on the air.

- Ball throwing - quite a difficult exercise. All preliminary actions and preparation for the throw are performed during the fast run, and the final effort is after the sudden braking of the run, which makes it possible to better use the inertia of the run and the elastic properties of the muscles involved in the throw. The ability to use this opportunity allows you to throw the ball much further than from a place.

- The difference in the range of the ball for schoolchildren depends on the level of technical and physical fitness , since the specific features of the ball throwing technique require them to have good coordination of movements, flexibility and mobility in the joints, dynamic and explosive strength, a sense of rhythm and the ability to control individual parts of the body.

- Practice proper grip.
- Focus on putting your hand back.
- Exercise more often in throwing the ball. Focus on moving the toe of the foot forward.
- Strive for "twisting" in the belt
- Throw the ball with a throwing step. At the same time, follow the path of the ball.
- Do exercises for the muscles of the shoulder girdle (stretching and mobility).
- Throwing on the target, throwing the ball from behind the head. Exercise slowly and correctly.

Look at the sculptures of the ancient Greeks, at the frescoes of the times of the Roman Empire and even at the cave paintings of primitive tribes. Any similarities? All the ancients depicted warriors or hunters running with a spear raised to throw.
In the old days, the ability to throw a spear was equated to the ability to survive in almost all the tribes inhabiting the planet. Now it has lost its relevance, but throwing the ball is a mandatory skill for any person. Indeed, it is throwing that allows us to develop a sense of all muscle groups and learn how to properly distribute efforts.
Story
In ancient times, residents of different states (rather, even territories) constantly fought with each other. Some defended, while others, on the contrary, conquered new territories. Before gunpowder, all weapons were swords, spades, spears, and arrows. The strongest and quickest won. The one who more accurately hit the target, the one who could correctly assess their strength and in time to get away from hand-to-hand combat, throwing a spear or pike. This skill was a direct path to survival and victory.
That is why in peacetime, the soldiers did not stop training. In order to evaluate their skills and compare them with the skills of other warriors, competitions were held in javelin throwing and lances. Most often, these were competitions on the throwing range and accuracy of hitting the target. In modern conditions, athletes master throwing the ball at the goal, not weapons.
The winner is determined by the judges. And the throwing range was measured by the “foot”, because there was no metric system yet. The judge counted the distance the athlete threw the spear with his feet. This was the most accurate measure.
And to this day, athletes compete in javelin, disc, core throwing. All of these sports are athletics, even despite the significant dimensions of the core pushers. At the Olympics, more than one set of awards is played in this sport. But in order to learn to accurately and far throw, you need to train a lot. We get the first skills back in school, when we learn ball throwing at physical education lessons.
Why learn throwing?
It would seem a simple task: throw the ball as far as possible, or hit the target, which is at a decent distance. But in practice, we are faced with the fact that only teaching the technique of throwing the ball gives us the result. Without training, the most “simple” thing that can happen is a dislocation or After all, you need to understand how to coordinate the movements of the arms and legs in order to get a decent result. Therefore, throwing the ball almost in a playful way helps us better understand our body, learn how to control it and, of course, strengthen muscles: arms, legs, torso. This exercise is especially important for children. At the age of 9-10, the child already understands that coordination of movements is not an easy task.
In adulthood, young people may again encounter throwing. True, this time already grenades. The ball throwing technique is also suitable for grenades. The difference is only in holding these shells and in their weight. Of course, few can boast of such a rare skill as javelin throwing. But to hit friends and buddies with an accurate throw of the ball into the target and add a couple of points to your authority will not hurt anyone!
Athletics: Throwing
Throwing is an athlete’s exercise that requires “explosive” muscle effort (short-term, but maximum voltage). The goal of any throw is to move as far as possible from the athlete. Throwing the ball, and it all starts with it, helps to develop strength, dexterity and speed of action. In addition, a person has an understanding of the optimal balance of these efforts.
Despite its apparent simplicity, throwing is a rather difficult exercise. Throwing the ball, it is necessary to assess the speed and strength of the hands, correlate them with the take-off and understand at what point it is necessary, in fact, to “let go” the ball so that it flies far and the athlete remains standing (instead of falling, for example, or stepping over the line ) All this allows us to develop an analysis of the most advantageous starting position, the swiftness of the takeoff and sweep, and finally, the determination of the point of application of maximum effort during the throw.
There are three types of throwing:
- Throwing a small ball, grenades, spears. These shells are lightweight. They are thrown from behind the head after a rapid run.
- Throwing various discs (the main distinguishing feature of the projectile is weight). Discs before the acceleration are thrown by rotating the body of the athlete.
- All kinds of kernels. The core is not “thrown”, but “pushed”. The core is the heaviest shell, so before you push it, the athlete needs to make a “jump” (literally, jump and push the core from the shoulder at the highest point).
Throwing Basics
Modern athletics doesn't consider throwing shells at a target. Throwing a small ball at a range is the first exercise. The throw can be performed in any way: standing from behind the head, from behind the head with a take-off run, throwing a projectile with unwinding it, pushing from the shoulder. The throwing method is selected depending on the projectile (its size and weight). Based on the age and physiological characteristics of the athlete, a sports apparatus is selected.
At the very beginning of training in this sport, it is not recommended to use maximum strength. Muscles and joints are not yet prepared and “do not know” the task, and this is fraught with dislocations and sprains. Learning the technique of throwing the ball does begin with throws on the target (accuracy). Gradually, the task becomes more complicated, and range is added to accuracy. Subsequently, with a serious throwing class, they pass to other heavier and more complex shells.
What to consider when throwing
So, what does the flight range depend on? Experts identify four conditions that determine a successful throw: projectile departure speed, angle, the height of the point at which the projectile breaks away from the athlete and air resistance.
Let's deal with each factor in order. The initial speed is affected by the effort that the athlete applies at the time of throwing. Further, the path length of the ball that it passes in the athlete’s hand. And finally, the time during which this path in the hand is overcome.
Accordingly, the longer the path and the shorter the time, the greater the velocity of the projectile thrown. Throwing a ball with a take-off means the speed of the take-off itself, the rotation of the body and the thrower jump. At the end of the run, the thrower creates “overtaking” by the athlete’s shell. For ball and javelin throwers, these are the last steps of acceleration, for discus throwers, overtaking is created during the rotation of the hull, and for shot putters, the last seconds of the jump are important.
Take-off time can only be reduced by accelerating the thrower. Therefore, training in throwing the ball includes running training with acceleration. At the last step of the run, the athlete pushes the projectile not only forward, but also upward.
When throwing the ball, an important point is the angle of flight with respect to the horizon. Knowledge of elementary geometry and the laws of trigonometry suggest that the maximum range is achieved at an angle of departure of 45 °. In practice, achieving such accuracy is not possible. Experienced and trained throwers push the projectile at an angle of 30-43 °.
It should be noted that throwing the ball at a range does not depend on the growth and length of the athlete's limbs. At first glance it seems that the higher the athlete, and the longer his arms, the farther the ball or spear will fly. In practice, we are faced with the fact that growth only affects the height of the departure point, but with the right throw, this characteristic will not significantly affect the final result.
The resistance of air masses is of the same unprincipled importance. Of course, airflow reduces time and speed. And that means the throwing range. But for such small items as the ball, this is immaterial. A properly “launched” disk can, in general, be “caught” by a stream of air and can stay in the air for a split second longer.
In any case, the influence of the height of the departure point and the resistance of the air masses is described by centimeters of flight range. In contrast to the take-off speed and projectile angle.
Ball throwing basics
One of the primary skills that a person receives is the ability to throw the ball and catch it. Already two-year-old kids can do this task perfectly. Of course, children's ball games have nothing to do with throwing shells, but only emphasizes the importance of developing dexterity and accuracy.

The throwing ball must be kept behind the head and slightly above its level. The elbow should not be higher than the shoulder, and the shoulder with the forearm should be less than 90 °. Professionals and their trainers claim that from this position the throw will turn out to be the most effective.
Take-off run
The technique of throwing the ball implies a run of 20 meters in length. In practice, this distance varies slightly depending on the individual characteristics of the athlete. The run itself should be uniform, but with acceleration. The step is also important: light, springy (in no case run with the body inclined forward). In addition, during the take-off it is necessary to control the position of the jerk arm.
Conditionally dividing the take-off run into two equal parts, we get the preparatory - the track and field athlete’s actual set of speed, and the throwing - preparation for projectile throwing.
Here coordination of movements is of great importance. It is necessary to maintain the speed gained in the first part of the take-off run, and at the same time bring your hand to throw behind.
At the start of the run, the athlete leans on the forefoot and slightly tilts the body forward. Before the final effort, it is necessary to take several "throwing" steps and take the arm with the shell back during this time. To facilitate the task, a place where you need to start moving your arm back is usually marked on the take-off run.
How to take your hand with the shell
At the time of the throw, the athlete’s body should be slightly tilted back. Those. during throwing steps, it is necessary that the legs literally outrun the arms. This is necessary in order to maximize the path of the application of force to the ball. There are several ways to take your arms back while taking a run.
In physical education classes at school, we easily master the simultaneous turn of the shoulder towards the throw with the arm backward (also due to the movement of the shoulder joint). When we are interested in professional athletics, throwing the ball requires a search for more effective techniques.
This is recognized as the technology of "taking the ball from the shoulder straight back." This brush movement greatly simplifies overall acceleration and does not slow down. Another way, the movement of the hand forward-down-backward, provides more opportunities to control the timeliness of hand movements relative to the center of gravity of the athlete’s body. This method is considered the most dynamic.

Cross step
As already noted, take-off speed is an important component of a successful projectile throw. However, there is no need to seek because this can cause muscle strain. Such muscular load will adversely affect the more crucial part of the throw - pushing the ball.
The most important is the penultimate of the throwing steps. It is he, the “cross step”, that allows the acceleration energy to be transferred to the arm with the shell laid back. In general, the last steps before throwing are designed to take a comfortable position for pushing the projectile.
Having dispersed, the athlete should quickly push off with the foot of his left foot to create acceleration to move the right foot forward, gently but quickly change the body tilt to the back position and allow the legs to “overtake” the hands.
The “cross step” requires special attention from the thrower. It is necessary to control the coordination of all actions and movements. During the “cross step”, the athlete needs to land on his leg, slightly open outward (up to 40 °), while making sure that the arm with the projectile is ready for the next throw. A slight turn of the pelvis, which is explained by the specific setting of the leg, will help to throw the ball correctly.
Actually, the starting position for the final effort can be described as follows: the athlete rests on a slightly bent right leg, the toe of which is turned outward; the case is turned with its left side towards the projectile throwing, and the straight right hand is laid back. The left hand, on the contrary, is slightly bent at the elbow and is located near the chest. The straightened left foot touches the ground with the inside of the foot. It is very important that the axis of the shoulders and the right hand make a straight line.

Toss
The ball kick begins at the moment when the athlete unbends his right leg at the knee. This movement allows you to move forward and up the pelvis, while the shoulders remain almost in place. The hand should be turned palm up, while turning the hand in the shoulder and bending it at the elbow. All these movements allow you to stretch the muscles of the right side of the body, the front of the right thigh and the right shoulder. The position of the thrower is called "bow tie".
At this point, the athlete has fully turned his chest forward, and the throwing arm goes forward, bending at the elbow joint. The forearm brush remains behind. All the described body movements allow you to maximize the speed of the ball at the time of its throw. At the same time, the left hand must be pulled back so that the inertia of this movement moves the body forward. When the elbow of the throwing arm aligns with the ear, it is necessary to begin a sharp movement of the shoulders forward. Simultaneously with this movement, the athlete should straighten the elbow joint. Finishing the throw, the thrower should make a “whip-like” movement with the hand. By inertia, the body also turns to the right, increasing the duration of the impact on the projectile.
Common mistakes
In order to achieve excellent results in throwing the ball, you need to train hard. And pay attention to typical mistakes. There are not many, several pieces, but getting rid of them is the most important task. The roughest - the deviation of the body to the left of the direction of the ball and the bending of the left leg in the knee at the time of expulsion of the projectile. This leads to the inevitable loss of the initial speed of departure of the ball from the athlete’s hand.
In order not to step over the limit line, the athlete needs to extinguish the forward movement. Jumping from the left foot to the right, while bending it at the knee, you can cope with this task.
The technique of throwing the ball into the goal is practically no different from throwing at a range. But one more important skill is added: the eye and the accuracy of estimating the distance to the target. All this can also be "trained" and "rehearsed." After all, nothing is impossible, it all depends on the desire and perseverance of a person.
High start and starting acceleration
In the 6th grade, training continues in fast, straightforward running on the front of the foot with an increase in running speed and step length in the starting acceleration (see . fig.1).
Fig. one. Starting acceleration
The runner holds the body in a bent position. With each step, the speed increases, the torso decreases, the runner smoothly and naturally switches to distance running.
Mistakes
- Early body straightening;
- insufficient handwork;
- indirect running;
- insufficient running stride length.
Grading
- “4” - the exercise was completed, but uncertainly, 1-2 errors were made;
- “3” - the exercise was difficult, more than 2 mistakes were made.
Throwing a tennis ball with 3 run range steps
I.p. - the left leg is freely set back on the toe, the body weight is on the right foot, the right arm with the ball is bent at the elbow at the right shoulder. Perform a step forward with the left foot, then a cross step with the right foot, the hand with the ball is retracted. Then perform the step with the left foot, the elbow of the right hand unfolds directly in the direction of throwing; the ball is sent back and forth with a whip of the hand. After the throw with a step of the right foot, the forward movement is stopped (see fig. 2).
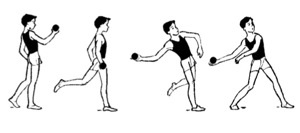
Fig. 2. Throwing ball
Mistakes
- There is no “bow bow” position; the hand holding the ball is bent at the elbow;
- there is no cross step;
- the body is strongly inclined forward;
- the student stopped after a run and then completed a throw;
- the ball flew out of the “corridor” for throwing.
Grading
- “5” - the exercise is performed correctly, clearly, easily;
Long jump with take-off run by bending legs with 7–9 take-off steps
Take-off, push and take-off must be carried out correctly in shape, rhythmically and freely. The take-off length is determined by the usual steps; two simple steps are equal to one running. The take-off run starts freely, all kinds of jumps are excluded, at the last steps of the take-off run the body is in an upright position, the head is straight. The last step is faster than the previous one; it is shorter in length; repulsion is quick, with a coordinated swing of the free leg and arms.
Mistakes
- The body is strongly deflected back, the jerked foot is stopped;
- insufficient running speed;
- trying to get on the board of repulsion, the student changes the frequency of steps and speed of running;
- insufficient handwork.
Grading
- “5” - the exercise is performed without tension, simple, easy;
- “4” - the exercise is completed, but with tension, 1-2 errors were made;
- “3” - the exercise is completed, but more than 2 mistakes are made.
High jump in the “step over” method with 3-5 steps
The run is carried out at an angle of 35–40 °: the first steps are on the toes, the last three are from heel to toe to exclude inhibition. The run-up is completed by pushing the leg furthest from the bar and straightening the fly leg with an energetic wave of the arms.
Mistakes
- Wrong running angle;
- no acceleration;
- running on a full stop, not on toes;
- missing hand work.
Grading
- “5” - the exercise is easy, free;
- “4” - the exercise is completed, but with tension, 1-2 errors were made;
- “3” - the exercise is completed, but more than 2 mistakes are made.
Benchmark
Control exercises |
Marks | |||||
| The boys | Girls | |||||
| "5" | "4" | "3" | "5" | "4" | "3" | |
| 200 | 165 | 145 | 190 | 155 | 135 | |
| 2. Running 3 × 10 m (sec.) | 8,3 | 9,0 | 9,3 | 8,8 | 9,6 | 10,0 |
| 3. Running 30 m (sec.) | 4,9 | 5,8 | 6,0 | 5,0 | 6,0 | 6,2 |
| 4. Running on 60 m (sec.) | 9,8 | 10,4 | 11,1 | 10,3 | 10,6 | 11,2 |
| 4.40 | 5.10 | 6.10 | 5.00 | 5.30 | 6.30 | |
| 7.30 | 7.50 | 8.10 | 8.00 | 8.20 | 8.40 | |
| 360 | 330 | 270 | 330 | 280 | 230 | |
| 115 | 110 | 90 | 110 | 100 | 85 | |
| 9. Throwing a tennis ball (m) | 36 | 29 | 21 | 23 | 18 | 15 |
7th grade
Distance running
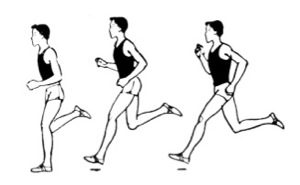
Fig. 3. Distance running
Runner striving to achieve his maximum speed and keep it as long as possible. In this case, it is necessary to observe the optimal ratio of the length and frequency of steps. The body is slightly inclined forward. Running on the forefoot is free, without undue stress, the feet move in one line, the thigh rises high, the step is wide and fast. The arms are bent at the elbows at the same angle (see fig. 3).
Mistakes
- The head is thrown back; the back bends;
- upper torso strongly inclined forward;
- running on the whole foot;
- indirect running;
- the steps are broad, but not quick.
Grading
- “5” - the exercise was performed correctly, easily, without stress, 1 error was made;
- “4” - the exercise is completed, but with stress, 2 errors were made;
- “3” - the exercise is completed, but more than 2 mistakes are made.
Throwing a ball at a range of 4–5 take-off steps
The aim of the take-off run is to increase the speed of the projectile. The run starts with the left foot, the ball in a bent arm in front of the shoulder, the brush at the level of the head. With each step, the arm with the shell is pulled back. Here, great attention is paid to the cross step. By increasing the speed of its execution, the athlete creates the conditions for a non-stop transition from run to throw. With a cross step, the athlete is in the “bowed position” and begins to throw. The left leg is placed in front of the body, focusing on the heel, and is used like a catapult. The throwing arm moves past the ear with the elbow forward, and the hand with the ball remains behind. The arm straightens first in the elbow joint, then in the wrist. The throw ends with a jump to the right foot.
Mistakes
- At the time of the throw, the body is tilted forward, the left leg is bent;
- deviation of the body away from the throwing arm;
- the hand with the ball goes across the side;
- the ball flew out of the “corridor”;
- the student made an interruption.
Grading
- “5” - the exercise is done correctly, easily, without unnecessary effort;
- “4” - the exercise is completed, but with tension, 1-2 errors were made;
- “3” - the exercise is completed, but more than 2 mistakes are made.
Long jump with the “bent legs” method from 9–11 take-off steps

Fig. 4. Long jump flight phase
Finishing pushing away, the jumper completely unbends the pushing leg. The fly leg, bent at the knee, is extended forward, the arms rise to shoulder level. The push leg after repulsion for some time continues to move backward by inertia, then the jumper pulls it with his knee forward to the foreleg located in front. The torso bent back at the beginning of the flight begins to lean forward towards the legs. Both legs approach knees to the chest, and the legs rise up with their socks on themselves. By the moment of touching the ground, the legs should be straightened, the body is extremely tilted forward, and at the moment of touching the ground, the jumper bends his legs at the knees, and in order not to fall back, he actively sends his hands forward; further, rolling through the feet, he tries not to touch the sand with a basin (see fig. 4).
Mistakes
- Weak take-off and low flight path;
- insufficient body grouping and premature landing;
- insufficient handwork;
- landing on straight legs.
Grading
- “5” - the exercise is performed without tension, confidently, freely;
- “4” - the exercise is completed, but with tension, 1-2 errors were made;
- “3” - the exercise is completed, but more than 2 mistakes are made.
High jump with 5 steps

Fig. 5. High Jump Repulsion
An important technical aspect of the high jump is repulsion. The fly leg bends to almost 90 °. The pelvis and the jerk leg overtake the shoulders, the jerk leg is placed almost straight from the heel, and then immediately on the entire sole. As a result of all these movements, the center of mass of the body moves even more downward, the body deviates back, arms behind. From this position repulsion is carried out (see fig. 5).
Mistakes
· Slowing down the run in the last steps;
· Arms not laid back;
· Slight squatting, legs and pelvis do not overtake the shoulders;
· The push is made not far from the bar leg.
Grading
· "5" - the exercise is completed without errors, easy, free;
· “4” - the exercise is completed, but with stress, 1-2 errors were made;
· “3” - the exercise is completed, but more than 2 errors are made.
Benchmark
Control exercises |
Marks | |||||
| The boys | Girls | |||||
| "5" | "4" | "3" | "5" | "4" | "3" | |
| 1. Long jump from a place (cm) | 205 | 170 | 150 | 200 | 160 | 140 |
| 2. Running 3 × 10 m (sec.) | 8,3 | 9,0 | 9,3 | 8,7 | 9,5 | 10,0 |
| 3. Running 30 m (sec.) | 4,8 | 5,6 | 5,9 | 5,0 | 6,2 | 6,3 |
| 4. Running on 60 m (sec.) | 9,4 | 10,2 | 11,0 | 9,8 | 10,4 | 11,0 |
| 5. Running on 1000 m (min., Sec.) | 4.30 | 5.00 | 6.00 | 4.50 | 5.20 | 6.20 |
| 6. Running at 1500 m (min., Sec.) | 7.00 | 7.30 | 8.00 | 7.30 | 8.00 | 8.30 |
| 7. Long jump with a take-off run (cm) | 380 | 350 | 290 | 350 | 300 | 240 |
| 8. High jump with a take-off run (cm) | 125 | 115 | 100 | 110 | 110 | 90 |
| 9. Ball throwing (m) | 39 | 31 | 23 | 26 | 19 | 16 |
8th grade
Low start
Fig. 6. Low start
A low start is a way to start a run, which provides the conditions for the development of maximum running speed on the shortest possible distance.
On command "On your marks!" hands rest on the ground with fingers shoulder width apart, head and trunk form one straight line. The gaze is directed 1-2 m forward from the start line. A strong leg is in front, at a distance of 1.5–2 feet to the start line, and the knee of the other leg is located on the ground near the front foot. The severity of the body is evenly distributed between all points of support.
On command "Attention!" the severity of the body is transferred to the arms and the front leg, the pelvis rises slightly above shoulder level, the legs straighten slightly, the runner freezes.
On command "March!" the runner is energetically repelled by his legs, while the back leg is quickly carried forward and upward, and the front leg is fully unbent. Arms bent at the elbow joints perform quick energetic movements. Repulsion is carried out at an acute angle, movements at the exit from the start are performed as quickly as possible.
Mistakes
- The head is strongly inclined back, the back is bent;
- the runner rests too much on his hands;
- the pelvis is raised high, the legs are almost straight;
- quick straightening of the body.
Grading
- “5” - the exercise is performed correctly, without errors, easily;
Throwing a ball with 5–8 take-off steps
In the 8th grade, the main attention is paid to the technical implementation of all phases of the throw:
- take-off should increase the speed of the projectile;
- the throw is carried out whackily, all the efforts of the throw are transferred to the projectile;
- the transfer of body weight from one leg to another is carried out to maintain balance, which allows you not to step over the limit line.
Students are encouraged to complete ball shots with 5–8 take-off steps in a 10-meter-wide corridor using the execution technique.
Mistakes
- There is no cross step;
- spade;
- malfunctioning throwing hands;
- the ball did not hit the “corridor”;
- a stop is made after a run, and then a throw.
Grading
- “4” - the exercise is completed, but with tension, 1 mistake was made;
- “3” - the exercise is completed, but 2 or more mistakes are made.
Long jump using the “bent legs” method from 11–13 take-off steps
Eighth graders should be able to perform non-stop repulsion at an accessible speed. Therefore, when evaluating, the main attention is paid to all phases of the jump:
- the correct rhythm and pace of the run;
- accurate hit on the repulsion board;
- flight phase;
- landing.
Students are encouraged to complete a long jump from 11–13 steps of a run on equipment.
Mistakes
- Weak start;
- spade;
- landing on straight legs;
- weak handwork.
Grading
- “5” - the exercise is easy, without errors;
- “4” - the exercise was performed with tension, 1 mistake was made;
- “3” - the exercise is completed, but 2 or more mistakes are made.
High jump in the “step over” method with 7–9 take-off steps
When evaluating, the main attention is paid to all the main phases of the jump. As a control task, students are encouraged to perform a high jump in the “step over” manner from 7–9 steps of the take-off run to the technique.
Mistakes
- Not enough strong take-off;
- pushing away not far from the bar with the foot;
- improper footwork in flight;
- weak handwork.
Grading
- “5” - the exercise is easy, without errors;
- “4” - the exercise is completed, but with tension, 1 mistake was made;
- “3” - the exercise is completed, but 2 or more mistakes are made.
Benchmark
Control exercises |
Marks | |||||
| The boys | Girls | |||||
| "5" | "4" | "3" | "5" | "4" | "3" | |
| 1. Long jump from a place (cm) | 210 | 180 | 160 | 200 | 160 | 145 |
| 2. Running 3 × 10 m (sec.) | 8,0 | 8,7 | 9,0 | 8,6 | 9,4 | 9,9 |
| 3. Running 30 m (sec.) | 4,7 | 5,5 | 5,8 | 4,9 | 5,8 | 6,0 |
| 4. Running on 60 m (sec.) | 8,8 | 9,7 | 10,5 | 9,7 | 10,2 | 10,7 |
| 5. Run for 2000 m (min., Sec.) | 10.00 | 10.40 | 11.40 | 11.00 | 12.40 | 13.50 |
| 4.00 | 4.300 | 5.20 | 4.40 | 5.10 | 6.10 | |
| 7. Long jump with a take-off run (cm) | 410 | 370 | 310 | 360 | 310 | 260 |
| 8. High jump with a take-off run (cm) | 130 | 120 | 105 | 115 | 105 | 95 |
| 9. Ball throwing (m) | 42 | 37 | 28 | 27 | 21 | 17 |
9th grade
Finish
Fig. 7.Finishing technique
Running in the last meters of the distance, despite the desire to increase the pace, must remain free and relaxed so as not to cause stress, as this affects the speed. Directly in front of the finish ribbon, the runner sharply tilts the torso forward or, together with the tilt, rotates the torso and touches the ribbon with his shoulder. It is necessary to exclude the jump on the ribbon, so this reduces the speed of running and can lead to a fall (see . fig. 7).
Mistakes
- Decrease in speed before a finishing tape;
- preparation for a throw to the ribbon a few meters before the finish line, falling run;
- stop at the finish line.
Grading
- “5” - the exercise is completed correctly, easily, without errors;
- “4” - the exercise is completed, but with tension, 1 mistake was made;
- “3” - the exercise is completed, but more than 1 mistake is made.
Benchmark
Control exercises |
Marks | |||||
| Young men | Girls | |||||
| "5" | "4" | "3" | "5" | "4" | "3" | |
| 1. Long jump from a place (cm) | 220 | 190 | 175 | 205 | 165 | 155 |
| 2. Running 3 × 10 m (sec.) | 7,7 | 8,4 | 8,6 | 8,5 | 9,3 | 9,7 |
| 3. Running 30 m (sec.) | 4,5 | 5,3 | 5,5 | 4,9 | 5,8 | 6,0 |
| 4. Running on 60 m (sec.) | 8,4 | 9,2 | 10,0 | 9,4 | 10,0 | 10,5 |
| 5. Running 100 m (sec.) | 14,8 | 15,2 | 15,7 | 16,8 | 17,3 | 18,0 |
| 6. Running on 1000 m (min., Sec.) | 3.40 | 3.50 | 4.20 | 4.30 | 5.00 | 6.00 |
| 7. Long jump (cm) | 430 | 380 | 330 | 370 | 330 | 290 |
| 8. High jump (cm) | 130 | 125 | 110 | 115 | 110 | 100 |
| 9. Ball throwing (m) | 45 | 40 | 31 | 28 | 23 | 18 |
| 10. Run 2000 m (min., Sec.) | 9.20 | 10.0 | 11.0 | 10.2 | 12.0 | 13.0 |
Grades 10–11
At physical education classes in grades 10-11, students improve previously learned motor actions; significantly less time is devoted to learning new material. The lessons in these classes to a large extent acquire the features of training. Therefore, the main task is to teach students to perform motor actions not only correctly, but also with increasing speed, strength, dexterity and endurance. In this regard, the distance, running speed, standards in jumps, projectile weight in throwing are increasing.
Relay race
Relay race - a type of team run, where the distance is divided into stages of a certain length; each participant runs through his stage, and then passes a special relay baton to the other member of his team (see fig. 8).
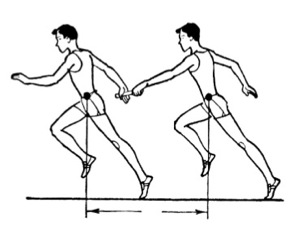
Fig. 8. Relay race
The transfer of the baton takes place only in the transfer zone, which has a length of 20 m. From the line indicating the boundary of the end of the stage, 10 m is measured in both directions. This will be the transfer zone. The transfer of sticks is carried out from hand to hand. The first member of the team with a relay stick in his right hand starts and, having run the stage, passes the stick to his left hand to the next participant; having run his stage, he passes the wand to the next hand in his right hand, etc. The hand of the relay-receiving runner is positioned so that it is convenient to put a wand in it, and the relay-taking runner should already start running (see Fig. 9).

Fig. nine. Hand-to-hand transfer of the baton
Mistakes
- Relay transfer outside the transfer zone;
- loss of sticks while running or passing;
- transfer of the relay to the same hand;
- passing the baton on the spot.
Grading
- “5” - the exercise is done correctly, easily, confidently;
- “4” - the exercise was completed, but uncertainly, 1 mistake was made;
- “3” - the exercise is completed, but 2 or more mistakes are made.
Grenade throwing
The technique of throwing a grenade is not significantly different from the technique of throwing a ball, but you need to pay attention to safety during class, since the weight of the grenade significantly exceeds the weight of the ball, and the likelihood of injury increases. Assessment is the same as when throwing the ball (8th grade).
Benchmark
10th grade
Control exercises |
Marks | |||||
| Young men | Girls | |||||
| "5" | "4" | "3" | "5" | "4" | "3" | |
| 1. Long jump from a place (cm) | 230 | 195 | 180 | 210 | 170 | 160 |
| 2. Running 3 × 10 m (sec.) | 7,3 | 8,0 | 8,2 | 8,4 | 9,3 | 9,7 |
| 3. Running 30 m (sec.) | 4,4 | 5,1 | 5,2 | 4,8 | 5,9 | 6,1 |
| 4. Running 100 m (sec.) | 14,5 | 14,9 | 15,5 | 16,5 | 17,0 | 17,8 |
| 15.00 | 16.00 | 17.00 | 10.10 | 11.40 | 12.40 | |
| 6. Running on 1000 m (min., Sec.) | 3.30 | 3.40 | 4.00 | 4.20 | 4.50 | 5.50 |
| 440 | 400 | 340 | 375 | 340 | 300 | |
| 8. High jump (cm) | 135 | 130 | 105 | 120 | 115 | 105 |
| 32 | 26 | 22 | 18 | 13 | 11 | |
11th grade
Control exercises |
Marks | |||||
| Young men | Girls | |||||
| "5" | "4" | "3" | "5" | "4" | "3" | |
| 1. Long jump from a place (cm) | 240 | 205 | 190 | 210 | 170 | 160 |
| 2. Running 3 × 10 m (sec.) | 7,2 | 7,9 | 8,1 | 8,4 | 9,3 | 9,6 |
| 3. Running 30 m (sec.) | 4,3 | 5,0 | 5,1 | 4,8 | 5,9 | 6,1 |
| 4. Running 100 m (sec.) | 14,2 | 14,5 | 15,0 | 16,0 | 16,5 | 17,0 |
| 5. Running for 3000 m - boys and 2000 m - girls (min., Sec.) 15.00 16.00 17.00 10.10 11.40 12.40 | 13.00 | 15.00 | 16.00 | 10.00 | 11.30 | 12.20 |
| 6. Running on 1000 m (min., Sec.) | 3.20 | 3.30 | 3.50 | 4.10 | 4.40 | 5.40 |
| 7. Long jump with a take-off run (cm) | 460 | 420 | 370 | 380 | 340 | 310 |
| 8. High jump (cm) | 140 | 135 | 120 | 120 | 115 | 105 |
| 9. Throwing grenades weighing 700 g / 500 g (m) 32 26 22 18 13 11 | 38 | 32 | 26 | 23 | 18 | 12 |
Valery Semenov,
honored Teacher of Russia, Gymnasium No. 27, Kurgan
In ancient times, wars were constantly waged between different states, in which some defended their independence, while others conquered new lands. Then there were no swift missiles, there were not even guns. The success of the battle was decided by hand-to-hand combat, in which short swords and spears were used. Many warriors were armed with two spears. They threw one at the enemy, and used the other as a lance.
To successfully use this weapon, the soldiers trained in throwing spears at a range and at a target. Some of them began to compete among themselves, and then the first official competitions appeared. Then the results
athletes were measured by the number of judges feet. At that time it was the most accurate measure.
Competitions in javelin throwing have been preserved to this day Ho, in order to successfully wield this projectile, you need to learn the proper throwing technique, as well as strengthen the muscles of the arms, legs and torso. This will help you with the ball throwing exercises that you will pass according to the conditions of the “Bold and Agile” stage, Handing over the norms of the II stage, you will have to throw a grenade - this is a heavier shell and requires good physical preparation.
The technique of throwing these shells is very similar, therefore, learning to throw the ball, you need to pay serious attention to its proper assimilation.
Throw various objects more often, play snowballs more in winter. Being on the river’s beret, try to throw stones as far as possible. In the forest, you can organize competitions in throwing fir cones.
First, learn the proper throwing technique. To do this, stand with the left foot on the line, and put the right foot behind. Taking the ball with the ball back, turn your shoulders more and bend the right leg a little. From this position, the hand with the ball goes up, while legs and shoulders are turned forward. Then follows the throw.
All these movements need to be performed together. Pay particular attention to the wide rotation of the body, as this is an important element in throwing the ball, grenades and spears. When this exercise will be performed easily and freely, you can start throwing with 3 steps of the run.
To do this, stand facing the throwing, right foot in front, left half a step behind. Taking a step with your left foot, begin to turn your shoulders and take your ball back. The next step is the crossed right leg quickly put in front of the left to the outside of the foot with the toe to the right. At this time, the arm fully completed the swing. After completing the last step with your left foot, you can throw.
To learn the techniques of these methods, try throwing the ball at targets, at a wall or floor at a bounce distance. Try to come up with a throwing ball.
state budgetary professional educational institution
Rostov region Zernograd Pedagogical College
ROUTING
Lesson physical education,
held on 05/04/2016 in the 2nd “B” class
MBOU SOSH UIOP Zernograd
student of GBPOU RO "ZernPK"
Vasilenko Victoria Andreevna
Teacher: Shcherbakova T.N.
Methodist: G. Shchirova
_____________________
(signature)
Zernograd
Lesson topic: "Throwing a tennis ball at a target and at a range."
The purpose of the lesson: Learn the correct arm position when throwing at a range.
Training tasks:
Aimed at achieving personal results:
Orientation to active communication and interaction with peers;
The manifestation of discipline, diligence and perseverance in achieving the goals.
Aimed at achieving meta-subject results:
Cognitive:
1. Independently formulate problems and find ways to solve them.
Regulatory:
1. make the necessary adjustments to the actions after its completion on the basis of its assessment of the nature of the mistakes made, use the proposals and estimates to create a new one;
Communicative:
1. Formulate their own opinion and position, agree on the distribution of functions and roles in joint activities.
2. agree and come to a common decision in joint activities, including in a situation of conflict of interest;
Aimed at achieving objective results:
1 Start training throwing a tennis ball at a range.
2. To learn the mobile game "Name", the inactive "Paint";
Inventory for teacher:sports uniforms, tennis balls, whistle.
Inventory for students:sports wear.
During the classes.
| Lesson stage | Teacher activities | Students activities | Universal actions | Correction and development work |
| 1.Organizational moment. | Welcomes students creates an emotional mood. Class, "Keep up," "At attention," Hello, free. My name is Victoria Andreyevna, today I will give you a lesson in physical education. Today in the lesson we will learn the technique of throwing the ball at a range. | Children listen, welcome teachers | Personal:show positive personality traits and manages his emotions in various situations and conditions. Able to show discipline, perseverance in achieving goals. | Development of emotional - volitional sphere and educational motivation Posture correction. |
| 2. Actualization of knowledge. | Reminds safety measures at a physical education lesson. Class, "Keep up," "At attention," Performing drill exercises: “Left”, “Round”, “Left”, “Right” and Gives the command: "Right!" He gives the command: "Bypassing the hall with the step" March! " Gives the command: "Hands to shoulders, circular rotation of the shoulder joint" Gives the command: "right hand at the top, jerking hands" He gives the command: “Put your hands on your belt, on socks” “March!” He gives the command: “Put your hands behind your head, on your heels” “March!” The teacher gives a method of indicating: keep a distance, straight back, look forward. He gives the command: “Put your hands on your belt, walking with a roll from heel to toe” It gives the command: “Put your hands on your belt, with an added step with your right side,“ March! ” "Left side," March! " Gives the command: "On the run," March! " Gives the command: "Step," March. " Gives the command: "Restore breathing. Hands up - entrance, hands down - exhale. " "Guide on the spot! Wait! One, two! Left!". Rebuilding children to perform outdoor ball games with a tennis ball. Gives the command: Class "Equalize", "At attention". Gives the command: "Pay off for 1-2", Gives the command: “First numbers 4 steps forward” “March” Holding an outdoor switchgear. (Appendix 1) Rebuilds students in a line. He gives the command: “Get out of class! Become one line! ” | Students complete the task. Perform walking with tasks. Perform walking on the heels with a roll. Perform a run with an added step. Run on the site. Students perform breathing exercises. Children perform outdoor switchgear in a circle. | Regulatory:control in the form of a comparison of the mode of action. Personal: Personal: establishing by students the connection between the purpose of the educational activity and its motive. Communicative:to teach not only to show motor action, but also to pronounce the exercise, to explain its relevance for solving the tasks. | - Posture correction. The development of physical quality (speed). - Posture correction. Correction of flat feet. |
| 3. The study of new material. | Today in the lesson we will practice the technique of throwing the ball at a range To begin with, we will learn the rule of free grip, in which the little finger holds the ball on one side, the thumb on the other, the other three fingers on which the ball rests hold together. Main stance: stand facing the target, legs apart, left foot in front of the right, on the front of the foot. The ball is in the right hand, the brush is at face level, the left hand is directed forward and down. Moving the right arm back and forth and slightly bending the right leg, tilt the torso slightly to the right, resting the foot of the straight left foot on the platform of the sock and turn it inward. The throw begins with an energetic extension of the right leg, combined with the rotation of the upper body in the direction of throwing and the transfer of the body to the left leg. After the throw, the body turns to the left, the left hand rises to the side, and the right hand in front of the chest. | Enter into dialogue with the teacher. Watch the technique of throwing. Throw at the target and range. | Subjects:ability to get throwing information. Personal: showing support and respect for each other during exercise Regulatory: developing an adequate understanding of oral communication information; ability to objectively evaluate the results of one’s own and collective task fulfillment, ability to control one’s emotions Communicative: the formation of a tolerant attitude towards peers; the ability to collaborate in a group, to carry out tasks together | Spatial perception. |
| 4. Primary comprehension and consolidation. | Mobile game "Name" Students become in a circle, one in the middle with the ball, tossing the ball up calls the name of his friend, he must catch the ball so that it does not fall to the floor. And the game starts anew. The game of low mobility "Paint" (APPENDIX 2) | Play the mobile game "Name" They play the sedentary game "Colors" | Regulatory:accept the instructions of the teacher and clearly follow it; accept and save the educational task in the process of participating in the game; adequately perceive the teacher’s assessment. Communicative:they can negotiate and come to a common decision in joint gaming activities. Personal:Able to show discipline, perseverance in achieving goals. | Attention development. Broadening the horizons of children. |
| 5. The results of the lesson. Reflection. | Conducts a conversation on the following issues: What did you do in the lesson? What games did we play? What was interesting in the lesson? Mark active students. Guys, this is our lesson finished, bye. Lead to class | Answer questions, determine their emotional state in the lesson. | Personal:understand the value of knowledge for a person and accept it. Regulatory:predict the results of the level of assimilation of the studied material. |
Appendix No. 1
ORU complex with a tennis ball.
1) pulling up.
1- rise on toes, arms up- pull up
3-4 is the same
I.p.- accept
2) Circular rotation with hands.
I.p.- o.s.- legs shoulder-width apart, the ball in his right hand.
1- the right hand is back, and the left is forward and up, the ball is in the left hand.
2 - return in reverse motion.
3-4- the same with the other hand.
3) turns.
I.p.- o.s.- legs shoulder-width apart.
1-right foot a step to the side, hands to the side, the ball in the right hand, turn to the left.
2- hands forward, pass the ball to the left hand.
3- hands to the sides.
4- put the right one, return to ip
5-8- the same in the other direction.
4) Castle.
I.p.- o.s.- legs shoulder-width apart, arms to the sides, ball in the right hand
1- bend your right arms over your shoulder from above and left from below from behind and shift the ball to the left
2- and.p. ball in the left hand
3-4- the same with the other hand
5) tilts back and forth
I. p. - nights shoulder-width apart, ball below.
1 - tilt, ball up
2 - tilt, put the ball on the floor
3- 4- same
6) tilts to the right, left
1 - tilt to the right
2 - straighten up
3- left lean
4- straighten your arms up
5-8- same thing to the other leg
7) slopes
I. p. - nights shoulder-width apart, ball above
1 - tilt to the right foot, put the ball on the floor at the right foot
2 - straighten up
3- tilt to your right foot and take the ball into your right hand
4- straighten your arms up
5-8- same thing to the other leg
8) bending of the legs in the knee joint.
I. p. -o.sball in right hand
1 - bending the right leg forward, the ball under the knee, arms to the sides
2 - take the ball with your left hand and return to ip
3- 4- same with the other leg.
9) squats
Hands in front of you
Boys -10
Girls 6
10) Restore breathing.
I.p.-.s. feet shoulder width apart. Raise your hands up and take your right foot back, and return to the starting position. In the same way, we raise our hands up and take our left foot back.
1-arms up, the right leg is taken back.
2- and.p.-o.s.
3- arms up, take the left leg back.
4- and.p.-o.s.
Appendix 2 Paints Children choose the owner and two buyers, all other players are paints. Each paint invents a color for itself and quietly calls its owner. When all colors have chosen a color, the owner invites one of the buyers. The buyer is knocking: “Knock-knock!” - “Who is it?” - “Buyer.” - “Why did you come?” - “For paint.” “For what?” “For blue.” If there is no blue paint, the owner says: “Follow the blue path, find the blue boots, swear and bring back.” If the buyer guessed the color of the paint, then the paint takes itself. There is a second buyer, the conversation with the owner is repeated. And so they take turns and make out the paint. The buyer who guessed more colors wins. When the game is repeated, he acts as the owner, and the players choose the buyers. The rule. The buyer should not repeat the same paint color twice, otherwise he gives way to the second buyer. Directions for carrying out. The game is held with children both indoors and outdoors. The owner, if the buyer has not guessed the color of the paint, can give a more difficult task, for example: "Jump on one leg along the blue track." If there are many children playing, you need to choose four buyers and two owners. Buyers for paints come in turn.