

Constructive drawing - this is a section of the discipline of academic drawing - drawing of the external contours of objects, both visible and invisible, made using construction lines. You create a “frame” of the object that you are going to draw. And in order to create such a frame, you need to analyze the depicted object. The design drawing begins with analysis.
Take a closer look, think of what the object consists of? What geometric bodies? And what are the simplest geometric bodies? This is a cube, ball, cylinder, cone, prism, etc. If you learn to see geometric bodies in the objects around you, then you can easily create a frame, or, more precisely, a constructive drawing.
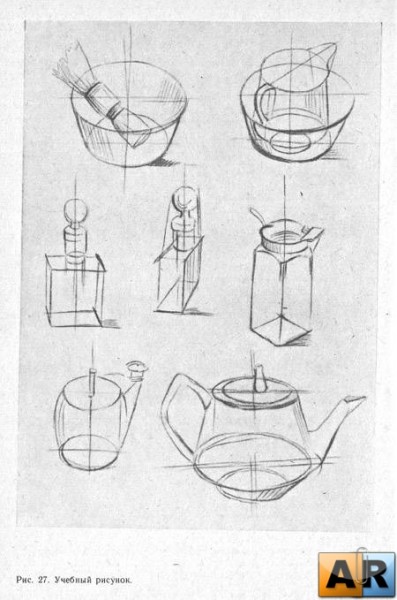
For example, take an ordinary bottle. It contains a cylinder, maybe a cone (truncated), also, maybe a truncated ball or a torus. Or, for example, a cabinet or a table, - consists of a tetrahedral prism or, perhaps, of cubes and parallelepipeds.
Therefore, the first step is to learn to find geometric bodies in everything that surrounds us. This will help develop volumetric thinking.
The second step is the image of the "frame". You need to learn how to correctly place the geometric bodies that make up the depicted object in space. This requires knowledge of a linear perspective.
That is, you need to know what the horizon line, vanishing points and how to use this knowledge. For example, when we draw an ordinary cube, we draw lines of parallel faces of the cube so that they converge at one point or at two points on the horizon.
The second point is the center line.
She helps to create a design correctly. For example, we need to draw two cylinders of different thicknesses, that is, different diameters. And one cylinder is located above the other. We make, for example, the design of the bottle. For this we need an axial line. If the bottle is standing, then this line will be vertical.
Draw a vertical line. Draw a rectangle (the main part of the bottle) so that this line runs in the middle. Draw another smaller rectangle (neck) so that the centerline runs in the middle. Now you need to draw (build) 4 ellipses - below and above each of the rectangles.
Something more like a bottle is already becoming. Or here's another option for a design drawing. If you draw a bottle in perspective, as if looking at it from the side and slightly above. How then do we create a constructive drawing? First, we draw not two rectangles, but two tetrahedral prisms, from which we then obtain two cylinders.
It is clear that at first one prism is the main one. Next, on the lower and upper planes of this prism we draw diagonals, we get two points. Connect these points - we get the middle axis. This axis will help us to build another prism correctly, from which we will create a bottleneck cylinder.
Having put one prism on another, we build two cylinders. After that, round the corners, give this design the credibility of the bottle. You can create not only the designs of such simple objects as utensils, furniture, but also animals and even humans.
Despite the complexity of the structure of a person or an animal, we can find simple geometric bodies in them - cylinders, prisms, cubes, balls, etc. Simply, in order to master the constructive drawing, you need to see, as if through and through, of what we draw.
Begin to develop volumetric thinking with an ordinary cube. Draw it on a piece of paper, this, whatever one may say, is the basis. This is where the constructive drawing begins. The cube presents us with three dimensions of space - width, height and depth.
The latter, that is, depth, is an illusion, since we cannot have depth on the plane of the sheet. Here are some examples of constructive construction.
This is how the frame or wrapping surface is created for the future item. This is a constructive construction.
Now let's look at examples of constructive phased drawing from simple geometric shapes to a human figure:
Phased drawing methodology ...

Constructive analysis of the shape of household items.
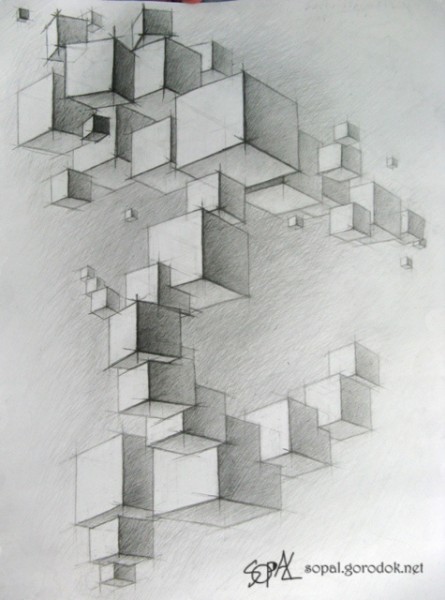
Studying perspectives using cubes of various sizes as examples.

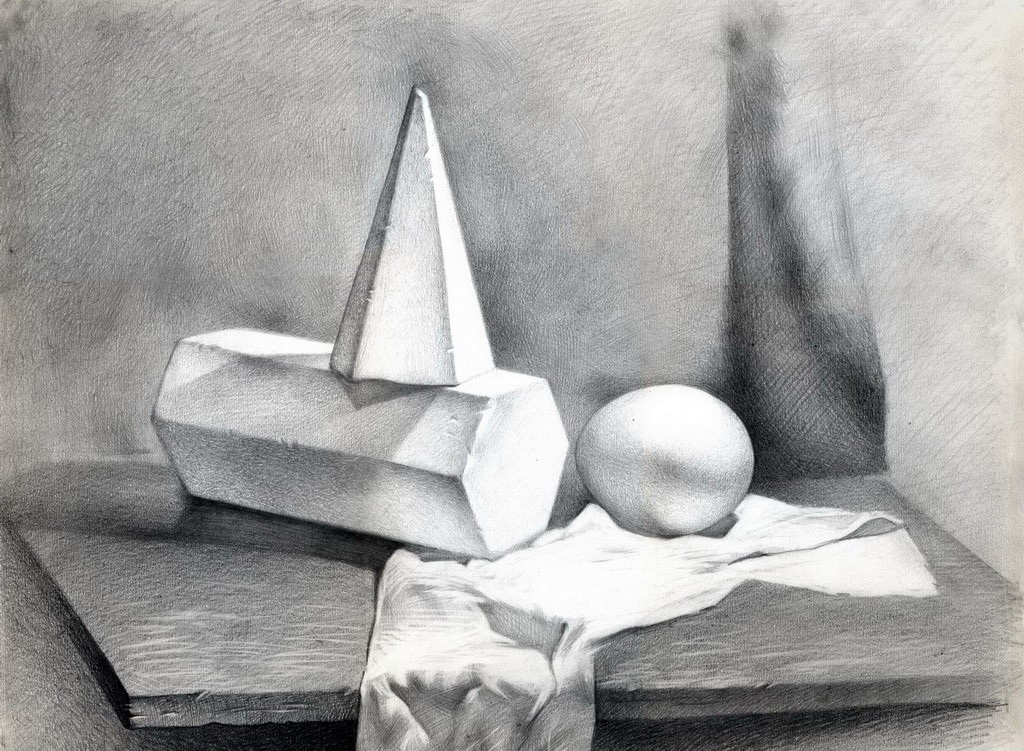
Still life of geometric bodies.
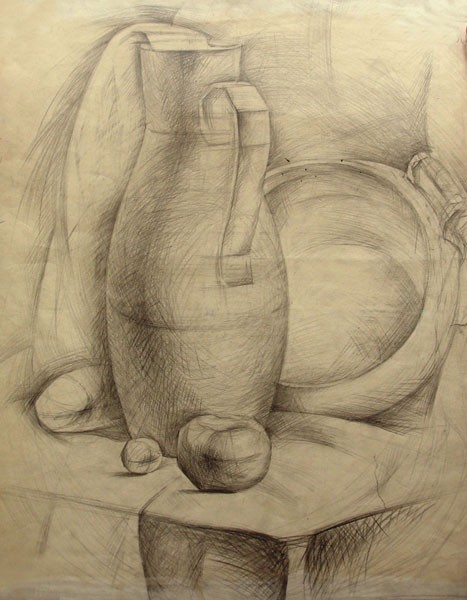
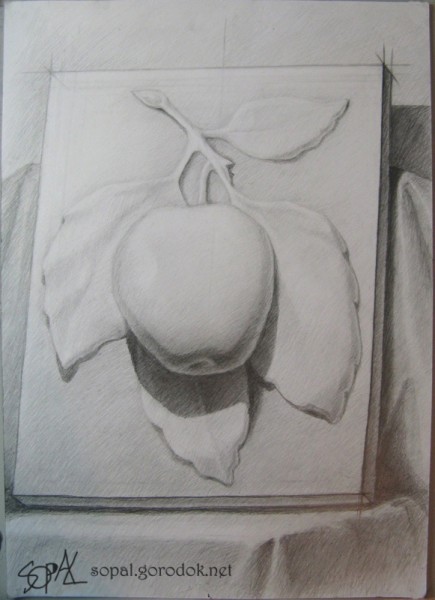
Subject still life at the stage of shaping.
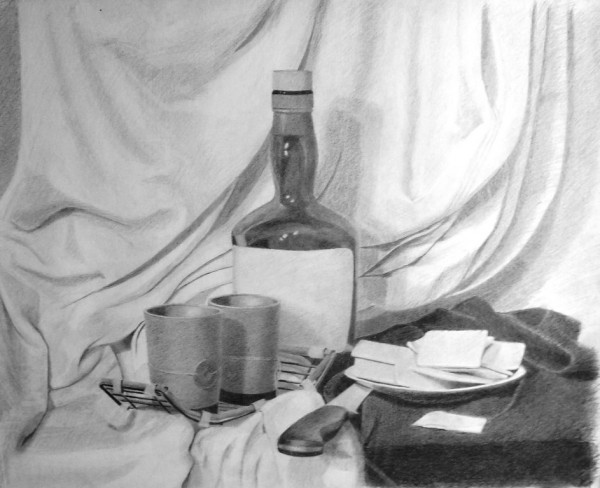
Finished subject still life.
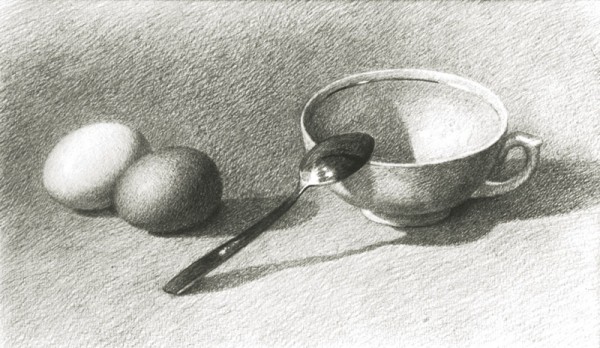
Simple table still life.
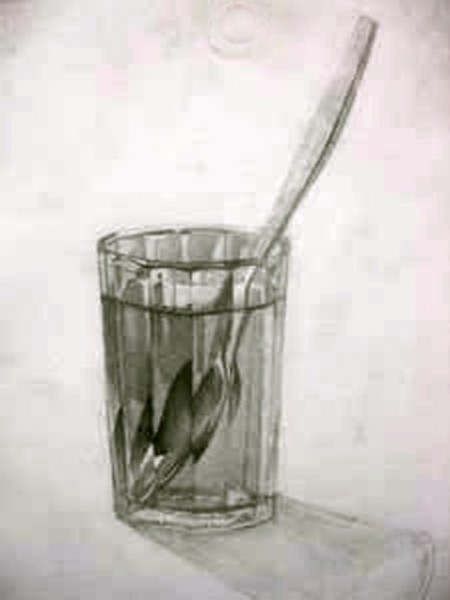
Drawing a complex subject.
Drawing of a plaster palette.
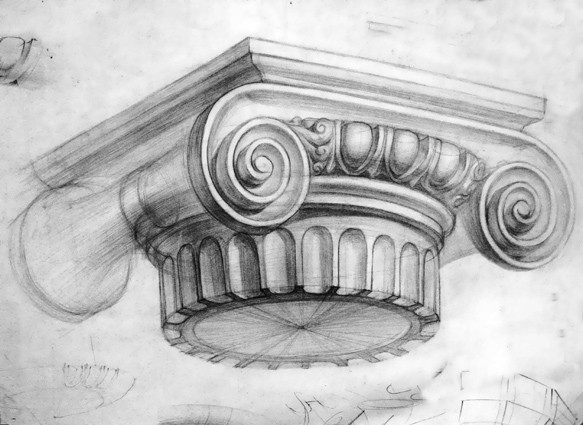
Drawing capitals of the column of the Ionian order.
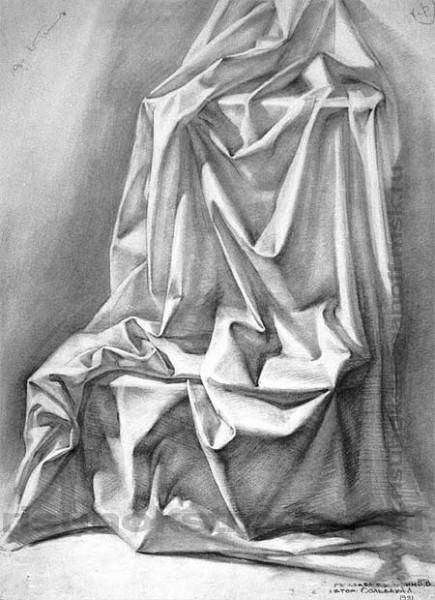
Drapery drawing.
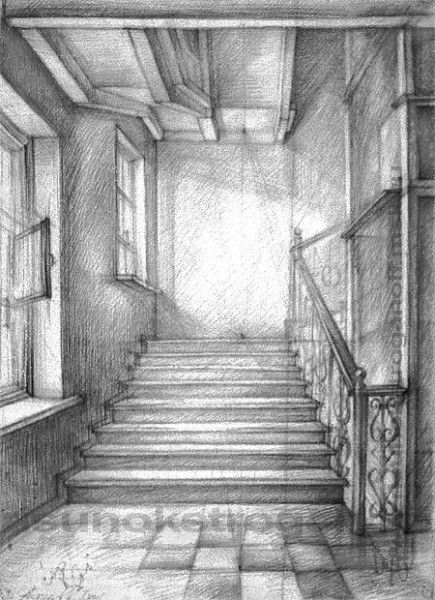
Perspective drawing of the interior.

Constructive analysis of the shape of the skull with hatching.
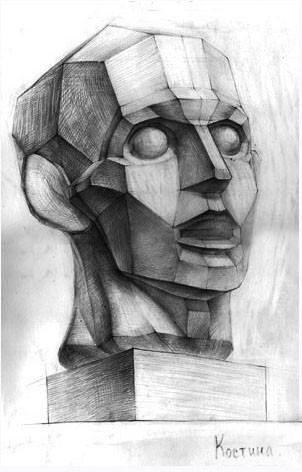
Figure of a stump of a human head.
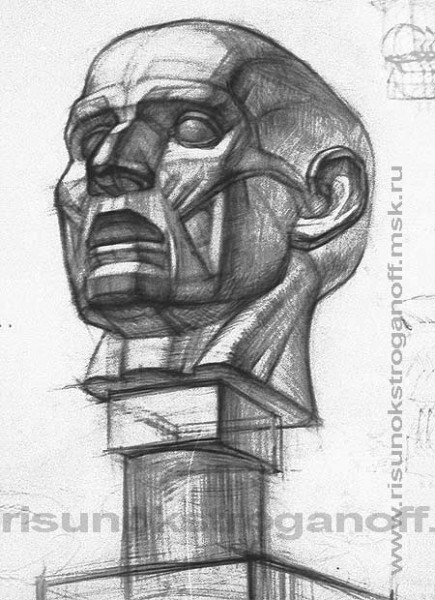
Drawing ekorshe human head.
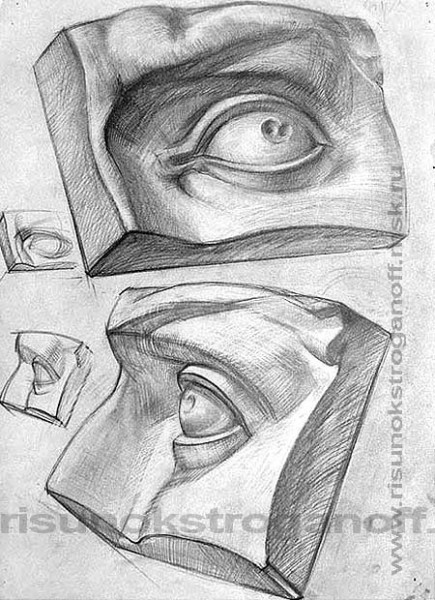
The eye pattern of David is an exercise in understanding the shape of the parts of the human head.
Constructive construction of the human head (front part).
Constructive analysis of the human head with weak hatching.
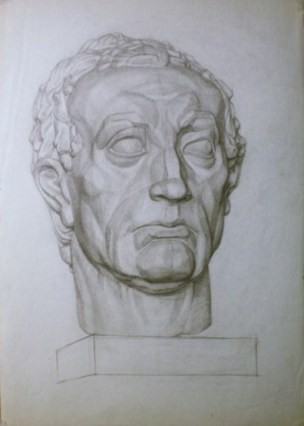
Drawing of the gypsum head of the Hattamelate condenser.
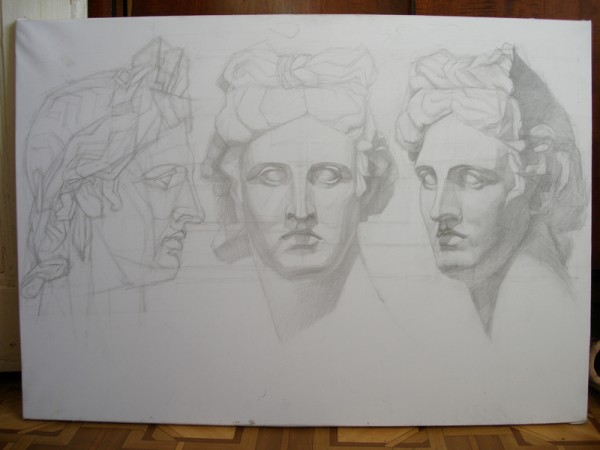
Analysis of the shape of the gypsum head of Apollo Belvedere from several angles.
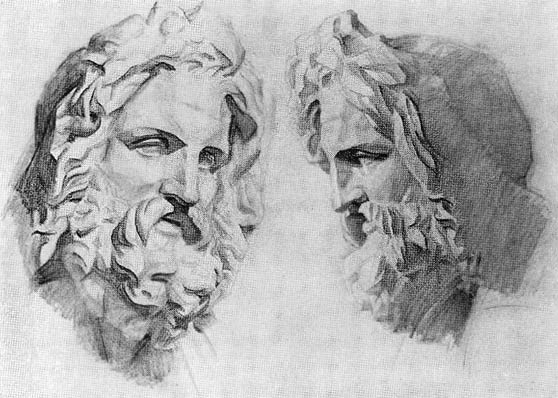
Drawing of the head of Zeus in two angles.
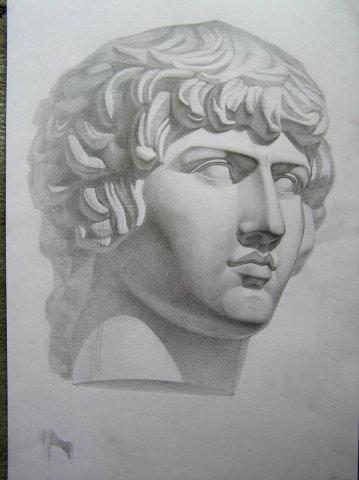
Drawing of the head of the favorite of the emperor Hadrian - Antinous.
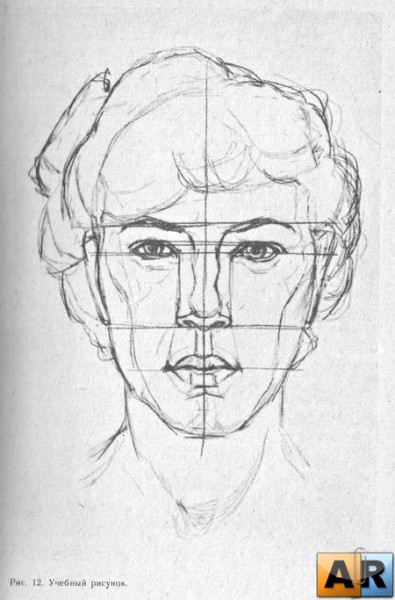
The human head is one of the most complex image objects, so a gradual preliminary preparation for its drawing follows.
Before you start drawing a gypsum head, you should study the structure and features of the main parts of the face that determine the plastics of a person’s head. Thus, it is advisable to perform drawings of the eyes, nose, lips, ear. Plaster casts of parts of the face of the statue of David, the work of Michelangelo, the Italian Renaissance sculptor, are usually used as models for such drawings.
Consider the structure and features of drawing each part of the face separately.
Eye. The eyeball is placed in the orbital cavity. When studying the structure of the eye, the eyeball and its additional organs are distinguished (Fig. 3.13).
The eyeball has a rounded shape and determines the shape of the upper and lower eyelids.
The wall of the eyeball consists of three membranes: fibrous, vascular and reticular. The opaque part of the fibrous membrane is called the protein membrane, or sclera. In front of the sclera, it passes into the transparent cornea, or cornea. What we call the white of the eye is the part of the sclera that is visible through the slit of the eyelids.
Through the cornea, the iris is visible, which is the anterior part of the choroid. The iris contains pigment, on which the color of the eyes depends. There are three main tones of eye color: dark, transition from dark to light and light. Each of them has four subgroups, resulting in a total of 12 varieties of eye color: black, dark brown, light brown, yellow, brown-yellow-green, green, gray-green, blue with a brown-yellow rim, gray, blue gray, blue, blue.
In the center of the iris is a hole - the pupil of the eye. Narrowing and expanding, it regulates the amount of light rays entering the eyeball.
Behind the iris is a lens that resembles a lens in shape. Behind the lens is the vitreous body, which fills most of the cavity of the eyeball.
Light rays passing through the transparent media of the eye are refracted and fall on the retina, where they project the inverse reduced image of the object visible to the eye. Due to the fact that the lens can change its shape (become more convex or flatten), our eye can clearly see both at close and far distances.
Fig. 13. The eye. Front view:
1 - eyebrow; 2 - the upper eyelid; 3 - the outer corner of the eye; 4, 8 - protein coat; 5 - lower eyelid; 6 - a pupil; 7, 11 - eyelashes; 9 - the inner corner of the eye; 10 - the lacrimal meat; 12 - iris
In the orbit there is fatty tissue, which is important for the depth of the eyeball. It is known that with severe weight loss, the retraction of the eyeball increases.
The eyelids have a skeleton in the form of cartilage of the upper and lower eyelids. Between the skin and the cartilage is located the aforementioned secular part of the circular muscle of the eye. The upper eyelid is more prominent than the lower. Passing over the cornea, the upper eyelid rises, following the movement of the eyeball.
The inner corner of the eye is rounded, and the outer is sharp. From the side of the inner corner there is an extension - the “lacrimal lake”, in the area of \u200b\u200bwhich there is a small elevation of red color - the “lacrimal meat”. From the outside corner, the lower eyelid is tucked under the upper.
The position of the gap of the eyelids varies for different people. There are deviations from its usual horizontal direction, consisting in the fact that the inner corner of the eye is below the outside (slanting eyes) or, conversely, above the outside (Fig. 14).
Between the middle fragment of the eyebrow and the upper eyelid there is a slightly “covering crease” hanging slightly above it.
The front view of the eye can be entered into the shape of a horizontally elongated rectangle, and with a profile - the eye fits into a triangular shape. When planning an eye, you need to carefully analyze its general shape and the movement of the eyeball, drawing the axis of the section and the transverse line of the shape of the eye in the figure (Fig. 15).
Drawing a plaster cast of the eye is carried out in the same sequence as the drawing of any object: from general to particular and vice versa. An example of a sequence of drawing a plaster cast of the eye is given in Fig. 16.
Getting to the drawing of the eye, it is necessary to outline the orbital cavity, clarify the size of the hemisphere of the eyeball, draw the axis of the eye incision (Fig. 16, a). The transverse line to the axis of the incision should indicate the position of the pupil, then outline the position of the upper and lower eyelids (Fig. 16, b). When drawing the eyelids, it must be borne in mind that they have a thickness, and always the lower eyelid is illuminated throughout the entire thickness, and the upper one is darkened (Fig. 16, c, d).
It is desirable to make an eye drawing in three positions: straight, three-quarter and profile. In this case, it is necessary to carefully trace the forms
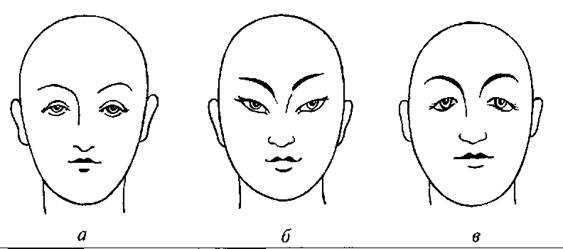
Fig. 14. Types of location of the gap of the eyelids
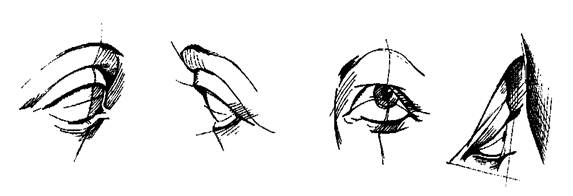
Fig. 15. The position of the axial lines of the eye in its various turns
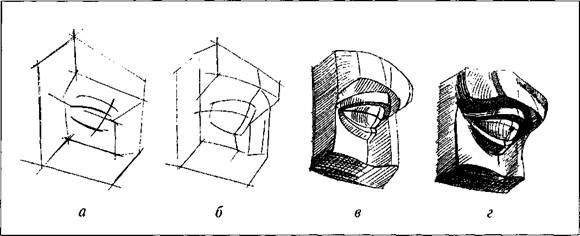
Fig. 16. The sequence of drawing a plaster cast of the eye of the eyelids and eyeball, as well as its landing.
Nose. The nose has a skeleton made up of bones and cartilage. The rigid base of the nose at the top are the nasal bones and the edge of the pear-shaped opening. The nose consists of elastic cartilage (Fig. 17), which are supporting formations of its moving part. The epiglottis is formed by a trapezoid, with a wide upper base, a frontal bone area lying between the superciliary arches at an angle to the frontal surface of the forehead.
The shapes of the noses are extremely diverse. When viewed from the front, three main forms can be distinguished: wide, medium, narrow (or thin). When viewed from the side, a straight nose is distinguished, with a hump, with a hollow (snub-nosed), uneven, etc. (Fig. 18). However, despite all the variety of forms, the construction of the nose in the figure is based on a prism consisting of four surfaces: the front (the back of the nose) lying between the nose and the tip of the nose, two lateral and lower, on which the nasal openings (nostrils) are located. The lower surface has the shape of a trapezoid (Fig. 19).
At the initial marking of the nose, you need to remember that the middle facial

Fig. 17. Nasal cartilage:
/ - nasal bone; 2 - lateral cartilage of the nose; 3 - cartilage of the septum of the nose; 4 - small cartilage of the wing of the nose; 5 - large cartilage of the wing of the nose
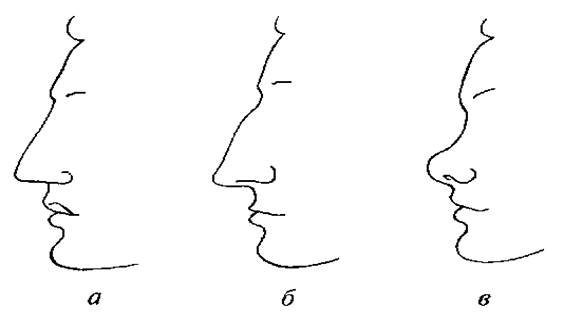
Fig. 18. Different forms noses
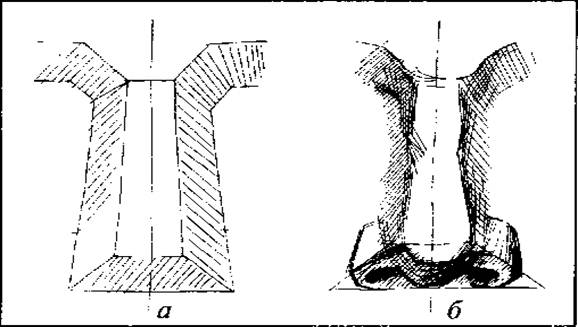
Fig. 19. Constructive nose drawing:
a - planes forming the shape of the nose; b - specification of the shape of the nose
the line runs through the middle of the nose and the middle of the base of the nose. You can not draw this line through the tip of the nose, since it significantly recedes from the base. This is especially important to consider when building the nose in a three-quarter turn. The stronger the head is turned to the profile position, the further the tip of the nose comes forward.
The correct position of the teardrops (inner corner of the eye) and nostrils is also of great importance in the construction of the nose, since the accuracy of the proportions of the nose largely depends on this.
The sequence of drawing a plaster cast of the nose is shown in Fig. 20.
Lips. The lips are very mobile. Like the eyes, they take an active part in facial expressions. The complex plastic shape of the lips is determined by the circular muscles of the mouth, the configuration of the red border lying on the arches formed by the arched shape of the jaws and teeth (Fig. 21).
The upper and lower lip, converging, form a wavy line of the mouth. The upper lip has a thickening in the middle - the tubercle of the upper lip, towards which from the base of the nose there is a deepened groove, called a filter.
The lower lip is divided into two symmetrical parts. Under the lower lip there is a groove separating it from the chin.
The brightness of the lips is due to a rush of blood to them. The lips are red, pink and pale. The mouth size of different people varies: large, medium and small. Lips of medium fullness, thick and thin, are distinguished (Fig. 22). With age, the fullness of the lips usually decreases slightly.
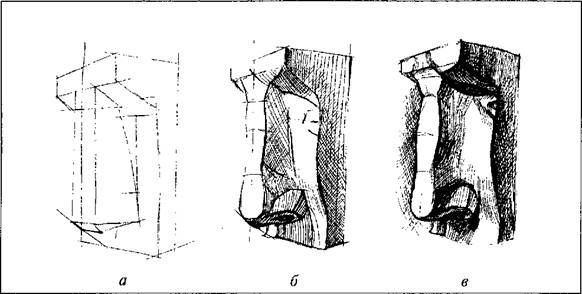
Fig. 20. The sequence of drawing a plaster cast of the nose
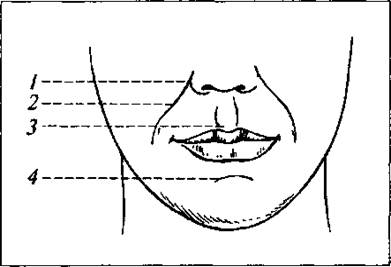
Fig. 21. Furrows in the nose, mouth and chin:
/ - nasal; 2 - nasolabial; 3 - “filter”; 4 - chin labial
When constructing the lips, we note that the oral gap passes through the upper third of the distance from the base of the nose to the end of the chin. In a straight position in the figure, we postpone the width of the mouth symmetrically on both sides of the midline. With a three-quarter turn, part of the lips visually decreases.
Outlining the proportions of the lips, you should pay attention to the nature of the line of the mouth. You should not immediately outline the contour of the lips. First of all, it is necessary to consider their shape well and transfer it in the figure with division into a number of planes.
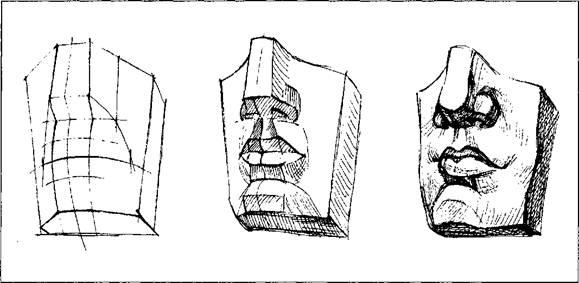
Fig. 23. Stages of drawing a plaster cast of lips and nose
When drawing lips in profile, you need to outline the size of the mouth cut, its slope, as well as the degree of extension of one of the lips. After these constructions, you can sculpt the shape of the lips. In fig. 3.23 depicts the steps of constructing a picture of a plaster cast of the lips and part of the nose in a three-quarter turn.
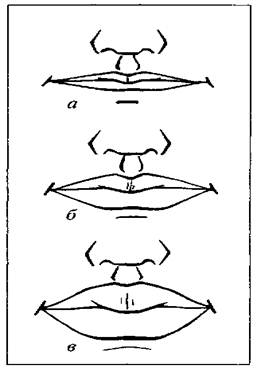
Fig. 22. Lips: a - thin; b - medium completeness; in - full
An ear. The ear not only perceives sound irritations, but it is also a sensory organ perceiving irritations associated with the movement of the body (especially the head) in space.
The ear is divided into external, middle and internal. In plastic anatomy, the outer ear is important, which includes the auricle and the external auditory meatus (Fig. 24).
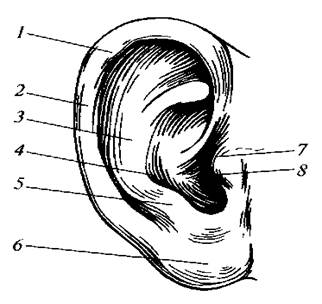
Fig. 24. Auricle:
I - tubercle; 2 - curl; 3 - antihelix; 4 - the cavity of the auricle; 5 - counter-green; 6 - lobule of earlobe; 7 - external auditory meatus; 8 - tragus
The auricle has a cartilaginous skeleton, which is absent only in the lower part of the auricle, called the earlobe. The auricle has a thickening along its edge - a curl. To the center of the curl is approximately parallel to the roller - anti-curl. In front of the auditory opening are protrusions - a tragus and an antitrack lying behind the auditory opening. In the middle of the auricle is a recess - its cavity.
The shape of the auricle is different for different people. Ears of large, medium and small sizes are found. The degree of separation of the auricle from the skull also varies. Great individual features lobes of the auricle. Sometimes it is well expressed, and sometimes it can be completely absent.
The oval of the auricle has a conditional axis that is parallel to the axis of the nose or branches of the mandibular bone. In drawing the ear, you need to correctly outline the axis of its oval. Next, establish the proportions of the oval of the auricle, the general shape of the ear and draw the details, measuring and comparing them with the general shape.
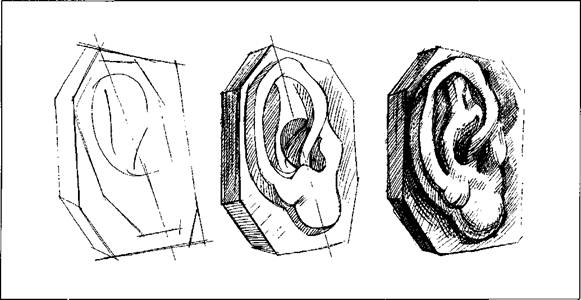
Fig. 25. Stages of drawing an ear with a plaster cast
After the completion of the linear constructive construction, it is necessary to lay chiaroscuro, molding the shape of the ear in tone and stroke. The stages of work on the pattern of a plaster cast of the ear are shown in Fig. 3.25. It should be noted that the details of the face depict a linear constructive pattern with easy laying of chiaroscuro.
The next task in the course on drawing the human head will be the study of individual fragments on the example of plaster casts of the nose, eye, ear and lips. Gypsum Eye Drawing Is the first exercise in this series.
As in other assignments on the topic of drawing fragments human body the model will serve as a permanent example of classical proportions - a sculpture of David by Michelangelo.
The study of the anatomical structure of the eye and its visual image will be a very important stage. By this time, having gone through a series of tasks on the general structure of the head, chopping, we proceed to the study of individual fragments.
This sequence of exercises has been used in academic education for many centuries and contributes to a good level of drawing of the human figure. When you know the general design and structure of the whole, in this context - the head, you can accurately establish the location and correctly depict a small detail in a large composition.
The model of the eye, nose or ear looks like a separate existing cast, isolated from the general sculpture in the form of a rectangular segment. Representing a gypsum eye, one should represent its position not only as a separate sculpture in space, but also in the structure of the general shape of the head, its position relative to the nose, forehead, temple, which will allow you to correctly navigate in the scale and direction of the main parts of the eye.
In our practice, we are faced with the fact that students depict non-existent lines in the models of the eyes, lips, nose, as if outlining the contours of the common idea of \u200b\u200bthe pattern of lips and eyes. Plaster models provide an excellent opportunity to get away from this stereotype.
- First, gypsum white colorthat is not distracting due to the difference in color and tone.
- Secondly, the analysis of the model is based on chiaroscuro, which clearly shows the structure and shape of each part.
- Thirdly, the drawing of classical patterns forms the correct idea of \u200b\u200bthe shape of the object and develops an artistic taste.
The primacy of contour over form or form over contour is still an unresolved issue in the theory of academic drawing. For clarity, we want to give an interesting quote from the famous Soviet teacher and author study guides according to the drawing by A. M. Soloviev:
“When starting to build the volume, it is necessary first of all to explain to the students what the contour line is, which usually attracts the attention of inexperienced draftsmen. It is necessary to bring to their consciousness that it belongs to the volume and how part of the volume depends on the whole.
What is called a contour, or rather, should be considered the edge of the form, is a variable and unstable phenomenon. With this or that rotation, any surface that forms the volume of the human body or other object can turn out to be a contour. ....... Thus, the contour is nothing more than the sum of surfaces that have been reduced to lines, and therefore, when constructing a volume in a drawing, it is impossible to focus on it from the very beginning ”
Head chopping pattern
Grisaille painting
Skull drawing
Decorative still life
Drawing nose, ear, lips
Drawing capitals
Adult Painting Lessons
Construction of the ornament
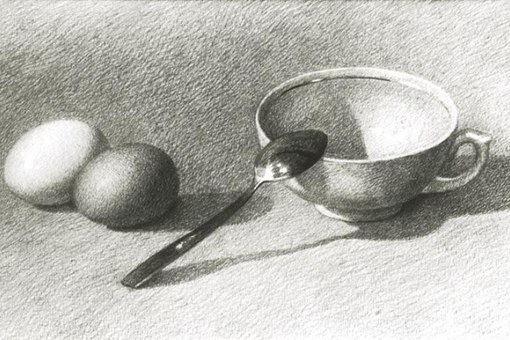
 Academic drawing - This is an image of various objects, this is the basis of fine art, this is a systematic knowledge of physics, geometry, this is life that has frozen on paper. Not in vain in Art institutes on academic drawing training years go by. Fortunately, today art studios and art schools offer to get professional knowledge as soon as possible. Academic drawing courses are designed for connoisseurs of art of different ages, and most importantly, it is not necessary to have artistic talent or drawing skills: most students begin their journey through the path of creativity without any idea of \u200b\u200bdrawing, but wanting to learn this art. In other words, graphic and academic drawing courses are great for beginners.
What are the lessons of academic drawing for and what do they give
The course of academic drawing for beginners is designed for intensive study of the basics of literacy. Many can draw, and professionally depict objects and plots of varying complexity - units. For this reason, the teachers of our studio are ready to offer a helping hand in the development of technically complex science. At the end of the courses you will be more confident in your artistic abilities, learn how to freely navigate in matters of graphics and drawing techniques, guaranteed to become more competent in the rules of fine art.What is taught in the lessons of academic drawing
 Laws of perspective; Ability to compose objects on a piece of paper; Ability to convey constructive and proportional construction; Correctly arrange chiaroscuro and transfer paper to the texture of objects.
 Materials for work:
- A simple pencil HB, 2V, 4V;
- Soft eraser and nag;
- Whatman A-2 format;
- Masking tape;
- Breadboard knife.
Basics of Academic Drawing
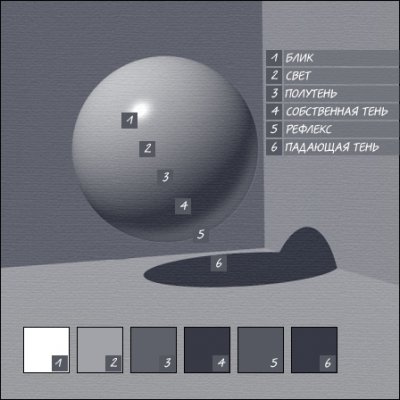
 1. Of particular importance is the constructiveness of the subject, at the same time, chiaroscuro should be clearly visible and harmoniously distributed in the composition. 2. Each detail of the depicted object is divided into different geometric shapes, gradually drawing and giving a recognizable look to each shape. 3. Based on the construction of objects, the student must find the boundaries of the midtones, each of which occupies its own section of the plane. 4. Shadows and design of objects are drawn at the same time, so the picture at any stage of development should look like a completed work. 5. From great to small. Initially, a sketch and drawing of large objects is done, smoothly moving on to the details. Academic Pencil Drawing This technique involves the use of pencils of various softness and hardness. Depending on the stage of completeness of the drawing, pencils are used: T, TM, M, 2M. Soft leads are recommended for sketching images, as well as for black-and-white drawing of volumes of an object and filling the background. In the work on complex projects, it is recommended at first to use solid leads, which are also used for the final modeling of the drawing. Academic drawing still life The academic drawing of a still life with a pencil begins by placing the composition on a piece of paper. First of all, the student must find the most advantageous angle, determine the volume and proportions, and only after that proceed with the easy drawing of sketches. Academic drawing of a human figure The first step towards a professional image on paper of a human figure is an academic drawing of a plaster head or a skull an academic drawing. First of all, it is necessary to visually note the proportions and characteristic features of the three-dimensional figure and find the best angle. The next step is the uniform layout of the drawing relative to the sheet of paper and easy sketching of the sketch, a method called cutting the head academic drawing and is a construction of the head with generalized forms. All proportions must be measured and strictly observed. To begin drawing the elements that are closer to us, to perform, an academic drawing of the nose, an academic drawing of the eyes, an academic drawing of the lip, without delving into smaller details. Drawing small details and setting chiaroscuros is the final stage in the drawing of a plaster head.
 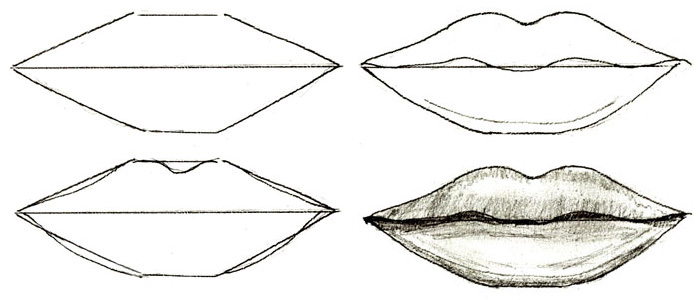 The academic drawing of the legs, arms, torso of a person is also an important component of the entire image and requires a competent approach. The course “Academic drawing and painting” will bring bright colors to your gray everyday life, change a boring life for the better and open up many new talents. Sign up for the course "