Japanese comics (manga) and cartoons (anime) are a huge layer of culture with its own traditions and rules. Anime characters are easily recognizable, and millions of fans of this art movement are scattered around the world.
We will tell you how to draw manga and anime correctly and beautifully in a series of our lessons. In the first lesson, we will start with the basics of drawing.
Movement is life
Anime and manga are impossible without dynamics. Each episode is characterized by a specific event and a specific movement. If you are going to draw your anime character, first of all think about what position he should take in the picture. Do not try to draw "from memory" or as you "deems necessary." Manga is not only (and by no means always) big eyes, it is, first of all, a clear correspondence to the “real world”. You will definitely need examples. Take similar images from other works or use a large mirror in which you pose for yourself. Try different angles before proceeding with the final sketch.
The basics of drawing. Create a hero figure
As you may know from lesson "", a person grows on average seven and a half of his "goals". Because anime heroes are still any heroes, their growth, as a rule, is 8 or more “goals”. Thus, our heroes are more expressive. The remaining proportions of the body are identical to the proportions of man.
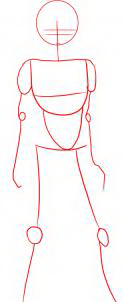
At the first stage of drawing, we create only the mannequin of our future character, which is more like a hinged doll than the next master of the elements.
From framework to overall structure
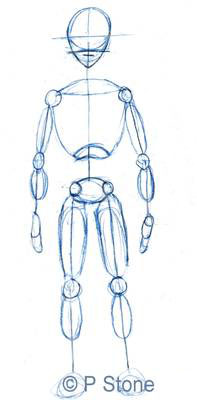
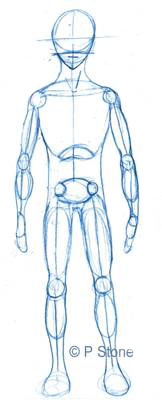
So, let's try to give more specific features to our character. For convenience, take the simplest pose. Mark the muscles, put small ovals in the joints. Note that the wrists and the very bottom of the legs remained sticks. The torso is also not bonded to the legs.
End the contours
Now, finally, we will form the contours of the body. Carefully draw slightly curved lines that completely form the image of our hero. The smoothness of the lines is extremely important. Any angles will create the effect of mechanicality and naturalness.
Gum is our everything
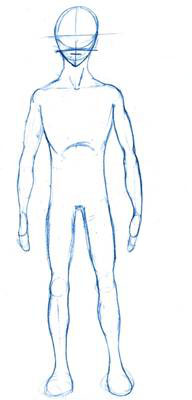
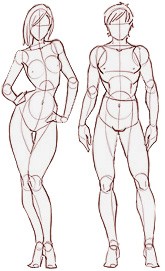
Gently wipe all auxiliary lines. As you can see, we have a man. If you want to portray a woman, then in addition to a pronounced chest, you should also make her wider hips and a thinner waist, giving the shape of an “hourglass”. According to the canons of manga, women have narrower shoulders and a slimmer neck. Often, a woman’s legs are drawn in such a way as to further emphasize the shape of the hourglass.
So wipe off any excess parts. Feel free to clean up the bumps. Our body is ready for detail.
Posing
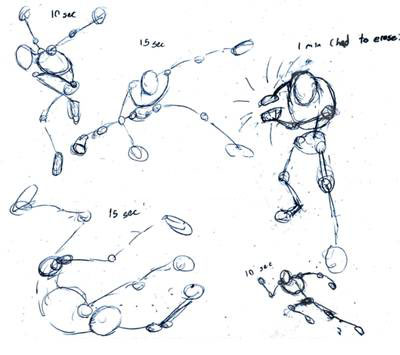
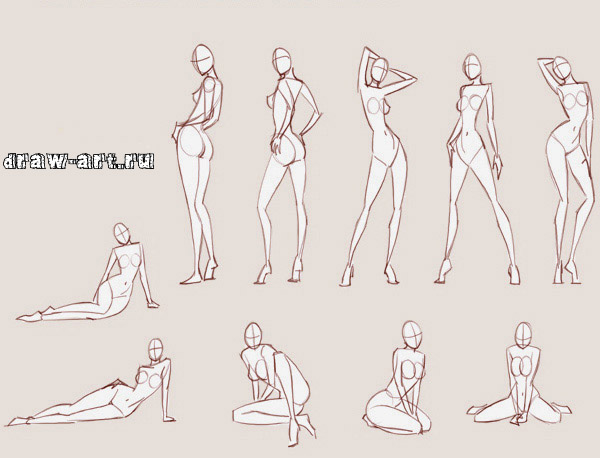
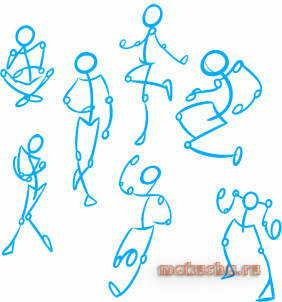
The stick-stick-cucumber approach, which we used in general and in this lesson in particular, is a very convenient way for beginners to learn various poses and correctly draw their characters in the required position. Having mastered with a similar articulated method, later you can draw characters by skipping this step. Practice drawing different positions of the characters by drawing, for example, shapes as in the picture above.
In the next lesson, we will continue to walk you through the basics of drawing anime and manga.
In fact, this wonderful lesson should be called "14 laws of female sexuality" or "How to get into the top ten pose!" because the conversation will be about that.
The success of the whole picture as a whole often depends on the choice of the main character’s pose. Every self-respecting artist must possess the ability to correctly position a character.
ANDso .. Here are the key foundations - the foundation of your characters!
If you misunderstand it, then do not expect much “better” much.
Building greatly expands the personality that you want to fill your character with, giving you the power to deepen the character’s relationship with the viewer. This is where you give life to your character. This is where it all starts.
Tip 1: GOAL
Now, before you take the pencil, the most important part is the design! A clear idea and knowledge of what you want to achieve. You must be very sure of what you are moving towards and believe that you can do it, that everything will work out. AIM ON THE TOP OF WHAT YOU CAN. ABOVE THAN SOMETHING ANYTHING ACHIEVED IN THE HISTORY OF HUMANITY ON THE EARTH. From here you fill the process with positive and make sure that you have the ability to have a great start.
Tip 2: MEN vs. WOMEN
If you can cope with the female structure, then with the male you will not have any difficulties.
Both man and woman are divided into many of the same basic components. If you deal only with a man, then this is only a matter of assembling several parts here and there, scaling and clarifying some areas. Honestly, I draw very few men, but when necessary, I can draw them effectively because I work with a female figure. Those who focus primarily on male anatomy in the future will encounter the difficulty of conveying female beauty and sexuality. It is for this reason that this lesson will focus on magnificent female forms.
Tip 3: UNDERSTANDING WHAT YOU DO
First of all, you need to get acquainted with the outlines and forms with which you will work. You must pay attention to all the curves, joints and components in order to understand where they should be located relative to each other. Finding hidden lines and the principle of where certain parts touch and connect with each other will be your guide to the work. Just remember EVERY TINY LINE DRAWED BY YOU - IS PURPOSE AND DESIGNED TO WORK WITH OTHERS IN TOGETHER. You will notice that if one thing disappears, the other will follow.

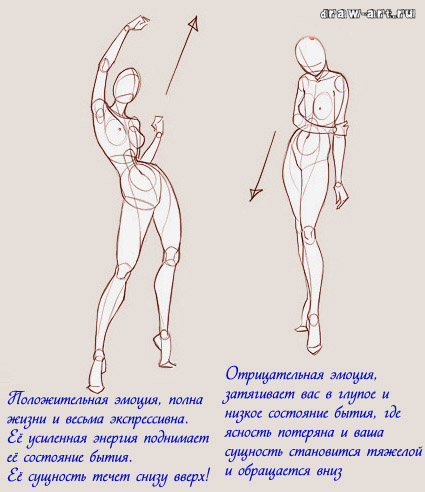
Tip 4: MOVING
Everything is moving! Even if something does not move, in reality there is movement, with only a slight emphasis on anatomy and rhythm.
TIP: FOR YOUR POSITION TO BE MOVED, THINK ABOUT IT AS ABOUT THE LETTER "S". THIS WILL BE A FLOATING LINE LEADING YOUR EYE IN THE FIGURE, WHICH EVEN CAN HELP YOU WITH THE COMPOSITION IN GENERAL.
Make sure that the visible plastic in the figure does not make it (the figure) straight, rigid and awkward.

Tip 5: ANGULAR EFFECT
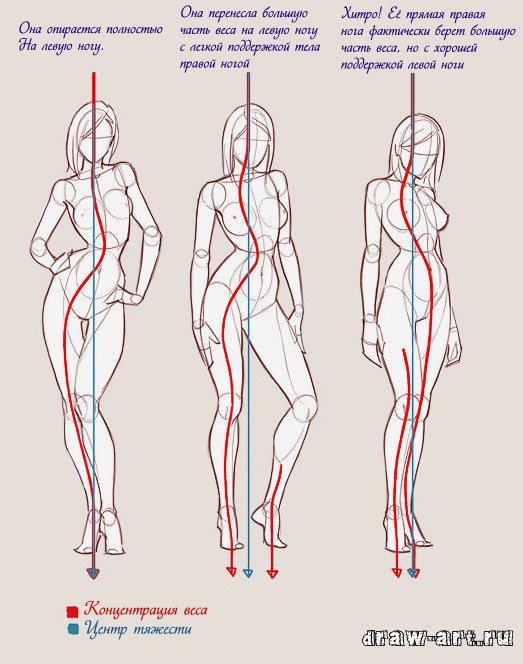
When building a figure in an attractive, confident and sexy pose, you must adjust the angles in the head, trunk, hips and legs. To draw correctly, you need to understand this. The pose at the bottom is reached by the legs, which have moved and shifted the body weight to the right side. Now the right thigh confidently sticks out, legs are widely spaced and they occupy a significant part of the weight.
ONE OF THE REASONS FOR LOCATION OF THE TORSO IN AN OPPOSITE CORNER WITH RESPECT TO THE HIPS IS COMPENSATION OF THE OFFSET OF THE CENTER OF GRAVITY AND ITS WEIGHT FOR MAINTENANCE OF BALANCE AND STORAGE OF THE BODY IN VERTICAL POSITION.
The head bends anywhere, depending on which direction you choose.

Tip 6: WEIGHT BALANCING
I am sure that many of you were upset after trying to build a “simple” pose correctly. For some reason you simply could not do this, it seems that the posture had only one desire to "annoy you endlessly." Usually this is the result of people forgetting about the physics of balancing or about the center of gravity when working with all angles in a pose.
REALLY THE SOLUTION IS ACTUALLY BASIC. SO SIMPLE WHICH USES FROM SOME OF US.
The leg, which is the most direct and shortest, takes on most of the weight. So keep your support balanced against the character’s center of gravity, not forgetting where the weight concentration is.
Hint 7: NOW RECTANGULAR!
The perspective and perspective can very depress all of us artists, so don’t think about this difficulty well? This will be a great starting point. If you know how to enter a box or just a rectangle into perspective, this same knowledge will help you fit your figures into perspective from both fronts: front and back.
YES, HUMAN AS A FORM MUCH MUCH MORE DIFFICULT FOR WORK THAN MUCH OTHER THINGS, BUT IF YOU CAN KEEP PROPORTIONS WITHIN THE RIGHT PRINCIPLES OF THE RECTANGULAR, IT WILL BE POSSIBLE.
Pay attention to the stability of the central points in both fields.
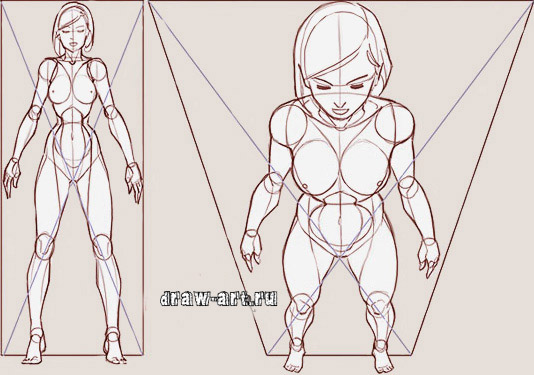
Tip 8: USING DESTINATION POINTS
Ok, this looks like a rectangle / box, but I find this approach more accurate for the job. This is by far my preferred method, although it did give me a bit of trouble. First you must determine the level of the eyes so that you look up at what is higher and look down at what will be lower.
ATTEMPT TO KEEP THE BODY SYMMETRY BASED ON THE LINE.
It would be safer to turn more often to the idea of \u200b\u200bthe figure to see which areas and parts are parallel to each other.
Yes...! Poses that are far from symmetrical will require much more attention.
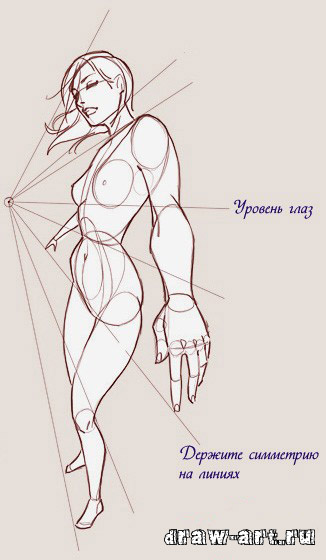
Tip 9: EYE LEVEL
Eye level is really important when creating a dynamic pose. Using a low eye level can make your character dominant, heroic, or simply huge. The point at which you look plays an important role in creating the pose, because in essence, this is how you, the artist, want the world to look at your character.
CHOOSING AN AMAZING POSE, DECIDE WHERE YOU WANT TO PLACE AN EYE LEVEL, BECAUSE IT CAN EVEN A SIMPLE POSE TO MAKE A VERY Dramatic.

Tip 10: THE CENTER YOU NEED
Dividing the workspace into a simpler scale will give you focus, which will help you focus on the main thing, without any confusing or uninteresting details. Loosen your technique and just smoothly go with the flow. When you think too much, you acknowledge that you still don’t know everything. In fact, you know more than you think, so do not let thoughts interfere with you!
DO NOT THINK IF YOU CAN KNOW THIS. YOU LIMIT ONLY THAT YOU DETERMINE YOURSELF FOR YOURSELF;)
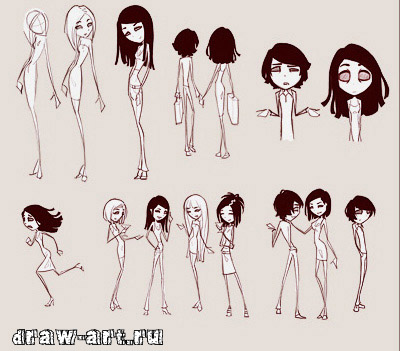
Tip 11: EXPERIMENT WITH DIFFERENT STYLES!
Yes yes exactly! You really can learn a lot using a different style. Your work with the approach to things from different angles will give you a fresh point of view.
ONLY YOUR UNDERSTANDING OF THE CONSTRUCTION OF ANATOMY AS A WHOLE WILL BE EXPOSED.
I notice that my skills are self-upgrading after I work with various alternative styles. So it is highly recommended for everyone!
Tip 12: EMOTIONALITY
Emotion and mood are a vital element in creating an illustration. Here you have the opportunity to further influence the audience by fine-tuning this area. The pose itself can convey a lot of emotions without using, for example, facial expressions.
REAL EMOTION IN FACIAL EXPRESSION IS ALSO EXPRESSED IN THE OTHER PART OF YOUR BODY.
There are no exceptions! So you just need to know the body language that you set for your characters.
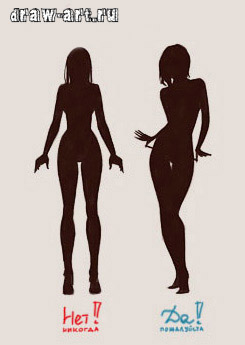
Tip 13: SILHOUETTE
A great way to check if your pose is eye-catching or dynamic is to fill it with black or dark.
SILHOUETT LETS YOU SEE IF YOU TRANSFER WHAT YOU ORIGINALLY ASSUMED.
Your eyes will focus on the essentials without distracting the details, which in turn can help with composition and scaling. Looking at the external shape of the figure, you can choose which side it will be - front or back! Front and back - identical silhouette.
You can also make sure that the shapes are not too flat or too straight (symmetrical), because this can give the figure a stiff or rigid shape. For women, even a simple tilt of the hips can solve a huge bunch of problems.
Tip 14: IMPORTANT TIP
Use all of the above and Result GUARANTEED! I still do this, and I would not be at this level of skill if I did not use these techniques.
USE THESE Tricks AS MUCH AS YOU NEED AND EVERY TIME WHEN YOU NEED.
Once you begin to acquire these skills, you will have confidence that you can create without using references and achieve amazing results. You realize that you are able to draw things that you have never painted before and that will very accurately display their real copies. You will be surprised when you begin to discover what has been hiding from you all this time.
A FEW TIPS IN CONCLUSION
WELL DETERMINE WHAT YOU WANT AND WHAT YOU LIKE. Try to study and understand this, do your part, reconnect with it ...
Nothing is accidental. Everything has a purpose. Practice more, copy what you can (just do not pass off as your original work - these techniques are only for practice).
BE MODERN. Arrogance will only hinder you. It gives rise to complacency, which prevents progress, to a higher level.
TAG HIGH, TOGETHER FOR THE BORDERS OF WHAT ALREADY HAS BEEN ACHIEVED IN ART. LEARN FROM YOUR ARTISTS. ART IS SELF-EXPRESSION AND ACHIEVEMENT OF NEW, BEFORE OPEN TOPS DIRECTLY IN YOURSELF. Art - DOESN'T MEAN to be better than someone. FIND YOUR OWN STYLE.
We are all unique incarnations of endless possibilities. Cross out the word “attempt” from use. Trying, you actually do not do what you intended, putting it off for later. Instead, just do what you’ve planned from start to finish. Feel the love and enjoyment of the experience that art brings to your life and you will move on.
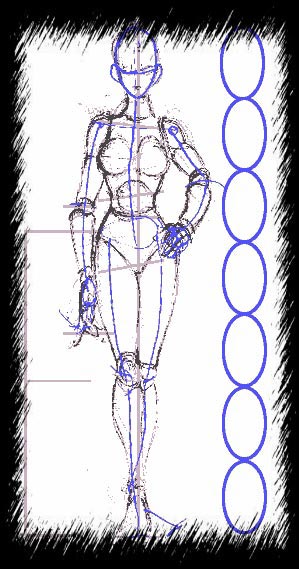
No fancy, just a quick sketch of the shape of the needles, which will serve as the basis of the picture. Notice that the height of the figure is equal to the height of 7 goals. The shoulders are from the top of the figure at a height of 1.5 heads. Shoulders and hips are equal in width to 2 heads. Hips are from the top of the figure at a height of 3 goals. Knees - at a height of 5 goals. Be free at this point, but be careful about the proportions of your figure.

Note that you can draw a straight line from the top of the head to the very bottom of the feet. Body mass is distributed equally on both sides of this axis for balance. The navel is located from the top of the figure at a height of 2.5 goals. Elbows are also located at this distance if the arm is in a natural position. The hand comes out of the shoulder reaches the hand at a distance from the middle of the thigh. In the anime, the legs are slightly longer than the upper half of the body. The knees are in the middle between the top of the hips and the bottom of the foot. Female torso is determined randomly, sensual position is determined by tilting the shoulder and hips in different directions.
Now we will give her flesh. You must be able to draw cylinders and ovals well in order to correctly do this. Examine muscle groups to understand the structure of your shoulders, arms, and legs. Breasts are located in the middle of the upper torso. Try using only curved lines. Nothing is perfectly even on the human body, for women this condition is fulfilled in two grooves stronger. Twist, twist! A good model is the soldier M-66 ( 1 , 2 ) from Black Magic, drawn by Masamune Shirow. It has a structure female body, broken down into main figures, and also greatly influenced me in creating a sketch at this stage. Now let's move on to where we will begin to refine your drawing. Take a soft eraser and erase all the sketch lines, leave only those that you think will be needed for the final drawing. The cleaner your drawing at the end of this step, the easier it will be for you in the next step.
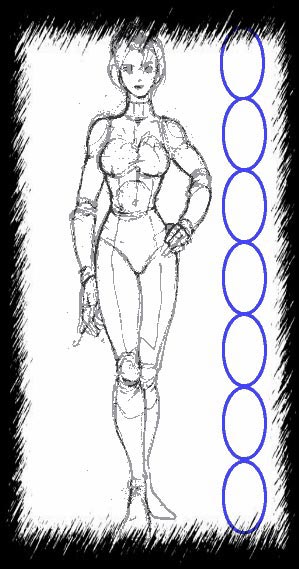
I gradually began to create it, outlining the flesh on a sketch and smoothing on it everything that I built from the ball and cone joints. A good eraser helps a lot at this stage, when we bring the sketch to a clearer and beautiful view, wiping the mistakes made in the process of drawing, so that you can go to the stage of ink tracing over the cleaned sketch. There is nothing worse than bad ink pens, so be careful not to get dirty !!!

And here she is. Not my best ink job, but we got what we wanted. All traces of the pencil have been erased at this stage, and I take an inked sketch on the scanner to decorate it. This lesson provides guidance for you on how to build a body. Try using the rules to create other characters in different positions. Hope this helps. As usual: let me know if you want to see detailed description any lesson and I will try to help
06.11.2006
I like anime and therefore often draw in my spare time various characters, animals and Pokémon in anime style. Today I’ll try to tell you how to draw exactly male body in that style. In addition to the main facial features of anime characters, their figures and poses have characteristic features. After going through our lesson, you should get an idea of \u200b\u200bthe main points of drawing male human body and anime and manga style. All three drawings that we can get can be considered below. All in order, do not rush or be upset if you have to start from the beginning. Although I am sure you will succeed easily the first time.
Step 1.
Okay, this step will be the first of the three parts of the lesson on drawing the male body and anime poses that are drawn for all anime lovers. After passing this lesson, you can draw anime from any male character in clothes and without, be this hero from anime / manga or from your own imagination. Have a good drawing and most importantly - take your time.
Step 2
Well let's get started, draw a line that looks like a structure dummy. Let's start with a circle for the head, add the lines of the arms, neck and chest frame in the form of a shield. Add auxiliary lines on the face. Draw the lower limbs and connect them to the torso.
Step 3
Now that you can see that you have drawn the main lines in help and for proportions, we begin work on the real contours of the figures of our anime hero. Draw the head with a thin line, add the torso and leg lines, draw the arms. Then, let's draw. First, draw the character’s hair in the style of long spikes. As soon as it turns out in the figure, finish the neck line, and then draw the lowered hand with the fingers and the line of the chest and collarbone. Draw the correct shape of the legs. Then proceed to the next step.
Step 4
Well, you did it and now the fourth stage of the guide. Draw the hairstyle to our character on the right and add details on top in the form of hair lines. Draw large eyes, as well as the mouth and nose as shown. We will not delve into the subtleties of drawing the eyes of anime heroes in this lesson. I will devote more time to this in the following. Let's add some human body features to the hero - draw ribs and abdominal muscles. Add the clavicle line. All that remains is to remove the unnecessary auxiliary lines and go to the next step.
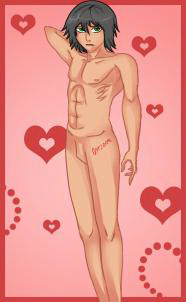
Step 5
This is roughly what you should get after you go through all the steps in the drawing. You can colorize or add clothes, but we will move on to another position to see the proportions and lines of the figures of men in the anime.
Step 6
Now that you have completed the first lesson on drawing a male body, we will draw the body in front. As you can see, our model is very beautiful, and in perfect shape.

Step 7
As always, we start with the auxiliary lines of a figure similar to a mannequin. start with a circle for the head with auxiliary lines of the face, add a neck. We draw the torso according to the shapes, as in the figure, observing the proportions and distances. Add the lines and joints of the upper and lower extremities.
Step 8
Now that the figure is packed, draw some more lines for the arms and legs. if you repeated all the lines of the previous step, then you will not have the slightest difficulty. Draw the bottom of the head.
I thought, and they insistently prompted me (Maxim Fischenko) that it was time to prepare a lesson on how to draw anime characters step by step. The last time we drew an angel girl and, perhaps, a lot of time has passed since then. I was practically sweating, preparing this lesson. Although whom I am deceiving. Drawing from the author took much more strength and energy. The end result of both of us will have to help those of you who have struggled with anime drawings and anime characters for even a very long time. This tutorial contains some very useful steps and tips that will guide you in the right direction in drawing anime. I confessed to my friend that this lesson is probably the biggest anime lesson I've ever prepared for the site, so I hope you find it useful and you don’t stop loving anime.
We really haven’t painted in anime style for a very long time, but I plan to prepare a number of lessons and to reveal a little this topic for drawing.
Step 1.
Have you ever just sat at a table and suddenly you have an unusual picture in your head, so you immediately wanted to transfer it to a piece of paper? As soon as you start drawing, you already understand that your hand is not so capable of repeating the picture in your head and the drawing is not as good as we would like. You accelerate and sweat, draw scribbles and erase mistakes again and again. In the end, you get something completely different from your original vision of the picture. This is because unskilled and novice artists see things differently than an experienced artist. An experienced artist knows his limits through constant “training” and experimentation, and above all, practice. While you learn to draw, your passion subsides, and rolls up a feeling of defeat. This lesson is simple and will cover the base for drawing with the basic principles of body structure of anime characters. So you yourself understand how useful it will be.

Step 2
Before rushing into drawing bodies and shapes, you should always plan your shape in a rough concept. Never draw something at once and do not begin to work out the final drawing without seeing it as a whole in a rough form. I would advise you to plan your pose in skeletal lines or guides before you finish with the functional parts of the body. If you have a weak foundation, you will get a weak result. Accustom yourself to sketch quickly, this is called “sketch”, as soon as you get a “vision” of the drawing, you can move on. It really helps!
Step 3
As I said in the previous step, it is very important that you outline the “skeletal lines" of the figure before drawing the exact limbs and body structures. If you do not have a strong and accurate guide on how to build forms, then you will get complete seams and quality garbage in the end. This actually simplifies the whole job, because it gives you the edge to paint accurately. Spend 30 minutes and roughly sketch out a variety of poses. The more practice you have in drawing general poses, the higher your chances of creating dynamic drawings.

Step 4
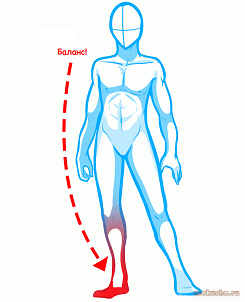
The main drawback of novice artists (do not worry, I include everyone except Leonardo da Vinci and maybe a couple of masters) is that they do not understand the essence and concept of “balance”, which is very important when drawing plausibility of poses. The balance is basically at a level that holds the weight evenly so that we can stand without the hassle. When we change the balance (either climbing a sloping staircase or going down a mountain), it becomes unreliable and slightly unexpected. In this figure, the weight is balanced and falls on the left leg, leaving the right leg and other limbs free for any direction of movement.
Step 5
When drawing a male figure, keep in mind that they are less magnificent than the shape of the limbs and body in women. Their bodies are boxy and crisp. They have more muscle mass and less flexibility. Their shoulders are wider, giving the impression of strength and physique. From the side you can see that the body is completely straight, without visible curves like a woman's. The gray line shows the line of movement or “balance” of the figure.
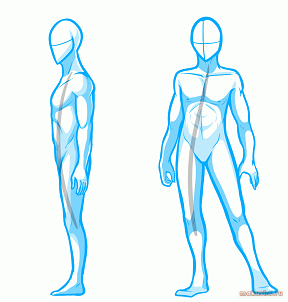
Step 6
This is just a brief overview of the three main body types for men. The first type, of course, is muscle giants and mesomorphs, male trucks, so to speak. The body has thin external lines that only indicate tone and clear muscle lines for the mass. As soon as we begin to scale to the usual physique, you will see that the details will become less intense. The pink arrows indicate the lines that give realism to the figure and its depth. If you are going to draw a muscular character, then I would like to recommend viewing photos of muscular guys.

Step 7
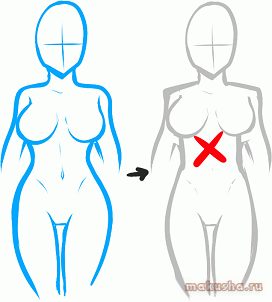
The basics of female anatomy in anime style. Difference between drawing female figures and masculine in that women are generally more “curvaceous." The hips and shoulders are almost perfectly aligned vertically relative to each other. It is best to look at links to examples of the female body in some movement, to get an idea of \u200b\u200bhow it looks in different formats, and try to note interesting points that you simply hadn’t noticed before when viewing them. Please note the typical height of a woman in proportions of 6-7 goals. This is such an interesting size when drawing.

Step 8
Note that the proportions of the body and hips are almost completely aligned at the shoulders. Please note that the female shoulders are NOT sharp at all and the waist is not straight, as in the figure on the right. Notice all the little things!
Step 9
Options for drawing anime. Now there are several examples of various sizes and proportions of the chest of female characters in the anime. Here we have a very small, medium, above average and large chest cups. Because gravity is constantly working, the chest will fall down with some protrusions at the ends in the form of nipples. NEVER draw breasts convex outward, as if there is a force pushing them outward or upward, as shown in gray figures. In addition, the lines of their volume should be noted along the patterned line to mark their middle. This determines how the superimposed objects will be transformed in the form of uniforms or clothes.

Step 10
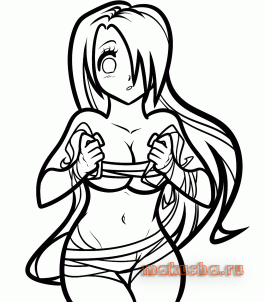
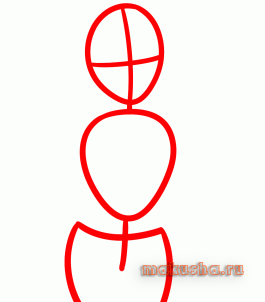
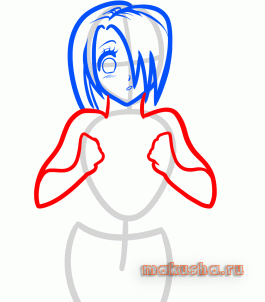
Let's draw one of the girls in anime style in simple steps. Start by drawing shapes and guidelines to form the base, as in our drawing.
Step 11
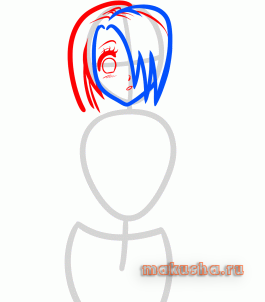
Extend the shape of the face and start drawing on the hair covering its entire right. We will draw bangs sharp and long.

Step 12
Here you draw the other side of her hairstyle so as to add detail at the base of her hair. Draw thin eyebrows, then add eyes. The eyes show surprise and in my opinion they are very beautiful. The line for the eyes in the form of an eyelid should be very thick and bold, if you want to repeat this look for your girl. Add nose and mouth and move on.
Step 13
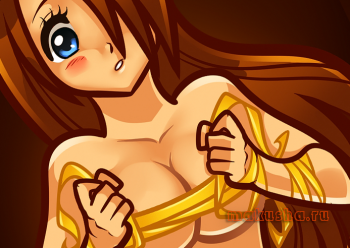
We start drawing the body. Add the neck, shoulders, then hands that are upturned. Fists are clenched because she will keep her clothes in our next stages.
Step 14
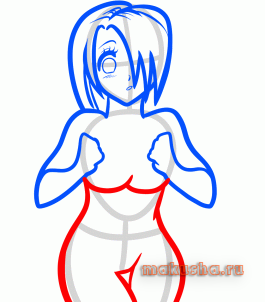
We draw the shape of her body, here we will have a trunk, waist and hips. Remember to draw a gap between the legs and the shape of the lower part of her chest.
Step 15
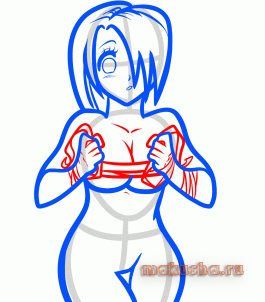
Add the lines of the clavicle and draw the bandages on her hands, the ends of which protrude from them. With this bandage, she hides from us her immodest parts of the body. On the hands should be noted lines for the fingers.
Step 16
Here you can outline the bandages on the hips and small areas on the body. If you want to draw your own details of clothing, then you can do it right now. Add details to her belly in the form of a navel and small lines and you are almost done.

Step 17
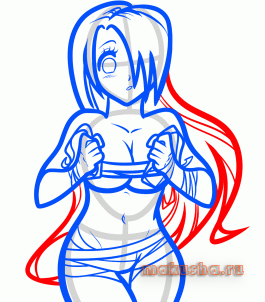
And finally, draw her long wavy hair. The length of the hair depends on your imagination, on them we only need to outline all the details and lines of fibers that add texture. Erase mistakes and begin to prepare for pleasure.
Step 18
So now that you have practiced this in only one position, you must go ahead and start practicing your own poses and ideas. From the initial step, a simple example using skeletal lines to the formation of limbs. I hope you guys enjoyed the lesson and that you spent a lot of time on our general practice. Let me know if all this was helpful to you. Thank you very much and see you at the lessons!