

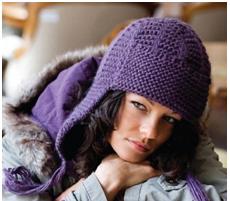
This model has been trending for more than one season and, I think, will delight its owners for a long time to come. Although why only the owners? A cap with earflaps with knitting needles is a truly universal version of the headgear, not only for women, but also for men. This is a warm and stylish little thing for a boy and a girl, youth. A variety of models allows you to knit such a hat different from others. It can be a cap with earflaps with or without a lapel. The ears on the cap can be made long, or you can limit yourself to short, purely symbolic ones. Ties, pompons, finishing with the most unimaginable jacquards or aranas - this all diversifies the model of earflaps. But first, learn the principle of knitting such a model, understand the essence of the construction and assembly of this universal and so beloved by many hats.
Video: Ear-cap with knitting needles
We knit a female model
Women's knitted hat with earflaps looks best from medium-thick yarn. In addition, we will need:
- a pair of ordinary straight knitting needles corresponding to the thickness of the yarn (for recommendations, see the packaging of the yarn);
- a set of stocking double-edged knitting needles (they will be needed later, when forming the bottom of the cap);
- thick needle for stitching knitwear;
- for measuring and calculating loops a centimeter tape.
Depending on the style and decor of the cap, you will have to stock up with additional knitting needles or pins (when making braids), a ready-made pompom, as well as a variety of beads, buttons, etc.
Any master class in knitting hats with knitting needles of this model is built on the basis of the following steps:
- Knitting a sample - knit a sample with the desired pattern, calculate the number of loops, measure the head circumference.
- The calculation of the size of parts - regardless of whether it is a female hat, male or children's, the eye is calculated based on the fact that its width should correspond to a fifth of the total circumference of the head. The width of the lapel should correspond to about a quarter of this volume.
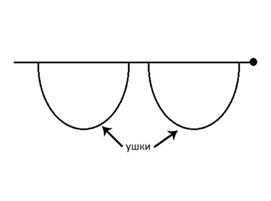
- Important: Here, a schematic diagram of the construction of a cap with earflaps is intentionally provided. However, depending on the model chosen, the ears may be narrower (as, for example, in some models of Peruvian chulo hats) or wider, as in Russian ear-flaps. Consider individual preferences, as well as forehead width.
Knitting ears - they can be knitted in turn, however, for not quite an experienced knitter, we recommend starting immediately a couple of ears at the same time. To do this, from two different glomeruli begin on one pair of knitting needles two different abalone. And although such knitting will require a little more attention, the details will be perfectly the same. Ears can be started with up to five loops and knit by adding to the desired height. Increases are gradually made in each row or, depending on the length of the eyelet, through the row. Here is the layout of the ears on the spoke:
 Knitting a lapel - this detail is tied out after the finished ears are laid aside, for this, use additional knitting needles. Having knitted it with ordinary working knitting needles to the desired height, also put it on an additional knitting needle. Here's what the drawing looks like:
 Knitting the main part of the cap with earflaps - half of the number of loops (hereinafter referred to as P.) of the back of the product is typed on the main knitting needles. Further, the deferred P. of the first ear and loops of the finished lapel are put on the same spoke. If you plan to knit the cap with knitting needles without it, then instead of it, put as many P. on the same knitting needle as you need for the forehead. Then you remove P. of the second ear on the knitting needle and pick up the second often P., which will serve as the back side. It should be like this:
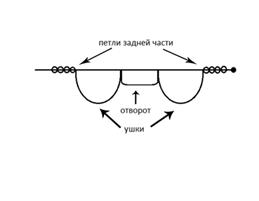 Further, the product is knitted either on five knitting needles (in this case, you manage to avoid stitching the seam), or on ordinary knitting needles by knitting straight and reverse rows.
Having knitted the main part, closer to the completion of work, make uniform decreases to form the back of the head. If your hat is knitted on two knitting needles, make a knitted seam behind the product. Finishing can be done as you like. Below is a video master class on how to make a knitted side seam.
Video: Knit stitching
As can be seen in the photo above, this method of knitting allows you to make a neat continuous fabric from the ears to the crown of the product. As a rule, it is in this way that they usually knit products for women, men. However, a simpler method can also be used for children - from the lower edge of the finished hat, P. is dialed for the ears and lapel. Further, the lapel is knitted as usual, and the ears with a decrease. As a result, knitting is even easier than in the first case. One small minus - the connection line will be a little noticeable. However, this does not spoil children's hats.
Original hat with earflaps for women
It would be wrong not to devote you to another simple way to make earflaps. You can see it in the photo:
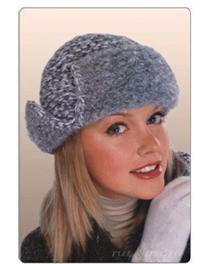 In this model, in addition to the main knitting needles, a hook is used - they finish the lapel. The hat is made of bookled gray yarn and white plain.
The “trick” and simplicity of this model is precisely in the fact that imitation of earflaps is achieved by attaching a lapel and back, that is, a second, back, lapel to the previously connected hat.
The master class of such a cute hat is the simplest:
- make P. calculation on the head;
- in two threads dial the desired number of P .;
- knit 12 cm upwards with a garter stitch (how such a knitting is done, you already know - on the right side of the product, the right stitches are knitted);
- to design the bottom of the cap, divide the fabric into 8 wedges, then continue to knit, in each of the wedges make a decrease in one P. in each second row. When there will be 10 P. on the spoke, pull them together with a thread and fix the tip;
- with a gray thread in two additions, draw along the lower edge of the cap of the loop for the lapel - in front along the width of the forehead. After knitting 10 cm, close the lapel loop. From the remaining P. caps of the cap, collect the back lapel folded in half with gray yarn and knit 10 cm in this way. Folding the threads different colors, tie the lapels. To do this, use a crochet hook and posts.
Below is a video master class on such a binding.
Video: Learning to tie the hem
And a photo of the strapping scheme:
Video: We knit a hat - earflaps with a braid pattern
Hat for men and boys
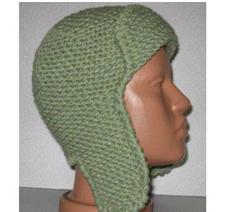
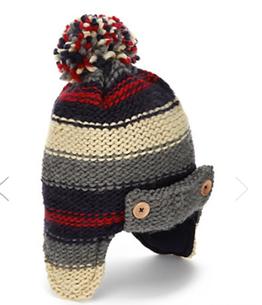
A cap with earflaps with knitting needles for men, in comparison with female models, is more dense, so to speak, a little brutal. The essence of knitting is the same - with a separate manufacture of ears, lapel, assembly of parts together. But this cap has a more closed back of the nape. See how it looks in the photo:
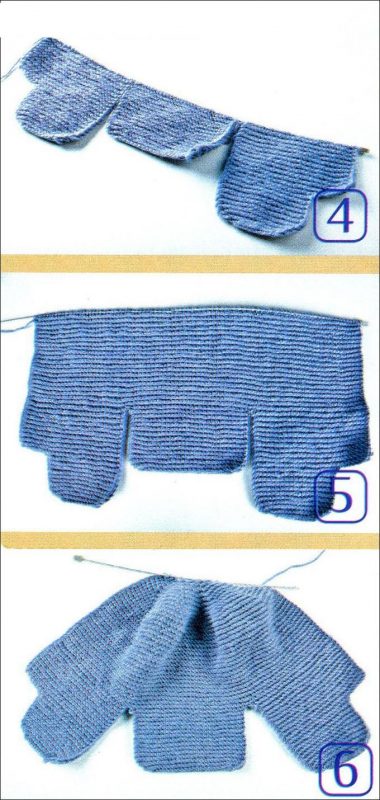
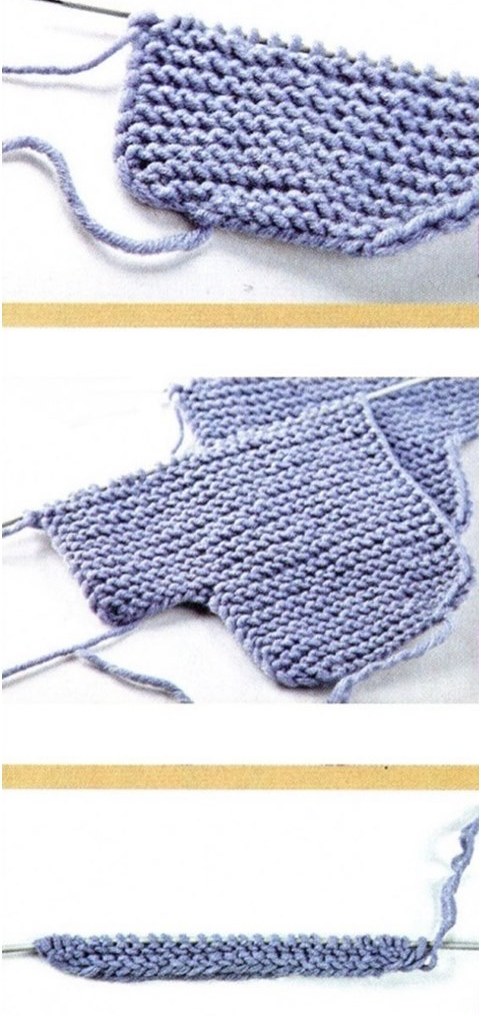
The master class of this model is as follows. Collect the desired number of loops and start knitting ears. They can be either square, as in the photo below, or with beveled edges. Please note: increments are made in every second row on both sides of the edge of the part.
Having knitted the desired length of the eyelet, do not immediately put it on the knitting needle, but knit the half of the back of the head: in the second photo below you can clearly see how this is done:
 The third and fourth photos show a set of lapels. Do it by the size of your forehead. Having knitted the desired height, collect all the loops in this way: one eye, lapel, second eye.

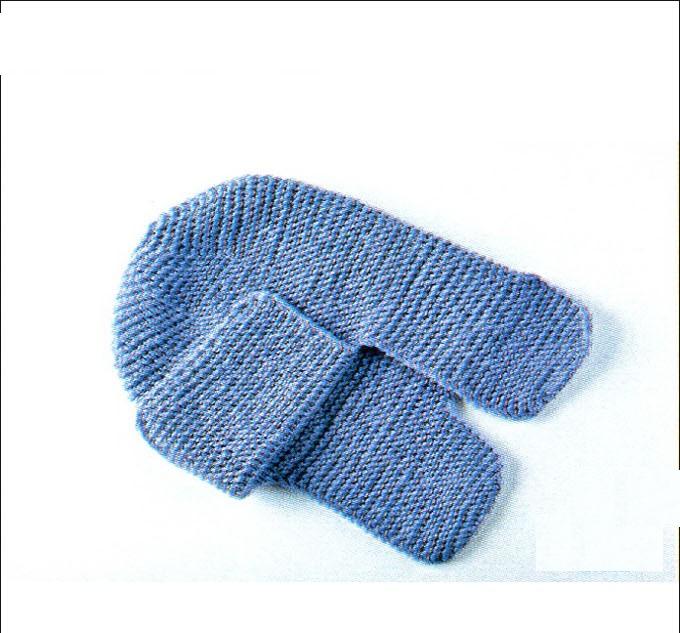
To knit the bottom of the cap, we outline the wedges, as in one of the previous descriptions, then evenly reduce the loops along the edges of the wedges, knitting a pair of loops together. When there are loops 15, we pull them with a thread. Lapel fasten on the front side. Men's hat is ready.
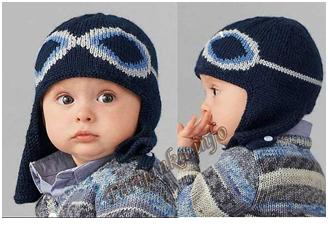
Similarly, we knit a hat for a boy. A hat with earflaps with knitting needles for a boy can be decorated with various drawings, applications, thematic pictures. So, for the boy, the jacquard in the form of pilot glasses or a variety of fur pompons, ornaments will be interesting:

Buttons, applications, etc. can also decorate a hat for a boy:
Knitting a hat with earflaps for a girl gives even greater scope for creativity and imagination, however, classic earflaps with a visor-lapel for little girls are still less commonly used than for a boy:

Two-color hat with earflaps with knitting needles for babies from six months. up to 4 years
Knitted hat with earflaps
A cap with earflaps is made with knitting needles with a handkerchief pattern from two colors of acrylic yarn.
The size: 6/12 months (1.5 / 2 years, 4 years). 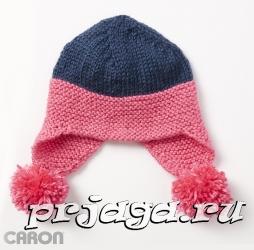
Head circumference: 43 (45.5, 48) cm.
Materials: Caron Simply Soft yarn (100% acrylic, 170 g / 288 m.) - red (thread A) and black (thread B) colors., knitting needles 4.5 mm. and 5.0 mm., hinge holder.
Knitting density: 18 loops * 24 rows \u003d 10 * 10 cm. With large knitting needles.
Hat with earflaps, knitting needles, job description:
Ears (tie 2): with smaller knitting needles and thread A, dial 6 (6, 8) loops.
1st row (out. Side): persons. loops.
2 and 3 rows: add 2 loops, knit to the end of the row \u003d 10 (10, 12) loops.
4 row: 1 faces., Knit a loop two times, knit to the last 2 stitches, knit a loop two times, 1 person. \u003d 12 (12, 14) loops.
5-7 rows: persons. loops.
8 row: 1 faces., Knit a loop two times, knit to the last 2 stitches, knit a loop two times, 1 person. \u003d 14 (14, 16) loops.
Repeat 5-8 rows twice \u003d 18 (18, 20) loops.
Continue knitting with a scarf pattern to a height of 5.5 (6, 7) cm.
Cut the thread, remove the loops on the loop holder.
Tie the second eye but do not cut the threads.
Connections: on the front side with smaller knitting needles, knit new 3 (4, 4) loops, knit 18 (18, 20) loops of the second eye, knit new 24 (26, 26) loops, knit 18 (18, 20) loops of the first eye, get a new 3 (4, 4) loops \u003d 66 (70, 74) loops.
Knit with a handkerchief pattern - 5 cm.
Trim Thread A.
Go to the large knitting needles and thread B.
Continue knitting only with facial loops (front stitch) to a height of 9 (11, 12) cm from the connection.
Only for size 18/24 months. (out side): 1 out., * 2 together out., 15 out., repeat from * to last. hinges, 1 out. \u003d 66 loops.
For all sizes: perform reductions
1st row (persons. Party): 1 persons. * 2 persons together. left, 2 persons together. to the right, 12 (12, 14) persons., repeat from * to the last loop, 1 person. \u003d 58 (58, 66) loops.
2nd and all wrong rows: out. loops.
3rd row: 1 persons., * 2 persons together. left, 2 persons together. to the right, 10 (10, 12) persons., repeat from * to the last loop, 1 person. \u003d 50 (50, 58) loops.
5th row: 1 persons. * 2 persons together. left, 2 persons together. to the right, 8 (8, 10) persons., repeat from * to the last loop, 1 person. \u003d 42 (42, 50) loops.
7th row: 1 persons. * 2 persons together. left, 2 persons together. to the right, 6 (6, 8) persons., repeat from * to the last loop, 1 person. \u003d 34 (34, 42) loops.
9th row: 1 persons., * 2 persons together. left, 2 persons together. to the right, 4 (4, 6) persons., repeat from * to the last loop, 1 person. \u003d 26 (26, 34) loops.
11th row: 1 persons. * 2 persons together. left, 2 persons together. to the right, 2 (2, 4) persons., repeat from * to the last loop, 1 person. \u003d 18 (18, 26) loops.
13th row: 1 persons. * 2 persons together. left, 2 persons together. to the right, 0 (0, 2) persons., repeat from * to the last loop, 1 person. \u003d 10 (10, 18) loops.
Only for size for 4 years:
14th row (out side): purl loops.
15th row (persons. Party): 1 persons. * 2 persons together. left, 2 persons together. to the right, repeat from * to the last loop, 1 person. \u003d 10 loops.
For all sizes: cut the thread leaving a long tail.
Pass the last 10 loops with your tail and pull tight.
Run the back seam.
Pompom (do 2): around 4 fingers wrap thread A about 150 times.
Remove from the fingers, tie in the center, trim the edges and fluff the pompom.
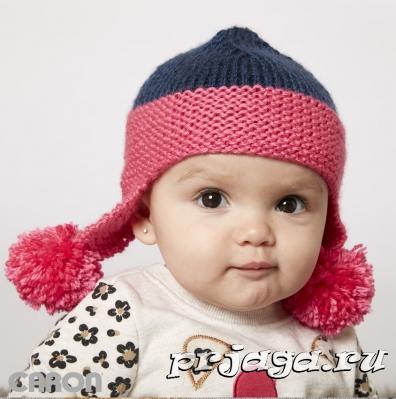
Sew pompons to the ears as in the photo.
The original model of the hat, warming the ears, will not let you freeze. Connect this product yourself using the instructions with a photo and diagram. This is a necessary thing in cold weather. A cap with earflaps can be tied to yourself and your family, will not remain indifferent to this product. All you need is just a little time and yarn with knitting needles.
For work you need:
- choose your favorite yarn for work. The thread should be dense, not torn, the color to your taste. The composition of the thread (wool, cotton, mohair, acrylic, polyamide), choose for yourself;
- knitting needles (2 pieces), the thickness is approximately equal to the thread;
- scissors.

Instruction manual
Before you start making this warm and beautiful hat you need to do the following:
Knit a small square centimeter per centimeter and count the number of loops needed for it. In width and length. With this, you will not be mistaken in calculating the size during manufacture, but you will need to knit the entire product with the same density.
At work, we will use a garter stitch (all rows are facial).
The following is a knitting pattern for the front loop:
Back loop diagram: 
You can simply remove the first and last loop of the row or, knit them with the wrong ones (it all depends on you). In any case, the binding will be garter.
Let's get started:
We measure the girth of the head. We got 55 cm, you follow your size, increase or decrease the number of loops.
Knit ears:
- we put 8 loops into two knitting needles, then we start knitting in the manner described above ( garter stitch from the front loops), in this case, one loop must be added to each row at the beginning and at the end (two loops on the whole row);
- as soon as there are 22 loops, we stop and no longer add two loops. Now we continue to knit with a regular garter stitch. You need to knit to the ear length you have outlined (we have 20 cm.). The width is 12 cm.
We pass to the main part
The front of the cap will be 39 loops (20 cm). Two connected ears of 22 loops (12 cm). The occipital part of the 36 loops (this includes two edging for the edges) (19 cm.).
We calculate how much we get in the end: 39 + 22 + 22 + 36 \u003d 119 loops.
First, we knit on the knitting needles 18 loops (36 occipital parts: 2), after that the turn of one eyelet, then 39 loops of the front part, the second eyelet, the remaining 18 now. We knit this sequence with a garter stitch for about 5 rows to fully fix.
Now we knit hats to a sufficient depth for us (we knitted 15 cm).
You can use the circuit shown in the figures. To the ears on the sides add 18 loops, knit. Then, make forward. Having connected the details, begin to knit the top.
We knit the top of the cap
Here a sufficiently strong narrowing is necessary. First, reduce by 2 loops (on the sides 2 loops in one). Then we go down: the next row gradually reduces 8 loops in it (over the course of the row we connect 2 loops into one loop at one end and leave 2 edge loops at the end; then 7 loops ... Thus, we get to 2. We should have at the end works about 15-17 loops after 10 rows knitted, we tighten the remaining loops.
Lapel caps.
We collect 39 loops in the already prepared place (in front of the cap) to the edge and knit the required length for us with a garter stitch (you can try on to choose the best option during operation).
We knitted 10 cm. We slightly rounded the edges so that the front of the cap looked more interesting, we remove 1 loop in each row (we knit 2 loops in one). Thus, we knit about 5 rows. Then close the remaining loops. 
We remove all the sticking threads
Below is another version of the header scheme.
Our hat is ready! Carry it with pleasure, give it to relatives so that it warms them in bad weather. Unusual, catchy, bright and beautiful, everyone will like it! 
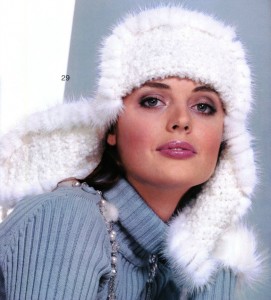
Hats with earflaps are now in fashion for both children and adults. Women now also happily wear earflaps: fur, knitted, and knitted with fur. Each of them is beautiful in its own way. I also really like this hat in the photo.
Victoria from Mom Country knitted such a beautiful hat. She knitted herself, without a description, having before her eyes only the photo that you see above. So, then its description.
Knitted on the volume of the head 56 cm.
So, Lana Gold Alize yarn (240m / 100g). Color - a dusty rose. 1 skein was enough for me.
Knitting needles number 3. The density of knitting I got: 20 loops - 10 cm.
Ears: on knitting needles we collect 6 loops. We knit a garter stitch, adding 1 loop in each front row at the beginning and end of knitting. I knitted two ears at once - it’s more convenient for me.
When the number of loops reaches 20, stop adding loops and knit an ear of the desired length. I got 17 cm. The width of the ear was 10 cm.
Having connected both ears, we proceed to the main part of the cap.
The loops are distributed as follows - on the front of the cap you need to dial 36 loops + 1 for symmetry \u003d a total of 37 loops (19 cm). Two ears of 20 stitches (10 cm). And the back of the cap is 32 loops + 2 hem (17 cm). Total - 17 + 20 +37 + 20 +17 \u003d 111 stitches.
We collect the first 17 loops on the knitting needle, add the first ear, collect the central 37 loops, add the second ear, and collect the last 17 loops. Only 111 loops. We knit all the loops 4 rows of garter stitch.
Getting to the main pattern - this is the "Stars"
Here is the star pattern video
The number of loops is a multiple of three, + 1 loop for symmetry + 2 edge loops. We have it 36 \u200b\u200b* 3 + 1 + 2 \u003d 111.
We continue knitting (12 cm was enough for me for my hat depth).
Then we proceed to knitting the top of the cap - here the fun begins ...
1 row - all front (all wrong rows - front loops) 109 + 2 cr.
2 row - 2 together 8 persons. - until the end of the row 98 + 2 cr.
3 row - 2 together 7 persons. - until the end of the row 87 + 2 cr.
4th row - 2 together 6 persons. - until the end of the row 76+ 2 cr.
5 row - 2 together 5 persons. - until the end of the row 65 + 2 cr.
6 row - 2 together 4 persons. - until the end of the row 54 + 2 cr.
7 row - 2 together 3 persons. - until the end of the row 43 + 2 cr.
8 row - 2 together 2 persons. - until the end of the row 32 + 2 cr.
9 row - 2 together 1 persons. - until the end of the row 21 + 2 cr.
10 row - 2 together - to the end of the row 11 + 2 cr.
We tighten the remaining 13 stitches, sew the hat (I do this with a mattress seam).
Here is a video tutorial on how to sew with a mattress seam:
Now we knit a lapel - we collect 35 loops on the bottom of the front of our earflaps and knit a garter stitch to the desired length (along the way we try on our beloved).
I got 7 cm. After that, in order to round the edges of the lapel, I reduced 1 loop from two sides four times (that is, at the beginning and at the end of each row I knitted two together). Close the lapel loop.
Now it's up to the flowers
Flowers are different - large and small, as you know ... I liked the flower scheme 1316.
Sculpted three pieces and sewn to the lapel. A bead was sewn into the center of each flower. (This was later, so it is not visible in the photo).
For brushes - cut 50 pieces of yarn 30 cm long (this is two brushes). The number of threads can be varied according to your own taste and desire. Fold in half and attach to the edge of the ears according to the principle of fringe.
We pick on the needles 6 * 3 + 1 + 2 cr. \u003d 21 stitch and knit with the main pattern “Stars” 4 cm. Close the stitch, sew.
We put it on the brush, masking the attachment points of the fringe. We fasten “tightly” with several stitches. Perform the procedure again with the second ear ... Voila - the hat is ready !!!
Women's hat earflaps
Colds began and my mother tied herself a hat with earflaps, which she was about to knit for a long time. For the cap itself, she took a mohair in 2 threads + 1 woolen not very thick thread. The ears and lapel took 100 g of yarn “under the fur” (photo of the yarn below). The lapel and ears were sheathed with rabbit fur ribbon. About what it is, how it can be cut if there is a skin or old thing from the fur of a rabbit (not necessarily a rabbit, you can have another fur) I read.
And these photos and a description from the Fashion Magazine inspired mom to knit hats with earflaps:
You will need for a hat: 150 g of golden brown bookly yarn; small pieces of natural rabbit fur or mink; circular knitting needles No. 5.
Shawl knitting: in all rows, all loops are knitted; when knitting in a circle - 1 row knit with facial loops, 1 row out. loops. Alternate these two rows.
Description of caps with earflaps, knitting needles:
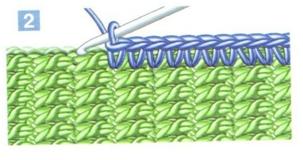
Before starting work, tie the sample with a garter stitch and make the loop calculation according to the pattern (Fig. 1). Start knitting with “ears”, for which type for each part 3 p. And knit a scarf 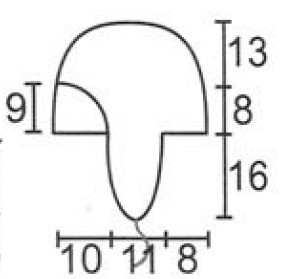 viscous, adding 1 p. on each side in each 2nd p., until the width reaches 11 cm. Next, knit directly to a height of 16 cm. Drop open loops on the auxiliary knitting needle. Then tie the visor and fold the loops on the recall. knitting needle. Continue to work trace. way: put on the knitting needle open loops of "ears", typing between them will complement. hinges for the occipital part of the visor and knit a cloth around them in a circle with a garter cloth. At a height of 8 cm from the beginning of knitting in a circle, start to decrease, evenly dividing the fabric (for example, into 6 wedges) and reducing 1 point in the wedges in each 2nd p. Pull the remaining items with working thread and secure. Bind Art. non-contour
  visor, "ears" and occipital part. Remove the visor detail from the fur, then cut the tape about 3 cm wide. Sew the visor's fur detail to knitted details. Then decorate the product with fur ribbon, passing it through the holes between the loops and wrapping it over the edge (Fig. 2). On the ears make ties - chains of air. loops 20 cm long.