

Before you start creating your portrait, imagine how it will look in the final version. Determine for yourself what is most important for you in the future image, what you want to highlight, what you want to say and emphasize with this image. Before proceeding with the image of certain details, let's consider the features of creating a portrait, find out what you should pay attention to first.
General information
The eyes are the window to the soul. This banal phrase does not lose its relevance. Reflected in the eyes inner world a person, what he thinks about, about which, perhaps, does not speak. Think about what lines, small touches will say more about the interlocutor than his words. Photographic accuracy of eyes, lips, nose, chin is not a portrait yet, a camera can handle it. Thought, mood - that's what you and your sitter will give the portrait. Try not to spoil the "original", not to bring into it something that does not exist, that is not peculiar to it. Any "trifle" like a distorted corner of the mouth, a slightly raised eyebrow can make you angry or envious. Try to understand the person first, look into him from the inside, notice the most basic things and convey it on paper.
What is a portrait
The most difficult view visual arts requires daily work, failures and finds. As in any other activity in which a person can reach certain heights, drawing requires a lot of patience and talented mentoring. Your personality will remain with you, but it is important to "put your hand", to learn the techniques of the image, which before you worked through trial and error for many generations of portrait painters. Only having mastered these techniques, you can find yourself in them, your originality, your essence.
Any drawing begins to be performed with general outlines, gradually moving from general to particulars. Stock up on a set simple pencils varying degrees of softness. They must of course be well sharpened. Don't forget about good paper and a soft eraser that won't ruin the paper or smudge your pencil lines.

Let's start with the outlines
Examine the eyebrows. They also emphasize the character of a person: surprisingly raised corners, frowning, wide, narrow, long, short. Try to show them as similar as possible to the original, carefully examine and depict the main lines of the hair framing the face, these lines can be hard and soft. A person's lips can express the whole gamut of emotions that a person experiences in a given situation. Step-by-step instruction will help you portray what you want.
The question arises: how to draw lips beautifully? Start with the lower lip, then draw the upper lip. The lips can be the same in width or different, whimsically puffed out or dry drawn. Sweep up these details. Then draw the nose. We start with its lower contours, the tip of the nose can be blunt or pointed, the wings - wide or narrow. pay attention to characteristics its shape. In the process of drawing, remove unnecessary details with an eraser, auxiliary lines that you no longer need. Do this carefully so as not to damage the painting and paper.
Now let's take a closer look at a person with a pencil. Below is a simple instruction.

pencil step by step
We start with a few simple paths. They will "limit" the size of the upper and lower lip. The lines will outline the overall outline of the mouth. Try to keep the proportions of the sitter's lips. Draw their borders with short lines, connect the corners.
From general to particular
Studying the question of how to draw lips with a pencil in stages, a number of points should be taken into account. Let's consider them. Above the upper lip, a person has a hollow that divides it into two parts. Draw it in the shape of a heart, and then remove the extra lines with an eraser.
We give clarity
To make the lips more realistic, you need to pick up a soft pencil and draw shadows. So we will give them volume, character. Look at the lips of the sitter. Maybe the person has wrinkles that are persistent or appear when he is happy or frowning. See how and where they are located, how deep and visible. Reflect these details in the drawing also with a soft pencil.

Lighting
Studying the question of how to draw lips with a pencil in stages, one must take into account not only the features of the sitter. Lighting is of great importance. Light can give highlights on the lips, leave these areas white. If you want to add color to your image, do it now. But do not get carried away with brightness, you are painting a portrait, not coloring a children's book. Try to make the image as realistic as possible. If you have reflected all this in your drawing - the lips of your sitter will come to life, acquire individuality, originality, character. That, in fact, is all. Now you know how to draw lips with a pencil step by step.
Conclusion
As you can see, everything is not so difficult and scary. You can learn to draw if you really want it and are ready to spend a lot of time and effort on this lesson. It is also important to learn to peer, observe and notice details that may not be visible to a less attentive person. Your lesson will bring you many joyful minutes when you will get what you have in mind, conceived, you will be able to transfer and give someone a particle of yourself and your skill.
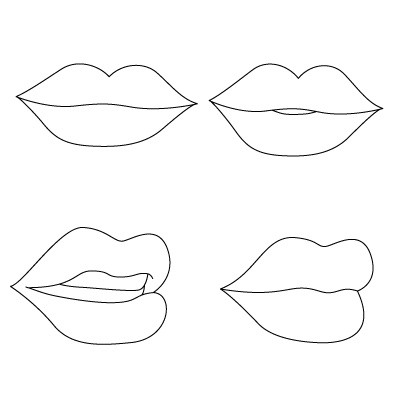
All lips are very different in shape and size. There are thin, there are fat, there are sad, there are smiling. But all of them can be drawn according to the same principle. First of all, you need to find the location of the lips on the face, that is, the distance from the nose, chin, from the cheeks, and so on, as well as their slope. Next, you need to find the ratio of the smaller parts of the lips, that is, the width of the lower lip in relation to the upper one, how the teeth are located, if you draw a mouth with a smile or an open mouth, the width of the most protruding parts, and so on. AND the last step you need to give your lips volume with chiaroscuro. Of course, it does not sound very encouraging, inspirational, but in fact it is not difficult to draw lips.
Linear lip drawing - finding basic proportions and ratios
Suppose our lips are on a face that is slightly twisted and slightly tilted.
The first thing we do is find the dimensions of the lips in relation to the entire face. Since I have abstract lips from my head, I will imagine that I have already found these dimensions. 
Next, we look for the ratio of the upper lip to the lower one - how much the upper lip is narrower than the lower one, or vice versa. If a person somehow did not curl his lips, then the corners of the lips are located in most cases symmetrically. To convey this in the picture, draw a horizontal line through the corners of the lips. It will allow us not only to arrange the corners of the lips symmetrically, but also show the slope of these lips. 
It is a mistake to believe that the corners of the lips are in one straight line with the place where the lips meet. In fact, the face has a rounded shape, it is not flat. And therefore, depending on the angle, the place where the lips meet will be above or below the line on which the corners of the lips are located.

Of course, it also happens that everything is located on one straight line, when the lips are tense, for example, or some specific angle. But most often the line of closing of the lips is located above or below the line through which the corners of the lips pass.
Now the most interesting line is the middle line. Lips are symmetrical relative to her. It passes between the upper triangles of the lips, and on the lower lip it is advisable to draw it through the middle along the most protruding point. 
If you delve into the anatomy of the lips, then they have three such balls, this line just runs in the middle of the upper and between the two lower ones. 
At this line, you need to estimate the slope. If you look in profile, then with a normal anatomical structure of the skull, the upper lip hangs slightly over the lower one. That is, the midline is not perpendicular to the horizontal line through the corners of the lips. 
Of course, humans have different anatomical features that affect this tilt. For example, the lower jaw is strongly protruding, or very plump twisted lips, missing teeth. All this affects the slope.
If you outline the line of the middle along the relief of the lips, it will show how much rounded the lips are, how deep the point of lip closure is, how deep is the fossa under the lip, or vice versa, everything is flat in a person. 
How this line is rounded at the lips is shown by the shadows. When we look in front, this line is straight, and the stronger the turn, the more this relief will be seen.
Now we note two more dimensions - the width between the corners on the upper lip and the width of the lower part along the most prominent points.
Let's outline the upper lip. 
Compare with nature how the lines and shapes are rounded, how the distant lip curls - the more the turn, the more this curl is visible.
These three balls define the nature of the lip closing line. The more pronounced they are, the more likely it will be curved. 
On my lips, I randomly estimate these balls and draw a line of closing of the lips and outline the lower lip. Here are the plump lips I got. 
Chiaroscuro on the lips
The next step is volume. We look at how chiaroscuro is located on the lips. I will assume that my light falls from somewhere here. 
And this is a diagram of the distribution of chiaroscuro suggests itself to me. 
The upper lip usually gets less light because it is wrapped inward, so it is all darker than the lower lip. The main stroke will be in shape, just as the cracks on the lips are located. Also add a drop shadow on the chin from the upper lip. And in general, we will mark the areas around the lips a little so that they are not stuck to the sheet. The most contrasting and brightest will, of course, be the falling shadow from the upper lip. The upper lip will have its own shadow with a bright reflex.
The main, basic stroke follows the shape of the lips, I even slightly twist it along their roundness. In addition to the shape, it will also emphasize in the future small folds of the skin of the lips. I impose a stroke in the cross direction at a slight angle, I also try to round it off. 
We cover the entire upper lip in tone, thicken the shadows with cross strokes. Immediately somewhere I mark large folds with a stroke. 
The falling shadow on the lower lip smoothly turns into its own. The lower lip is very plump, voluminous, notice how large, rounded stroke I have. This place is the foreground, the contrast of light and shadow, so it needs to be made bright and expressive. I work immediately over the entire area of \u200b\u200bthe lips. Since I draw from my head, I look everything at once, in general, I bring the tone gradually. When you look from nature, you immediately see where what is, and in this case it is possible to work in parts. 
Imagine that my lower lip is strongly curled towards the bottom, very rounded, so I will make a rather dense shadow of my own below, and below it, falling with a reflex. 
When you draw a hollow above the lip, do not make its edges sharp and contrasting, it actually does not have sharp, sharp edges, they are rounded, in some people this hollow is not very pronounced at all, so observe the nature. There is almost always a light expressive strip at the edge of the lips, do not forget to leave it. 
If you want to add folds of skin, then do it very carefully, without fanaticism, without brute force. They can crush the mold very hard, so be careful.
As a result, we got such sponges.
In this tutorial I will teach you how to draw lips with a base on a triangular shape in just ten simple steps... You can reproduce different types of lip positions by making minor adjustments in the first step. This method came about by accident: I somehow compared lips to a bow and arrow.
(I regularly get messages from followers who have tried this method and they are all convinced of its effectiveness. Hope it helps you too! Have fun getting creative!)
For this tutorial you will need:
- mechanical pencil with HB shaft 0.5 mm thick;
- 6B graphic pencil (for example, Derwent);
- nag eraser;
- stump;
- smooth paper (for example, Bristol).
Step 1:

Draw an elongated isosceles triangle. At the top corner, draw a curve (in the shape of a “U”). Draw a horizontal straight line between the curve and the base of the triangle. The longer the drawn line, the wider the lips will be, and vice versa: the shorter, the fuller.
"But what if I want to paint it on my face already?" See my tutorial on drawing faces to determine the location of the "triangle". Here you have to pay attention to the proportions, and they will help you calculate the length of the triangle and the width of the lips, taking into account the rest of the face.
Step 2:


Sketch the upper lip, mimicking the shape of the Cupid's bow.
Step 3:

Draw the lower lip with a curved line that does not extend beyond the base of the triangle. Relying on a horizontal line, "slightly open" the drawn mouth.
Step 4:


After you erase the triangle, identify the light source. In this example, the light source is on the upper right side. I will highlight the parts that I want to lighten and also put a shadow on the left side of the lower lip.
Step 5:


Darken both lips and keep the areas that you defined as the lightest in step 4. You can see that there is a shadow under the lower lip. Closer to the right side, it gets smaller, which shows that the light source is in the upper right corner.
Step 6:


Draw some folds on the lips with a hard-soft pencil (0.5mm). Do not press hard, as you will have difficulty in the next step.
Step 7:


Smooth out the darkening on the lower lip with a feather. Don't touch the highlights from step 4. The highlights will make your lips look plump and plump. You may also notice that the lip folds become thinner in the shade, but do not completely disappear.
Step 8:


Walk the sharpest corner of the eraser over the highlights and give the highlights a cleaner look with a glint effect.
Step 9:


Repeat steps 7-8 on the upper lip.
Last step:


Intensify shadows in areas such as the outer edges of the lips, above the upper lip, folds and corners of the lips (6B pencil).
You can resize the lips by moving the horizontal line up (to make the upper gua thinner) or down (to make the upper lip plump). Also add some glare with the eraser to make the lips look even more voluminous.
Do you still have any questions? Leave them in the comments below the article! Don't be discouraged if you don't get the desired result on the first try. Keep working and take each step apart. The job will become much easier! Also remember to experiment with different triangle shapes and line positions in step 2.
Translation of an article from the website rapidfireart.com.
In the drawing of the lips, as well as in the drawing of the nose or eyes, contours should not be drawn. Lip shape - voluminous. It's not just a circuit. Therefore, for those who want to learn how to draw a portrait, the diagram below will be useful. In it, the lips are depicted in a simplified manner, in the form geometric shapes... Such a schematic drawing helps to see the structure and plastic. For example, the lower lip consists of two ovals. And the upper one is divided in the middle by a tubercle.

In this drawing, it is also important to see how the shape of the lips smoothly passes into the chin, cheeks, nose. All these shapes are bent and illuminated with light. Something is in the shade, something in partial shade, and something in the light. The upper lip, overhanging the lower lip, is most often in the shadow. And the lower lip, protruding, as a rule, faces the light. There is a depression between the lower lip and chin, which is most often submerged in the shadow. What will be in the light and what will be in the shade depends on the location of the light source. For example, if the light is directed not from top to bottom, but from bottom to top, then the picture will be exactly the opposite.

In addition to the above, you still need to understand that the lip line is not straight. It follows the circumference of the head. For clarity, I drew two options: one is correct and the other is incorrect. It follows that the entire lip shape will be subject to this rule.

Next, I followed the phased classic drawing lips. At the first stage, a light linear drawing is laid, revealing the main planes and edges. At the second stage, the shadow sides are worked out with light shading. At the final third stage, all the details are honed and all semitones are worked out in more detail. In the tone of the lips, it is important to convey lighting and volume. As in the drawing of a plaster ball in the drawing of the lips, it is also necessary to convey light, partial shade, shadow, reflex, falling shadow.


If you decide to portray a person, then you probably have a question: "How to draw lips?" For a professional, this will not be difficult. He had to paint lips so many times different shapes and the size that he is able to do it with his eyes almost closed. If you are just learning to embody your images on paper, then this article is for you. More specifically, how to draw lips with a pencil step by step for beginners... Similar lessons often appear on our resource. If you don't want to miss them, subscribe.
How to draw lips with a pencil
There are many techniques that allow you to depict this part of the body, both on paper and on a monitor screen. However, we still recommend starting with a simple pencil. This will allow you to hone your craft and understand the basic principles of the image. Moreover, it is much easier to get used to it than to a graphics tablet.
It is also worth saying that all the lessons that you can find are only advisory in nature. Their task is to show the basic principles of depicting lips on paper. Nobody and nothing prevents you from creating your own and unique style. Perhaps it will someday be taken as a basis for drawing tutorials. However, before that you will have to work a lot and fruitfully.
For this tutorial you will need:
- clean album sheet;
- one or more simple pencils of different hardness;
- eraser;
- patience.
Geometry in nature
If you look closely, then absolutely everything consists of geometric shapes. This is also true for human lips. To draw them with a pencil, we will use a triangle. Draw an isosceles triangle. The higher it gets, the larger size lips you will succeed. In the upper corner, draw a raised line, as if you wanted to draw the corner of the shape. Draw a line around the middle of the triangle. The wider it is, the wider the lips, the narrower the plump. In this case, we will draw the female lips. Therefore, the line will be shorter.
To draw the upper outline of the lips with a pencil, draw down two lines from both ends of the convex line at the top of the triangle. The ends of the paths should touch the transverse line drawn earlier. Bend the ends of the contours slightly up. As a result, you should have a shape that looks a bit like a medieval bow.
In addition, I would like to give you some more tips for the image of lips:
- Improve yourself. Draw every day. You shouldn't dwell only on our materials. Try to paint lips over and over again until this skill is brought to automaticity. Also try to portray them from different angles.
- Depict dynamics. The more dynamic and lively the drawing, the more interesting it is. A static, closed mouth will attract much less attention than lips contorted with joy or anger. If you don't know how to portray a particular emotion, stand in front of a mirror and look at your reflection. By the way, this is exactly what many of the company's illustrators did.
- No axioms. We have already mentioned in the material, but let's say it again. There are no hard truths. There are only general guidelines. If you think that for the best effect you need to neglect this or that rule, feel free to do it.
- Don't be afraid of criticism. The best way learn something, listen to criticism. Register on various thematic resources. Put your work in open access with the ability to comment.
- Learn from other people's mistakes. Yes, you need to upload your work. But it will not be superfluous to study the works of other authors. Look at what mistakes they made and try not to do the same. It's always better to learn from someone else's mistakes than from your own.
- Don't look for the right paths. You should not waste time thinking about the correctness of the chosen path. Better try three wrong ones. But in the future, you will definitely know that you shouldn't pay attention to them.
Did you like this material? Then share it with your friends and like-minded people. Let them also learn how to draw lips in stages with a pencil for beginners. Leave your comments and suggestions on which topic to choose for the next text. Subscribe to our updates to stay up to date with new tutorials and tutorials. If you want to learn something new right now, read the material about.