

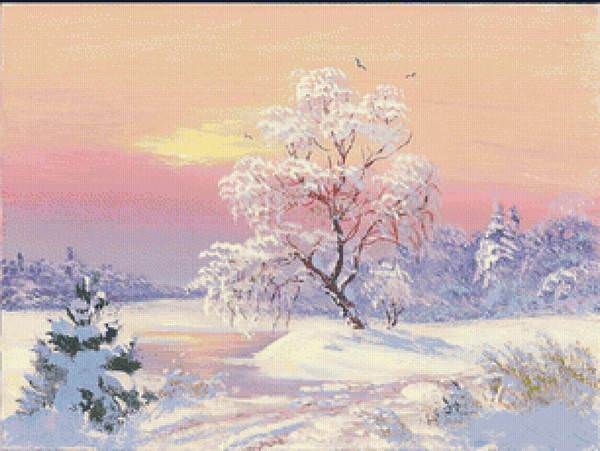
Creation of the picture "Russian field" (felt with 3D elements)
Author: Yulia V. Simova, teacher additional education MAOU DO TsRTD and Yu Kamensky district of the Penza region
The master class is intended for teachers, students and all lovers of working with wool.
The picture was created by a student, Khromova Alena, individual work with a gifted child. The original source from which the picture was made was taken from the Internet.
Target: Creation of a picture from wool in a wet way with 3D elements.
Tasks:
to teach the technology of wet felting wool using 3D elements;
develop creativity, imagination, fine motor skills hands;
to cultivate aesthetic needs, interest and respect for manual labor, the desire for creative self-realization.
Materials: fine, semi-fine, merino wool (shades of green, blue, red, white, black and yellow).
Equipment: pimply film, mesh, scissors, water, soap.
Progress
We spread oilcloth on the table, prepare a soap solution (pour warm water into the dishes and put soap or pour a little liquid soap, we mainly use baby soap).
The size of the finished painting will be 25-30% smaller due to wool shrinkage. Our painting is 30 by 40 centimeters in finished form.
We lay out the wool on the pimply film, pulling it out of the combed tape, one layer (vertically) white, then visually divide it into 3 parts, cover the top with horizontal white wool, vertically light blue on top.

We cover the lower part horizontally with green wool, and the middle part is divided into 2 parts, white on top, then light green above the green, also horizontally.

We outline the clouds in the sky with blue wool.

Add clouds with white wool. We lay out yellow on a white narrow strip.

We add horizontal strands to the yellow stripe, lay out the “grass” on light green and green (thin strands of different shades of green, slightly twisted on top).

On the table we form poppy petals from red wool, for this we bend elongated short strands.

We form a flower.

We add red from the center to the edge of the petals, a little white, put a light green circle in the center, shade with black.

At this stage, we put pieces of film under the petals, not reaching the center.

A little independent work, the field is painted with flowers at the request of the student, more voluminous details appear. Important: more pieces of film are added to the bulk poppy and the upper petals are laid out. Add black around light green to get the adhesion of the fibers of the two layers of petals.

Cover with mesh. Next, the process of impregnation with warm soapy water. We lather the film on both sides for better glide, and the first "lapping" of the layers begins. We act carefully, first with light movements, so as not to move the picture.

When the initial waving occurred, the fibers intertwined slightly, we begin to work on the petals, one by one with soapy hands we wilted.

Here our picture is already visible in its entirety, the petals of both three-dimensional flowers have been worked out. We remove the picture, for this we turn it over, placing pieces of film under the petals, rub it from the inside, look where the weak points are. Important: the corners should not be stretched, deformed. You can, of course, trim later, but part of the picture will be lost.

Rinse thoroughly. Important: the temperature of the water should be slightly warm, as when felting with soap, if you rinse with cold water, the picture will shrink from the temperature difference, that is, it will decrease in size. We dry it in a straightened form, first on a towel, then you can dry it on a rope, gently hooking it with clothespins on the bent edge. Dry can be ironed without affecting the bulk elements.
The painting is ready.

We fill it in a frame without glass, first glue the picture along the edge to the cardboard.

In conclusion, I can say that we liked the process of creating the picture, and the result pleased.
I hope that the master class will be useful to lovers of artistic felt and those who are just looking at this kind creative work. Thanks everyone for watching!
Felting, or as it is also called felting, felting is a special kind of needlework, along with embroidery. With the help of wool, craftswomen create delightful unique paintings, toys and crafts. It is not at all difficult to make such a craft with your own hands, because now needlework is widespread, and in stores you can find a wide variety of ready-made kits for creating paintings. There are 2 ways to make crafts. In this article, we will talk about what felting is, and what kind of pictures can turn out, depending on the chosen needlework method.
Pictures made by felting wool are very airy and warm.
Felting pictures: types
At the moment, there are several types of this type of needlework - dry and wet. In the first case, paintings and other crafts are created using a special felting needle. The dry wool is pierced many times to get the right texture and pattern.
In this case, the wool falls off, its fibers are fastened to each other, as a result, a homogeneous material is obtained.
During wet felting, wool is felted using a special solution or ordinary soap. To make a craft in this way, you must first lay out the wool, then apply the solution, and felt the wool using friction. Then the finished product dries, resulting in an unusual and very beautiful picture.

The classic wet felting technique involves the use of soap and hot water.
It is this type of felting that is most often used to create flat products, for example:
- Paintings;
- panel;
- Decoration of clothes and fabrics.
Dry felting is best suited for making toys, jewelry and various figurines. Of course, for different types felting will require a variety of materials. For a dry look, you will need to purchase wool directly, a special serif needle so that the wool can interlock with each other and create the desired texture. In another case, you will need to create or find a ready-made solution for felting.
Merino wool is the most popular and easy to use wool, it is often called combed tape. It may vary in its thickness and texture. At the same time, ordinary cotton wool, wool for stuffing, making crafts from felt, as well as synthetic winterizer, sliver, silk and other decorative threads for decoration are also suitable for felting. Ordinary yarn will not work, like ordinary threads, only wool is needed.
Dry felting paintings: master class
To create a unique picture with your own hands, you will need not so many tools and materials. For beginners, the dry felting master class by Nadezhda Ganyukova looks simple.
Namely:
- The first step is to purchase a special needle;
- Then prepare the wool of various colors;
- Take foam rubber of medium thickness;
- Choose a picture and get to work.

The dry felting method produces more voluminous products, and the colors remain bright and uniform.
Merino wool or carded wool is best for creating a picture. Needles can be both with triangular and star-shaped notches. The order of work is simple. The wool is superimposed on a piece of foam rubber, take a needle and start to tangle the wool with it, you can make a substrate from a synthetic winterizer, and then cover it with wool. As you work, you can change the needle to a thicker or thinner one to work out certain details. Also change coat color. You should know some of the nuances while working with wool and a needle. The felting needle is very sharp, so you need to work very carefully and carefully and hold the tool at a right angle to the craft.
If, as you work, it is clear that there is not enough wool, you can add more and hide the flaws in this way.
Dry felting makes toys better than paintings, they look too clear, sharp, it is ideal to use wet felting to create canvases.
Wet felting from wool paintings: stages
Another type of felting - wet felting, is felting with a soap solution or ordinary liquid soap. Gauze is also used, on which wool is laid according to the pattern. As a fixing solution, you can use the finished composition.
The composition can be prepared with your own hands at home according to a specific recipe.
2 pieces of any soap are rubbed on a grater, the finished shavings must be poured with a couple of liters of boiling water and mixed well, left for 1-2 hours so that the mixture becomes thick enough. After that, you need to prepare a place where the work will be performed. Suitable for any flat surface, be it a table or the floor. It is better to put something under the future picture.

With the help of wet felting, modern and unique works are obtained, which will be a wonderful gift for relatives and friends.
Stages:
- You need to put gauze on the surface, and on it - the base and the necessary pattern.
- Wool lay out in the form of a cross and stripes, holes and bald spots should be avoided, the layers should lie at right angles to each other, and also have the same thickness.
- You should lay out the base first, then the background and the drawing itself.
- When there is already an idea of the future picture, and the blank has already been laid out, the wool is sprinkled with water, covered with a thin cloth, preferably nylon, and liberally smeared with soapy composition. Excess should be blotted with a napkin.
- And finally, directly felting - the wet method consists in using friction from side to side to create the desired texture and volume of wool.
You can also felt wool in machine technology using a washing machine, but this method is not very convenient. In the end, you can create a lot of paintings and canvases that are very different in their color schemes and techniques.
Sets for beautiful felting paintings
If you have no experience in buying wool for felting, you can come to any needlework store and pick up a kit already assembled by professionals for making a variety of paintings. The main advantage of this type of creativity is the inability to get dirty - after all, to create a product, you only need wool and a needle or soap, depending on the chosen style of work. Ready-made kits may include different volumes of wool, needles of various sizes, a special solution for wet equipment.
The advantage of ready-made kits is that after creating one picture, the needles and composition remain, and you can work with them more than once, so after the first picture it is not necessary to purchase a set again - you can try to pick up the wool yourself.

Felting kits are best for beginners, because few people can immediately come up with ideas for future work.
Manufacturers of goods for needlework came up with drawings of different degrees of complexity. For example, nature and the sky are the simplest and ideal for beginners, animals and flowers (cat, poppies, bullfinch) are more difficult and better suited for already experienced craftsmen, people and reproductions famous paintings– it is necessary to choose already professionals of business.
Sets usually include:
- Sheep wool dyed, the number of colors depends on the pattern;
- Wooden frame for the finished product;
- The lining is fabric.
Wet felting paintings (video)
Each set comes with step by step instructions. Wool and tools after work can remain, which allows them to be reused. However, dry felting is not suitable for children - working with a needle is very dangerous for a small child. The resulting paintings will please creative individuals and will be a wonderful decoration for your home.
Wool painting for those who do not have an artistic gift, but really want to learn fine art needlework. An entertaining technique of dry felting in the form of wool paintings is a rather exclusive author's gift for a family celebration. Such a product is especially attractive due to its simple execution and moderate costs.
Woolen painting for those who do not have an artistic gift, but really want to learn the beautiful art of needlework
You will need:
- Photo frame;
- Manicure scissors;
- Wool for felting;
- Tweezers;
- Iron;
- Glue stick;
- Viscose napkin;
- Small clips (paperclips).
How to make a picture step by step:
- Disassemble the frame. Put a napkin on a wooden or cardboard base of the frame, secure it carefully with paper clips.
- Wrap the wool of the background chosen for the base tightly around the index finger, sequentially pinch off the material in pieces.
- Put the prepared strands on a napkin, fix with glue. It is important that the edges of the wool go beyond the base of the frame by 1-2 cm.
- From the edge corners of the picture lay out the background with a darker shade, towards the middle we reduce the color gamut by introducing lighter tones. Each strand is lightly fixed with glue.
- After the base has dried, iron it through a clean paper sheet. The process fixes the wool after only two strokes of the hot iron.
- We also consistently lay out further plucked strands of the selected pattern. We iron each element of the picture through a blank sheet of paper.
- We remove excess hairs with scissors. Visually, a drawing to give volume can be made by rolling the strands in the palm of your hand in one direction. If you turn in different directions- the strand is untwisted.
- After finishing the picture, iron it again with an iron, this will remove the volume and excess hairiness. We cut off excess hairs and inaccurate contours with nail scissors.
Put the glass gently on the picture, cut off the hairs along the edges. Close frame.
Gallery: wool paintings (25 photos)


Wool painting: master class (video)
What tools are needed
For work you will need:
- First of all, the basis of the future picture is needed - a glass frame 30 by 40 cm, you can focus on the size of an ordinary A4 paper sheet. A regular photo frame will do.
- In order to fix the original material, we use viscose napkins or interlining.
- When applying smaller parts of the wool, aligning the details, tweezers come in handy.
- You can cut off excess hairs without disturbing the ornament with nail scissors. Stationery scissors come in handy for coarser cuts of the material.
- Adjustable iron - for smoothing individual picture elements.
- Dry glue pencil will perfectly fix the constituent details of the picture.

to create masterpieces you need certain tools
In the technique of dry felting, types of wool are widely used:
- Sliver is a white woolen thread that does not have guard hairs. Suitable as a basis for drawing.
- Troitskaya - coarse, dyed factory-made wool, many thick fibers. It is mainly used for making toys.
- Merino sheep's wool is a uniform color, consists of thin and soft to the touch curls. It is characterized by elasticity. Widely used in felting technique.
- Mohair is the wool of the angora goat. Light, silky, with long villi.
- Semenovskaya - the composition uses angora wool and Australian merino. Factory painting in warmer tones, awn fibers come across.
- New Zealand sheep is characterized by an exceptional white tint. Thin and strong, long and wavy. It has antibacterial properties, hypoallergenic. Excellent heat retention, used in the manufacture of blankets.
- Carded cotton wool has a loose structure, lends itself well to rolling. Wool paintings give a watercolor effect.
DIY wool watercolor
When creating a painting "Winter Forest in the Morning", use carded cotton wool or felt.
Necessary:
- Drawing - a plot for a picture;
- Frame;
- Wool for the base white color, brown and blue shades;
- Scissors;
- Soap.
With due diligence, the picture can turn out to be simply charming.
How to do:
- Take the cardboard base of the frame, wet a bar of soap, rub the base.
- From a piece of white wool, make strands, pulling them out by the last hairs of the skein.
- On the base, lay out horizontally, then vertically matched colors of the blue background of the picture, forming the sky. The cardboard base should not be translucent. Make the edges of the hairs of the strand protrude beyond the base.
- In the right corner of the picture, put a white spool, on top of it are several hairs of a blue-blue hue. It turns out a white oval of the winter sun, covered with clouds.
- To make the pattern smooth, periodically in the process of work we press the laid out wool with our hand.
- Pulling hairs out of a woolen skein, by rolling them with our hands we form flagella - an image of a clear line of an image of a tree and branches.
- Depicting voluminous snow caps on tree branches, finely cut chaotic wool shavings from 2 to 3 mm in size with scissors. Here you can put barely noticeable pellets of red mountain ash under the white background of snow.
- Applying glass to the picture, lightly press down on the drawing, this will allow you to see inaccuracies for their subsequent elimination.
- If desired, you can make animals in the picture or a bird sitting on a tree by forming the appropriate color of the flagella and fluffing them in the middle. Use black wool for the nose and eyes.
- Fix the finished craft with a gentle spritz of hairspray. Place under glass.
Painting in the style of "watercolor" is great for winter drawing images.
Wool painting: mk how to create a flower
The composition is quite accessible for creativity by children's hands under the competent adjustment of adults. If you follow the instructions, working with wool will seem like an exciting and unusual game.
Necessary:
- Kleimerny frame (with clips);
- Interlining for the substrate;
- Scissors;
- Tweezers;
- Six for a background of white and light yellow;
- Wool for drawing (shades of green, colors of the future flower).

The composition is quite accessible for creativity by children's hands under the competent adjustment of adults.
What to do:
- Draw the white background of the image. Pulling the woolen thread from the skein, fluff it a little with your fingers and lay it on the base, fix the first layer with glue.
- At the bottom of the picture, make a mixture of yellow and white villi, starting from half of the picture.
- Lay out the grass with pieces of wool, cutting them randomly with 3 mm scissors.
- We form the stem of the flower. Pinch off a few villi of different shades of green. Twist them with your palms into a twig. Put on the image, carefully shape the stem with tweezers.
- To form the petals, take a wide strand of the desired color. Spread the fibers well in the palm of your hand. Outline the required size of the petal by cutting off both ends with scissors.
- Put the petal on the surface, push the fibers apart with tweezers.
- In the middle of the flower put a small skein of wool knitted into a circle. To give the flower a graceful naturalness, add a pair of adjacent villi to each petal. colors.
- Wool of a darker shade can shade the contours of the flower image.
- During work, periodically apply glass to the drawing. This is to ensure a snug fit of the wool and allow timely detection of an error in the execution of the picture. After finishing, clamp the picture under glass with kleimers, cut off excess wool around the edges.
Without limiting the child's imagination, flowers of other colorings can be added to the same picture. For example, chrysanthemums are organically suited to bright red poppies. The multi-stage petals of such a flower are easy to make by twisting wool of similar shades with thin flagella and overlapping each other. And by slightly twisting the tips of the three petals with tweezers, you can depict a tulip.
Do-it-yourself light autumn landscape felted from wool
Drawing autumn and nature, we take thin felt and Trinity wool as a base. To create a believable effect, it is recommended to cut the leaves before forming flagella-trees in the picture. This format visually creates a distance of the image in the work.
You will need:
- Frame with glass;
- a piece of felt;
- Manicure scissors, tweezers;
- Wool red, orange, yellow, green, burgundy and white. For trees, take brown tones;
- Hair spray.

Drawing an autumn landscape, we take thin felt and Trinity wool as a base
How to do:
- We cover the entire felt substrate with a light shade, leaving a little white background. Strands must be laid out in a horizontal order.
- Lay out the sketch of the drawing itself in a darker tone, adjusting the height of the woolen strands with tweezers.
- We form the decor element of tree branches in the appropriate brown tone, twisting them into stripes with our palms. When superimposing on the image, correct with tweezers and press down with your hand.
- Leaves - we cut pieces of wool with scissors immediately onto the image, removing excess hairs with tweezers. When forming the leaves, we use three different colors to give credibility to the pattern.
- Form the fruits of the tree into small pellets, scattering them over the branches.
- Around the image - a tree with leaves, you can make a small lawn by mixing the hairs of brown and green wool. We form flower petals in small pieces, and opening buds - in spools.
- Before placing the design under the glass, touch up the hairs of the wool again.
Finished work covered with glass and framed.
Wool paintings by Nina Mazyreva
Known popularity in the technique of felting paintings acquired Nina Manzyreva. The skill of a skilled artist and blogger amazes with charming beauty, simplicity of execution and realism of the work performed.
Speaking in programs, she gives beginner needlewomen the opportunity to master the technique of dry and wet felting from wool at home through video and photo lessons online. Watching illustrative examples of her creation of another man-made masterpiece, it is much easier for a housewife to imagine her future work in reality.
Lilac: do-it-yourself wool painting (video)
At first glance, it may seem that such a hobby for modern needlewomen as felting has appeared relatively recently.
However, what do you say to the fact that about 8000 years ago people already put into practice the manufacture of various things from wool? Later, entire workshops began to appear, specializing in working with natural wool. Let's see where everyone can start getting acquainted with this needlework today.
Felting for beginners: a master class
It is too early for beginner needlewomen to immediately make toys or paintings. But something simple like jewelry is quite possible. Let's try to do flower brooch.
So, for the brooch "Lilies of the valley" you will need:
- In fact, wool
- Fine felting needles
- thin wire
- A dense sponge or brush as a stand for making jewelry
- Beads with a diameter of 7-10 millimeters
- Acrylic varnish
- Scissors
- soapy water
- Clasp used to make a brooch
Getting Started:
- Primarily, it is necessary to form a frame for the leaves. And for this you need a wire

- Now a strand of green wool is taken. It must be placed under the frame and on the brush. This strand is needed pierce with needles
IMPORTANT: Keep in mind that the strand must be larger than the wire frame. Should not be taken.
- The strand turns over, the actions from the previous paragraph are repeated


- Tips of improvised leaves wrap up


- It turned out a blank for a leaf. Now she needs put the wireframe back on


- The edges of the leaf are also processed with felting needles
- Now is the time to give the leaf naturalness, shading it with fur green gamut
IMPORTANT: In order for the transitions of shades to turn out smooth, it is worth smoothing the workpiece with an iron.
- Further leaf outlines are formed- it should not be flat, because it is unnatural. In this case, the twisted ends of the wire stick out of the workpiece
- Glue is applied to the above twisted ends of the wire. A little more green wool should be applied to the glue. The wool is twisted so that the wire is not visible at all, and a stem is formed. Need to help yourself with a needle


- Now you can start making branches. Take some white wool and form a kind of pancake out of it.
- In such a pancake and you need to put a bead, then decorating it with wool. For the best effect, you should help yourself with needles.
- Now the bead should be dipped in soapy water, and then roll out in your hands
IMPORTANT: It is worth removing the knocked-out hairs with scissors.
- One top is cut off, after which 8 cuts are made. The bead is taken out of the woolen cocoon - and now the woolen blank resembles the outlines of lily of the valley flowers
- Received flowers need to be dipped in acrylic varnish. However, beforehand, the varnish should be slightly diluted with water. Blanks are pressed, dried
- Buds are forming- white and green woolen balls
- Well now assembly starts- balls are strung on the wire. The wire is twisted so that the balls do not separate from it.
- Also flowers are strung, and from a piece of wire sticking out of the flower, core
- All branches are collected, fastened together with green wool and glue


- Now a twig, a leaf and a brooch barrette come together. You can decorate this product with a green ribbon
The next decoration bright summer beads using the felting technique. For them come in handy:
- Wool. As for the color scheme, it can be the most diverse.
IMPORTANT: Pay attention to the fact that you have wool on hand, not acrylic.
- Needle. It is advisable to purchase a coarse ordinary felting needle
- Waxed cord. Stock up on 2-3 meters
- Caps for beads or from acorns. If you did not find acorns near you, it is quite possible to contact the hardware store
- Special felting brush. However, you can replace it with a regular dishwashing sponge or a piece of foam rubber.
- Various accessories- these are holders for pendants, which are called bales, and locks, and fasteners for cords. However, if you cannot get all this, there is an option to use a waxed cord or a chain from some unnecessary jewelry.


Let's get to work:
- So, first of all, take wool. Fluff it up, tangle it with your fingers
IMPORTANT: How much material is needed for one bead? It all depends on the size of the beads, but keep in mind in any case that the wool shrinks a lot during work. This means that a reserve is needed.


- Wool rolls into a ball. You need to make more effort, as the wool must be twisted tightly


- Put the ball on the stand- brush, sponge or foam rubber. Remember to hold the ball with your fingers, as at this stage it may well fall apart. into it a needle is stuck to fix the shape, and you need to start from the place where the wool is fastened

- Now you need to process the entire surface of the ball with a needle- so it falls off better, becomes denser and better in shape


- Similar procedure carried out with the rest of the balls for beads


- To complete the felting process, it is recommended pour into a bowl hot water by dissolving shampoo or liquid soap in it. Balls are thrown into this bowl
IMPORTANT: Before dropping all the balls, you should make sure that the wool will not shed. Otherwise, there is a high risk of getting a spotted product.

- Each ball is taken and rolled between the palms as if you are working with plasticine, that is, in a circle. At first, the pressure should be weak, but then it should be increased. If you immediately press hard, ugly creases may form. Don't be surprised if the dimensions are reduced to 30% or even 50%

- As soon as the bead becomes denser and smaller, it rolls out between the palms like a sausage. It is necessary to carry out this action until the bead is will look like an egg


- Beads should be rinsed to remove the soap solution. Then they need to be squeezed out and put to dry.


- And at this stage you need process the collected acorns. You must first separate the hats, then from the hats - tails. Holes are made in the caps. These parts are thoroughly washed and dried. You can optionally process blanks for beads with varnish
IMPORTANT: If you purchase special bead caps, then the hole-drilling step is, of course, not needed.


- A piece is cut from the waxed cord, folded in half and tied with a loop


- Now the task is more difficult - pull a loop through the cap from the acorn. If she doesn’t want to be threaded in any way, you can resort to a little trick, namely, thread a thread through the hat, hook the loop with the thread, and then thread it all into the hat


- Pull the loop so that the knot rests on the hat. Another knot is tied on the inside of the hat. so that the loop does not move anywhere


- At the bottom of the impromptu hat should be added a small amount of glue


- Now to the glue pressed bead
IMPORTANT: You need to press the bead strongly, but not for long - a few seconds are enough.

- The final stage — putting all the loops with beads on some unnecessary chain or on a waxed cord

Materials and tools for felting wool
IMPORTANT: Whatever technique is used, the materials needed are the same.
- So, first of all, this is a special unspun wool. Density, hardness and colors have no limits - their choice depends purely on tastes and the desired result. You can buy in special stores for creativity. Beginners are advised to buy the so-called “melange” sets with matching shades.
 wool for felting is varied
 - Needles- must also be special. Ordinary sewing machines should be left for other activities, as felting devices are sharper. They have special notches that help the wool fall off. Felting is done with thick needles, shaping with medium needles, and final touches are formed with thin needles.
- Brush- can be special for felting, purchased at a craft store. However, it is quite possible to replace it with a piece of foam rubber or a sponge for washing dishes.
IMPORTANT: You should not refuse this item, as it protects the table and hands from needle pricks.
- Sintepon- recommended if you are thinking of something voluminous. In this case, the base is formed from it, and wool is applied on top.
- Decor elements– beads, ribbons, beads, accessories, glass eyes


Wet felting from wool: technique
This technique produces excellent bags, scarves, mittens, slippers. The peculiarity is that it is necessary to use a soap solution in which pieces of wool are placed. In this case, the wool shrinks significantly, which implies the need for a workpiece that is several times larger than the desired dimensions of the product.


- So, the first step is to prepare a soap solution. To do this, a bar of soap grated on a coarse grater must be poured with boiling water in a volume of two liters. The soap is thoroughly mixed until completely dissolved, the solution is infused. Alternatively, you can use liquid soap.
IMPORTANT: The solution must be infused until it thickens. As a rule, it takes two hours.
- After the solution reaches a state of readiness, you can proceed directly to the needlework itself. Cover the surface with bubble wrap, since it is reusable many times, it prevents the fibers from sticking. Please note that the film is spread with the bubble side up.


- First thing a base layer is placed on the film, then a background layer, and only then a layer with a pattern. The layers must be thin, overlapping and perpendicular, otherwise gaps will occur. Particular attention should be paid to ensure that the thickness of the layers is the same everywhere.
- From a spray bottle, treat the workpiece with water- this will help not to move the picture. After that, it is worth covering the workpiece with a nylon cloth and wetting it in soapy water.
- But now you can start rubbing the canvas by hand. Moreover, the directions must be different to achieve the best result.

Dry felting from wool: technique
With dry felting, a person who has not previously encountered felting should begin, since it is less time-consuming. You can create with this technique interesting toys, flowers, beads.


Put a piece of wool on the sponge, and then with the help of a needle, begin to form a product from this piece - that's all the technology. Remember at the same time that wool shrinks by about a third, so you have to stock up on a large amount.
IMPORTANT: Punctures should be done carefully, otherwise either the needle will break or the hands will be injured.
Masters usually start with thicker needles, and only in the process of compacting the material they replace them with thin ones. At the same time, the needles held perpendicular to the product to avoid breakage. The material must be placed on the surface, and not to keep on weight.

Felting toys from wool: master class
To begin with, let's try to make a cute sheep with the help of felting. It is made as follows:
- The first step is to work on the base. An L-shaped roller is created from a carded card in beige, white, brown or any other natural colors. It should be dense, for which it should be properly rolled

- Now you need to form a head from a part of the base. It is formed by adding wool - this is how the cheeks, front and upper parts with all their reliefs appear
IMPORTANT: If you suddenly feel that the volume of the head becomes smaller than it should, do not panic! Just add a little more wool - fortunately, the carded comb allows you to do this. The main thing is to create a good density.

- It's the turn of the eyes. With the help of a thick needle, two notches are formed. A needle with a thick thread is threaded through the neck into one of the corners of the eye. A bead is then strung on it, after which the needle is threaded into the other corner of the eye, removed in the next eye hole. Further, the same algorithm as with the first eye, after which the needle is withdrawn in the neck area


- The muzzle is important to give the final look by attaching corners in the form of a nose and mouth. It is worth adding a jumper between them. These parts are fastened with a thick needle, and processed with a thin

- The body is being formed with the help of a caddy. The silhouette must be made drop-shaped
IMPORTANT: Use a thick needle to create the torso.


- In order to create the legs of a lamb, it follows from the carded comb that two rollers should be twisted properly. At the same time, the ends of the rollers should remain loose


- Now form boots from brown wool, first with thick, and then with thin needles. Excess hairs are carefully cut off


- The legs are attached to the body and the joints are covered with small pieces of carded wool. You can add more wool to create a tummy and thighs


- The arms are created in the same way as the legs., but only the rollers this time are smaller. The ends of the hands need to be wrapped in bright wool - these are mittens. Don't forget to shape the thumbs on the mittens
IMPORTANT: To work on the mitten, you will need thin needles.


- Ears are made in the form of oval pieces. One end of the pieces should be loose - this will make it easier to attach the ears to the head
- The hair is finally formed reverse needle. The whole figure is processed with the exception of the legs and muzzle. In this case, the surface must be well dried in advance, otherwise the toy will fall apart.


- reverse needle camouflaged and the junction of the arms with the body
- Ears connect just like hands


- If you love to knit, thin knitting needles Cast on 7 stitches and create a scarf for the toy. Approximately 15-17 centimeters is enough


- Eye area needs toning. However, like the lines of the muzzle, ears. It is recommended to tint with dark pastels, but eye shadow is also suitable.


- Sheep toy is ready!


Felting paintings
The uniqueness of the paintings created with the help of felting lies in the fact that the master does not have to be a painter. And the result is very similar to watercolor paintings.


There are several techniques:
- reupload considered the most convenient technique for beginners. No soap, no water, no needles needed. Wool fibers are simply laid out in layers
IMPORTANT: In order for the work to hold, you need to press it down with glass.
- Wet technique requires the use of soap and water. At the same time, the fibers interlock so well that they are barely distinguishable, turn into a single whole.


- mixed media is that wet felting is used first, and only then dry fibers are applied. For the wet part of the work, the main shades are taken, and the dry part brings additional shades. In the latter case, needles are used


IMPORTANT: Whatever the technique, remember that you should not expect a quick result. Perhaps the work will take several weeks, otherwise there will be a lot of shortcomings.
The nuances of creating paintings using a felttig:
- A toothpick or a needle is a must for better work small parts. Not bad work is obtained if, when laying out wool, use tweezers
- Apply glass to the painting from time to time- so the flaws will be better visible. Since many works are eventually stored under glass, it is better to immediately arrange a check on the type of picture. It will immediately become clear how tightly the layers are in relation to each other. In addition, wool under glass tends to become flattened, which causes the item to increase in size.
- Variety of shades- an indispensable condition for creating a picture. Highlights, spots, shadows make the work naturalistic. And creating them is very simple if you replace the layers
IMPORTANT: You should, however, be careful about replacing layers, otherwise the picture will lose its lightness.


Felting is an excellent family activity. Wool is absolutely safe, unless there are allergic reactions to it. This means that even children can be involved in such an activity, instilling in them diligence, perseverance and a sense of beauty. Improve time after time with felting!
Video: How to buy wool for felting?
Video: Felting, or how to dump a panda?
To make a picture you will need:
- kleimer frame (it consists of hardboard (fiberboard), glass, kleimer-clamps);
- wool (combed tape) different colors- 6 colors are enough for this work: white, blue, light blue, yellow, brown, dark green;
- scissors,
- tweezers (for laying out small details of the foreground),
- interlining or flannel - whatever you find (as a substrate).
We disassemble the frame. We put the kleimers aside (they will be needed at the very end of the work. On the hardboard (hardboard) we put a substrate - interlining. It is designed to "hold" the wool fibers on itself. The working surface is ready!

On the prepared surface we lay out the sliver (undyed, unbleached wool), evenly filling the entire area in any direction. At the same time, we draw out the fibers from the woolen tape in the form of wide thin strands (as shown in the photo Step 3)
This stage is necessary for the formation of the base layer of the picture, as well as in order to "feel" the wool (in my last works, I do not use a sliver, I immediately spread the colored wool)

This method of working with wool is called "pulling". Indeed, it turns out that we pull the wool fibers from the combed ribbon, which we hold in one hand, with the fingers of the other hand, forming thin strands.
To make it clearer, I show on dark wool.

Having laid out the working surface with a layer of sliver, we proceed to the formation of the background of the picture. In this case, we use a different method of working with wool - "plucking" (see step 5)

The method of "plucking" the wool is implemented as follows: we take in one hand a combed ribbon of the color we need, while it is the FOLD of the ribbon that is taken (see photo); with the fingers of the other hand, we pinch the superficial hairs of the tape with frequent quick movements. A fluffy lump forms in the hands, which we lay out on the work surface.

Go with blue and blue wool we form the background (background) of the picture. We also use the pinching method.

We continue to draw the background. We highlight the middle of the picture with the help of white wool, create something like haze.

Using the pulling method, we form strands from which we add snowdrifts. We use white and blue wool.

With white wool we determine the place for the moon. This will be a halo of light emanating from her.

We add here and there strands of yellow wool so that the light of the moon is warm. We form the moon itself by cutting white wool. Those. take a strand of wool and cut it thin enough so that the length of the hairs is 2-3mm. And the resulting fluff is laid with tweezers on the picture, forming a circle.

With white wool we draw trees in the distance. At the same time, we cut the wool directly onto the picture, correct it with tweezers, what lay "not right".

Fill the horizon with a forest of white snow-covered trees, as described in step 11.

Let's make the picture "warmer" by adding yellow wool to the snow.

Draw the skeleton of the house with brown wool (you can "cut" the brown wool or roll a strand of wool into a ball and lay it on the surface). Draw a window with yellow wool. White wool will help to give our house a finished look - let's draw a snowy roof and a snowdrift at the base of the house.

We combine in one thick strand the wool of dark green, blue and Brown color, then we cut this strand onto the picture, forming a Christmas tree. (non-uniform color of the Christmas tree is preferable - it looks more natural).

With white wool we draw snow on the Christmas tree, we use the same technique as in the previous step.

Draw tree trunks with brown wool. To do this, pull out thin long strands and twist them slightly. In the same way we draw branches.

With white wool we will make highlights on the trees.

We cut white wool and lay fluffs on tree branches. I tried to depict young pines covered with snow.

To the left of the moon, draw a couple of trees. Trunks and branches are formed by twisting thin strands of brown wool, you can add a little white (glare).

Draw snow branches with white wool. It is better to cut wool directly on the picture, forming the desired shape with tweezers.

With yellow wool we will make a “moon path” on the snow, it should be quite “blurred”, and we will also make the moon, one side of the Christmas tree and the crown of pines a little yellower.
With blue wool we will make a shadow from the Christmas tree as shown in the photo.

We cover the finished picture with glass (before this, the glass must be cleaned, for example, I use napkins to clean displays). We clamp with clamps
glass and hardboard with a woolen picture between them, cut off the excess wool protruding along the edges.
The finished picture can be framed in a baguette.
And this, in fact, the picture is already under glass (it somehow appears brighter under it):

- If you don't have a wide choice of coat colors, that's not a problem. Wool of one color, when mixed with wool of another color, like paints, forms shades of varying degrees of uniformity. Using the shades obtained by mixing the primary colors, you can create an amazing picture. For example, I really like contrasting things. Having only 2 colors of wool available, you can create a complete picture (for example, dark blue and white wool is enough to "draw" a chic night landscape). As my mother says: "The need for inventions is cunning" (about someone's ingenuity, especially with tight means)
- Do not try to copy the image (photo) exactly, use it only as a model and source of inspiration. Do you have your own personal vision for this story? You, as a creator, as a creator, have the right to place your own accents in this plot (add or remove some details in the foreground, slightly or completely change the background (background) of the picture, choosing the colors and shades of wool that are most suitable in this case)
- To speed up the natural felting of the wool, it is useful to periodically, in the process of laying out the picture, gently clap it with the palm of your hand to fasten the layers together.
- For paintings with a dark background (dark blue, black, brown, etc.), it is convenient to take black interlining as a substrate. In this case, you can start laying out the picture not from the sliver, but immediately from the colored wool of the dark color you need. Thus, a lot of effort and time is saved, as well as the material itself (wool).